


 Loading...
1910100116 REV1.0.0
Contents
About this guide . . . . . . . . . . . . . . . . . . . . . . . . . . . . . . . . . . . . . . . . . . . . . . . . . . . i Chapter 1. Get started . . . . . . . . . . . . . . . . . . . . . . . . . . . . . . . . . . . . . . . . . . . . . 1
1. 1 Overview . . . . . . . . . . . . . . . . . . . . . . . . . . . . . . . . . . . . . . . . . . . . . . . . . . . . . . . . . . . . . . . . . . . 1 1. 2 Buttons. . . . . . . . . . . . . . . . . . . . . . . . . . . . . . . . . . . . . . . . . . . . . . . . . . . . . . . . . . . . . . . . . . . . . 1 1. 3 Assemble your device. . . . . . . . . . . . . . . . . . . . . . . . . . . . . . . . . . . . . . . . . . . . . . . . . . . . . . . 2 1. 4 Charge your device . . . . . . . . . . . . . . . . . . . . . . . . . . . . . . . . . . . . . . . . . . . . . . . . . . . . . . . . . 3
Chapter 2. Basics . . . . . . . . . . . . . . . . . . . . . . . . . . . . . . . . . . . . . . . . . . . . . . . . . . 4
2. 1 Touchscreen gestures . . . . . . . . . . . . . . . . . . . . . . . . . . . . . . . . . . . . . . . . . . . . . . . . . . . . . . . 4 2. 2 Home screen . . . . . . . . . . . . . . . . . . . . . . . . . . . . . . . . . . . . . . . . . . . . . . . . . . . . . . . . . . . . . . . 6 2. 3 Status icons . . . . . . . . . . . . . . . . . . . . . . . . . . . . . . . . . . . . . . . . . . . . . . . . . . . . . . . . . . . . . . . . 6 2. 4 Quick Settings Panel . . . . . . . . . . . . . . . . . . . . . . . . . . . . . . . . . . . . . . . . . . . . . . . . . . . . . . . . 7 2. 5 Type text . . . . . . . . . . . . . . . . . . . . . . . . . . . . . . . . . . . . . . . . . . . . . . . . . . . . . . . . . . . . . . . . . . . 9
Chapter 3. Connection . . . . . . . . . . . . . . . . . . . . . . . . . . . . . . . . . . . . . . . . . . . .11
3. 1 Connect to WLAN. . . . . . . . . . . . . . . . . . . . . . . . . . . . . . . . . . . . . . . . . . . . . . . . . . . . . . . . . .11 3. 2 Connect to the Internet . . . . . . . . . . . . . . . . . . . . . . . . . . . . . . . . . . . . . . . . . . . . . . . . . . . .11 3. 3 Connect to computer . . . . . . . . . . . . . . . . . . . . . . . . . . . . . . . . . . . . . . . . . . . . . . . . . . . . . .11 3. 4 Bluetooth . . . . . . . . . . . . . . . . . . . . . . . . . . . . . . . . . . . . . . . . . . . . . . . . . . . . . . . . . . . . . . . . .11 3. 5 Tethering & portable hotspot . . . . . . . . . . . . . . . . . . . . . . . . . . . . . . . . . . . . . . . . . . . . . .12
Chapter 4. Calls. . . . . . . . . . . . . . . . . . . . . . . . . . . . . . . . . . . . . . . . . . . . . . . . . . .13
4. 1 Make a call . . . . . . . . . . . . . . . . . . . . . . . . . . . . . . . . . . . . . . . . . . . . . . . . . . . . . . . . . . . . . . . .13 4. 2 Answer & end a call . . . . . . . . . . . . . . . . . . . . . . . . . . . . . . . . . . . . . . . . . . . . . . . . . . . . . . . .14 4. 3 Options during a call. . . . . . . . . . . . . . . . . . . . . . . . . . . . . . . . . . . . . . . . . . . . . . . . . . . . . . .14 4. 4 Call log . . . . . . . . . . . . . . . . . . . . . . . . . . . . . . . . . . . . . . . . . . . . . . . . . . . . . . . . . . . . . . . . . . . .15 4. 5 Call settings . . . . . . . . . . . . . . . . . . . . . . . . . . . . . . . . . . . . . . . . . . . . . . . . . . . . . . . . . . . . . . .15
Chapter 5. Messenger . . . . . . . . . . . . . . . . . . . . . . . . . . . . . . . . . . . . . . . . . . . .16
5. 1 Type of messages . . . . . . . . . . . . . . . . . . . . . . . . . . . . . . . . . . . . . . . . . . . . . . . . . . . . . . . . . .16 5. 2 Send & receive messages. . . . . . . . . . . . . . . . . . . . . . . . . . . . . . . . . . . . . . . . . . . . . . . . . . .16 5. 3 Message management. . . . . . . . . . . . . . . . . . . . . . . . . . . . . . . . . . . . . . . . . . . . . . . . . . . . .16 5. 4 Message settings . . . . . . . . . . . . . . . . . . . . . . . . . . . . . . . . . . . . . . . . . . . . . . . . . . . . . . . . . .17
Chapter 6. Contacts. . . . . . . . . . . . . . . . . . . . . . . . . . . . . . . . . . . . . . . . . . . . . . .19
6. 1 Manage contacts . . . . . . . . . . . . . . . . . . . . . . . . . . . . . . . . . . . . . . . . . . . . . . . . . . . . . . . . . .19 6. 2 Import/export contacts . . . . . . . . . . . . . . . . . . . . . . . . . . . . . . . . . . . . . . . . . . . . . . . . . . . .19 6. 3 Contacts settings . . . . . . . . . . . . . . . . . . . . . . . . . . . . . . . . . . . . . . . . . . . . . . . . . . . . . . . . . .20
Chapter 7. Phone Manager. . . . . . . . . . . . . . . . . . . . . . . . . . . . . . . . . . . . . . . .21
7. 1 Phone accelerator . . . . . . . . . . . . . . . . . . . . . . . . . . . . . . . . . . . . . . . . . . . . . . . . . . . . . . . . .21 7. 2 Power saving . . . . . . . . . . . . . . . . . . . . . . . . . . . . . . . . . . . . . . . . . . . . . . . . . . . . . . . . . . . . . .21 7. 3 Permission manager . . . . . . . . . . . . . . . . . . . . . . . . . . . . . . . . . . . . . . . . . . . . . . . . . . . . . . .21 7. 4 Harassment filter . . . . . . . . . . . . . . . . . . . . . . . . . . . . . . . . . . . . . . . . . . . . . . . . . . . . . . . . . .21
Chapter 8. Camera. . . . . . . . . . . . . . . . . . . . . . . . . . . . . . . . . . . . . . . . . . . . . . . .22
8. 1 Get to know Camera . . . . . . . . . . . . . . . . . . . . . . . . . . . . . . . . . . . . . . . . . . . . . . . . . . . . . . .22 8. 2 Take a photo. . . . . . . . . . . . . . . . . . . . . . . . . . . . . . . . . . . . . . . . . . . . . . . . . . . . . . . . . . . . . . .23 8. 3 Record a video. . . . . . . . . . . . . . . . . . . . . . . . . . . . . . . . . . . . . . . . . . . . . . . . . . . . . . . . . . . . .23
Chapter 9. Calendar . . . . . . . . . . . . . . . . . . . . . . . . . . . . . . . . . . . . . . . . . . . . . .24
9. 1 Use the calendar. . . . . . . . . . . . . . . . . . . . . . . . . . . . . . . . . . . . . . . . . . . . . . . . . . . . . . . . . . .24 9. 2 Calendar settings . . . . . . . . . . . . . . . . . . . . . . . . . . . . . . . . . . . . . . . . . . . . . . . . . . . . . . . . . .24
Chapter 10.Clock. . . . . . . . . . . . . . . . . . . . . . . . . . . . . . . . . . . . . . . . . . . . . . . . . .25
10. 1 Alarm . . . . . . . . . . . . . . . . . . . . . . . . . . . . . . . . . . . . . . . . . . . . . . . . . . . . . . . . . . . . . . . . . . . . .25
10. 2 Worldclock . . . . . . . . . . . . . . . . . . . . . . . . . . . . . . . . . . . . . . . . . . . . . . . . . . . . . . . . . . . . . . . .25
10. 3 Timer. . . . . . . . . . . . . . . . . . . . . . . . . . . . . . . . . . . . . . . . . . . . . . . . . . . . . . . . . . . . . . . . . . . . . .25
10. 4 Stopwatch. . . . . . . . . . . . . . . . . . . . . . . . . . . . . . . . . . . . . . . . . . . . . . . . . . . . . . . . . . . . . . . . .26
Chapter 11.Browser . . . . . . . . . . . . . . . . . . . . . . . . . . . . . . . . . . . . . . . . . . . . . . .27
11. 1 Go to a webpage . . . . . . . . . . . . . . . . . . . . . . . . . . . . . . . . . . . . . . . . . . . . . . . . . . . . . . . . . .27 11. 2 Browser tabs. . . . . . . . . . . . . . . . . . . . . . . . . . . . . . . . . . . . . . . . . . . . . . . . . . . . . . . . . . . . . . .28 11. 3 Bookmarks . . . . . . . . . . . . . . . . . . . . . . . . . . . . . . . . . . . . . . . . . . . . . . . . . . . . . . . . . . . . . . . .28 11. 4 History . . . . . . . . . . . . . . . . . . . . . . . . . . . . . . . . . . . . . . . . . . . . . . . . . . . . . . . . . . . . . . . . . . . .28 11. 5 Browser settings . . . . . . . . . . . . . . . . . . . . . . . . . . . . . . . . . . . . . . . . . . . . . . . . . . . . . . . . . . .28
Chapter 12.File Manager . . . . . . . . . . . . . . . . . . . . . . . . . . . . . . . . . . . . . . . . . . |
29 |
12. 1 View files (AUDIO, VIDEO, IMAGE, DOCUMENT, COMPRESS, APP) . . . . . . . . . . . . .29 12. 2 Manage your files & folders. . . . . . . . . . . . . . . . . . . . . . . . . . . . . . . . . . . . . . . . . . . . . . . . .29
Chapter 13.Weather . . . . . . . . . . . . . . . . . . . . . . . . . . . . . . . . . . . . . . . . . . . . . . .31
13. 1 Add a city . . . . . . . . . . . . . . . . . . . . . . . . . . . . . . . . . . . . . . . . . . . . . . . . . . . . . . . . . . . . . . . . . 31 13. 2 Check the weather. . . . . . . . . . . . . . . . . . . . . . . . . . . . . . . . . . . . . . . . . . . . . . . . . . . . . . . . .31 13. 3 Remove a city. . . . . . . . . . . . . . . . . . . . . . . . . . . . . . . . . . . . . . . . . . . . . . . . . . . . . . . . . . . . . .31 13. 4 Weather settings. . . . . . . . . . . . . . . . . . . . . . . . . . . . . . . . . . . . . . . . . . . . . . . . . . . . . . . . . . .31
Chapter 14.Gallery . . . . . . . . . . . . . . . . . . . . . . . . . . . . . . . . . . . . . . . . . . . . . . . .32
14. 1 Manage your photos. . . . . . . . . . . . . . . . . . . . . . . . . . . . . . . . . . . . . . . . . . . . . . . . . . . . . . .32 14. 2 Screenshot . . . . . . . . . . . . . . . . . . . . . . . . . . . . . . . . . . . . . . . . . . . . . . . . . . . . . . . . . . . . . . . .33
Chapter 15.Notes . . . . . . . . . . . . . . . . . . . . . . . . . . . . . . . . . . . . . . . . . . . . . . . . .34
15. 1 Compose a note . . . . . . . . . . . . . . . . . . . . . . . . . . . . . . . . . . . . . . . . . . . . . . . . . . . . . . . . . . .34 15. 2 Note options . . . . . . . . . . . . . . . . . . . . . . . . . . . . . . . . . . . . . . . . . . . . . . . . . . . . . . . . . . . . . .34
Chapter 16.Applications . . . . . . . . . . . . . . . . . . . . . . . . . . . . . . . . . . . . . . . . . . .35
16. 1 Manage applications. . . . . . . . . . . . . . . . . . . . . . . . . . . . . . . . . . . . . . . . . . . . . . . . . . . . . . .35 16. 2 GoogleTM applications. . . . . . . . . . . . . . . . . . . . . . . . . . . . . . . . . . . . . . . . . . . . . . . . . . . . . .35
Chapter 17.Tools . . . . . . . . . . . . . . . . . . . . . . . . . . . . . . . . . . . . . . . . . . . . . . . . . .37
17. 1 FM Radio . . . . . . . . . . . . . . . . . . . . . . . . . . . . . . . . . . . . . . . . . . . . . . . . . . . . . . . . . . . . . . . . . .37
17. 2 Flashlight. . . . . . . . . . . . . . . . . . . . . . . . . . . . . . . . . . . . . . . . . . . . . . . . . . . . . . . . . . . . . . . . . .37
17. 3 Sound Recorder . . . . . . . . . . . . . . . . . . . . . . . . . . . . . . . . . . . . . . . . . . . . . . . . . . . . . . . . . . .37
17. 4 Calculator . . . . . . . . . . . . . . . . . . . . . . . . . . . . . . . . . . . . . . . . . . . . . . . . . . . . . . . . . . . . . . . . .38
17. 5 Downloads . . . . . . . . . . . . . . . . . . . . . . . . . . . . . . . . . . . . . . . . . . . . . . . . . . . . . . . . . . . . . . . .38
17. 6 System Update . . . . . . . . . . . . . . . . . . . . . . . . . . . . . . . . . . . . . . . . . . . . . . . . . . . . . . . . . . . .38
17. 7 Feedback . . . . . . . . . . . . . . . . . . . . . . . . . . . . . . . . . . . . . . . . . . . . . . . . . . . . . . . . . . . . . . . . . .38
17. 8 SIM Toolkit. . . . . . . . . . . . . . . . . . . . . . . . . . . . . . . . . . . . . . . . . . . . . . . . . . . . . . . . . . . . . . . . .38
Chapter 18.Settings . . . . . . . . . . . . . . . . . . . . . . . . . . . . . . . . . . . . . . . . . . . . . . .39
18. 1 SIM cards . . . . . . . . . . . . . . . . . . . . . . . . . . . . . . . . . . . . . . . . . . . . . . . . . . . . . . . . . . . . . . . . . .39 18. 2 Airplane mode. . . . . . . . . . . . . . . . . . . . . . . . . . . . . . . . . . . . . . . . . . . . . . . . . . . . . . . . . . . . .39 18. 3 Display . . . . . . . . . . . . . . . . . . . . . . . . . . . . . . . . . . . . . . . . . . . . . . . . . . . . . . . . . . . . . . . . . . . .39 18. 4 Lock screen. . . . . . . . . . . . . . . . . . . . . . . . . . . . . . . . . . . . . . . . . . . . . . . . . . . . . . . . . . . . . . . .40 18. 5 Sound and notification. . . . . . . . . . . . . . . . . . . . . . . . . . . . . . . . . . . . . . . . . . . . . . . . . . . . .40 18. 6 Storage. . . . . . . . . . . . . . . . . . . . . . . . . . . . . . . . . . . . . . . . . . . . . . . . . . . . . . . . . . . . . . . . . . . .40 18. 7 Battery . . . . . . . . . . . . . . . . . . . . . . . . . . . . . . . . . . . . . . . . . . . . . . . . . . . . . . . . . . . . . . . . . . . .41
18. 8 Apps . . . . . . . . . . . . . . . . . . . . . . . . . . . . . . . . . . . . . . . . . . . . . . . . . . . . . . . . . . . . . . . . . . . . . .41
18. 9 Location. . . . . . . . . . . . . . . . . . . . . . . . . . . . . . . . . . . . . . . . . . . . . . . . . . . . . . . . . . . . . . . . . . .41 18. 10 Security . . . . . . . . . . . . . . . . . . . . . . . . . . . . . . . . . . . . . . . . . . . . . . . . . . . . . . . . . . . . . . . . . . .41 18. 11 Accounts . . . . . . . . . . . . . . . . . . . . . . . . . . . . . . . . . . . . . . . . . . . . . . . . . . . . . . . . . . . . . . . . . .41 18. 12 Language and input . . . . . . . . . . . . . . . . . . . . . . . . . . . . . . . . . . . . . . . . . . . . . . . . . . . . . . .42 18. 13 Backup and reset . . . . . . . . . . . . . . . . . . . . . . . . . . . . . . . . . . . . . . . . . . . . . . . . . . . . . . . . . .42 18. 14 Date & time. . . . . . . . . . . . . . . . . . . . . . . . . . . . . . . . . . . . . . . . . . . . . . . . . . . . . . . . . . . . . . . .43 18. 15 Accessibility . . . . . . . . . . . . . . . . . . . . . . . . . . . . . . . . . . . . . . . . . . . . . . . . . . . . . . . . . . . . . . .43 18. 16 About phone . . . . . . . . . . . . . . . . . . . . . . . . . . . . . . . . . . . . . . . . . . . . . . . . . . . . . . . . . . . . . .43
Appendix A: Specifications. . . . . . . . . . . . . . . . . . . . . . . . . . . . . . . . . . . . . . . . .44
Appendix B: Technical Support. . . . . . . . . . . . . . . . . . . . . . . . . . . . . . . . . . . . .46

About this guide
This guide is a complement to Quick Start Guide. The Quick Start Guide provides instructions for quick setup, while this guide provides details of each function and shows how to configure the smart phone appropriate to your needs.
When using this guide, please notice that features of the device may vary slightly depending on the model and software version you have, and on your location, language, and Internet service provider. All screenshots, images, parameters and descriptions documented in this guide are used for demonstration only.
Conventions
In this guide, the following conventions are used:
Convention |
Description |
|
Smart phone/phone |
Stands for Y5 without any explanation. |
|
Parameters |
Parameters provided in the screenshots are just references for configuring the smart phone, which may be |
|
different from the actual situation. You can set the parameters according to your demand. |
||
|
||
Screenshots |
The demonstrated screenshots may look a little different from the actual UI of your smart phone due to the |
|
various firmware versions. Please just configure your phone based on the actual UI. |
||
|
||
-> |
The menu structure which shows the path to enter the corresponding page. For example, Settings -> WLAN |
|
means the WLAN function page is under the Settings menu. |
||
|
||
|
|
|
Note: |
Ignoring the notes in the guide might result in a malfunction or damage to the phone. |
|
|
|

1 Get started
This chapter introduces the smart phone’s hardware information and guides you how to assemble your phone when you get started on using your new phone.
•Overview
•Assemble your device
•Power on
•Charge your device
1. 1 Overview
Earpiece
Front Camera
 Headset Jack
Volume Button
 Power Button
Back
Home
 Recent Apps
 Charge/Data Port
1. 2 Buttons
The buttons you use with Neffos include virtual ones and physical ones.
Power button
•Lock Neffos: When you are not using your phone, press the Power button to lock your phone. Locking your phone puts the display to sleep, saves the battery and prevents unmeant operations on the screen. You can still receive phone calls, text messages, alarms and notifications as well as listening to music and adjusting the volume. Neffos locks the screen automatically if you do not touch it for some time. To adjust the timing, go to  Settings -> Display -> Automatically lock.
•Unlock Neffos: Press the Power button, then swipe the screen to unlock your phone screen. For
additional security, you can require a password to unlock you phone. Go to Settings -> Lock screen -> Screen lock to choose a safe way to unlock your phone. For more information, see Lock screen.
• Turn Neffos on: Press and hold the Power button until your phone vibrates and the logo appears.
Chapter 1 . Get started |
1 |
• Turn Neffos off: Press and hold the Power button until a pop-up window appears and then tap Power off.
Volume button
You can adjust the audio volume on the right side when you’re on the phone or listening to songs, movies, or other media. You can also use Volume button to take a picture or record a video. See Take a photo and Record a video.
Home button
The Home button takes you to the Home screen and provides other convenient shortcuts.
Back button
Tap the virtual Back button to return to the previous screen, or close a dialogue box, menu, the notification panel or onscreen keyboard.
Recent apps
Tap the Recent button to display recent apps, or tap and hold for home screen options.
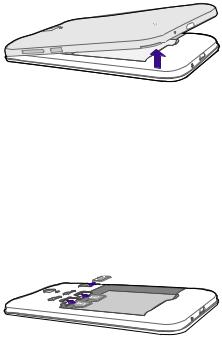
1. 3 Assemble your device
Remove the back cover
Hold your phone face down, put a fingernail in the bottom corner hole in the cover and pry the back cover off.
 Note: Do not bend or twist the back cover excessively in case you damage the phone.
Insert Micro SIM cards and MicroSD card (optional)
Carefully slide the cards into the card slots with the gold contacts facing down. Since your phone is a dual SIM phone, you can use one or two SIM cards by putting them in the corresponding card slots.
 Note:
Note:
1.The device uses Micro SIM cards.
2.If the card is not inserted correctly, the phone will not detect them.
Chapter 1 . Get started |
2 |

Insert the battery
Insert the battery into the opening on the back of the phone, aligning the gold contacts on the battery with the gold contacts in your phone. Then gently press down to secure the battery.
Replace the back cover
Align the cover and press all the way around the cover’s edges, making sure it snaps into place.
1. 4 Charge your device
Connect the device to a power outlet using the included USB cable and power adapter.
1.Connect the USB cable into the port.
2.Connect the USB cable to the power adapter, then plug the power adapter into a power outlet.
3.When the battery is full, unplug the power adapter from the power outlet and remove the USB cable from your phone.
Chapter 1 . Get started |
3 |

2 Basics
This chapter introduces the smart phone’s basic feature.
•Touchscreen gestures
•Unlock and lock the screen
•Home screen
•Quick settings panel
•Notification panel
•Type text
2. 1 Touchscreen gestures
Touch: Simply tap an item to select or launch it.
Touch and hold: Touch and leave your finger on the screen for 2 seconds or more to activate onscreen items. For example, touch and hold a widget on the Home screen to move it.
|
|
|
|
|
Chapter 2 . Basics |
|
|
|
|
|
|
|
||
4 |
||||
Swipe: Place your finger on the screen, and drag your finger to the direction you want. For example, you can swipe to scroll through the Home screen or a list.
Drag: To drag, touch and hold an item and then move it to a new position. For example, you can rearrange a widget on the home screen.
Zoom out: Pinch two fingers together on the screen. For example, pinch two fingers together to zoom out while viewing a picture or a web page.
|
|
|
|
|
Chapter 2 . Basics |
|
|
|
|
|
|
|
||
5 |
||||

Zoom in: Pinch two fingers apart on the screen. For example, pinch two fingers out to zoom in while viewing a picture or a web page.
2. 2 Home screen
 Status bar
 Widget
 Multi-touch display
 APP icons
Status bar: Status and notification icons are displayed in the status bar.
Widget: Self-contained applications that run on the Home screen (not shortcuts).
Multi-touch display: A display where you do various operations of your phone.
APP icons: App icons that show you the shortcuts to your favorite applications.
2. 3 Status icons
The icons in the status bar at the top of the screen provide device information.
Status icons |
Indications |
Battery low
Charging
Chapter 2 . Basics |
6 |

|
Battery full |
|
Signal strength |
|
No signal |
G |
GPRS network connected |
3G |
3G network connected |
4G |
4G network connected |
E |
Enhanced Data Rates for GSM EvolutioN network connected |
H |
High Speed Packet Access(HSPA) network connected |
H |
Evolved HSPA network connected |
|
Connected to a PC using USB cable |
|
Wi-Fi |
|
Hotspot |
|
MicroSD card |
|
Micro SIM card |
|
No SIM card installed |
|
Screenshots |
|
Mute mode enabled(not include alarms) |
|
Vibrate mode enabled |
|
Airplane mode enabled |
|
Bluetooth enabled |
|
Download status |
|
Uploading data |
|
Alarms enabled |
|
Call in progress |
|
Call on hold |
|
Forward calls |
|
Missed calls |
|
New messages |
2. 4 Quick Settings Panel
Swipe down from the top of any screen twice to open the Quick Settings Panel.
 Note: On the lock screen, swipe only once to open the Quick Settings Panel.
Chapter 2 . Basics |
7 |

|
10 |
|
|
9 |
|
1 |
8 |
|
2 |
7 |
|
4 |
||
|
||
3 |
6 |
|
|
5 |
Touch the shortcut switches on the Quick Settings Panel to turn the functions on or off.
1.WLAN: Tap to enable WLAN.
2.No SIM card: Tap to view the data usage.
3.Flashlight: Tap to enable flashlight.
4.Airplane mode: Tap to enable airplane mode.
5.Location: Tap to enable location services.
6.Screenshot: Tap to make a screenshot.
7.Auto-rotate: Tap to enable auto-rotate.
8.Bluetooth: Tap to enable Bluetooth.
9.Brightness slider: Use this slider to adjust the brightness of the screen.
10.Settings: Tap to configure the settings.
Notification Panel
Notification Panel collects all the notifications and alerts so that you can review them whenever you like. Open Notification Panel: Swipe down from the top edge of the screen to open the Notification Panel.
View a notification: Tap an item to view the details. Or swipe the notification left or right to remove it from the list.
Close Notification Panel: Swipe up, or press the Home button.
Chapter 2 . Basics |
8 |

2. 5 Type text
The onscreen keyboard enables you to enter text when needed.
Enter text
|
1 |
|
|
7 |
|
2 |
, |
|
|
|
|
|
|
|
3 |
|
4 |
5 |
6 |
1.Tap Shift to type uppercase, or touch and hold the key to slide to the uppercase. Double-tap Shift for caps lock.
2.To enter numbers, punctuations, or symbols, tap 
 .
.
3.Tap to enter a comma, or tap and hold the key to open the input options.
Chapter 2 . Basics |
9 |

4.If you have several keyboards, you can tap  to switch to the last one you used. You can also touch and hold it to choose the keyboard you need.
5.Tap to enter a space, or you can double-tap the space bar quickly to end a sentence with a period or space.
6.Tap to enter a period.
7.Tap to delete the characters to the left of the cursor.
Tap and hold to delete multiple characters to the left of the cursor.
Edit text
•Revise text: Tap the text to position the insertion point  and start revising.
•Select text: Tap and hold the text field to display the selection options (cut/copy/share/select all). Or doubletap a word to select it. Drag
 to select more or less text.
Spell checker
You can turn on the Spell checker feature to help you enter correct words.
1.Go to  Settings -> Language & input -> Spell checker.
2.Turn the switch on.
Switch input method
1.On the Home screen, tap  Settings.
2.Tap Language & input -> Keyboard & input methods to select an input method you need.
Chapter 2 . Basics |
10 |

3 Connection
Learn how to connect to WLAN, computer and how to use Bluetooth and hotspot helps you a lot.
This chapter contains the following sections.
•Connect to WLAN
•Connect to computer
•Bluetooth
•Tethering & portable hotspot
3. 1 Connect to WLAN
If appears at the top of the screen, you are connected to a Wi-Fi network. Neffos reconnects anytime you return to the same location.
1.Swipe down from the top of any screen (except for the Lock screen) twice to open the Quick Settings Panel.
2.Tap and hold WLAN  to enter the WLAN settings.
3.Tap the switch to turn it on. (You can also turn Wi-Fi on in  Settings -> WLAN.)
4.Tap an available WLAN to connect. Then enter the password if needed.
3. 2 Connect to the Internet
Neffos connects to the Internet whenever necessary, using a Wi-Fi connection (if available) or your carrier’s cellular network. For information about connecting to a Wi-Fi network, see Connect to WLAN above.
1.Swipe down from the top of any screen (except for the Lock screen) twice to open the Quick Settings Panel.
2.Tap and hold Mobile to enter the cellular data settings.
3.Tap the switch to turn it on.
 Note:
Note:
If a Wi-Fi connection to the Internet isn’t available, apps and services may transfer data over your carrier’s cellular network, which may result in additional fees. Contact your carrier for information about you cellular data plan rates.
3. 3 Connect to computer
1.Connect your phone to a computer using a USB cable.
2.On the notification panel, tap USB for charging.
3.Select a USB connection mode (Charging/File transfers/Photo transfer (PTP)/MIDI) depending on your needs.
3. 4 Bluetooth
You can share data on your phone with other devices using Bluetooth.
1.Swipe down from the top of any screen (except for the Lock screen) twice to open the Quick Settings Panel.
Chapter 3 . Connection |
11 |

2.Tap and hold Bluetooth to enter the Bluetooth settings.
3.Tap the switch to turn it on and find the device you want to connect, then follow the pop-up prompts to complete the connection. (You can also turn Bluetooth on in  Settings -> Bluetooth.)
Rename your phone
1.On the Home screen, tap  Settings -> Bluetooth.
2.Tap the switch to turn it on.
3.Tap  -> Rename this device.
4.Edit the device name and tap Rename to complete the settings.
3. 5 Tethering & portable hotspot
Use USB tethering
You can use a USB cable to share your phone’s mobile data with a computer.
1.Connect your phone to a computer using a USB cable.
2.On the Home screen, tap  Settings -> More -> Tethering & portable hotspot.
3.Tap the USB tethering switch to turn it on. Then you can share your phone’s mobile data with computer.
Use WLAN hotspot
You can use portable WLAN hotspot to share your phone’s mobile network with other devices.
1.On the Home screen, tap  Settings -> More -> Tethering & portable hotspot.
2.Tap the Portable WLAN hotspot switch to turn it on.
3.Tap Set up WLAN hotspot.
4.Set the WLAN name, security and password.
5.Tap SAVE to complete the settings.
Use Bluetooth tethering
You can use Bluetooth tethering to share your phone’s mobile data with other devices.
1.Pair your phone with other devices via Bluetooth.
2.On the Home screen, tap  Settings -> More -> Tethering & portable hotspot.
3.Tap the Bluetooth tethering switch to turn it on. Then you can share your phone’s mobile data with the connected devices.
Chapter 3 . Connection |
12 |
Loading...