


 Loading...
1910100109 REV1.0.0
Contents
About this guide . . . . . . . . . . . . . . . . . . . . . . . . . . . . . . . . . . . . . . . . . . . . . . . . . . . i Chapter 1. Get started . . . . . . . . . . . . . . . . . . . . . . . . . . . . . . . . . . . . . . . . . . . . 1
1. 1 Overview . . . . . . . . . . . . . . . . . . . . . . . . . . . . . . . . . . . . . . . . . . . . . . . . . . . . . . . . . . . . . . . . . . . 1 1. 2 Assemble your device. . . . . . . . . . . . . . . . . . . . . . . . . . . . . . . . . . . . . . . . . . . . . . . . . . . . . . . 1 1. 3 Power on . . . . . . . . . . . . . . . . . . . . . . . . . . . . . . . . . . . . . . . . . . . . . . . . . . . . . . . . . . . . . . . . . . . 2 1. 4 Charge your device . . . . . . . . . . . . . . . . . . . . . . . . . . . . . . . . . . . . . . . . . . . . . . . . . . . . . . . . . 2
Chapter 2. Basics . . . . . . . . . . . . . . . . . . . . . . . . . . . . . . . . . . . . . . . . . . . . . . . . . 4
2. 1 Touchscreen gestures . . . . . . . . . . . . . . . . . . . . . . . . . . . . . . . . . . . . . . . . . . . . . . . . . . . . . . . 4 2. 2 Unlock and lock the screen. . . . . . . . . . . . . . . . . . . . . . . . . . . . . . . . . . . . . . . . . . . . . . . . . . 6 2. 3 Home screen . . . . . . . . . . . . . . . . . . . . . . . . . . . . . . . . . . . . . . . . . . . . . . . . . . . . . . . . . . . . . . . 7 2. 4 Status icons . . . . . . . . . . . . . . . . . . . . . . . . . . . . . . . . . . . . . . . . . . . . . . . . . . . . . . . . . . . . . . . . 7 2. 5 Quick settings panel . . . . . . . . . . . . . . . . . . . . . . . . . . . . . . . . . . . . . . . . . . . . . . . . . . . . . . . . 8 2. 6 Notification panel. . . . . . . . . . . . . . . . . . . . . . . . . . . . . . . . . . . . . . . . . . . . . . . . . . . . . . . . . . . 9 2. 7 Enter a text . . . . . . . . . . . . . . . . . . . . . . . . . . . . . . . . . . . . . . . . . . . . . . . . . . . . . . . . . . . . . . . . . 9
Chapter 3. Connection . . . . . . . . . . . . . . . . . . . . . . . . . . . . . . . . . . . . . . . . . . .11
3. 1 Connect to WLAN. . . . . . . . . . . . . . . . . . . . . . . . . . . . . . . . . . . . . . . . . . . . . . . . . . . . . . . . . .11 3. 2 Connect to mobile data . . . . . . . . . . . . . . . . . . . . . . . . . . . . . . . . . . . . . . . . . . . . . . . . . . . .11 3. 3 Connect to computer . . . . . . . . . . . . . . . . . . . . . . . . . . . . . . . . . . . . . . . . . . . . . . . . . . . . . .11 3. 4 Bluetooth . . . . . . . . . . . . . . . . . . . . . . . . . . . . . . . . . . . . . . . . . . . . . . . . . . . . . . . . . . . . . . . . .11 3. 5 Tethering & portable hotspot . . . . . . . . . . . . . . . . . . . . . . . . . . . . . . . . . . . . . . . . . . . . . .12
Chapter 4. Calls . . . . . . . . . . . . . . . . . . . . . . . . . . . . . . . . . . . . . . . . . . . . . . . . . .13
4. 1 Make a call . . . . . . . . . . . . . . . . . . . . . . . . . . . . . . . . . . . . . . . . . . . . . . . . . . . . . . . . . . . . . . . .13 4. 2 Answer & end a call . . . . . . . . . . . . . . . . . . . . . . . . . . . . . . . . . . . . . . . . . . . . . . . . . . . . . . . .14 4. 3 Options during a call. . . . . . . . . . . . . . . . . . . . . . . . . . . . . . . . . . . . . . . . . . . . . . . . . . . . . . .14 4. 4 Call log . . . . . . . . . . . . . . . . . . . . . . . . . . . . . . . . . . . . . . . . . . . . . . . . . . . . . . . . . . . . . . . . . . . .15 4. 5 Call settings . . . . . . . . . . . . . . . . . . . . . . . . . . . . . . . . . . . . . . . . . . . . . . . . . . . . . . . . . . . . . . .16
Chapter 5. Messages . . . . . . . . . . . . . . . . . . . . . . . . . . . . . . . . . . . . . . . . . . . . .17
5. 1 Type of messages . . . . . . . . . . . . . . . . . . . . . . . . . . . . . . . . . . . . . . . . . . . . . . . . . . . . . . . . . .17 5. 2 Send & receive messages. . . . . . . . . . . . . . . . . . . . . . . . . . . . . . . . . . . . . . . . . . . . . . . . . . .17
5. 3 Manage conversations . . . . . . . . . . . . . . . . . . . . . . . . . . . . . . . . . . . . . . . . . . . . . . . . . . . . .17 5. 4 Message settings . . . . . . . . . . . . . . . . . . . . . . . . . . . . . . . . . . . . . . . . . . . . . . . . . . . . . . . . . .18
Chapter 6. Contacts . . . . . . . . . . . . . . . . . . . . . . . . . . . . . . . . . . . . . . . . . . . . . .20
6. 1 Manage contacts . . . . . . . . . . . . . . . . . . . . . . . . . . . . . . . . . . . . . . . . . . . . . . . . . . . . . . . . . .20 6. 2 Import/Export contacts . . . . . . . . . . . . . . . . . . . . . . . . . . . . . . . . . . . . . . . . . . . . . . . . . . . .21 6. 3 Groups . . . . . . . . . . . . . . . . . . . . . . . . . . . . . . . . . . . . . . . . . . . . . . . . . . . . . . . . . . . . . . . . . . . .21 6. 4 Contacts settings . . . . . . . . . . . . . . . . . . . . . . . . . . . . . . . . . . . . . . . . . . . . . . . . . . . . . . . . . .21
Chapter 7. Emails . . . . . . . . . . . . . . . . . . . . . . . . . . . . . . . . . . . . . . . . . . . . . . . .22
7. 1 Set up your email accounts. . . . . . . . . . . . . . . . . . . . . . . . . . . . . . . . . . . . . . . . . . . . . . . . .22 7. 2 Send and check emails. . . . . . . . . . . . . . . . . . . . . . . . . . . . . . . . . . . . . . . . . . . . . . . . . . . . .22 7. 3 Email settings. . . . . . . . . . . . . . . . . . . . . . . . . . . . . . . . . . . . . . . . . . . . . . . . . . . . . . . . . . . . . .22
Chapter 8. Camera and video . . . . . . . . . . . . . . . . . . . . . . . . . . . . . . . . . . . . .24
8. 1 Get to know camera . . . . . . . . . . . . . . . . . . . . . . . . . . . . . . . . . . . . . . . . . . . . . . . . . . . . . . .24 8. 2 Take a photo. . . . . . . . . . . . . . . . . . . . . . . . . . . . . . . . . . . . . . . . . . . . . . . . . . . . . . . . . . . . . . .25 8. 3 Record a video. . . . . . . . . . . . . . . . . . . . . . . . . . . . . . . . . . . . . . . . . . . . . . . . . . . . . . . . . . . . .25 8. 4 Gallery . . . . . . . . . . . . . . . . . . . . . . . . . . . . . . . . . . . . . . . . . . . . . . . . . . . . . . . . . . . . . . . . . . . .26 8. 5 Video Player . . . . . . . . . . . . . . . . . . . . . . . . . . . . . . . . . . . . . . . . . . . . . . . . . . . . . . . . . . . . . . .26
Chapter 9. Calendar. . . . . . . . . . . . . . . . . . . . . . . . . . . . . . . . . . . . . . . . . . . . . .27
9. 1 Use the calendar. . . . . . . . . . . . . . . . . . . . . . . . . . . . . . . . . . . . . . . . . . . . . . . . . . . . . . . . . . .27 9. 2 Calendar settings . . . . . . . . . . . . . . . . . . . . . . . . . . . . . . . . . . . . . . . . . . . . . . . . . . . . . . . . . .27
Chapter 10. Clock . . . . . . . . . . . . . . . . . . . . . . . . . . . . . . . . . . . . . . . . . . . . . . . . .28
10. 1 Alarm . . . . . . . . . . . . . . . . . . . . . . . . . . . . . . . . . . . . . . . . . . . . . . . . . . . . . . . . . . . . . . . . . . . . .28
10. 2 Clock . . . . . . . . . . . . . . . . . . . . . . . . . . . . . . . . . . . . . . . . . . . . . . . . . . . . . . . . . . . . . . . . . . . . . .28
10. 3 Timer. . . . . . . . . . . . . . . . . . . . . . . . . . . . . . . . . . . . . . . . . . . . . . . . . . . . . . . . . . . . . . . . . . . . . .28
10. 4 Stopwatch. . . . . . . . . . . . . . . . . . . . . . . . . . . . . . . . . . . . . . . . . . . . . . . . . . . . . . . . . . . . . . . . .29
Chapter 11. Browser . . . . . . . . . . . . . . . . . . . . . . . . . . . . . . . . . . . . . . . . . . . . . .30
11. 1 Go to a webpage . . . . . . . . . . . . . . . . . . . . . . . . . . . . . . . . . . . . . . . . . . . . . . . . . . . . . . . . . .30 11. 2 Browser tabs. . . . . . . . . . . . . . . . . . . . . . . . . . . . . . . . . . . . . . . . . . . . . . . . . . . . . . . . . . . . . . .31 11. 3 Bookmarks . . . . . . . . . . . . . . . . . . . . . . . . . . . . . . . . . . . . . . . . . . . . . . . . . . . . . . . . . . . . . . . .31 11. 4 History . . . . . . . . . . . . . . . . . . . . . . . . . . . . . . . . . . . . . . . . . . . . . . . . . . . . . . . . . . . . . . . . . . . .31
Chapter 12. File Explorer . . . . . . . . . . . . . . . . . . . . . . . . . . . . . . . . . . . . . . . . . .32
12. 1 View files (PIC, MUSIC, VIDEO, DOC, APK, ZIP) . . . . . . . . . . . . . . . . . . . . . . . . . . . . . . .32 12. 2 Manage your files . . . . . . . . . . . . . . . . . . . . . . . . . . . . . . . . . . . . . . . . . . . . . . . . . . . . . . . . . .32 12. 3 Options for selected files or folders . . . . . . . . . . . . . . . . . . . . . . . . . . . . . . . . . . . . . . . . .32
Chapter 13. Weather . . . . . . . . . . . . . . . . . . . . . . . . . . . . . . . . . . . . . . . . . . . . . .34
13. 1 Add a city . . . . . . . . . . . . . . . . . . . . . . . . . . . . . . . . . . . . . . . . . . . . . . . . . . . . . . . . . . . . . . . . . 34 13. 2 Check the weather. . . . . . . . . . . . . . . . . . . . . . . . . . . . . . . . . . . . . . . . . . . . . . . . . . . . . . . . .34 13. 3 Remove a city. . . . . . . . . . . . . . . . . . . . . . . . . . . . . . . . . . . . . . . . . . . . . . . . . . . . . . . . . . . . . .34 13. 4 Update the weather . . . . . . . . . . . . . . . . . . . . . . . . . . . . . . . . . . . . . . . . . . . . . . . . . . . . . . . 34
Chapter 14. Music. . . . . . . . . . . . . . . . . . . . . . . . . . . . . . . . . . . . . . . . . . . . . . . . .35
14. 1 Get to know music . . . . . . . . . . . . . . . . . . . . . . . . . . . . . . . . . . . . . . . . . . . . . . . . . . . . . . . . .35
Chapter 15. Notes. . . . . . . . . . . . . . . . . . . . . . . . . . . . . . . . . . . . . . . . . . . . . . . . .37
15. 1 Compose a note . . . . . . . . . . . . . . . . . . . . . . . . . . . . . . . . . . . . . . . . . . . . . . . . . . . . . . . . . . .37 15. 2 Note options . . . . . . . . . . . . . . . . . . . . . . . . . . . . . . . . . . . . . . . . . . . . . . . . . . . . . . . . . . . . . .37
Chapter 16. Applications . . . . . . . . . . . . . . . . . . . . . . . . . . . . . . . . . . . . . . . . . .38
16. 1 Manage applications. . . . . . . . . . . . . . . . . . . . . . . . . . . . . . . . . . . . . . . . . . . . . . . . . . . . . . .38 16. 2 Google applications . . . . . . . . . . . . . . . . . . . . . . . . . . . . . . . . . . . . . . . . . . . . . . . . . . . . . . .38
Chapter 17. Tools . . . . . . . . . . . . . . . . . . . . . . . . . . . . . . . . . . . . . . . . . . . . . . . . .40
17. 1 FM Radio . . . . . . . . . . . . . . . . . . . . . . . . . . . . . . . . . . . . . . . . . . . . . . . . . . . . . . . . . . . . . . . . . .40
17. 2 Flashlight. . . . . . . . . . . . . . . . . . . . . . . . . . . . . . . . . . . . . . . . . . . . . . . . . . . . . . . . . . . . . . . . . .40
17. 3 Sound Record . . . . . . . . . . . . . . . . . . . . . . . . . . . . . . . . . . . . . . . . . . . . . . . . . . . . . . . . . . . . .40
17. 4 Mirror . . . . . . . . . . . . . . . . . . . . . . . . . . . . . . . . . . . . . . . . . . . . . . . . . . . . . . . . . . . . . . . . . . . . .41
17. 5 Calculator . . . . . . . . . . . . . . . . . . . . . . . . . . . . . . . . . . . . . . . . . . . . . . . . . . . . . . . . . . . . . . . . .41
17. 6 Downloads . . . . . . . . . . . . . . . . . . . . . . . . . . . . . . . . . . . . . . . . . . . . . . . . . . . . . . . . . . . . . . . .41
17. 7 Photo Editor . . . . . . . . . . . . . . . . . . . . . . . . . . . . . . . . . . . . . . . . . . . . . . . . . . . . . . . . . . . . . . .41
17. 8 Compass . . . . . . . . . . . . . . . . . . . . . . . . . . . . . . . . . . . . . . . . . . . . . . . . . . . . . . . . . . . . . . . . . .41
17. 9 Feedback . . . . . . . . . . . . . . . . . . . . . . . . . . . . . . . . . . . . . . . . . . . . . . . . . . . . . . . . . . . . . . . . . .41
17. 10 SIM Toolkit. . . . . . . . . . . . . . . . . . . . . . . . . . . . . . . . . . . . . . . . . . . . . . . . . . . . . . . . . . . . . . . . .41
17. 11 System Update . . . . . . . . . . . . . . . . . . . . . . . . . . . . . . . . . . . . . . . . . . . . . . . . . . . . . . . . . . . .41
Chapter 18. Settings . . . . . . . . . . . . . . . . . . . . . . . . . . . . . . . . . . . . . . . . . . . . . .42
18. 1 SIM cards . . . . . . . . . . . . . . . . . . . . . . . . . . . . . . . . . . . . . . . . . . . . . . . . . . . . . . . . . . . . . . . . . .42
18. 2 Airplane mode. . . . . . . . . . . . . . . . . . . . . . . . . . . . . . . . . . . . . . . . . . . . . . . . . . . . . . . . . . . . .42 18. 3 Display . . . . . . . . . . . . . . . . . . . . . . . . . . . . . . . . . . . . . . . . . . . . . . . . . . . . . . . . . . . . . . . . . . . .42 18. 4 Cast screen . . . . . . . . . . . . . . . . . . . . . . . . . . . . . . . . . . . . . . . . . . . . . . . . . . . . . . . . . . . . . . . .43 18. 5 Sound and notification. . . . . . . . . . . . . . . . . . . . . . . . . . . . . . . . . . . . . . . . . . . . . . . . . . . . .43 18. 6 Storage. . . . . . . . . . . . . . . . . . . . . . . . . . . . . . . . . . . . . . . . . . . . . . . . . . . . . . . . . . . . . . . . . . . .44 18. 7 Battery . . . . . . . . . . . . . . . . . . . . . . . . . . . . . . . . . . . . . . . . . . . . . . . . . . . . . . . . . . . . . . . . . . . .44 18. 8 Apps . . . . . . . . . . . . . . . . . . . . . . . . . . . . . . . . . . . . . . . . . . . . . . . . . . . . . . . . . . . . . . . . . . . . . .44 18. 9 Location. . . . . . . . . . . . . . . . . . . . . . . . . . . . . . . . . . . . . . . . . . . . . . . . . . . . . . . . . . . . . . . . . . .44 18. 10 Security . . . . . . . . . . . . . . . . . . . . . . . . . . . . . . . . . . . . . . . . . . . . . . . . . . . . . . . . . . . . . . . . . . .44 18. 11 Accounts . . . . . . . . . . . . . . . . . . . . . . . . . . . . . . . . . . . . . . . . . . . . . . . . . . . . . . . . . . . . . . . . . .44 18. 12 Language and input . . . . . . . . . . . . . . . . . . . . . . . . . . . . . . . . . . . . . . . . . . . . . . . . . . . . . . .45 18. 13 Backup and reset . . . . . . . . . . . . . . . . . . . . . . . . . . . . . . . . . . . . . . . . . . . . . . . . . . . . . . . . . .46 18. 14 Date & time. . . . . . . . . . . . . . . . . . . . . . . . . . . . . . . . . . . . . . . . . . . . . . . . . . . . . . . . . . . . . . . .46 18. 15 Schedule power on & off . . . . . . . . . . . . . . . . . . . . . . . . . . . . . . . . . . . . . . . . . . . . . . . . . . .46 18. 16 Accessibility . . . . . . . . . . . . . . . . . . . . . . . . . . . . . . . . . . . . . . . . . . . . . . . . . . . . . . . . . . . . . . .46 18. 17 About phone . . . . . . . . . . . . . . . . . . . . . . . . . . . . . . . . . . . . . . . . . . . . . . . . . . . . . . . . . . . . . .46
Appendix A: Specifications. . . . . . . . . . . . . . . . . . . . . . . . . . . . . . . . . . . . . . . . .48
Appendix B: Technical Support. . . . . . . . . . . . . . . . . . . . . . . . . . . . . . . . . . . . .50

About this guide
This guide provides details of each function and shows how to configure the smart phone appropriate to your needs.
Conventions
In this guide, the following conventions are used:
Convention |
Description |
|
Smart phone/phone |
Stands for C5 Max without any explanation. |
|
Parameters |
Parameters provided in the screenshots are just references for configuring the smart phone, which may be |
|
different from the actual situation. You can set the parameters according to your demand. |
||
|
||
Screenshots |
The demonstrated screenshots may look a little different from the actual UI of your smart phone due to the |
|
various firmware versions. Please just configure your phone based on the actual UI. |
||
|
||
-> |
The menu structure which shows the path to enter the corresponding page. For example, Settings -> WLAN |
|
means the WLAN function page is under the Settings menu. |
||
|
||
|
|
|
Note: |
Ignoring the notes in the guide might result in a malfunction or damage to the phone. |
|
|
||
Tips: |
Tips Indicate important information that helps you make better use of your phone. |
|
|
1 Get started
This chapter introduces the smart phone’s hardware information and guides you how to assemble your phone when you get started on using your new phone.
•Overview
•Assemble your device
•Power on
•Charge your device
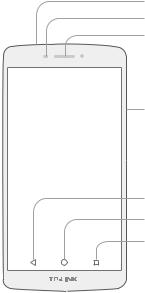
1. 1 Overview
Headset Jack
Ambient Light Sensor
Earpiece
 Front Camera
Volume Button
 Power Button
Back
Home
Recent Apps

 Launcher Settings Panel
 Charge/Data Port
1. 2 Assemble your device
Remove the back cover
Hold your phone face down, put a fingernail in the bottom corner hole in the cover and pry the back cover off.
 Note: Do not bend or twist the back cover excessively in case you damage the phone.
Chapter 1 . Get started |
1 |
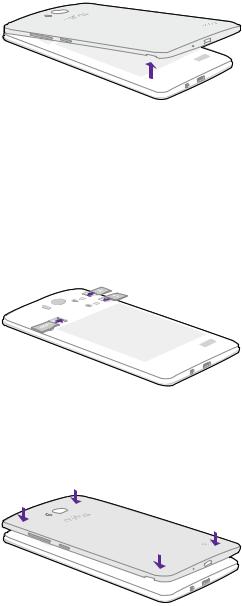
Insert Micro SIM cards and MicroSD card (optional)
Carefully slide the cards into the card slots with the gold contacts facing down. Since your phone is a dual SIM phone, you can use one or two SIM cards by putting them in the corresponding card slots.
 Note:
Note:
1.The device uses Micro SIM cards.
2.If the card is not inserted correctly, the phone will not detect them.
Replace the back cover
Align the cover and press all the way around the cover’s edges, making sure it snaps into place.
1. 3 Power on
Press and hold the Power button until your phone vibrates and starts up.
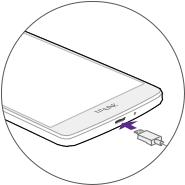
1. 4 Charge your device
Connect the device to a power outlet using the included USB cable and power adapter.
1.Connect the USB cable into the port.
2.Connect the USB cable to the power adapter, then plug the power adapter into a power outlet.
3.When the battery is full, unplug the power adapter from the power outlet and remove the USB cable from your phone.
Chapter 1 . Get started |
2 |
Chapter 1 . Get started |
3 |
2 Basics
This chapter introduces the smart phone’s basic feature.
•Touchscreen gestures
•Unlock and lock the screen
•Home screen
•Status icons
•Quick settings panel
•Notification panel
•Enter a text
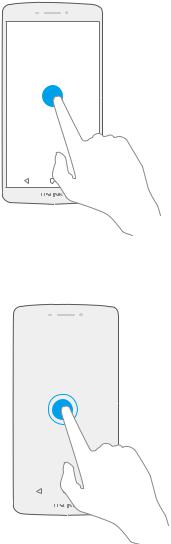
2. 1 Touchscreen gestures
Touch: Simply tap an item to select or launch it.
Touch and hold: Touch and leave your finger on the screen for 2 seconds or more to activate onscreen items. For example, touch and hold a widget on the Home screen to move it.
|
|
|
Chapter 2 . Basics |
4 |
|
Swipe: Place your finger on the screen, and drag your finger to the direction you want. For example, you can swipe to scroll through the Home screen or a list.
Drag: To drag, touch and hold an item and then move it to a new position. For example, you can rearrange a widget on the home screen.
Zoom in: Pinch two fingers apart on the screen. For example, pinch two fingers out to zoom in while viewing a picture or a web page.
|
|
|
Chapter 2 . Basics |
5 |
|
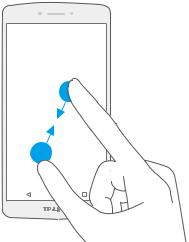
Zoom out: Pinch two fingers together on the screen. For example, pinch two fingers together to zoom out while viewing a picture or a web page.
2. 2 Unlock and lock the screen
Use the screen lock features to secure your phone.
Screen unlock: Press the Power button, then swipe the screen.
Screen lock: Press the Power button to turn the screen off.
 Note: By default, your phone locks automatically when the screen times out.
If you want to set a more secure lock, you can do as follows:
1.On the Home screen, tap  Settings.
2.Tap  Security.
3.Tap Screen lock to choose a screen lock.
•None: Never use a screen lock.
•Swipe: Swipe the screen to unlock. It’s the default option and offers no security.
•Pattern: Slide your finger on the dots to create a pattern. You can use the pattern to unlock the screen.
•PIN: Create a PIN code (must be 4 digits) to unlock the screen.
•Password: Create a password to unlock the screen.
Chapter 2 . Basics |
6 |

2. 3 Home screen
4G |
|
|
Status bar |
||
|
|
|
|
|
Widget |
|
|
|
|
|
|
 APP screen indicator
 APP shortcuts
Status bar: Status and notification icons are displayed in the status bar.
Widget: Self-contained applications that run on the Home screen (not shortcuts). APP screen indicator: Indicates which screen is being displayed.
APP shortcuts: Shortcuts to your favorite applications.
2. 4 Status icons
The icons in the status bar at the top of the screen provide device information.
Status icons |
Indications |
|
Battery low |
|
Charging |
|
Battery full |
|
Signal strength |
|
No signal |
G |
GPRS network connected |
3G |
3G network connected |
4G |
4G network connected |
E |
Enhanced Data Rates for GSM EvolutioN network connected |
H |
High Speed Packet Access(HSPA) network connected |
H |
Evolved HSPA network connected |
|
Connected to a PC using USB cable |
|
Wi-Fi |
|
Hotspot |
|
MicroSD card |
|
Micro SIM card |
|
No SIM card installed |
|
Screenshots |
|
Mute mode enabled(not include alarms) |
|
Vibrate mode enabled |
Chapter 2 . Basics |
7 |
Airplane mode enabled
Bluetooth enabled
Download status
Uploading data
Synchronizing data
GPS enabled
Alarms enabled
Call in progress
Missed calls
New messages
New emails
Headset plugged in
System update is available.
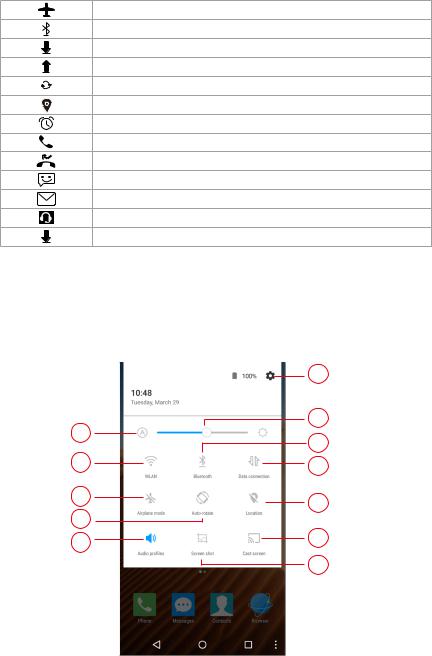
2. 5 Quick settings panel
Swipe down from the top of any screen twice to open the quick settings panel.
 Note: On the lock screen, swipe only once to open the quick settings panel.
|
1 |
|
3 |
2 |
5 |
|
|
4 |
6 |
7 |
9 |
|
|
8 |
|
10 |
12 |
|
|
|
11 |
Touch the shortcut switches on the quick settings panel to turn the functions on or off.
1.Settings: Tap to open the settings.
2.Auto brightness: Tap to make the phone automatically adjust the screen brightness.
3.Brightness slider: Use this slider to adjust the brightness of the screen.
4.WLAN: Tap to enable WLAN. For more information, see Connect to WLAN.
5.Bluetooth: Tap to enable Bluetooth. For more information, see Bluetooth.
6.Data connection: Tap to enable mobile data. For more information, see Connect to mobile data.
7.Airplane mode: Tap to enable airplane mode. For more information, see Airplane mode.
8.Auto-rotate: Tap to enable auto-rotate.
9.Location: Tap to enable location services.
10.Audio profiles: Tap to select the audio profiles (general/slient/meeting/outdoor).
Chapter 2 . Basics |
8 |
11.Screen shot: Tap to select the screen shot type.
12.Cast screen: Tap to share the display on your phone with your TV or other devices. For more information, see Cast screen.
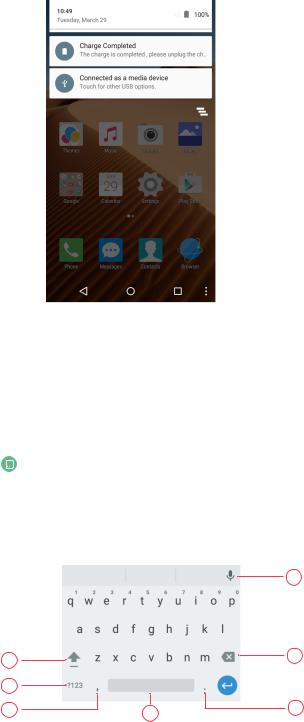
2. 6 Notification panel
Swipe down from the top of any screen to open the notification panel.
1.Tap an item to view the details.
2.Swipe the notification left or right to remove it from the list.
2. 7 Enter a text
Switch input method
1.On the Home screen, tap  Settings.
2.Tap A Language & input.
3.Then select an input method.
Use android keyboard
Tap a text field to use the onscreen keyboard.
7
1 |
|
6 |
2 |
|
|
3 |
4 |
5 |
1.Tap to switch between lowercase and uppercase letters.
Chapter 2 . Basics |
9 |
Tap and hold or quickly tap twice to enable caps lock.
2.Tap to switch to numbers and symbols.
3.Tap to enter a comma.
Tap and hold to open the input options menu.
4.Tap to enter a space.
5.Tap to enter a period.
Tap and hold to enter a symbol.
6.Tap to delete the characters to the left of the cursor.
Tap and hold to delete multiple characters to the left of the cursor.
7.Switch to Google™ Voice Typing. For more information, see Use Google Voice Typing.
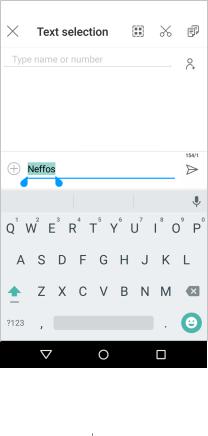
Cut, copy & paste
Tap the text field to use the onscreen keyboard.
Select text: Tap and hold the text to bring up 
 . Then drag
  or
or  to select more or less text. Select all text: Tap and hold the text. Then tap
  .
.
Cut text: Select the text and tap 
 . Copy text: Select the text and tap
  .
.
Paste text: Open the text box where you want to paste the text. Then tap PASTE to paste the text.
Chapter 2 . Basics |
10 |

3 Connection
This chapter contains the following sections.
•Connect to WLAN
•Connect to computer
•Bluetooth
•Tethering & portable hotspot
3. 1 Connect to WLAN
Option One
1.Swipe down from the top of any screen (except for the Lock screen) twice to open the quick settings panel.
2.Tap and hold to enter the WLAN settings.
WLAN
3.Tap the switch to turn it on.
4.Tap an available WLAN to connect. Then enter the password if needed.
Option Two
1.On the Home screen, tap  Settings ->
  WLAN.
WLAN.
2.Tap the switch to turn it on.
3.Tap an available WLAN to connect. Then enter the password if needed.
3. 2 Connect to mobile data
1.Swipe down from the top of any screen (except for the Lock screen) twice to open the quick settings panel.
2.Tap Data connection to enable mobile data.
3.3 Connect to computer
1.Connect your phone to a computer using a USB cable.
2.On the notification panel, tap Connected as a media device.
3.Select a USB connection mode (Media device (MTP), Camera (PTP) or Charge only) depending on your needs.
3. 4 Bluetooth
You can share data on your phone with other devices using Bluetooth. Pair and connect your phone to a Bluetooth device.
Option One
1.Swipe down from the top of any screen (except for the Lock screen) twice to open the quick settings panel.
2.Tap and hold Bluetooth to enter the Bluetooth settings.
Chapter 3 . Connection |
11 |
3.Tap the switch to turn it on and find the device you want to connect, then follow the on-screen prompts to complete the connection.
Option Two
1.On the Home screen, tap  Settings ->
  Bluetooth.
2.Tap the switch to turn it on.
3.Tap the device you want to connect. Then follow the pop-up prompts to complete the connection.
 Note: Your phone is visible to nearby devices while Bluetooth settings is open.
Rename your phone
1.On the Home screen, tap  Settings ->
  Bluetooth.
2.Tap the switch to turn it on.
3.Tap  -> Rename this device.
4.Edit the device name and tap Rename to complete the settings.
3. 5 Tethering & portable hotspot
Use USB tethering
You can use a USB cable to share your phone’s mobile data with a computer.
1.Connect your phone to a computer using a USB cable.
2.On the Home screen, tap  Settings ->
  More -> Tethering & portable hotspot.
3.Tap the USB tethering switch to turn it on. Then you can share your phone’s mobile data with computer.
Use WLAN hotspot
You can use portable WLAN hotspot to share your phone’s mobile network with other devices.
1.On the Home screen, tap  Settings ->
  More -> Tethering & portable hotspot.
2.Tap the WLAN hotspot switch to turn it on.
3.Tap Set up WLAN hotspot.
4.Set the WLAN name, security and password.
5.Tap Save to complete the settings.
Use Bluetooth tethering
You can use Bluetooth tethering to share your phone’s mobile data with other devices.
1.Pair your phone with other devices via Bluetooth.
2.On the Home screen, tap  Settings ->
  More -> Tethering & portable hotspot.
3.Tap the Bluetooth tethering switch to turn it on. Then you can share your phone’s mobile data with the connected devices.
Chapter 3 . Connection |
12 |

4 Calls
This chapter contains the following sections.
•Make a call
•Answer & end a call
•Options during a call
•Call log
•Call settings
4. 1 Make a call
Dial directly by entering numbers
1.On the Home screen, tap  Phone ->
  .
.
2.Enter a number and tap  to make a call.
Dial a recent number from the call log
All incoming , outgoing and missed call are in the call log.
1.On the Home screen, tap  Phone -> Recents, a list of recent calls will be displayed.
2.Tap a number to call. If your phone supports dual SIM cards, choose SIM1 or SIM2 to make the call.
 Note:
Note:
If you want to make SIM1 or SIM 2 as the default SIM card to make calls or if you want to deactivate one of them, go to
Settings -> SIM cards to configure.
Dial from contact list
1.On the Home screen, tap  Phone -> Contacts.
2.Tap a contact and then tap the number to dial. If your phone supports dual SIM cards, choose SIM1 or SIM2 to make the call.
Make an international call
1.On the Home screen, tap  Phone.
2.On the dialer, tap and hold 0 to enter +, then enter the country or region code, area code, and phone number in sequence.
3.Tap  . If your phone supports dual SIM cards, choose SIM1 or SIM2 to make a call.
Make an emergency call without SIM cards
The emergency calling mode makes dialing an emergency number a one-tap process.
1.On the Lock screen, tap EMERGENCY CALL.
2.Enter an emergency number and tap  to dial.
Make a conference call
The conference calling enables multiple persons to talk simultaneously.
1.Call the first participant.
Chapter 4 . Calls |
13 |

2.After connected, tap  -> Add call to call the second participant. The first participant will be placed on hold.
3.When the second participant is connected, tap  -> Merge calls to start a conference call.
Make a call using speed dial
Using speed dial, you can call someone quickly by dialing a shortcut number instead of the original number.
•Make a speed dial: Go to  Phone, then tap and hold the speed dial number.
•Create a speed dial: Go to  Phone ->
  -> Settings -> General -> Speed dial settings. The speed dial screen will display the numbers 1 through 9 (Number 1 is reserved for voicemail). Tap a not-set number and enter a phone number or select a contact, then tap OK.
•Replace a speed dial: Go to  Phone ->
  -> Settings -> General Settings -> Speed dial settings, press and hold the number you want to replace, then select Replace and enter a new
number.
• Delete a speed dial: Go to  Phone ->
  -> Settings -> General Settings -> Speed dial settings, press and hold the number you want to remove, then select Delete.
4. 2 Answer & end a call
On the incoming call screen:
Answer a call: Drag  right. Reject a call: Drag
  left.
left.
Quick response message: Drag  upward to reject the call and select a quick response message to the caller.
 Note:
Note:
On the dialer screen, you can tap  ->Settings -> General -> Quick responses to edit the quick reponse message that will be sent to the receiver. Then tap OK.
End a call: When you are ready to end a call, tap  .
.
4. 3 Options during a call
Your phone provides a variety of functions that you can use during a call.
Adjust the call volume
You can press the volume key to increase or decrease the volume.
Listen with the speaker
You can press  to hear the caller with the speaker.
Chapter 4 . Calls |
14 |
Loading...