


 Loading...
NC220
Day/Night Cloud Camera, 300Mbps Wi-Fi
1910011260
REV1.0.0
COPYRIGHT & TRADEMARKS
Specifications are subject to change without notice.  is a registered trademark of TP-LINK TECHNOLOGIES CO., LTD. Other brands and product names are trademarks or registered trademarks of their respective holders.
No part of the specifications may be reproduced in any form or by any means or used to make any derivative such as translation, transformation, or adaptation without permission from TP-LINK TECHNOLOGIES CO., LTD. Copyright © 2015 TP-LINK TECHNOLOGIES CO., LTD. All rights reserved.
http://www.tp-link.com

FCC STATEMENT
This equipment has been tested and found to comply with the limits for a Class B digital device, pursuant to part 15 of the FCC Rules. These limits are designed to pro-vide reasonable protection against harmful interference in a residential installation. This equipment generates, uses and can radiate radio frequency energy and, if not in-stalled and used in accordance with the instructions, may cause harmful interference to radio communications. However, there is no guarantee that interference will not occur in a particular installation. If this equipment does cause harmful interference to radio or television reception, which can be determined by turning the equipment off and on, the user is encouraged to try to correct the interference by one or more of the following measures:
•Reorient or relocate the receiving antenna.
•Increase the separation between the equipment and receiver.
•Connect the equipment into an outlet on a circuit different from that to which the receiver is connected.
•Consult the dealer or an experienced radio/ TV technician for help.
This device complies with part 15 of the FCC Rules. Operation is subject to the following two conditions:
1)This device may not cause harmful interference.
2)This device must accept any interference received, including interference that may cause undesired operation.
Any changes or modifications not expressly approved by the party responsible for compliance could void the user’s authority to operate the equipment.
Note: The manufacturer is not responsible for any radio or TV interference caused by unauthorized modifications to this equipment. Such modifications could void the user’s authority to operate the equipment.
FCC RF Radiation Exposure Statement:
This equipment complies with FCC RF radiation exposure limits set forth for an uncontrolled environment. This device and its antenna must not be co-located or operating in conjunction with any other antenna or transmitter.
“To comply with FCC RF exposure compliance requirements, this grant is applicable to only Mobile Configurations. The antennas used for this transmitter must be installed to provide a separation distance of at least 20 cm from all persons and must not be co-located or operating in conjunction with any other antenna or transmitter.”
CE Mark Warning
This is a class B product. In a domestic environment, this product may cause radio interference, in which case the user may be required to take adequate measures.
Canadian Compliance Statement
This device complies with Industry Canada license-exempt RSS standard(s). Operation is subject to the following two conditions:
(1) This device may not cause interference, and
(2)This device must accept any interference, including interference that may cause undesired operation of the device.
Cet appareil est conforme aux norms CNR exemptes de licence d’Industrie Canada. Le fonctionnement est soumis aux deux conditions suivantes:
(1)cet appareil ne doit pas provoquer d’interférences et
(2)cet appareil doit accepter toute interférence, y compris celles susceptibles de provoquer un fonctionnement non souhaité de l’appareil.
This device has been designed to operate with the antennas listed below, and having a maximum gain of 3 dBi. Antennas not included in this list or having a gain greater than 3 dBi are strictly prohibited for use with this device. The required antenna impedance is 50 ohms.
To reduce potential radio interference to other users, the antenna type and its gain should be so chosen that the equivalent isotropically radiated power (e.i.r.p.) is not more than that permitted for successful communication.
Industry Canada Statement
Complies with the Canadian ICES-003 Class B specifications.
Cet appareil numérique de la classe B est conforme à la norme NMB-003 du Canada.
This device complies with RSS 210 of Industry Canada. This Class B device meets all the requirements of the Canadian interference-causing equipment regulations.
Cet appareil numérique de la Classe B respecte toutes les exigences du Règlement sur le matériel brouilleur du Canada.
Korea Warning Statements:
.
NCC Notice & BSMI Notice
加大功率或變更原設計之特性或功能。
頻電機需忍受合法通信或工業、科學以及醫療用電波輻射性電機設備之干擾。
●

● ● ● ●
●
Продукт сертифіковано згідно с правилами системи УкрСЕПРО на відповідність вимогам нормативних документів та вимогам, що передбачені чинними законодавчими актами України.
Safety Information
When product has power button, the power button is one of the way to shut off the product; when there is no power button, the only way to completely shut off power is to disconnect the product or the power adapter from the power source.
Don’t disassemble the product, or make repairs yourself. You run the risk of electric shock and voiding the limited warranty. If you need service, please contact us.
Avoid water and wet locations.
This product can be used in the following countries:
AT |
BG |
BY |
CA |
CZ |
DE |
DK |
EE |
ES |
FI |
FR |
GB |
GR |
HU |
IE |
IT |
LT |
LV |
MT |
NL |
NO |
PL |
PT |
RO |
RU |
SE |
SK |
TR |
UA |
US |
|
|
 TP-LINK TECHNOLOGIES CO., LTD
DECLARATION OF CONFORMITY
For the following equipment:
Product Description: Day/Night Cloud Camera, 300Mbps Wi-Fi
Model No.: NC220
Trademark: TP-LINK
We declare under our own responsibility that the above products satisfy all the technical regulations applicable to the product within the scope of Council Directives:
Directives 1999/5/EC, Directives 2004/108/EC, Directives 2006/95/EC, Directives 1999/519/EC, Directives 2011/65/EU
The above product is in conformity with the following standards or other normative documents
EN 300 328 V1.8.1
EN 301 489-1 V1.9.2 & EN 301 489-17 V2.2.1 EN 55022: 2010 + AC: 2011
EN 55024: 2010
EN 61000-3-2: 2006 + A1: 2009 + A2: 2009 EN 61000-3-3: 2013
EN 60950-1: 2006 + A11: 2009 + A1: 2010 + A12: 2011 EN 62311: 2008
The product carries the CE Mark:
Person responsible for making this declaration:
Yang Hongliang
Product Manager of International Business
Date of issue: 2015
TP-LINK TECHNOLOGIES CO., LTD.
Building 24 (floors 1, 3, 4, 5), and 28 (floors 1-4) Central Science and Technology Park,
Shennan Rd, Nanshan, Shenzhen, China
|
|
CONTENTS |
|
Chapter 1 About this Guide.................................................................................... |
1 |
||
1.1 |
Conventions ................................................................................................................... |
1 |
|
1.2 |
Overview of This Guide.................................................................................................. |
1 |
|
Chapter 2 Introduction............................................................................................ |
2 |
||
2.1 |
Overview ........................................................................................................................ |
2 |
|
2.2 |
Main Features ................................................................................................................ |
2 |
|
2.3 |
Appearance Description................................................................................................. |
3 |
|
|
2.3.1 |
Front Panel .......................................................................................................... |
3 |
|
2.3.2 |
Rear Panel .......................................................................................................... |
4 |
2.4 |
Mount the Camera ......................................................................................................... |
5 |
|
|
2.4.1 |
The Screw Size ................................................................................................... |
5 |
|
2.4.2 |
Mount the Camera ............................................................................................... |
5 |
Chapter 3 Managing the Camera............................................................................ |
7 |
||
3.1 |
Login |
............................................................................................................................... |
7 |
3.2 |
Live View ........................................................................................................................ |
8 |
|
3.3 |
Basic............................................................................................................................. |
|
10 |
|
3.3.1 ................................................................................................. |
Basic → Status |
11 |
|
3.3.2 ............................................................................................. |
Basic → Network |
12 |
|
3.3.3 ......................................................................... |
Basic → Wireless Connection |
13 |
|
3.3.4 ..................................................................................... |
Basic → Cloud Setting |
15 |
|
3.3.5 ................................................................................................... |
Basic → LED |
16 |
3.4 |
Advanced ..................................................................................................................... |
17 |
|
|
3.4.1 ......................................................................................... |
Advanced → Status |
17 |
|
3.4.2 ...................................................................................... |
Advanced → Network |
17 |
|
3.4.3 .................................................................. |
Advanced → Wireless Connection |
21 |
|
3.4.4 ...................................................................... |
Advanced → Wireless Extender |
23 |
|
3.4.5 ............................................................................. |
Advanced → Cloud Setting |
24 |
|
3.4.6 ......................................................................................... |
Advanced → DDNS |
24 |
|
3.4.7 .......................................................................................... |
Advanced → Video |
25 |
|
3.4.8 ........................................................................ |
Advanced → Motion Detection |
27 |
|
3.4.9 ........................................................................ |
Advanced → Sound Detection |
28 |
|
3.4.10 ................................................................... |
Advanced → Notification Delivery |
29 |
|
3.4.11 ............................................................................................ |
Advanced → LED |
32 |
3.5 |
System ......................................................................................................................... |
32 |
|
|
3.5.1 .............................................................................................................. |
Account |
33 |
|
3.5.2 .......................................................................................................... |
Date/Time |
35 |
|
3.5.3 ..................................................................................................... |
Management |
37 |
|
3.5.4 ....................................................................................................... |
System Log |
39 |

NC220 Day/Night Cloud Camera, 300Mbps Wi-Fi
Chapter 1 About this Guide
This User Guide contains information for setup and management of NC220 Day/Night Cloud Camera, 300Mbps Wi-Fi. Please read this guide carefully before operation.
1.1 Conventions
In this Guide the following conventions are used:
The camera or NC220 mentioned in this Guide stands for NC220 Day/Night Cloud Camera, 300Mbps Wi-Fi without any explanation.
Bold font indicates a button, a toolbar icon, menu or menu item.
Symbol in this Guide
Symbol |
Description |
|
|
|
|
Note: |
Ignoring this type of note might result in a malfunction or damage to the |
|
device. |
||
|
|
1.2 Overview of This Guide
Chapter |
|
Introduction |
|
||
|
|
|
Chapter 1 About This Guide |
Introduces the guide structure and conventions |
|
|
|
|
Chapter 2 |
Introduction |
Introduces the features, application and appearance of the |
|
|
camera |
|
|
|
Chapter 3 |
Managing the |
Introduces how to quickly set up the camera using the built-in |
Camera |
|
web management page |
|
|
|
Appendix A Specifications |
Introduces the specifications of the camera |
|
|
|
|
Appendix B Troubleshooting |
Lists the answers or resolutions for some common problems |
|
|
|
|
1

NC220 Day/Night Cloud Camera, 300Mbps Wi-Fi
Chapter 2 Introduction
Thanks for choosing the NC220 Day/Night Cloud Camera, 300Mbps Wi-Fi!
2.1 Overview
NC220 is a versatile solution for home & office monitoring to keep an eye on your home, kids or workplace; whatever it is that you care for most.
NC220 has a complete system with a built-in CPU and web server that transmits high quality video images, which can fully meet the need of your small office or home’s security and surveillance.
NC220 is an affordable and fully scalable surveillance camera. Because the camera can be added to your existing local area network (LAN) with a stable high speed Wi-Fi connection, you will potentially save a lot from unnecessary cabling. With wireless extender feature, it can also be used as a Wi-Fi range extender to easily expand your Wi-Fi network.
NC220 can be accessed remotely, and controlled from any computer over your local network or through the Internet via a web browser. NC220 is a complete and cost-effective home or office security solution for it comes with remote monitoring and motion detection feature.
NC220 is a cloud-based Wi-Fi video monitoring device with free live streaming and remote viewing, which makes it easy to stay connected with what you care most wherever you are. You can view and manage your camera from anywhere over the Internet through the TP-LINK Cloud website or through the tpCamera app for iOS and Android.
2.2 Main Features
•Monitor your home or office remotely with web-based management page
•iOS and Android app for remote viewing and management with TP-LINK Cloud
•TP-LINK Cloud (www.tplinkcloud.com) access for easy viewing and management
•Email or FTP notification triggered by motion detection
•Supports wireless 802.11b/g/n with speed up to 300Mbps
•Wireless connectivity compliant with WPS button
•Instantly eliminates the dead zones and expand your home’s wireless network
•Ethernet port for wired connectivity
•UPnP support for network setup & configuration
•4x digital zoom for close-up viewing
2
NC220 Day/Night Cloud Camera, 300Mbps Wi-Fi
2.3Appearance Description
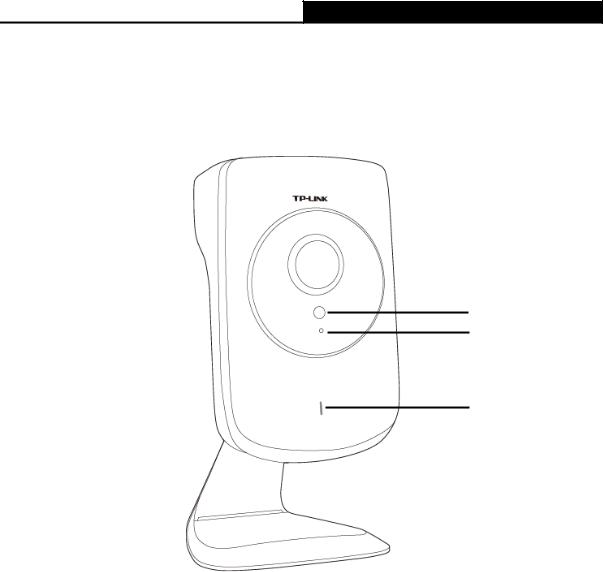
2.3.1Front Panel
Light Sensor
Microphone
System LED
Figure 2-1 Front Panel
Light Sensor: The camera has a built-in internal photodetector. It is used to identify day or night.
Microphone: The camera has a built-in internal microphone. This microphone is hidden in the pinhole located on the front panel.
System LED:
Status |
Indication |
Flashing Red |
The camera starts booting up. |
Solid Red |
The camera has boot up, but is not connected to any network. |
Flashing Green |
The camera is in firmware upgrade procedure. |
Solid Green |
The camera is connected to a network or is transferring data. |
3
NC220 Day/Night Cloud Camera, 300Mbps Wi-Fi
2.3.2 Rear Panel
Power Jack |
|
|
|
ETHERNET Port |
|
|
WPS LED
Heat Emission Holes
WPS/RESET
Button
|
|
Figure 2-2 Rear Panel |
WPS LED: |
|
|
|
|
|
|
Status |
Indication |
|
|
The camera starts booting up. |
|
Flashing Green |
|
|
The camera is connecting to a network by WPS function. This |
|
|
|
process will last in the first 2 minutes. |
|
|
|
|
Off |
The camera has boot up. |
|
|
|
|
The camera failed to be added to a network by WPS function. |
|
|
|
|
|
|
|
|
Solid Green |
The camera has been successfully added to a network by WPS |
|
function. This process will last in the first 2 minutes. |
|
|
|
|
|
|
|
ETHERNET Port: The ETHERNET port is used to connect the camera to a network via RJ45 cable.
Power Jack: The power jack is where you connect the AC adapter to the camera.
WPS/RESET Button: This button is used for both WPS and RESET function. To use the WPS function, press it for 1 second; to use the RESET function, press and hold for more than 5 seconds.
4
NC220 Day/Night Cloud Camera, 300Mbps Wi-Fi
Used as RESET button:
With the camera powered on, press and hold the WPS/RESET button (more than 5 seconds) until both the System LED and WPS LED turn off. Then release the button and wait the camera to reset to its factory default settings.
Used as WPS button:
If your router supports WPS, then you can press the WPS/RESET button for 1 second to quickly establish a connection between the camera and router.
Heat Emission Holes: These holes are used for heat dissipation.
2.4Mount the Camera
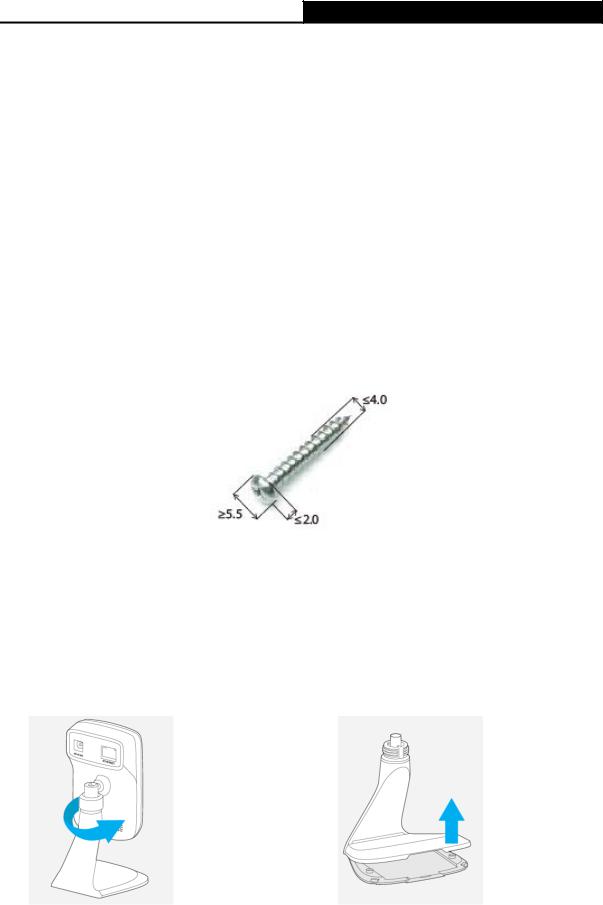
2.4.1 The Screw Size
2.4.2 Mount the Camera
Note:
If you use the camera wirelessly, mount the camera within the coverage of your wireless network.
1. Unscrew the camera head. |
2. Remove the base cover. |
5
NC220 Day/Night Cloud Camera, 300Mbps Wi-Fi
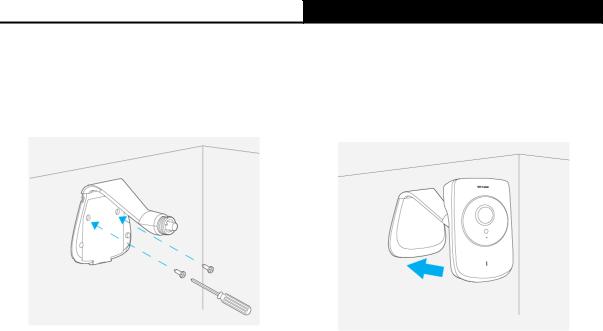
3. Drill two mounting holes and fix the |
4. Put the base cover and camera head back. |
mounting base. |
|
6
NC220 Day/Night Cloud Camera, 300Mbps Wi-Fi
Chapter 3 Managing the Camera
The camera’s built-in web management page is designed to allow you to easily access and configure your camera.
3.1Login
1.Find the management IP address of the camera via one of the following methods:
Run the Setup Wizard. The IP address is displayed on the Select a camera screen.
Find the IP address on the DHCP setting page of the front device such as a router.
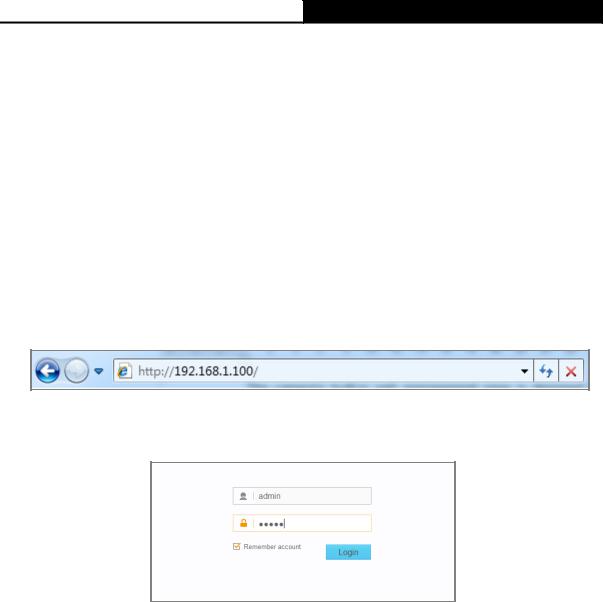
2.Open a Web browser, type in the management IP address in the address field, and press
Enter.
3.Enter the default username and password (admin/admin). Click Login to start the main menu.
Note:
For the administrator, the default password is “admin”. We recommend that you change it in the Account menu. (Go to “System → Account”)
If you log in to the camera as an administrator, you can perform all the settings provided by the camera.
If you log in to the camera as a common user, you can only view the Live View. After logging as administrator, you can add up to five user accounts in the Account menu. (Go to “System → Account”)
7

NC220 Day/Night Cloud Camera, 300Mbps Wi-Fi
4.Click Download to download and install the required plugin.
Note:
If the installed plugin doesn't work, set your browser security settings to allow plugins. Here we take the settings for IE browser as an example. Go to "Tools→Internet Options→Security". Click "Internet→Custom Level", find the item "Download signed ActiveX controls" and check Prompt. Click "Local Intranet→Custom Level", find the item "Download signed ActiveX controls" and check Prompt.
5.After the plugin is successfully installed, refresh the webpage to display the monitor video.
3.2Live View
The Live View screen shows you the live video feed from your camera. On this screen, you can capture a picture, record a video, change the resolution and so on.
8
Loading...