


 Loading...
1910100170 REV1.0.1
Contents
About this guide. . . . . . . . . . . . . . . . . . . . . . . . . . . . . . . . . . . . . . . . . . . . . . . . . . . . . . . i
Chapter 1. Get started . . . . . . . . . . . . . . . . . . . . . . . . . . . . . . . . . . . . . . . . . . . . . . . 1
1. 1 Overview. . . . . . . . . . . . . . . . . . . . . . . . . . . . . . . . . . . . . . . . . . . . . . . . . . . . . . . . . . . . . . . . . . . . .1 1. 2 Key functions . . . . . . . . . . . . . . . . . . . . . . . . . . . . . . . . . . . . . . . . . . . . . . . . . . . . . . . . . . . . . . . .2 1. 3 Assemble your device. . . . . . . . . . . . . . . . . . . . . . . . . . . . . . . . . . . . . . . . . . . . . . . . . . . . . . . .3 1. 4 Power on/off your phone . . . . . . . . . . . . . . . . . . . . . . . . . . . . . . . . . . . . . . . . . . . . . . . . . . . . .4 1. 5 Unlock/lock the keys . . . . . . . . . . . . . . . . . . . . . . . . . . . . . . . . . . . . . . . . . . . . . . . . . . . . . . . . .4 1. 6 Charge your phone. . . . . . . . . . . . . . . . . . . . . . . . . . . . . . . . . . . . . . . . . . . . . . . . . . . . . . . . . . .4
Chapter 2. Basics. . . . . . . . . . . . . . . . . . . . . . . . . . . . . . . . . . . . . . . . . . . . . . . . . . . . 5
2. 1 Interface icons . . . . . . . . . . . . . . . . . . . . . . . . . . . . . . . . . . . . . . . . . . . . . . . . . . . . . . . . . . . . . . .5
2. 2 Type text. . . . . . . . . . . . . . . . . . . . . . . . . . . . . . . . . . . . . . . . . . . . . . . . . . . . . . . . . . . . . . . . . . . . .6
2. 3 Turn the torch on/off . . . . . . . . . . . . . . . . . . . . . . . . . . . . . . . . . . . . . . . . . . . . . . . . . . . . . . . . .6
2. 4 Adjust ringtone and volume . . . . . . . . . . . . . . . . . . . . . . . . . . . . . . . . . . . . . . . . . . . . . . . . . .6
2. 5 Copy content between your phone and computer . . . . . . . . . . . . . . . . . . . . . . . . . . . .7
Chapter 3. Calls and Contacts . . . . . . . . . . . . . . . . . . . . . . . . . . . . . . . . . . . . . . . 8
3. 1 Make and answer a call. . . . . . . . . . . . . . . . . . . . . . . . . . . . . . . . . . . . . . . . . . . . . . . . . . . . . . .8
3. 2 Call logs. . . . . . . . . . . . . . . . . . . . . . . . . . . . . . . . . . . . . . . . . . . . . . . . . . . . . . . . . . . . . . . . . . . . . .9
3. 3 Contacts. . . . . . . . . . . . . . . . . . . . . . . . . . . . . . . . . . . . . . . . . . . . . . . . . . . . . . . . . . . . . . . . . . . . .9
Chapter 4. Messages . . . . . . . . . . . . . . . . . . . . . . . . . . . . . . . . . . . . . . . . . . . . . . . 11
4. 1 Send messages. . . . . . . . . . . . . . . . . . . . . . . . . . . . . . . . . . . . . . . . . . . . . . . . . . . . . . . . . . . . 11
4. 2 Receive and reply to messages. . . . . . . . . . . . . . . . . . . . . . . . . . . . . . . . . . . . . . . . . . . . . 11
4. 3 Delete messages . . . . . . . . . . . . . . . . . . . . . . . . . . . . . . . . . . . . . . . . . . . . . . . . . . . . . . . . . . . 12
Chapter 5. FM radio. . . . . . . . . . . . . . . . . . . . . . . . . . . . . . . . . . . . . . . . . . . . . . . . . 13
5. 1 Listen to radio. . . . . . . . . . . . . . . . . . . . . . . . . . . . . . . . . . . . . . . . . . . . . . . . . . . . . . . . . . . . . . 13 5. 2 Save radio stations. . . . . . . . . . . . . . . . . . . . . . . . . . . . . . . . . . . . . . . . . . . . . . . . . . . . . . . . . 13 5. 3 Manage channel list . . . . . . . . . . . . . . . . . . . . . . . . . . . . . . . . . . . . . . . . . . . . . . . . . . . . . . . . 13
Chapter 6. Alarm . . . . . . . . . . . . . . . . . . . . . . . . . . . . . . . . . . . . . . . . . . . . . . . . . . . 14
6. 1 Edit an alarm . . . . . . . . . . . . . . . . . . . . . . . . . . . . . . . . . . . . . . . . . . . . . . . . . . . . . . . . . . . . . . . 14
6. 2 Enable or disable an alarm. . . . . . . . . . . . . . . . . . . . . . . . . . . . . . . . . . . . . . . . . . . . . . . . . . 14
Chapter 7. Calendar . . . . . . . . . . . . . . . . . . . . . . . . . . . . . . . . . . . . . . . . . . . . . . . . 15
7. 1 View the calendar . . . . . . . . . . . . . . . . . . . . . . . . . . . . . . . . . . . . . . . . . . . . . . . . . . . . . . . . . . 15
7. 2 Add new schedules . . . . . . . . . . . . . . . . . . . . . . . . . . . . . . . . . . . . . . . . . . . . . . . . . . . . . . . . 15
7. 3 Edit schedules . . . . . . . . . . . . . . . . . . . . . . . . . . . . . . . . . . . . . . . . . . . . . . . . . . . . . . . . . . . . . 15
7. 4 Delete schedules. . . . . . . . . . . . . . . . . . . . . . . . . . . . . . . . . . . . . . . . . . . . . . . . . . . . . . . . . . . 15
Chapter 8. Calculator . . . . . . . . . . . . . . . . . . . . . . . . . . . . . . . . . . . . . . . . . . . . . . . 16
8. 1 Use the calculator. . . . . . . . . . . . . . . . . . . . . . . . . . . . . . . . . . . . . . . . . . . . . . . . . . . . . . . . . . 16
8. 2 Repeat an operation. . . . . . . . . . . . . . . . . . . . . . . . . . . . . . . . . . . . . . . . . . . . . . . . . . . . . . . . 16
Chapter 9. Camera. . . . . . . . . . . . . . . . . . . . . . . . . . . . . . . . . . . . . . . . . . . . . . . . . . 17
9. 1 Take photos. . . . . . . . . . . . . . . . . . . . . . . . . . . . . . . . . . . . . . . . . . . . . . . . . . . . . . . . . . . . . . . . 17 9. 2 View and delete captured photos. . . . . . . . . . . . . . . . . . . . . . . . . . . . . . . . . . . . . . . . . . . 17 9. 3 Record videos. . . . . . . . . . . . . . . . . . . . . . . . . . . . . . . . . . . . . . . . . . . . . . . . . . . . . . . . . . . . . . 17 9. 4 View and delete recorded videos . . . . . . . . . . . . . . . . . . . . . . . . . . . . . . . . . . . . . . . . . . . 17
Chapter 10.Media and Games . . . . . . . . . . . . . . . . . . . . . . . . . . . . . . . . . . . . . . . 19
10. 1 View and delete photos . . . . . . . . . . . . . . . . . . . . . . . . . . . . . . . . . . . . . . . . . . . . . . . . . . . . 19 10. 2 Record videos. . . . . . . . . . . . . . . . . . . . . . . . . . . . . . . . . . . . . . . . . . . . . . . . . . . . . . . . . . . . . . 19 10. 3 Play music . . . . . . . . . . . . . . . . . . . . . . . . . . . . . . . . . . . . . . . . . . . . . . . . . . . . . . . . . . . . . . . . . 19 10. 4 Play videos. . . . . . . . . . . . . . . . . . . . . . . . . . . . . . . . . . . . . . . . . . . . . . . . . . . . . . . . . . . . . . . . . 19 10. 5 Manage files . . . . . . . . . . . . . . . . . . . . . . . . . . . . . . . . . . . . . . . . . . . . . . . . . . . . . . . . . . . . . . . 20 10. 6 Play games. . . . . . . . . . . . . . . . . . . . . . . . . . . . . . . . . . . . . . . . . . . . . . . . . . . . . . . . . . . . . . . . . 20
Chapter 11.Settings . . . . . . . . . . . . . . . . . . . . . . . . . . . . . . . . . . . . . . . . . . . . . . . . . 21
11. 1 Configure dual-SIM settings. . . . . . . . . . . . . . . . . . . . . . . . . . . . . . . . . . . . . . . . . . . . . . . . 21
11. 2 Set time and date . . . . . . . . . . . . . . . . . . . . . . . . . . . . . . . . . . . . . . . . . . . . . . . . . . . . . . . . . . 21
11. 3 Set system languages. . . . . . . . . . . . . . . . . . . . . . . . . . . . . . . . . . . . . . . . . . . . . . . . . . . . . . 21
11. 4 Set shortcut keys . . . . . . . . . . . . . . . . . . . . . . . . . . . . . . . . . . . . . . . . . . . . . . . . . . . . . . . . . . 21
11. 5 Restore factory settings. . . . . . . . . . . . . . . . . . . . . . . . . . . . . . . . . . . . . . . . . . . . . . . . . . . . 21
11. 6 Adjust brightness . . . . . . . . . . . . . . . . . . . . . . . . . . . . . . . . . . . . . . . . . . . . . . . . . . . . . . . . . . 22
11. 7 Set display backlight duration . . . . . . . . . . . . . . . . . . . . . . . . . . . . . . . . . . . . . . . . . . . . . . 22
11. 8 Set auto keypad lock . . . . . . . . . . . . . . . . . . . . . . . . . . . . . . . . . . . . . . . . . . . . . . . . . . . . . . . 22
11. 9 Improve security . . . . . . . . . . . . . . . . . . . . . . . . . . . . . . . . . . . . . . . . . . . . . . . . . . . . . . . . . . . 22
11. 10 About phone. . . . . . . . . . . . . . . . . . . . . . . . . . . . . . . . . . . . . . . . . . . . . . . . . . . . . . . . . . . . . . . 23
Appendix A: Specifications . . . . . . . . . . . . . . . . . . . . . . . . . . . . . . . . . . . . . . . . . . 24
Appendix B: Technical Support . . . . . . . . . . . . . . . . . . . . . . . . . . . . . . . . . . . . . . 25
Appendix C: Explanation of the symbols on the product label . . . . . . . . 31
Appendix D: Authentication . . . . . . . . . . . . . . . . . . . . . . . . . . . . . . . . . . . . . . . . . 32

About this guide
This guide is a complement to Quick Start Guide. The Quick Start Guide provides instructions for quick setup, while this user guide provides more details for you to configure your phone appropriate to your needs.
When using this guide, please notice that features of the device may vary slightly depending on the model and software version you have. All images, parameters and descriptions documented in this guide are used for demonstration only.
Conventions
In this guide, the following conventions are used:
Convention Description
Phone |
Stands for Neffos N105 without any explanation. |
|
Underlined |
Italic and underlined words or phrases are hyperlinks. You can click to redirect to a |
|
specific section for more details. |
||
|
The menu structure which shows the path to enter the corresponding page. For example,
>Menu > Messages means the Messages function page is under the Menu.
Note: |
Highlights important information and tips, and provides additional information. |
Caution: |
Indicates potential problems that may arise if proper care or attention is not given. |
1 |
Get started |
Get started with the basics and have your phone set up.
•Overview
•Key functions
•Assemble your device
•Power on/off your phone
•Unlock/lock the keys
•Charge your phone
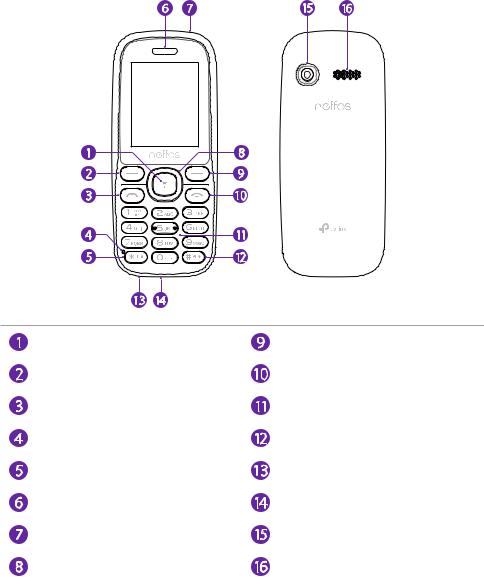
1. 1 Overview
OK key |
|
Right key |
Left key |
|
End call/Power key |
Call key |
|
Key pad |
Microphone |
|
# key |
* key |
|
Headphone jack |
Earpiece |
|
Charging/Data port |
Torch |
|
Camera |
Up/Down/Left/Right |
navigation |
Speaker |
key |
|
|
|
|
Chapter 1 . Get started |
1 |

1. 2 Key functions
Explore the keys and parts of your new phone.
Key |
|
|
Function Description |
|
|
|
• Select the current option. |
OK key |
|
|
• On the Home screen, press and hold it to turn on/off the |
|
|
torch. |
|
|
|
|
• On the Home screen, press it to enter Menu. |
|
|
|
• Scroll the cursor up/down/left/right. |
|
|
|
• On the Home screen, press the Up navigation key to |
|
|
> |
enter Calendar. |
|
|
Up |
• On the Home screen, press the Down navigation key to |
Navigation key |
|
|
|
Left< |
>Right |
enter Camera. |
> Down
•On the Home screen, press the Left navigation key to to write message.
|
• On the Home screen, press the Right navigation key to |
|
enter Contacts. |
Left key |
• On the Home screen, press it to enter Menu. |
• Select the options in the bottom left corner. |
|
Right key |
• On the Home screen, press it to enter Contacts. |
• Select the options in the bottom right corner. |
|
Call key |
• Make or answer a call. |
• On the Home screen, press the Call key to enter Calllogs. |
|
|
• End an active call or reject a call. |
End call/Power key |
• Press and hold it to power on/off the phone. |
•Exit from any interface to the Home screen.
•Input numbers or characters.
Key pad |
• Press and hold the appropriate number key to make a |
|
speed dial call. For how to set the speed dial, see Set a |
|
speed dial. |
* key |
• Input characters while editing text. |
• Input * or + in the dialer. |
|
|
• Input # in the dialer. |
#key • Select text mode while editing text.
•On the Home screen, press and hold it to switch between normal/silent/vibrate mode.
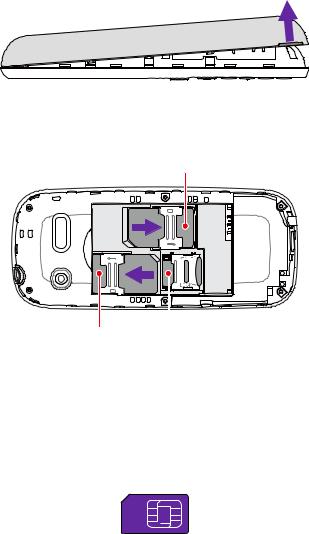
1.3 Assemble your device
Remove the back cover
Switch the device off and disconnect the charger and any other device before removing any covers. Hold your phone face down, put a fingernail in the bottom corner hole in the cover and pry the back cover off.
Chapter 1 . Get started |
2 |
 Caution: Do not bend or twist the back cover excessively in case you damage the phone.
Insert cards
SIM 1
SIM 2 |
mircoSD |
•Insert the SIM cards
Carefully slide the Normal SIM cards into the card slots with the gold contacts facing down. Your phone supports two Normal SIM cards. You can use one or two SIM cards by putting them in the corresponding card slots.
 Caution:
1.This device is designed to be used with one or two Normal SIM cards. Using incompatible SIM cards may damage the card or the device, and may corrupt data stored on the card.
2.If the card is not inserted correctly, the phone will not detect it.
3.Your phone supports only dual card dual standby single pass, which means you cannot use both SIM cards for calls or data services simultaneously.
•Insert the microSD card
1. Slide the clip up and lift the clip to open it.
2. Insert the microSD card into the slot with the gold contacts facing down. 3. Lower the clip and slide it down to lock the clip.
Insert the battery
Insert the battery into the opening on the back of the phone, aligning the gold contacts on the battery with the gold contacts in your phone. Then gently press down to secure the battery.
Replace the back cover
Align the cover and press all the way around the cover’s edges, making sure it snaps into place.
1. 4 Power on/off your phone
Press and hold the Power key to turn on or turn off your phone.
 Note: If your phone does not respond after holding down the Power button for about 10 seconds, the
Chapter 1 . Get started |
3 |
battery may be empty. Connect your phone to a charger to charge the battery.
1. 5 Unlock/lock the keys
•Unlock the keys: Press any key to wake the screen up; press the Left key and then press the * key.
•Lock the keys: On the Home screen, press the Left key and then press the * key.
1. 6 Charge your phone
Your phone displays a low battery warning when the battery is nearly empty, and your phone will turn off automatically when the battery is nearly empty. Charge your phone immediately to prevent it from switching off automatically.
 Caution:
1.When charging your phone, only use genuine Neffos batteries and chargers. Third-party accessories are a potential safety hazard and may impair your phone’s performance.
2.Avoid using your phone when it is charging. Do not cover your phone or the power adapter.
3.It is entirely normal that your phone may become warm after prolonged use or when exposed to high ambient temperatures. If your phone becomes hot to touch, stop charging it and disable unnecessary features. Place your phone in a cool location and allow it to cool down to room temperature. Avoid prolonged contact with the surface of your phone if it becomes hot.
Use the charger to charge your device
Connect your phone to a mains socket using the charger that came with your phone.
Use a USB port to charge your device
Charge your device by connecting it to a computer with a USB cable, and select Charging.
Chapter 1 . Get started |
4 |
2 Basics
Learn how to get the most out of your new phone.
•Interface icons
•Type text
•Turn the torch on/off
•Adjust ringtone and volume
•Copy content between your phone and computer
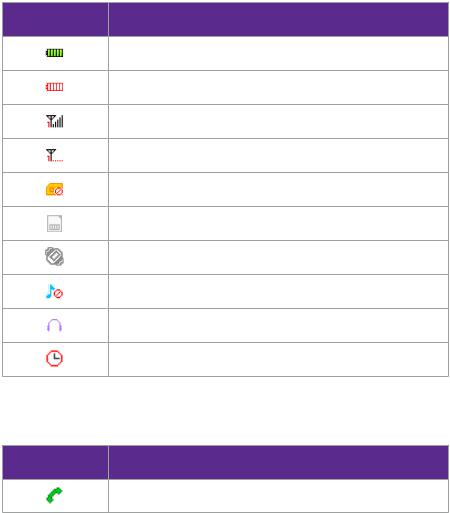
2. 1 Interface icons
Learn the interface icons, include status icons and notification icons.
Status icons
Status icons tell you about your phone’s status, including battery, signal strength, SIM cards and more.
Status icons |
Indications |
Battery full
Battery low
Signal strength
No signal
No SIM card installed
MicroSD card installed
Vibrate mode enabled
Silent mode enabled
Headset inserted
Alarms enabled
Notification icons
Notification icons will be displayed when you missed calls or received new messages.
N o t i f i c a t i o n s |
Indications |
|
icons |
||
|
Missed calls
Chapter 2 . Basics |
7 |
New messages
2. 2 Type text
Change input language
On the input screen, press the # key. Select Input language, and choose the input language you need.
Change input mode
On the input screen, press the # key. Select the input mode you need.
 Note: Under some input language, you should press and hold the # key to open the input mode list.
Input words/letters/numbers
•In the abc/Abc/ABC mode: Press the corresponding keys repeatedly until the desired letter or number appears.
•In the En/en/EN mode: Press the keys to key in words. When typing, press the Down/Up/Left/ Right navigation key to find matching words shown in the dictionary and pressing the OK key or the Left key to select the word you need.
•In the 123 mode: Press the number key once to enter the number.
Input symbols
You can input symbols in following ways:
•Press the * keys and choose the symbol you need.
•In the En/en/EN mode, press the 1 key and choose the symbol you need.
•In the abc/Abc/ABC mode, press the 1 key till the symbol (common symbols) appears.
Input space
Press the 0 key, except in the 123 mode.
Erase characters
Press the Right key.
2. 3 Turn the torch on/off
You can turn the torch on or off in following ways:
•On the Home screen, press and hold the OK key to turn the torch on or off.
•On the Home screen, select Menu > Extras > Torch and select On or Off.
2. 4 Adjust ringtone and volume
1.On the Home screen, select Menu > Settings > Profiles and find your profile.
2.Select Options > Settings. You can rename the profile, set the ringtone and volume of call and message, choose the ring type and customize other alert rings.
Chapter 2 . Basics |
8 |
2. 5 Copy content between your phone and computer
1.Insert a memory card into your phone.
2.Connect your phone to a compatible computer with a compatible USB cable.
3.Select Mass storage on the pop-up prompt.
4.On your computer, open a file manager, such as Windows Explorer, and browse to your phone. You can see the content stored on the memory card.
5.Drag and drop items between your phone and computer.
 Note: Apps and games installed on the phone memory card can not be used normally in this connecting type. Media and Camera also can not be used normally.
Chapter 2 . Basics |
9 |
3 |
Calls and Contacts |
Make calls with your phone to contact one quickly.
•Make and answer a call
•Call logs
•Contacts
3. 1 Make and answer a call
Make a call from dialer
1.Type in the phone number.
2.Press the Call key. If asked, select which SIM card to use to call.
3.To end the call, press the End call key.
Dial a recent number from the Call logs
1.On the Home screen, press the Call key or select Menu > Call logs to enter Call logs.
2.Press the Left/Right navigation key to switch between Missed, Dialed, Received and Rejected call list.
3.Choose a number or contact and press the Call key. If asked, select which SIM card to use to call.
4.To end the call, press the End call key.
Dial from Contact list
1.On the Home screen, select Contacts.
2.Choose the contact you want to call and press the Call key. If asked, select which SIM card to use to call.
3.To end the call, press the End call key.
Make an international call
1.Press the * key twice to enter + symbol.
2.Type in the country code, area code, and phone number.
3.Press the Call key. If asked, select which SIM card to use to call.
4.To end the call, press the End call key.
Make an emergency call
On the Locked screen, enter the emergency number for your location directly and select SOS.
 Note:
Note:
1.You must be in an area with cellular coverage, when you have to make an emergency call.
2.The ability to make emergency calls depends on local regulations and carriers in your area.
3.Poor network coverage or environmental interference may prevent your call from being connected. Never rely solely on your device for essential communication during emergencies.
Answer or reject a call
•Press the Call key to answer the call.
Chapter 3 . Calls and Contacts |
10 |
•Press the End key to reject the call.
3. 2 Call logs
View recent calls
1.On the Home screen, press the Call key or select Menu > Call logs to enter Call logs.
2.Press the Left/Right navigation key to switch between Missed, Dialed, Received and Rejected call list.
3.Select one to view the call details.
Send a message from the call logs
1.On the Home screen, press the Call key or select Menu > Call logs to enter Call logs.
2.Press the Left/Right navigation key to switch between Missed, Dialed, Received and Rejected call list.
3.Choose a number or contact and select Options > Create SMS.
4.After writing, press the OK key to send. If asked, select which SIM card to use to send the message.
Delete call logs
1.On the Home screen, press the Call key or select Menu > Call logs to enter Call logs.
2.Press the Left/Right navigation key to switch between Missed, Dialed, Received and Rejected call list.
3.Choose a number or contact and select Options > Delete.
3. 3 Contacts
View contacts
1.On the Home screen, select Contacts.
2.Press the Left/Right navigation key to switch between All contacts and Group contacts.
Add a contact
You can create a new contact or add a number to a contact in following ways:
•Add a contact directly
1. On the Home screen, enter the phone number you want to save.
2. Select Options > Add to contacts.
3. Select Add to new contact to save the number as a new contact, and select the storage location you want to store the contact to. Or select Addtoexistcontactto add the number to an existing contact.
4. Configure the contact information and select Save.
•Add a contact in Contacts
1. On the Home screen, select Contacts > Options.
2. Select New and the select the storage location you want to store the contact to. 3. Configure the contact information and select Save.
•Save a recent call to your contact list
Chapter 3 . Calls and Contacts |
11 |
Loading...