


EXPRESS ANTI-CALC

F
NL
D
GB
I
E
P
DK
S
FIN
N
GR
TR
PL
CZ
SK
H
RUS
UA
HR
RO
SLO
EST
LT
LV
EXPRESS ANTI-CALC
EXPRESS TURBO
ANTI-CALC
www.tefal.com

1*
10*
19c
19a
19e
19d
18
19
19b
2
3
4
5
6
7
8
9
11
12
13
14
15
16
17
1/4
1/4
fig. 1 fig. 2
fig. 3
fig. 7fig. 6
fig. 5
fig. 13
fig. 10
fig. 14
fig. 11
fig. 15
fig. 19fig. 18fig. 17
fig. 9
fig. 4
fig. 8
fig. 12
fig. 16
fig. 20

19
F
NL
D
GB
I
E
P
DK
S
FIN
N
GR
TR
PL
CZ
SK
H
RUS
UA
HR
RO
SLO
EST
LT
LV
Important recommendations
Safety instructions
• Please read these instructions carefully before first use. This product has been designed for domestic use only. Any commercial use,
inappropriateuseorfailuretocomplywiththeinstructions,themanufactureracceptsnoresponsibilityandtheguaranteewillnotapply.
• For your safety, this appliance conforms to the applicable standards and regulations (Low Voltage, Electomagnetic Compatibility,
EnvironmentalDirectives, asapplicable...).
• Yoursteamgenerator is an electrical appliance: it must be used in normal conditions of use. It is only designed for domestic use.
• Your generator is fitted with2 safety systems:
- a pressure releasevalve which,in theeventof a malfunction, releases any excess steam;
- a thermalfuse topreventtheappliance from overheating.
• Always plug in your steam generator:
- anelectricalinstallationwithvoltagebetween 220Vand 240V.
- anearthed socket.
Connectingto thewrong voltage may cause irreparable damage totheappliance and will invalidate yourguarantee.
Ifyou are using a mainsextension lead, ensure thatit is correctly rated (10A) with anearth,andisfullyextended.
• Completely unwind the power cord from its storage spacebefore connectingto an earthed socket.
• Iftheelectricpowercordortheiron-unitisdamaged,itmustbereplacedbyanApprovedServiceCentreinordertopreventanydanger.
• Do notunplugthe applianceby pullingon thecord.
Always unplugyour appliance:
- before filling the watertank orrinsing thecollector,
- before cleaning yourgenerator,
- after each use.
• Theappliance mustbe used and placedon a flat,stable,heat-resistantsurface.When you placetheironon the ironrest, make sure
thatthe surface on which you place itis stable.
• Thisapplianceis not intended for use by persons (including children) with reducedphysical, sensoryor mentalcapabilities, orlack of
experience and knowledge, unless they have been given supervision or instruction concerning use of the appliance by a person
responsiblefor their safety.
• Childrenshould be supervised to ensure that they do not playwiththe appliance.
• Never leavethe appliance unattended :
- when itis connected to the mains,
- untilit hascooled down (around1 hour).
• The soleplate and generator iron-restcanbecome very hot and cause burns: nevertouch these parts.
Never touch theelectriccords withthe soleplate of the iron.
• Your appliance gives offsteamwhichcancauseburns.Handleyouriron carefully,particularly when using the vertical steamfunction.
Never direct the steam towards personsor animals.
• Always wait before rinsing the collector until thesteam generatorhas cooleddown and has been unpluggedfor at least 2 hours
before unscrewing the collector.
• While rinsingout the boiler, never fillit directly under the tap.
• If youloseor damage the boiler rinse cap, have itreplacedby anapproved Service Centre.
• Do not immerse your steam generator in water or any other liquid. Donot rinse it under a running tap.
• The appliance must not be used if it has fallen to the floor, shows evidence of damage, leaks or fails to function correctly. Never
dismantleyourappliance. To avoid anydanger, have itinspected inan approved service centre.
• This appliance has been designed for domestic use only. Any commercial use, inappropriate use or failure to comply with the
instructions,themanufacturer accepts no responsibilityand the guarantee willnot apply.
1. Comfort handle (depending on model)
2. Steam control button
3. Irontemperature adjustmentbutton
4. Ironthermostatlight
5. Easycord system
6. Ironrest
7. Illuminated on / off switch
8. Powercord storage space
9. Power cord
10.Turbo button (depending on model)
11.Lock-System hoop
12. Water tank filler cover
13. Water tank
14. Steam generator boiler (in the base unit)
15. Iron-basesteam cord
16. Slide storage place for thesteam cord
17. Scale collector cover
18.Scalecollector
19. Control panel
a - Restart button
b - “Water tank empty” light
c - “Steam ready” light
d - “Anti-calc” indicator
e - Steam output control dial
Description
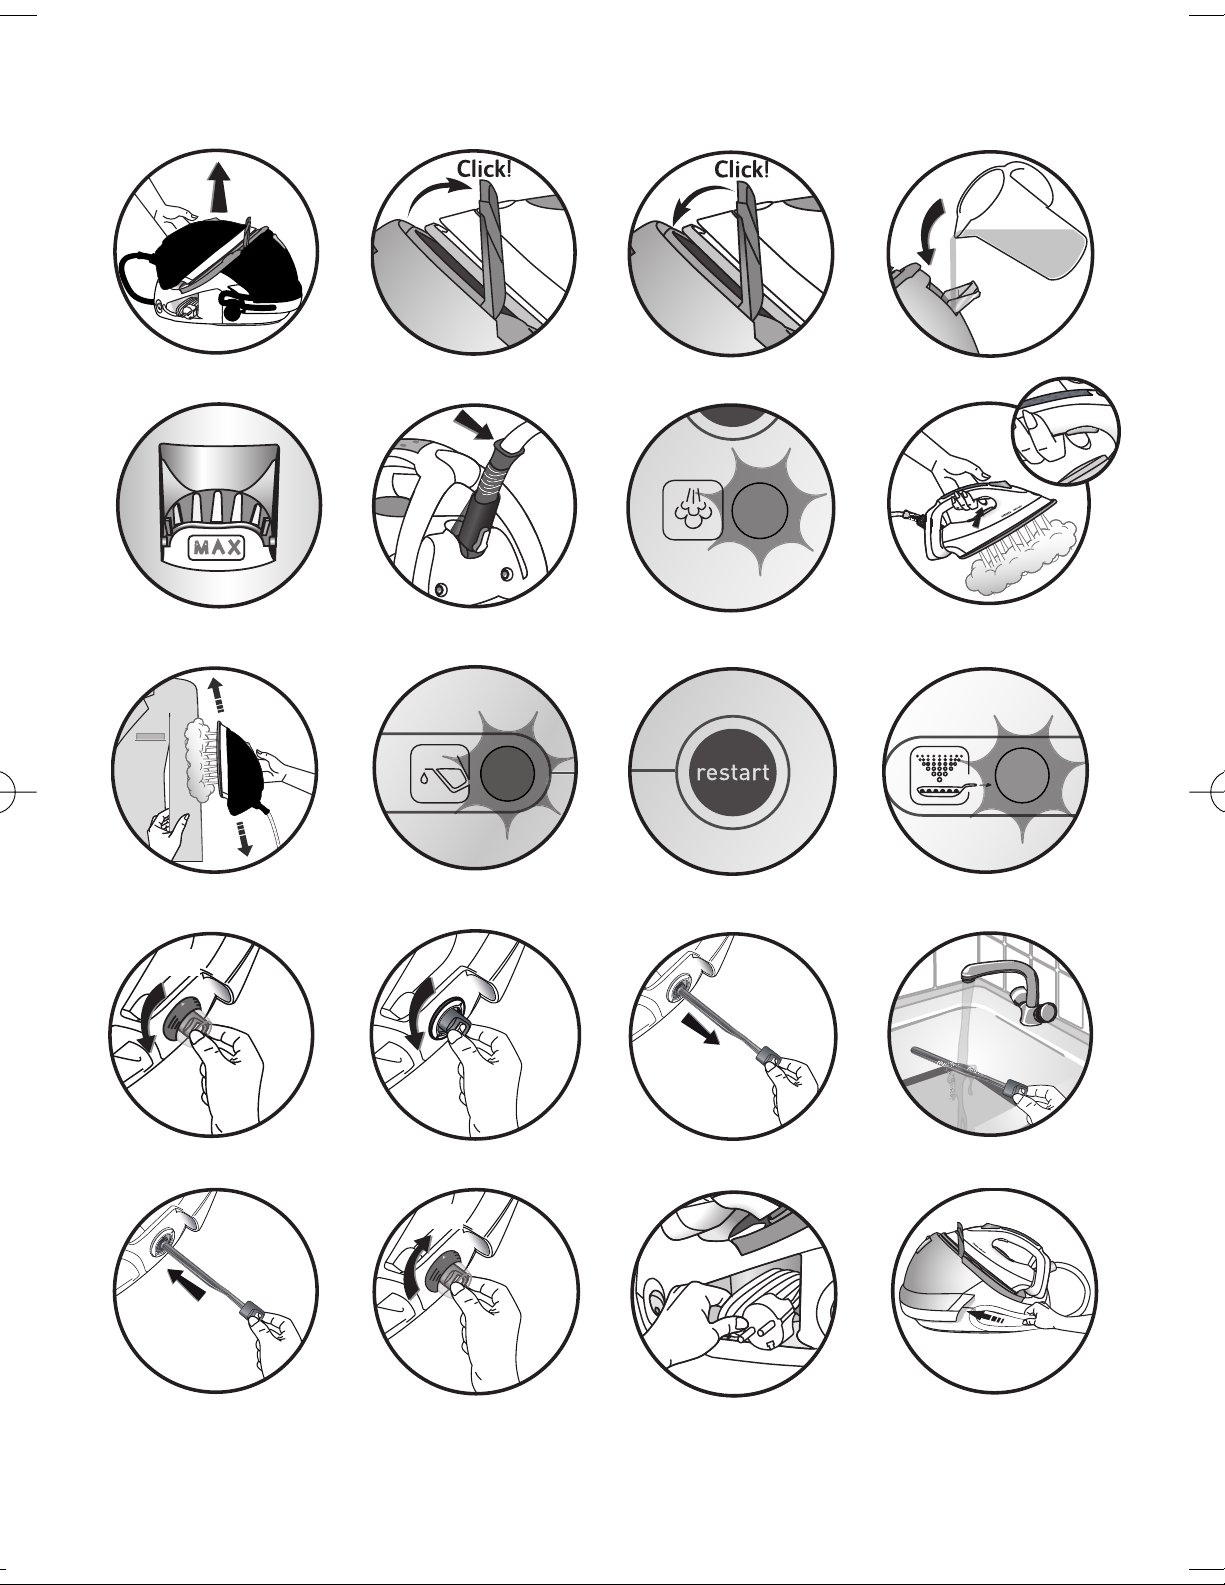
Locking system for retaining the iron on the base - Lock-system
Your steamgeneratorisfitted witha ring toholdthe iron onto thebase with a locked position for
easy transport and storage - fig.1:
• Locking - fig.2
• Unlocking - fig.3

20
To transport your steam generator using thehandle of the iron :
- place the iron inpositionon thehousingplate onthe steamgeneratorand fold theringoverthe
iron until it locks intoposition(you will heara “click”) - fig.2.
- Holdthe ironby the handle to transport your steam generator - fig.1.
What water may be used ?
• Your iron has been designed to operate using untreated tap water.
• Heat concentrates the elements contained in water during evaporation. The types of water
listedbelowcontainorganicwaste or mineral elements that cancause spitting,brownstaining
or premature wear of the appliance: water from clothes dryers, scented or softened water,
water from refrigerators, batteries or air conditioners, pure distilled or demineralised water or
rain water should not be used in youriron. Also do not use boiled, filtered or bottled water.
Ifyourwater is very hard (check
with your local water authority)
itis possibleto mixuntreated
tap water with store-bought
distilled ordemineralised water
inthefollowing proportions:
50% untreatedtap water,50%
distilled ordemineralised water.
Preparation
Filling the water tank
• Place the steam generator on a stable, horizontal and heat-resistant surface.
• Ensure that your steam generator is unplugged and that the soleplate and the iron rest have
cooled down.
• Openthe water tank filler cover - fig.4.
• Pour in untreated tap water up to the max mark - fig.5.
• Close the water tankfiller cover.
• Your iron is equipped with an extension cord system to prevent the cord from dragging over
thelaundry andcreasingitagainwhen ironing.
• Take thesteam cord out of its housing and unwind itcompletely.
• Remove the tie to release the cord outlet.
• Press the Eject button - fig.6and the Easycord system extends automatically.
• When the cord outlet tips, the Easycord system extends automatically without you having to
press theEjectbutton.
Using the Easycord system
Operating the control panel
• Green light flashes: the boiler heats up. - fig.7.
• Green light on: the steam is ready - fig.7.
• Red light “water tank” on:the water tank is empty - fig.10.
• The orange “anti-calc” indicator flashes - fig.12: you need to rinse the scale collector.
Switch on the steam generator
• Completely unwind the power cord and thesteam cord from its storage space.
• Lowerthe retaining hoop (depending on model) to unlock the safety catch - fig.3.
• Plug your steamgenerator into a mains socket with an earth pin”.
• Press on the on / off switch. The green light (located on the control panel) flashes and the
boiler heatsup- fig.7.
When the green “steam ready” light stops flashing (after 2 minutes approximately), the
appliance isready.
The first time the appliance is
used, there may be some
fumes and smell but this is
not harmful. They will not
affect use and will disappear
rapidly.
Steam ironing
• Placetheiron'stemperaturecontrolslideaccording tothetype offabrictobeironed (seetablebelow).
• The thermostat light comes on. Be careful ! The steam generator is ready when the thermostat
light goes out andwhen thegreen “steam ready”lightstays on.
• Adjust the steamoutput controldial (located on the controlpanel).
• While ironing, the light on top of the iron and the steam ready light turn on and off, as the
temperature adjusts without interrupting ironing.
• To obtain steam, press on the steam control button under the iron handle and keep it pressed -
fig.8. The steam will stop whenyou releasethe button.
• When starting, and regularly while it is being used, your steam generator's electric pump injects
water intothe boiler. It makes a noise but this isquitenormal. You mayalso hear a clicking noise
which is thesteam valve opening. Again this is normal.
• Always spray starch onto the reverse side of the fabricto be ironed.
Use
Do not place the iron on a
metal support.When
taking a break from
ironing, always place
the iron on the iron rest
plate of the unit. It is
equipped with non-slip
pads and has been
designed to withstand
high temperatures.
Always use the Easycord
system for enhanced
comfort of use.
Ironing Boards:
Due to the powerful steam
output, a mesh type ironing
board must be used to allow
any excess steam to escape
and to avoid steam venting.
21
F
NL
D
GB
I
E
P
DK
S
FIN
N
GR
TR
PL
CZ
SK
H
RUS
UA
HR
RO
SLO
EST
LT
LV
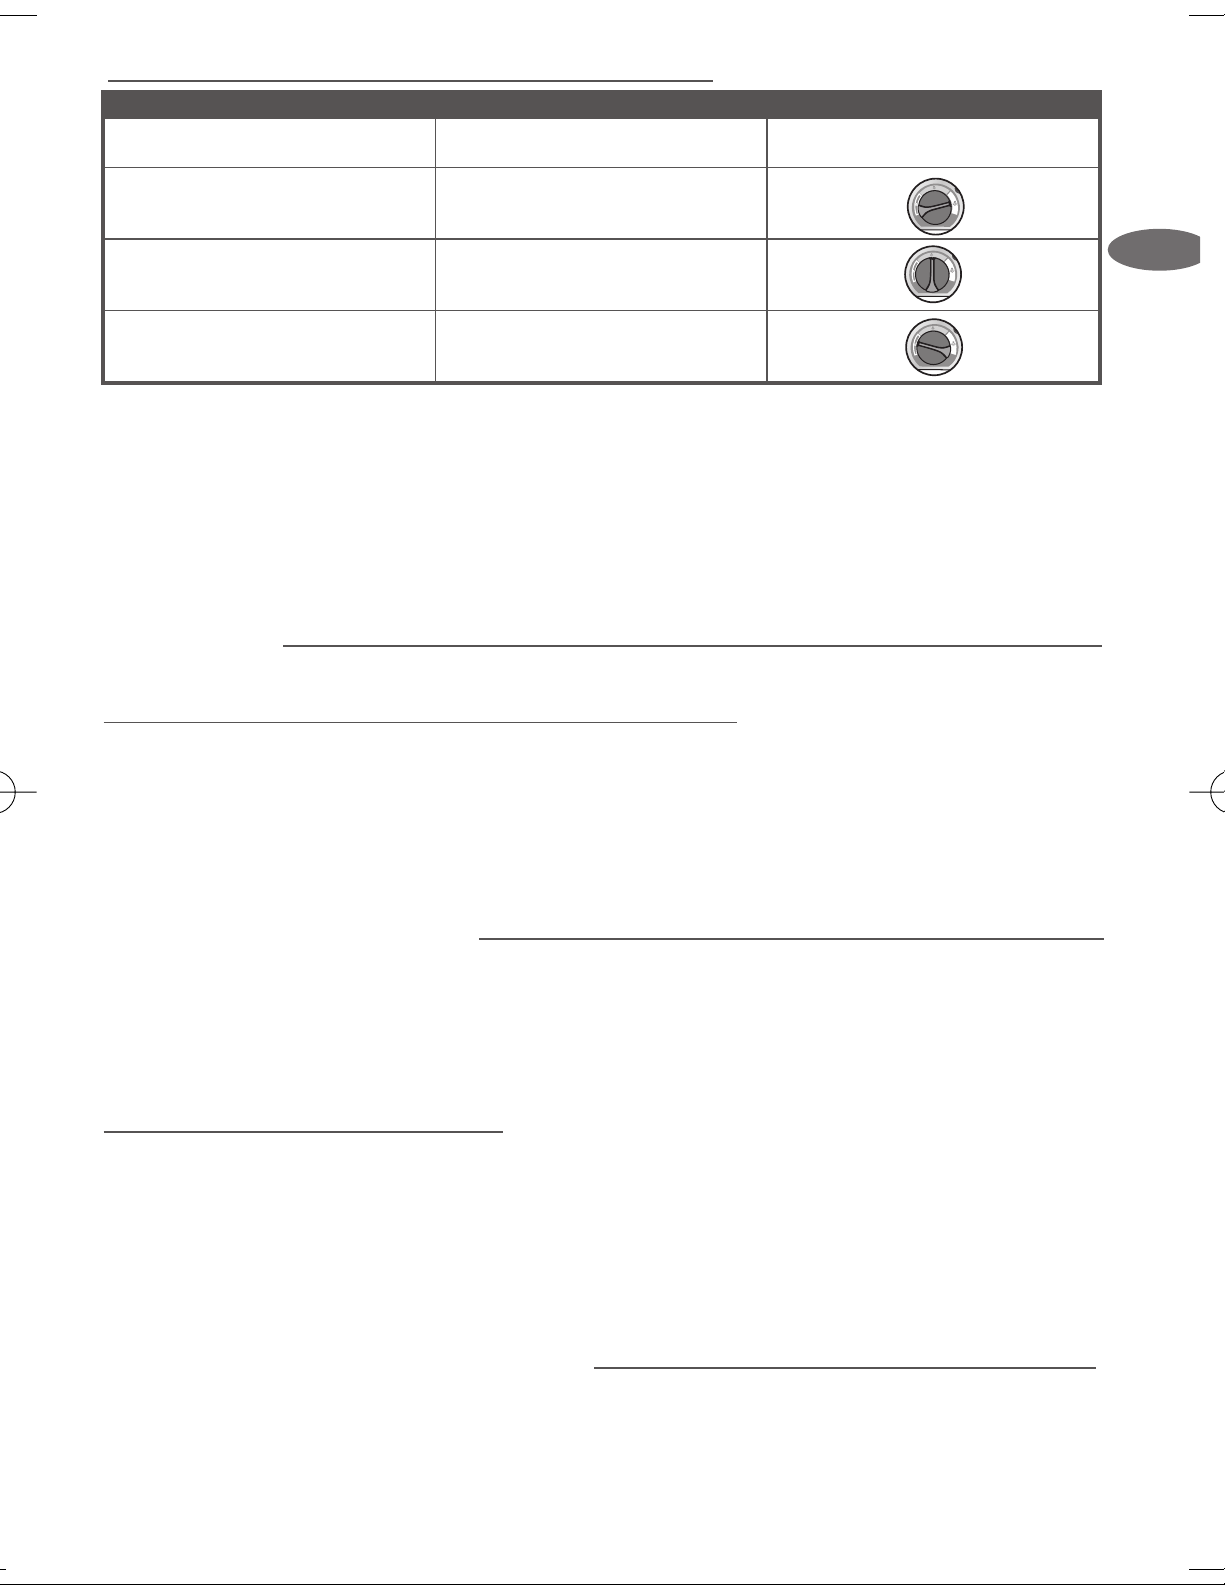
Setting the temperature
• Iron temperature setting:
- Start with the fabrics to be ironed at a low temperature (•) and finish with those which need
highertemperatures (••• or Max).
- Mixed fibre fabric: set the ironing temperature to the setting for the most delicate fabric.
- Woollen garments:pressrepeatedly on the steam controlbutton - fig.8 to obtain short bursts
of steam,without placing the iron on thegarment itself.
• Steam output setting:
- Thick fabric: increase the steam setting.
- At a low temperature: setthe steam output control dial to the lowposition.
Dry ironing
• Do not press the steam control button under the iron handle.
TYPE OF FABRICS
SETTING TEMPERATURE
CONTROL
SETTING STEAMOUTPUT CONTROLDIAL
Linen,cotton
•••
Silk, Wool
••
Synthetics
(polyester, acetate, acrylic, polyamide)
•
SETTING THE TEMPERATURE AND STEAM OUTPUT ACCORDING TO TYPE OF FABRIC TO BE IRONED:
To prime thesteam circuit,
either before using the iron for
the first time, or ifyouhave not
used the steam function for a
few minutes, press thesteam
control button several times in a
row, holdingthe iron awayfrom
your clothes
- fig.8. This will
enable any cold water to be
ejected from thesteam circuit.
Maintenance and cleaning
Cleaning your steam generator
• Do not use detergent or descaling products for cleaningthe soleplate base-unit.
• Never hold the iron or the base unitunderthe tap.
• Empty and rinse the removable water tank.
• Clean the plastic parts of the applianceoccasionally witha soft cloth.
Tip: for easy, non-aggressive
cleaning of the sole plate of your
iron, use a damp sponge to clean
the sole plate while it is still warm.
Vertical steam ironing
• Set theiron temperature controlslideand thesteam output control dial (locatedonthe control
panel)tothe MAX position.
• Hang the garment on a coathanger and hold thefabric slightly taut with one hand.
As steam is very hot : never attempt to remove creases from a garment while it is being
worn, always hang garments on a coat hanger.
• Holding the iron in a vertical position - fig.8, tilted slightly forwards, press repeatedly on the
steam control button (underneath theironhandle) moving the iron fromtop to bottom - fig.9.
Refilling the water tank
• Whenthe red “tank empty” indicatorlightturns on, thereis nomoresteam- fig.10.Thewatertankisempty.
• Unplug the steam generator. Open the tank filler flap - fig.4.
Fill the water tank up without exceeding the MAX level - fig.5.
• Close the water tank filler cover.
• Plug in the steam generator. Press the “Restart” button - fig.11, on the control panel to continue
ironing. When the green indicatorremains lit, the steamisready.
TURBO Function (according to model)
• Press the Turbocontrol 2 or 3 times when you needextra steam:
- for ironingthicker fabrics,
- for gettingrid of creases,
- for powerful vertical steaming.
Use the Turbo function with care as its exceptional steam power can cause burns.
Recommendations : for
fabrics other than linen or
cotton, hold the iron a few
centimetres from the
garment to avoid burning
the fabric.
22
Easy descaling of your steam generator:
To extendthe life of your steamgeneratorand avoid scale onyourironing, yoursteam generator
is equipped with a built-inscale collector. This valve,locatedinthe tank,
automatically removes the scale that forms inside.
Operation:
• Anorange“anti-scale” lightlocated on thecontrol panel startsblinkingtotellyou that theanti-
scale valveneedsrinsing - fig.12.
Important: This operation must not be carried out unless the steam generator has
been unplugged for at least two hours and has cooled down completely.
To carry out this operation, the steam generator must be close to a sink as water may
come out of the tank when it is opened.
• Once the steamgenerator has cooled down completely,remove thescalecollectorcover- fig.13.
• Unscrew the anti-scalevalve andremoveit fromthehousing;it containsthe scalethathas built
up in thetank- fig.14 and fig.15.
• To clean the valve properly, just rinse it under running water to remove the scale it contains -
fig.16.
• Put the valve back into its housing and screw it in completely to keep it watertight - fig.17.
• Refit the scale collector cover - fig. 18.
The next time you use your iron, press the “restart” button on the control panel to turn
off the orange “anti-scale” light.
Do not use any descaling
substances (vinegar,
industrial descaling
products, etc.) when rinsing
the anti-scale valve :
they could damage it.
Before emptying your steam
generator, it must always be
left to cool for 2 hours to
avoid any risks of scalding.
Storing the steam generator
• Press the illuminated on/offswitch and unplug the generator.
• Place the irononthe housingplate on the steam generator.
• Raise the retaining hoopover the iron until it locks into place (audible click) - fig.2.
• Your iron is then safely retained on its base. Warning: do not touch thesoleplate while still hot.
• Slot the extension cord outlet in the notch (depending on model). Take the end of the cord support and
press to returnthe flexible partinto the base.
• Store the steam cord in its slide storage place - fig.19. Take it, fold it in two so as to make a loop. Put the
end of this loop in the slide storage place then push gently until you see the end on the other side of the
slide storage place - fig.20.
• Leave the steam generator to cool for at least one hour before putting it away if it is to be stored in a
cupboard or confinedspace.
• You can store thesteam generator in completesafety.
PROBLEMS CAUSES SOLUTIONS
The steam generator does not switch on
or the iron indicator and ON/OFF
indicatordonot switch on.
Theappliance is not switched on.
Check that your appliance is correctly
plugged in and press the illuminated
on/off switch.
Water runs out of the holes in the
soleplate.
Water has condensed in the pipes because
youareusing steamforthefirsttimeoryou
have not used itfor some time.
Press on the steam control button away
from your ironing board until the iron
produces steam.
Thesoleplate is not hot enough.
Decrease the steam output while ironing
atlow temperature (steamoutput control
dial on the control panel). Wait for the
thermostat light to go out before
activating the steam control button.
Your thermostat is faulty: the iron is not
hotenough.
Contact an ApprovedService Centre.
Water streaks appear on the linen.
Your ironing board cover is soaked with
water as it is not suited to the power of a
steam generator.
Check that your ironing board is suitable
(See page20).
Problems with your steam generator?
23
F
NL
D
GB
I
E
P
DK
S
FIN
N
GR
TR
PL
CZ
SK
H
RUS
UA
HR
RO
SLO
EST
LT
LV
PROBLEMS CAUSES SOLUTIONS
White streaks come through the holes in
thesoleplate.
Your generator tank is ejecting scale as it
hasnot beendescaled regularly.
Rinse the collector (see § descaling your
steam generator).
Brown streaks come through the holes in
thesoleplate and stainthe linen.
You are using chemical descaling agents
or additives in the water for ironing.
Never add this type of product in the
water tank or in the boiler (see page 5 for
what water may be used). Contact an
Approved Service Centre.
Fabric fibres have accumulated in the
holes of thesoleplate and are burning.
Clean the soleplate with a non-metallic
sponge.
The soleplate is dirty or brown and may
stain the linen.
Your linen is not rinsed sufficiently or you
have ironed a new garment before
washing it.
Ensure linen is rinsed thoroughly to remove
any soap deposits or chemicals on new
garmentswhichmaybesuckedupbytheiron.
You are ironing at too high a temperature. See ourrecommendations regarding
temperature control setting.
You are using starch. Always spray starch on the reverse side of
thefabric to be ironed.
There is no steam or there is little steam. Thewater tankis empty (red light on). Fill the water tank.
The steam output control dial is set at
minimum.
Increase the steam output(controldial on
thecontrol panel).
The soleplate temperature is set to the
maximum.
The steam generator operates normally
butthesteamisveryhotand dry,and hard
to see.
Steam comes out around thecollector. Thecollector is not tightenedcorrectly. Tighten the collector.
Thecollector sealisdamaged. Contact an ApprovedService Centre.
Theappliance is faulty. Do not use the steam generator and
contact an Approved Service Centre.
Thered “water tank empty” light is on. The water tankisempty. Fill the water tank.
Steam or water escapes under the
appliance.
Therinseplug seal is damaged. Do not use the steam generator and
contact an Approved Service Centre.
The“anticalc” indicator is lit. You have not pressed the “Restart” button. Press the “Restart” button on the control
panel.
Environment protection first !
If you have any product problems or queries pleasecontactour Customer Relations Team first for expert help
and advice
Your appliance contains valuable materials which canbe recovered or recycled.
Leave it at a local civic waste collection point.
If youhave any problems or queries please call our Customer Relations team first for expert help and advice:
0845 602 1454 - UK
(01) 677 4003 - Ireland
or consult our website - www.tefal.co.uk

39
F
NL
D
GB
I
E
P
DK
S
FIN
N
GR
TR
PL
CZ
SK
H
RUS
UA
HR
RO
SLO
EST
LT
LV
Vigtige informationer
Sikkerhedsregler
• Læs brugsanvisningen omhyggeligt igennem før apparatet tages i brug første gang; TEFAL påtager sig intet ansvar for skader,
deropstår ved forkert brug.
• Dette apparats sikkerhed er i overensstemmelse med gældende tekniske forskrifter og standarder (elektromagnetisk
kompatibilitet, lavspænding, miljøbeskyttelse).
• Dampgeneratoreneret elektriskapparat: Denskalbruges undernormalebrugsbetingelser.Den erudelukkende beregnettil brug
i en almindelighusholdning.
• Det er forsynet med 2 sikkerhedssystemer:
- en ventil, som forhindrer overtryk vedatlede overskydende damp ud i tilfælde af funktionsforstyrrelser.
- en varmesikring, som forhinder overopvarmning.
• Tilslut altid dampgeneratoren:
- en el-installationmed en spænding på mellem 220 og 240 V.
- Tilslut kun dampgeneratoren til en ekstrabeskyttet el-installation.
-Forkerte tilslutninger kanforårsage uoprettelige skader på apparatet og annullerer garantien.
Hvis der benyttes forlængerledning, skal det undersøges, om den er to-polet (10 A),ogomden er ekstrabeskyttet.
• Træk el-ledningen helt ud før stikket sættes i en ekstrabeskyttet stikkontakt.
• Hvis el-ledningenellerledningen mellem strygejernet og basen erbeskadiget, er det strengt nødvendigt at få den udskiftetaf
et autoriseret serviceværkstedaf TEFAL for at undgå enhver fare.
• Tag ikkeapparatets stikudved at trække i ledningen.
Trækaltidstikket ud af stikkontakten:
- før vandbeholderen fyldes op eller før kalk-opsamleren skylles,
- Inden apparatet gøres rent.
- Hver gang apparatet har været i brug.
• Apparatet skal bruges og placeres på en stabil flade. Når strygejernet stilles på sin sokkel, skal man sikresig, at soklen er anbragt
på en stabil flade.
• Dette apparat er ikke beregnet til at blive brugt af personer (herunder børn) hvis fysiske, sensoriske eller mentale evner er
svækkedeellerpersoner medmanglende erfaringellerkendskab, medmindre deer under opsyn ellerhar modtagetforudgående
instruktioner om brugen af apparatet af en person, der er ansvarlig for deressikkerhed.
• Børn skal være under opsyn for atsikre, at de ikke leger med apparatet.
• Gå aldrig fra dampgeneratoren:
- når dener tilsluttet strøm,
- så længe den ikke er kølet helt af(ca. 1 time).
• Strygesålenogsoklenkannåop påmeget højetemperaturer,derkan forårsageforbrændinger. Rørderforikkeveddem,nårdeervarme.
Lad aldrig strygejernetssål røre ved el-ledningerne.
• Strygejernet udsender damp, der kan forårsageforbrændinger. Strygejernet skal håndteres forsigtigt, og specielt hvis der stryges
i lodret position. Ret aldrig dampen mod personer eller dyr.
• Vent altid til dampgeneratoren er helt kølet af (stikket skal være trukket ud af stikkontakten i mindst 2 timer), inden
udtømningsproppen skrues af kedlen.
• Vent altid indtil dampgeneratorener kølet af ogstikkethar været taget ud i over 2 timer,før kalk-opsamleren skrues afog skylles.
• Hvisproppentilkedlenbliver væk ellerødelægges,skal den udskiftesmedennyfraenautoriseretserviceforretninganbefaletafTEFAL.
• Dyp aldrig dampgeneratoren ned i vand eller enhver andenvæske. Skyl den aldrig under rindende vand.
• Brug ikke apparatet,hvis det harværettabt pågulvetellerharsynligebeskadigelser, hvisdetlækkerellervisertegnpåfunktionsforstyrrelser.
Prøv aldrig selv atskilleapparatetad: Få det undersøgt i etautoriseret serviceværkstedafTEFALforatundgå enhverfare.
1. Komforthåndtag (afhængigafmodel)
2. Dampknap
3. Strygejernetstemperaturvælger
4. Termostat lampe
5. Easy Cord systemet
6. Sokkel til strygejernet
7. Pilot lampe tænd/sluk knap
8. Kammer til opbevaringafel-ledning
9. Ledning
10. Turbotast (afhængig af model)
11. Buetil at fastholde strygejernet på basen(Lock-System)
12. Påfyldningshul
13. Vandbeholder
14. Kedel(indei basen)
15. Ledning mellemstrygejernet og basen
16. Skinnetil opbevaringsplads
17. Skjuler til kalk-opsamler
18. Kalk-opsamler
19. Kontrolpanelet
a - RESTART” knap
b - Vandbeholderen er tom
c - Dampgeneratoren klar lampe
d - “Anti-kalk” kontrollampe
e - Knap til indstilling af dampmængden
Apparatbeskrivelse
System til at låse strygejernet fast på soklen (Lock-system)
Dampgeneratoren erudstyretmed enbøjle tilat fastholde strygejernet på basenfor at gøre transportogopbevaringlettere- fig.1:
• Lås - fig.2.
• Lås op - fig.3.
 Loading...