


EN
FR
ES
Electric Pressure Cooker
www.t-fal.com
I
A
H
B
C 


 J D K E


F 


 L G
L G 


M


 O
O
N
1 |
|
|
1 |
2 |
3 |
4 |
5 |
6 |
2 |
|
|
7 |
8 |
9 |
|
|
3 |
10 |
11 |
12 |
13 |
14 |
15 |
16 |
17 |
18 |
19 |
20 |
21 |
4
22 |
23 |
24 |
 2h
2h
25 |
26 |
5

3
27 |
28 |
29 |
30 |
31 |
32 |
33 |
34 |
35 |
|
2 |
|
|
36 |
1 |
37 |
38 |
|
6

IMPORTANT SAFEGUARDS
When using electrical appliances, basic safety precautions should always be followed including the following:
1.Read all instructions.
2.Do not touch hot surfaces. Use handles or knobs.
3.To protect against electrical shock do not immerse cord, plugs, or any other parts in water except for the removable insert and accessories.
4.Close supervision is necessary when any appliance is used by or near children.
5.Unplug from outlet when not in use and before cleaning. Allow to cool before putting on or taking off parts.
6.Do not operate any appliance with a damaged cord or plug or after the appliance malfunctions or has been damaged in any manner. Return appliance to the nearest authorized service facility for examination, repair or adjustment.
7.The use of accessory attachments not recommended by the appliance manufacturer may cause injuries.
8.Do not use outdoors.
9.Do not let the cord hang over the edge of table or counter, or touch hot surfaces.
10.Do not place on or near a hot gas or electric burner, or in a heated oven.
11.Do not move the product when in use or when the steam pressure valve is closed.
12.Always attach plug to appliance first, then plug cord into the wall outlet. To disconnect, turn any control to «off», then remove plug from wall outlet.
13.Do not use appliance for other than intended use.
14.SAVE THESE INSTRUCTIONS.
FOR HOUSEHOLD USE ONLY.
15.To reduce the risk of electric shock, cook only in removable container.
CAUTION: DO NOT CARRY THE PRODUCT BY THE LID HANDLES.
EN
FR
ES
7

Read and follow the instructions for use. Keep them for future use.
SAFETY INSTRUCTIONS
1.This appliance complies with the safety regulations and conditions in effect at the time of manufacture.
2.Check that the power supply voltage corresponds to that shown on the appliance (alternating current) and that there’s a grounded plug.
3.Given the diverse standards in effect, if the appliance is used in a country other than that in which it is purchased, have it checked by an approved service center.
4.This appliance is intended for household use only.
5.In case of commercial use, inappropriate use or failure to comply with the instructions, the manufacturer accepts no responsibility and the guarantee does not apply.
6.This appliance is not intended for use by persons (including children) with reduced physical, sensory or mental capabilities, or lack of experience and knowledge, unless they have been given supervision or instruction concerning use of the appliance by a person responsible for their safety.
7.Children should be supervised to ensure that they do not play with the appliance.
8.Replace the sealing gasket every 2 years, or sooner if you see the gasket is worn or in need of replacement. Use only original parts available in authorized repair centers.
CONNECTING TO THE POWER SUPPLY
1.Make sure the plug is connected properly to both the appliance and the outlet.
2.Only connect the appliance to grounded electrical outlet. If the sockets and plug on the appliance are not compatible, consult a professional qualified technician to replace the outlet with a more suitable one.
3.Do not use the appliance if:
-It or its cord is damaged.
-The appliance has been dropped, shows visible damage, or does not work properly.
8

In these cases, the appliance must be sent to an approved |
|
Service Center. Do not take the appliance apart yourself. |
|
4. Do not use an extension cord. If you accept liability for doing |
|
so, only use a grounded extension cord which is in good |
EN |
condition and is suited to the wattage of the appliance. |
5.If the power cord is damaged, it must be replaced by the manufacturer, an authorized Service Center or a similarly FR qualified person in order to avoid any danger.
6.Do not leave the cord hanging.
7. Do not unplug the appliance by pulling on the cord. |
ES |
8. Always unplug the appliance immediately after use; when |
|
moving it; prior to any cleaning or maintenance. |
|
USE OF THE APPLIANCE
1.Use a flat and stable, heat resistant work surface, away from any water splashes.
2.Always place your Electric Pressure Cooker on a dry surface.
3.Always check the pressure release devices for clogging before use.
4.Make sure that the Electric Pressure Cooker is properly closed before bringing it up to pressure.
5.It is highly recommended not to move the Electric Pressure Cooker when it is under pressure. The pressure limit valve may move: this could cause burns by steam being released.
6.Do not touch the hot surfaces. Be careful, metal parts and especially the lid are very hot. Always wear oven mitts.
7.Do not touch the hot surfaces. Use the carrying handles and not the lid handle. Always wear oven mitts.
8.Never use the insert handle to carry the product, use the carrying handle on the product body.
9.Your Electric Pressure Cooker cooks under pressure. Burns could result from boiling over if not used properly.
10.Do not open the pressure cooker until the unit has cooled and all internal pressure has been released. If the handles are difficult to push apart, this indicates that the cooker is still pressurized : do not force it open. Any pressure in the cooker can be hazardous.
9

11.Do not try to open the lid until the float valve is down.
12.Never use your Electric Pressure Cooker without liquid; when the cooking pot is empty or without the cooking pot: this could cause serious damage.
13.Do not remove the cooking pot while the appliance is working.
14.Do not fill your Electric Pressure Cooker above maximum level. For food that expands considerably during cooking, such as rice, dehydrated vegetables or compotes, do not fill the Electric Pressure Cooker more than half full. Respect the levels indicated in the recipes.
15.After cooking meat which has an outer layer of skin, which could swell due to the effects of pressure, to avoid burns do not pierce the skin after cooking if it appears swollen. Pierce food before cooking to avoid burns.
16.When cooking food with a thick texture (chick peas, rhubarb, compotes, etc.) the Electric Pressure Cooker should be shaken slightly before opening to ensure that the food does not spurt out.
17.Do not use the Electric Pressure Cooker to fry under pressure using oil.
18.The bottom of the removable insert and the heating plate should be in direct contact. Any objects inserted between them or food residue remaining on either surface will affect performance.
19.Wipe clean the bottom of the removable insert and the heating plate after every use.
20.Do not use other cooking pots in the pressure cooker in place of the removable insert. Only replace the removable insert with an original spare part designed to be used with this product.
21.Use the removable insert in the pressure cooker ONLY. Do not use it to cook on stovetops, in the oven etc.
22.During cooking & steam release, the appliance exhausts heat and steam. Keep your face and hands away from the steam flow. Do not touch the lid during cooking. Do not obstruct the steam outlet.
23.When opening the lid, always hold the lid by its handle. In some cases, boiling water may be trapped between the steam shield and the lid. This can cause severe scalding.
10
24.Use the product ONLY IF the removable bowl is correctly placed in the unit and the handle is correctly inserted above the carrying handles.
25.If large amounts of steam are released from the rim of the lid,
turn power OFF and unplug the power cord at once. Carefully cleanthelid,sealinggasketandsealinggasketsupportcoverto ensurethatfoodresidueisnotinterferingwithproperoperation. If the problem persists after cleaning, consult an authorized Service Center for repair.
26. If pressure is released continuously (during more than
1 minute) while pressure cooking, switch off the appliance and release pressure, and consult an authorized Service Center for repair.
27.Do not immerse the pressure cooker housing in water, or pour water or food directly on to the heating plate without the removable insert in place. If you inadvertently do so, consult an authorized Service Center for repair.
28.Do not touch the float valve and the limit pressure valve except when cleaning and maintaining in accordance with instructions.
29.Do not place foreign objects on top of or blocking the steam valve. Do not replace the valve.
30.Do not use a cloth between the lid and the housing to leave it open.
31.If any part of the appliance is damaged, bring the appliance to service center.
32.Do not substitute other sealing gaskets.
33.Any repairs should be made by an authorized service center using original spare parts.
34.Do not use the appliance if any part is damaged.
35.When using the browning and sauté function, always remove the lid.
36.Be aware that certain foods, such as applesauce, cranberries, pearl barley, oatmeal or other cereals, split peas, noodles, macaroni, rhubarb, or spaghetti can foam, froth, and sputter, and clog the pressure release device (steam vent). Use caution when cooking these foods and when opening the lid after being under pressure.
EN
FR
ES
11

ELECTRICAL REQUIREMENTS
This appliance has a grounded plug. Do not attempt to modify the plug in any way.
•A short power-supply cord has been provided to reduce risk resulting from becoming entangled in or tripping over a longer cord.
•If an extension cord is used:
-The marked electrical rating of the extension cord should be compatible with the electrical rating of the appliance.
-The cord must be arranged so that it will not drape over the countertop or tabletop where it can be pulled on by children or tripped over unintentionally.
Your appliance contains many materials which can be recycled. Take it to a local civic collection point.
12
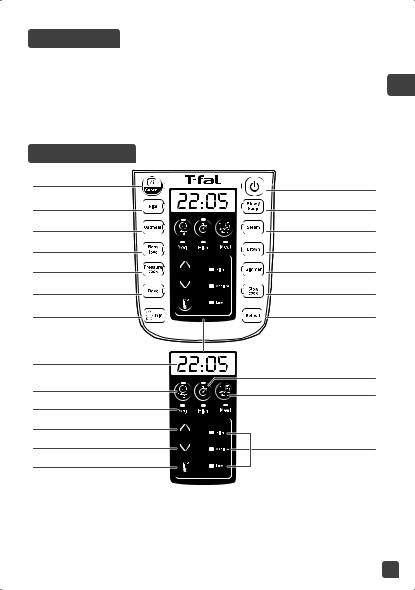
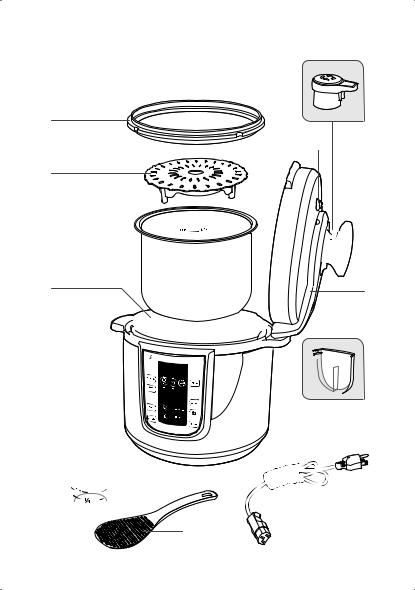
DESCRIPTION
A |
Sealing gasket |
I |
Pressure limit valve |
B |
Trivet |
J |
Lid handle |
C |
Cooking pot |
K |
Lid |
D |
Heating element |
L |
Condensation collector |
E |
Transport handle |
M |
Measuring cup |
F |
Control panel |
N |
Rice ladle |
G |
Base |
O |
Power cord |
H |
Safety valve |
|
|
CONTROL PANEL
Keep warm
Cancel function key
Rice function key
Oatmeal function key Baby food function key Pressure cook function key Bake function key
DIY function key
Digital display
Delayed start key Type of food indicators Increase key
Reduce key
Temperature key
Start / Stop function key
Stew / Soup function key
Steam function key
Brown function key
Simmer function key
Slow cook function key
Reheat function key
Timer key
Menu key
Pressure level indicators
EN
FR
ES
1.The 20 key operations are respectively: «Keep Warm/Cancel», «Rice», «Oatmeal», «Baby
food», «Pressure cook», «Bake», «DIY», «Reheat», «Slow Cook», «Simmer», «Brown», «Steam», «Stew/Soup»,  , «Delayed Start», «Timer», «Menu»,
  ,
,  , «Temperature».
2.25 types of cooking are proposed, please see Table 1 for more information.
3.For «Steam», «Stew/Soup» and «Simmer», you can choose the type of food: «vegetables», «fish», «meat».
13

BEFORE FIRST USE
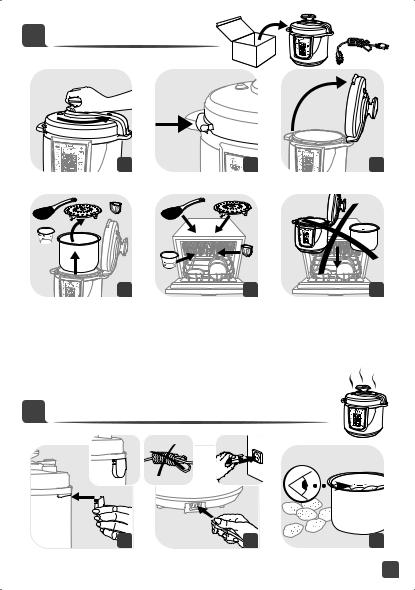
Remove packaging
•Take your appliance out of its packaging. Please keep your warranty card and remember to read the operating instructions before using the appliance for the first time.
•Place your appliance on a flat surface. Remove all packaging materials from the inside of the appliance: plastic bags, accessories (trivet, rice ladle, measuring cup & condensation collector) as well as the plug - fig. 4.
•Remove the promotional sticker on the appliance before using your appliance for the first time.
The lid
•To open the lid, take hold of the handle, turn it to the left, lift and pull the lid to the right - fig. 1-2-3.
Cleaning
•Be aware: only the accessories are dishwasher safe.
•Rinse the cooking pot, the condensation collector, the trivet, the sealing gasket.
Using your appliance for the first time
• Unroll the power cord; connect it to the appliance then to a grounded socket - fig. 8.
INSTRUCTIONS FOR USE
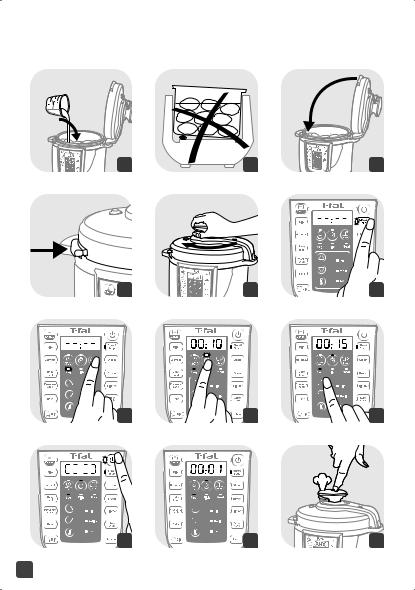
Put the condensation collector into place.
Take the cooking pot out and add the ingredients
•Remove the cooking pot.
•Put ingredients in the cooking pot.
•Please note that the level of foods and liquids should never exceed the max level marking on the cooking pot - fig. 9.
Place the cooking pot in the appliance
•Wipe clean the bottom of the cooking pot and remove any food residue from the heating plate. Then place the cooking pot into the appliance - fig. 10-11.
•Do not use your appliance without the cooking pot.
Close and lock the lid
•Check that the sealing gasket is securely placed on the sealing gasket supporting cover.
•Close the lid on the appliance and turn it on the right - fig. 12-13-14.
14

Place the pressure limit valve
•Position the pressure limit valve and ensure that it is on. Please note that the valve does not click into place and that it will remain somewhat loose. Check that the pressure limit valve is down before you start pressure cooking (please see appliance description).
FUNCTION ILLUSTRATION
1. Self test with power on (standby)
Connect the power supply, system starts to self check, buzzer makes a «BEEP» sound, digital screen and all indicator light on. After 1 second, the screen displays «----», the appliance is in the standby mode.
2. Working mode
1.In the following 3 functions «Stew/Soup», «Steam» and «Simmer», you can select the required type of food by pressing «Menu» key.
After selecting the required cooking function and type of food, the corresponding function indicator and the type of food indicator will light up. If no other function setting
is required, press the  key to start the cooking. The corresponding function’s indicator will move from flickering to a constant light.
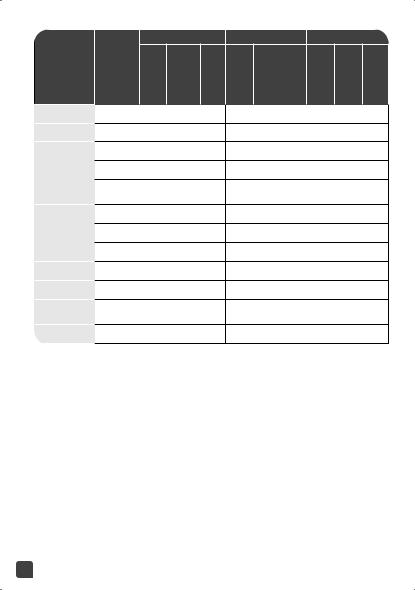
2.Each function has a default time and temperature, as shown below:
|
|
TIME SET (min) |
|
TEMPERATURE |
|
LID POSITION |
||||||||
|
|
|
|
|
(°F) |
|
||||||||
|
|
Default |
|
Range |
|
Every |
|
Default |
|
|
closeLid+ locklid closeLid+ locknotlid |
openLid |
||
PROGRAMS MENU |
|
|
|
|
Range |
|
||||||||
|
|
|
|
|
|
|
|
|
|
|
|
|
||
Rice |
|
9 |
|
1-50 |
|
1 |
|
226 |
|
no change |
|
• |
|
|
|
|
|
|
|
|
|
|
|||||||
|
|
|
|
|
|
|
|
|
|
|
|
|
|
|
Oatmeal |
|
3 |
|
1-20 |
|
1 |
|
194 |
|
no change |
|
• |
|
|
|
|
|
|
|
|
|
|
|
|
|
|
|
|
|
|
veg |
10 |
|
1-70 |
|
1 |
|
226 |
|
no change |
|
• |
|
|
Stew / Soup |
fish |
20 |
|
1-70 |
|
1 |
|
219 |
|
no change |
|
• |
|
|
|
|
|
|
|
|
|
|
|||||||
|
meat/ |
40 |
|
1-70 |
|
1 |
|
237 |
|
no change |
|
• |
|
|
|
bean |
|
|
|
|
|
|
|
||||||
|
|
|
|
|
|
|
|
|
|
|
|
|
||
|
veg |
3 |
|
1-40 |
|
1 |
|
226 |
|
no change |
|
• |
|
|
Steam |
fish |
3 |
|
1-15 |
|
1 |
|
219 |
|
no change |
|
• |
|
|
|
|
|
|
|
|
|
|
|||||||
|
meat/ |
10 |
|
5-40 |
|
1 |
|
237 |
|
no change |
|
• |
|
|
|
bean |
|
|
|
|
|
|
|
||||||
EN
FR
ES
15
|
|
TIME SET (min) |
||||
PROGRAMS MENU |
Default |
|
Range |
|
Every |
|
|
|
|
|
|
||
Browning |
|
10 |
|
1-60 |
|
1 |
|
|
|
||||
Reheat |
|
4 |
|
1-60 |
|
1 |
|
veg |
15 |
|
1-35 |
|
1 |
Simmer |
fish |
15 |
|
1-35 |
|
1 |
|
|
|
|
|
|
|
|
meat/ |
15 |
|
5-35 |
|
1 |
|
bean |
|
|
|||
|
|
|
|
|
|
|
|
high |
30 |
|
5-40 |
|
1 |
Pressure |
medium |
30 |
|
5-40 |
|
1 |
cooking |
|
|
||||
|
|
|
|
|
|
|
|
low |
30 |
|
5-40 |
|
1 |
Baby food |
|
30 |
|
1-70 |
|
1 |
Baking |
|
40 |
|
1-60 |
|
1 |
Slow cooking |
|
2h |
|
2h- |
|
30 |
|
|
9h |
|
min. |
||
|
|
|
|
|
||
DIY Chef |
|
10 |
|
1-60 |
|
1 |
|
|
|
|
|
|
|
TEMPERATURE (°F) |
LID POSITION |
|||
Default |
Range |
Lid close + lid lock Lid close lid not lock |
Lid open |
|
|
|
+ |
|
|
320 |
|
|
|
• |
212-320 |
|
|
||
194 |
no change |
• |
|
|
226 |
no change |
• |
|
|
219 |
no change |
• |
|
|
237 |
no change |
• |
|
|
237 |
no change |
• |
|
|
226 |
no change |
• |
|
|
219 |
no change |
• |
|
|
237 |
no change |
• |
|
|
302 |
no change |
|
• |
|
185 |
no change |
• |
|
|
158 |
158-248 |
• |
|
• |
Browning function
You can add oil first and then the ingredients, or you can also add oil and ingredient at the same time. We suggest not to brown more than 30 minutes in order to avoid oil temperature going too high. You have the possibility to adjust temperature for «Browning» function.
DIY Chef function
1.Thanks to this function, you are free to choose regarding the cooking time and temperature, but also the lid position.
2.Be aware that to use pressure cooking, there must be liquid in the cooking pot and the temperature must be higher than a certain temperature (between 70 to 120°C).
3.Pressure state. When the food is cooked under pressure, after the cooking process the appliance will enter into a pressure retention stage.
Keep Warm
1.Keeping warm state. When the holding time countdown is 0, the buzzer «will beep», then it automatically goes into the keep warm setting, (except for DIY functions), the digital
16

screen indicates «00:00».
2.If pressing «Keep warm/Cancel» key during standby mode, it goes to keeping warm function, the digital screen indicates «00:00»
3.After 24 consecutive hours, this function will be cancelled automatically and it returns to
the standby state.
4. During Keep Warm, take care that lid is closed.
3. Time setting
1.You can adjust your cooking time by pressing «Timer» key. Then press  or
or  to select the desired cooking time. Please see table to know the range.
2 When setting the timing, the corresponding timing indicator lights up.
4. Delayed start setting
1.When choosing a function, before the appliance has started cooking, you can press the
Delayed start function key to set a delayed time. By pressing  and
and  keys, you can adjust the time, time changes in the unit of 10 minutes.
2.The delayed time setting range (2-24 hours) contains the cooking time; when you
press  the Delayed start/timer function key, it indicates «02:00», press the
  key to increase and the
  key to decrease.
3.After setting the delayed start the corresponding function indicator will light up.
Note : «Delayed start» is not available for the «Browning» and «DIY» functions.
5. Temperature adjustment
In the choice of DIY and Browning functions, you can select temperature key and press the  and
and  buttons to adjust the temperature value.
6. Cancel/Stop setting
In the following setting: preset, cooking, pressure cooking, keeping warm, only «keep warm/cancel» key is available. Press the «keep warm/cancel» key for one second to cancel and return to the standby mode.
You have the possibility to switch off the product by pressing the  key more than 2 seconds.
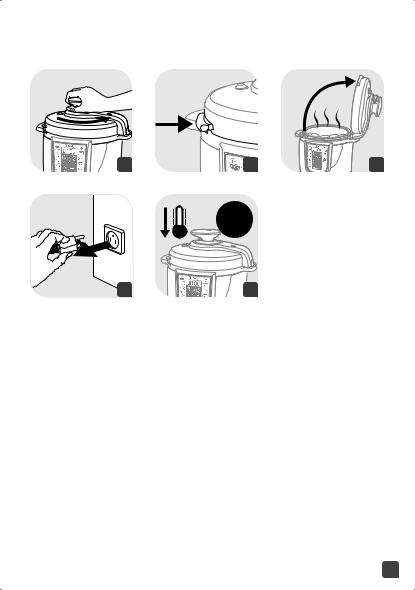
7. Opening the lid
After cooking under pressure is completed, steam will be released by pressing on the button on the handle “one-touch steam release”- fig. 21, it will take only a few seconds to 10 minutes depends on quantity of liquid inside.
•To open the lid, take hold of the handle, turn it the left, lift and pull the lid to the right - fig. 22-23-24.
•Unplug the power cord - fig. 25.
Note : Be careful of the hot steam coming out from the bowl. Keep your face and hands from the steam flow.
EN
FR
ES
17
 Loading...