


EN
FRCS
ESSK
HU
RO
BG
HR
ES
PT
Fast & Delicious Multicooker
www.tefal.com

J
A
B 


 I C
I C 

D
E
F
G
H
N
O
K
L
M
P

1 |
|
|
1 |
2 |
3 |
4 |
5 |
6 |
2 |
|
|
7 |
8 |
9 |
|
|
3 |

10 |
11 |
12 |
13 |
14 |
15 |
16 |
17 |
18 |
19 |
20 |
21 |
4

22 |
23 |
24 |
 2h
2h
25 |
26 |
5

3
27 |
28 |
29 |
30 |
31 |
32 |
33 |
34 |
35 |
|
2 |
|
|
36 |
1 |
37 |
38 |
|
6

SAFETY INSTRUCTIONS |
|
Take the time to read all the following instructions |
|
carefully. |
EN |
• Indoor use only. |
•For cleaning your appliance, please refer instructions for use. You can wash the cooking bowl and steam basket in soapy hot water or in the dishwasher. Clean the body of the appliance using a damp cloth.
•Do not immerse the appliance in water.
•Improper use of the appliance and its accessories may damage the appliance and cause injury.
•Do not touch hot parts of the appliance. After use, heating element surface is subject to residual heat after use.
•For your safety, this product conforms to all applicable standards and regulations (Low Voltage Directive, Electromagnetic Compatibility, Food Compliant Materials, Environment, ...).
•This appliance is not intended for use by persons (including children) with reduced physical, sensory or mental capabilities, or lack of experience and knowledge, unless they have been given supervision or instruction concerning use of the appliance by a person responsible for their safety.
Children should be supervised to ensure that they do not play with the appliance.
•If the supply cord is damaged, it must be replaced by the manufacturer, its service agent or similary qualified persons in order to avoid a hazard. Do not replace the power cord supplied with other cords.
7

•This appliance is intended for domestic household use only. It is not intended to be used in the following applications, and the guarantee will not apply for:
-staff kitchen areas in shops, offices and other working environments;
-farm houses;
-by clients in hotels, motels and other residential type environments;
-bed and breakfast type environments.
•This appliance shall not be used by children. Keep the appliance and its cord out of reach of children.
•Appliances can be used by persons with reduced physical, sensory or mental capabilities or lack of experience and knowledge if they have been given supervision or instruction concerning use of the appliance in a safe way and if they understand the hazards involved.
•Children shall not play with the appliance.
•Do not fill your appliance more than the MAX mark on the pot. Do not fill it more than half full for food that expands during cooking, such as rice, dehydrated vegetables.
Reduce the volume of water to avoid the risk of boiling over.
•Please follow the recommendations on the volume of food and water to avoid the risk of boiling over which can damage your appliance and cause injury.
•Before using your appliance, check that the float valve and the pressure limit valve are clean (see section Cleaning and maintenance).
8

•Do not place any foreign objects in the pressure relief system. Do not replace the valve.
•When you open the lid, always hold it by the lid handle. Position your arms in alignment with the side carrying EN handles. Boiling water could remain trapped between the gasket support and the lid and could cause burns.
•Be careful also about the risk of scalding from the steam coming out of the appliance when you open the lid. First open the lid very slightly to allow the steam to escape gently.
•Never force the appliance open. Make sure that the inside pressure has returned to normal. Do not open the lid when the product is under pressure. To do so, see the Instructions for use.
•Use only the appropriate spare parts for your model. This is particularly important for the sealing gasket,
the cooking pot and the metal lid.
•Do not damage the sealing gasket. If it is damaged, have it replaced in an Approved Service Centre.
•The heat source necessary for cooking is included in the appliance.
•Do not place the appliance in a heated oven or on a hot hob. Do not place the appliance close to an open flame or a flammable object.
•Do not heat the cooking pot with any other heat source than the heating plate of the appliance and do not use any other pot. Do not use the cooking pot with other appliances.
•Do not move the appliance when it is under pressure. Do not touch the hot surfaces. Use the carrying handles when moving it and wear oven mitts, if necessary. Do not use the lid handle to lift the appliance.
•Do not use appliance for other than the intended purpose.
•This appliance is not a steriliser. Do not use it to sterilise jars.
•The appliance cooks food under pressure. Incorrect use may cause risks of burns due to steam.
•Make sure that the appliance is properly closed before bringing it up to pressure (see Instructions for use).
•Do not use the appliance empty, without its pot or without liquid inside the pot. This could cause serious damage to the appliance.
•After cooking meat which has an outer layer of skin (such as ox tongue), which could swell due to the effects of pressure, do not pierce the skin after cooking if it appears swollen: you could get burnt. Pierce it before cooking.
9

•When cooking food with a thick texture (chick peas, rhubarb, compotes, etc.), shake the appliance slightly before opening it to ensure that the food or cooking juices do not spurt out.
•Do not use the appliance to fry food in oil. Only browning is allowed.
•In browning mode, be careful of risks of burns caused by spattering when you add food or ingredients into the hot pot.
•During cooking and steam release at the end of cooking, the appliance releases heat and steam. Keep your face and hands away from the appliance to avoid scalding. Do not touch the lid during cooking.
•Do not use a cloth or anything else between the lid and the housing to leave the lid ajar. This can permanently damage the gasket.
•Do not touch the safety devices, except while cleaning and maintaining the appliance in accordance with the instructions given.
•Make sure that the bottom of the cooking pot and the heating element are always clean. Make sure that the central part of the heating plate is mobile.
•Do not fill up your appliance without its cooking pot.
•Use a plastic or wooden spoon to prevent any damage to the non-stick coating of the pot. Do not cut food directly in the cooking pot.
•If a great deal of steam is released from the rim of the lid, unplug the power cord at once and check whether the appliance is clean. If necessary, send the appliance to an Approved Service Centre for repair.
•Do not carry the appliance by holding it by the handles of the removable pot. Always use the two side handles on the housing of the appliance. Wear oven mitts if the appliance is hot. For more safety, make sure that the lid is locked before transporting the appliance.
•If pressure is released continuously through the valve of the appliance (for more than 1 minute) while pressure cooking, send the appliance to a service centre for repair.
•Do not use a damaged appliance. Take it to your approved service centre.
SAVE THESE INSTRUCTIONS CAREFULLY.
•Use only spare parts sold in an approved service centre.
•The warranty does not cover the abnormal wear and tear of the cooking pot.
•Read these instructions for use carefully before using your appliance for the first time. Any use which does not conform to these instructions will absolve the manufacturer from any liability and void the warranty.
•In accordance with current regulations, before disposing of an appliance no longer needed, the appliance must be rendered inoperative (by unplugging it and cutting off the supply cord).
Environment protection first!
 Your appliance contains valuable materials which can be recovered or recycled.
  Leave it at a local civic waste collection point.
10
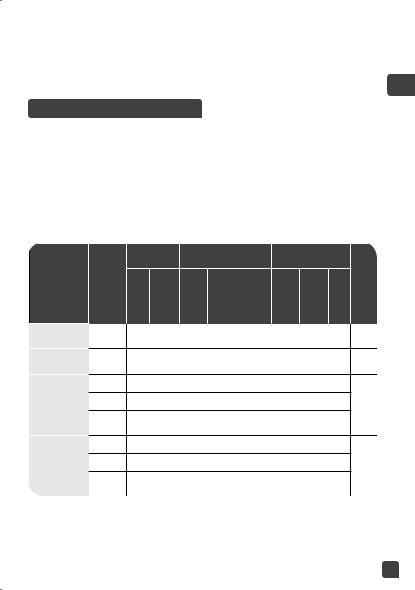
DESCRIPTION
A |
Sealing gasket |
I |
Safety valve |
B |
Steam basket |
J |
Pressure limit valve |
C |
Trivet |
K |
Lid handle |
D |
Cooking pot (removable) |
L |
Lid |
E |
Heating element |
M |
Condensation collector |
F |
Carrying handle |
N |
Measuring cup |
G |
Control panel |
O |
Rice ladle |
H |
Base |
P |
Power cord |
EN
CONTROL PANEL
Keep warm
Cancel function key
Rice function key
Oatmeal (Porridge) function key
Baby food function key
Pressure cook function key
Bake function key
DIY function key
Digital display
Delayed start key
Type of food indicators
Increase key
Reduce key
Temperature key
Start / Stop function key
Stew / Soup function key
Steam function key
Browning function key
Simmer function key
Slow cook function key
Reheat function key
Timer key
Menu key
Pressure level indicators
1.The 20 features are respectively: «Keep Warm/Cancel», «Rice», «Oatmeal», «Baby food»,
«Pressure cook», «Bake», «DIY», «Reheat», «Slow Cook», «Simmer», «Brown», «Steam», «Stew/Soup»,  , «Delayed Start», «Timer», «Menu»,
  ,
,  , «Temperature».
2.25 types of cooking are proposed, please see Table 1 for more information.
3.For «Steam», «Stew/Soup» and «Simmer», you can choose the type of food: «vegetables», «fish», «meat/bean».
11

BEFORE FIRST USE
Remove packaging
•Take your appliance out of its packaging. Please keep your warranty card and remember to read the operating instructions before using the appliance for the first time.
•Place your appliance on a flat surface. Remove all packaging materials from the inside of the appliance: plastic bags, accessories (trivet, rice ladle, measuring cup & condensation collector) as well as the plug - fig. 4.
•Remove the promotional sticker on the appliance before using your appliance for the first time.
Opening the lid
•To open the lid, take hold of the handle, turn anti-clockwise, lift and pull the lid to the right - fig. 1-2-3.
Cleaning
•Be aware: only the accessories are dishwasher safe.
•Rinse the cooking pot, the condensation collector, the trivet, the sealing gasket.
Using your appliance for the first time
• Fully unwind the power cord; connect it to the appliance and then plug it into the mains - fig. 8.
INSTRUCTIONS FOR USE
Put the condensation collector into place. - fig. 7.
Take the cooking pot out and add the ingredients
•Remove the cooking pot.
•Put ingredients in the cooking pot.
•Please note that the level of foods and liquids should never exceed the max level marking on the cooking pot - fig. 9.
Place the cooking pot in the appliance
•Ensure the bottom of the cooking pot is clean and dry, and remove any food residue from the heating plate. Then place the cooking pot into the appliance - fig. 10-11.
•Do not use your appliance without the cooking pot.
Close and lock the lid
•Check that the sealing gasket is securely placed on the sealing gasket supporting cover.
•Close the lid on the appliance and turn it fully clockwise - fig. 12-13-14.
12
Fit the pressure limit valve
• Position the pressure limit valve and ensure that it is on. Please note that the valve does not click into place and that it will remain somewhat loose. Check that the pressure limit
valve is down before you start pressure cooking (please see appliance description).
EN
FUNCTIONS ILLUSTRATION
1. Switching on the appliance (standby mode)
Connect to the power supply, the system starts to self check, a buzzer makes a «BEEP» sound. The digital screen and all the indicator lights come on. After 1 second, the screen displays «----», the appliance is in the standby mode.
2. Working mode
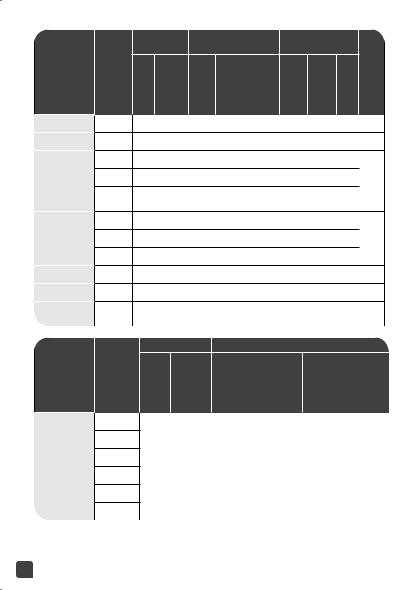
1.Each function has a default time and temperature and requires a specific lid position as shown below:
PROGRAMS MENU
Rice |
|
Oatmeal |
|
(Porridge) |
|
|
veg |
Stew / Soup |
fish |
|
meat/ |
|
bean |
|
veg |
Steam |
fish |
|
meat/ |
|
bean |
|
|
TIME SET |
TEMPERATURE (°C) |
|
LID POSITION |
|||||
(min) |
|
|||||||
|
|
|
|
|
|
|
||
Default |
Range |
Default |
|
Range |
|
Lid closed + locked Lid closed + not locked |
Lid raised |
|
9 |
|
108 |
|
not applicable |
|
• |
|
|
1-50 |
|
|
|
|
||||
3 |
1-20 |
90 |
|
not applicable |
|
• |
|
|
10 |
1-70 |
108 |
|
not applicable |
|
• |
|
|
20 |
1-70 |
104 |
|
not applicable |
|
• |
|
|
40 |
1-70 |
112 |
|
not applicable |
|
• |
|
|
3 |
1-40 |
108 |
|
not applicable |
|
• |
|
|
3 |
1-15 |
104 |
|
not applicable |
|
• |
|
|
10 |
5-40 |
112 |
|
not applicable |
|
• |
|
|
|
|
|
|
|
|
|
|
|
cooking with pressure
•
•
•
13
PROGRAMS MENU
Browning
Reheat
veg Simmer fish
meat/ bean
high
Pressure medium cooking
low
Baby food
Baking
Slow cooking
TIME SET |
TEMPERATURE (°C) |
LID POSITION |
|
||||||
|
(min) |
cooking with pressure |
|||||||
|
|
|
|
|
|
|
|||
Default |
|
Range |
Default |
|
Range |
Lid closed + locked Lid closed + not locked |
Lid raised |
||
10 |
|
160 |
|
100-160 |
|
|
• |
|
|
|
1-60 |
|
|
|
|
||||
4 |
|
1-60 |
104 |
|
not applicable |
• |
|
|
• |
15 |
|
1-35 |
108 |
|
not applicable |
• |
|
|
• |
15 |
|
1-35 |
104 |
|
not applicable |
• |
|
|
|
|
|
|
|
|
|
||||
15 |
|
5-35 |
112 |
|
not applicable |
• |
|
|
|
30 |
|
5-40 |
112 |
|
not applicable |
• |
|
|
|
30 |
|
5-40 |
108 |
|
not applicable |
• |
|
|
• |
30 |
|
5-40 |
104 |
|
not applicable |
• |
|
|
|
30 |
|
5-70 |
112 |
|
not applicable |
• |
|
|
• |
40 |
|
5-60 |
150 |
|
not applicable |
|
• |
|
|
2h |
|
2h- |
85 |
|
not applicable |
• |
|
|
|
|
9h |
|
|
|
|
||||
|
|
|
|
|
|
|
|||
|
|
|
|
|
|
|
|
|
|
PROGRAMS MENU
1
2
3
DIY Chef
4
5
6
TIME SET (min) |
LID POSITION |
||||
Default |
Range |
closed + locked |
|
not locked / raised |
|
|
|
|
|||
|
|
70°C |
|
70°C |
|
|
|
|
|
||
|
|
|
|
|
|
|
|
80°C |
|
80°C |
|
|
|
|
|
|
|
10 |
1-60 |
90°C |
|
90°C |
|
|
|
|
|
||
LOW*(104°C) |
|
100°C |
|
||
|
|
|
|
||
|
|
|
|
|
|
|
|
MEDIUM*(108°C) |
|
110°C |
|
|
|
|
|
|
|
|
|
HIGH*(112°C) |
|
120°C |
|
|
|
*Cooking with pressure |
|
|
|
14

COOKING PROGRAM INSTRUCTIONS |
|
Rice, Oatmeal (Porridge), Baby Food, Baking, Slow cooking, |
|
Reheat functions |
EN |
•Press the corresponding key of the desired function, the screen displays the default cooking time.
•Then press  and set the desired time by pressing
  or
or  keys.
keys.
•Then press  . The appliance enters into cooking preheat and the screen displays a rotating red circle «


 ».
».
•When the temperature for cooking is reached, the appliance switches automatically to counting down signifying the cooking phase has started.
•At the end of the count down the appliance will beep to announce the end of cooking.
Note : Refer to the table on pages 13 and 14 for the lid position for each function.
Stew/Soup, Steam, Simmer functions
•Press the corresponding key of the desired function, the screen displays the default cooking
time, the indicator for the type of food lights up 


 as the default and the corresponding pressure level indicator lights comes on too.
•If needed you can change the time and type of food.
•To change cooking time, press  and set the desired time by pressing
  or
or  keys.
keys.
•To change the type of food, press Menu key several times until the indicator of the desired type of food lights up. The specified food will have a red light indicator light underneath.
•Then press  . The appliance enters into cooking preheat and the screen displays «


 ».
».
•When the temperature for cooking is reached, the appliance switches automatically to cooking phase, and the time previously set starts counting down.
•At the end of the count down the appliance will beep to announce the end of cooking.
•The appliance enters into keep warm mode (see Keep Warm chapter).
Note : refer to the table on pages 13 and 14 for the lid position for each function.
Browning function
•You can add oil first and then the ingredients, or add oil and ingredients at the same time.
•Press the Browning key, the screen displays the default temperature.
•If needed you can change the temperature by pressing  or
or  keys.
keys.
•Then if you want to change the browning time press  and set the desired time by pressing
  or
or  keys.
keys.
•You are able to change the temperature by pressing the temperature key ( ) and
) and  or
or  key.
key.
•Then press  . The appliance enters into cooking preheat and the screen displays «


 ».
».
•When the temperature for cooking is reached, the appliance switches automatically to cooking phase, and the time previously set starts counting down.
•At the end of the count down the appliance will beep to announce the end of cooking.
Note :
*The lid must remain open during browning.
*To avoid the oil overheating do not use the browning function for more than 30 minutes.
15

Pressure cooking function
•Press the Pressure cook key, the pressure level is indicated by a light on the control panel (High, Medium or Low) and on the display by «HI-P», «P», or «LO-P».
•You can change the pressure level by pressing  or
or  keys.
keys.
•If needed you can also change the cooking time, by pressing  and set the desired time by pressing
  or
or  keys.
keys.
•Then press  . The appliance enters into cooking preheat and the screen displays «


 ».
».
•The appliance switches automatically to cooking phase (indicated by a single beep sound), and the time previously set starts counting down. Another beep sound during cooking (double beep sound) informs that the operational pressure is achieved.
•At the end of the count down the appliance will beep to announce the end of cooking.
•The electric pressure cooker enters into keep warm mode (see Keep Warm chapter).
Note : The lid must remain closed and locked during pressure cooking.
DIY Chef function
Thanks to this function, you are free to choose the cooking time and temperature/pressure.
•Set your DIY cooking level from 1 to 6 depending on the cooking you want to do (see the
table page 14), by pressing  or
or  keys. If you want to cook with pressure in DIY mode : the lid must be locked, there must be enough liquid in thecooking pot, and you have to choose between the three levels : 4 (LOW pressure 20kPa), 5 (MEDIUM pressure 38kPa) or 6 (HIGH pressure 60kPa).
•If needed you can also change the cooking time, by pressing  and set the desired time by pressing
  or
or  keys.
keys.
•Then press  . The appliance enters into cooking preheat and the screen displays «


 ».
».
•When the temperature for cooking is reached, the appliance switches automatically to cooking phase, and the time previously set starts counting down.
•At the end of the count down the appliance will beep to announce the end of cooking.
Keep Warm
•In keep warm mode, when the cooking countdown reaches 0, the appliance “will beep”, then it automatically goes into the keep warm setting, (except for DIY functions), the digital screen indicates «00:00».
•If pressing  during standby mode, it goes to keeping warm function, the digital screen indicates «00:00» and counts up.
•After 24 consecutive hours, this function will be cancelled automatically and it returns to the standby state.
•During Keep Warm, take care that the lid is closed.
16

Delayed start setting
• When choosing a function, before the appliance has started cooking, you can press |
to |
|
||||
set a delayed time. By pressing |
and |
keys, you can adjust the time, in intervals of |
|
|||
10 minutes. |
|
|
|
|
|
EN |
• The delayed time setting range (2-24 hours) contains the cooking time; when you press |
||||||
the Delayed start/timer function key, it indicates «02:00», press the |
key to increase |
|
||||
and the |
key to decrease. |
|
|
|
|
|
• After setting the delayed start the corresponding function indicator will light up.
Note : «Delayed start» is not available for the «Browning» and «DIY» functions.
Cancel/Stop setting
In the following setting: preset, cooking, pressure cooking, keeping warm, only «keep warm/cancel» key is available. Press the «keep warm/cancel» key for one second to cancel and return to the standby mode.
You have the possibility to switch off the product by pressing the  key more than 2 seconds.
Opening the lid after pressure cooking
After cooking under pressure is completed, steam will be released by pressing on the button on the handle “one-touch steam release”- fig. 21, it will take only a few seconds to 10 minutes depending on the of liquid inside.
•To open the lid, take hold of the handle, turn it clockwise, lift and pull the lid to the right - fig. 22-23-24.
•Unplug the power cord - fig. 25.
Note : Be careful of the hot steam coming out from the bowl. Keep your face and hands away from the steam flow.
GENERAL INFORMATION FOR COOKING UNDER PRESSURE
•Once pressure has built up in the appliance:
−The pressure limit valve will rise. The safety lock in the lid is then activated and the lid will not be able to be opened during cooking. Never attempt to open the lid during pressure cooking.
−The led Low, Medium, or High will light on to indicate that there is pressure in the appliance.
•When using the pressure cooker for the first few times, you may notice slight leaking from the pressure limit valve and the sealing gasket. This is normal and will occur when pressure builds up.
•Your favourite traditional recipes can be easily adapted to PRESSURE COOK setting.
−Low (Low Pressure): to cook delicate food such as fish, shellfish and some vegetables
−Medium (Moderate Pressure): to cook vegetables
−High (High Pressure): to cook meat and frozen food
•It is normal for a small amount of steam to escape during cooking (as the valve is a safety valve).
17

•Don’t use the pressure cooking without a minimum amount of water of 10cl.
•For cooking with pressure, the starting of the cooking is indicated by a single beep sound. The operational pressure is achieved after a double beep sound.
Safety features
Your pressure cooker contains several safety features:
Safety When Opening:
−If your pressure cooker is under pressure, the manometric rod is in the upper locking position, which prevents the cover from opening. Never try to force open your pressure cooker.
−It is especially important not to apply pressure to the manometric rod.
−Ensure that the internal pressure has fallen (additional steam escaping from the safety valve) prior to trying to open the cover.
Two Overpressure Safety Features:
−First device: the safety valve releases the pressure – see chapter on Cleaning and Maintenance, page 18.
−Second device : the joint let off steam on the back of the cover.
If one of the overpressure safety features is triggered:
•Turn off your appliance.
•Allow your appliance to completely cool down.
•Open it.
•Check and clean the safety valve, decompression ball and gasket. See chapter on Cleaning and Maintenance.
•If your appliance leaks or is no longer operational after having performed these checks and cleaning, take it to an Authorised Service Centre.
Regulating your appliance:
The pressure can be regulated by switching the heating element on or off.
SERIE EPC06
Low pressure 20kPa (104,5°C) / Medium Pressure 38kPa (108,5°C) / High pressure 60kPa (112,5°C) / PS: 130 kPa
Product capacity: 5.8L / Useful capacity: =3.8L Built-in heating (overmolded heating resistance)
CLEANING AND MAINTENANCE
•Once your food is cooked, unplug the appliance and let it cool for at least 2 hours before cleaning - fig. 25-26. Clean your appliance after each use.
•Clean the housing and the inside of the lid with a damp cloth - fig. 32-33. Do not immerse the appliance in water or pour water into it without the inner bowl - fig. 27.
•Remove the condensation collector and clean it thoroughly under water. Place it back in its original position - fig. 35.
18

• Rinse the sealing gasket. Dry it off thoroughly before placing it back. |
|
• To clean the float valve, remove the lid - fig. 36 then remove the valve gently from the lid |
|
- fig. 37 and rinse it under water. Dry it off thoroughly. Take care that the duct is properly |
|
cleaned before placing the float valve back in its original position. |
|
• Press on the internal part of the safety valve spring to check that it is not clogged - |
EN |
fig. 37,38. |
•Clean the cooking pot and the accessories. Only the accessories are dishwasher safe - fig. 29. Do not use a scourer or abrasive cleaners to clean the pot as this can damage the non stick coating in the pot.
•Remove the pressure limit valve from the pipe and clean both valve and pipe with water. Once dry, take care that duct of the pipe is properly cleaned before to plug the valve back on it - fig. 31.
•Do not immerse the appliance. Always use the cooking pot provided. Do not pour water or food directly into the appliance - fig. 27.
•If you inadvertently immerse your appliance in water or spill water directly on the heating element (when the pot is not in place), do not use the appliance and take it to your service centre for repair.
•Clean your appliance after each use.
•Change the sealing gasket every 2 years. Use only the gasket reference 22CM CYSB50YC8.
19

TROUBLESHOOTING
Problem
Unable to open lid.
Unable to close lid.
Intense release of pressure from pressure limit valve.
Food is uncooked
E0 displayed on digital screen.
E1 displayed on digital screen.
E2 displayed on digital screen.
E5 displayed on digital screen.
Steam leaking from lid.
Possible reasons |
Solutions |
|
Unable to open because |
a.Wait for the pressure in the pot to release |
|
of pressure in the inner |
completely. |
|
pot. |
b. Press and hold the pressure release button. |
|
|
a. Be sure the pressure is totally released by |
|
Pressure in the pot is |
leaving to completely cool down for 2 hours |
|
minimum (not under water). |
||
fully released but the |
||
b. Please use a skewer to poke the float |
||
float valve is stuck |
||
valve, to make it fall down. Be careful, keep |
||
because it is too dirty, |
||
your face away from the lid and the handle |
||
and therefore unable to |
||
as hot steam/food may be released. |
||
move down. |
c. Before next use, please clean and wipe |
|
|
the float valve. |
|
Sealing gasket is not |
Install the sealing gasket properly. |
|
properly installed. |
||
|
||
The float valve is stuck |
a. Please use a skewer to poke the float |
|
valve, to make it fall down. |
||
because it is too dirty, |
||
b. Before next use, please clean and wipe |
||
and therefore unable to |
||
the float valve (see page 18, cleaning steps |
||
move down. |
of the float valve). |
|
|
||
Direction which lid was |
Close the lid in the correct direction |
|
closed is incorrect. |
according to the instruction manual. |
|
Faulty pressure control |
Send to repair and maintenance |
|
resulted in release of |
||
department. |
||
pressure. |
||
|
||
Pressure limit valve is in |
Gentling press the pressure limit valve to |
|
an incorrect in position. |
make it fall into place. |
|
Rice/water ratio is |
Use the required rice/water ratio |
|
Be sure the releasing valve is not dirty and |
||
incorrect. |
||
creating leakage during cooking. |
||
|
||
No electricity from the |
Check the home electric circuit. |
|
power supply. |
||
|
||
Lid temperature sensor |
Send to repair and maintenance |
|
is faulty. |
department. |
|
The bottom sensor open |
Send to repair and maintenance |
|
circuit or short circuit. |
department |
|
|
Check if the program selected requires the |
|
|
lid totally closed . |
|
lid is not locked |
If yes, completely lock the lid. |
|
|
If no, send to repair and maintenance |
|
|
department. |
|
|
Check that gasket is properly installed and |
|
Abnormal low pressure. |
cleaned.Check that pressure limit valve falls |
|
down into place and is cleaned.Check that |
||
|
lid fixing nut is well tightened. |
|
The sealing gasket was |
Remove the gasket, clean it and reinstall the |
|
sealing gasket properly, in correct position (see |
||
not properly installed. |
||
page 18, cleaning steps of the lid gasket). |
||
|
20
BEZPEČNOSTNÍ POKYNY
Nespěchejte a pozorně si přečtěte všechny následující pokyny.
•Přístroj používejte výhradně uvnitř.
•V případě čištění přístroje konzultujte pokyny v návodu. Varnou nádobu a parní košík můžete umýt v teplé vodě CS se saponátem nebo v myčce. Tělo přístroje čistěte vlhkým hadříkem.
•Tento přístroj se nikdy nesmí ponořit do žádné kapaliny.
•Nesprávné použití přístroje a jeho příslušenství může poškodit přístroj a způsobit zranění.
•Nikdy se nedotýkejte horkých částí přístroje. Ohřívací součást má po použití zbytkové teplo.
•V zájmu vaší bezpečnosti je tento přístroj ve shodě
s použitelnémi normami a předpisy (Směrnice o nízkém napětí, Elektromagnetické kompatibilitě, Materiálech v kontaktu s potravinami, životním prostředí...).
•Tento přístroj není určen k tomu, aby ho používaly osoby (včetně dětí), jejichž fyzické, smyslové nebo duševní schopnosti jsou snížené, nebo osoby bez patřičných zkušeností nebo znalostí, pokud na ně nedohlíží osoba odpovědná za jejich bezpečnost nebo pokud je tato osoba předem nepoučila o tom, jak se přístroj používá.
Na děti je třeba dohlížet, aby si s přístrojem nehrály.
•Jestliže je napájecí kabel tohoto přístroje poškozený, z bezpečnostních důvodů jej musí vyměnit výrobce, jeho servisní oddělení nebo osoba se srovnatelnou kvalifikací. Nevyměňujte dodaný napájecí kabel za jiný kabel.
•Tento přístroj je určen výhradně pro použití v domácnosti. Není určen pro použití v následujících případech, na které se nevztahuje záruka:
21

-používání v kuchyňských koutech vyhrazených pro personál v obchodech, kancelářích a v jiném profesionálním prostředí,
-používání na farmách,
-používání zákazníky hotelů, motelů a jiných zařízení ubytovacího typu,
-používání v pokojích pro hosty.
•Přístroj nesmí být používán dětmi. Ukládejte přístroj a jeho kabel mimo dosah dětí.
•Tento přístroj smějí používat osoby, jejichž fyzické, smyslové nebo duševní schopnosti jsou snížené, nebo osoby bez patřičných zkušeností nebo znalostí, pokud jsou pod dohledem nebo obdržely pokyny týkající se bezpečného používání přístroje a náležitě rozumí potenciálním rizikům.
•Zařízení není určeno k tomu, aby dětem sloužilo jako hračka.
•Nenaplňujte přístroj nad rysku MAX v nádobě. Nenaplňujte více než polovinu objemu nádoby v případě pokrmů, které
se během vaření rozšiřují, jako je rýže nebo sušená zelenina, snižte objem vody, aby nedošlo k přetékání.
•Dbejte na dodržení doporučení týkajících se objemu potravin a vody, abyste zabránili jakémukoli přetížení, které by mohlo poškodit přístroj a způsobit zranění.
•Před každým použitím ověřte, zda je dekompresní kulička a bezpečnostní ventil čistý, než přístroj použijete (viz oddíl Čištění a údržba).
•Do dekompresního systému nevstrkujte žádný předmět ani cizí těleso. Kuličku nevyměňujte.
•Pokud otevíráte víko, udržujte je vždy za držadlo pro otevření/zavírání. Umístěte ruce do linie bočních přenosných držadel.
22

Může dojít k tomu, že mezi držákem těsnění a víkem zbyla vařící voda, a mohli byste se popálit.
•Dávejte také pozor na riziko opaření párou, která vychází z výrobku v okamžiku otevření. Nejprve víko pootevřete, aby pára mohla pomalu unikat.
• Nikdy nezkoušejte násilím otevřít víko. |
CS |
Víko neotevírejte, dokud je výrobek pod tlakem. Postupujte |
|
vždy podle pokynů k použití. |
|
•Vzhledem k rozmanitosti platných norem je třeba, pokud je přístroj používán v jiné zemi, než ve které byl zakoupen, nechat ho zkontrolovat schváleným servisem.
•Používejte výhradně náhradní díly upravené pro váš model. Toto platí zejména pro těsnění, varnou nádobu a kovové víko.
•Dávejte pozor, abyste nepoškodili těsnění. Pokud dojde k jeho poškození, nechte je vyměnit
vAutorizovaném servisním středisku.
•Zdroj ohřevu pro vaření je součástí přístroje.
•Přístroj nikdy neumisťujte do vyhřáté trouby nebo na teplou plotnu. Přístroj nestavte do blízkosti otevřeného plamene nebo hořlavého předmětu.
•Neohřívejte varnou nádobu pomocí jiného zdroje tepla než topného tělesa přístroje a nepoužívejte jinou nádobu. Nepoužívejte varnou nádobu ani s jinými přístroji.
•Pokud je přístroj pod tlakem, přemisťujte jej velmi opatrně. Nedotýkejte se horkých částí přístroje. Přenášejte přístroj jen pomocí držadel určených k tomuto účelu a používejte ochranné rukavice podle potřeby. Nikdy nepoužívejte držadlo víka na přenášení přístroje.
•Nikdy nepoužívejte spotřebič v jiných podmínkách, než pro jaké byl navržen.
•Tento výrobek není sterilizátor. Nepoužívejte jej ke sterilizaci nádob.
•Přístroj vaří pokrmy pod tlakem. Nesprávným používáním může dojít k vzniku popálenin a opaření od páry.
•Zkontrolujte, zda je přístroj správně uzavřen, než jej natlakujete (viz návod k použití).
•Nikdy nepoužívejte přístroj na prázdno, bez nádoby ani bez kapaliny v nádobě. Tím by mohlo dojít
kvážnému poškození přístroje.
•Pokud vaříte silnější kus masa (například hovězí jazyk), nepropichujte kůži, pokud po uvaření vypadá nafouknutě, mohli byste se popálit. Nezapomeňte kůži propíchnout před vařením. Pokud vaříte pokrmy tužší konzistence (cizrna, rebarbora, zavařované ovoce atd.), opatrně natřeste přístroj, než jej otevřete, aby pokrmy nevystříkly anebo aby šťávy z vaření nevytryskly při otevření.
•Nepoužívejte přístroj na smažení pokrmů v oleji. Přípustné je jen opékání/osmahnutí.
•Při opékání dávejte pozor na riziko popálení vlivem vystřikujícího oleje, když přidáváte pokrmy nebo přísady do teplé nádoby.
23

•Při vaření a automatickém uvolnění tlaku na konci vaření z přístroje uniká teplo i pára. Udržujte obličej
iruce dále od přístroje v tomto okamžiku, abyste se nepopálili. Během vaření se nedotýkejte víka.
•Mezi víko a trup přístroje nevstouvejte žádný předmět (utěrku apod.) s cílem udržet víko otevřené - mohlo by dojít k trvalému poškození těsnění.
•Nikdy se nedotýkejte bezpečnostních prvků kromě čištění a údržby přístroje, které je nutno provádět
vsouladu s dodanými pokyny.
•Dávejte pozor, aby spodní část varné nádoby a topné těleso byly vždy čisté. Zkontrolujte, zda je středový prvek topného tělesa pohyblivý.
•Přístroj nenaplňujte bez nainstalování varné nádoby.
•Použijte plastové nebo dřevěné náčiní, abyste nepoškodili nepřilnavý povrch nádoby. Nikdy nekrájejte pokrmy přímo ve varné nádobě.
•Pokud se na okraji víka objeví výrazné množství páry, okamžitě odpojte napájecí kabel a zkontrolujte čistotu přístroje. Podle potřeby odešlete přístroj k opravě do Autorizovaného servisního střediska.
•Nepřenášejte přístroj za držadla odnímatelné nádoby. Vždy používejte obě boční držadla umístěná na trupu přístroje, pokud je přístroj teplý, používejte ochranné rukavice. Z bezpečnostních důvodů zkontrolujte, zda je víko před přepravou zamčeno.
•Pokud tlak trvale uniká pomocí tlumicího ventilu přístroje (po dobu déle než 1 minuta) při vaření pod tlakem, odešlete přístroj do autorizovaného servisního střediska k opravě.
•Nepoužívejte poškozený přístroj, zaneste jej do autorizovaného servisního střediska.
TYTO POKYNY PEČLIVĚ USCHOVEJTE.
•Používejte pouze náhradní díly dodávané autorizovanými servisními středisky.
•Záruka se nevztahuje na neobvyklé opotřebení varné nádoby.
•Pozorně si přečtěte návod k použití, než přístroj poprvé použijete. Jakékoli používání, které není
vsouladu s pokyny, znamená omezení odpovědnosti a záruky výrobce.
•V souladu s platnými předpisy musíte přístroj připravit a zajistit jeho nepoužitelnost (odpojte jej
aodřízněte napájecí kabel) před jeho likvidací.
Podílejme se na ochraně životního prostředí!
 Váš přístroj obsahuje četné materiály, které lze zhodnocovat nebo recyklovat.
 Svěřte jej sběrnému místu nebo, neexistuje-li, schválenému servisnímu středisku, kde s ním bude naloženo odpovídajícím způsobem.
24

POPIS
Atěsnící profil
BNapařovací košík
CTrojnožka
DVarná nádoba (vyjímatelná)
ETopné těleso
FMadlo na přenášení
GOvládací panel
HZákladna
OVLÁDACÍ PANEL
Klávesa funkce
Cancel (Udržování teploty / Zrušit)
Klávesa funkce Rice (Rýže)
Klávesa funkce Oatmeal (Porridge) (Ovesná kaše (Vločková kaše))
Klávesa Baby food (Dětská strava)
Funkce Pressure cook (Tlakové vaření)
Klávesa funkce Bake (Pečení)
Klávesa funkce DIY (Vlastní nastavení)
Digitální displej
Klávesa Delayed start (Odložený start)
Duh kontrolek potravin
Klávesa Increase (Zvýšit)
Klávesa Reduce (Snížit)
Klávesa Temperature (Teplota)
I |
Bezpečnostní ventil |
|
J |
Tlakový omezovací ventil |
|
K |
Držadlo víka |
|
L |
Víko |
|
M |
Kondenzační nádoba |
|
Ne |
Odměrný šálek |
CS |
O |
Naběračka na rýži |
|
P |
Napájecí kabel |
|
Klávesa funkce Start / Stop (Start / Stop)
Klávesa funkce Stew / Soup (Dušení / Polévka)
Klávesa funkce Steam (Pára)
Klávesa funkce Browning (Propečení kůrky)
Klávesa funkce Simmer
(Mírný var)
Klávesa funkce Slow cook
(Pomalé vaření) Klávesa funkce Reheat (Ohřev)
Klávesa Timer (Časovač)
Klávesa Menu (Nabídka)
Ukazatele hladiny tlaku
1.Těmito 20 funkcemi je: «Udržování teploty / Zrušit», «Rýže», «Ovesná kaše», «Dětská strava»,
«Tlakové vaření», «Pečení», «Vlastní nastavení», «Udržování teploty», «Pomalé vaření», «Mírný
var», «Zapečení», «Pára», «Dušení/Polévka», , «Odložený start», «Časovač», «Nabídka»,
 ,
, , «Teplota».
2.Je navrženo 25 druhů vaření, více informací naleznete v tabulce 1.
3.Pro režimy «Pára», «Dušení / Polévka» a «Mírný var» můžete zvolit druh potraviny: «zelenina», «ryby», «maso / fazole».
25

PŘED PRVNÍM POUŽITÍM
Sejměte obal
•Vybalte spotřebič z obalu. Uschovejte si záruční kartu a před prvním použitím spotřebiče si přečtěte návod k obsluze.
•Umístěte spotřebič na rovný povrch. Odstraňte veškerý obalový materiál z vnitřku
spotřebiče: plastové sáčky, příslušenství (trojnožku, naběračku na rýži, odměrku a kondenzační nádobu) a zástrčku – obr. 4.
• Před prvním použitím spotřebiče z něj sejměte reklamní samolepku.
Otevření víka
• Chcete-li otevřít víko, uchopte rukojeť, otočte s ní proti směru hodinových ručiček a vytáhněte víko doprava – obr. 1-2-3.
Čištění
•Pozor: pouze příslušenství lze bezpečně mýt v myčce na nádobí.
•Opláchněte varnou nádobu, kondenzační nádobu, trojnožku, těsnicí profil.
První použití spotřebiče.
• Zcela rozviňte napájecí kabel, zapojte jej do spotřebiče a poté jej zapojte do sítě – obr. 8.
NÁVOD K POUŽITÍ
Umístěte na příslušné místo kondenzační nádobu. – obr. 7.
Vyjměte varnou nádobu a přidejte ingredience
•Vyjměte varnou nádobu.
•Ingredience vložte do varné nádoby.
•Upozorňujeme, že hladina potravin a kapalin by nikdy neměla převyšovat značku maximálního množství na varné nádobě – obr. 9.
Umístěte varnou nádobu do spotřebiče.
•Přesvědčte se, že dno varné nádoby je čisté a suché, a odstraňte z varné desky veškeré zbytky potravin. Potom umístěte varnou nádobu do spotřebiče – obr. 10-11.
•Spotřebič nepoužívejte bez varné nádoby.
Zavřete a zamkněte víko.
•Zkontrolujte, zda je těsnicí profil správně usazen na nosném krytu pro těsnicí profil.
•Zavřete víko spotřebiče a otočte jím zcela doprava – obr. 12-13-14.
26
Upevněte tlakový omezovací ventil
•Upravte polohu tlakového omezovacího ventilu a přesvědčte se, že funguje. Upozorňujeme, že ventil nezacvakne na své místo a že zůstane mírně uvolněn. Než zahájíte tlakové vaření, zkontrolujte, zda je tlakový omezovací ventil dole (viz popis spotřebiče).
VYSVĚTLENÍ FUNKCÍ
CS
1. Zapnutí spotřebiče (pohotovostní režim)
Připojte spotřebič k napájení. Systém zahájí automatickou kontrolu a zvuková signalizace «ZAPÍPÁ». Digitální displej a všechny kontrolky se rozsvítí. Po 1 sekundě se na displeji zobrazí «----» a spotřebič bude v pohotovostním režimu.
2. Pracovní režim
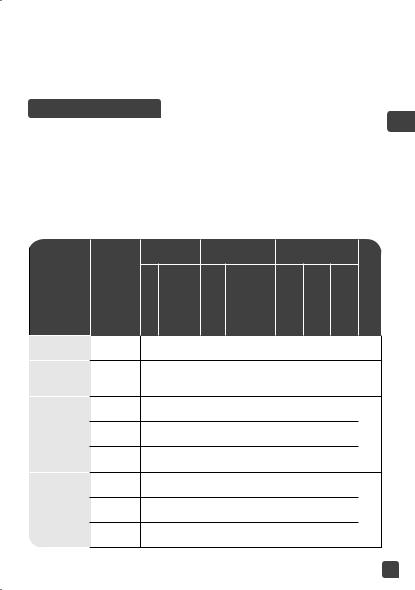
1.Každá funkce má výchozí dobu a teplotu a vyžaduje specifickou polohu víka, jak je vyobrazeno níže:
PROGRAMY NABÍDKA
Rýže |
|
Ovesná kaše |
|
(Vločková |
|
kaše) |
|
|
zel |
Dušení / |
|
Polévka |
ryby |
|
maso / |
|
fazole |
|
zel |
Pára |
ryby |
|
|
|
maso / |
|
fazole |
|
|
NASTAVENÁ |
|
TEPLOTA (°C) |
|
POLOHA VÍKA |
|
||||||
DOBA (min) |
|
|
vaření s tlakem |
||||||||
|
|
|
|
|
|
|
|
||||
Výchozí |
|
Rozmezí |
|
Výchozí |
|
Rozmezí |
|
Víko je zavřené + zamčené Víko je zavřené + nezamčené Víko je zvednuté |
|||
9 |
|
1–50 |
|
108 |
|
není |
|
• |
|
|
• |
|
|
|
|
|
|
||||||
|
|
|
relevantní |
|
|
|
|||||
3 |
|
1–20 |
|
90 |
|
není |
|
• |
|
|
|
|
|
|
relevantní |
|
|
|
|
||||
10 |
|
1–70 |
|
108 |
|
není |
|
• |
|
|
|
|
|
|
relevantní |
|
|
|
|
||||
20 |
|
1–70 |
|
104 |
|
není |
|
• |
|
|
• |
|
|
|
relevantní |
|
|
|
|||||
40 |
|
1–70 |
|
112 |
|
není |
|
• |
|
|
|
|
|
|
relevantní |
|
|
|
|
||||
3 |
|
1–40 |
|
108 |
|
není |
|
• |
|
|
|
|
|
|
relevantní |
|
|
|
|
||||
3 |
|
1–15 |
|
104 |
|
není |
|
• |
|
|
• |
|
|
|
relevantní |
|
|
|
|||||
10 |
|
5-40 |
|
112 |
|
není |
|
• |
|
|
|
|
|
|
relevantní |
|
|
|
|
||||
|
|
|
|
|
|
|
|
|
|
|
|
27

|
|
NASTAVENÁ |
|
|
|
DOBA (min) |
|
PROGRAMY |
NABÍDKA |
Výchozí |
Rozmezí |
|
|
||
Propečení kůrky
Ohřev
Mírný var
Vaření pod tlakem
Dětská strava
Pečení
Pomalé vaření
|
10 |
1–60 |
|
4 |
1–60 |
zel |
15 |
1–35 |
ryby |
15 |
1–35 |
maso/fazole |
15 |
5–35 |
vysoký |
30 |
5–40 |
střední |
30 |
5–40 |
nízký |
30 |
5–40 |
|
30 |
5–70 |
|
40 |
5–60 |
|
2 h |
2 h– |
|
9 h |
|
|
|
NASTAVENÁ
DOBA (min)
PROGRAMY |
NABÍDKA |
Výchozí |
Rozmezí |
|
|
|
|||
|
|
|
|
|
|
1 |
|
|
|
|
2 |
|
|
|
|
|
|
|
|
Vlastní |
3 |
10 |
1-60 |
|
nastavení |
4 |
|||
|
|
|||
|
5 |
|
|
|
|
6 |
|
|
|
|
|
|
|
TEPLOTA (°C) |
|
|
POLOHA VÍKA |
vaření s tlakem |
|||||||
Výchozí |
|
Rozmezí |
|
Víko je zavřené |
+ zamčené |
Víko je zavřené + nezamčené |
|
Víko je zvednuté |
|||
160 |
|
100–160 |
|
|
|
|
|
|
• |
|
|
|
|
|
|
|
|
|
|
|
|||
104 |
|
není |
|
|
• |
|
|
|
|
• |
|
|
relevantní |
|
|
|
|
|
|
||||
108 |
|
není |
|
|
• |
|
|
|
|
|
|
|
relevantní |
|
|
|
|
|
|
|
|||
104 |
|
není |
|
|
• |
|
|
|
|
• |
|
|
relevantní |
|
|
|
|
|
|
||||
112 |
|
není |
|
|
• |
|
|
|
|
|
|
|
relevantní |
|
|
|
|
|
|
|
|||
112 |
|
není |
|
|
• |
|
|
|
|
|
|
|
relevantní |
|
|
|
|
|
|
|
|||
108 |
|
není |
|
|
• |
|
|
|
|
• |
|
|
relevantní |
|
|
|
|
|
|
||||
104 |
|
není |
|
|
• |
|
|
|
|
|
|
|
relevantní |
|
|
|
|
|
|
|
|||
112 |
|
není |
|
|
• |
|
|
|
|
• |
|
|
relevantní |
|
|
|
|
|
|
||||
150 |
|
není |
|
|
|
|
• |
|
|
|
|
|
relevantní |
|
|
|
|
|
|
|
|
||
85 |
|
není |
|
|
• |
|
|
|
|
|
|
|
relevantní |
|
|
|
|
|
|
|
|||
|
|
|
POLOHA VÍKA |
|
|
|
|
||||
zavřené + zamčené |
nezamčené / |
||||||||||
zvednuté |
|
||||||||||
|
|
|
|
|
|
|
|
||||
|
|
70 °C |
|
|
|
|
|
70 °C |
|
||
|
|
|
|
|
|
|
|
||||
|
|
80 °C |
|
|
|
|
|
80 °C |
|
||
|
|
|
|
|
|
|
|
|
|
||
|
|
90 °C |
|
|
|
|
|
90 °C |
|
||
|
|
|
|
|
|
|
|||||
|
NÍZKÝ*(104 °C) |
|
|
|
100 °C |
|
|||||
|
STŘEDNÍ*(108 °C) |
|
|
|
110 °C |
|
|||||
|
VYSOKÝ*(112 °C) |
|
|
|
120 °C |
|
|||||
|
|
|
|
|
|
|
|
|
|
|
|
*Vaření s tlakem
28
NÁVOD K PROGRAMŮM VAŘENÍ
Funkce Rýže, Ovesná kaše (Vločková kaše), Dětská strava, Pečení, Pomalé vaření, Udržování teploty
•Stiskněte příslušné tlačítko požadované funkce a na displeji se zobrazí výchozí doba vaření.
•Potom stiskněte  a nastavte požadovanou dobu vaření stiskem kláves
  nebo
nebo  .
.
• Následně stiskněte |
. Spotřebič přejde do režimu předehřátí pro vaření a na displeji |
CS |
||
se zobrazí kroužící červené kolečko « |
». |
|||
|
||||
•Jakmile je dosaženo teploty pro vaření, spotřebič se přepne automaticky na odpočet, což značí zahájení fáze vaření.
•Na konci odpočtu spotřebič pípne, a oznámí tak konec vaření.
Poznámka: Polohu víka pro jednotlivé funkce naleznete v tabulce na stranách 13 a 14.
Funkce Dušení/Polévka, Pára, Mírný var
•Stiskněte příslušnou klávesu požadované funkce a na displeji se zobrazí výchozí doba
vaření, rozsvítí se výchozí ukazatel pro druh potraviny 


 a také příslušný ukazatel hladiny tlaku.
•V případě potřeby můžete dobu a druh potraviny změnit.
•Chcete-li změnit dobu vaření, stiskněte klávesu  a nastavte požadovanou dobu stisknutím kláves
  nebo
nebo  .
.
•Chcete-li změnit druh potraviny, stiskněte několikrát klávesu Nabídka, dokud se nerozsvítí ukazatel požadovaného druhu potraviny. Pod určenou potravinou se rozsvítí červený ukazatel.
•Následně stiskněte  . Spotřebič přejde do režimu předehřátí pro vaření a na displeji se zobrazí «


 ».
».
•Jakmile je dosaženo teploty pro vaření, spotřebič se přepne automaticky do fáze vaření a započne odpočet dříve nastavené doby.
•Na konci odpočtu spotřebič pípne, a oznámí tak konec vaření.
•Spotřebič přejde do režimu udržování teploty (viz kapitola Udržování teploty).
Poznámka: polohu víka pro jednotlivé funkce naleznete v tabulce na stranách 13 a 14.
Funkce propečení kůrky
•Můžete nejprve přidat olej a až poté ingredience nebo přidat olej a ingredience současně.
•Stiskněte klávesu Propečení kůrky a na displeji se zobrazí výchozí teplota.
•V případě potřeby můžete teplotu stisknutím kláves  nebo
nebo  .
.
•Poté, chcete-li změnit dobu propékání kůrky, stiskněte klávesu  a nastavte požadovanou dobu stisknutím kláves
  nebo
nebo  .
.
•Teplotu můžete změnit stisknutím klávesy teploty (  ) a klávesy
  nebo
nebo  .
.
•Následně stiskněte  . Spotřebič přejde do režimu předehřátí pro vaření a na displeji se zobrazí «


 ».
».
•Jakmile je dosaženo teploty pro vaření, spotřebič se přepne automaticky do fáze vaření a započne odpočet dříve nastavené doby.
•Na konci odpočtu spotřebič pípne, a oznámí tak konec vaření.
Poznámka:
*Víko musí během propékání kůrky zůstat otevřené.
*Abyste předešli přehřátí oleje, nepoužívejte funkci propečení kůrky po dobu delší než 30 minut.
29

Funkce tlakového vaření
•Stiskněte klávesu Pressure cook (Tlakové vaření); tlaková hladina je indikována kontrolkou na ovládacím panelu (Vysoká, Střední nebo Nízká) a na displeji symboly «HI-P», «P» nebo «LO-P».
•Tlakovou hladinu můžete měnit stisknutím kláves  nebo
nebo  .
.
•V případě potřeby můžete měnit také dobu vaření stisknutím klávesy  a nastavením požadované doby stisknutím kláves
  nebo
nebo  .
.
•Následně stiskněte  . Spotřebič přejde do režimu předehřátí pro vaření a na displeji se zobrazí «


 ».
».
•Spotřebič se automaticky přepne do fáze vaření (oznámené jedním pípnutím) a zahájí odpočet předtím nastavené doby. Další pípnutí během vaření (dvě pípnutí) informuje, že je dosažen provozní tlak.
•Na konci odpočtu spotřebič pípne, a oznámí tak konec vaření.
•Elektrický tlakový hrnec přejde do režimu udržování teploty (viz kapitola Udržovat teplotu).
Poznámka: Během tlakového vaření musí víko zůstat zavřené a zamknuté.
Funkce Vlastní nastavení
Díky této funkci můžete libovolně nastavovat dobu vaření a teplotu/tlak.
•Nastavte si vlastní úroveň vaření DIY od 1 do 6 v závislosti na vaření, které chcete realizovat
(viz tabulka 14), stisknutím kláves nebo
nebo . Chcete-li vařit s použitím tlaku v režimu vlastního nastavení: víko musí být zamknuto, ve varné nádobě musí být dostatek kapaliny a musíte si zvolit mezi třemi úrovněmi: 4 (NÍZKÝ tlak 20 kPa), 5 (STŘEDNÍ tlak 38 kPa) nebo 6 (VYSOKÝ tlak 60 kPa).
•V případě potřeby můžete měnit také dobu vaření stisknutím klávesy  a nastavením požadované doby stisknutím kláves
  nebo
nebo  .
.
•Následně stiskněte  . Spotřebič přejde do režimu předehřátí pro vaření a na displeji se zobrazí «


 ».
».
•Jakmile je dosaženo teploty pro vaření, spotřebič se přepne automaticky do fáze vaření a započne odpočet dříve nastavené doby.
•Na konci odpočtu spotřebič pípne a oznámí tak konec vaření.
Udržování teploty
•V režimu udržování teploty, pokud odečet při vaření dosáhne 0, spotřebič “pípne” a potom automaticky přejde do nastavení udržování teploty (kromě funkcí vlastního nastavení) a na digitálním displeji se zobrazí «00:00».
•Pokud stisknete  v pohotovostním režimu, spotřebič aktivuje funkci udržování teploty, na digitálním displeji se zobrazí «00:00» a začne běžet čas.
•Po 24 hodinách bude tato funkce automaticky zrušena a spotřebič se vrátí do pohotovostního režimu.
•Během udržování teploty dbejte na to, aby bylo víko zavřené.
30
 Loading...