


DSC-S3000
Table of contents
 Loading...
4-273-931-51(1)
DSC-S3000
Digital Still Camera / Instruction Manual GB
Appareil photo numérique / Mode d’emploi FR
Fotocamera digitale / Istruzioni per l’uso IT
Cámara fotografía digital / Manual de instrucciones ES
Câmara fotográfica digital / Manual de instruções PT
Digitale Fotokamera / Gebrauchsanleitung DE
Digitale camera / Gebruiksaanwijzing NL
Cyfrowy aparat fotograficzny / Instrukcja obsługi PL
Digitální fotoaparát / Návod k obsluze CZ
Digitális fényképezőgép / Használati útmutató HU
Digitálny fotoaparát / Návod na používanie SK
Digital stillbildskamera / Handledning SE
Digitaalikamera / Käyttöopas FI
Digitalt stillkamera / Bruksanvisning NO
Digitalt stillbilledkamera / Betjeningsvejledning DK
Digitalni fotoaparat / Priručnik za upotrebu HR
Aparat foto digital / Manual de instrucţiuni RO
Dijital Fotoğraf Makinesi / Kullanma Kılavuzu TR
Ψηφιακή φωτογραφική μηχανή / Εγχειρίδιο οδηγιών GR
©2011 Sony Corporation Printed in China
DSC-S3000

English
Owner’s Record
The model and serial numbers are located on the bottom. Record the serial number in the
space provided below. Refer to these numbers whenever you call upon your Sony dealer
regarding this product.
Model No. DSC-S3000
Serial No. ______________________________
WARNING
To reduce fire or shock hazard, do not expose the unit to rain or
moisture.
For Customers in the U.S.A.
If you have any questions about this product, you may call:
Sony Customer Information Center
1-800-222-SONY (7669).
The number below is for the FCC related matters only.
[ Regulatory Information
Declaration of Conformity
Trade Name: SONY
Model No.: DSC-S3000
Responsible Party: Sony Electronics Inc.
Address: 16530 Via Esprillo,
Telephone No.: 858-942-2230
This device complies with Part15 of the FCC Rules. Operation is subject to the
following two conditions: (1) This device may not cause harmful interference, and (2)
this device must accept any interference received, including interference that may cause
undesired operation.
San Diego, CA 92127 U.S.A.
GB
2

[ CAUTION
You are cautioned that any changes or modifications not expressly approved in this manual
could void your authority to operate this equipment.
[ Note:
This equipment has been tested and found to comply with the limits for a Class B digital
device, pursuant to Part 15 of the FCC Rules.
These limits are designed to provide reasonable protection against harmful interference in
a residential installation. This equipment generates, uses, and can radiate radio frequency
energy and, if not installed and used in accordance with the instructions, may cause
harmful interference to radio communications. However, there is no guarantee that
interference will not occur in a particular installation. If this equipment does cause harmful
interference to radio or television reception, which can be determined by turning the
equipment off and on, the user is encouraged to try to correct the interference by one or
more of the following measures:
– Reorient or relocate the receiving antenna.
– Increase the separation between the equipment and receiver.
– Connect the equipment into an outlet on a circuit different from that to which the
receiver is connected.
– Consult the dealer or an experienced radio/TV technician for help.
The supplied interface cable must be used with the equipment in order to comply with the
limits for a digital device pursuant to Subpart B of Part 15 of FCC Rules.
For Customers in Europe
[ Notice for the customers in the countries applying EU Directives
The manufacturer of this product is Sony Corporation, 1-7-1 Konan Minato-ku Tokyo,
108-0075 Japan. The Authorized Representative for EMC and product safety is Sony
Deutschland GmbH, Hedelfinger Strasse 61, 70327 Stuttgart, Germany. For any service or
guarantee matters please refer to the addresses given in separate service or guarantee
documents.
This product has been tested and found compliant with the limits set out in the EMC
Directive for using connection cables shorter than 3 meters (9.8 feet).
[ Attention
The electromagnetic fields at the specific frequencies may influence the picture and sound
of this unit.
[ Notice
If static electricity or electromagnetism causes data transfer to discontinue midway (fail),
restart the application or disconnect and connect the communication cable (USB, etc.)
again.
GB
GB
3
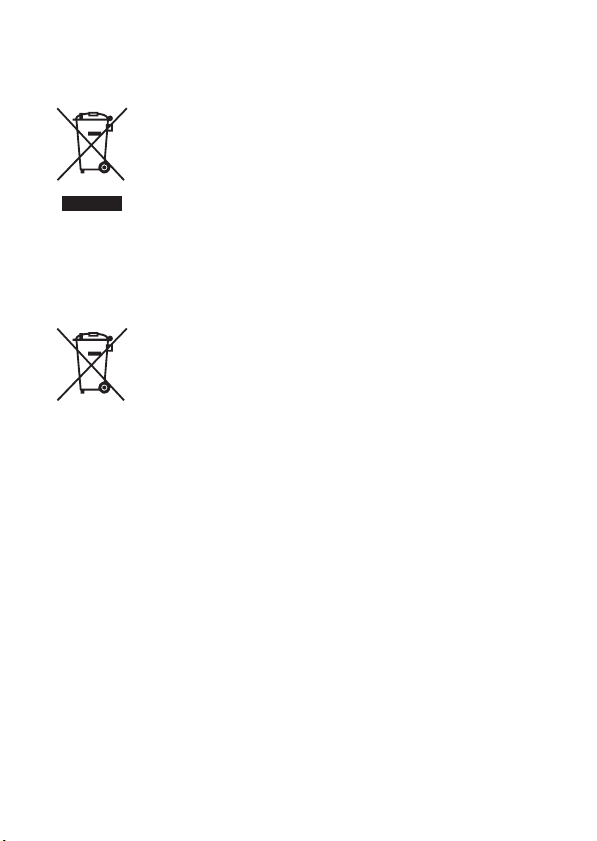
[ Disposal of Old Electrical & Electronic Equipment (Applicable in
the European Union and other European countries with separate
collection systems)
This symbol on the product or on its packaging indicates that this product
shall not be treated as household waste. Instead it shall be handed over to
the applicable collection point for the recycling of electrical and electronic
equipment. By ensuring this product is disposed of correctly, you will help
prevent potential negative consequences for the environment and human
health, which could otherwise be caused by inappropriate waste handling
of this product. The recycling of materials will help to conserve natural
please contact your local Civic Office, your household waste disposal service or the shop
where you purchased the product.
resources. For more detailed information about recycling of this product,
[ Disposal of waste batteries (applicable in the European Union
and other European countries with separate collection systems)
This symbol on the battery or on the packaging indicates that the battery
provided with this product shall not be treated as household waste.
On certain batteries this symbol might be used in combination with a
chemical symbol. The chemical symbols for mercury (Hg) or lead (Pb) are
added if the battery contains more than 0.0005% mercury or 0.004% lead.
potentially negative consequences for the environment and human health which could
otherwise be caused by inappropriate waste handling of the battery. The recycling of the
materials will help to conserve natural resources.
In case of products that for safety, performance or data integrity reasons require a
permanent connection with an incorporated battery, this battery should be replaced by
qualified service staff only. To ensure that the battery will be treated properly, hand over
the product at end-of-life to the applicable collection point for the recycling of electrical
and electronic equipment.
For all other batteries, please view the section on how to remove the battery from the
product safely.
Hand the battery over to the applicable collection point for the recycling of waste batteries.
For more detailed information about recycling of this product or battery, please contact
your local Civic Office, your household waste disposal service or the shop where you
purchased the product.
By ensuring these batteries are disposed of correctly, you will help prevent
GB
4

Refer to “Cyber-shot User Guide” (HTML) on supplied CD-ROM
For details on advanced operations, please read “Cyber-shot User Guide”
(HTML) on the CD-ROM (supplied) using a computer.
Insert the CD-ROM into the CD-ROM drive.
For Windows users:
1 Click [User Guide] t [Install].
2 Start “User Guide” from the shortcut on the desktop.
For Macintosh users:
1 Select the [User Guide] and copy [eng] folder stored in the [User Guide]
folder to your computer.
2 After copying is complete, double-click “index.html” in the [eng] folder.
Checking the accessories supplied
• LR6 (size AA) alkaline batteries (2)
• Dedicated USB cable (Sony Corporation 1-837-597-) (1)
• Wrist strap (1)
•CD-ROM (1)
– Cyber-shot application software
– “Cyber-shot User Guide”
• Instruction Manual (this manual) (1)
GB
GB
5

Identifying parts
G Lens
H LCD screen
I (Playback) button
J Control button
Menu on: v/V/b/B/z
Menu off: DISP/ / /
K For shooting: W/T (Zoom)
button
For viewing: (Playback
zoom) button/ (Index) button
L Mode switch
M Hook for wrist strap
N (USB) / A/V OUT jack
O (Delete) button
P Access lamp
Q MENU button
R Tripod receptacle
• Use a tripod with a screw less
than 5.5 mm (7/32 inches) long.
Otherwise, you cannot firmly
secure the camera, and damage to
the camera may occur.
S Speaker
T Battery/memory card cover
U Memory card slot
V Battery insertion slot
A ON/OFF (Power) button
B Shutter button
C ON/OFF (Power) lamp
D Flash
E Microphone
F Self-timer lamp/Smile Shutter
GB
lamp
6
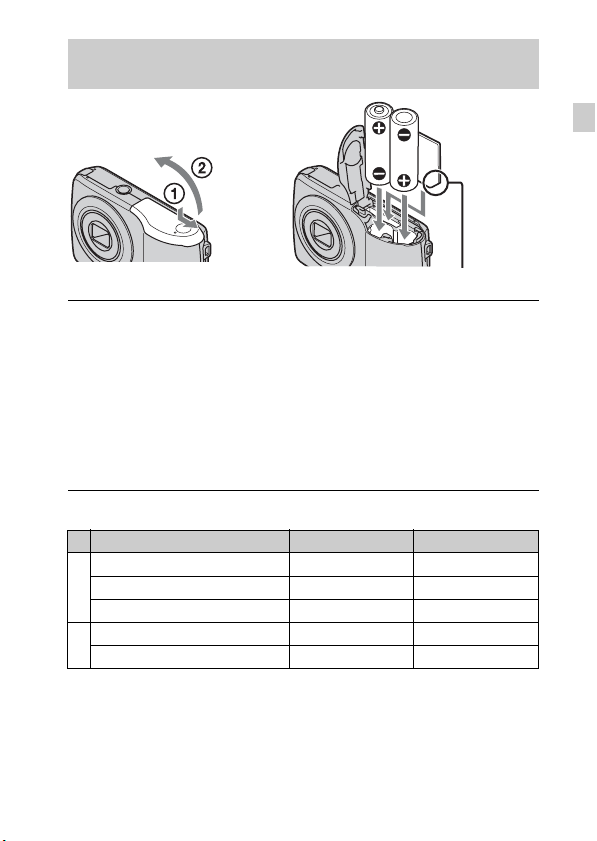
Inserting the batteries/a memory card (sold separately)
Ensure the notched corner faces correctly.
Open the cover.
1
Insert the memory card (sold separately).
2
• With the notched corner facing as illustrated, insert the memory card
until it clicks into place.
Match +/– and insert the batteries.
3
Close the cover.
4
x
Memory cards that you can use
Memory Card For still images For movies
Memory Stick PRO Duo aa
A
Memory Stick PRO-HG Duo aa
Memory Stick Duo a —
SD memory card aa
B
SDHC memory card aa
In this manual, products in A are collectively referred to as “Memory Stick Duo”
•
media.
• In this manual, products in B are collectively referred to as SD card.
• When recording movies, it is recommended that you use Class 2 or faster SD
cards.
GB
GB
7
x
To remove the memory card/batteries
Memory card: Push the memory card in once.
Batteries: Be sure not to drop the batteries.
Note
• Never open the battery/memory card cover or remove the batteries/memory card
when the access lamp (page 6) is lit. This may cause damage to data in the
memory card/internal memory.
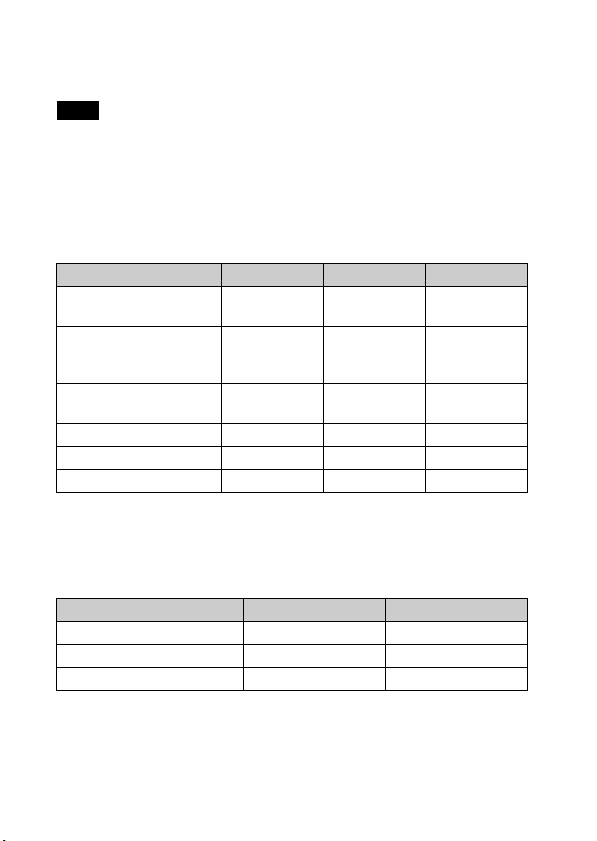
x
Batteries you can and cannot use with your camera
In the table below, a indicates the battery can be used, while — indicates the
one cannot be used.
Battery type Supplied Supported Rechargeable
LR6 (size AA) alkaline
batteries
HR15/51: HR6 (size AA)
Nickel-Metal Hydride
batteries
ZR6 (size AA) Oxy Nickel
Primary batteries
Lithium batteries* — — —
Manganese batteries* — — —
Ni-Cd batteries* — — —
* Operating performance cannot be ensured if voltage drops or other problems are
caused by the nature of the battery.
x
Battery life and number of images you can record/
aa—
— aa
— a —
view
Battery life (min.) No. of Images
Shooting still images Approx. 100 Approx. 200
Viewing still images Approx. 350 Approx. 7000
Shooting movies Approx. 160 —
GB
8

Notes
• The number of images that can be recorded is an approximate number when
shooting with new batteries. The number may be less depending on the
circumstances.
• The number of images that can be recorded is when shooting under the following
conditions:
– Using Sony “Memory Stick PRO Duo” (Mark2) media (sold separately).
– New batteries are used at an ambient temperature of 25°C (77°F).
• The number of still images that can be recorded is based on the CIPA standard,
and is for shooting under the following conditions.
(CIPA: Camera & Imaging Products Association)
– [SteadyShot] is set to [Off].
– DISP (Screen Display Settings) is set to [Normal].
– Shooting once every 30 seconds.
– The zoom is switched alternately between the W and T ends.
– The flash strobes once every two times.
– The power turns on and off once every ten times.
• The battery life for movies is when shooting under the following conditions:
– Recording mode: VGA
– When continuous shooting ends because of set limits (page 16), press the shutter
button down again and continue shooting. Shooting functions such as the zoom
do not operate.
• The values shown for alkaline battery are based on commercial norms, and do not
apply to all alkaline batteries in all conditions. The values may vary, depending on
the battery manufacturer/type, environmental conditions, product setting, etc.
GB
GB
9

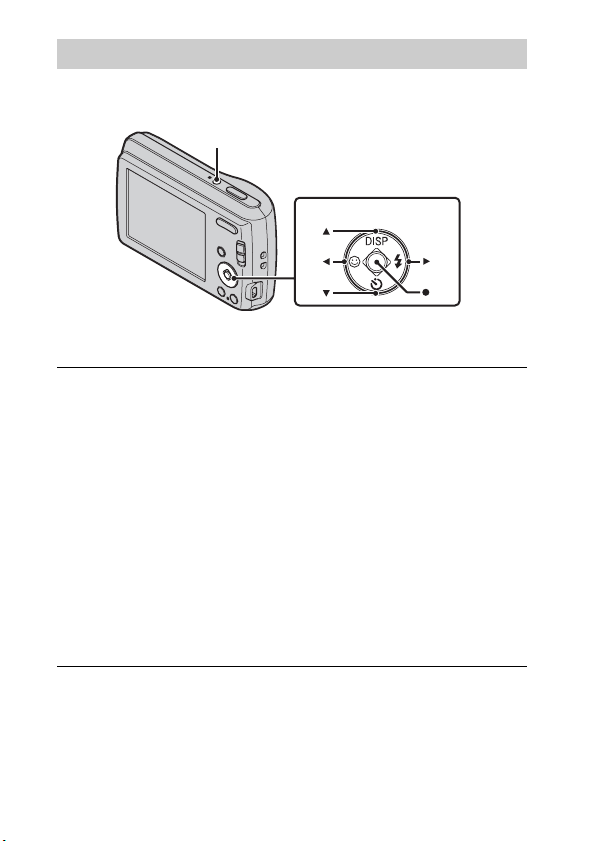
Setting the date and time
Date & Time setting is displayed when you press the ON/OFF (Power) button
for the first time.
ON/OFF (Power)
Control button
Select items: v/V/b/B
Set: z
Press the ON/OFF (Power) button.
1
Date & Time setting is displayed when you press the ON/OFF (Power)
button for the first time.
• It may take time for the power to turn on and allow operation.
Set [Date & Time Format], [Daylight Savings] and [Date
2
& Time], then press [OK].
• Midnight is indicated as 12:00 AM, and noon as 12:00 PM.
Select the desired area following the instructions on the
3
screen, then press z t [OK].
Select the desired display color and display resolution
4
mode, following the instructions on the screen.
10
GB
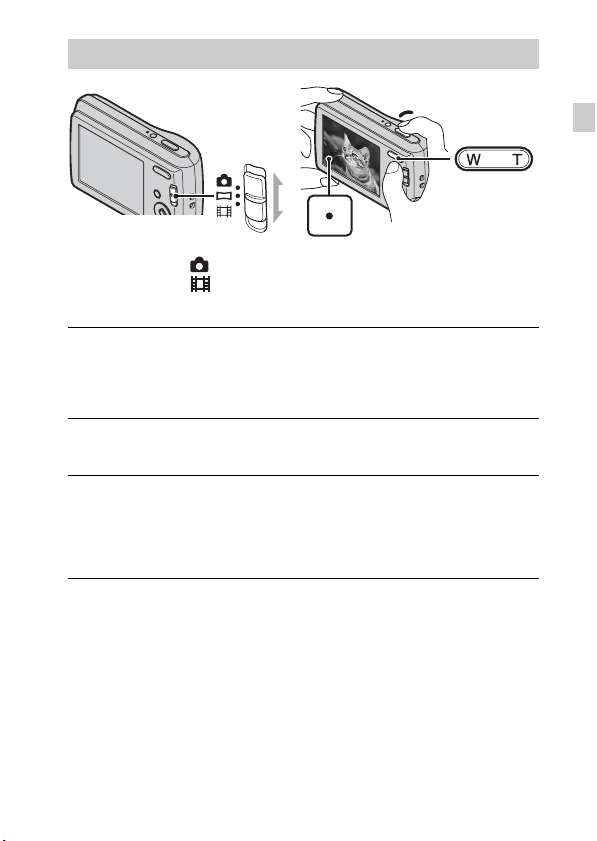
Shooting still images/movies
Shutter button
Mode switch
: Still image
: Movie
Shooting still images:
Press the shutter button halfway down to focus.
1
When the image is in focus, a beep sounds and the z indicator lights.
Press the shutter button fully down.
2
Shooting movies:
Press the shutter button fully down to start recording.
1
• You can zoom by pressing the W/T (zoom) button before shooting.
Press the shutter button fully down again to stop
2
recording.
GB
W: zoom out
T: zoom in
GB
11
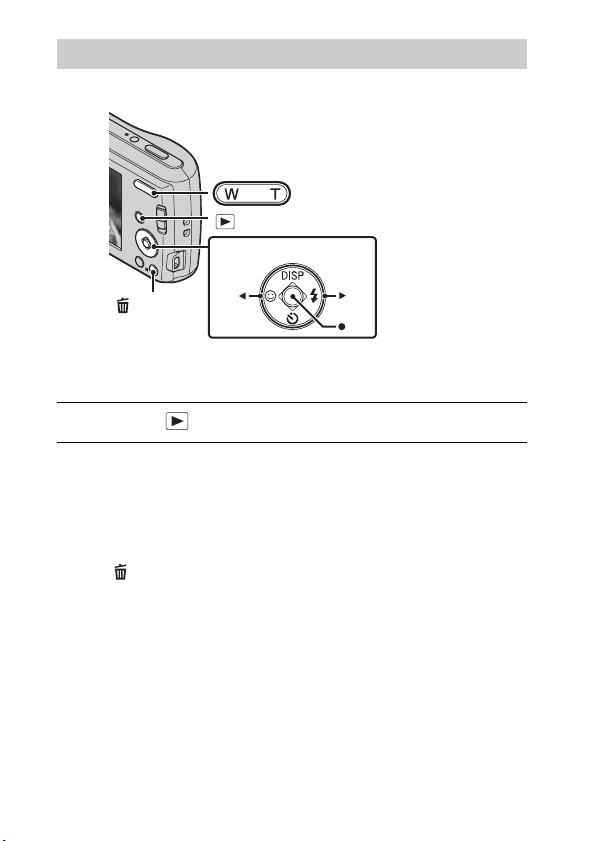
Viewing images
W: zoom out
T: zoom in
(Playback)
Control button
(Delete)
Select images: B (next)/b (previous)
Set: z
Press the (Playback) button.
1
x
Selecting next/previous image
Select an image with B (next)/b (previous) on the control button. Press z in
the center of the control button to view movies.
x
Deleting an image
1 Press (Delete) button.
2 Select [This Image] with v on the control button, then press z.
x
Returning to shooting images
Press the shutter button halfway down.
GB
12
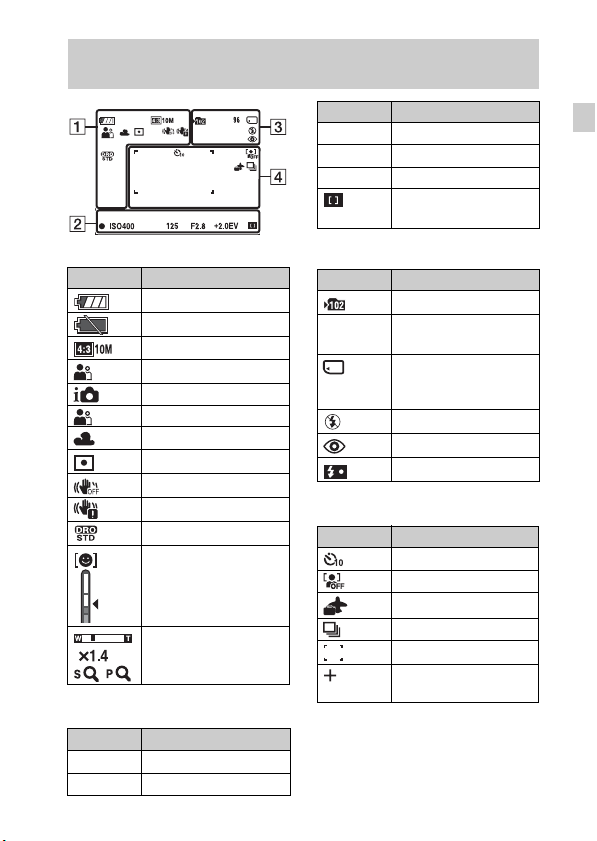
List of icons displayed on the screen (When shooting still images)
A
Display Indication
Battery remaining
Low battery warning
Image size
Scene Selection
Shooting mode
Scene Recognition icon
White balance
Metering Mode
SteadyShot
Vibration warning
DRO
Smile Detection
Sensitivity indicator
Zoom scaling
B
Display Indication
z
ISO400 ISO number
AE/AF lock
Display Indication
125 Shutter speed
F2.8 Aperture value
+2.0EV Exposure Value
AF range finder frame
indicator
C
Display Indication
Recording folder
96 Number of recordable
images
Recording/Playback
Media (memory card,
internal memory)
Flash mode
Red-eye reduction
Flash charging
D
Display Indication
Self-timer
Face Detection
Destination
Burst Settings
AF range finder frame
Spot metering crosshairs
GB
GB
13
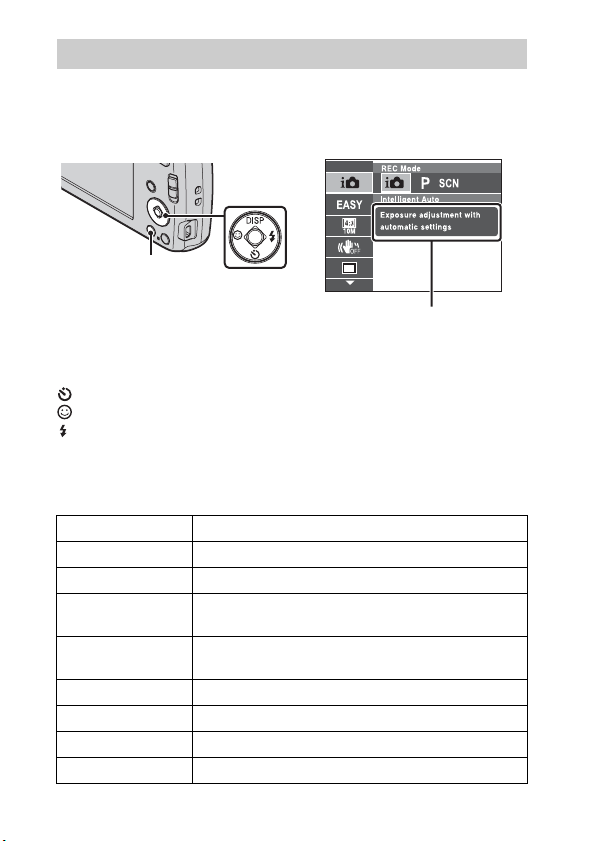
Introduction of other functions
Other functions used when shooting or playing back can be operated using the
Control button or MENU button on the camera. This camera is equipped with
a Function Guide that allows you to easily select from the functions. While
displaying the guide, try the other functions.
Control
button
MENU
Function Guide
x
Control button
DISP (Screen Display Settings): Allows you to change the screen display.
(Self-Timer): Allows you to use the self-timer.
(Smile Shutter): Allows you to use the Smile Shutter mode.
(Flash): Allows you to select a flash mode for still images.
x
Menu Items
Shooting
REC Mode Select recording mode.
Scene Selection Select pre-set settings to match various scene conditions.
Easy Mode Shoot still images using minimal functions.
Shooting Direction
Image Size
SteadyShot Select the anti-blur mode.
Burst Settings Select single-image mode or burst mode.
EV Adjust the exposure manually.
GB
ISO Adjust the luminous sensitivity.
Set the direction to pan the camera when shooting Sweep
Panorama images.
Select the image size for still images, panoramic images
or movie files.
14
White Balance Adjust color tones of an image.
Focus Select the focus method.
Metering Mode
Smile Detection
Sensitivity
Face Detection
DRO
Select the metering mode that sets which part of the
subject to measure to determine the exposure.
Set the Smile Shutter function sensitivity for detecting
smiles.
The camera detects faces and adjusts various settings
automatically.
Set DRO function to correct the brightness and contrast
and improve the image quality.
Viewing
Easy Mode
Slideshow Select a method of continuous playback.
Retouch Retouch an image using various effects.
Delete Delete an image.
Protect Protect the images.
DPOF Add a print order mark to a still image.
Rotate Rotate a still image to the left or right.
Select Folder
x
Setting items
Set the text-size increases and all indicators become
easier to see.
Select a folder which contains the images you want to
play back.
If you press the MENU button while shooting or during playback,
(Settings) is provided as a final selection. You can change the default
settings on the (Settings) screen.
Shooting Settings
Main Settings
Grid Line/Disp. Resolution/Digital Zoom/Red Eye
Reduction
Beep/Language Setting/Function Guide/Display color/
Power Save/Initialize/Video Out/USB Connect/LUN
Setting
GB
GB
15
Format/Create REC. Folder/Change REC. Folder/Delete
Memory Card
*
Tool
Clock Settings
* If a memory card is not inserted, (Internal Memory Tool) will be displayed and
only [Format] and [File Number] can be selected.
REC. Folder/Copy/File Number
Area Setting/Date & Time Setting
Number of still images and recordable time of movies
The number of still images and recordable time may vary depending on the
shooting conditions and the memory card.
x
Still images
(Units: Images)
Capacity
Size
10M 1 440
VGA 35 11000
16:9(7M) 1 520
x
Movies
The table below shows the approximate maximum recording times. These are
the total times for all movie files. The recordable movie file size is up to
approx. 2 GB for each file.
Capacity
Size
VGA 0:00:05 0:25:00
QVGA 0:00:15 1:15:00
Internal memory Memory card
Approx. 6 MB 2 GB
(Units: hour : minute : second)
Internal memory Memory card
Approx. 6 MB 2 GB
16
GB

Notes on using the camera
Changing the language setting
The screen language setting, press the MENU button, then select
(Settings) t (Main Settings) t [Language Setting].
On use and care
Avoid rough handling, disassembling, modifying, physical shock, or impact
such as hammering, dropping or stepping on the product. Be particularly
careful of the lens.
Notes on recording/playback
• Before you start recording, make a trial recording to make sure that the
camera is working correctly.
• The camera is neither dust-proof, nor splash-proof, nor water-proof.
• Avoid exposing the camera to water. If water enters inside the camera, a
malfunction may occur. In some cases, the camera cannot be repaired.
• Do not aim the camera at the sun or other bright light. It may cause the
malfunction of the camera.
• If moisture condensation occurs, remove it before using the camera.
• Do not shake or strike the camera. It may cause a malfunction and you may
not be able to record images. Furthermore, the recording media may become
unusable or image data may be damaged.
Do not use/store the camera in the following places
• In an extremely hot, cold or humid place
In places such as in a car parked in the sun, the camera body may become
deformed and this may cause a malfunction.
• Under direct sunlight or near a heater
The camera body may become discolored or deformed, and this may cause a
malfunction.
• In a location subject to rocking vibration
• Near a location that generates strong radio waves, emits radiation or is
strongly magnetic place. Otherwise, the camera may not properly record or
play back images.
• In sandy or dusty places
Be careful not to let sand or dust get into the camera. This may cause the
camera to malfunction, and in some cases this malfunction cannot be
repaired.
GB
GB
17

On carrying
Do not sit down in a chair or other place with the camera in the back pocket of
your trousers or skirt, as this may cause malfunction or damage the camera.
On the battery
• Avoid rough handling, disassembling, modifying, physical shock, or impact
such as hammering, dropping or stepping on the battery.
• Do not use a deformed or damaged battery.
• Do not mix a used battery together with a new battery or different types of
batteries.
• Remove the batteries from the camera when you do not operate the camera
for long periods, or when the batteries are dead.
Notes on the LCD screen and lens
The LCD screen is manufactured using extremely high-precision technology
so over 99.99% of the pixels are operational for effective use. However, some
tiny black and/or bright dots (white, red, blue or green) may appear on the
LCD screen. These dots are a normal result of the manufacturing process, and
do not affect the recording.
On camera’s temperature
Your camera and battery may get warm due to continuous use, but it is not a
malfunction.
Warning on copyright
Television programs, films, videotapes, and other materials may be
copyrighted. Unauthorized recording of such materials may be contrary to the
provisions of the copyright laws.
No compensation for damaged content or recording failure
Sony cannot compensate for failure to record or loss or damage of recorded
content due to a malfunction of the camera or recording media, etc.
Cleaning the camera surface
Clean the camera surface with a soft cloth slightly moistened with water, then
wipe the surface with a dry cloth. To prevent damage to the finish or casing:
– Do not expose the camera to chemical products such as thinner, benzine, alcohol,
disposable cloths, insect repellent, sunscreen or insecticide.
18
GB

Specifications
Camera
[System]
Image device:
6.14 mm (1/2.9 type) color CCD,
Primary color filter
Total pixel number of camera:
Approx. 10.3 Megapixels
Effective pixel number of camera:
Approx. 10.1 Megapixels
Lens: 4× zoom lens
f = 4.0 mm – 16.0 mm (28 mm –
112 mm (35 mm film equivalent))
F3.0 (W) – F5.7 (T)
Exposure control: Automatic exposure,
Scene Selection (9 modes)
White balance: Automatic, Daylight,
Cloudy, Fluorescent 1/2/3,
Incandescent, Flash
Recording interval for Burst mode:
Approx. 1.5 second
File format:
Still images: JPEG (DCF Ver. 2.0,
Exif Ver. 2.3, MPF Baseline)
compliant, DPOF compatible
Movies: AVI (Motion JPEG)
Recording media: Internal Memory
(approx. 6 MB), “Memory Stick
Duo” media, SD card
Flash: Flash range (ISO sensitivity
(Recommended exposure Index)
set to Auto):
Approx. 0.5 m to 3.0 m (1 ft 7 3/4
inches to 9 ft 10 1/8 inches) (W)/
approx. 0.5 m to 1.5 m (1 ft 7 3/4
inches to 4 ft 11 1/8 inches) (T)
[Input and Output connectors]
(USB)/A/V OUT terminal:
Video output
Audio output (Monaural)
USB communication
USB communication: Hi-Speed USB
(USB 2.0)
[LCD screen]
LCD panel:
6.7 cm (2.7 type) TFT drive
Total number of dots: 230 400 (960
× 240) dots
[Power, general]
Power: LR6 (size AA) alkaline
batteries (2), 3 V
HR15/51: HR6 (size AA) NickelMetal Hydride batteries (2) (sold
separately), 2.4 V
ZR6 (size AA) Oxy Nickel Primary
batteries (2) (sold separately), 3 V
Power consumption (during shooting):
1.1 W
Operating temperature: 0°C to 40°C
(32°F to 104°F)
Storage temperature: –20°C to +60°C
(–4°F to +140°F)
Dimensions (CIPA compliant):
99.0 mm × 61.0 mm × 29.3 mm
(4 inches × 2 1/2 inches
× 1 3/16 inches) (W/H/D)
Mass (CIPA compliant): Approx. 167 g
(5.9 oz) (including two batteries
and “Memory Stick Duo” media)
Microphone: Monaural
Speaker: Monaural
Exif Print: Compatible
PRINT Image Matching III:
Compatible
GB
GB
19
Design and specifications are subject to
change without notice.
Trademarks
• The following marks are trademarks
of Sony Corporation.
“Memory Stick PRO Duo,”
“Memory Stick PRO-HG Duo,”
“Memory Stick Duo”
• Windows is registered trademark of
Microsoft Corporation in the United
States and/or other countries.
• Macintosh is registered trademark of
Apple Inc.
• SDHC logo is trademarks of SD-3C,
LLC.
• In addition, system and product
names used in this manual are, in
general, trademarks or registered
trademarks of their respective
developers or manufacturers.
However, the ™ or ® marks are not
used in all cases in this manual.
, “Cyber-shot,”
Additional information on this
product and answers to frequently
asked questions can be found at
our Customer Support Website.
Printed on 70% or more recycled paper
using VOC (Volatile Organic
Compound)-free vegetable oil based
ink.
20
GB


Français
Aide-mémoire
Les numéros de modèle et de série se situent sous l’appareil. Prendre en note le numéro de
série dans l’espace prévu ci-dessous. Se reporter à ces numéros lors des communications
avec le détaillant Sony au sujet de ce produit.
Modèle no DSC-S3000
No de série _____________________________
AVERTISSEMENT
Afin de réduire les risques d’incendie ou de décharge électrique,
n’exposez pas cet appareil à la pluie ou à l’humidité.
À l’intention des clients aux É.-U.
Pour toute question au sujet de cet appareil, appeler :
Sony Centre d’information à la clientèle
1-800-222-SONY (7669).
Le numéro ci-dessous concerne seulement les questions relevant de la Commission
fédérale des communications des États-Unis (FCC).
[ Information réglementaire
Déclaration de conformité
Nom commercial : SONY
No de modèle : DSC-S3000
Responsable : Sony Electronics Inc.
Adresse : 16530 Via Esprillo,
San Diego, CA 92127 É.-U.
No de téléphone : 858-942-2230
Cet appareil est conforme à la Partie 15 de la réglementation de la FCC des États-Unis.
Son utilisation est sujette aux deux conditions suivantes : (1) Cet appareil ne doit pas
générer d’interférences nuisibles et (2) il doit être en mesure d’accepter toute
interférence reçue, y compris les interférences pouvant générer un fonctionnement
indésirable.
FR
2

[ AVERTISSEMENT
Par la présente, vous êtes avisé du fait que tout changement ou toute modification ne
faisant pas l’objet d’une autorisation expresse dans le présent manuel pourrait annuler
votre droit d’utiliser l’appareil.
[ Note
L’appareil a été testé et est conforme aux exigences d’un appareil numérique de Classe B,
conformément à la Partie 15 de la réglementation de la FCC.
Ces critères sont conçus pour fournir une protection raisonnable contre les interférences
nuisibles dans un environnement résidentiel. L’appareil génère, utilise et peut émettre des
fréquences radio; s’il n’est pas installé et utilisé conformément aux instructions, il pourrait
provoquer des interférences nuisibles aux communications radio. Cependant, il n’est pas
possible de garantir que des interférences ne seront pas provoquées dans certaines
conditions particulières. Si l’appareil devait provoquer des interférences nuisibles à la
réception radio ou à la télévision, ce qui peut être démontré en allumant et éteignant
l’appareil, il est recommandé à l’utilisateur d’essayer de corriger cette situation par l’une
ou l’autre des mesures suivantes :
– Réorienter ou déplacer l’antenne réceptrice.
– Augmenter la distance entre l’appareil et le récepteur.
– Brancher l’appareil dans une prise ou sur un circuit différent de celui sur lequel le
récepteur est branché.
– Consulter le détaillant ou un technicien expérimenté en radio/téléviseurs.
Le câble d’interface fourni doit être utilisé avec l’appareil pour que celui-ci soit conforme
aux critères régissant les appareils numériques, conformément à la sous-partie B de la
Partie 15 de la réglementation de la FCC.
Note pour les clients européens
[ Avis aux consommateurs des pays appliquant les Directives UE
Le fabricant de ce produit est Sony Corporation, 1-7-1 Konan Minato-ku Tokyo, 108-0075
Japon. Le représentant agréé pour la compatibilité électromagnétique et la sécurité du
produit est Sony Deutschland GmbH, Hedelfinger Strasse 61, 70327 Stuttgart, Allemagne.
Pour toute question relative à la garantie ou aux réparations, reportez-vous à l’adresse que
vous trouverez dans les documents ci-joints, relatifs à la garantie et aux réparations.
Cet appareil a été testé et jugé conforme aux limites établies par la directive EMC visant
l’utilisation de câbles de connexion de moins de 3 mètres.
[ Attention
Le champ électromagnétique à des fréquences particulières peut avoir une incidence sur
l’image et le son de cet appareil.
[ Avis
Si l’électricité statique ou les champs électrostatiques entraînent une interruption lors du
transfert des données (échec), redémarrez l’application ou débranchez, puis rebranchez le
câble de connexion (USB, etc.).
FR
FR
3
[ Traitement des appareils électriques et électroniques en fin de
vie (Applicable dans les pays de l’Union Européenne et aux
autres pays européens disposant de systèmes de collecte
sélective)
Ce symbole, apposé sur le produit ou sur son emballage, indique que ce
produit ne doit pas être traité avec les déchets ménagers. Il doit être remis
à un point de collecte approprié pour le recyclage des équipements
électriques et électroniques. En s’assurant que ce produit est bien mis au
rebut de manière appropriée, vous aiderez à prévenir les conséquences
négatives potentielles pour l’environnement et la santé humaine. Le
recyclage des matériaux aidera à préserver les ressources naturelles. Pour
pouvez contacter votre municipalité, votre déchetterie ou le magasin où vous avez acheté le
produit.
toute information supplémentaire au sujet du recyclage de ce produit, vous
[ Elimination des piles et accumulateurs usagés (Applicable dans
les pays de l’Union Européenne et aux autres pays européens
disposant de systèmes de collecte sélective)
Ce symbole, apposé sur les piles et accumulateurs ou sur les emballages,
indique que les piles et accumulateurs fournis avec ce produit ne doivent
pas être traités comme de simples déchets ménagers.
Sur certains types de piles, ce symbole apparaît parfois combiné avec un
symbole chimique. Les symboles pour le mercure (Hg) ou le plomb (Pb)
0,004% de plomb.
En vous assurant que ces piles et accumulateurs sont mis au rebut de façon appropriée,
vous participez activement à la prévention des conséquences négatives que leur mauvais
traitement pourrait provoquer sur l’environnement et sur la santé humaine. Le recyclage
des matériaux contribue par ailleurs à la préservation des ressources naturelles.
Pour les produits qui pour des raisons de sécurité, de performance ou d’intégrité de
données nécessitent une connexion permanente à une pile ou à un accumulateur, il
conviendra de vous rapprocher d’un service technique qualifié pour effectuer son
remplacement. En rapportant votre appareil électrique en fin de vie à un point de collecte
approprié vous vous assurez que la pile ou l’accumulateur incorporée sera traitée
correctement.
Pour tous les autres cas de figure et afin d’enlever les piles ou accumulateurs en toute
sécurité de votre appareil, reportez-vous au manuel d’utilisation.
Rapportez les piles ou accumulateurs usagés au point de collecte approprié pour le
recyclage.
Pour toute information complémentaire au sujet du recyclage de ce produit ou des piles et
accumulateurs, vous pouvez contacter votre municipalité, votre déchetterie locale ou le
point de vente où vous avez acheté ce produit.
sont rajoutés lorsque ces piles contiennent plus de 0,0005% de mercure ou
FR
4

Reportez-vous au « Guide de l’utilisateur du Cyber-shot » (HTML) qui figure sur le CD-ROM fourni
Pour plus d’informations sur les opérations avancées, lisez sur un ordinateur le
« Guide de l’utilisateur du Cyber-shot » (HTML) disponible sur le CD-ROM
(fourni).
Insérez le CD-ROM dans le lecteur de CD-ROM.
Pour les utilisateurs Windows :
1 Cliquez sur [Guide de l’utilisateur] t [Installation].
2 Démarrez le « Guide de l’utilisateur » depuis le raccourci se trouvant sur le
bureau.
Pour les utilisateurs Macintosh :
1 Sélectionnez [Guide de l’utilisateur] et copiez le dossier [fr] stocké dans le
dossier [Guide de l’utilisateur] sur votre ordinateur.
2 Une fois la copie terminée, double-cliquez sur « index.html » dans le
dossier [fr].
Vérification des accessoires fournis
• Piles alcalines LR6 (taille AA) (2)
• Câble USB dédié (Sony Corporation 1-837-597-) (1)
• Dragonne (1)
•CD-ROM (1)
– Logiciel d’application Cyber-shot
– « Guide de l’utilisateur du Cyber-shot »
• Mode d’emploi (le présent manuel) (1)
FR
FR
5
Identification des pièces
G Objectif
H Ecran LCD
I Touche (Lecture)
J
Touche de commande
Menu activé :
Menu désactivé : DISP/ / /
K Pour la prise de vue : touche
W/T (Zoom)
Pour l’affichage : touche
(Zoom de lecture)/touche
(Index)
L Commutateur de mode
M Crochet pour dragonne
N Prise (USB) / A/V OUT
O Touche (Supprimer)
P Témoin d’accès
Q Touche MENU
R Douille de trépied
• Utilisez un trépied avec une vis
de moins de 5,5 mm (7/32 pouce)
de long. Dans le cas contraire
vous ne pourrez pas fixer
solidement l’appareil et vous
risquez de l’endommager.
S Haut-parleur
T Couvercle du logement des piles/
carte mémoire
U Logement pour carte mémoire
V Logement d’insertion des piles
v/V/b/B/z
A Touche ON/OFF (Marche/Arrêt)
B Déclencheur
C Témoin ON/OFF (Marche/Arrêt)
D Flash
E Micro
F Témoin du retardateur/témoin de
FR
détection de sourire
6
Insertion des piles/d’une carte mémoire (vendue séparément)
Assurez-vous que le coin biseauté est
correctement orienté.
Ouvrez le couvercle.
1
Insérez la carte mémoire (vendue séparément).
2
• Le coin biseauté étant orienté de la manière illustrée, insérez la carte
mémoire jusqu’à ce qu’un déclic confirme qu’elle est bien en place.
Faites correspondre les pôles +/– et insérez les piles.
3
Fermez le couvercle.
4
x
Cartes mémoire que vous pouvez utiliser
Carte mémoire
Memory Stick PRO Duo aa
A
Memory Stick PRO-HG Duo aa
Memory Stick Duo a —
Carte mémoire SD aa
B
Carte mémoire SDHC aa
Dans le présent manuel, les produits A sont appelés collectivement « Memory
•
Stick Duo ».
• Dans le présent manuel, les produits B sont appelés collectivement carte SD.
• Lors de l’enregistrement de films, il est recommandé d’utiliser des cartes SD de
classe 2 ou supérieure.
Pour les images
fixes
Pour les films
FR
FR
7
x
Pour retirer les piles/carte mémoire
Carte mémoire : appuyez une fois sur la carte mémoire.
Piles : veillez à ne pas faire tomber les piles.
Remarque
• N’ouvrez jamais le couvercle du logement des piles/carte mémoire ou ne retirez
jamais les piles/carte mémoire lorsque le témoin d’accès (page 6) est allumé. Cela
risque d’endommager les données de la carte mémoire/mémoire interne.
x
Piles que vous pouvez utiliser avec votre appareil
Dans le tableau ci-dessous, a indique les piles que vous pouvez utiliser et —
celles que vous ne pouvez pas utiliser.
Type de piles Fournies Compatibles Rechargeables
Piles alcalines LR6 (taille
AA)
HR15/51 : piles nickelhydrure métallique HR6
(taille AA)
Piles primaires nickel-oxy
ZR6 (taille AA)
Piles au lithium* — — —
Piles au manganèse*———
Piles Ni-Cd* — — —
* Les performances de fonctionnement ne peuvent pas être garanties en cas de chute
de tension ou d’autres problèmes dus à la nature de la pile.
x
Autonomie des piles et nombre d’images que vous
aa—
— aa
— a —
pouvez enregistrer/visionner
Autonomie des piles
(min.)
Prise de vue d’images fixes Environ 100 Environ 200
Visualisation d’images fixes Environ 350 Environ 7000
Enregistrement de films Environ 160 —
Nombre d’images
FR
8

Remarques
• Le nombre indiqué est le nombre approximatif d’images pouvant être enregistrées
lors de la prise de vue avec des piles neuves. Selon les circonstances, il se peut que
ce nombre soit réduit.
• Le nombre indiqué est le nombre d’images pouvant être enregistrées lors de la
prise de vue dans les conditions suivantes :
– Utilisation d’un « Memory Stick PRO Duo » (Mark2) Sony (vendu séparément).
– Des piles neuves sont utilisées à une température ambiante de 25 °C (77 °F).
• Le nombre d’images fixes pouvant être enregistrées se base sur la norme CIPA et
s’applique à la prise de vue dans les conditions suivantes.
(CIPA: Camera & Imaging Products Association)
– [SteadyShot] est réglé sur [Désact].
– DISP (Réglages affichage sur écran) est réglé sur [Normal].
– Une prise de vue toutes les 30 secondes.
– Le zoom bascule alternativement entre les positions W et T.
– Le flash se déclenche une fois sur deux.
– L’appareil est mis sous et hors tension une fois sur dix.
• La valeur affichée indique l’autonomie des piles pour l’enregistrement des films
dans les conditions suivantes :
– Mode d’enregistrement : VGA
– Lorsque la prise de vue en rafale prend fin en raison des limites définies
(page 17), enfoncez à nouveau complètement le déclencheur et continuez la
prise de vue. Des fonctions de prise de vue telles que le zoom ne sont pas
opérationnelles.
• Les valeurs affichées pour des piles alcalines sont basées sur des normes
commerciales et ne s’appliquent pas à toutes les piles alcalines dans toutes les
conditions. Les valeurs peuvent varier en fonction du type/fabricant de piles, des
conditions environnementales, de la configuration du produit, etc.
FR
FR
9
Réglage de la date et de l’heure
Le réglage Date&heure s’affiche lorsque vous appuyez pour la première fois
sur la touche ON/OFF (Marche/Arrêt).
ON/OFF (Marche/Arrêt)
Touche de commande
Sélectionner des éléments : v/V/b/B
Régler : z
Appuyez sur la touche ON/OFF (Marche/Arrêt).
1
Le réglage Date&heure s’affiche lorsque vous appuyez pour la première
fois sur la touche ON/OFF (Marche/Arrêt).
• Cela peut prendre un peu de temps avant que l’appareil se mette sous
tension et puisse être utilisé.
Sélectionnez [Format date&heure], [Heure d’été] et
2
[Date&heure], puis appuyez sur [OK].
• Minuit est indiqué par 12:00 AM et midi par 12:00 PM.
Sélectionnez la zone souhaitée en vous conformant aux
3
instructions affichées, puis appuyez sur z t [OK].
Sélectionnez la couleur d’affichage et le mode de
4
résolution d’affichage souhaités, conformément aux
instructions affichées.
10
FR
Loading...