


Internal Hard Disk Drive (40GB)
(for PlayStation®2)
and HDD Utility Disc (ver 1.10)
Disque Dur Interne (40 Go)
(pour PlayStation®2)
et Disque d’Utilitaires HDD (version 1.10)
Disco Duro Interno (40GB)
(para PlayStation®2)
y Disco de Utilidad HDD (ver. 1.10)
Instruction manual
Before using the internal hard disk drive (40GB) (for PlayStation®2) or HDD Utility Disc (ver 1.10), carefully read this manual and retain it for future reference. Refer also to the hardware installation guide for the internal hard disk drive (40GB) (for PlayStation®2) and the instruction manual for the PlayStation®2 console.
This software is exclusively for use with the PlayStation®2 computer entertainment system. Note that HDD Utility Disc (ver 1.10) can only be used with the internal hard disk drive (for PlayStation®2).
Mode d’emploi
Avant d’utiliser le disque dur interne (40 Go) (pour PlayStation®2) ou le disque d’utilitaires HDD (version 1.10), lisez attentivement ce manuel et conservez-le pour pouvoir vous y reporter ultérieurement. Reportez-vous aussi au Guide d’installation du matériel pour le Disque Dur Interne (40 Go) (pour PlayStation®2) et au mode d’emploi de la console PlayStation®2.
Ce logiciel doit être utilisé exclusivement avec le système de loisir interactif PlayStation®2. Notez que le disque d’utilitaires HDD (version 1.10) peut être utilisé uniquement avec le disque dur interne (pour PlayStation®2).
Manual de Instrucciones
Antes de utilizar el disco duro interno (40GB) (para PlayStation®2) o el disco de utilidad HDD (ver. 1.10), lea este manual detenidamente y consérvelo para consultarlo en el futuro. Consulte también la Guía de instalación del hardware Disco Duro Interno (40GB) (para PlayStation®2) y el manual de instrucciones de la consola PlayStation®2.
El uso de este software está destinado exclusivamente al sistema de entretenimiento computarizado PlayStation®2. Tenga en mente que el Disco de Utilidad HDD (ver. 1.10) sólo puede utilizarse con el disco duro interno (para PlayStation®2).
UD v. 1.0
US
English
FR
Français
ES
Español

Table of contents
Before using this product ................................. |
3 |
Precautions ...................................................... |
4 |
About HDD Utility Disc (ver 1.10) ..................... |
6 |
Basic operations .............................................. |
7 |
Analog controller (DUALSHOCK®2) ........................... |
7 |
On-screen keyboard .................................................. |
8 |
USB keyboard ........................................................... |
9 |
Starting the PlayStation®2 console ................ |
10 |
Shutting down the PlayStation®2 console ............... |
11 |
Changing PlayStation®2 system |
|
configuration settings .................................. |
12 |
Changing system settings ....................................... |
12 |
Checking version information .................................. |
15 |
Using the HDD compatible browser ............... |
17 |
Checking HDD information ...................................... |
17 |
Managing data saved to a memory card (8MB) |
|
(for PlayStation®2) or memory card ...................... |
17 |
Starting PlayStation®2 format software |
|
installed on the HDD .................................... |
18 |
Deleting PlayStation®2 format software from the |
|
HDD ..................................................................... |
19 |
Managing folders and data on the HDD ......... |
20 |
Creating a folder ..................................................... |
21 |
Copying a folder ..................................................... |
22 |
Renaming a folder .................................................. |
23 |
Moving data ........................................................... |
24 |
Deleting a folder ..................................................... |
24 |
Playing an audio CD ....................................... |
26 |
Playing a DVD video ...................................... |
27 |
Playing a DVD video ............................................... |
27 |
Operating the DVD player ....................................... |
27 |
Optimizing the HDD ....................................... |
29 |
Diagnosing and repairing the HDD ................. |
30 |
Formatting the HDD ....................................... |
31 |
Re-installing the HDD software ...................... |
32 |
Installing the DVD Player software ................ |
33 |
Troubleshooting ............................................. |
34 |
2

Before using this product
US
The internal hard disk drive (for PlayStation®2) (also referred to as “HDD” throughout this manual) contains pre-installed HDD software (HDD compatible browser, additional system configuration settings and CD Player software).
HDD Utility Disc (ver 1.10) can be used to maintain the HDD or to re-install the HDD software if necessary.
•Before using HDD Utility Disc (ver 1.10), carefully read the “Precautions” section in this manual, the hardware installation guide for the internal hard disk drive (40GB) (for PlayStation®2) and the instruction manual for the network adaptor (for PlayStation®2) (sold separately). Also read the “Important safeguards” section in the instruction manual for the network adaptor (for PlayStation®2). Please pay special attention to the disc handling instructions and be sure to keep HDD Utility Disc (ver 1.10) in a safe place where it will not be lost. If you lose HDD Utility Disc (ver 1.10), you will not be able to use the Diagnose and Repair HDD utility. You will also not be able to re-install the HDD software.
•HDD Utility Disc (ver 1.10) is only compatible with the internal hard disk drive (for PlayStation®2). Note that you cannot use this disc with other hard disk drives.
•Formatting the HDD will erase all data and software stored on the HDD.
•The Diagnose and Repair HDD utility may not be able to fix all errors on the HDD. In such cases, refer to the Troubleshooting section of this manual and follow the instructions given there.
•Data deleted by the Diagnose and Repair HDD utility cannot be recovered.
•When saving or loading to the HDD (while the HDD access indicator is blinking):
–do not subject the HDD to physical shock or vibration
–do not open the disc tray
–do not press the 1 (standby)/RESET button
–do not turn off the console using the MAIN POWER switch
–do not remove the power plug for the console from the electrical outlet.
Doing so may cause software or data loss or corruption, or damage to the HDD.
•To help protect against data loss or corruption, it is recommended that you back up game save data to a memory card (8MB) (for PlayStation®2) or a memory card.
If for any reason software or data loss or corruption occurs on the HDD, it is usually not possible to recover the software or data. Sony Computer Entertainment Inc. and its subsidiaries and affiliates will not be held liable for any damages or injury in the case of software or data loss or corruption.
3
Precautions
About HDD Utility Disc (ver 1.10)
HDD Utility Disc (ver 1.10) is compatible only with PlayStation®2 consoles that have the symbol marked on the console rear.
HDD Utility Disc (ver 1.10) is exclusively for use with the PlayStation®2 computer entertainment system.
Never use this disc on other hardware, as doing so may cause serious damage to the hardware, or result in health hazards to the eyes and ears.
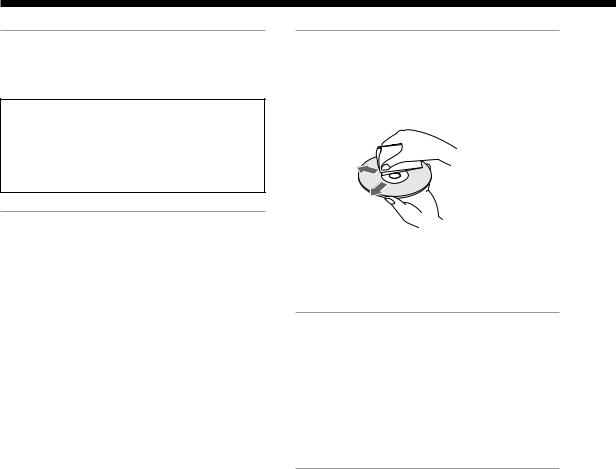
When cleaning HDD Utility Disc (ver 1.10)
•Fingerprints or dust on the disc can distort the picture or reduce sound quality. Always make sure that the disc is clean before use.
•Clean the disc using a soft cloth, lightly wiping from the center outwards.
Disc handling
•Do not touch the disc surface when handling HDD Utility Disc (ver 1.10); hold it by the edges.
•Do not leave the disc near a heat source, in direct sunlight, or in high humidity.
•Do not stick paper or tape onto the disc.
•Do not write on the disc with a marker or other writing utensil.
•Always place the disc in the disc tray with the label side facing up (data side down).
•Do not use the disc if it is cracked or warped, or has been repaired with adhesives, as this may damage the console or cause a malfunction.
•Store the disc in its case when not in use. Stacking discs or standing them at an angle without putting them in their cases can cause the discs to warp or get damaged.
•Do not insert a finger or any other object through the disc hole. Personal injury or damage to the disc may result.
•Never throw the disc as this may damage it.
•Sony Computer Entertainment Inc. and its subsidiaries and affiliates will not be held liable for any injury or damage resulting from the mishandling of discs.
•Do not use solvents such as benzine, commercially available cleaners not intended for CDs, or anti-static spray intended for vinyl LPs, as these may damage your disc.
Health precautions
To help prevent health hazards, please observe the following.
•Do not watch the TV screen continuously for long periods of time. Doing so may cause eye fatigue, and may reduce your eyesight. If you feel any discomfort or pain while viewing the TV screen, stop using the software at once and take a rest.
If the symptoms do not go away even after taking a break, consult your physician.
Static image warning
Static, non-moving images, such as DVD menus, configuration displays, or paused images may leave a permanent faint image on the TV screen if left on for extended periods of time. Projection TVs are more susceptible to this than other types of displays. Do not operate the PlayStation®2 console in such a manner that this could occur.
4

US
About this manual
•Some illustrations of parts or screen images in this manual may not be based on the final product.
•This manual is written on the premise that the user is familiar with basic operations of the PlayStation®2 computer entertainment system. For details on operating the PlayStation®2 console, refer to the PlayStation®2 console instruction manual.
•The internal hard disk drive (for PlayStation®2) (“HDD”) cannot be used without a network adaptor (for PlayStation®2) (sold separately). The HDD must be connected to a network adaptor to be installed in the PlayStation®2 console. Throughout this manual, the HDD and network adaptor (for PlayStation®2) combination is referred to as the “HDD unit”.
•Unauthorized reproduction, modification, public cinematographic presentation, public performance, public transmission (including broadcasting, wire diffusion, and making transmittable), of this software, including all the copyrighted works therein (“Software”), public communication of the publicly transmitted Software or lending of the Software, is prohibited by law. Individual sale of HDD Utility Disc (ver 1.10) is prohibited. Reverse engineering of the Software is not authorized.
•Sony Computer Entertainment Inc. and its subsidiaries and affiliates will not be held liable for any damages or injury related to the use of the supplied software.
•The supplied software cannot be used in devices other than those specified within this manual.
•The design and specifications of the supplied software are subject to change without notice.
5

About HDD Utility Disc (ver 1.10)
HDD Utility Disc (ver 1.10) can be used to re-install the HDD software (HDD compatible browser, additional system configuration settings and CD Player software) on the HDD.
Optionally, you can use HDD Utility Disc (ver 1.10) to install the DVD Player software (for PlayStation®2)* on a memory card (8MB) (for PlayStation®2).
*The DVD Player (for PlayStation®2) is software that allows playback of DVD videos on the PlayStation®2 console.
With the HDD installed in the PlayStation®2 console, you can do the following:
•Manage folders and data stored on the HDD.
The HDD holds data in “folders.”
You can save data from PlayStation®2 format software that is marked as HDD compatible to a folder in the HDD. You can also copy, move, or rename folders or data. Additionally, you can copy data from a SCPH-10020U memory card (8MB) (for PlayStation®2) or SCPH-1020 U memory card (both sold separately) to a folder.
•Start PlayStation®2 format software titles that are stored on the HDD.
•Change your PlayStation®2 console system configuration settings, including settings for new menu items (“Keyboard” and “Mouse”).
You can use HDD Utility Disc (ver 1.10) to do the following:
•Optimize the HDD.
•Diagnose and repair the HDD.
•Format the HDD.
•Re-install the HDD software.
•Install the DVD Player software on a memory card (8MB) (for PlayStation®2).
6
Basic operations
US
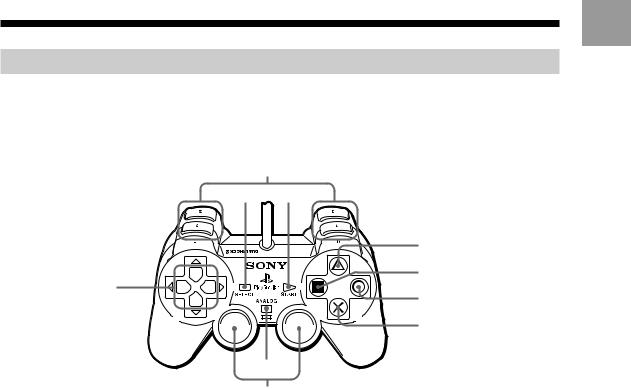
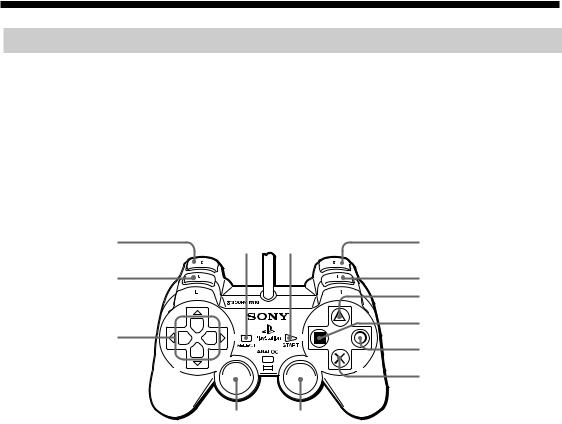
Analog controller (DUALSHOCK®2)
The analog controller (DUALSHOCK®2) can be used as shown below. It can also be used to input text using the on-screen keyboard. For details, see “On-screen keyboard” (page 8).
9
7 6
1
8
9
1Directional buttons: Move between pages, Choose item
2f button: Access version information, Options
3s button: Display
4a button: Back
2
3
4
5
5× button: Enter
6START button: Unused
7SELECT button: Unused
8ANALOG mode button: Unused
9L1/R1, L2/R2, L3/R3 buttons: Unused
7

Basic operations (continued)
On-screen keyboard
You can use the on-screen keyboard to input text.
A keyboard with a keyboard layout appropriate for the language you have selected under “Keyboard” in the System Configuration menu will be displayed.
Cursor |
|
BS (Backspace) key |
– text insertion point |
Text input area |
– erases the character directly before the cursor |
|
|
Help key |
|
|
– displays the Basic |
|
|
Operations screen (for |
Tab key |
|
use when inputting by |
|
|
controller) |
Caps Lock |
|
: " |
Enter key
key
Space bar – inserts a blank space
Shift key
Operating the on-screen keyboard with an analog controller (DUALSHOCK®2)
× button |
|
Enter |
|
R1 button |
|
Shift* |
|
|
|
|
|
|
|
f button |
|
Space |
|
L2 button, R2 button |
|
Move cursor |
|
|
|
|
|
|
|
s button |
|
Backspace |
|
Directional buttons |
|
Select key/item |
|
|
|
|
|
|
|
a button |
|
Back |
|
R1 button + s button |
|
Delete |
|
|
|
|
|
|
|
START button |
|
Accept and quit |
|
|
|
|
|
|
|
|
|
|
|
SELECT button |
|
Switch keyboard |
|
|
|
|
|
|
|
|
|
|
|
* You can type in capital letters by holding down the R1 button while typing.
Inputting symbols and special characters
Switch keyboards using the SELECT button.
You can choose from among the 4 keyboards listed below.
•standard keyboard
•special character keyboard
•symbol keyboard
•numerical keyboard
The keyboard in use is highlighted in  at the lower right of the screen.
Erasing characters
If you type in the wrong character by mistake, use the buttons shown below to erase the mistaken character and type in the correct one.
|
s button – erase the character immediately before the cursor |
|
R1 button + s button – erase the character immediately after the cursor |
|
Changing to the keyboard for a different language |
|
If you want to use the keyboard for a different language, choose the language you |
8 |
want to use under “Keyboard” in the System Configuration menu. |
For details on keyboard settings, see “Changing system settings ” (pages 12 – 14). |
US
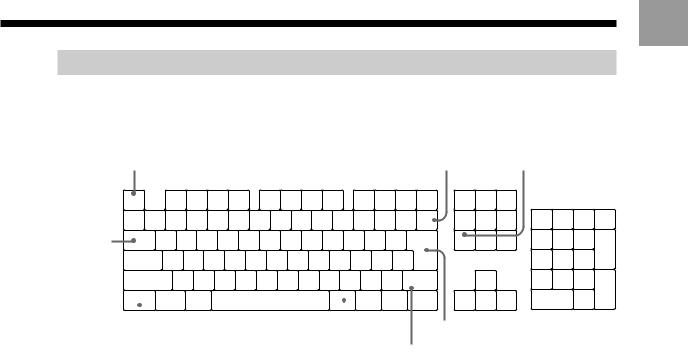
USB keyboard
You can use a USB keyboard to input text.
You can use a keyboard for the language selected under “Keyboard” in the System Configuration menu.
Esc (Escape) key* – Cancel |
Backspace key |
Delete key |
|
* The escape key may be labeled ‘Echap’ |
|||
|
|
||
on some French keyboards. |
|
|
Tab key
|
|
|
|
Enter key |
|
|
|
|
|
|
|
|
|
Shift key |
Ctrl key |
Alt Gr key |
|||
–Input special characters
Inputting symbols and special characters
To input a symbol or special character, press the key for the symbol or character you want to input while holding down the Shift key or Alt Gr key*.
* The Alt Gr key is available on keyboards for some European languages.
Inputting symbols or characters that are not available on your USB keyboard
To input a symbol or character that is not on your USB keyboard, press the
× (Enter) button on your controller to switch to use of the on-screen keyboard. Switch to the appropriate keyboard using the SELECT button, and input the desired symbol or character.
Erasing characters
If you type in the wrong character by mistake, use the keys shown below to erase the mistaken character and type in the correct one.
Backspace key – erase the character immediately before the cursor
Delete key – erase the character immediately after the cursor
Using the keyboard for a different language
Select the keyboard for the language you want to use under “Keyboard” in the System Configuration menu.
Then connect a USB keyboard for the language you selected to a USB connector on the PlayStation®2 console front.
For details on keyboard settings, see “Changing system settings” (pages 12 – 14).
9

Starting the PlayStation®2 console
1Install the HDD unit in your PlayStation®2 console.
To install the HDD unit, follow the instructions in the hardware installation guide for the internal hard disk drive (40GB) (for PlayStation®2). Do not attempt to install the HDD unit without referring to the installation guide.
2 Turn on the console using the MAIN POWER switch on the console rear.
3Press the 1 (standby)/RESET button on the PlayStation®2 console front.
The 1 indicator lights up in green, and the Main menu will appear.
When you turn on a new console for the first time, the initial setup screen will appear. You will be prompted to set “Language,” “Time Zone” and “Daylight Savings Time (Summer Time)” settings.
1 Select the language using the directional buttons, and then press the × (Enter) button. 2 Select the time zone using the directional buttons, and then press the × button.
3 Select the appropriate daylight savings time setting using the directional buttons, and then press the × button.
After these settings are confirmed, the Main menu will appear.
If these settings are already entered, the Main menu appears.
At the Main menu you can choose from the options described below.
x System Configuration
You can change the system configuration settings of the PlayStation®2 console. For details, see “Changing PlayStation®2 system configuration settings” (page 12).
x Browser
At the Browser screen, you can start disc playback, view data saved to a memory card (8MB) (for PlayStation®2) or memory card, or display the HDD screen and start a software title. For details, see “Using the HDD compatible browser” (page 17).
Note
If left inactive for over 20 minutes, the HDD will enter sleep mode. The response to the first operation from this state may be slightly delayed.
10
US
Shutting down the PlayStation®2 console
To shut down a PlayStation®2 console with an HDD unit installed, check that the 1 indicator on the console front is lit up in red to indicate that the console is in standby mode. Then, press the MAIN POWER switch on the console rear.
Caution
•Do not turn off the PlayStation®2 console using the MAIN POWER switch on the console rear without following this procedure. Doing so may cause software or data loss or corruption, or damage to the HDD.
•Before following the procedure, check that the HDD access indicator located inside the front vent of the PlayStation®2 console is not blinking.
11

Changing PlayStation®2 system configuration settings
With the HDD installed in the PlayStation®2 console, new menu items (“Keyboard” and “Mouse”) are added to the System Configuration menu.
The system settings that were in place before installing the HDD remain in effect. The initial setting for each menu item is underlined in the instructions below. Note that if you reformat the HDD, the settings for “Keyboard” and “Mouse” will return to their original values.
Note
System Configuration menu items may vary depending on the console in use. For complete instructions on all System Configuration menu items, refer to the instruction manual for your PlayStation®2 console.
Changing system settings
1Select “System Configuration” in the Main menu, and then press the × (Enter) button.
The System Configuration menu will appear.
2Select the item you want to change using the directional buttons, and then press the × button.
3Select the desired setting using the directional buttons, and then press the × button.
The setting is changed.
System Configuration menu items
x Clock Adjustment
Sets the PlayStation®2 system clock.
Use the up, down, and right directional buttons to set the “month,” “day,” “year,” “hour,” “minute,” and “second,” and then press the × button.
Optional settings for the clock
1 Select “Clock Adjustment,” and then press the f (Options) button. 2 Select the desired menu, and then press the × button.
3 Select the desired setting, and then press the × button.
•Time Format
– 12 hour clock
– 24 hour clock
•Date Format
–MM/DD/YYYY
–DD/MM/YYYY
–YYYY/MM/DD
• Time Zone
Select the appropriate time zone.
12

US
• Daylight Savings Time (Summer Time)
–Standard (Winter Time)
–Daylight Savings (Summer Time)
x Screen Size
Selects the display mode according to the TV to be connected.
–4:3 : select this when the console is connected to a standard TV.
–Full : select this when the console is connected to a standard TV. The black margins on the upper and lower portions of the screen are cut off.
–16:9 : select this when the console is connected to a wide-screen TV.
x Digital Out (Optical)
Selects whether to output signal via the DIGITAL OUT (OPTICAL) connector.
–On : select this when you connect with an optical digital cable (sold separately). Normally select this option.
–Off : select this when you do not want sound signal to be output via the DIGITAL OUT (OPTICAL) connector.
x Component Video Out
If your TV, monitor or projector has a RGB input connector or component video input connectors (Y, CB/PB, CR/PR), that conform to the output signals of the PlayStation®2 console, set this item.
When connecting the PlayStation®2 console using the SCPH-10030 U AV cable (integrated audio/video) supplied with the PlayStation®2 console or SCPH-10060 U S VIDEO cable (sold separately), you do not need to set this item.
–Y Cb/Pb Cr/Pr : select this when you connect the console to the component video input connectors.
–RGB : select this when you connect the console to the RGB input connector.
Use this setting only when outputting PlayStation®2 and PlayStation® format software. When you output a DVD video, the setting automatically changes to Y Cb/Pb Cr/Pr output.
x Language
Selects the language for the on-screen display.
–English
–French
–Spanish
–German
–Italian
–Dutch
–Portuguese
13

Changing PlayStation®2 system configuration settings (continued)
x Mouse*
Sets the button for main use.
–Right-Handed : selects the left mouse button.
–Left-Handed : selects the right mouse button.
Optional settings for the mouse
1 Select “Mouse,” and then press the f (Options) button.
2 Select the desired menu, and then press the × (Enter) button. 3 Select the desired setting, and then press the × button.
•Mouse Cursor Speed
– Slow
– Normal
– Fast
•Double Click Speed
– Slow
– Normal
– Fast
x Keyboard*
Sets the layout for the on-screen keyboard or USB keyboard. (The initial setting matches the “Language” selected in the System Configuration menu.)
–English (US)
–English (UK)
–French (Canada)
–French (France)
–Spanish (Spain)
–German (Germany)
–Italian (Italy)
–Dutch (Netherlands)
–Portuguese (Portugal)
Optional settings for the keyboard
1 Select “Keyboard,” and then press the f button.
2 Select the desired menu, and then press the × button. 3 Select the desired setting, and then press the × button.
• Delay Until Repeat
Sets the time before a character is repeated when a key is held down.
–Short
–Normal
–Long
• Repeat Rate
Sets the speed at which a character is repeated when a key is held down.
–Slow
–Normal
–Fast
*No official PlayStation®2 products are currently available. Compatible USB certified products are available from other manufacturers.
14

US
Checking version information
When you press the f (Version) button in the Main menu, the Version Information screen will appear. At this screen you can check version information, use the autodiagnosis feature, and configure the PlayStation® Driver.
About MAC address
The MAC (Media Access Control) address is a unique hardware address that defines the host inside a network. The address is assigned to the network connector of the network adaptor (for PlayStation®2) (sold separately).
15

Changing PlayStation®2 system configuration settings (continued)
At the Version Information screen, you can use the auto-diagnosis feature or configure the PlayStation® Driver as explained below.
x Auto-diagnosis
The PlayStation®2 console automatically adjusts its internal settings for best possible disc playback. However, when auto-diagnosis is set to “On”, the console makes additional adjustments that may allow discs that were previously unplayable to be played.
Diagnosis
–On
–Off
1 Select “Console” using the directional buttons, and then press the f (Options) button. 2 Select “On” using the directional buttons, and then press the × button.
3 Insert a disc. The console automatically starts the diagnosis.
Note
The auto-diagnosis setting automatically returns to “Off” when you press the 1/RESET button or start playing a PlayStation® or PlayStation®2 format disc, audio CD or DVD video disc.
x PlayStation® Driver
Configures the setting for loading PlayStation® format software.
• Disc Speed
–Standard : normally select this position.
–Fast : shortens the loading time for software. Depending on the software, there may be no effect or the software may unexpectedly fail. In this case, select “Standard.”
• Texture Mapping
–Standard : normally select this position.
–Smooth : makes the display smoother when playing a PlayStation® format disc. Depending on the software, there may be no effect or the display may be blurred. In this case, select “Standard.”
1 Select “PlayStation® Driver” using the directional buttons, and then press the f button. 2 Select the desired setting, and then press the × button.
Note
The “PlayStation® Driver” settings automatically return to “Standard” when you press the 1/RESET button or turn off the console.
16
Using the HDD compatible browser
US
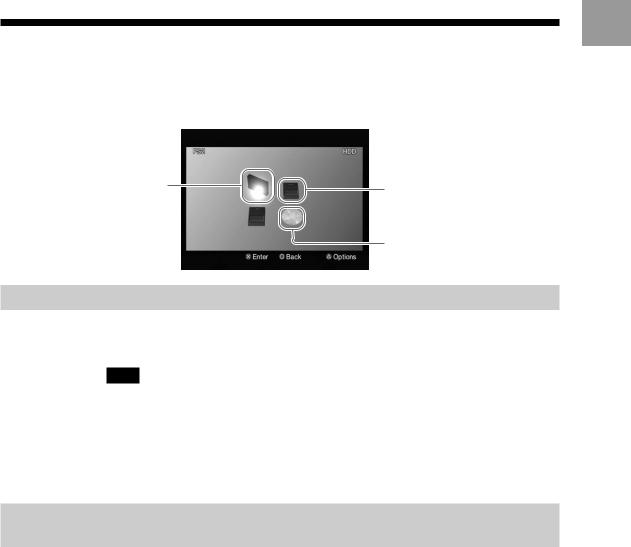
At the Main menu, select “Browser,” and then press the × (Enter) button.
At the Browser screen, you can display the contents of the HDD, and manage data stored on a memory card (8MB) (for PlayStation®2) or a memory card.
The Browser screen appears as shown below.
HDD icon
Displays the HDD screen, where you can manage folders and data, or start PlayStation®2 format software installed on the HDD.
Memory card icon
Displays the memory card screen, where you can manage data saved to a memory card (8MB) (for PlayStation®2) or memory card.
Disc icon
Starts playback of the disc currently in the disc tray.
Checking HDD information
At the Browser screen, select the HDD icon, and then press the f (Options) button to display a screen showing the capacity and free space of the HDD.
Note
HDD capacity and free space are displayed in megabytes.
–1 gigabyte = 1024 megabytes
–1 megabyte = 1024 kilobytes
To view the contents of the HDD
Select the HDD icon, and then press the × button.
Managing data saved to a memory card (8MB) (for PlayStation®2) or
memory card
You can copy or move data from one memory card (8MB) (for PlayStation®2) or memory card to another, or to the HDD. You can also delete data and view information about a selected data item.
1At the Browser screen, select the icon for the memory card (8MB) (for
PlayStation®2) or memory card that holds the desired data, and then press the × button.
2
3
Select the icon of the desired data, and then press the f button.
The data management screen will appear.
Select the desired command, and then press the × button.
When you select “Copy,” “Move,” or “Delete,” a confirmation message will |
|
appear. |
|
If you want to proceed, select “Yes,” and then press the × button. |
17 |
|
Starting PlayStation®2 format software installed on the HDD
You can start PlayStation®2 format software installed on the HDD. To install software on the HDD, follow the on-screen instructions or the instructions in the software manual. If you want to start PlayStation®2 format software that is not compatible with the HDD, refer to the PlayStation®2 console instruction manual.
1At the Browser screen, select the HDD icon, and then press the × (Enter) button.
The HDD screen will appear.
2Select the icon for the PlayStation®2 format software you want to start, and then press the × button.
The software starts up.
Notes
•Some software requires a disc for start up, even if it is installed on the HDD.
•The icons appear in the order in which they were installed.
•If there are too many icons to be displayed at one time, directional arrows appear on the HDD screen. Use the up and down directional buttons to scroll through the screen.
•Depending on the number of icons, it may take some time for the screen to scroll.
•Once the HDD is installed, you may not be able to reset software by pressing the
1 (standby)/reset button on the console front. To help avoid losing game progress, try to save before attempting to reset a game.
Quitting PlayStation®2 format software compatible with the HDD
To quit PlayStation®2 format software marked as compatible with the HDD, follow the on-screen instructions or the instructions in the software manual.
If you cannot find specific instructions on how to quit a software title, you can quit by doing the following.
First make sure that the HDD access indicator located inside the front vent of the PlayStation®2 console is not blinking. Then press and immediately release the
1 (standby)/RESET button on the console front. The 1 indicator will turn red when the console has entered standby mode.
Note
If you are not able to quit a software title by the method described above, you can force the software to quit by pressing and holding down the 1/RESET button until the 1 indicator turns red. Note, however, that software or data loss or corruption may occur when this method of quitting is used.
18
US
Deleting PlayStation®2 format software from the HDD
To delete PlayStation®2 format software from the HDD, follow this procedure.
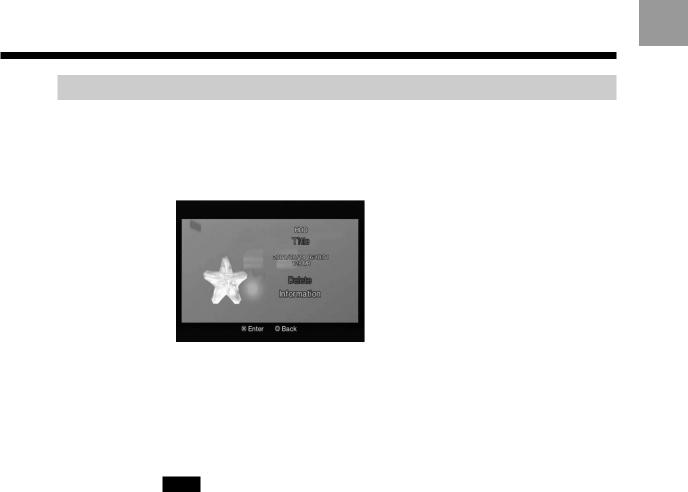
1At the HDD screen, select the icon for the PlayStation®2 format software you want to delete, and then press the f (Options) button.
The PlayStation®2 format software management screen will appear.
2
3
Select “Delete,” and then press the × (Enter) button.
A confirmation message will appear.
Select “Yes,” and then press the × button.
The software is deleted.
Notes
•In some cases, when you delete software, all corresponding data (saved data, settings data, etc.) may also be deleted. If this happens, you cannot recover the data that has been deleted even if you re-install the same software. For details, refer to the appropriate software manual.
•In step 2, select “Information,” and then press the × button to view the attributes of the PlayStation®2 format software.
19

Managing folders and data on the HDD
The HDD holds data in “folders.”
You can save data from an HDD compatible PlayStation®2 format software title, or copy data from a memory card (8MB) (for PlayStation®2) or memory card (both sold separately) to a folder. You can also create multiple folders and organize or rename data.
At the Browser screen, select the HDD icon, and then press the × (Enter) button. The HDD screen will appear.
Icons for each folder will then appear, followed by icons for all PlayStation®2 format software installed on the HDD.
Notes
•The folder and software icons are listed in the order they were created.
•When you use the HDD for the first time, nothing will appear on the HDD screen.
20
US
Creating a folder
This section explains how to create a new folder.
You can organize data by copying or moving it into the new folder.
1At the HDD screen, select the first folder icon (in the upper left of the screen), and then press the left or up directional button.
2
3
The HDD icon in the upper left of the screen is selected.
With the HDD icon selected, press the f (Options) button.
Select “Create Folder,” and then press the × (Enter) button.
The on-screen keyboard and text input area will appear.
You can input a new name for the folder. For details, see “On-screen keyboard” (page 8) or “USB keyboard” (page 9).
4Press the START button.
The new folder appears.
Note
You cannot create a folder inside another folder.
To check information about a folder
Select the icon for the folder you want information about, and then press the f button. The folder management screen will appear. At this screen, you can check the creation date and other information about the folder. You can also copy, rename or delete the folder.
To view the contents of a folder
Select a folder icon, and then press the × button. An icon for each data saved to the folder will appear.
21

Managing folders and data on the HDD (continued)
Copying a folder
1At the HDD screen, select the icon for the folder you want to copy, and then press the f (Options) button.
2
3
The folder management screen will appear.
Select “Copy,” and then press the × (Enter) button.
A confirmation message will appear.
Select “Yes,” and then press the × button.
The on-screen keyboard and text input area will appear.
You can input a new name for the folder. For details, see “On-screen keyboard” (page 8) or “USB keyboard” (page 9).
4Press the START button.
The folder and all data inside the folder are copied.
To copy data
You can copy data from one folder to another, or to a memory card (8MB) (for PlayStation®2) or memory card.
1At the HDD screen, select the icon for the folder that holds the data you want to copy, and then press the × button.
2
3
4
5
Select the icon for the data you want to copy, and then press the f button.
Select “Copy,” and then press the × button.
Select the location for the copied data using the left and right directional buttons, and then press the × button.
Select “Yes,” and then press the × button.
Depending on where the data is copied, you may have to rename the copied data.
Notes
•Some types of data cannot be copied.
•You cannot copy a folder inside another folder.
22

US
Renaming a folder
1At the HDD screen, select the icon for the folder you want to rename, and then press the f (Options) button.
The folder management screen will appear.
2Select “Rename,” and then press the × (Enter) button.
The on-screen keyboard and text input area will appear.
3Input a new name.
For details on how to input characters, see “On-screen keyboard“ (page 8) or “USB keyboard“ (page 9).
To rename data
1At the HDD screen, select the icon for the folder that holds the data you want to rename, and then press the × button.
2
3
Select the icon for the data you want to rename, and then press the f button.
Follow steps 2 and 3 in “Renaming a folder.”
Note
Some types of data cannot be renamed.
23

Managing folders and data on the HDD (continued)
Moving data
You can move data from one folder to another, or to a memory card (8MB) (for PlayStation®2) or memory card.
1At the HDD screen, select the icon for the folder that holds the data you want to move, and then press the × (Enter) button.
2Select the icon for the data you want to move, and then press the f (Options) button.
The data management screen will appear.
3 Select “Move,” and then press the × button.
4Select the location you want to move the data to using the left and right directional buttons, and then press the × button.
A confirmation message will appear.
5Select “Yes,” and then press the × button.
The data is moved.
Depending on where the data is moved, you may have to rename the data.
Note
Some types of data cannot be moved.
Deleting a folder
1In the HDD screen, select the icon for the folder you want to delete, and then press the f button.
The folder management screen will appear.
2
3
Select “Delete,” and then press the × button.
A confirmation message will appear.
Select “Yes,” and then press the × button.
The folder is deleted.
Note
If the folder contains any data, that data will also be deleted.
24

US
To delete data
1At the HDD screen, select the icon for the folder that holds the data you want to delete, and then press the × (Enter) button.
2Select the icon for the data you want to delete, and then press the f (Options) button.
3 Follow steps 2 and 3 in “Deleting a folder” (page 24).
25

Playing an audio CD
To start playback of an audio CD on the PlayStation®2 console, follow the procedure below. For complete instructions on all audio CD playback options, refer to the PlayStation®2 console instruction manual.
Note
For users of PlayStation®2 console model numbers SCPH-50001, SCPH-50001/N or SCPH50010/N: Once the HDD is installed, you may not be able to operate the PlayStation®2 console’s CD Player using the DVD remote control (for PlayStation®2) (sold separately). In such cases, use the analog controller (DUALSHOCK®2). If you have questions about operating the PlayStation®2 console’s CD Player, contact our technical support line at 1-800-345-7669.
1At the Main menu, select “Browser,” and then press the × (Enter) button.
The Browser screen will appear.
2Press the A (open) button on the PlayStation®2 console front.
The disc tray on the PlayStation®2 console front opens.
3Place a disc in the disc tray on the PlayStation®2 console front with the label side facing up (data side down).
4
5
Press the A button.
At the Browser screen, select the icon for the audio CD, and then press the × button.
The icons for each track on the CD will appear. Select the track you want to listen to, and then press the × button to start playback.
26

Playing a DVD video
US
Playing a DVD video
To play a DVD video using the DVD Player installed on a memory card (8MB) (for PlayStation®2), insert the memory card (8MB) (for PlayStation®2) containing the installed DVD Player into a MEMORY CARD slot on the PlayStation®2 console front and follow the steps below to start playback.
Note
If you want to play a DVD video using the DVD Player software that is pre-installed on the
PlayStation®2 console, you do not need to use a memory card (8MB) (for PlayStation®2).
1Turn on the PlayStation®2 console using the MAIN POWER switch on the console rear.
2 Press the 1 (standby)/RESET button on the PlayStation®2 console front.
3Press the A (open) button on the PlayStation®2 console front.
The disc tray on the PlayStation®2 console front will open.
4Place a DVD video disc in the disc tray on the PlayStation®2 console front with the label side facing up (data side down).
5Press the A button.
The disc tray will close and playback of the DVD video will start.
Notes
•Depending on the DVD video, some operations may be different or may not be available. For details, refer to the instructions supplied with your DVD video.
•The DVD Player software, if installed, may affect the appearance of the on-screen Control Panel used to operate the console’s DVD player. Depending on the console in use, certain additional features may be available. If you have any questions, contact our technical support line at 1-800-345-7669.
27
Playing a DVD video (continued)
Operating the DVD player
You can operate the DVD player directly using the buttons on the analog controller (DUALSHOCK®2) or the on-screen Control Panel.
For details on using the on-screen Control Panel or changing settings for the DVD player, refer to the PlayStation®2 console instruction manual.
Operating the DVD player directly with a controller
You can operate the DVD player directly with the buttons on a controller when the Control Panel is not displayed on the screen. The function of each button is shown in the diagram below.
1 |
4 |
5 |
6 |
|
|
||
2 |
|
|
7 |
|
|
|
8 |
|
|
|
9 |
3 |
|
|
0 |
|
|
|
|
|
|
|
qa |
|
qd |
qs |
|
1L2 button: Search Backward |
|
8f button: Display the DVD menu |
|
2L1 button: Previous Chapter |
|
9s button: Display the Title menu |
|
3Directional buttons: Select item |
|
0a button: Stop |
|
4SELECT button: Display the Control Panel |
qa× button: Enter |
||
5START button: Playback, Pause |
|
qsR3 button*: Audio Options |
|
6R2 button: Search Forward |
|
qdL3 button*: Subtitle Options |
|
7R1 button: Next Chapter |
|
|
|
*When using a controller without the L3 or R3 button, select the Subtitle Options function or the Audio Options function using the Control Panel.
28

Optimizing the HDD
US
You can use the Optimize HDD utility when a message appears stating that there is not enough space to install software or data on the HDD. By optimizing, you may create some additional free space on the HDD.
Notes
•The Optimize HDD utility will not delete or change data or PlayStation®2 format software saved on the HDD.
•The Optimize HDD utility is most effective when used after software or data has been deleted from the HDD.
1Start HDD Utility Disc (ver 1.10).
The opening screen will appear. Then, after several seconds, the Basic Operations screen will appear.
2
3
4
At the Basic Operations screen, press the × (Enter) button.
The Utilities menu will appear as shown below.
Select “Optimize HDD,” and then press the × button.
Proceed with the utility according to the on-screen instructions.
The current status will appear on the screen while the utility is in use.
When the operation is completed, remove HDD Utility Disc (ver 1.10), and store it in a safe place for future use.
Notes
•Depending on the volume and location of data stored on the HDD, the Optimize HDD utility may take a long time to complete.
•Depending on the volume and location of data stored on the HDD, the Optimize HDD utility may not be able to create extra free space.
•To help prevent software or data loss or corruption when optimizing the HDD:
–do not open the disc tray
–do not turn off the PlayStation®2 console, or press the 1 (standby)/RESET button
–do not remove the HDD unit from the console.
•For details on how to check free space on the HDD, see “Checking HDD information” (page 17).
29

Diagnosing and repairing the HDD
You can use the Diagnose and Repair HDD utility when a message concerning errors on the HDD appears. This utility will search for and correct errors on the HDD.
1 Start HDD Utility Disc (ver 1.10).
2
3
The opening screen will appear. Then, after several seconds, the Basic Operations screen will appear.
At the Basic Operations screen, press the × (Enter) button.
The Utilities menu will appear.
Select “Diagnose and Repair HDD,” and then press the × button.
4Proceed with the utility according to the on-screen instructions.
The current status will appear on the screen while the utility is in use.
When the operation is completed, remove HDD Utility Disc (ver 1.10), and store it in a safe place for future use.
Notes
•In some cases, the Diagnose and Repair HDD utility may not be able to fix all errors on the HDD. In such cases, refer to the Troubleshooting section of this manual and follow the instructions given there.
•Data with errors may be deleted while repairing the HDD.
•Depending on the volume and location of data on the HDD, the Diagnose and Repair HDD utility may take a long time to complete.
•To help prevent software or data loss or corruption when diagnosing and repairing the HDD:
–do not open the disc tray
–do not turn off the PlayStation®2 console, or press the 1 (standby)/RESET button
–do not remove the HDD unit from the console.
30
 Loading...