


 Loading...
Sony MHS-PM5, MHS-PM5 L, MHS-PM5 P, MHS-PM5 V, MHS-PM5 W Handbook
...Handbook
Mobile HD Snap Camera
MHS-PM5/PM5K
© 2010 Sony Corporation
VCLICK!
 Table of contents
Getting started
Basic Operations
Using with your


 computer
Using functions for shooting
Using functions for viewing
Customizing the settings
Enjoying the 360 Video
 (MHS-PM5K)
Viewing images on a TV
Troubleshooting
Others
 Index
Index
4-167-123-11(1) GB

Notes on using your camera
Types of memory card you can use with your camera
•The memory cards that you can use with this camera are “Memory Stick PRO Duo” media, “Memory Stick PRO-HG Duo” media, SD memory cards and SDHC memory cards. You cannot use a MultiMediaCard.
•Memory cards of up to 32 GB have been confirmed to operate correctly with this camera.
•“Memory Stick PRO Duo” media and “Memory Stick PRO-HG Duo” are collectively called “Memory Stick PRO Duo” media in this manual.
•For recording movies, it is recommended that you use “Memory Stick PRO Duo” media of 1 GB or larger marked with:
–


 * (“Memory Stick PRO Duo” media)
–


 (“Memory Stick PRO-HG Duo” media)
*Marked with Mark2 or not, either can be used.
•See page 41 for the recordable time of “Memory Stick PRO Duo” media.
“Memory Stick PRO Duo”/“Memory Stick PRO-HG Duo” media
When using “Memory Stick PRO Duo” media with the standard size “Memory Stick” media compatible slot
Be sure to insert the “Memory Stick PRO Duo” media into the “Memory Stick Duo” media adaptor.
“Memory Stick Duo” media adaptor
Notes on the battery
•Charge the battery before using the camera for the first time.
•The battery can be charged even if it is not completely discharged. Also, even if the battery
is not fully charged, you can use the partially charged capacity of the battery as is.
•If you do not intend to use the camera for a long time, use up the existing charge and store the camera in a cool, dry place. This is to maintain the battery functions.
•For details on the battery, see page 68.
No compensation for contents of the recording
•The contents of the recording cannot be compensated for if recording or playback is not possible due to a malfunction of your camera or recording media, etc.
Internal memory and memory card back up
•Do not turn off the camera or remove the memory card while the access lamp is lit, or the internal memory data or the memory card data may be destroyed. Always protect your data by making a back up copy.
About changing the language setting
•The on-screen displays in each local language are used for illustrating the operating procedures. Change the screen language before using your camera if necessary (page 22).
Notes on recording/playback
•To ensure stable operation of the memory cards, we recommend that you format the memory card the first time you use it with this camera. However, if you format the memory card, all the data on the memory card will be deleted and you cannot restore that data. So, be sure to store your important data on the computer before formatting the memory card.
•This camera is neither dust-proof, nor splashproof, nor water-proof.
•Before you record one-time events, make a trial recording to make sure that the camera is working correctly.
•Be careful not to get the camera wet. Water entering the inside of the camera may cause malfunctions which in some cases may not be repairable.
•If you rotate the lens portion back when your camera is connected to other devices with the USB connection support cable, the recorded images may be lost.
2

Notes on using your camera
•Do not aim the camera at the sun or other bright light. This may cause irrecoverable damage to your eyes. Or it may cause the malfunction of your camera.
•Do not use the camera near a location that generates strong radio waves or emits radiation. The camera may not be able to record or play back properly.
•Using the camera in sandy or dusty locations may cause malfunctions.
•If moisture condensation occurs, turn off the camera and leave it for about an hour before using it.
•Do not shake or strike the camera. In addition to malfunctions and an inability to record images, this may render the recording medium unusable, or cause image data breakdown, damage or loss.
•When inserting or ejecting the memory card, be careful so that the memory card does not pop out and drop.
•When connecting your camera to another device with a cable, be sure to insert the connector plug in the correct way. Pushing the plug forcibly into the terminal will damage the terminal and may result in a malfunction of your camera.
•Playback of movies other than those shot, edited or composed on this camera is not guaranteed.
Notes on the LCD screen and the lens
•The LCD screen is manufactured using extremely high-precision technology, so over 99.99% of the pixels are operational for effective use. However, there may be some tiny black points and/or bright points (white, red, blue or green in color) that constantly appear on the LCD screen. These points are normal in the manufacturing process and do not affect the recording in any way.
 Black, white, red, blue or green points
•Exposing the LCD screen or the lens to direct sunlight for long periods may cause malfunctions. Be careful when placing the camera near a window or outdoors.
•Do not press against the LCD screen. The screen may be discolored and that may cause a malfunction.
•Images may trail across on the LCD screen in a cold location. This is not a malfunction.
Note on disposal/transfer
•When using software embedded in the camera, personal information such as IDs and mail addresses may be saved on the internal memory of the camera. When transferring the camera to others or on disposal, do so after deleting the information input.
On image data compatibility
•This camera supports “MP4 format” as movie file format. Therefore, movies recorded by this camera cannot be played on devices that do not support “MP4 format”.
•This camera does not support “AVCHD format” and therefore is not compatible with the playback and recording of movies in “AVCHD format” like a Digital HD Video camera recorder.
•Still images recorded by this camera are compressed/recorded in JPEG*1 format. The file extension is “.JPG”.
•This camera conforms with DCF*2 universal standard established by JEITA (Japan
Electronics and Information Technology Industries Association)*3.
•Playback of still images/movies recorded with your camera on other equipment and playback of still images recorded or edited with other equipment on your camera are not guaranteed. *1 Joint Photographic Experts Group
*2 Design rule for Camera File system
*3 Japan Electronics and Information
Technology Industries Association
On the overheat protection
•The power may go off automatically to protect the camera depending on the temperature of the camera or the battery pack. In this case, the message appears on the screen before the power goes off. If the message “Camera overheating Allow it to cool” appears, the camera has been overheating. The power will go off automatically. Place the camera in a cool place until the temperature of the camera grows colder.
3
Notes on using your camera
Warning on copyright
•Television programs, films, videotapes, and other materials may be copyrighted. Unauthorized recording of such materials may be contrary to the provisions of the copyright laws.
About this Handbook
•The photographs used as examples of pictures in this Handbook are reproduced images, and are not actual images shot using this camera.
•Design and specifications of recording media and other accessories are subject to change without notice.
4

Enjoying the camera
Enjoying high definition images
The movies shot with this camera will be recorded in MPEG-4 AVC/H.264 Main Profile, approximately 30 frames per second, Progressive, AAC LC, “MP4 format”.
–MPEG: Movie Picture Experts Group
–AVC: Advanced Video Codec
What is “MPEG-4 AVC/H.264”?
MPEG-4 AVC/H.264 is a standard of video camera, which uses highly efficient image compression encoding technology to record HD (high definition) images. Compared with the existing image compression encoding technology, MPEG-4 AVC/H.264 is able to compress images even more effectively.
•In the MPEG-4 AVC/H.264, the camera supports high definition images with effective scanning
lines of 1080 or 720. The number of recorded image pixel is 1920×1080 or 1280×720, and the image is recorded in progressive mode*.
Progressive playback
The camera supports progressive mode*, which is used in computers, and therefore is suited for playing back images on computers.
Shooting movies in image quality suited for your purpose
The camera supports the common and widely used VGA (640×480) as well as HD (high definition) image quality. Select VGA (640×480) image quality to upload the recorded images on websites or to attach to mails without the need to convert the image quality.
Movie Size you can select with this camera
Movie Size |
Usage guidelines |
|
1920 |
× 1080 30P |
Shoot HD (high definition) quality movies in sizes suited for display |
|
|
on computer or high definition TV |
|
|
|
1280 |
× 720 60P |
Shoots the rapidly moving action scenes such as sports smoothly with |
|
|
HD (high definition) quality |
|
|
|
1280 |
× 720 30P |
Shoot HD (high definition) quality movies in sizes suited for display |
|
|
on computer |
|
|
|
640 × 480 30P |
Shoot SD (standard definition) quality movies in sizes suited for |
|
|
|
uploading on websites |
|
|
|
* The progressive mode is a type of movie recording method, which reads out all image pixels at once.
5

How to handle the camera
• When carrying the camera, rotate the lens portion back as illustrated.
• Be careful not to block the lens with your finger when shooting.
•Do not hold the camera by only holding the battery/memory card cover, jack cover, the USB jack or the lens portion.
• See page 15 for how to attach the wrist strap.
6

Table of contents |
|
|
Notes on using your camera ..................................................................... |
2 |
|
Enjoying the camera.................................................................................. |
5 |
|
How to handle the camera ........................................................................ |
6 |
|
Identifying parts....................................................................................... |
10 |
|
Indicators on the screen .......................................................................... |
12 |
|
Getting started |
|
|
Checking the accessories supplied ......................................................... |
15 |
|
1 |
Preparing the battery pack .................................................................. |
16 |
2 |
Inserting the memory card .................................................................. |
19 |
3 |
Turning the camera on/setting the language and clock....................... |
21 |
Basic Operations |
|
|
Shooting images...................................................................................... |
23 |
|
Viewing images ....................................................................................... |
27 |
|
Using the menu items.............................................................................. |
29 |
|
Menu items.............................................................................................. |
30 |
|
Using with your computer |
|
|
Using with your computer........................................................................ |
31 |
|
Connecting the camera to the computer ................................................. |
33 |
|
Uploading videos and still images to media services.............................. |
35 |
|
Using the software................................................................................... |
38 |
|
Using functions for shooting |
|
|
Shooting menu ........................................................................................ |
40 |
|
Photo Size: Selecting the photo size according to use Movie Size: Selecting the movie size according to use
SteadyShot: Allows you to reduce camera shake when shooting images Face Detection: Detects the faces of your subjects, and adjusts the exposure automatically
Setup: Selecting the shooting settings
7

Table of contents
Using functions for viewing
Viewing menu ......................................................................................... |
43 |
(Delete): Allows you to select and delete unwanted images
 (Slideshow): Playing back a series of images
 (Protect): Preventing accidental erasure

 (Rotate): Rotating a still image
  (Setup): Changing Setup items
Customizing the settings |
|
Using Setup items................................................................................... |
46 |
Shooting Setting ............................................................................... |
47 |
Flicker Reduction |
|
Main Settings 1/2 .............................................................................. |
48 |
Beep |
Language Setting |
LCD Backlight |
Initialize |
Display Color |
|
Main Settings 2/2 .............................................................................. |
49 |
LUN Settings |
|
Video Out |
|
Memory Card Tool ............................................................................ |
50 |
Format |
|
Copy |
|
Internal Memory Tool........................................................................ |
51 |
Format |
|
Clock Settings................................................................................... |
52 |
Clock Settings |
|
Enjoying the 360 Video (MHS-PM5K) |
|
Shooting 360 Video images .................................................................... |
53 |
Viewing images on a TV |
|
Viewing images on a TV ......................................................................... |
55 |
8

Table of contents |
|
Troubleshooting |
|
Troubleshooting ....................................................................................... |
58 |
Warning indicators and messages .......................................................... |
64 |
Others |
|
On the “Memory Stick” media ................................................................. |
66 |
On the battery ......................................................................................... |
68 |
Precautions ............................................................................................. |
69 |
Specifications .......................................................................................... |
70 |
Index |
|
Index........................................................................................................ |
71 |
9

Identifying parts
See the pages in parentheses for details of operation.
ALens
BMicrophone
CHook for wrist strap (15)
DSpeaker
EBattery/Memory card cover (19)
FBattery slot
GMemory card slot
HAccess lamp (20)
ILCD screen (25)
JMENU button (29)
KMulti-selector
Menu on: v/V/b/B (29)
Menu off: v (Screen display)/
V (Self-timer) (26)
L (Play) button (27)
MPower/Charge lamp (16)
•The Power/Charge lamp lights up in green when the power is turned on, and lights up in orange while charging the battery.
N (Photo) button (23)
• Shoots still images.
O (Movie) button (23)
• Starts/stops shooting movies.
PON/OFF button (21)
QZoom lever
For shooting: Zoom (W/T) (26) For viewing: Playback zoom/


 (Index) (28)
10
Identifying parts
RTripod receptacle (bottom)
• Use a tripod with a screw length of less than 5.5 mm (7/32 inches). You will be unable to firmly secure the camera to tripods having screws longer than 5.5 mm (7/32 inches), and may damage the camera.
SUSB jack slide lever
T (USB) jack (33)
•Used when connecting to a computer with a USB connection support cable.
UA/V OUT jack (55)
•Used when connecting to a TV, etc. with an A/V connecting cable.
VJack cover
11
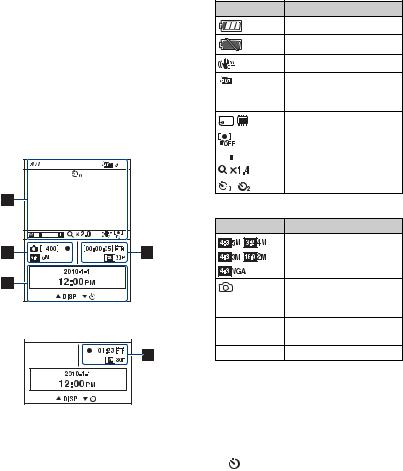
Indicators on the screen
When you tilt the multi-selector to v (Screen display) repeatedly, the display changes (page 25).
Indicators on the screen disappear after about 5 seconds with the default settings in effect when you purchased this camera. If you want to make indicators appear again, carry out any operation other than those using the zoom lever. The indicators appear for only 5 seconds, however.
See the pages in parentheses for details of operation.
When shooting still images
When recording movies
5 |
A
Display Indication
Battery remaining (18)
Low battery warning (64)
SteadyShot (42)
Recording folder
•This does not appear when using internal memory.
|
|
Recording Media |
|
|
|
|
|
Face Detection (42) |
|
|
|
|
|
Zoom scaling |
|
|
|
|
|
|
/ |
Self-timer (26) |
|
|
||
B
Display Indication
Image size (40)
Information on the still image settings appears near the  (Photo) icon.
[400]Remaining number of recordable images (40)
zAE lock (green) (24)
C
Display |
Indication |
2010-1-1 |
Current date and time |
12:00 PM |
|
|
|
v DISP |
Changing the screen |
|
display |
|
|
V |
Using the self-timer |
|
|
12

Indicators on the screen
D
Display Indication
Image size (40)
[00:00:05] Remaining recordable time (40)
Information on the movie settings appears near the
 (Movie) icon.
E
Display Indication
Image size (40)
|
Movie recording (red) |
01:23 |
Recording time (41) |
b Note
•Indicators and their positions are approximate and differ from what you actually see.
13

Indicators on the screen
When playing back still images
When playing back movies
A
Display Indication
Battery remaining (18)
Image size (40)
|
|
|
|
|
|
|
|
|
Protect (44) |
|
|
|
|
|
|
|
|
|
|
|
|
|
|
|
|
|
|
|
|
|
|
|
|
|
|
|
|
|
|
|
|
|
|
|
|
|
|
|
|
|
|
|
|
|
|
|
|
|
|
|
|
|
|
|
|
|
|
|
|
|
|
|
|
|
|
|
|
|
|
|
|
|
|
|
|
|
|
|
|
|
|
|
|
|
|
|
|
|
|
VOL. |
Volume (27) |
||||||||
|
|
|
|
|
|
|
|
|
|
|
|
|
|
|
|
|
|
|
Zoom scaling |
|
|
|
|
|
|
|
|
|
|
|
|
|
|
|
|
|
|
|
Low battery warning (64) |
|
|
|
|
|
|
|
|
|
|
B |
|
||||||||
|
|
|
|
|
|
|
|
|
|
Display |
Indication |
||||||||
|
|
|
|
|
|
|
|
|
Playback bar |
|
|
|
|
|
|
|
|
|
|
|
|
|
|
|
|
|
|
|
|
00:00:00 |
|
|
|
|
Counter |
||||
|
|
|
|
|
|
|
|
|
|
2010-1-1 |
|
|
|
|
Recorded date/time of the |
||||
9:30 AM |
playback image |
||||||||
|
|
|
|
|
|
|
|
|
|
|
|
BACK/ |
Select images |
||||||
NEXT |
|
||||||||
|
|
|
|
|
|
|
|
|
|
v DISP/ |
Change the display setting |
||||||||
V VOLUME |
with v, and adjust the |
||||||||
|
|
|
|
|
|
|
|
|
volume with V. The |
|
|
|
|
|
|
|
|
|
guidance message is |
|
|
|
|
|
|
|
|
|
displayed alternately. |
|
|
|
|
|
|
|
|
|
|
C |
|
||||||||
|
|
|
|
|
|
|
|
|
|
Display |
Indication |
||||||||
|
|
|
|
|
|
|
|
|
Playback folder |
|
|
|
|
|
|
|
|
|
• This does not appear when |
|
|
|
|
|
|
|
|
|
using internal memory. |
|
|
|
|
|
|
|
|
|
|
12/12 |
|
|
|
|
|
|
Image number/Number of |
||
|
|
|
|
|
|
|
|
|
images recorded in selected |
|
|
|
|
|
|
|
|
|
folder |
|
|
|
|
|
|
|
|
|
|
|
|
|
|
|
|
|
|
|
Playback Media |
|
|
|
|
|
|
|
|
|
|
b Note
•Indicators and their positions are approximate and differ from what you actually see.
14
Getting started
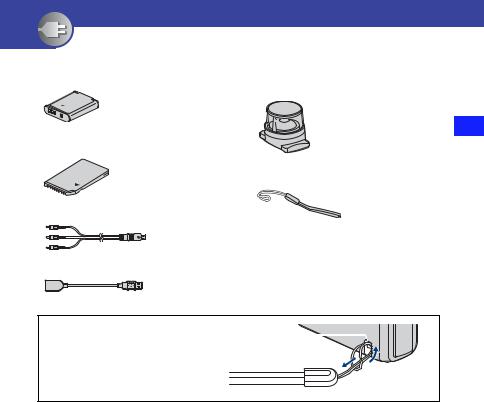
Checking the accessories supplied
•Rechargeable battery pack NP-BK1 (1)
•Memory card (“Memory Stick PRO Duo” 4GB) (1) (MHS-PM5K only)
•A/V connecting cable (1)
•USB connection support cable (1)
•360 Video Lens VCL-BPP1 (1) (MHS-PM5K only)
•360 Video Lens Pouch (1) (MHS-PM5K only)
•Wrist strap (1)
•CD-ROM (1)
–“PMB” (software, including “PMB Help”)
–bloggie Handbook (PDF)
•Instruction Manual
•Important Notice
Attach the strap and place your hand
through the loop to prevent the camera Hook  from damage by being dropped, etc.
started Getting
15

1 Preparing the battery pack
Power/Charge lamp
USB connection support cable (supplied)
USB jack slide |
USB jack |
AC Adaptor |
|
cover |
|||
lever |
|||
|
|
Power cord (Mains lead)
1 Open the battery/memory card cover and insert the battery pack into this camera, then close the cover.
•Insert the battery pack as far as it will go, then press the back of the battery pack gently until it clicks.
•You cannot open the battery/memory card cover when a tripod is attached to the camera.
2 Open the USB jack cover, then slide the USB jack slide lever.
3 Connect the camera to the computer that is turned on with the USB connection support cable (supplied).
•The Power/Charge lamp lights up in orange, and charging starts.
•When the Power/Charge lamp turns off, charging is finished.
•The Power/Charge lamp may turn off when the temperature is outside of the recommended operating temperature (10 to 30°C.)
4 When charging is finished, disconnect the USB connection support cable from the USB jack of your camera.
b Notes
•While the camera is connected to a computer, you cannot operate the camera. Be sure to disconnect the camera before operation.
•Charging the battery with customized or hand-built computers is not guaranteed. Depending on the type of USB device used, charging may not function properly.
16

1 Preparing the battery pack
•Do not apply force to the camera, when you connect the camera to a computer. This may cause damage to the camera or the computer.
•When you connect the camera to a notebook computer that is not connected to an AC power source, the battery of the notebook computer may be depleted rapidly. Do not leave the camera connected to the
computer for a long time.
To remove the battery pack
Slide the battery eject lever.
Be sure not to drop the battery.
Charging time
Full charge time
Approx. 300 min.
•Time required to charge a fully depleted battery at a temperature of 25°C (77°F). Charging may take longer under certain circumstances or conditions.
•See page 40 for the number of images that can be recorded.
•When charging is finished, disconnect the USB connection support cable from the computer.
Approximate recording/playback time (min.)
Recording time*1
Continuous recording time |
95 |
|
|
Typical recording time*2 |
60 |
Playback time
130
*1 Shooting movies continuously with an image size of [1280 × 720 30P]
*2 Typical recording time shows the time when you repeat recording start/stop, turning the power on/off and zooming.
started Getting
17

1 Preparing the battery pack
To check the remaining battery time
Rotate the lens portion or press the ON/OFF button to turn on and check the remaining battery on the LCD screen.
Battery |
|
|
|
|
|
remaining |
|
|
|
|
|
indicator |
|
|
|
|
|
Battery |
Sufficient |
Battery |
Battery half |
Battery low, |
Charge the battery. |
remaining |
power |
almost fully |
full |
recording/ |
(The warning |
guidelines |
remaining |
charged |
|
playback |
indicator flashes.) |
|
|
|
|
will stop |
|
|
|
|
|
soon. |
|
•It takes about one minute until the correct battery remaining indicator appears.
•The displayed battery remaining indicator may not be correct under certain circumstances.
•If the camera is running on battery power and you do not operate the camera for about five minutes, the camera turns off automatically to prevent wearing down the battery (Auto power off function).
•The Language Setting screen appears when the camera is turned on for the first time (page 21).
18

2 Inserting the memory card
1 |
2 |
3 |
|
Battery/memory |
Be careful of the direction |
|
card cover |
of the notched corner. |
2 |
1 |
|
started Getting
1 Open the cover.
2 Insert the memory card all the way in until it clicks with its notched corner directed downward as shown in the illustration.
3 Close the cover.
When there is no memory card inserted
The camera records/plays back images using the internal memory (approx. 26 MB). When the movie size is set to [1920 × 1080 30P] or [1280 × 720 60P], you cannot record movies, however.
19

2 Inserting the memory card
To remove the memory card
Open the battery/memory card cover.
 Make sure that the access lamp is not lit, then push the memory card in once.
•Never remove the memory card when the access lamp is lit. This may cause damage to data in the memory card.
20
3 Turning the camera on/setting the language and clock
ON/OFF button
Power/Charge lamp
MENU button |
Multi-selector |
|
1 Rotate the lens portion to turn the power on.
•The Power/Charge lamp lights up in green.
•Rotating the lens portion in the arrow direction turns on the camera.
started Getting
•You can also turn the power on by pressing the ON/OFF button.
•The lens rotates within the range of 0 to 270 degrees.
2 Select the desired language with the multi-selector tilt to v/V, then press the multi-selector.
21

3 Turning the camera on/setting the language and clock
3 Set the clock with the multi-selector.
1Select the date display format with v/V, then press the multi-selector.
2Select each item with b/B and set the numeric value with v/V.
3Select [OK] with B, then press the multi-selector.
To turn the power off
Press the ON/OFF button.
•You can also turn the power off by rotating the lens portion back while the camera is in the recording mode.
•You cannot turn the power off, even if you rotate the lens portion back while the camera is in the playback mode.
To change the language settings
Press MENU and select  (Setup) t
  (Main Settings 1/2) t [Language Setting] (page 48).
To change the date and time
Press MENU and select  (Setup) t [Clock Settings] (page 52).
22
Loading...