


 Loading...
3-070-303-12(1)
MovieShaker
Ver.3.1 for MICROMV
Operating Instructions
Before using MovieShaker, be sure to read carefully the END-USER LICENSE AGREEMENT (the Software License Agreement) at the end of the Operating Instructions.
© 2001 Sony Corporation

Program © 2001 Sony Corporation
Documentation © 2001 Sony Corporation
© 2001 Sony Corporation. All rights reserved.

 is a trademark of Sony Corporation.
MovieShaker is a trademark of Sony Corporation.
Microsoft, MS-DOS and Windows are registered trademarks of Microsoft Corporation (USA) in the USA and in other countries.
QuickTime and the QuickTime logo are trademarks used under license (licence).
QuickTime is registered in the U.S. and other countries.


 ,
, 


 , and MICROMV logo are trademarks of Sony Corporation.
Other system names and product names appearing in this document are generally registered trademarks or trademarks of their manufacturers, although ™ and ® marks are not shown in this document.
About the copyright:
Video or audio files recorded using this software should not be utilized (utilised) for any purpose other than private pleasure unless prior permission from its rightful owner under the Copyright Act is obtained.
About the screenshots used in this manual:
The screenshots used in this manual may be somewhat different than those you actually see on your own computer; this is due to the different specifications of various computers.
Copying all or part of the contents of this software and manual, or renting the software without authorization are prohibited by copyright laws.
The Company cannot accept liability for damage or loss resulting from the use of this software, or for any claim from a third party.
The Company assumes no responsibility aside from the replacement of the media due to manufacturing fault.
This software must not be used in a system other than that specified.
The software specifications may be subject to change without notice.
The Company cannot be responsible for loss due to any inability to make video or audio files recordings that may arise due to malfunctions of this device or this software.
2

Table of Contents |
|
Before Use |
|
What you can do with MovieShaker ........................................................ |
5 |
Precautions for Use ..................................................................................... |
6 |
About the MICROMV .......................................................................... |
6 |
Using MovieShaker .............................................................................. |
7 |
How to Use this Manual ............................................................................ |
9 |
How to Use this Help ................................................................................. |
9 |
Installing the software .............................................................................. |
11 |
To install MovieShaker ...................................................................... |
11 |
To Install QuickTime 5 ....................................................................... |
16 |
To Install DirectX 8.0a ........................................................................ |
17 |
If you are running Windows 2000 .................................................... |
17 |
If you are running Windows Me ...................................................... |
17 |
Basic Operation |
|
Starting MovieShaker ............................................................................... |
18 |
Workflow .................................................................................................... |
19 |
Collecting clips .......................................................................................... |
20 |
To capture multiple images (Batch Capture) ................................. |
20 |
To capture an image while playing it back ..................................... |
23 |
To capture all images that have an index and arrange them |
|
on the Product tray (Dubbing) ......................................................... |
25 |
To make a shaken scene with collected clips .................................. |
27 |
Placing clips to make a movie ................................................................. |
29 |
To place a clip (on the Storyboard) .................................................. |
29 |
To place a transition effect between scenes .................................... |
31 |
Editing effects, etc. .................................................................................... |
33 |
To select a scene for processing ........................................................ |
33 |
To apply effects to a scene ................................................................. |
35 |
To apply text effects to a scene ......................................................... |
37 |
To change the volume or playback speed of a scene ..................... |
39 |
Exporting a final movie product ............................................................. |
41 |
To preview a final movie product .................................................... |
41 |
To export a final movie product ....................................................... |
42 |
|
Continued |
3

Additional information |
|
Troubleshooting ........................................................................................ |
45 |
END-USER LICENSE AGREEMENT ..................................................... |
46 |
4

Before Use
What you can do with MovieShaker
Movie making
You can capture images directly from the MICROMV device connected to your computer with an i.LINK cable to make a final movie product.
Shake!
You can easily create a scene of approximately 30 seconds long including BGM, by using clips on the Clip tray at random, simply by clicking a button. A scene is automatically created and may have special effects in addition to those on the Effect tray.
Effective scenes can easily be created using this tool.
To apply effects to a scene
You can apply effects provided with MovieShaker to a scene to make it more visually interesting.
To place a transition effect between scenes
You can add an effect, such as a cross-fade or wipe effect, between scenes on the Storyboard to provide an interesting transition from one scene to another.
To export a final movie product
You can export your final movie product to a file for distribution or viewing by other people.
5
Use Before

Precautions for Use
The hardware and software requirements for using MovieShaker are as follows:
IBM PC/AT or compatible with the following capabilities.
–Minimum 600 MHz Pentium III® CPU (800 MHz or faster recommended)
–Minimum 128 MB main memory (256 MB or more recommended)
–Minimum 100 MB available hard disk space (for Standard installation), models having a speed of ATA66 or better (needed during capturing)
–Minimum 800 · 600 pixel or 1024 · 480 pixel Hi Color (Colour) (16-bit color (colour)) display driver capability.
–Sound: Sound Blaster 16 compatible sound card
–Other: with i.LINK (IEEE1394) terminal
•We cannot guarantee that this product will operate correctly in all recommended environments.
•Depending on a computer environment, this product may not operate correctly due to insufficient memory when the main memory is 128 MB on the computer.
Operating System
Microsoft® Windows® 2000 Professional (hereafter, Windows 2000), Microsoft® Windows® MillenniumEdition (hereafter, Windows Me), or Microsoft® Windows® XP Home/Professional
It is necessary for the above operating systems to have been installed at the factory.
•We cannot be responsible for any later upgrades that may have been made in the environment.
•Languages of the Operating Systems that can be used: Japanese, English, French, German, Italian, Spanish, and Portuguese
About the MICROMV
•The MICROMV device can record and play back about 60 minutes of video at the same high picture quality as the DV device (digital video camcorder).
•All MICROMV cassettes are provided with Micro Cassette Memory. The MICROMV device is provided with a function (called "Multi-picture search") which allows you to use this Micro Cassette Memory to easily access scenes you wish to view.
MovieShaker allows you to capture or process images efficiently using an index contained on the Micro Cassette Memory.
•The data compression method used is MPEG2, the same used with BS digital broadcasting.
6

Using MovieShaker
• The following table lists the file formats compatible with the Clip tray.
Type |
Format |
Extension |
Movie |
QuickTime Movie* |
.MOV |
|
AVI (includes movie saved as DV) |
.AVI |
|
MPEG1 |
.MPG,.MPEG |
|
MPEG2 |
.MPG,.MPEG |
|
MICROMV |
.MMV |
Still image |
Windows Bitmap |
.BMP |
|
GIF |
.GIF |
|
JPEG |
.JPG |
|
PNG |
.PNG |
|
PICT |
.PCT,.PICT |
Sound |
WAVE |
.WAV |
|
AIFF |
.AIF |
|
MP3 |
.MP3 |
|
|
|
*QuickTimeVR, QuickTime3D, and VECTOR files are not supported.
•To use MovieShaker, make sure to use the following display settings: Screen area: 800 x 600 pixels or 1024 x 480 pixels or more Color (Colour): High Color (Colour) (16 bits) or superior
•Do not change any screen setting in the Windows "Display Properties" while running MovieShaker. You must exit MovieShaker before changing the screen resolution, colors (colours), or Desktop Scheme.
•MovieShaker displays still images with an aspect ratio of 4:3. Still images with any other aspect ratio will be trimmed (the upper left part) to adjust the screen size to 4:3 aspect.
•If the movie is captured from a MICROMV device recorded in widescreen mode (aspect ratio 16:9), its aspect ratio for display on the monitor is 4:3. Note that, however, it is exported to a MICROMV device with an aspect ratio of 16:9.
•When you open a project file in MovieShaker, or if you have saved the interim contents of the Clip tray and Product tray as a project file, do not move or delete the original files to which the clips on the Clip tray and the scenes on the Product tray are referring.
Use Before
Continued
7
•Exporting a final movie product to a file is time-consuming to complete. Check the remaining battery charge before exporting. Use AC power whenever possible. The "MICROMV" or "DV-AVI" option takes a particularly long time.
Also, use AC power to export a final movie product to a MICROMV device as this is also time-consuming.
•RealProducer 8.5 Basic is needed when exporting the product to a RealVideo format file. If RealProducer 8.5 Basic is not installed on your computer, you need to install it.
•Do not uninstall QuickTime.
•Do not put your computer into System Suspend mode or the System Hibernation mode.
•Digital recording is not possible if the audio source is a CD disc.
•Running MovieShaker with the hard disk drive connected using an i.LINK or USB cable may cause the software to malfunction. In this case, exit MovieShaker and stop using the device, and then restart MovieShaker.
•Because large amounts of memory are needed to execute MovieShaker commands, be sure to set the maximum and minimum sizes of virtual memory to at least 1024 MB (for Windows 2000 and Windows XP operating systems).
To capture from or export to MICROMV devices connected to your computer
Depending on the computer settings, packet loss* may occur if a heavy load is put on the CPU or hard disk while capturing images from or exporting files to MICROMV devices. To reduce the occurrence of this problem, make sure of the computer settings. For further information about the computer settings, see "Configuring your computer for use with MICROMV devices (Be sure to read this.)" of the on-line help.
When you capture images from or export files to MICROMV devices, see "Limitations and notes for capturing from or exporting to MICROMV devices" of the on-line help.
*Loss of data transferring between your computer and a MICROMV device due to a heavy load put on the system that may cause distorted images.
8

How to Use this Manual
This manual describes how to use MovieShaker, from capturing images from a MICROMV device to creating a movie. You can learn basic functions of MovieShaker following the manual.
This manual describes only the basic operations of MovieShaker. More detailed operations are described in MovieShaker on-line help. Please see "How to Use this Help" for instructions on how to use MovieShaker on-line help.
How to Use this Help
MovieShaker on-line help provides more detailed information than this manual. You not only can find descriptions from predetermined keywords but also you can type in any words you like to search for explanations.
Displaying the Help Contents
MovieShaker on-line help is displayed by clicking "How to Use MovieShaker" in the "Help" menu.
•The left side area of Help where "Contents," "Index," and "Search" are displayed is called the left frame.
• Select "Contents" or "Index" to switch displays. |
Continued |
Use Before
9
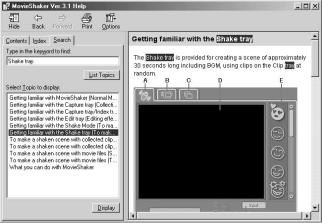
The right side area of Help, where explanations are displayed, is called the right frame.
•When you click underlined text in the explanation, you can see an explanation of the underlined text.
To search by contents
When you select "Contents" in the left frame, a table of contents appears. When you click or double-click an item in the table of contents, the explanation of that item appears in the right frame.
To search by predetermined keywords
When you select "Index" in the left frame, a list of keywords appears. Enter a few characters from the beginning of the word you want to find, or
select a keyword from the list and click "Display" to see the explanation of the keyword.
To search with your own words:
Select "Search" in the left frame.
1Enter the word you want in "Type in the keyword to find:," then click "List Topics."
A list of items which contain the word you entered appears in the left frame.
2Select an item from the list, and click "Display."
An explanation appears in the right frame. In the explanation, the word you entered in step 1 is highlighted.
z Hint
If you use an * (asterisk) such as "MPE*," you can list items which start with MPE.
10
Installing the software
You need to install MovieShaker on your computer before using it. Perform the following steps to install the program, after exiting all other programs including anti virus software.
Notes
•Be sure to connect the MICROMV device to your computer after installing MovieShaker. This will allow the computer to find it easily.
•If another version of MovieShaker is already installed, confirmation of the version will be performed. Therefore, without uninstalling the previous version, install the new version by clicking "Install MovieShaker 3.1," then follow the instructions on the screen. (See the screen of step 2 in page 12)
•You need QuickTime 5 to use MovieShaker. If QuickTime 5 or later is not installed on your computer, you need to install it in advance before installing MovieShaker 3.1. (See page 16)
•You need DirectX 8.0a or later to use MovieShaker. If DirectX 8.0a or later is not installed on your computer, you need to install it in advance. (See page 17)
•If you are running Windows 2000, be sure to log on as a user with administrative privileges (such as "Administrator") to install MovieShaker.
To install MovieShaker
1Insert the MovieShaker CD-ROM into the CD-ROM drive.
When the CD-ROM drive access lamp turns off, the "Setup MovieShaker 3.1 for MICROMV" dialog (dialogue) box appears.
Use Before
Continued
Note
If this dialog (dialogue) box does not appear when the CD-ROM is inserted, start Windows Explorer and double-click on the installation file (SETUP.EXE) on the CD-ROM.
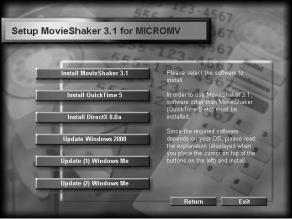
2Click "Install MovieShaker."
A dialog (dialogue) box appears, from which you can select software to install.
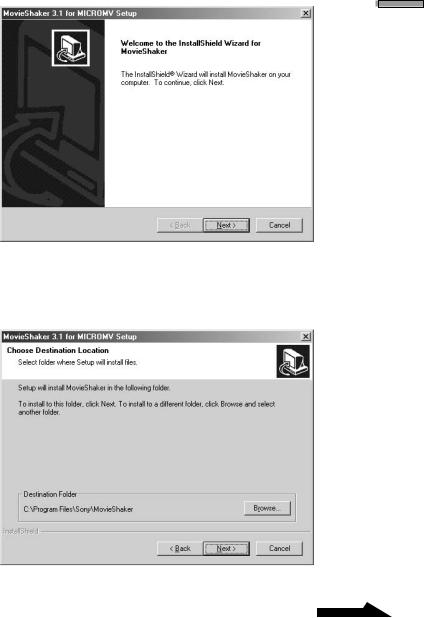
3Click "Install MovieShaker 3.1."
The "Welcome to the InstallShield Wizard for MovieShaker" dialog (dialogue) box appears.
Note
If another version of MovieShaker is already installed, confirmation of the version will be performed. Therefore, without uninstalling the previous version, install the new version by clicking "Install MovieShaker 3.1," then follow the instructions on the screen.
12
Use Before
4Click "Next."
The "Choose Destination Location" dialog (dialogue) box appears. The default destination, "C:\Program Files\Sony\MovieShaker," is already in the dialog (dialogue) box.
Continued
13
5Click "Next" if the displayed destination folder is acceptable. z Hints
•If you want to change the destination folder, click "Browse" to display the "Choose Folder" dialog (dialogue) box.
Click a folder to select the folder to be the installation destination, and click "OK." You can also directly type a folder name in the path and click "OK" to select the destination folder.
•If your operating system is Windows 2000, a dialog (dialogue) box may be displayed inviting you to confirm your digital signature. When the dialog (dialogue) box appears, be sure to click "Yes."
6Click to select "NTSC" or "PAL."
A dialog (dialogue) box appears, from which you select a television broadcast system. Please check the system written on the MICROMV device or package.
To change the television broadcast system after installing MovieShaker, select "Programs" from the Windows "Start" menu, and point to "MovieShaker," then click "NTSC-PAL Switcher" to display a dialog (dialogue) box. Follow the instructions on the screen to change the system.
The necessary files will be copied from the CD-ROM to your hard disk. After the files are copied, the "InstallShield Wizard Complete" dialog (dialogue) box appears.
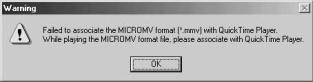
Note
When you install MovieShaker without installing QuickTime 5, the warning dialog (dialogue) box shown below may appear.
After you click "OK" to finish installation of MovieShaker, you can install QuickTime 5.
14

7Click to select "Yes, I want to restart my computer now." and click "Finish."
Installation is now complete, and your computer will reboot.
Use Before
15
Loading...