


Digital HD Video Camera Recorder
HDR-CX405/CX440/PJ410/PJ440
How to Use
Before use
Model Information
Model Information [1]
Parts and controls
Parts and controls (front/top) [2]
Parts and controls (LCD monitor) [3]
Parts and controls (side) [4]
Parts and controls (back/bottom) [5]
Screen indicators
Screen indicators [6]
Selecting items on the LCD monitor [7]
Getting started
Checking the supplied items
Supplied items [8]
Power source preparations

Inserting the battery pack [9]
Charging the battery pack using the AC Adaptor [10] Charging the battery pack using your computer [11] Turning the power on [12]
Using this product supplying power from a wall outlet (wall socket) [13] Checking the remaining battery power [14]
Initial setup
Setting the language, date and time [15]
Adjusting the angle of the LCD monitor for easier viewing [16] Displaying items on the LCD monitor [17]
Preparing a memory card
Inserting a memory card [18]
Types of memory card you can use with this product [19]
Recording
Recording movies/photos
Recording movies [20]
Shooting photos [21]
Useful functions for recording
Zooming [22]
Capturing photos during movie recording (Dual Capture) [23] Recording in mirror mode [24]
Intelligent Auto [25]
Playback
Playing images using Event View

Playing movies and photos from the Event View screen [26]
Screen display on the Event View screen [27]
Creating a highlight movie
About Highlight Movie Maker [28]
Creating a highlight movie (MP4 format) with Highlight Movie Maker [29] Playing highlight movies [30]
Playing MP4 movies (HD movie) (switching the movie format)
Playing MP4 movies (HD movie) (switching the movie format) [31]
Editing images from the playback screen
Notes on editing [32]
Deleting the selected images [33] Deleting by date [34]
Dividing a movie [35]
Capturing a photo from a movie (models with the internal memory or models with the USB IN/OUT jacks) [36]
Viewing trajectory of a moving object (Motion Shot Video) [37]
Using the built-in projector
Notes on using the projector (models with the projector) [38] Using the built-in projector (models with the projector) [39]
Using the projector for your computer or smartphone (models with the projector) [40]
Playing images on a high definition TV
Connecting this product to a high definition TV [41]
Using BRAVIA Sync [42]
On Photo TV HD [43]
On the HDMI cable [44]
Playing images on a non-high-definition TV

Connecting this product to a non-high-definition TV [45]
Saving images with an external device
Using the PlayMemories Home software
Using the PlayMemories Home software [46]
Checking the computer system [47]
Installing the PlayMemories Home software in your computer [48]
Disconnecting this product from the computer [49]
About the dedicated software for this product [50]
Creating a Blu-ray disc [51]
Creating a disc with a recorder
Creating a disc with a recorder [52]
Using the Wi-Fi function
What you can do with the Wi-Fi function
What you can do with the Wi-Fi function (models with the Wi-Fi/NFC functions) [53]
Controlling via a smartphone
Using your smartphone or tablet as a wireless remote commander (models with the WiFi/NFC functions) [54]
Using your smartphone or tablet as a wireless remote commander using the NFC function (NFC one-touch remote) (models with the Wi-Fi/NFC functions) [55]
Transferring images to a smartphone
Transferring movies (MP4) and photos to your smartphone or tablet (models with the Wi-
Fi/NFC functions) [56]
Transferring movies (MP4) and photos to your smartphone or tablet using the NFC function (NFC one-touch sharing) (models with the Wi-Fi/NFC functions) [57]
Transferring images to a computer

Send to Computer (models with the Wi-Fi/NFC functions) [58]
Transferring images to a TV
Playing images on a TV (View on TV) (models with the Wi-Fi/NFC functions) [59]
Connecting a smartphone
Connecting to an Android smartphone or tablet (models with the Wi-Fi/NFC functions) [60]
Connecting to an iPhone or iPad (models with the Wi-Fi/NFC functions) [61]
Connecting to an NFC-enabled smartphone or tablet (models with the Wi-Fi/NFC functions) [62]
Installing PlayMemories Mobile
About the PlayMemories Mobile software (models with the Wi-Fi/NFC functions) [63]
Live Streaming
About Live Streaming (HDR-CX440/PJ410/PJ440) [64]
Preparing Live Streaming (HDR-CX440/PJ410/PJ440) [65]
Performing Live Streaming (HDR-CX440/PJ410/PJ440) [66]
Restrictions for Live Streaming (HDR-CX440/PJ410/PJ440) [67]
Controlling other cameras through this product
Shooting with this product and other cameras with Multi Camera Control (HDRCX440/PJ410/PJ440) [68]
Connecting this product to one camera with Multi Camera Control (Single Connection) (HDR-CX440/PJ410/PJ440) [69]
Connecting this product to more than one camera with Multi Camera Control (Multi Connection) (HDR-CX440/PJ410/PJ440) [70]
Editing images recorded with several cameras (HDR-CX440/PJ410/PJ440) [71]
Menu operations

Using menu items
Setting up menu items [72]
How to use the keyboard (HDR-CX440/PJ410/PJ440) [73]
Shooting Mode
Movie [74]
Photo [75]
Camera/Mic
White Balance [76]
Exposure [77]
Focus [78]
IRIS [79]
Shutter Speed [80]
Low Lux [81]
Scene Selection [82]
Picture Effect [83]
Fader [84]
Self-Timer [85]
SteadyShot (Movie) [86]
SteadyShot (Photo) [87]
Digital Zoom [88]
Auto Back Light [89]
Face Detection [90]
Smile Shutter [91]
Smile Sensitivity [92]
Blt-in Zoom Mic [93]
Wind Noise Reduct. [94]
Micref Level [95]
My Button [96]
Grid Line [97]
Display Setting [98]

Image Quality/Size
REC Mode [99]
Frame Rate [100]
Dual Video REC [101]
File Format [102]
Image Size [103]
Wireless
Ctrl with Smartphone (HDR-CX440/PJ410/PJ440) [104] Multi Camera Control (HDR-CX440/PJ410/PJ440) [105] Live Streaming (HDR-CX440/PJ410/PJ440) [106]
Send to Smartphone (HDR-CX440/PJ410/PJ440) [107] Send to Computer (HDR-CX440/PJ410/PJ440) [108] View on TV (HDR-CX440/PJ410/PJ440) [109] Airplane Mode (HDR-CX440/PJ410/PJ440) [110]
Multi Camera Ctrl Set (HDR-CX440/PJ410/PJ440) [111] Vid REC during strm. (HDR-CX440/PJ410/PJ440) [112] WPS Push (HDR-CX440/PJ410/PJ440) [113]
Access point settings (HDR-CX440/PJ410/PJ440) [114] Edit Device Name (HDR-CX440/PJ410/PJ440) [115] Disp MAC Address (HDR-CX440/PJ410/PJ440) [116] SSID/PW Reset (HDR-CX440/PJ410/PJ440) [117] Network Info Reset (HDR-CX440/PJ410/PJ440) [118]
Playback Function
Event View [119]
Edit/Copy
Delete [120]
Protect [121]
Copy (models with the internal memory) [122]

Setup
Media Select (Models with the internal memory) [123] Media Info [124]
Format [125]
Empty (Models with the internal memory) [126] Repair Img. DB F. [127]
File Number [128]
Data Code [129] Volume [130]
Motion Interval ADJ [131]
Download Music (Models with the USB IN/OUT jacks) [132]
Empty Music (Models with the USB IN/OUT jacks) [133] TV Type [134]
HDMI Resolution [135]
CTRL FOR HDMI [136] USB Connect [137]
USB Connect Setting [138]
USB Power Supply [139]
USB LUN Setting [140] Beep [141]
Monitor Brightness [142]
Language Setting [143] Power Save [144] Initialize [145]
Demo Mode [146] Version [147]
Date & Time Setting [148]
Area Setting [149]
Charging time/recording time of movies/number of recordable photos

Check the charging time
Charging time [150]
Expected recording and playback times for individual batteries
Expected recording time with NP-BX1 [151]
Expected playback time with NP-BX1 [152]
Expected movie recording time and number of recordable photos for the internal memory
Notes on recording movies [153]
Expected recording time of movies (models with the internal memory) [154]
Expected number of recordable photos (models with the internal memory) [155]
Expected movie recording time and number of recordable photos for memory cards
Notes on recording movies [156]
Expected recording time of movies [157]
Expected number of recordable photos [158]
Bit-rate for each recording mode
Bit-rate and recording pixels [159]
Pixels recorded at each image size of photos
Recording pixels and aspect ratio [160]
Additional information
Precautions
About the AVCHD format [161]
About the memory card [162]
About the battery pack [163]

Handling of this product
On use and care [164]
On connecting to a computer or accessory etc. [165] Notes on optional accessories [166]
On moisture condensation [167]
Notes on disposal/transfer the ownership of this product (models equipped with the internal memory) [168]
Note on disposal/transfer of the memory card [169]
Maintenance
On handling the LCD monitor [170]
To clean the casing and the projector lens surface (models with the projector) [171] About care and storage of the lens [172]
Using this product abroad
Using this product abroad [173]
Trademarks
On trademarks [174]
License
Notes on the License [175]
Zoom magnifications
Zoom magnifications [176]
Using this product after a long time
Using this product after a long time [177]
Troubleshooting
Troubleshooting
If you have problems
If you have problems [178]
Overall operations
The power does not turn on. [179]
This product does not operate even when the power is set to on. [180] The menu settings have been changed automatically. [181]
This product gets warm. [182]
A rattling noise is heard when this product is shaken. [183] Intelligent Auto is canceled. [184]
Batteries/power sources
The power abruptly turns off. [185]
The POWER/CHG (charge) lamp does not light while the battery pack is being charged. [186]
The POWER/CHG (charge) lamp flashes while the battery pack is being charged. [187] The remaining battery power is not displayed correctly. [188]
The battery pack is quickly discharged. [189]
Monitor
Menu items are grayed out. [190]
The buttons do not appear on the LCD monitor. [191] The buttons on the LCD monitor quickly disappear. [192]
There are dots in the shape of a grid on the monitor. [193]
The backlight of the LCD monitor turns off if you do not attempt to operate this product for a while. [194]
Memory card

Operations using the memory card cannot be performed. [195] Images stored on the memory card cannot be deleted. [196] The data file name is not indicated correctly or flashes. [197]
Images cannot be played back or the memory card is not recognized. [198]
Recording
Pressing START/STOP or PHOTO does not record images. [199] Photos cannot be recorded. [200]
The access lamp remains lit or flashing even if recording has stopped. [201] The imaging field looks different. [202]
The actual recording time for movies is less than the expected recording time of the recording media. [203]
This product stops recording. [204]
There is a slight time lag between the moment when START/STOP is pressed and the actual movie recording starts or stops. [205]
The auto focus does not function. [206] SteadyShot does not function. [207]
Images cannot be recorded or played back correctly. [208]
The subjects passing across this product very fast appear crooked. [209] Horizontal stripes appear on the images. [210]
[Monitor Brightness] cannot be set. [211] Photos are recorded automatically. [212]
Playback
Images cannot be played back. [213]
Photos cannot be played back. [214]
The movie freezes. [215]
An icon appears on a thumbnail. [216]
No sound or only a quiet sound is heard during playback. [217]
Wi-Fi
The wireless access point you want to connect to does not appear. (models with the Wi-

Fi/NFC functions) [218]
[WPS Push] does not work. (models with the Wi-Fi/NFC functions) [219]
[Ctrl with Smartphone], [Send to Smartphone], [Send to Computer] or [View on TV] terminates prematurely. (models with the Wi-Fi/NFC functions) [220]
Cannot transfer movies to your smartphone. (models with the Wi-Fi/NFC functions) [221]
The shooting screen does not display smoothly. The connection is cut off. (models with the Wi-Fi/NFC functions) [222]
The shooting screen during Multi Camera Control does not display smoothly. The connection is cut off. (models with the Wi-Fi/NFC functions) [223]
The NFC connection does not work. (models with the Wi-Fi/NFC functions) [224]
Editing movies/photos on this product
Unable to edit. [225]
A movie cannot be divided. [226]
The demonstration movies cannot be deleted. (models with the internal memory) [227]
Playback on a TV
Neither image nor sound is played on the connected TV. [228]
The top, bottom, right, and left edges of images are trimmed slightly on a connected TV. [229]
The image appears distorted on the 4:3 TV. [230]
Black bands appear at the top and bottom of the LCD monitor of the 4:3 TV. [231]
Copying/Connecting to other devices
Images are not copied correctly. [232]
Connecting to a computer
PlayMemories Home cannot be installed. [233]
PlayMemories Home does not work correctly. [234]
This product is not recognized by the computer. [235]
Self-diagnosis display/Warning indicators

Self-diagnosis display/Warning indicators
Self-diagnosis display [236]
Error messages during Live Streaming
Error messages during Live Streaming (HDR-CX440/PJ410/PJ440) [237]
Warning messages
Warning messages
Warning Indicators [238]
[1] How to Use Before use Model Information
Model Information
In this Help Guide, the differences in the specifications for each model are described together.
If you find the description like “Models with ... ” as below, confirm in this chapter whether the description applies to this product.
(models with the internal memory) (1080 60i-compatible device) (1080 50i-compatible device)
To confirm the model name of this product
See the bottom of this product.
A: Model name (HDR-CX405/CX440/PJ410/PJ440)
Differences in functions
Models with the internal memory: HDR-CX440/PJ440 Models with the projector: HDR-PJ410/PJ440
Models with the Wi-Fi/NFC functions: HDR-CX440/PJ410/PJ440 1080 60i-compatible device: See the bottom of this product. 1080 50i-compatible device: See the bottom of this product. Models with the USB IN/OUT jacks: Except models for Europe. Models with the USB Output only jack: Models for Europe only.
Note
For the following items, the descriptions are explained with the model name.
 Parts and controls
 Menu items
 Expected recording time of movies
  Expected number of recordable photos
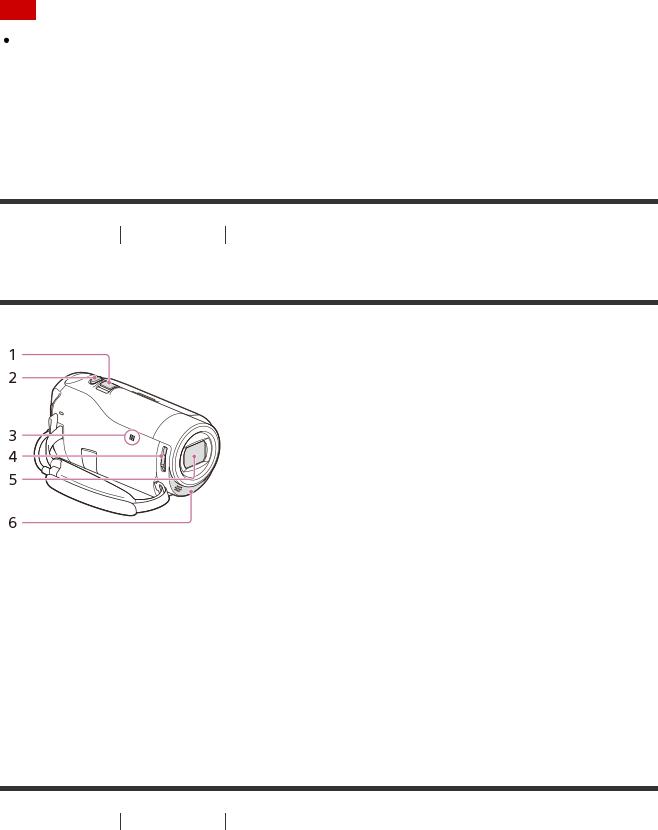
[2] How to Use Before use Parts and controls
Parts and controls (front/top)
1.Power zoom lever
2.PHOTO button
3.N mark (HDR-CX440/PJ410/PJ440) NFC: Near Field Communication
4.LENS COVER switch
5.Lens (ZEISS lens)
6.Built-in microphone
[3] How to Use Before use Parts and controls
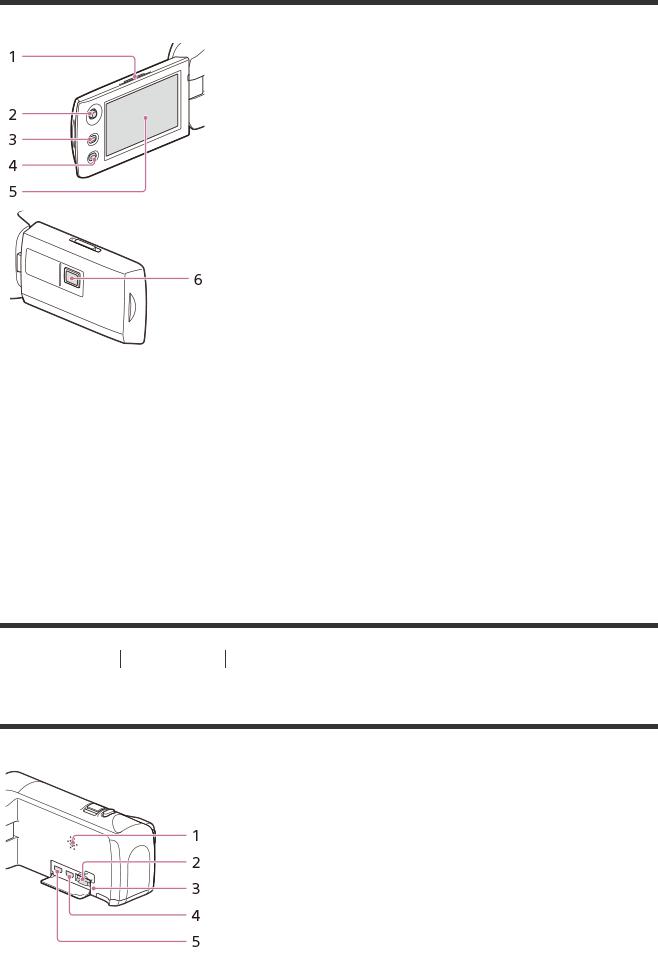
Parts and controls (LCD monitor)
1.PROJECTOR FOCUS lever (HDR-PJ410/PJ440)
2.Multi-selector
3. (View Images) button
4.PROJECTOR button (HDR-PJ410/PJ440)
5.LCD monitor
If you rotate the LCD panel 180 degrees, you can close the LCD monitor with the screen facing out. This is convenient during playback operations.
6.Projector lens (HDR-PJ410/PJ440)
[4] How to Use Before use Parts and controls
Parts and controls (side)
1.Speaker
2.Memory card slot
3.Memory card access lamp
While the lamp is lit or flashing, this product is reading or writing data.
4.HDMI OUT jack
5.PROJECTOR IN jack (HDR-PJ410/PJ440)
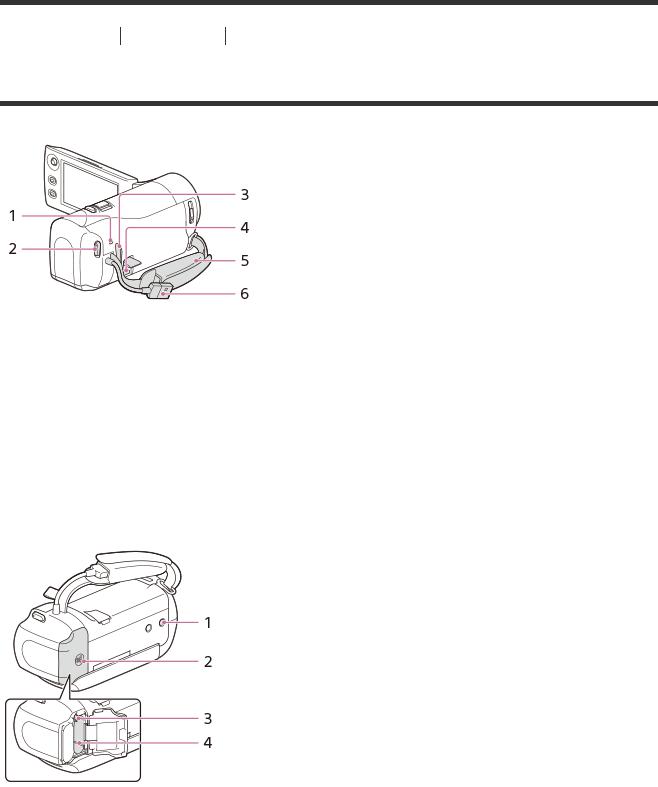
[5] How to Use Before use Parts and controls
Parts and controls (back/bottom)
1.POWER/CHG (charge) lamp
2.START/STOP button
3.Loop for a shoulder belt
4.MULTI Terminal
This terminal does not support VMC-AVM1 Adaptor Cable (sold separately). You cannot use accessories via an A/V Remote Connector.
5.Grip belt
6.Built-in USB Cable
1. Tripod receptacle
Attach a tripod (sold separately: the length of the screw must be less than 5.5 mm (7/32 in.)). Depending on the specifications of the tripod, this product may not attach in the proper direction.
2.Battery cover
3.Battery release lever
4.Battery pack
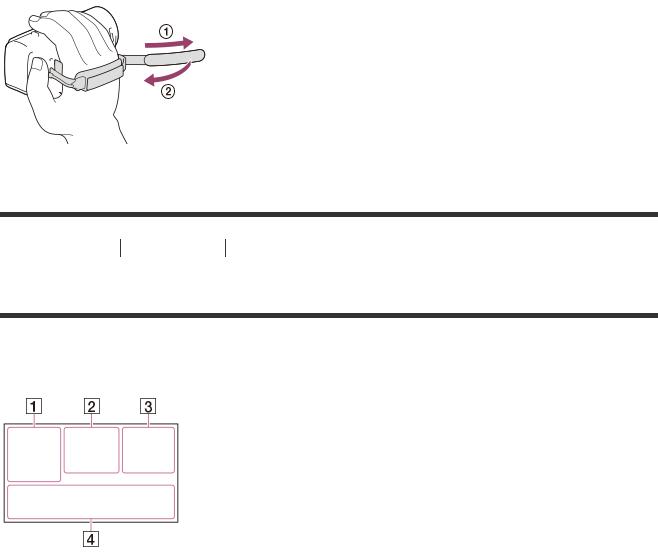
To fasten the grip belt
[6] How to Use Before use Screen indicators
Screen indicators
The following indicators appear when you change the settings.
On the left side of the screen ( )
)
 MENU button
 Self-timer recording
 [Airplane Mode] set to [On]

 Fader
Fader
 [Face Detection] set to [Off]

 [Smile Shutter]


 Manual focus


 Scene Selection


 White Balance
SteadyShot off


 Intelligent Auto
Picture Effect
At the center of the screen ( )
)
 Slideshow Set


 Warning
 Playback mode
REC /STBY Recording mode
 AE/AF lock
 NFC
NFC
 Wi-Fi
Wi-Fi
On the right side of the screen ( )
)

 60i
60i  Frame rate (30p/60p/50p/60i/50i), recording mode (PS/FX/FH/HQ/LP) and movie size

 Dual Video REC
 Remaining battery

 Recording/playback/editing media 0:00:00 Counter (hour:minute:second) 00min Estimated recording time
9999 
 9.2M Approximate number of recordable photos and photo size
  Folder of the memory card
100/112 Current playing movie or photo/Number of total recorded movies or photos
At the bottom of the screen ( )
)
 [Wind Noise Reduct.] set to [On]
 Blt-in Zoom Mic
 Low Lux
 Exposure
 Shutter Speed
 IRIS
IRIS
 Intelligent Auto
 Data file name
 Protect
Note
Indicators and their positions are approximate and may differ from what you actually see. Some indicators may not appear, depending on the model.

[7] How to Use Before use Screen indicators
Selecting items on the LCD monitor
Use the multi-selector to select the items on the LCD monitor.
1.Move the multi-selector towards  /
/ /
/ /
/ to select the desired item.
2.Press the center of the multi-selector to complete the selection.
[8] How to Use Getting started Checking the supplied items
Supplied items
The numbers in ( ) indicate the supplied quantity.
Camcorder (1)
AC Adaptor (1)
 The shape of the AC Adaptor varies depending on the countries/regions. HDMI cable (1)
USB connection support cable (1)
Rechargeable battery pack NP-BX1 (1)

When using this product while connected to a wall outlet (wall socket), such as while charging, make sure to attach the battery pack to this product.
“Operating Guide” (1)
Hint
The USB connection support cable is designed for use with this product only. Use this cable when the Built-in USB Cable of this product is too short for connection.
[9] How to Use Getting started Power source preparations
Inserting the battery pack
Insert the battery pack to this product.
1. Open the battery cover by sliding it in the direction of arrow.
A: Battery cover
2.Insert the battery pack into this product.
Insert the battery pack into this product sliding the battery release lever.
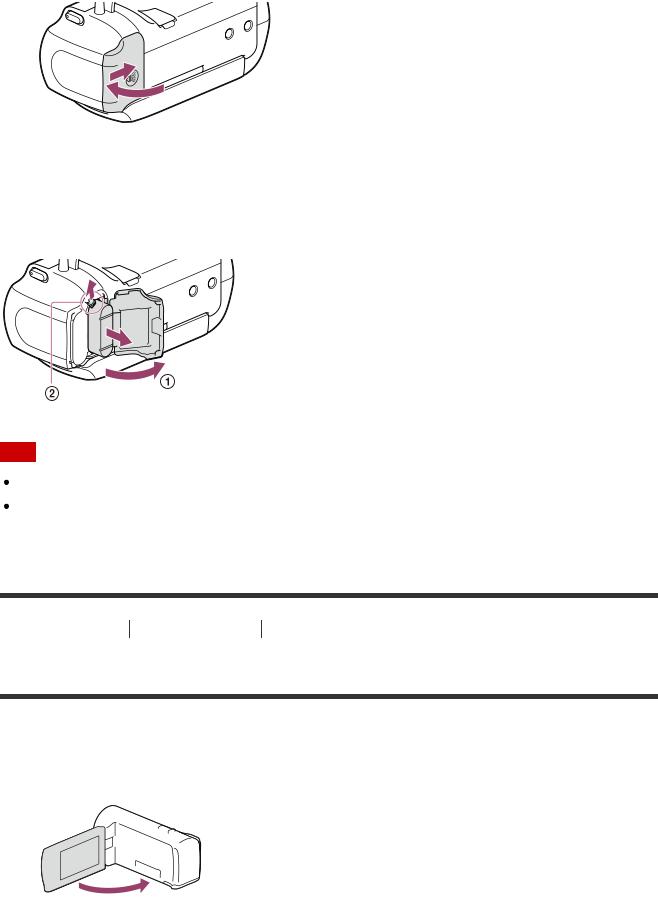
A: Battery release lever
3.Close the battery cover by sliding it in the direction of arrow.
To remove the battery pack
Turn off this product, then open the battery cover ( ), and then remove the battery pack from this product sliding the battery release lever (
 ).
).
Note
You cannot insert any battery pack other than the X type to this product.
In the default setting, the power turns off automatically if you leave this product without any operation for about 2 minutes, to save battery power (Power Save).
[10] How to Use Getting started Power source preparations
Charging the battery pack using the AC Adaptor
Charge the battery pack using the supplied AC Adaptor. Insert the battery pack in advance.
1. Close the LCD monitor.
2. Pull out the Built-in USB Cable from this product.
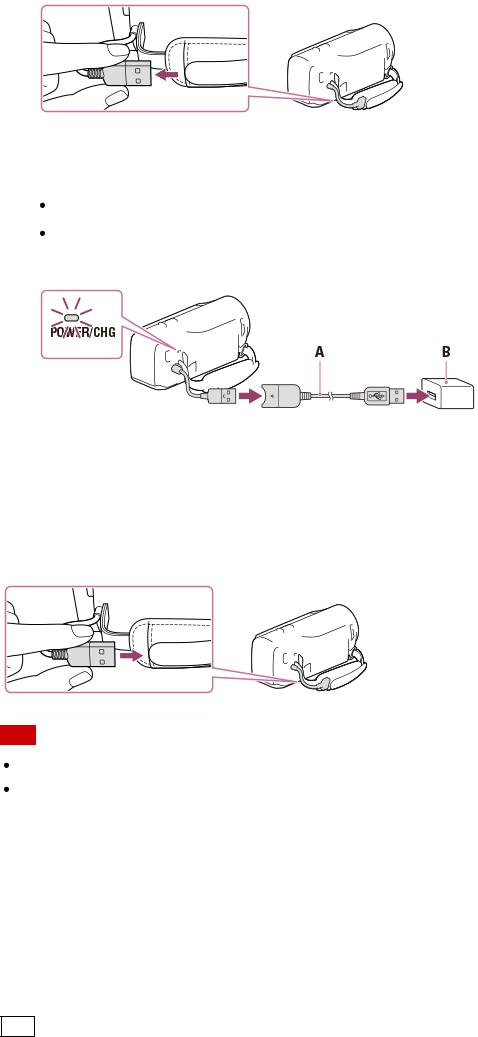
3.Connect this product to a wall outlet (wall socket) using the USB connection support cable and the AC Adaptor.
The POWER/CHG (charge) lamp lights orange.
The POWER/CHG (charge) lamp turns off when the battery pack is fully charged. Disconnect the USB connection support cable from this product.
A:USB connection support cable
B:AC Adaptor
To store the Built-in USB Cable
Put the Built-in USB Cable back in the pocket on the grip belt after use.
Note
The shape of the AC Adaptor varies depending on the countries/regions. Be aware of the following notes on using the AC Adaptor.
 Use a nearby wall outlet (wall socket) when using the AC Adaptor. Disconnect the AC Adaptor from the wall outlet (wall socket) immediately if any malfunction occurs while using this product.
 Do not use the AC Adaptor placed in a narrow space, such as between a wall and furniture.
 Do not short-circuit the USB jack of the AC Adaptor or battery terminal with any metallic objects. This may cause a malfunction.
 To disconnect the AC Adaptor from this product, first disconnect the USB connection support cable from the AC Adaptor, and then disconnect this product from the USB connection support cable holding the connectors.
Hint
It is recommended that you charge the battery in a temperature range of 10 °C to 30 °C
(50 °F to 86 °F).
[11] How to Use Getting started Power source preparations
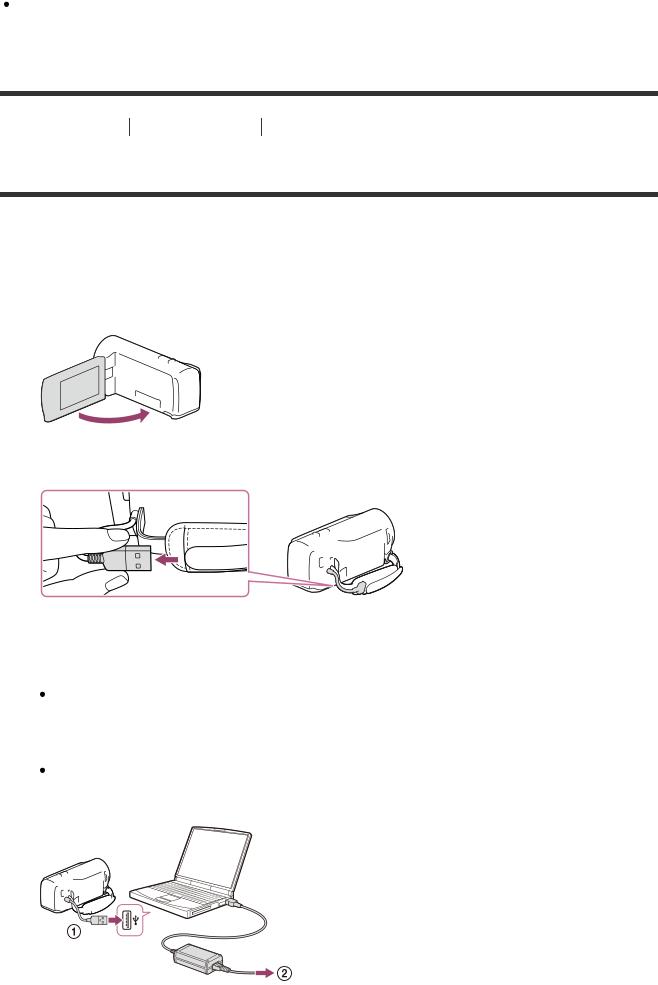
Charging the battery pack using your computer
Charge the battery pack by connecting this product and your computer with the Built-in USB Cable. Insert the battery pack in advance.
1.Close the LCD monitor.
2.Pull out the Built-in USB Cable from this product.
3.Connect this product to a running computer using the Built-in USB Cable.
 The POWER/CHG (charge) lamp turns orange.
The POWER/CHG (charge) lamp turns off when the battery pack is fully charged. Disconnect the Built-in USB Cable from the computer, and then store it in the pocket on the grip belt.
If the Built-in USB Cable is not long enough for the connection, use the USB connection support cable.
 : Built-in USB Cable
 : To a wall outlet (wall socket)
To put the Built-in USB Cable away
Put the Built-in USB Cable back in the pocket on the grip belt after use.
Hint
It is recommended that you charge the battery in a temperature range of 10 °C to 30 °C (50 °F to 86 °F).
[12] How to Use Getting started Power source preparations
Turning the power on
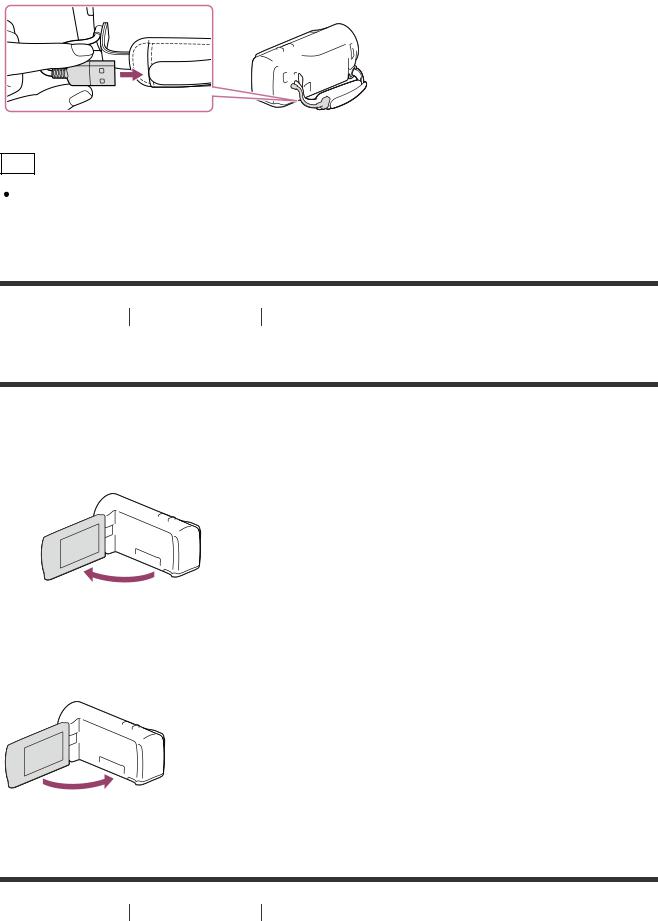
Turn on this product.
1. Open the LCD monitor of this product and turn the power on.
To turn off the power
Close the LCD monitor.
[13] How to Use Getting started Power source preparations

Using this product supplying power from a wall outlet
(wall socket)
Supply power to this product using the AC Adaptor.
1.Insert the battery pack, and then pull out the Built-in USB Cable.
2.Connect this product to a wall outlet (wall socket) using the USB connection support cable and the AC Adaptor.
Note
The battery pack is not charged, even when the AC Adaptor is connected to this product, as long as the power is on.
The battery pack must be inserted into this product. Otherwise power will not be supplied. Even when connecting the AC Adaptor to this product, this product may subsidiarily use power from the battery pack depending on the environment in which you use this product.
[14] How to Use Getting started Power source preparations
Checking the remaining battery power
An icon indicating the remaining battery power is displayed.
 :
:
Sufficient power remaining
 /
/ /
/ :
:
Remaining battery level
 :
:
Battery power depleted
It will take approximately 1 minute to display the correct remaining battery power.
The remaining battery power may not be displayed correctly depending on ambient

conditions and the environment in which you are using this product.
[15] How to Use Getting started Initial setup
Setting the language, date and time
Set the language, date and time when using this product for the first time.
1.Open the LCD monitor of this product and turn the power on.
2.Select the desired language, then select [Next].
Hint
Select the button on the LCD monitor using the multi-selector.
3.Select the desired geographical area with  /
/ , then select [Next].
4.Set [Daylight Savings] or [Summer Time], select the date format and the date and time.
 If you set [Daylight Savings] or [Summer Time] to [On], the clock advances 1 hour.
When you select the date and time, select one of the items and adjust the value with  /
/ .
.
When you select  -
-  , the date and time setting operation is complete.
Hint
The date and time are recorded automatically and can be displayed only during playback.
To display them, select  - [Setup] - [
 Playback Settings] - [Data Code] - [Date/Time].
[16] How to Use Getting started Initial setup
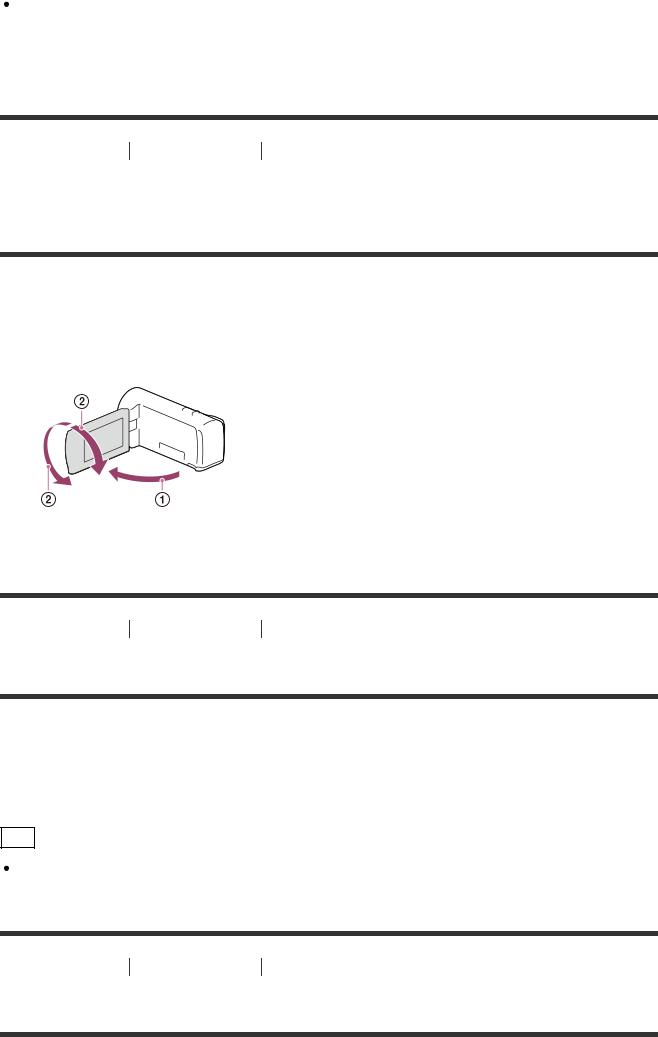
Adjusting the angle of the LCD monitor for easier viewing
You can adjust the angle of the LCD monitor for easier viewing.
1.First open the LCD monitor 90 degrees to this product ( ), and then adjust the angle (
 ).
).
[17] How to Use Getting started Initial setup
Displaying items on the LCD monitor
Items on the LCD monitor disappear if you do not operate this product for a few seconds after you turn this product on or switch between the movie recording and photo shooting modes. To display items on the LCD monitor again, operate the multi-selector.
Hint
To keep the LCD monitor active, use [Display Setting] to change the setting.
[18] How to Use Getting started Preparing a memory card
Inserting a memory card

Insert a memory card into this product.
1. Open the cover and insert the memory card until it clicks.
microSD memory card: Insert the memory card straight in the direction shown in figure A until it clicks.
Memory Stick Micro (M2) media: Insert the memory card straight in the direction shown in figure B until it clicks.
A:Label side
B:Terminal side
C:Access lamp
Note
To ensure stable operation of the memory card, it is recommended to format the memory card with this product before the first use. Formatting the memory card will erase all the data stored on it and the data will be irrecoverable. Save your important data on your PC, etc.
If [Failed to create a new Image Database File. It may be possible that there is not enough free space.] is displayed, format the memory card.
Confirm the direction of the memory card. If you forcibly insert the memory card in the wrong direction, the memory card, memory card slot, or image data may be damaged. Do not insert any memory card other than those that fit into the memory card slot. Doing so may cause a malfunction.
When inserting or ejecting the memory card, be careful so that the memory card does not pop out and drop.
Memory card will not be recognized by this product unless it is inserted straight in the correct direction.
If [Preparing image database file. Please wait.] is displayed, wait until the message disappears.
Hint
To eject the memory card, open the cover and lightly push the memory card in once.

[19] How to Use Getting started Preparing a memory card
Types of memory card you can use with this product
The following types of memory cards can be used with this product.
Types of Memory Stick media you can use with this product
In this Help Guide, the following Memory Stick media you can use with this product is called Memory Stick Micro media.
Memory Stick Micro (Mark2) media
Note
Memory Stick Micro media with a capacity up to 16 GB have been confirmed to operate properly with this product.
Types of SD memory card you can use with this product
In this Help Guide, the following types of microSD cards you can use with this product are called “microSD card.”
microSD memory card microSDHC memory card microSDXC memory card
Note
For recording movies, use the card of Class 4 or faster.
When recording images in XAVC S format, use a microSDXC memory card of Class 10 or faster.
microSD cards with a capacity up to 64 GB have been confirmed to operate properly with this product.
[20] How to Use Recording Recording movies/photos
Recording movies
Record movies.
1. Open the lens cover.
 Loading...