


 Loading...
Samsung SMX-C13LP, SMX-C14GP, SMX-C10GP, SMX-C14RP, SMX-C10FP User Manual
...SMX-C10RP/SMX-C10LP/
SMX-C10GP/SMX-C10FP/
SMX-C13RP/SMX-C13LP/
SMX-C13GP/SMX-C14RP/
SMX-C14LP/SMX-C14GP
Memory Camcorder
user manual
imagine the possibilities
Thank you for purchasing a Samsung product. To receive a more complete service, please register your product at
www.samsung.com/register
key features of your memory camcorder
High-resolution Colour Widescreen LCD (2.7” WIDE TFT LCD)
The Samsung memory camcorder features a 2.7-inch Widescreen LCD of 230k pixels which allows bright and clear monitoring. In addition, the reinforced LCD Enhancer adjusting colour and brightness to the screen lighting conditions allows better monitoring under strong sunlight.
H.264/AVC (MPEG4 part 10/Advanced Video Coding) Encoding
latest video compression technology, uses a high compression rate to sharply increase the recordable time with the same size storage.
T
W
Simple & Easy User Interface
Designed to provide optimised and easy use with ergonomic design including customisable button layout for recording/playback functions and frequently used functions. And, the improved Graphics User Interface offers a new and fresh look as well as easy operation.
High-capacity embedded Flash Memory (8GB (SMX-C13 only), 16GB (SMX-C14 only))
The camcorder has a built-in high capacity flash memory that allows you to record videos (or photos).
User-friendly Functions
User-friendly EASY Q optimises your memory camcorder to the recording conditions automatically, providing beginners with the best performance.
Twice the memory options (8GB (SMX-C13 only), 16GB (SMX-C14 only))
The memory camcorder’s external memory slot accepts both high capacity SDHC and MMCplus. Play and transfer videos, quickly and easily using the memory type of your choice. In addition to this slot the memory camcorder has the built-in flash memory.
~
{
High-resolution image through Mobile DNIe
The Samsung memory camcorder includes features such as 3DNR (3-dimensional noise reduction), high-sensitivity colour expression (intelligent colour expression), High performance Anti-Shake (Hyper DIS), and automatic face detection (Face Detection).
Capture Visions farther than the eye can see (10x Optical/1200x Digital Zoom)
Samsung's powerful optical zoom lenses bring the world closer without
losing image quality. In addition, Digital Zoom Interpolation makes extreme digital zooming clearer, with less distortion than previous types of digital zooms.
ii_English

Various Recording Features
The memory camcorder supports Anti-Shake (HDIS), Digital Effect and a wide range of
other functions that you can select according to the scene you are recording. ²pages 56~70
Capturing Photo Image (8GB (SMX-C13 only), 16GB (SMX-C14 only))
Captures a moving subject instantly and saves the scene as a photo image.
Comfortable, Ergonomic Design
This camcorder is designed for comfort when making long recordings.
With this ergonomic design, you can shoot subjects comfortably from any position.
Time Lapse Recording Catches the Moment
You can record a long scene in short intervals. Record artistic, documentary videos including the passage of clouds, blooming flowers etc. Use this function to make UCC (user created contents) videos, educational programs or for other various purposes.
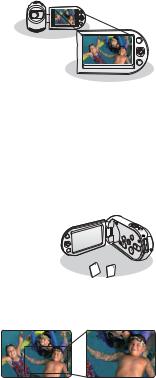
Direct upload of your videos to the Web!
The built-in editing software Intelli-studio installs directly from this camcorder to your PC, when you simply connect your camcorder to a PC via USB cable. Intelli-studio also allows direct uploading of your contents to YouTube or Flickr. Sharing the contents with your friends is simpler than ever before.
Direct Uploading Your Recordings with One-Touch Sharing button
This method uses the software built in your camcorder to upload your recordings to the website such as the YouTube with a simple one-touch operation.
Make a digest of your video! Storyboard printing!
Using the storyboard printing, you can make the digest image of your video abridging its story. This function captures 16 still images arbitrarily from the selected video and makes up one still image of 16-splits to save it into the storage media. It presents a quick overview of your video, helping you to understand the whole story of the video.
English_iii

safety warnings
What the icons and signs in this user manual mean :
Death or risk of serious personal injury.
WARNING
Potential risk of personal injury or material damage.
CAUTION
To reduce the risk of fire, explosion, electric shock, or personal injury when using your camcorder,
follow these basic safety precautions:
CAUTION
Hints or referential pages that may be helpful when operating the camcorder.
These warning signs are to prevent injury to you and others.
Please follow them explicitly. After reading this section, keep it in a safe place for future reference.
precautions
Warning!
•This camcorder should always be connected to an AC outlet with a protective grounding connection.
•Batteries shall not be exposed to excessive heat such as sunshine, fire or similar.
Caution
Danger of explosion if battery is incorrectly replaced.
Replace only with the same or equivalent type.
To disconnect the apparatus from the mains, the plug must be pulled out from the mains socket, therefore the mains plug shall be readily operable.
iv_English

important information on use
BEFORE USING THIS CAMCORDER
•This camcorder is designed exclusively for high-capacity built-in flash memory (8GB (SMX-C13 only), 16GB (SMX-C14 only)) and external memory card.
•This camcorder records video in H.264/AVC (MPEG4 part 10/Advanced Video Coding) format compliant with Standard resolution (SD-VIDEO) format.
•Please note that this camcorder is not compatible with other digital video formats.
•Before recording important video, make a trial recording.
-Play back your trial recording to make sure the video and audio have been recorded properly.
•The recorded contents cannot be compensated for:
-Samsung cannot compensate for any damages caused when recording is not made normally or recorded contents cannot be played back because of a camcorder or card defect.
Also, Samsung cannot be held responsible for your recorded video and audio.
-Recorded contents may be lost due to an error when handling this camcorder or memory card, etc. Samsung shall not be held responsible for the loss of recorded contents, and cannot compensate for any damages.
•Make a backup of important recorded data.
-Protect your important recorded data by copying the files to a PC. It is recommended to copy it from your PC to other recording media for storage. Refer to the software installation and USB connection guide.
•Copyright: Please note that this camcorder is intended for an individual consumer’s use only.
-Data recorded on the card in this camcorder using other digital/analogue media or devices is protected by the copyright act and cannot be used without permission of the copyright owner, except for personal enjoyment. Even if you record an event such as a show, performance or exhibition for personal enjoyment, it is strongly recommended that you obtain permission beforehand.
English_v

important information on use
IMPORTANT NOTE
•Handle the liquid crystal display (LCD) with care:
-The LCD is a very delicate display device: Do not press its surface with excessive force, hit it or prick it with a sharp object.
-If you push the LCD surface, unevenness in display may occur. If unevenness does not disappear, turn the camcorder off, wait for a few moments, and then turn it on again.
-Do not place the camcorder with the open LCD screen down.
-Close the LCD monitor when not using the camcorder.
•Liquid crystal display:
-The LCD screen is a product of high precision technology. Out of the total pixels (approx. 230,000 pixels of an LCD monitor ), 0.01% or less pixels may be out (black dots) or may remain lit as coloured dots (red, blue, and green). This shows the limitations of the current technology, and does not indicate a fault that will interfere with recording.
-The LCD screen will be slightly dimmer than usual when the camcorder is at low temperature, as in cold areas, or right after the power is turned on. Normal brightness will be restored when the temperature inside the camcorder rises. Note that the above mentioned phenomena have no effect on the image in a storage media, so there is no cause for concern.
•Hold the camcorder correctly:
-Do not hold the camcorder by the LCD monitor when lifting it: the LCD monitor could detach and the camcorder may fall.
•Do not subject the camcorder to impact:
-This camcorder is a precision machine. Take great care that you do not strike it against a hard object or let it fall.
-Do not use the camcorder on a tripod in a place where it is subject to severe vibrations or impact.
•No sand or dust!
-Fine sand or dust entering the camcorder or AC power adaptor could cause malfunctions or defects.
•No water or oil!
-Water or oil entering the camcorder or AC power adaptor could cause electric shock, malfunctions or defects.
•Heat on surface of product:
-The surface of the camcorder will be slightly warm when used, but this does not indicate a fault.
•Be careful of unusual ambient temperature:
-Using the camcorder in a place where the temperature is over 104°F (40°C) or lower than 32°F (0°C) may result in abnormal recording/playback.
-Do not leave the camcorder on a beach or in a closed vehicle where the temperature is very high for a long time: This could cause malfunctions.
•Do not point directly at the sun:
-If direct sunlight strikes the lens, the camcorder could malfunction or a fire could occur.
-Do not leave the camcorder with the LCD screen exposed to direct sunlight: This could cause malfunction.
•Do not use the camcorder near TV or radio:
-This could cause noise to appear on the TV screen or in radio broadcasts.
vi_English

•Do not use the camcorder near strong radio waves or magnetism:
-If the camcorder is used near strong radio waves or magnetism, such as near a radio wave
tower or electric appliances, noise could enter video and audio that are being recorded. During playback of normally recorded video and audio, noise may also be present in photo and sound.
At worst the camcorder could malfunction.
•Do not expose the camcorder to soot or steam:
-Thick soot or steam could damage the camcorder case or cause malfunctions.
•Do not use the camcorder near corrosive gas:
-If the camcorder is used in a place where there is dense exhaust gas generated by gasoline or diesel engines, or corrosive gas such as hydrogen sulphide, the external or internal terminals could corrode, disabling normal operation, or the battery connection terminals could corrode, so that power will not turn on.
•Do not use the camcorder near ultrasonic humidifier:
-Calcium and other chemicals dissolved in water could scatter in the air, and white particles could adhere to the optical head of the camcorder, which could cause it to operate abnormally.
•Do not clean the camcorder body with benzene or thinner:
-The coating of exterior could peel off or the case surface could deteriorate.
-When using a chemical cleaning cloth, follow the instructions.
•Keep the memory card out of reach of children to prevent swallowing.
•To disconnect the apparatus from the mains, the plug must be pulled out from the mains socket, therefore the mains plug shall be readily operable.
ABOUT THIS USER MANUAL
•This User Manual covers models SMX-C10RP, SMX-C10LP, SMX-C10GP, SMX-C10FP, SMX-C13RP, SMX-C13LP, SMX-C13GP, SMX-C14RP, SMX-C14LP, and SMX-C14GP. The SMX-C13RP, SMX-C13LP and SMX-C13GP have a 8GB built in flash memory respectively but also use memory cards. The SMX-C14RP, SMX-C14LP and SMX-C14GP have a 16GB built in flash memory respectively but also use memory cards. The SMX-C10RP, SMX-C10LP, SMX-C10GP, SMX-C10FP does not have built-in flash memory and uses memory cards exclusively. Although some features of SMX-C10RP, SMX-C10LP, SMX-C10GP, SMX-C10FP, SMX-C13RP, SMX-C13LP, SMX-C13GP, SMX-C14RP, SMX-C14LP, and SMX-C14GP are different, they operate in the same way.
•Illustrations of model SMX-C10P are used in this user manual.
•The displays in this user manual may not be exactly the same as those you see on the LCD screen.
•Designs and specifications of storage media and other accessories are subject to change without any notice.
•In this user manual’s function descriptions, the icon on the on-screen display section means that it will appear on the screen when you set the corresponding function.
Ex) Submenu item of “Video Resolution” ¬ page 58
item |
contents |
on-screen display |
"TV Super Fine" |
Videos recorded in 720x576(50i) resolution at super-fine image quality. |
|
(If set, corresponding icon ( ) will appear on the screen.)
•Descriptions of the “Photo” and “built-in memory” in this user manual apply only to the following models: SMX-C13, SMX-C14
English_vii

important information on use
NOTES REGARDING TRADEMARKS
•All the trade names and registered trademarks mentioned in this manual or other documentation provided with your Samsung product are trademarks or registered trademarks of their respective holders.
•Windows® is registered trademark or trademark of Microsoft Corporation, registered in the United States and other countries.
•Macintosh is trademark of Apple Inc.
•YouTube® is a trademark of Google Inc.
•Flickr® is a trademark of Yahoo.
•All the other product names mentioned herein may be the trademark or registered trademarks of their respective companies.
•Furthermore, “TM” and “®” are not mentioned in each case in this manual.
Correct disposal of batteries in this product
(Applicable in the European Union and other European countries with separate battery return systems)
This marking on the battery, manual or packaging indicates that the batteries in this product should not be disposed of with other household waste at the end of their working life. Where marked, the chemical symbols Hg, Cd or Pb indicate that the battery contains mercury, cadmium or lead above the reference levels in EC Directive 2006/66.
If batteries are not properly disposed of, these substances can cause harm to human health or the environment.
To protect natural resources and to promote material reuse, please separate batteries from other types of waste and recycle them through your local, free battery return system.
Correct Disposal of This Product
(Waste Electrical & Electronic Equipment)
(Applicable in the European Union and other European countries with separate collection systems)
This marking on the product, accessories or literature indicates that the product and its electronic accessories (e.g. charger, headset, USB cable) should not be disposed of with other household waste at the end of their working life. To prevent possible harm to the environment or human health from uncontrolled waste disposal, please separate these items from other types of waste and recycle them responsibly to promote the sustainable reuse of material resources.
Household users should contact either the retailer where they purchased this product, or their local government office, for details of where and how they can take these items for environmentally safe recycling.
Business users should contact their supplier and check the terms and conditions of the purchase contract. This product and its electronic accessories should not be mixed with other commercial wastes for disposal.
viii_English
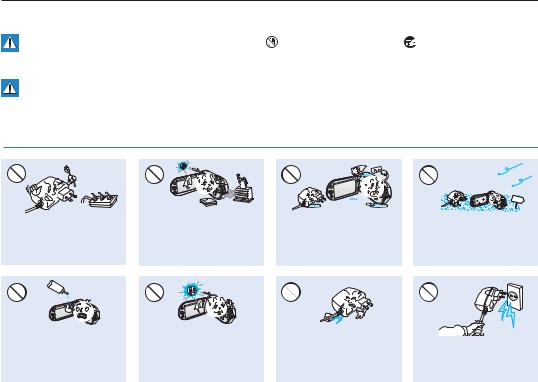
precautions during use
The safety precautions illustrated below are to prevent personal injury or material damage. Heed all instructions carefully.
WARNING
Death or risk of serious personal injury.
CAUTION
Means that there is a potential risk of personal injury or material damage.
 Prohibited action.
 Do not disassemble product.
|
Do not touch product. |
|
Unplug from power supply. |
|
|
|
|
 This precaution must be kept.
 WARNING
Do not overload outlets or extension cords as this may result in abnormal heat or fire.
Using the camcorder at temperatures over 140°F (60° C) may result in fire. Keeping the battery at a high temperature may cause an explosion.
Do not allow water or metal and inflammable matter to enter the camcorder or AC power adaptor. Doing so may pose a fire hazard.
SAND
No sand or dust! Fine sand or dust entering the camcorder or AC power adaptor could cause malfunctions or defects.
O |
I |
L |
|
|
No oil! Oil entering the camcorder or AC power adaptor could cause electric shock, malfunctions or defects.
Do not aim the LCD screen directly into the sun. Doing so could cause eye injuries, as well as lead to malfunctioning of internal parts of the product.
Do not bend the power-cord or damage the AC power adaptor by pressing on it with a heavy object. There may be a risk of fire or electric shock.
Do not disconnect the AC adaptor by pulling on its power-cord, as this could damage the power-cord.
English_ix
precautions during use
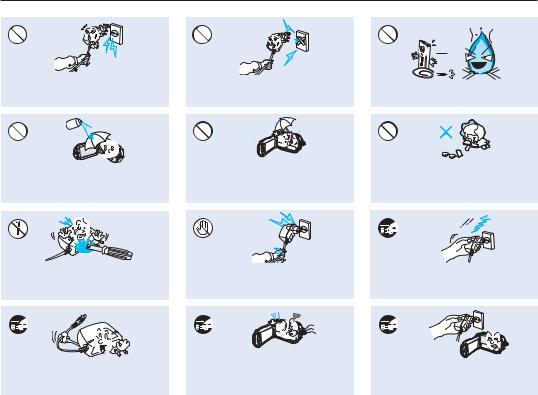
Do not use the AC adaptor if it has damaged, split or broken cords or wires. Doing so may cause fire or electric shock.
Never use cleaning fluid or similar chemicals. Do not spray cleaners directly on the camcorder.
Do not attempt to disassemble, repair, or reform the camcorder or the AC adaptor to avoid a risk of fire or electric shock.
When cleaning the AC adaptor, unplug the power-cord to avoid a risk of a malfunction or electric shock.
Do not connect the AC adaptor unless the plug can be fully inserted with no part of the blades exposed.
Keep the camcorder away from water when used near the beach or pool or when it rains. There is a risk of malfunction or electric shock.
Do not plug or unplug the power cord with wet hands. There is a risk of electric shock.
If the camcorder makes an abnormal sound, or smells or smokes, unplug the power-cord immediately and request service from a Samsung service centre. There is a risk of fire or personal injury.
Do not dispose of battery pack in a fire as it may explode.
Keep the used lithium battery or memory card out of the reach of children. If the lithium battery or memory card is swallowed by children, consult physician immediately.
Keep the power-cord unplugged when not in use or during lightning storms to prevent fire hazard.
If the camcorder malfunctions, immediately detach the AC adaptor or battery from the camcorder to avoid fire or injury.
x_English
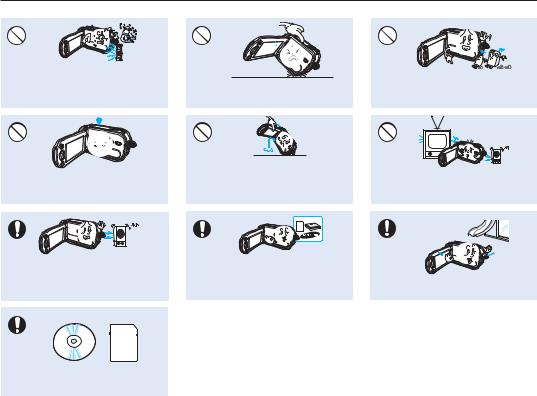
 CAUTION
Do not press the surface of the LCD with force, or hit it with a sharp object.
If you push the LCD surface, display unevenness may occur.
Do not use the camcorder near direct sunlight or heating equipment. This will especially shorten the operation range of the remote control which uses infrared rays.
Do not drop or expose the camcorder, battery pack, AC adaptor or other accessories to severe vibrations or impact. This may cause a malfunction or injury.
Do not expose the camcorder to sand or water when recording at the beach or pool, or recording on a rainy day. Doing so may cause a malfunction or electric shock.
Do not use the camcorder on a tripod (not supplied) in a place where it is subject to severe vibrations or impact.
Do not leave the camcorder in a closed vehicle where the temperature is very high for a long time.
Do not expose the camcorder to soot or steam. Thick soot or steam could damage the camcorder case or cause a malfunction.
Do not use the camcorder near dense exhaust gas generated by gasoline or diesel engines, or corrosive gas such as hydrogen sulphide. Doing so may corrode the external or internal terminals, disabling normal operation.
E
D
I
C
I
T
C
E
S
N
I
Do not expose the camcorder to insecticide. Insecticide entering the camcorder could cause the product to operate abnormally. Turn the camcorder off and cover it with vinyl sheet, etc. before using insecticide.
English_xi
precautions during use
Do not expose the camcorder to sudden changes in temperature or humid places. There is also a risk of defect or electric shock when using outdoors during lightning storms.
Do not leave the LCD monitor open when not using the camcorder.
Do not place the camcorder with the open LCD screen down.
Do not hold the camcorder by the LCD monitor when lifting it. The LCD monitor could detach and the camcorder may fall.
W
Do not wipe the camcorder body with benzene or thinner. The exterior coating could peel off or the case surface could deteriorate.
Do not use the camcorder near TV or radio. This could cause noise on the TV screen or to radio broadcasts.
W
Do not use the camcorder near strong radio waves or magnetism such as speakers and large motors. Noise could enter video or audio that are being recorded.
Keep important data separately. Samsung is not responsible for data loss.
Use Samsung-approved accessories only. Using products from other manufacturers may cause overheating, fire, explosion, electric shock or personal injuries due to abnormal operation.
Place the camcorder on a stable surface and a place with ventilation openings.
xii_English

contents
QUICK START GUIDE |
07 You can record videos in H.264 format! |
07
GETTING TO KNOW YOUR CAMCORDER
PREPARATION
14
ABOUT THE STORAGE MEDIA
38
RECORDING
45
11What's included with your camcorder
12Front & left view
13Rear & bottom view
14Using the hand strap
14Adjusting the LCD screen
15Basic camcorder positioning
16Connecting a power source
24Basic operation of your camcorder
25LCD screen indicators
31 Turning the screen indicators on/off ( 


 ) 33 Shortcut menu (OK GUIDE)
35 Initial setting : Time Zone, Date And Time & OSD Language
38Selecting the storage media (SMX-C13/C14 only)
39Inserting / ejecting the memory card
40Selecting a suitable memory card
43 Recordable time and capacity
45Recording videos
46Recording with ease for beginners (EASY Q Mode)
47Taking photo images (SMX-C13/C14 only)
48Zooming in and out
English_03

contents
PLAYBACK
49
RECORDING OPTIONS
54
PLAYBACK OPTIONS
71
04_English
49Changing the playback mode (SMX-C13/C14 only)
50Playing videos
53Viewing photos (SMX-C13/C14 only)
54Changing the menu settings
56Menu items
57Using the recording menu items
57iSCENE
58Video resolution
59Photo resolution
5916:9 Wide
60EV (Exposure Value)
61Back light
62Focus
62 Face detection
64Anti-Shake (HDIS)
65Digital effect
66Fader
66Wind cut
67Digital zoom
68Time lapse REC
70Guideline
71Menu items
72Play option
73Delete
74Protect
75Story-board print
76Copy (SMX-C13/C14 only)
78Divide
80Combine
81Share mark
82Slide show (SMX-C13/C14 only)
83File info
SETTINGS OPTIONS
84
USING WITH A WINDOWS COMPUTER
96
84Changing the menu settings in "settings"
85Menu items
86Using the settings menu items
86Storage (SMX-C13/C14 only)
86Storage Info
87Format
87File No.
88Time Zone
90Date/Time Set
90Date Type
90Time Type
91Date/Time Display
91LCD Brightness
91LCD Colour
92LCD Enhancer
92Auto LCD Off
92Menu Design
92Transparency
93Beep Sound
93Shutter Sound (SMX-C13/C14 only)
93Auto Power Off
94PC Software
94TV Display
94Default Set
95Version
95Language
95Demo
96Checking your computer type
97What you can do with a Windows computer
98Using the Intelli-studio programme
105 Using as a removable storage device
English_05

contents
CONNECTING TO OTHER |
107 |
Connecting to a TV |
DEVICES |
108 |
Viewing on a TV screen |
107 |
109 |
Recording (dubbing ) images on a VCR or DVD/HDD recorder |
|
|
|
MAINTENANCE & ADDITIONAL |
110 |
Maintenance |
INFORMATION |
111 |
Additional information |
110 |
113 |
Using your camcorder abroad |
|
|
|
TROUBLESHOOTING |
114 |
Troubleshooting |
SPECIFICATIONS |
127 |
Specifications |
POWER SOURCES |
128 |
|
(UNITED KINGDOM ONLY ) |
|
|
06_English
quick start guide
+This quick start guide introduces the basic operation and features of your camcorder. See the reference pages for more information.
You can record videos in H.264 format!
You can record videos in H.264 format that is convenient to email and share with your friends and family. You can also take photos with your camcorder (SMX-C13/C14 only).
Step1: Get ready
1. Insert a memory card. ¬page 39
• You can use commercially available SDHC
(SD High Capacity) or MMC plus cards with this camcorder.
• Set the appropriate storage media. (SMX-C13/C14 only)
2.Insert the battery into the battery slot. ¬page 16
• Gently slide the Battery
pack release switch in the direction as shown in the
diagram.
[Battery pack release] Switch
English_07
quick start guide
Step 2: Record with your camcorder
LCD screen
~GGGG{
~
{
Zoom lever
PHOTO ( ) button
(SMX-C13/C14 only)
CHG indicator
Recording start/stop button
RECORDING VIDEOS WITH H.264 FORMAT
Your camcorder uses advanced H.264 compression technology to realise the clearest video quality.
¬ page 106
1.Open the LCD screen.
2.Press the Power ( ) button.
3.Press the Recording start/stop button.
•To stop recording, press the Recording start/stop button.
RECORDING PHOTOS (SMX-C13/C14 ONLY)
1.Open the LCD screen.
2.Press the Power ( ) button.
3.Press the PHOTO ( ) button fully when you are ready.
0:00:00 [245Min]
•Your camcorder is compatible with H.264 recording format which achieves efficient coding of high quality video with less capacity.
•You can record videos with SD (standard definition). The default setting is “TV Fine (720x576/50i)”. ¬ page 58
•You cannot record photos while you are recording videos.
08_English
Step 3: Play back videos or photos
VIEWING THE LCD SCREEN OF YOUR CAMCORDER
You can find your desired recordings quickly by using the thumbnail index view.
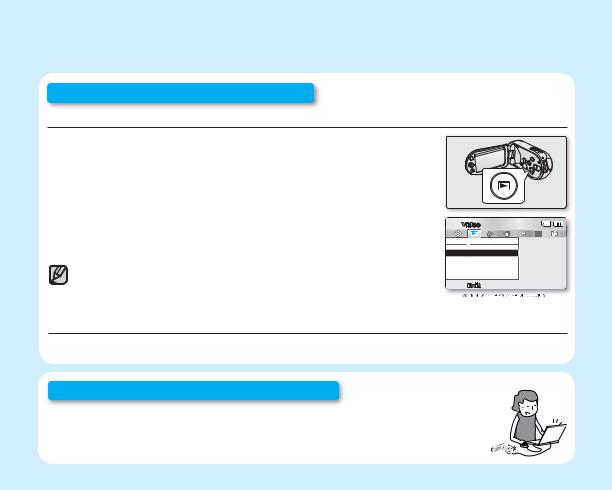
1.Press the Mode ( ) button to select the Play mode.
•The thumbnail index view appears. The thumbnail of the latest created or played file is highlighted.
2.Set the Play Mode to “Video” or “Photo”. (SMX-C13/C14 only)
•Press the MENU button. Use the Control button to select “Play Mode”
“Video” or “Photo”.
3.Use the Control button to select a desired video or photo, and then press the
Control button (OK).
•Setting the Play Mode menu is available in thumbnail view only. (SMX-C13/C14 only)
•The photo function is available for the model, SMX-C13/C14 only.
 Video
Video
Play Mode

 Video
Video
Photo
 Exit
Exit
(SMX-C13/C14 only)
VIEWING ON A TV
• You can enjoy detailed, brilliant quality videos on the connected TV. ¬page 108
Step 4: Save recorded videos or photos
Simple and fun! Enjoy the various features of Intelli-studio on your Windows computer.
Using the Intelli-studio programme, built in your camcorder, you can import videos/photos into your computer, edit or share the videos/photos with your friends. For details, see page 98.
English_09
quick start guide
IMPORTING AND VIEWING VIDEOS/PHOTOS FROM THE CAMCORDER TO YOUR PC
Folders directory on your PC
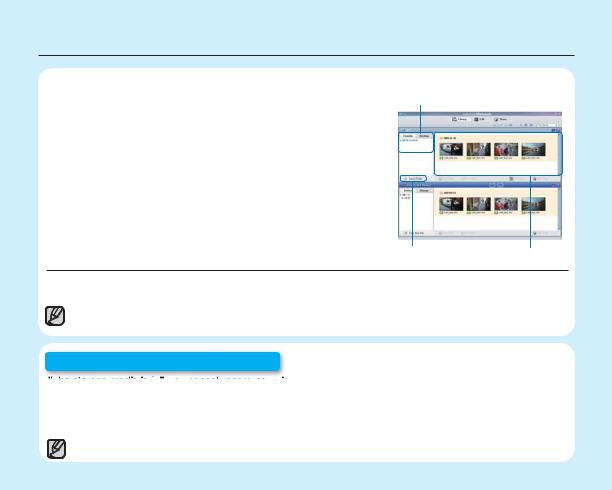
1. Launch the Intelli-studio programme by connecting the camcorder to your PC via USB cable.
• A new file saving screen appears with the Intelli-studio main window. Click “Yes”, the uploading procedure will start.
2. Click “Import folder” to import the videos or photos from the PC to the Intelli-studio, and you can see the files location on the Intelli-studio browser.
3. You can double-click on the file you would like to start playback.
“Import folder” button |
Imported Files |
SHARING VIDEOS/PHOTOS ON YouTube/Flickr
Share your contents with the world, by uploading photos and videos directly to a web site with a single click. Click on the “Share” “Upload to Share Site” tab on the browser. ¬ page 101
The Intelli-studio runs automatically once the camcorder is connected to a Windows computer (when you specify “PC Software: On”). ¬ page 94
Step 5: Delete videos or photos
If the storage media is full, you cannot record new videos or photos. Delete videos or photos data that have been saved on a computer from the storage media. Then you can record new videos or photos on newly freed-up space.
Press the Mode ( ) button to switch the Play mode Press the MENU button Control button (S /T / W / X/OK) to select "Delete." ¬page 73
The photo function is available for the models, SMX-C13/C14 only.
10_English
getting to know your camcorder
WHAT'S INCLUDED WITH YOUR CAMCORDER
Your new camcorder comes with the following accessories. If any of these items are missing from your box, call Samsung’s Customer Care Centre.
+ The exact shape of each item may vary by model.
Battery pack |
|
AC power adaptor |
|
|
|
|
|
|
|
|
Audio/Video cable |
|
USB cable |
||||
|
|
|
||||||
(IA-BH130LB) |
|
(AA-MA9 type) |
|
|
||||
|
|
|
|
|
|
|
||
|
|
|
|
|
|
|
|
|
|
|
|
|
|
|
|
|
|
Hand strap |
Quick start guide |
User manual CD |
•The contents may vary depending on the sales region.
•Parts and accessories are available for purchase at your local Samsung dealer.
SAMSUNG is not responsible for reduced battery life time or malfunctions caused by any unauthorised use of accessories such as AC adaptor or the batteries.
•A memory card is not included. See page 40 for memory cards compatible with your camcorder.
•Your camcorder includes a user manual CD and a quick start guide (printed).
English_11

getting to know your camcorder
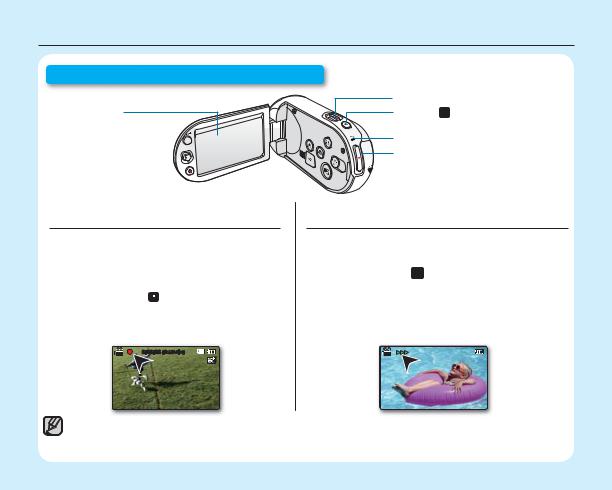
FRONT & LEFT VIEW
|
|
|
|
|
|
|
|
|
|
16 |
15 |
|
(SMX-C13/C14 only) |
|
|
|
|
|
|
|
|
|
|
|
|
||
|
|
|
|
|
|
|
|
|
|
|
|
|
~GGGG{ |
|
|
|
~ |
|
|
|
|
|
|
|
|
|
|
|
1 |
2 |
{ |
|
|
|
|
|
|
|
|
|
|
|
|
|
|
|
|
|
|
|
|
|
|
||
|
|
|
3 |
4 |
5 |
6 |
7 |
8 |
9 |
10 11 |
12 |
13 |
|
1 |
Internal microphone |
|
|
|
|
|
9 |
USB jack ( |
) |
|
|
||
2 |
Lens |
|
|
|
|
|
|
10 |
Display ( |
|
) button |
|
|
3 |
Recording start/stop button |
|
|
|
|
11 |
Mode ( |
) button |
|
|
|||
4 |
Control button (S/T/W/X/ OK), Zoom(W/T) button |
|
12 |
EASY Q button |
|
|
|||||||
5 |
MENU button |
|
|
|
|
|
|
13 |
Hand strap hook |
|
|
||
6 |
LCD screen |
|
|
|
|
|
|
14 |
PHOTO ( |
) button (SMX-C13/C14 only) |
|||
7 |
Power ( ) button |
|
|
|
|
|
|
15 |
Zoom lever (W/T) |
|
|
||
8 |
Built-in speaker |
|
|
|
|
|
|
16 |
Share ( |
) button |
|
||
Be careful not to cover the internal microphone and lens during recording.
CAUTION
14
12_English

REAR & BOTTOM VIEW
8
1 |
2 |
7 |
3
 6
6
4
5
1 |
Charging indicator (CHG) |
|
6 |
Memory card slot |
2 |
Recording start/stop button |
7 |
Battery pack slot |
|
|
|
|
|
|
3 |
AV cable jack (AV) |
|
8 |
Jack/ Battery pack/ Memory card cover |
4 |
DC IN jack (DC IN) |
|
9 |
Tripod receptacle |
5Battery pack release switch
9
Usable Memory Cards
(32GB Max)
SDHC MMCplus
English_13
preparation
This section provides information that you should know before using this camcorder such as how to use the provided accessories, how to charge the battery, and how to setup the operation mode and initialise setup.
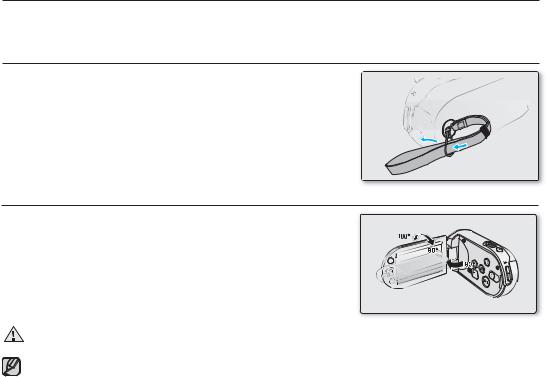
USING THE HAND STRAP
Attach the strap and place your hand through the loop to prevent the camcorder from damage by being dropped.
ADJUSTING THE LCD SCREEN
The wide LCD screen on your camcorder offers high quality image viewing. 1. Open the LCD screen with your finger.
• The screen opens up to 90°.
2. Rotate the LCD screen towards the lens.
• You can rotate it up to 180° towards the lens and up to 90° backward. To view recordings more conveniently, rotate the screen by 180° towards the lens, then fold it back to the body.
Excessive rotation may damage the connective hinge between the screen and the camcorder.
WARNING
•Remove fingerprints or dust on the screen with a soft cloth.
•When the LCD screen is rotated by 180° toward the lens, the left and the right sides of the subject are shown in reverse as if you were looking at a mirror. This is not a problem and does not affect the image being recorded.
14_English
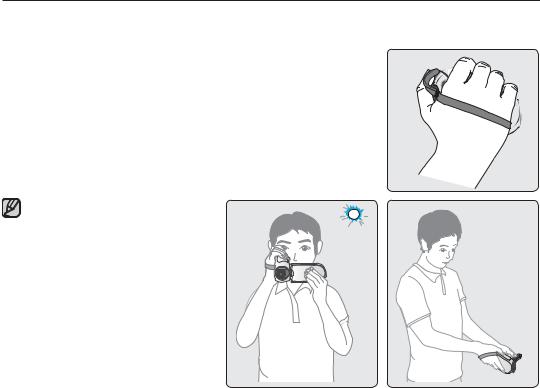
BASIC CAMCORDER POSITIONING
Use both hands while taking a video or photo to prevent the camcorder from shaking. Try to avoid any slight movement while shooting.
Adjusting the shooting angle
Aim the camcorder as shown in the illustration.
1.Hold the camcorder with your both hands.
2.Hook up the hand strap to fit to hand.
3.Make sure your footing is stable and there is no danger of colliding with another person or object.
4.Aim and focus as shown in the illustration.
• This camcorder lens shooting angle is approx. 25˚ higher than the rest of the camcorder body. Make sure the camcorder lens is angled for proper shooting.
• It is recommended to keep the sun behind you while shooting.
English_15
preparation
CONNECTING A POWER SOURCE
•Be sure to charge the battery pack before you start using your camcorder.
•Use IA-BH130LB battery pack only.
•The battery pack may be charged a little at the time of purchase.
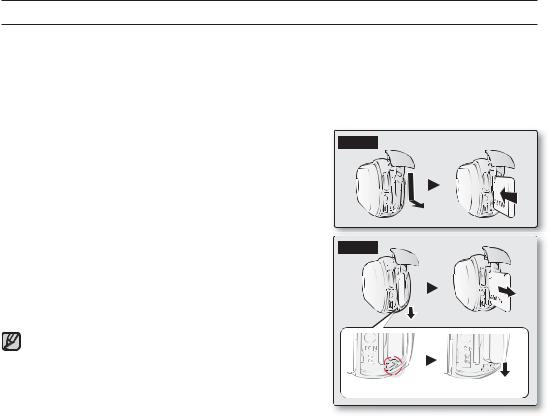
Battery pack insertion/ejection
It is recommended you purchase one or more additional battery packs to allow continuous use of your camcorder.
Inserting the battery pack
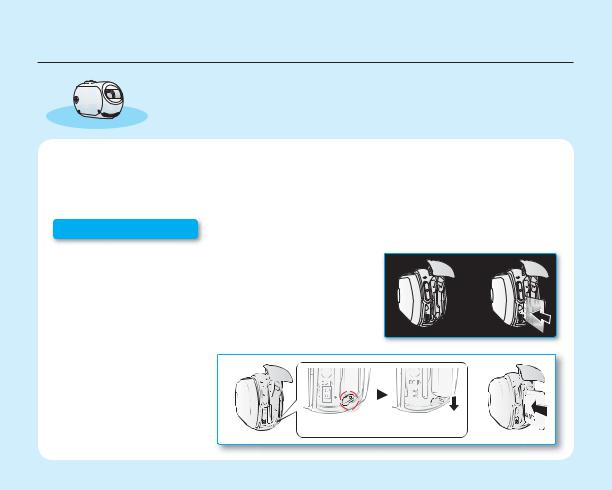
1.Slide and open the battery slot cover as shown in the diagram.
2.Insert the battery pack into the battery slot until it locks.
•Make sure that the SAMSUNG logo is facing left while the battery pack is placed as shown in the diagram.
3.Slide and close the battery slot cover.
Ejecting the battery pack
1.Slide and open the battery slot cover and push the Battery pack release switch.
•Gently push the Battery pack release switch in the direction as shown in the diagram to eject the battery.
2.Pull the ejected battery out in the direction as shown in the diagram.
3.Slide and close the battery slot cover.
•Store the battery pack separately from the camcorder while not in use.
•It is recommended to prepare an additional battery pack for prolonged outdoor use.
•Contact your nearest Samsung Electronics Service Centre for purchasing additional battery packs.
Insert
Eject
[Battery pack release] Switch
16_English
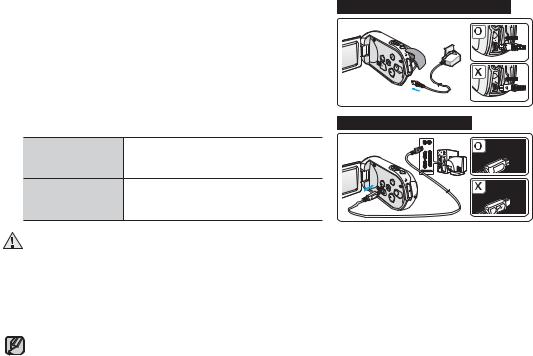
Charging the battery
You can charge the battery using the AC power adaptor or USB cable.
1.Insert the battery to the camcorder. ²page 16
2.Press the Power ( ) button to turn off the camcorder.
3.Open the connector cover of the unit.
4.Charge the battery using the AC power adaptor or USB cable.
•The CHG (charge) lamp lights up and charging starts. When the battery is fully charged, the charging (CHG) lamp turns green. ²page 18
Using the AC power Connect the AC power adaptor with the camcorder properly and plug the AC
adaptor
Power adaptor to the wall outlet.
Connect the USB cable with the
Using the USB cable camcorder properly and connect the other end to a USB port of a PC.
Connecting the AC power adaptor
Connecting the USB cable
• Charging the battery pack in a low temperature may take longer or fail to fully charge (green indicator will not
turn on).
CAUTION
•Please make sure that there are no foreign substances in plug and socket when you connect the AC power supply to the camcorder.
•Fully charge the battery pack before use.
•When using the AC power supply, place it close to the wall outlet. If there is a malfunction during use of the camcorder, separate the AC power supply immediately from the wall outlet.
•Do not use the AC power supply in a tight space, such as between furnishings.
•For recording indoors with available wall outlet, it is convenient to use the AC power supply instead of the battery pack.
•It is recommended to charge the battery pack in a place with ambient temperature of 10°C ~ 30°C.
•For charging, connecting both USB cable and AC power adaptor simultaneously will have the same effect as using the AC power adaptor only.
•Even with the power is switched on, battery pack will still charge with the AC power adaptor or USB cable. But you need more charging time when the power is on. It is recommended you to keep the camcorder
turned off while charging. |
English_17 |
|
preparation
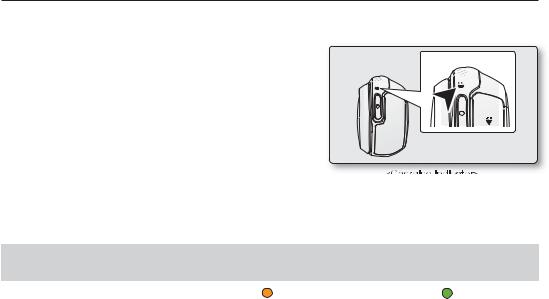
Charging indicator
Tips for battery identification
+ The colour of the LED indicates the charging status.
• If the battery has been fully charged, the charge indicator is green.
• While the battery is being charged, the charge indicator lights orange.
• If an error occurs while the battery is being charged, the charge indicator blinks orange.
Charging (CHG) lamp
The colour of the charging indicator shows the charging state.
Charging state |
|
Charge |
|
|
|
|
|
Charging |
|
Fully Charged |
|
|
|
||
|
|
|
|
LED Colour |
(Orange) |
|
(Green) |
|
|
||
|
|
|
|
•If there is no operation for more than 5 minutes when the LCD screen is closed, the charging lamp blink green to indicate the camcorder is powered on. (uses the battery as main power and make sure the "Auto Power Off" set on "off")
18_English
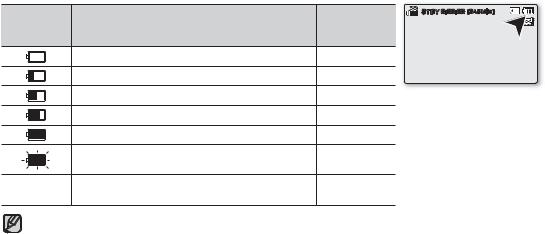
Battery Level Display
The Battery Level Display shows the amount of battery power remaining in the battery pack.
Battery |
|
STBY 0:00:00 [245Min] |
|
Level |
State |
Message |
|
Indicator |
|
|
|
|
Fully charged |
- |
|
|
20%~40% used |
- |
|
|
40%~60% used |
- |
|
|
60%~80% used |
- |
|
|
80%~99% used |
- |
|
|
Exhausted (flickers): The device will soon turn off. |
- |
|
|
Change the Battery Pack as soon as possible. |
||
|
|
||
- |
(flickers): The device will be forced to turn off after |
"Low battery" |
|
3 seconds. |
|||
|
|
• Before using the camcorder, charge the battery.
• Above figures are based on a fully charged battery pack at a normal temperature. Low ambient temperature may affect the use time.
English_19
preparation
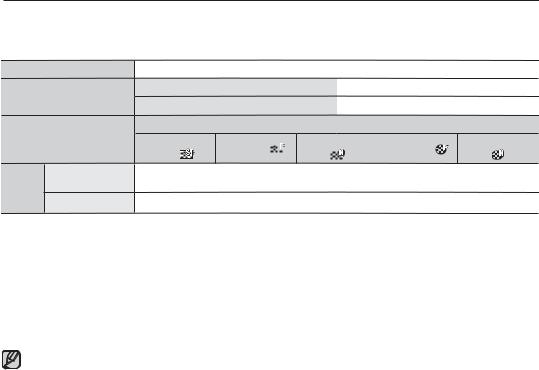
Charging, recording and playback times with fully charged battery pack (with no zoom operation, etc.)
• For your reference, the approximate time with fully charged battery pack:
Battery type
Charging time
Video resolution
|
Continuous |
Mode |
recording time |
|
|
|
Playback time |
|
|
|
|
|
|
|
|
IA-BH130LB |
|
|
|
|
|
|||
Using a AC power adaptor |
|
|
|
|
approx. 2 hr. |
|
|
|||||||||
|
|
Using a USB cable |
|
|
|
|
|
approx. 4 hr. |
|
|
||||||
|
|
|
|
|
|
|
|
|
||||||||
|
|
|
720 x 576 (50i) |
|
|
|
|
640 x 480 (25p) |
|
|||||||
TV Super |
TV Fine ( |
|
|
|
) |
TV Normal |
Web Fine ( |
|
) |
Web Normal |
||||||
|
|
|
|
|||||||||||||
Fine ( |
|
) |
|
|
|
( |
|
|
) |
|
( |
) |
||||
|
|
|
|
|
|
|
|
|
|
|
||||||
|
|
|
|
|
|
|
|
|
|
|
|
|
|
|
|
|
approx. 160min. approx. 180min.
-The time is only for reference. Figures shown above are measured under Samsung's test environment, and may differ according to user and condition.
-We recommend using the AC power adaptor when using the Time Lapse REC Function.
Continuous Recording (without zoom)
The continuous recording time of the camcorder in the table shows the available recording time when the camcorder is in the recording mode without using any other function after recording started. When actually recording, the battery pack may discharge 2-3 times faster than this reference since the record start/stop and zoom functions are being operated, and playback is performed. Prepare additional charged battery pack(s) to allow for the time you are planning to record on the camcorder. Note that the battery pack discharges faster in a cold environment.
The charging time will vary depending on the remaining battery level.
20_English
Loading...