


 Loading...
Samsung SM-X700, SM-X706B, SM-X800, SM-X806B, SM-X806E User Manual
...USER MANUAL
SM-X700
SM-X706B
SM-X800
SM-X806B
SM-X806E
SM-X900
SM-X906B
English. 09/2022. Rev.1.0 |
www.samsung.com |
Table of Contents
Getting started
6 Device layout and functions
11 Charging the battery
14SIM or USIM card (nano-SIM card) (Mobile network enabled models)
15Memory card (microSD card)
17Turning the device on and off
18Initial setup
Apps and features
19Introduction
20Samsung account
21Understanding the screen
29Notification panel
31Entering text
33Installing or uninstalling apps
35Phone
38Contacts
40Messages
42Internet
43Multi window
45Bixby
47Bixby Vision
48Samsung Kids
49Samsung Health
50Samsung Members
50Samsung Global Goals
50Samsung TV Plus
50Galaxy Shop
51Calendar
52Reminder
53My Files
53 Clock
53Calculator
54Game Launcher
55Game Booster
56SmartThings
56Smart View
57Music Share
59Samsung Flow
60Daily Board
62Samsung DeX
69Google apps
70S Pen
84Samsung Notes
88PENUP
88Camera
99Gallery
103AR Zone
108Voice Recorder
109Sharing content
110Screen capture and screen record
112Transferring data from your previous device (Smart Switch)
2

Table of Contents
Settings
114Introduction
115Samsung account
115Connections 116 Wi-Fi 118 Bluetooth
119Data saver (Mobile network enabled models)
119Mobile data only apps (Mobile network enabled models)
120Mobile Hotspot (Mobile network enabled models)
120 More connection settings
122Connected devices
123Modes and Routines 123 Using modes 123 Using routines
124Sounds and vibration
125 Sound quality and effects
125 Separate app sound
126 Notifications
126Display
127 Motion smoothness
128Changing the screen mode or adjusting the display colour
129Wallpaper and style
129Home screen
129Lock screen 130 Smart Lock
130Security and privacy 131 Face recognition
133 Fingerprint recognition
137 Samsung Pass
139 Secure Folder
142 Secure Wi-Fi
143 Location
143Safety and emergency
144Accounts and backup 145 Users
146 Samsung Cloud
147 Google
147Advanced features
149 Motions and gestures
149 Video call effects
150 Dual Messenger
151Digital Wellbeing and parental controls
151Battery and device care
151 Optimising your device
152 Battery
152 Storage
152 Memory
152 Device protection
153 Auto optimisation
153 Software update
153 Diagnostics
153Apps
154General management
155Accessibility
156Software update
156 About tablet
Usage notices
158 Precautions for using the device
160Notes on package contents and accessories
161Device overheating situations and solutions
3

Table of Contents
Appendix
165 Troubleshooting
170 Removing the battery
4

Getting started
5
Getting started
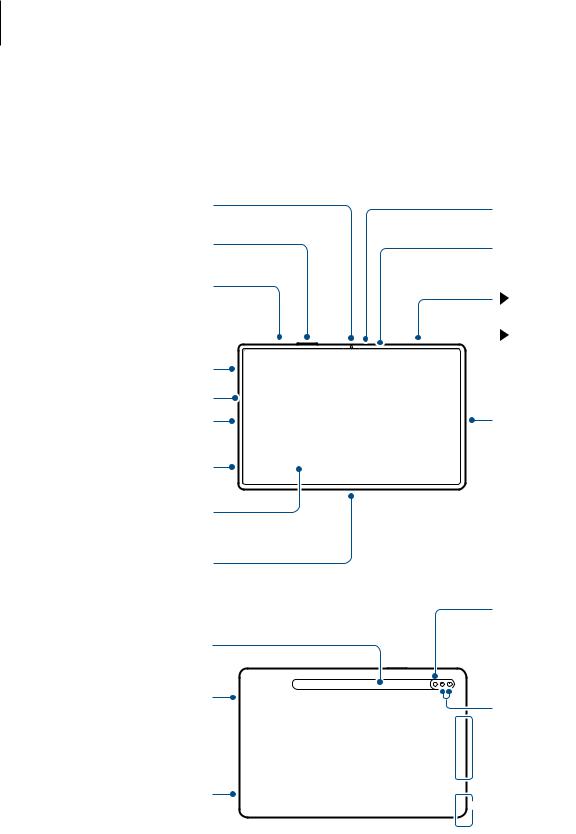
Device layout and functions
►SM-X700, SM-X706B:
Front camera
Volume key
Side key (Fingerprint recognition sensor)
Speaker
Light sensor
Microphone
Speaker
Touchscreen
Keyboard dock port
S Pen charger
Speaker
Microphone
Light sensor
SM-X706B: SIM card / Memory card tray
SM-X700: Memory card tray
Earphone jack /
Multipurpose jack (USB
Type-C)
Flash
Rear camera |
 Main antenna (SM-X706B)
Speaker
 GPS antenna
6
Getting started
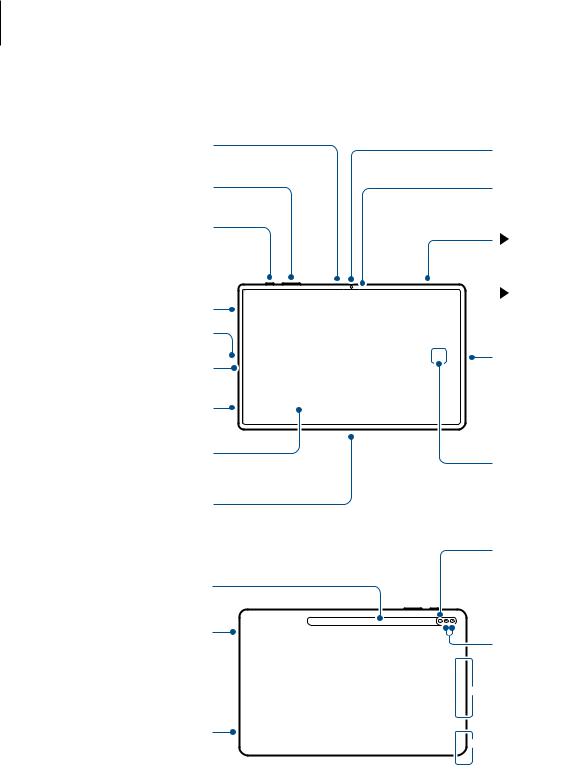
►SM-X800, SM-X806B, SM-X806E:
Microphone
Volume key
Side key
Speaker
Microphone
Light sensor
Speaker
Touchscreen
Keyboard dock port
Front camera
Light sensor
SM-X806B, SM-X806E: SIM card / Memory card tray
SM-X800: Memory card tray
Earphone jack /
Multipurpose jack (USB
Type-C)
Fingerprint recognition sensor
Flash
S Pen charger Speaker
Rear camera |
 Main antenna (SM-X806B, SM-X806E)
Speaker
 GPS antenna
7
Getting started
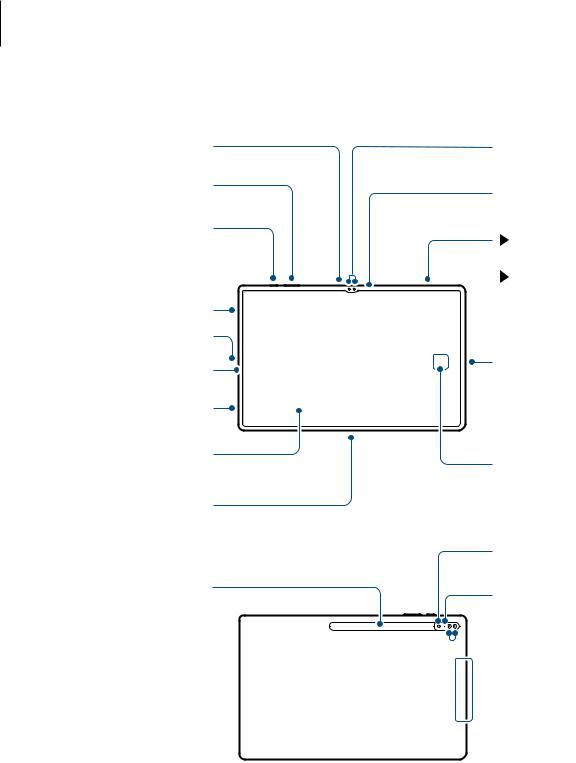
►SM-X900, SM-X906B:
Microphone
Volume key
Side key
Speaker
Microphone
Light sensor
Speaker
Touchscreen
Keyboard dock port
S Pen charger
Speaker 
Speaker 
Front camera
Light sensor
SM-X906B: SIM card / Memory card tray
SM-X900: Memory card tray
Earphone jack /
Multipurpose jack (USB
Type-C)
Fingerprint recognition sensor
Flash
Microphone |
 Rear camera
 Main antenna (SM-X906B)
 GPS antenna
8

Getting started
The device and some accessories (sold separately) contain magnets. The American Heart Association (US) and the Medicines and Healthcare Products Regulatory Agency (UK) both warn that magnets can affect the operation of implanted pacemakers, cardioverters, defibrillators, insulin pumps or other electro medical devices (collectively, “Medical Device”) within the range of 15 cm (6 inches). If you are a user of any of
these Medical Devices, DO NOT USE THIS DEVICE AND SOME ACCESSORIES (SOLD SEPARATELY) UNLESS YOU HAVE CONSULTED WITH YOUR PHYSICIAN.
• Do not store your device and some accessories (sold separately) near magnetic fields. Magnetic stripe cards, including credit cards, phone cards, passbooks, and boarding passes, may be damaged by magnetic fields.
•When using the speakers, such as when playing media files or using speakerphone, do not place the device close to your ears.
•Be careful not to expose the camera lens to a strong light source, such as direct sunlight. If the camera lens is exposed to a strong light source, such as direct sunlight, the camera image sensor may be damaged. A damaged image sensor is irreparable and will cause dots or spots in pictures.
•If you use the device with its glass or acrylic body broken, there may be a risk of injury. Use the device only after it has been repaired at a Samsung Service Centre.
•If dust or foreign materials enter the microphone, speaker, or receiver, the device’s sound may become quiet or certain features may not work. If you attempt to remove the dust or foreign materials with a sharp object, the device may be damaged and its appearance may be affected.
• Connectivity problems and battery drain may occur in the following situations:
–If you attach metallic stickers on the antenna area of the device
–If you attach a device cover made with metallic material to the device
–If you cover the device’s antenna area with your hands or other objects while using certain features, such as calls or the mobile data connection
•Do not cover the light sensor area with accessories, such as stickers or a cover. Doing so may cause the sensor to malfunction.
•Do not allow water to contact the touchscreen. The touchscreen may malfunction in humid conditions or when exposed to water.
9

Getting started
Hard keys
Key |
Function |
|
|
• |
When the device is off, press and hold to turn it on. |
|
• |
Press to turn on or lock the screen. |
Side key |
• |
Press and hold to start a conversation with Bixby. Refer to Using |
|
|
Bixby for more information. |
|
• |
Press twice or press and hold to launch the app or feature you set. |
|
|
|
Side key + |
• |
Press simultaneously to capture a screenshot. |
Volume Down key |
• |
Press and hold simultaneously to turn off the device. |
Setting the Side key
Select an app or feature to launch by pressing the Side key twice or pressing and holding the Side key.
Launch the Settings app, tap Advanced features →Side key, and then select an option you want.
Soft buttons
Home button
Recents button 


 Back button
When you turn on the screen, the soft buttons will appear at the bottom of the screen. Refer to Navigation bar (soft buttons) for more information.
10
Getting started
Charging the battery
Charge the battery before using it for the first time or when it has been unused for extended periods.
Wired charging
Connect the USB cable to the USB power adaptor and plug the cable into the device’s multipurpose jack to charge the battery. After fully charging, disconnect the charger from the device.
Quick charging
Launch the Settings app, tap Battery and device care →Battery →More battery settings, and then activate the feature you want.
•Fast charging: To use the fast charging feature, use a battery charger that supports Adaptive fast charging.
You can charge the battery more quickly while the device or its screen is turned off.
Charging other devices
Use the USB cable to charge another mobile device with your device’s battery.
Connect your device and the other device using your device’s USB cable. A USB connector may be needed depending on the other device.
When charging starts, the battery charging icon will appear on the other device’s screen.
The app selection pop-up window that appears on your device is for data transfer. Do not select an app from the pop-up window.
11

Getting started
Reducing the battery consumption
Your device provides various options that help you conserve battery power.
•Optimise the device using the device care feature.
•When you are not using the device, turn off the screen by pressing the Side key.
•Activate power saving mode.
•Close unnecessary apps.
•Deactivate the Bluetooth feature when not in use.
•Deactivate auto-syncing of apps that need to be synced.
•Decrease the backlight time.
•Decrease the screen brightness.
Battery charging tips and precautions
Use only Samsung-approved battery, charger, and cable specifically designed for your device. Incompatible battery, charger, and cable can cause serious injuries or damage to your device.
• Connecting the charger improperly may cause serious damage to the device. Any damage caused by misuse is not covered by the warranty.
•Use only USB Type-C cable supplied with the device. The device may be damaged if you use Micro USB cable.
•If you charge the device while the multipurpose jack is wet, the device may be damaged. Thoroughly dry the multipurpose jack before charging the device.
12

Getting started
•To save energy, unplug the charger when not in use. The charger does not have a power switch, so you must unplug the charger from the electric socket when not in use to avoid wasting power. The charger should remain close to the electric socket and easily accessible while charging.
•When using a charger, it is recommended to use an approved charger that guarantees the charging performance.
•If the battery is completely discharged, the device cannot be turned on immediately when the charger is connected. Allow a depleted battery to charge for a few minutes before turning on the device.
•If you use multiple apps at once, network apps, or apps that need a connection to another device, the battery will drain quickly. To avoid losing power during a data transfer, always use these apps after fully charging the battery.
•Using a power source other than the charger, such as a computer, may result in a slower charging speed due to a lower electric current.
•The device can be used while it is charging, but it may take longer to fully charge the battery.
•If the device receives an unstable power supply while charging, the touchscreen may not function. If this happens, unplug the charger from the device.
•While charging, the device and the charger may heat up. This is normal and should not affect the device’s lifespan or performance. If the battery gets hotter than usual, the charger may stop charging.
•If the device is not charging properly, take the device and the charger to a Samsung Service Centre.
13
Getting started
SIM or USIM card (nano-SIM card) (Mobile network
enabled models)
Insert the SIM or USIM card provided by the mobile telephone service provider.
Some services that require a network connection may not be available depending on the service provider.
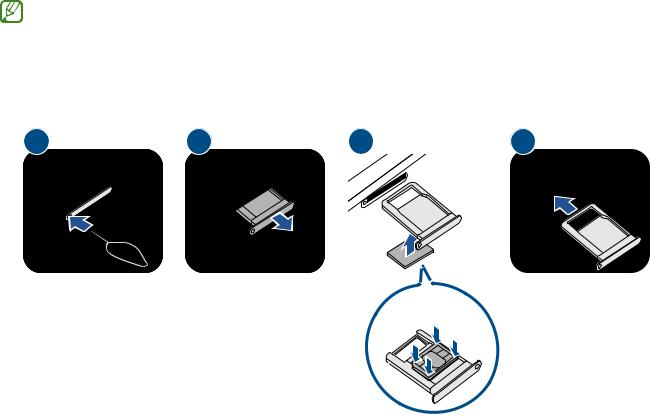
Installing the SIM or USIM card
1 |
2 |
3 |
4 |
<Underside>
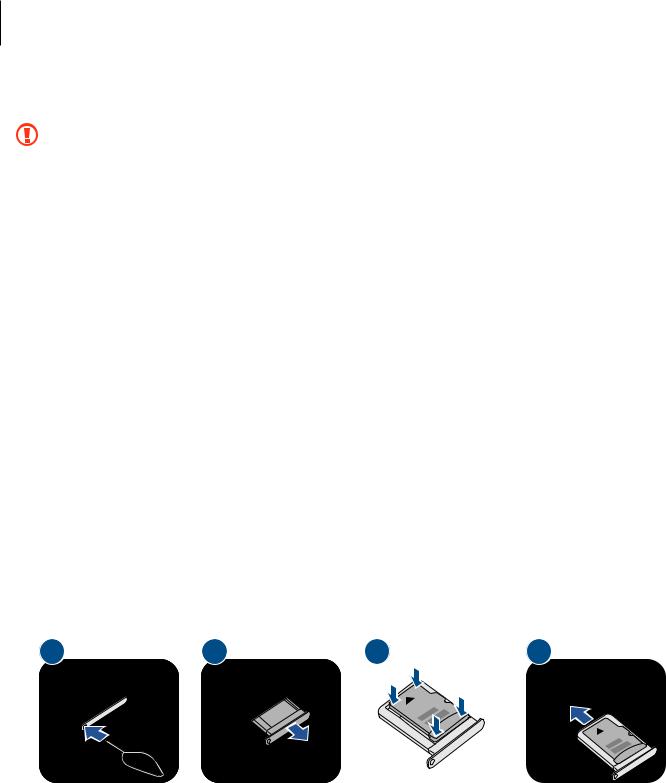
1Insert the ejection pin into the hole on the tray to loosen the tray.
2Pull out the tray gently from the tray slot.
3Place the SIM or USIM card on the tray with the gold-coloured contacts facing upwards and gently press the SIM or USIM card into the tray to secure it.
14
Getting started
4 Insert the tray back into the tray slot.
• Use only a nano-SIM card.
•Use caution not to lose or let others use the SIM or USIM card. Samsung is not responsible for any damages or inconveniences caused by lost or stolen cards.
•Ensure that the ejection pin is perpendicular to the hole. Otherwise, the device may be damaged.
•If the card is not fixed firmly into the tray, the SIM card may leave or fall out of the tray.
•If you insert the tray into your device while the tray is wet, your device may be damaged. Always make sure the tray is dry.
•Fully insert the tray into the tray slot to prevent liquid from entering your device.
Memory card (microSD card)
Installing a memory card
Your device’s memory card capacity may vary from other models and some memory cards may not be compatible with your device depending on the memory card manufacturer and type. To view your device’s maximum memory card capacity, refer to the Samsung website.
1 |
2 |
3 |
4 |
1Insert the ejection pin into the hole on the tray to loosen the tray.
2Pull out the tray gently from the tray slot.
3Place a memory card on the tray with the gold-coloured contacts facing downwards and gently press the memory card into the tray to secure it.
15

Getting started
4 Insert the tray back into the tray slot.
• Some memory cards may not be fully compatible with the device. Using an incompatible card may damage the device or the memory card, or corrupt the data stored in it.
•Use caution to insert the memory card right-side up.
•Ensure that the ejection pin is perpendicular to the hole. Otherwise, the device may be damaged.
•When you remove the tray from the device, the mobile data connection will be disabled. (Mobile network enabled models)
•If the card is not fixed firmly into the tray, the memory card may leave or fall out of the tray.
•If you insert the tray into your device while the tray is wet, your device may be damaged. Always make sure the tray is dry.
•Fully insert the tray into the tray slot to prevent liquid from entering your device.
•The device supports the FAT and the exFAT file systems for memory cards. When inserting a card formatted in a different file system, the device will ask to reformat the card or will not recognise the card. To use the memory card, you must format it. If your device cannot format or recognise the memory card, contact the memory card manufacturer or a Samsung Service Centre.
•Frequent writing and erasing of data shortens the lifespan of memory cards.
•When inserting a memory card into the device, the memory card’s file directory appears in the My Files →SD card folder.
Removing the memory card
Before removing the memory card, first unmount it for safe removal.
1Launch the Settings app and tap Battery and device care →Storage.
2Swipe to the left to view the SD card page.
3Tap  →Unmount.
Do not remove external storage, such as a memory card or USB storage, while the device is transferring or accessing information, or right after transferring data. Doing so can cause data to be corrupted or lost or cause damage to the external storage or device. Samsung is not responsible for losses, including loss of data, resulting from the misuse of external storage devices.
16
Getting started
Formatting the memory card
A memory card formatted on a computer may not be compatible with the device. Format the memory card on the device.
1Launch the Settings app and tap Battery and device care →Storage.
2Swipe to the left to view the SD card page.
3Tap  →Format.
Before formatting the memory card, remember to make backup copies of all important data stored in the memory card. The manufacturer’s warranty does not cover loss of data resulting from user actions.
Turning the device on and off
Follow all posted warnings and directions from authorised personnel in areas where the use of wireless devices is restricted, such as aeroplanes and hospitals.
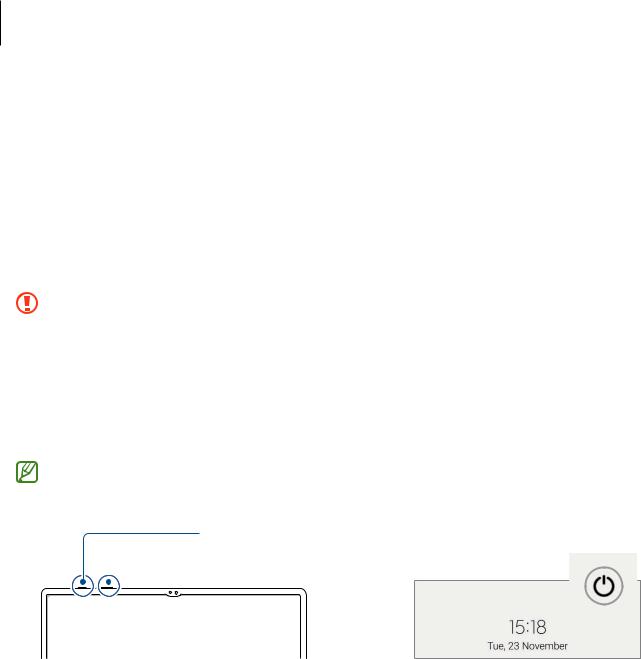
Side key
 Volume Down key
Turning the device on
Press and hold the Side key for a few seconds to turn on the device.
17

Getting started
Turning the device off
1To turn off the device, press and hold the Side key and the Volume Down key simultaneously. Alternatively, open the notification panel, swipe downwards, and then tap  .
.
2Tap Power off.
To restart the device, tap Restart.
You can set the device to turn off when you press and hold the Side key. Launch the
Settings app, tap Advanced features →Side key, and then tap Power off menu under Press and hold.
Forcing restart
If your device is frozen and unresponsive, press and hold the Side key and the Volume Down key simultaneously for more than 7 seconds to restart it.
Initial setup
When you turn on your device for the first time or after performing a data reset, follow the on-screen instructions to set up your device.
If you do not connect to a Wi-Fi network, you may not be able to set up some device features during the initial setup.
18
Apps and features
Introduction
Use apps and various features of the device.
This chapter is a common manual for apps and features provided by Samsung devices.
Depending on the model, some content may differ, or descriptions of apps or features not available on your device may be included.
19

Apps and features
Samsung account
Your Samsung account is an integrated account service that allows you to use a variety of Samsung services provided by mobile devices, TVs, and the Samsung website.
To check the list of services that can be used with your Samsung account, visit account.samsung.com.
1Launch the Settings app and tap Samsung account.
Alternatively, launch the Settings app and tap Accounts and backup →Manage accounts →Add account →Samsung account.
2Sign in to your Samsung account. If you do not have a Samsung account, tap Create account.
Finding your ID and resetting your password
If you forget your Samsung account ID or password, tap Find ID or Forgot password? on the Samsung account sign-in screen. You can find your ID or reset your password after you enter the required information.
Signing out of your Samsung account
When you sign out of your Samsung account, your data, such as contacts or events, will also be removed from your device.
1Launch the Settings app and tap Accounts and backup →Manage accounts.
2Tap Samsung account →My profile and tap Sign out at the bottom of the screen.
3Tap Sign out, enter your Samsung account password, and then tap OK.
20

Apps and features
Understanding the screen
Controlling the touchscreen
Tapping
Tap the screen.
Dragging
Tap and hold an item and drag it to the target position.
Swiping
Swipe upwards, downwards, to the left, or to the right.
Tapping and holding
Tap and hold the screen for approximately 2 seconds.
Double-tapping
Double-tap the screen.
Spreading and pinching
Spread two fingers apart or pinch on the screen.
•Do not allow the touchscreen to come into contact with other electrical devices. Electrostatic discharges can cause the touchscreen to malfunction.
•To avoid damaging the touchscreen, do not tap it with anything sharp or apply excessive pressure to it with your fingertips.
•It is recommended not to use fixed graphics on part or all of the touchscreen for extended periods. Doing so may result in afterimages (screen burn-in) or ghosting.
The device may not recognise touch inputs close to the edges of the screen, which are outside of the touch input area.
21
Apps and features
Navigation bar (soft buttons)
When you turn on the screen, the soft buttons will appear on the navigation bar at the bottom of the screen. The soft buttons are set to the Recents button, Home button, and Back button by default. The functions of the buttons can change according to the app currently being used or usage environment.
|
|
|
|
|
|
|
|
|
|
|
|
Button |
|
Function |
|||
Recents |
• |
Tap to open the list of recent apps. |
|||
|
|
|
|
||
Home |
• |
Tap to return to the Home screen. |
|||
• |
Tap and hold to launch the Google Assistant app. |
||||
|
|
||||
|
|
|
|||
Back |
• |
Tap to return to the previous screen. |
|||
|
|
|
|
|
|
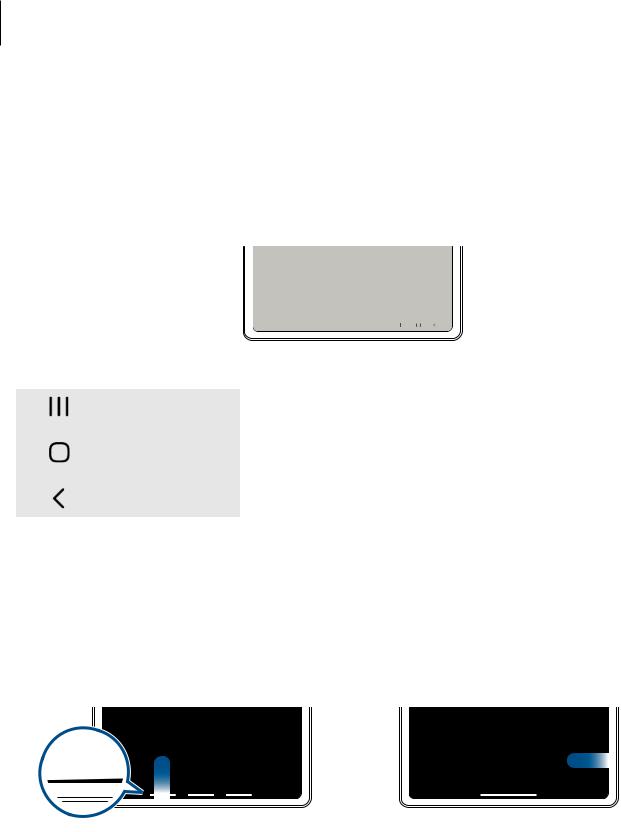
Hiding the navigation bar
View files or use apps on a wider screen by hiding the navigation bar.
Launch the Settings app, tap Display →Navigation bar, and then tap Swipe gestures under
Navigation type. The navigation bar will be hidden and the gesture hints will appear. Tap More options and select an option you want.
Swipe from bottom |
Swipe from sides and bottom |
If you want to hide the gesture hints at the bottom of the screen, tap the Gesture hint switch to deactivate it.
22
Apps and features
Home screen and Apps screen
The Home screen is the starting point for accessing all of the device’s features. It displays widgets, shortcuts to apps, and more.
The Apps screen displays icons for all apps, including newly installed apps.
Switching between Home and Apps screens
On the Home screen, swipe upwards to open the Apps screen.
To return to the Home screen, swipe upwards or downwards on the Apps screen. Alternatively, tap the Home button or the Back button.
Favourite apps |
|
|
|
|
|
|
Finder |
|||||
|
|
|
|
|||||||||
|
|
|
|
|
|
|
|
|
|
|
|
|
|
|
|
|
|
|
|
|
|
|
|
|
|
|
|
|
|
|
|
|
|
|
|
|
|
|
|
|
|
|
|
|
|
|
|
|
|
|
|
|
|
|
|
|
|
|
|
|
|
|
|
|
|
|
|
|
|
|
|
|
|
|
|
|
|
Home screen |
Apps screen |
If you add the Apps button on the Home screen, you can open the Apps screen by tapping the button. On the Home screen, tap and hold an empty area, tap Settings, and then tap the Show Apps screen button on Home screen switch to activate it. The Apps button will be added at the bottom of the Home screen.


 Apps button
23
Apps and features
Editing the Home screen
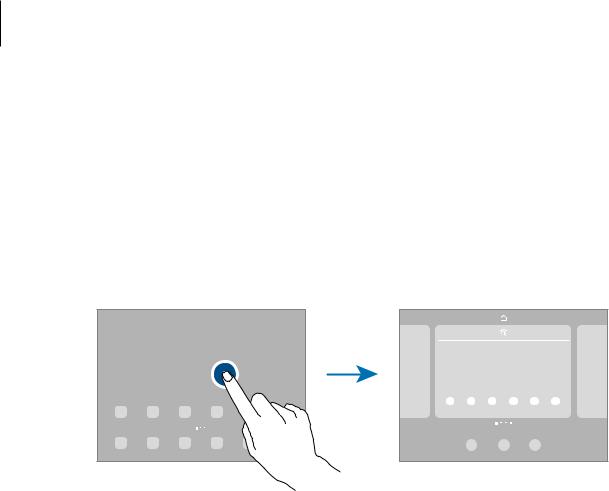
On the Home screen, tap and hold an empty area, or pinch your fingers together to access the editing options. You can set the wallpaper, add widgets, and more. You can also add, delete, or rearrange Home screen panels.
•Adding panels: Swipe to the left, and then tap  .
.
•Moving panels: Tap and hold a panel preview, and then drag it to a new location.
•Deleting panels: Tap  on the panel.
•Wallpaper and style: Change the wallpaper settings for the Home screen and the locked screen.
•Widgets: Widgets are small apps that launch specific app functions to provide information and convenient access on your Home screen. Select a widget and tap Add. The widget will be added on the Home screen.
•Settings: Configure settings for the Home screen, such as the screen layout.
Displaying all apps on the Home screen
Without using a separate Apps screen, you can set the device to display all apps on the Home screen. On the Home screen, tap and hold an empty area, and then tap Settings →Home screen layout →Home screen only →Apply.
You can now access all your apps by swiping to the left on the Home screen.
24
Apps and features
Launching Finder
Search for content on the device quickly.
1On the Apps screen, tap Search. Alternatively, open the notification panel, swipe downwards, and then tap  .
.
2Enter a keyword.
Apps and content on your device will be searched.
If you tap  on the keyboard, you can search for more content.
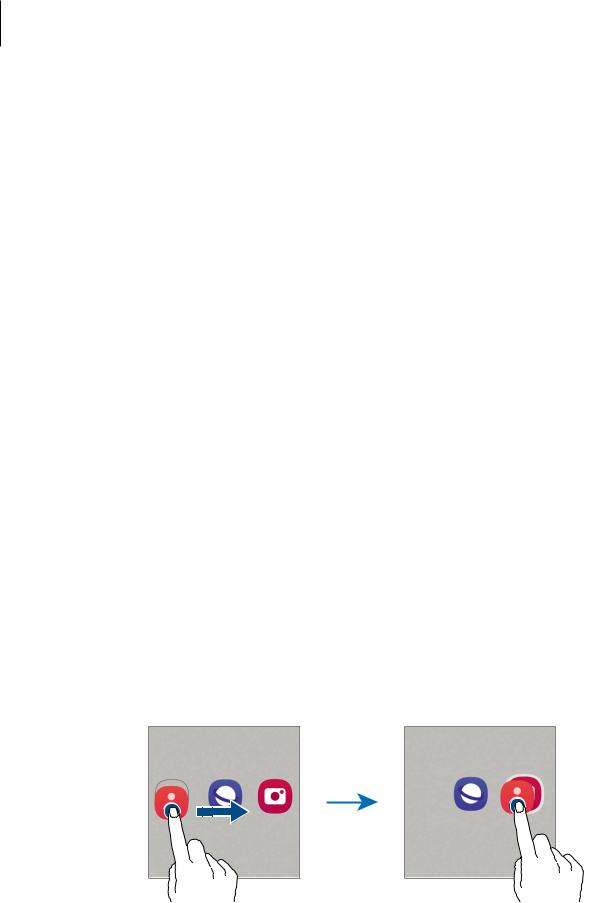
Moving items
Tap and hold an item, and then drag it to a new location. To move the item to another panel, drag it to the side of the screen.
To add a shortcut to an app on the Home screen, tap and hold an item on the Apps screen, and then tap Add to Home. A shortcut to the app will be added on the Home screen.
You can also move frequently used apps to the shortcuts area at the bottom of the Home screen.
Creating folders
Create folders and gather similar apps to quickly access and launch apps.
On the Home screen or the Apps screen, tap and hold an app, and then drag it over another app.
A new folder containing the selected apps will be created. Tap Folder name and enter a folder name.
•Adding more apps
Tap  on the folder. Tick the apps to add and tap Done. You can also add an app by dragging it to the folder.
25
Apps and features
•Moving apps from a folder
Tap and hold an app to drag it to a new location.
•Deleting a folder
Tap and hold a folder, and then tap Delete folder. Only the folder will be deleted. The folder’s apps will be relocated to the Apps screen.
Taskbar
The taskbar appears at the bottom of screen while using an app. The favourite apps from the bottom of the Home screen, recently used apps, and the all apps button will be displayed on the taskbar. You can switch apps quickly by selecting the app you want from the taskbar.
You can also run multiple apps at the same time. While using an app, tap and hold the app you want from the taskbar, drag it upwards, and then drop it wherever you want.
All apps button 


 Taskbar
Favourite apps |
|
Recently used apps |
|
If you do not want to use the taskbar, launch the Settings app, tap Display, and then tap the Taskbar switch to deactivate it.
26
Apps and features
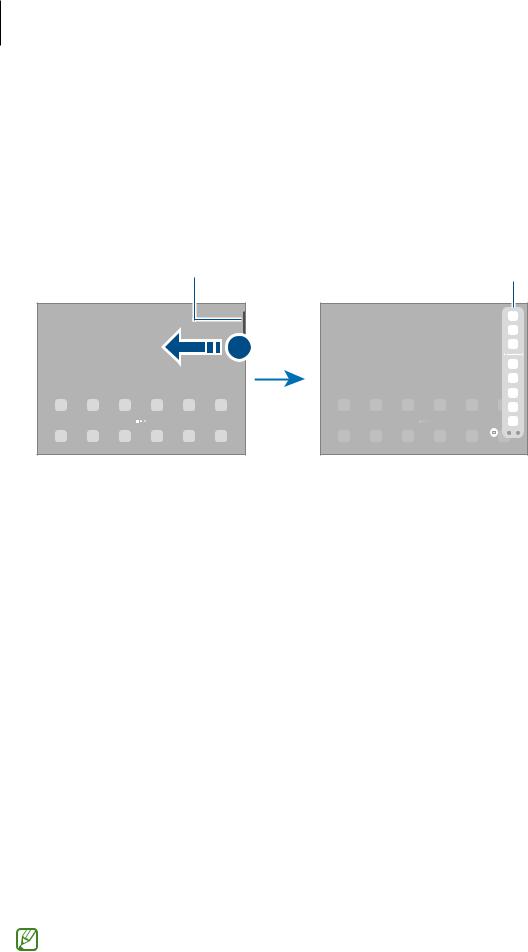
Edge panel
You can quickly access your favourite apps and features from the Edge panels. Drag the Edge panel handle towards the centre of the screen.
If the Edge panel handle is not visible, launch the Settings app, tap Display, and then tap the Edge panels switch to activate it.
Edge panel handle
 Edge panel
 Edge panel settings
Lock screen
Pressing the Side key turns off the screen and locks it. Also, the screen turns off and automatically locks if the device is not used for a specified period.
To unlock the screen, swipe in any direction when the screen turns on.
If the screen is off, press the Side key to turn on the screen. Alternatively, double-tap the screen.
Changing the screen lock method
To change the screen lock method, launch the Settings app, tap Lock screen →Screen lock type, and then select a method.
When you set a pattern, PIN, password, or your biometric data for the screen lock method, you can protect your personal information by preventing others from accessing your device. After setting the screen lock method, the device will require an unlock code whenever unlocking it.
You can set your device to perform a factory data reset if you enter the unlock code incorrectly several times in a row and reach the attempt limit. Launch the Settings app, tap Lock screen →Secure lock settings, unlock the screen using the preset screen lock method, and then tap the Auto factory reset switch to activate it.
27

Apps and features
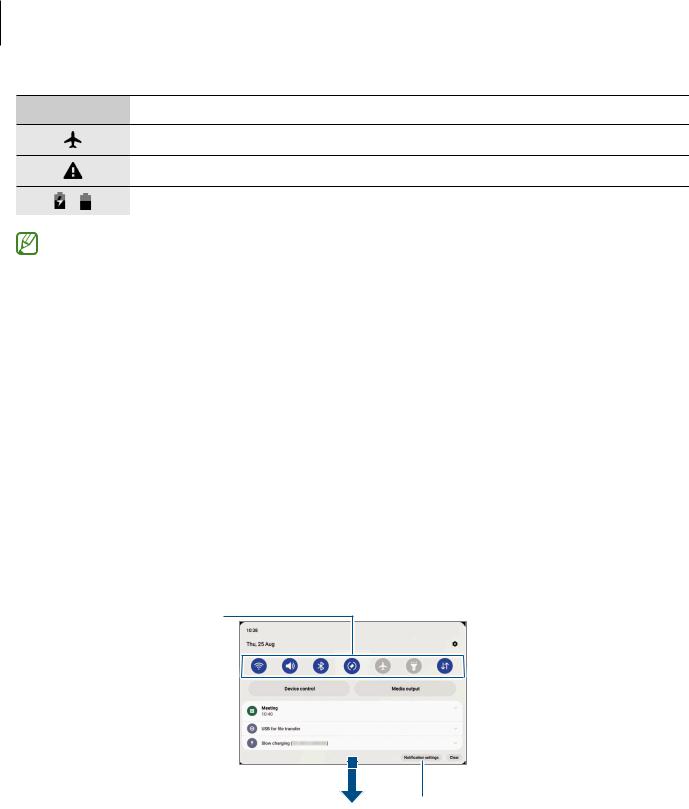
Indicator icons
Indicator icons appear on the status bar at the top of the screen. The icons listed in the table below are most common.
Icon |
Meaning |
|
No signal |
|
|
|
Signal strength |
|
|
|
Roaming (outside of normal service area) |
|
|
|
GPRS network connected |
|
|
|
EDGE network connected |
|
|
|
UMTS network connected |
|
|
|
HSDPA network connected |
|
|
|
HSPA+ network connected |
|
|
/ |
LTE network connected |
|
|
|
5G network connected |
|
|
|
LTE network connected in LTE network that includes the 5G network |
|
|
|
Wi-Fi connected |
|
|
|
Bluetooth feature activated |
|
|
/ |
S Pen connected/disconnected |
|
|
|
S Pen battery power level |
|
|
|
Location services being used |
|
|
|
Call in progress |
|
|
|
Missed call |
|
|
|
New text or multimedia message |
|
|
|
Alarm activated |
|
|
/ |
Mute mode / Vibration mode |
|
|
28
Apps and features
Icon Meaning
Flight mode activated
Error occurred or caution required
/ |
Battery charging / Battery power level |
•The status bar may not appear at the top of the screen in some apps. To display the status bar, drag down from the top of the screen.
•Some indicator icons appear only when you open the notification panel.
•The indicator icons may appear differently depending on the service provider or model.
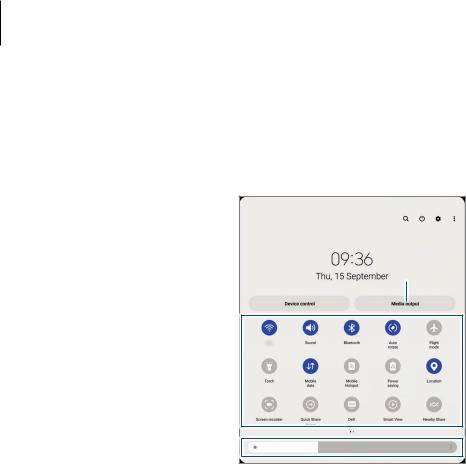
Notification panel
When you receive new notifications, indicator icons appear on the status bar. To see more information about the icons, open the notification panel and view the details.
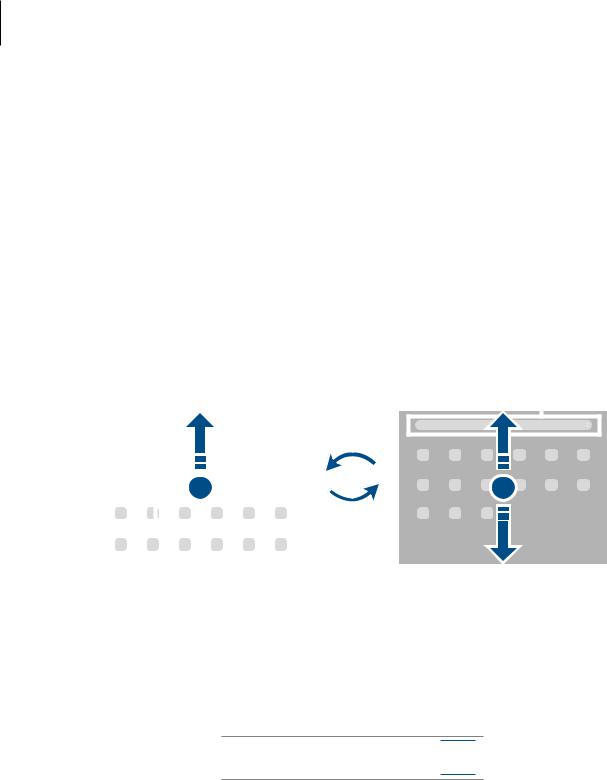
To open the notification panel, drag the status bar downwards. To close the notification panel, swipe upwards on the screen.
You can use the following functions on the notification panel.
Quick setting buttons
 Launch Settings.
View the notification details  and perform various actions.
 Clear all notifications.
 Access the notification settings.
29
Apps and features
Using quick setting buttons
Tap quick setting buttons to activate certain features. Swipe downwards on the notification panel to view more buttons. To add more buttons, tap  .
.
Control connected nearby  devices and SmartThings
devices and scenes.
 Control media on your device and connected nearby devices.
 Quick setting buttons
 Adjust the brightness of the display.
To change feature settings, tap the text under each button. To view more detailed settings, tap and hold a button.
To rearrange buttons, tap  →Edit buttons, tap and hold a button, and then drag it to another location.
Controlling media playback
Take control of music or video playback easily using the Media feature.
1Open the notification panel, swipe downwards, and then tap Media output.
2Tap the icons on the controller to control the playback.
Controlling nearby devices
Launch quickly and take control of nearby connected devices and frequently used SmartThings devices and scenes on the notification panel.
1Open the notification panel, swipe downwards, and then tap Device control. Nearby connected devices and SmartThings devices and scenes will appear.
2Select a nearby device or a SmartThings device to control it, or select a scene to launch it.
30
Loading...