


 Loading...
A N D R O I D T A B L E T
User Manual
Please read this manual before operating your device and keep it for future reference.

Warning! This product contains chemicals known to the State of California to cause cancer and reproductive toxicity.
Intellectual Property
All Intellectual Property, as defined below, owned by or which is otherwise the property of Samsung or its respective suppliers relating to the SAMSUNG Galaxy Tab, including but not limited to, accessories, parts, or software relating there to (the “Galaxy Tab System”), is proprietary to Samsung and protected under federal laws, state laws, and international treaty provisions. Intellectual Property includes, but is not limited to, inventions (patentable or unpatentable), patents, trade secrets, copyrights, software, computer programs, and related documentation and other works of authorship. You may not infringe or otherwise violate the rights secured by the Intellectual Property. Moreover, you agree that you will not (and will not attempt to) modify, prepare derivative works of, reverse engineer, decompile, disassemble, or otherwise attempt to create source code from the software. No title to or ownership in the Intellectual Property is transferred to you. All applicable rights of the Intellectual Property shall remain
with SAMSUNG and its suppliers.
Open Source Software
Some software components of this product incorporate source code covered under GNU General Public License (GPL), GNU Lesser General Public License (LGPL), OpenSSL License, BSD License and other open source licenses. To obtain the source code covered under the open source licenses, please visit:
http://opensource.samsung.com.
GEN_SM-T530NU_UM_Eng_NC4_TN_040114_F3
Disclaimer of Warranties; Exclusion of Liability
EXCEPT AS SET FORTH IN THE EXPRESS WARRANTY CONTAINED ON THE WARRANTY PAGE ENCLOSED WITH THE PRODUCT, THE PURCHASER TAKES THE PRODUCT "AS IS", AND SAMSUNG MAKES NO EXPRESS OR IMPLIED WARRANTY OF ANY KIND WHATSOEVER WITH RESPECT TO THE PRODUCT, INCLUDING BUT NOT LIMITED TO THE MERCHANTABILITY OF THE PRODUCT OR ITS FITNESS FOR ANY PARTICULAR PURPOSE OR USE; THE DESIGN, CONDITION OR QUALITY OF THE PRODUCT; THE PERFORMANCE OF THE PRODUCT; THE WORKMANSHIP OF THE PRODUCT OR THE COMPONENTS CONTAINED THEREIN; OR COMPLIANCE OF THE PRODUCT WITH THE REQUIREMENTS OF ANY LAW, RULE, SPECIFICATION OR CONTRACT PERTAINING THERETO. NOTHING CONTAINED IN THE INSTRUCTION MANUAL SHALL BE CONSTRUED TO CREATE AN EXPRESS OR IMPLIED WARRANTY OF ANY KIND WHATSOEVER WITH RESPECT TO THE PRODUCT. IN ADDITION, SAMSUNG SHALL NOT BE LIABLE FOR ANY DAMAGES OF ANY KIND RESULTING FROM THE PURCHASE OR USE OF THE PRODUCT OR ARISING FROM THE BREACH OF THE EXPRESS WARRANTY, INCLUDING INCIDENTAL, SPECIAL OR CONSEQUENTIAL DAMAGES, OR LOSS OF ANTICIPATED PROFITS OR BENEFITS.
Modification of Software
SAMSUNG IS NOT LIABLE FOR PERFORMANCE ISSUES OR INCOMPATIBILITIES CAUSED BY YOUR EDITING OF REGISTRY SETTINGS, OR YOUR MODIFICATION OF OPERATING SYSTEM SOFTWARE.
USING CUSTOM OPERATING SYSTEM SOFTWARE MAY CAUSE YOUR DEVICE AND APPLICATIONS TO WORK IMPROPERLY. YOUR CARRIER MAY NOT PERMIT USERS TO DOWNLOAD CERTAIN SOFTWARE, SUCH AS CUSTOM OS.
Samsung Electronics America (SEA), Inc
Address: 85 Challenger Road
Ridgefield Park,
New Jersey
07660
Toll Free 1-800-SAMSUNG
Telephone:
Internet www.samsung.com
Address:
©2014 Samsung Telecommunications America, LLC. Samsung is a registered trademark of Samsung Electronics Co., Ltd.
Do you have questions about your Samsung Mobile Device?
For 24 hour information and assistance, we offer a new FAQ/ARS System (Automated Response System) at: www.samsung.com/us/support
The actual available capacity of the internal memory is less than the specified capacity because the operating system and default applications occupy part of the memory. The available capacity may change when you upgrade the device.
The Bluetooth® word mark, figure mark (stylized “B Design”), and combination mark (Bluetooth word mark and “B Design”) are registered trademarks and are wholly owned by the Bluetooth SIG.
microSDTM, microSDHCTM, and the microSD logo are Trademarks of the SD Card Association.
Google, the Google logo, Android, the Android logo, Google Play, Gmail, Google Mail, Google Maps, Google Music, Google Talk, Hangouts, Picasa, YouTube and other marks are trademarks of Google Inc.
Wi-Fi is a registered trademark of the Wireless Fidelity Alliance, Inc.
Peel and the Peel logo are marks owned by Peel Technologies, Inc. and may be registered.

Table of Contents
Section 1: Getting Started ........................... |
4 |
Understanding This User Manual . . . . . . . . . . . . 4
Battery . . . . . . . . . . . . . . . . . . . . . . . . . . . . . . . 5
Turning Your Device On and Off . . . . . . . . . . . . . 7
Setting Up Your Device . . . . . . . . . . . . . . . . . . . 7
Memory Card . . . . . . . . . . . . . . . . . . . . . . . . . . 8
Galaxy Tab Accessories . . . . . . . . . . . . . . . . . . . 8
Securing Your Device . . . . . . . . . . . . . . . . . . . . 8
Holding the Device . . . . . . . . . . . . . . . . . . . . . . 9
Section 2: Understanding Your Device ..... |
10 |
Features . . . . . . . . . . . . . . . . . . . . . . . . . . . . . 10
Front and Sides . . . . . . . . . . . . . . . . . . . . . . . . 11
Back, Top, and Bottom . . . . . . . . . . . . . . . . . . 12
Home Screen . . . . . . . . . . . . . . . . . . . . . . . . . 13
Navigating Your Device . . . . . . . . . . . . . . . . . . 15
Using the Touch Screen . . . . . . . . . . . . . . . . . . 16
Multi Window . . . . . . . . . . . . . . . . . . . . . . . . . 19
Notifications . . . . . . . . . . . . . . . . . . . . . . . . . . 21
Status Bar . . . . . . . . . . . . . . . . . . . . . . . . . . . . 23
Folders . . . . . . . . . . . . . . . . . . . . . . . . . . . . . . 25
Wallpapers . . . . . . . . . . . . . . . . . . . . . . . . . . . 25
Apps Screen . . . . . . . . . . . . . . . . . . . . . . . . . .26
Task Manager . . . . . . . . . . . . . . . . . . . . . . . . .27
Screen Capture . . . . . . . . . . . . . . . . . . . . . . . .27
Help . . . . . . . . . . . . . . . . . . . . . . . . . . . . . . . . .27
Entering Text . . . . . . . . . . . . . . . . . . . . . . . . . .28
Section 3: Accounts and Contacts ........... |
33 |
Accounts . . . . . . . . . . . . . . . . . . . . . . . . . . . . .33
Your Google Account . . . . . . . . . . . . . . . . . . . .34
Your Samsung Account . . . . . . . . . . . . . . . . . .34
Contacts . . . . . . . . . . . . . . . . . . . . . . . . . . . . .34
Groups . . . . . . . . . . . . . . . . . . . . . . . . . . . . . . .38
Favorites . . . . . . . . . . . . . . . . . . . . . . . . . . . . .39
Section 4: Messaging ............................... |
41 |
Types of Messages . . . . . . . . . . . . . . . . . . . . . |
41 |
Email . . . . . . . . . . . . . . . . . . . . . . . . . . . . . . . . |
41 |
Gmail . . . . . . . . . . . . . . . . . . . . . . . . . . . . . . . . |
44 |
Hangouts . . . . . . . . . . . . . . . . . . . . . . . . . . . . . |
45 |
Google+ . . . . . . . . . . . . . . . . . . . . . . . . . . . . . |
45 |
Section 5: Multimedia ............................... |
46 |
Listening to Music . . . . . . . . . . . . . . . . . . . . . .46 Play Music . . . . . . . . . . . . . . . . . . . . . . . . . . . .46
1
Music Player . . . . . . . . . . . . . . . . . . . . . . . . . 47
WatchON . . . . . . . . . . . . . . . . . . . . . . . . . . . . 53
Section 6: Camera and Video ................... |
54 |
Camera . . . . . . . . . . . . . . . . . . . . . . . . . . . . . |
54 |
Gallery . . . . . . . . . . . . . . . . . . . . . . . . . . . . . . |
59 |
Video . . . . . . . . . . . . . . . . . . . . . . . . . . . . . . . |
61 |
YouTube . . . . . . . . . . . . . . . . . . . . . . . . . . . . |
62 |
Section 7: Applications ............................ |
63 |
Updating Applications . . . . . . . . . . . . . . . . . . 63
GPS Applications . . . . . . . . . . . . . . . . . . . . . . 63
Accessing Applications . . . . . . . . . . . . . . . . . 64
Alarm . . . . . . . . . . . . . . . . . . . . . . . . . . . . . . . 64
Calculator . . . . . . . . . . . . . . . . . . . . . . . . . . . 65
Calendar . . . . . . . . . . . . . . . . . . . . . . . . . . . . 65
Camera . . . . . . . . . . . . . . . . . . . . . . . . . . . . . 67
Chrome . . . . . . . . . . . . . . . . . . . . . . . . . . . . . 67
Contacts . . . . . . . . . . . . . . . . . . . . . . . . . . . . 67
Drive . . . . . . . . . . . . . . . . . . . . . . . . . . . . . . . 67
Dropbox . . . . . . . . . . . . . . . . . . . . . . . . . . . . . 68
Email . . . . . . . . . . . . . . . . . . . . . . . . . . . . . . . 68
Gallery . . . . . . . . . . . . . . . . . . . . . . . . . . . . . . 68
Gmail . . . . . . . . . . . . . . . . . . . . . . . . . . . . . . . 68
Google . . . . . . . . . . . . . . . . . . . . . . . . . . . . . . 68
Google Settings . . . . . . . . . . . . . . . . . . . . . . . 69
Google+ . . . . . . . . . . . . . . . . . . . . . . . . . . . . . 69
Hancom Viewer . . . . . . . . . . . . . . . . . . . . . . . 69
Hangouts . . . . . . . . . . . . . . . . . . . . . . . . . . . . 69
Help . . . . . . . . . . . . . . . . . . . . . . . . . . . . . . . . 69
Internet . . . . . . . . . . . . . . . . . . . . . . . . . . . . . 70
Maps . . . . . . . . . . . . . . . . . . . . . . . . . . . . . . . 70
Memo . . . . . . . . . . . . . . . . . . . . . . . . . . . . . . 70
Music . . . . . . . . . . . . . . . . . . . . . . . . . . . . . . . 71
My Files . . . . . . . . . . . . . . . . . . . . . . . . . . . . . 71
Netflix . . . . . . . . . . . . . . . . . . . . . . . . . . . . . . 72
Photos . . . . . . . . . . . . . . . . . . . . . . . . . . . . . . 72
Play Books . . . . . . . . . . . . . . . . . . . . . . . . . . . 73
Play Games . . . . . . . . . . . . . . . . . . . . . . . . . . 73
Play Movies & TV . . . . . . . . . . . . . . . . . . . . . . 73
Play Music . . . . . . . . . . . . . . . . . . . . . . . . . . . 73
Play Newsstand . . . . . . . . . . . . . . . . . . . . . . . 74
Play Store . . . . . . . . . . . . . . . . . . . . . . . . . . . . 74
S Voice . . . . . . . . . . . . . . . . . . . . . . . . . . . . . . 74
Samsung Apps . . . . . . . . . . . . . . . . . . . . . . . . 75
Screen Saver . . . . . . . . . . . . . . . . . . . . . . . . . 75
Settings . . . . . . . . . . . . . . . . . . . . . . . . . . . . . 75
Video . . . . . . . . . . . . . . . . . . . . . . . . . . . . . . . 75
Voice Search . . . . . . . . . . . . . . . . . . . . . . . . . 76
WatchON . . . . . . . . . . . . . . . . . . . . . . . . . . . . 76
2
World Clock . . . . . . . . . . . . . . . . . . . . . . . . . . . 76
YouTube . . . . . . . . . . . . . . . . . . . . . . . . . . . . . 77
Section 8: Connections ............................. |
78 |
Wi-Fi . . . . . . . . . . . . . . . . . . . . . . . . . . . . . . . . 78 Bluetooth . . . . . . . . . . . . . . . . . . . . . . . . . . . . 82 Managing Downloads . . . . . . . . . . . . . . . . . . . 87 Samsung Kies . . . . . . . . . . . . . . . . . . . . . . . . . 89 Synchronizing with Windows Media Player . . . 89 Connecting as a Mass Storage Device . . . . . . . 89
Section 9: Settings .................................... |
90 |
About Settings . . . . . . . . . . . . . . . . . . . . . . . . . 90
Connections . . . . . . . . . . . . . . . . . . . . . . . . . . 91
Wi-Fi . . . . . . . . . . . . . . . . . . . . . . . . . . . . . . . . 91
Bluetooth . . . . . . . . . . . . . . . . . . . . . . . . . . . . 91
Airplane Mode . . . . . . . . . . . . . . . . . . . . . . . . . 92
Data Usage . . . . . . . . . . . . . . . . . . . . . . . . . . . 92
Location Services . . . . . . . . . . . . . . . . . . . . . . 93
More Networks . . . . . . . . . . . . . . . . . . . . . . . . 94
Nearby Devices . . . . . . . . . . . . . . . . . . . . . . . . 96
Screen Mirroring . . . . . . . . . . . . . . . . . . . . . . . 96
Device . . . . . . . . . . . . . . . . . . . . . . . . . . . . . . . 97
Sound . . . . . . . . . . . . . . . . . . . . . . . . . . . . . . . 97
Display . . . . . . . . . . . . . . . . . . . . . . . . . . . . . . 98
Multi Window . . . . . . . . . . . . . . . . . . . . . . . . . 99
Lock Screen . . . . . . . . . . . . . . . . . . . . . . . . . .99
Wallpaper . . . . . . . . . . . . . . . . . . . . . . . . . . .102
Font . . . . . . . . . . . . . . . . . . . . . . . . . . . . . . . .102
Notification Panel . . . . . . . . . . . . . . . . . . . . . .102
Accessibility . . . . . . . . . . . . . . . . . . . . . . . . .103
Blocking Mode . . . . . . . . . . . . . . . . . . . . . . . .105
Controls . . . . . . . . . . . . . . . . . . . . . . . . . . . . .106
Language and Input . . . . . . . . . . . . . . . . . . . .106
Smart Screen . . . . . . . . . . . . . . . . . . . . . . . .110
General . . . . . . . . . . . . . . . . . . . . . . . . . . . . .110
Accounts . . . . . . . . . . . . . . . . . . . . . . . . . . . .110
Cloud . . . . . . . . . . . . . . . . . . . . . . . . . . . . . . .112
Backup and Reset . . . . . . . . . . . . . . . . . . . . .113
Date and Time . . . . . . . . . . . . . . . . . . . . . . . .114
Accessory . . . . . . . . . . . . . . . . . . . . . . . . . . .114
Application Manager . . . . . . . . . . . . . . . . . . .115
Default Applications . . . . . . . . . . . . . . . . . . . .117
Users . . . . . . . . . . . . . . . . . . . . . . . . . . . . . . .117
Battery . . . . . . . . . . . . . . . . . . . . . . . . . . . . .119
Power Saving Mode . . . . . . . . . . . . . . . . . . . .120
Storage . . . . . . . . . . . . . . . . . . . . . . . . . . . . .120
Security . . . . . . . . . . . . . . . . . . . . . . . . . . . . .122
About Device . . . . . . . . . . . . . . . . . . . . . . . . .126
Index ......................................................... |
128 |
3

Section 1: Getting Started
This section helps you to quickly start using your device.
Understanding This User Manual
The sections of this manual generally follow the features of your device. A robust index for features begins on page 128.
Also included is important safety information, beginning on page 128, that you should know before using your device.
This manual gives navigation instructions according to the default display settings. If you select other settings, navigation steps may be different.
Unless otherwise specified, all instructions in this manual assume that you are starting from a Home screen. To get to a Home screen, you may need to unlock the device. For more information, refer to “Securing Your Device” on page 8.
Note: Instructions in this manual are based on default settings and may vary from your device depending on the software version on your device and any changes to the device’s settings.
Note: Unless stated otherwise, instructions in this user manual start with the device unlocked, at the Home screen. All screen images in this manual are simulated. Actual displays may vary depending on the software version of your device and any changes to the device’s settings.
Special Text
In this manual, some text is set apart from the rest. This special text is intended to point out important information, share quick methods for activating features, define terms, and more. The definitions for these methods are as follows:
•Note: Presents alternative options for the current feature, menu, or sub-menu.
•Tip: Provides quick or innovative methods or useful shortcuts.
•Important!: Points out important information about the current feature that could affect performance.
•Warning!: Brings important information to your attention that can help to prevent loss of data or functionality or damage to your device.
Getting Started |
4 |
Text Conventions
This manual provides condensed information about how to use your device. To make this possible, the following text conventions are used to represent often-used steps:
Arrows are used to represent the sequence of selecting successive options inlonger,or repetitive, procedures.
For example:
From a Home screen, touch 


 Settings
Connections tab Wi-Fi.
Certain features and options use an OFF/ONbutton.
For example:
Touch the OFF/ON button to turn Bluetooth ON  or OFF
  .
.
Battery
Your device is powered by a rechargeable, standard Li-Ion battery. A Wall/USB Charger (Charging Head and USB cable) are included with the device for charging the battery.
Warning! Use only approved charging devices. Approved accessories are designed to maximize battery life. Using other accessories may invalidate your warranty and may cause damage.
Battery Indicator
The Battery icon 
 in the Status Bar shows the battery power level. When battery power is 15% or less, your device prompts you to charge the battery. If you continue to operate the device without charging, the device powers off. For battery use information, see “About Device” on page 126.
5

Charging the Battery
Your device comes with a Wall/USB Charger (Charging Head and USB cable) to charge your device from any standard AC power outlet.
Note: The battery comes partially charged. You must fully charge the battery before using your device for the first time. After the first charge, you can use the device while charging.
1.Insert the USB cable into the device’s Charger/ Accessory Port.
2.Insert the USB cable into the Charging Head.
3.Plug the Charging Head into a standard AC power outlet.
Warning! While the device is charging, if the touch screen does not function due to an unstable power supply, unplug the USB power adapter from the power outlet or unplug the USB cable from the device.
4.When charging is complete, unplug the Charging Head from the power outlet and remove the USB cable from the device.
Note: You cannot charge the battery using the USB cable and your PC.
Getting Started |
6 |
Note: If the battery is completely discharged, you cannot turn on the device, even with the USB power adapter connected. Allow a depleted battery to charge for a few minutes before you try to turn on the device.
Turning Your Device On and Off
Turning Your
Device On
Press and hold the
Power/Lock Key.
For more information, refer to
“Unlocking the Device” on page 9.
Turning Your
Device Off
1. Press and hold the
Power/Lock Key.
2.On the Device options menu, touch Power off OK.
Setting Up Your Device
The first time you turn your device on, the Setup Wizard will guide you through the basics of setting up your device.
Follow the prompts to choose a default language, set up accounts, choose location services, and learn more about your device.
Touch Skip to skip some screens, or touch Back to redisplay them.
Note: If your screen dims or turns off, press the Power/Lock Key to continue.
7
Memory Card
Your device supports removable microSD or microSDHC memory cards with maximum capacities of 64 GB (depending on the memory card manufacturer and type). Memory cards are used to store music, photos, videos, and other files.
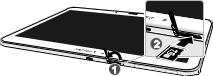
Installing a Memory Card
1.Open the memory card slot cover and turn to expose the slot.
2.With the gold contacts facing down, carefully slide the memory card into the slot, pushing gently until it clicks into place.
3. Close the memory card slot cover.
Galaxy Tab Accessories
To find accessories for your Galaxy Tab:
1.Go to samsung.com/us/mobile/galaxy-tab- accessories.
2.Use your model number to find compatible accessories.
Securing Your Device
By default, the device locks automatically when the screen times out or you can lock it manually.
Unlock the tablet by swiping your finger across the screen. This is the default Screen lock (Swipe), and offers no security.
Prevent others from using or accessing personal data and information stored in the device by using a secure Screen Lock.
For more information about creating and enabling a secure Screen Lock, see “Lock Screen” on page 99.
For other settings related to securing your device, see
“Security” on page 122.
Getting Started |
8 |
Locking the Device Manually
Press the Power/Lock Key.
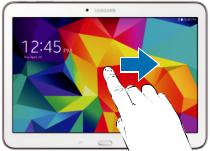
Unlocking the Device
1.Press the Power/Lock Key. The Lock screen displays.
2.Swipe across the screen as shown. This is the default Swipe screen lock and offers no security.
Holding the Device
Your device’s internal antenna is located along the top back of the device. Do not block the antenna; doing so may affect signal quality and may cause the device to operate at a higher power level than is necessary.
9

Section 2: Understanding Your Device
This section outlines key features of your device and describes the screen and the icons that appear when the device is in use. It also shows how to navigate through the device.
Features
•10.1-inch WXGA (1280x800) TFT (PLS) LCD touch screen
•Android Version: Kit Kat 4.4
•1.2 GHz quad-core processors
•Full HTML Web Browser
•Bluetooth 4.0 Wireless technology. For more information, refer to “Bluetooth” on page 82.
•Built-in Wi-Fi technology (802.11 a/b/g/n)
•3.2 megapixel camera and camcorder, plus 1.2 megapixel full HD forward-facing camera for video chat
•Full integration of Google applications (Gmail, Google Now, Google Settings, Google Maps, YouTube, and Voice Search)
•Photo gallery
•Messaging Features:
–Gmail
–Email (corporate and personal)
–Google Hangouts (Instant Messaging and Video Chat)
•HD Video Player (1080p) that supports MP4, 3GP, WMV, ASF, AVI, FLV, MKV, and WEBM
•Music player that supports MP3, M4A, 3GA, AAC, OGG, WAV, WMA, and FLAC
•Support for microSHD and microSDHC memory cards
•Preloaded applications such as Google Play Books, Google Play Games, Google Play Movies & TV, Google Play Music, Google Play Newsstand, Play Store, and more.
Warning! This device does not support some USB storage media devices. For more information, refer to
“Galaxy Tab Accessories” on page 8.
Understanding Your Device |
10 |
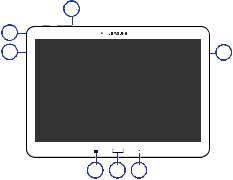
Front and Sides
The following items can be found on the front and sides of your device.
1
6
2 |
2 |
1.Front-Facing Camera Lens: Takes photos or records videos.
2.Speaker: Plays music, notification tones, and audio.
3.Back Key: Return to the previous screen or option.
4.Home Key: Display the central Home Screen.
5.Recent Key: Touch and hold to display recently used apps.
6.3.5mm Headset Jack: Plug in for headphones.
5 3 3
11
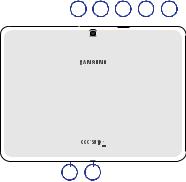
Back, Top, and Bottom
The following items can be found on the back, top, and bottom of your device.
1 |
2 |
3 |
4 |
5 |
|||||
|
|
|
|
|
|
|
|
|
|
|
|
|
|
|
|
|
|
|
|
|
|
|
|
|
|
|
|
|
|
7 6
1.Camera: Takes photos or recording videos.
2.Infrared Blaster: Controls other devices.
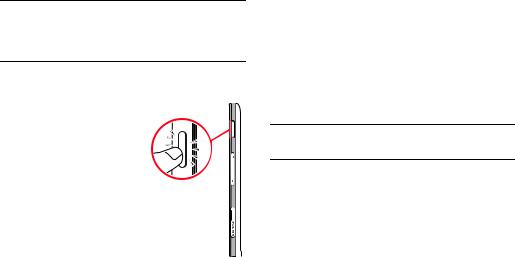
3.Memory Card Slot: Install a memory card for storage of files (not included).
4.Volume Key: From a Home Screen, press to adjust master volume. During music playback, press to adjust volume.
5.Power/Lock Key: Press and hold to turn the device on or off. Press to lock the device or to wake the screen for unlocking.
6.Charger/Accessory Port: Plug in a USB cable for charging or to sync music and files.
7.Microphone: Records audio.
Understanding Your Device |
12 |
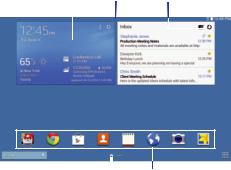
Home Screen
The Home screen is the starting point for using your device. It consists of:
•Status Bar: The Status Bar displays notifications on the left side and status indicators on the right side.
Note: The Status Bar is sometimes hidden. To display it, touch and drag the top of the screen down. It will disappear after a view seconds.
•Notifications: Notification icons appear on the Status Bar at the top of the screen to report calendar events, device status, and more. Drag down from the Status Bar to open the Notification Panel.
•Widgets: Applications that run on the Home screen. Some widgets are found on the Home screen by default.
•Refresh Content: Touch to refresh the content of the Home Screen App.
•Status indicators: Display your current network status, battery charge, and time.
•Google Search: Search the web by typing or speaking. For more information, refer to “Google” on page 68.
•Current Screen: Shows which Home screen is presently displayed.
•App Shortcuts: Touch to launch your favorite apps.
•App Screen: Access to all your apps and widgets.
Refresh Status
Notifications Widgets Status Bar Content Indicators
|
|
|
|
|
|
|
|
|
|
|
|
|
|
|
|
|
|
|
|
|
|
|
|
|
App |
|
|
|
|
|
Current |
Apps |
|||||||
|
Search |
Panel |
Shortcuts |
Screen |
|||||
13
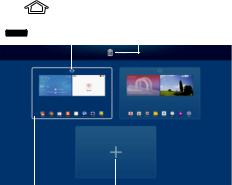
Extended Home Screen
The Home screen consists of the Home panel, plus panels that extend beyond the display width to provide more space for adding shortcuts, widgets and folders.
Slide your finger horizontally across the screen to scroll to the left or right side panels. As you scroll, the indicator at the bottom of the display shows your current position.
Home Screen Panels
You can customize the Home screen to include up to seven panels.
From a Home screen, pinch the screen from diagonal corners to the center to display the editing screen.
Set this panel as the main |
|
|
|
|
|
||||
Home screen (the panel |
|
|
|
|
|
||||
with |
|
will display |
|
Touch and hold a |
|||||
when you press the |
|
panel, and then drag |
|||||||
|
Home Key) |
|
it here to delete it |
||||||
|
|
|
|
|
|
|
|
|
|
|
|
|
|
|
|
|
|
|
|
|
|
|
|
|
|
|
|
|
|
|
|
|
|
|
|
|
|
|
|
Touch and hold a panel, and then drag it to a different location
Add a new panel
(up to a total of seven)
Understanding Your Device |
14 |

Navigating Your Device
Use command keys and the touch screen to navigate.
Command Keys
Recent Apps
To display a list of recently used apps:
Touch  Recent apps. Touch an app to open it.
To close an app:
Drag the app preview up or down.
To end all running apps:
Touch  Close all.
To manage running apps, downloads, device memory, and storage:
Touch  Recent apps
  Task Manager.
For more information, refer to “Task Manager” on page 27.
Home
To display the main Home screen:
Touch  Home.
Home.
To launch Google Now:
Touch and hold  Home.
Home.
Back
To return to the previous screen, option, or step:
Touch  Back.
Back.
15
Using the Touch Screen
Use only your fingers or a stylus with the touch screen.
Caution! Do not allow the touch screen to come into contact with other electrical devices. Electrostatic discharges can cause the touch screen to malfunction.
To avoid damaging the touch screen, do not touch it with anything sharp or apply excessive pressure to it with your fingertips.
Leaving the touch screen idle for extended periods may result in afterimages (screen burn-in) or ghosting. Turn off the touch screen when you do not use the device.
Finger Gestures
Touching
To open an application, to select a menu item, to press an onscreen button, or to enter a character using the onscreen keyboard, touch it with a finger.
Touching and Holding
Touch and hold an item for more than 2 seconds to access available options.
Dragging
To move an icon, thumbnail, or preview to a new location, touch and hold it and drag it to the target position.
Double-Tapping
Double-tap on a web page, map, or image to zoom in a part. Double-tap again to zoom out again.
Swipe
Swipe left or right on the Home screen or the Applications screen to see another panel. Swipe up or down to scroll through a web page or a list, such as contacts.
Pinching and Spreading
Spread two fingers apart on a web page, map, or image to zoom in. Pinch to zoom out.
Understanding Your Device |
16 |
Control Motions
Simple motions allow easy control of the device.
Before using motions, make sure the motion feature is activated.
1.From a Home screen, touch 


 Settings Controls tab Palm Motion.
2.Touch  to turn the feature ON.
Note: Excessive shaking or impact to the device may result in unintended inputs. Control motions properly.
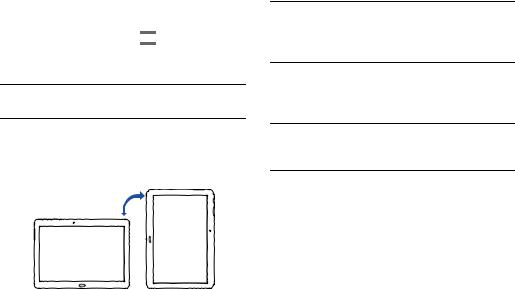
Rotating the Screen
Many applications allow display in either portrait or landscape orientation. Rotating the device causes the display to automatically adjust to fit the new screen orientation.
To prevent the display from rotating automatically, open the Notification Panel and deselect Screen rotation.
Note: Some applications do not allow screen rotation. Some applications display a different screen depending on the orientation. For example, the calculator turns into a scientific calculator when rotated to landscape.
Tilting
Touch and hold two points on the screen, and then tilt the device back and forth to zoom in or out.
Note: To move an icon to a new location, touch and hold it and drag it to the target position. For more information, refer to “Dragging” on page 16.
Panning to Browse
When an image is zoomed in, touch and hold a point on the screen, and then move the device in any direction to browse the image.
17

Sweeping
Sweep your hand across the screen to capture a screenshot. The image is saved in  Gallery Screenshots album.
Covering
Cover the screen with a palm to pause media playback.
Capturing Screenshots
Press and hold the Power/Lock Key and  Home to capture and save an image of the current screen.
Note: A copy of the screenshot is automatically saved to the clipboard.
To view the screen shots:
1.From a Home screen, touch 


 My Files.
2.Touch Categories Images.
3.Touch a screen capture file to display it.
Understanding Your Device |
18 |

Multi Window
Multi task by using two applications at the same time.
Note: Only applications displayed on the Multi window panel can be used with the Multi window feature.
Activate Multi Window
1.From a Home screen, touch 


 Settings Device tab.
2.Touch Multi window.
3.If necessary, touch  to turn Multi window ON.
4.If desired, touch Open in multi window view to automatically view content in Multi window when you open files from My Files or Video player, or attachments from email.
Note: You can also activate Multi window from the Notification Panel. For more information, refer to “Notification Panel” on page 21.
|
|
App 2 |
Multi Window |
||
App 1 |
|
Panel |
|||
|
|
|
|
|
|
|
|
|
|
|
|
|
|
|
|
|
|
|
|
|
|
|
|
|
|
|
|
|
|
|
|
|
|
|
|
Multi Window |
Panel |
Controls |
Controls |
19
Multi Window Panel
Multi window apps are displayed on the Multi window panel.
Display the Multi window panel:
1.Activate Multi window (see “Activate Multi Window” on page 19).
2.Swipe the right edge of the screen toward the center to display the Multi window panel. After a few seconds, the panel will be hidden again.
Using Multi Window Applications
You can use Multi window to run two applications at the same time.
1.With Multi window activated, swipe the right edge of the screen toward the center to display the Multi window panel.
2.Drag an app off the panel and release. Drag another app off of the panel and release it into one of the highlighted windows.
Window Controls
Select an application window and touch  in the middle of the windows. Window controls appear:
Switch Multi window applications.
Share items between the application windows. Drag an item to share from one window to another. Some applications may not support this feature.
Maximize the application.
Close the application.
Panel Configuration
You can rearrange the apps on the Multi window panel, add new apps, or remove apps.
On the Multi window panel:
1.Touch  to access the panel controls.
2.Touch  Edit.
Edit.
Understanding Your Device |
20 |

Configuring Apps
To remove an app from the panel:
Touch and drag it off of the panel and place it in the storage area.
To add an app to the panel:
Touch and drag it from the storage area to the panel.
To relocate an app:
Touch and drag it to a new location.
To save your changes:
Touch Done.
To download new Multi window apps:
From a Home screen, touch 


 Play Store.
Notifications
Notification icons appear on the Status Bar at the top of the screen to report calendar events, device status, and more. For details about these notifications, open the Notification Panel.
Notification Panel
To view the Notification Panel:
1.Swipe downward from the top of the screen to display the Status Bar.
2.Swipe downward again on the Status Bar to display the Notification Panel.
3.Scroll down the list to see additional notification details.
4.Touch an item to open it.
5.To clear a single notification, drag the notification left or right. Touch  to clear all notifications.
6.To close the Notification Panel, swipe upward from the bottom of the screen or touch  Back.
Back.
21

Accessing Additional Panel Functions
In addition to notifications, the Notification Panel also provides quick and ready access to separate device functions. These can be quickly activated or deactivated by toggling them on or off. You can choose the functions that display.
From the Notification Panel:
1.To go to Settings, touch  Settings. For more information, refer to “Settings” on page 90.
2.Touch 
 to display additional options.
The following functions can either be activated (green) or deactivated (gray): Wi-Fi, GPS, Sound/Mute, Screen rotation, Bluetooth, Reading mode,
Blocking mode, Power saving, Multi window,
Screen Mirroring, Smart stay, Smart pause, Sync, and Airplane mode.
3.Touch  and locate the Notification Panel area at the bottom of the Notification Panel screen.
•In a single motion, touch and hold a desired function, such as Airplane mode, then drag it to the top two rows.
•Touch Brightness and volume to create a check mark if you want to be able to adjust the screen brightness and volume from the Notification Panel.
•Touch  Back to exit the Notification Panel.
4.Touch 
 to display only your primary functions.
5.To set the display brightness, touch the Brightness slider and drag it to set the brightness or touch Auto to
allow the device to set brightness automatically based on available light and battery charge status. For more information, refer to “Display” on page 98.
6.To adjust the system volume, touch the  Sound slider and drag it to set the Notification sound level or touch
  to set the level for Notifications, Media, and System sounds. For more information, refer to “Sound”
on page 97.
To displays notifications
Touch a notification entry to display the details. Touch
 to remove Notification Icons from the Status Bar.
To close the Notification Panel:
Touch  Back, or swipe up.
Understanding Your Device |
22 |
Status Bar
The Status Bar at the top of the home screen provides device information (such as network status, battery charge, and time) on the right side and notification alerts on the left.
To display the Status Bar:
From a Home screen, swipe downward from the top of the screen. The grey Status Bar will appear. It will disappear after a few seconds.
Status Bar Icons
Some common status and notification icons are shown below.
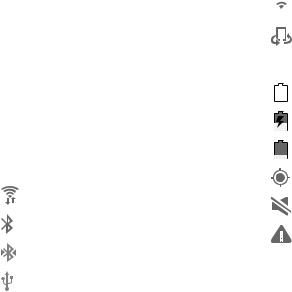
Connectivity Icons
Wi-Fi connected
Bluetooth enabled
Bluetooth paired
Connected to computer
 Wi-Fi Direct is active and your tablet is connected
 to another device.
The Nearby devices setting is enabled.
Device Status Icons
Battery full
Battery charging
Battery low
GPS enabled
Mute mode enabled
Error occurred or caution required
23
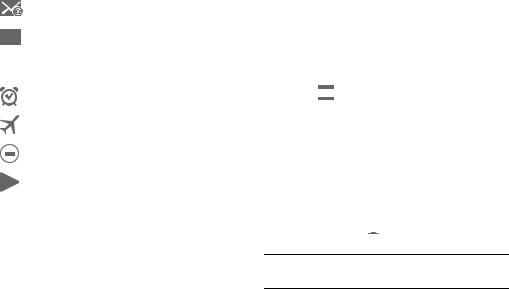
Messaging Icons
New email
New Gmail
Other Icons
Alarm activated
Airplane mode activated
Blocking mode activated
Music is playing.
Apps and Widgets
You can add, reposition, or remove shortcuts and widgets from the Home screen.
•Shortcuts: Icons on the Home screen that launch applications.
•Widgets: Self-contained applications. They appear as onscreen applications.
Adding a Shortcut or Widget
You can customize the Home screen by adding shortcuts and widgets.
1.From a Home screen, touch and hold on an empty area of the screen until the Home screen pop-up displays.
Touch Apps and Widgets.
– or –
Touch 


 to display the Apps screen.
2.For shortcuts, touch the Apps tab. For widgets, touch the Widgets tab.
3.Touch and hold the shortcut or widget, and then drag it to the Home screen and release.
Removing a Shortcut or Widget
Shortcuts and widgets can be removed from the Home screen.
Touch and hold the shortcut or widget until it detaches, and then drag it to  Remove and release.
Note: Removing a shortcut does not delete the application; it simply removes the shortcut from the Home screen.
Understanding Your Device |
24 |

Folders
Place folders on the Home screen to organize items.
Adding Folders
1.From a Home screen, touch and hold on an empty area of the screen until the Home screen pop-up appears.
2.Touch Folder.
3.Enter a name for the folder and touch OK.
Using Folders
Touch the folder to open it and access the shortcuts inside.
To add shortcuts to the folder, touch and hold the shortcut, and then drag it to the folder and release.
To delete a folder, touch and hold the folder until it detaches, and then drag it to  Remove and release.
Note: All shortcuts contained in the folder will also be deleted.
Wallpapers
You can choose a picture to display on the Home Screen, Lock screen, or on both the Home and Lock screens. Choose from preloaded wallpapers, or select a photo you have downloaded or taken with the Camera.
1.From a Home screen, touch and hold on an empty area of the screen until the Home screen pop-up displays.
2.Touch Home Screen, Lock screen, or Home and lock screens for options:
•Gallery: Access the Gallery to select a photo.
•Live wallpapers: Choose from pre-loaded interactive animated wallpapers (Home screen only).
•Photos: Access Google Photos to select a photo (Home screen only).
•Wallpapers: Choose from pre-loaded wallpaper images.
Note: You can also set the wallpaper in Settings. From a Home screen, touch 


 Settings Device tab
Wallpaper.
25
Loading...