


 Loading...
 SMT-i5210
Keyset User Guide
For OfficeServ™ 7000 Series Systems
05/2010

Copyright 2010 Samsung Telecommunications America.
All rights reserved. No part of this manual may be reproduced in any form or by any means—graphic, electronic or mechanical, including recording, taping, photocopying or information retrieval systems— without express written permission of the publisher of this material.
Samsung Telecommunications America reserves the right without prior notice to revise information in this guide for any reason. Samsung Telecommunications America also reserves the right without prior notice to make changes in design or components of equipment as engineering and manufacturing may warrant. Samsung Telecommunications America disclaims all liabilities for damages arising from the erroneous interpretation or use of information presented in this guide.
TABLE OF CONTENTS |
|
ABOUT THIS BOOK ...................................................................................................... |
1 |
SECTION 1. CAUTION AND PREPARATION .................................... |
2 |
CAUTION .............................................................................................................................. |
3 |
PREPARATION .................................................................................................................. |
4 |
Check the Contents of the Box ................................................................................ |
4 |
Phone Installation ...................................................................................................... |
4-5 |
Optional Equipment.................................................................................................. |
5-6 |
SECTION 2. PHONE FUNCTIONS.................................................................. |
7 |
SMT-i5210 LAYOUT .................................................................................................... |
8 |
Names and Functions .............................................................................................. |
8-9 |
KEY FUNCTIONS .......................................................................................................... |
10 |
Telephone Status Indicator ...................................................................................... |
10 |
Screen Structure .......................................................................................................... |
10 |
Text Input Method ...................................................................................................... |
11 |
Description of Icons.................................................................................................... |
12 |
Navigating the Menus................................................................................................ |
13 |
Navigation Button and Select Switch for FWD/DND/ABSENT MSG.......... |
13 |
SMT-i5210 SETUP ...................................................................................................... |
14 |
Initializing the SMT-i5210 ........................................................................................ |
14 |
Setup Mode .................................................................................................................. |
14 |
Easy Install Wizard ...................................................................................................... |
15 |
Selecting the Static IP Option ................................................................................ |
15 |
Setting Up Hot Desking (Idle Login) .................................................................... |
15 |
Configuration Menu Structure................................................................................ |
16 |
SECTION 3. FREQUENTLY USED |
|
FEATURE OPERATION .......................................................... |
17 |
EXTENSION LOG IN & OUT ................................................................................ |
18 |
PLACING CALLS............................................................................................................ |
18 |
ANSWERING CALLS .................................................................................................. |
19 |
PLACING A CALL ON HOLD .............................................................................. |
20 |
TRANSFERRING CALLS .......................................................................................... |
20 |

TRANSFERRING WITH CAMP-ON.................................................................. |
21 |
CALL WAITING .............................................................................................................. |
21 |
CONFERENCE CALLS................................................................................................ |
21 |
FORWARDING CALLS .............................................................................................. |
22 |
OTHER FEATURES AND FUNCTIONS .................................................. |
22-25 |
SECTION 4. PHONE FEATURES .................................................................... |
26 |
BASIC MENUS ................................................................................................................ |
27 |
Soft Button Structure ................................................................................................ |
27 |
Menu Soft Button ........................................................................................ |
27-36 |
Func. Soft Button ................................................................................................ |
36 |
AOM Soft Button ................................................................................................ |
37 |
SECTION 5. OFFICESERV 7000 SYSTEM FEATURES .......... |
38 |
OUTSIDE CALLS .......................................................................................................... |
39 |
Making Calls from AOM ............................................................................................ |
39 |
Universal Answer ........................................................................................................ |
39 |
Recall Dial Tone ............................................................................................................ |
39 |
Sending a Flash ............................................................................................................ |
39 |
Busy Line Queuing with Callback.......................................................................... |
39 |
Busy Station Callback ................................................................................................ |
40 |
Canceling Callback...................................................................................................... |
40 |
Busy Station Camp-On .............................................................................................. |
40 |
INTERCOM CALLS ...................................................................................................... |
42 |
Voice Announce Mode .............................................................................................. |
42 |
Auto Answer Mode .................................................................................................... |
42 |
Calling your System Operator ................................................................................ |
42 |
CALL PROCESSING .................................................................................................... |
43 |
System Hold .................................................................................................................. |
43 |
Exclusive Hold .............................................................................................................. |
43 |
Remote Hold ................................................................................................................ |
43 |
Hold Recall .................................................................................................................... |
44 |
Consultation Hold ...................................................................................................... |
44 |
Retrieving Calls Held at Another Station............................................................ |
44 |
Call Transfer .................................................................................................................. |
45 |
Transfer with Camp-On ............................................................................................ |
45 |
Transfer to Voice Mail ................................................................................................ |
46 |
Call Waiting.................................................................................................................... |
46 |
Call Forward Options ................................................................................................ |
46 |
Station Call Pickup ...................................................................................................... |
47 |
Group Call Pickup........................................................................................................ |
48 |
My Group Pickup ........................................................................................................ |
48 |
Privacy Release ............................................................................................................ |
48 |
DIALING FEATURES .................................................................................................. |
49 |
Speed Dialing................................................................................................................ |
49 |
Programming Personal Speed Dial Numbers .................................................. |
49 |
Directory Dialing.......................................................................................................... |
50 |
Last Number Redial .................................................................................................... |
51 |
Save Number with Redial ........................................................................................ |
51 |
Automatic Redial/Retry ............................................................................................ |
51 |
Pulse to Tone Changeover ...................................................................................... |
51 |
PAGING AND MESSAGING.................................................................................. |
52 |
Making and Internal Page ........................................................................................ |
52 |
Making an External Page.......................................................................................... |
52 |
All Page .......................................................................................................................... |
52 |
Meet Me Page .............................................................................................................. |
53 |
Call Park and Page ...................................................................................................... |
53 |
Messages—Set and Cancel .............................................................................. |
54-55 |
Returning Messages .................................................................................................. |
55 |
Programmed Messages ............................................................................................ |
55 |
CONVENIENCE FEATURES .................................................................................. |
56 |
Logging In and Out .................................................................................................... |
56 |
Do Not Disturb ............................................................................................................ |
56 |
One Time DND.............................................................................................................. |
56 |
Mute ................................................................................................................................ |
57 |
Background Music ...................................................................................................... |
57 |
Established Call Pick-Up............................................................................................ |
57 |
Door Phone Calls .................................................................................................. |
57-58 |
Executive/Secretary Hotline .................................................................................... |
58 |
Group Listening .......................................................................................................... |
59 |
Account Codes ............................................................................................................ |
59 |
Locking Your Keyset .................................................................................................. |
60 |
Manual Signalling........................................................................................................ |
60 |
Off-Hook Voice Announce ...................................................................................... |
61 |
OHVA Block.................................................................................................................... |
61 |
OHVA Reject .................................................................................................................. |
61 |
In Group/Out of Group.............................................................................................. |
62 |
CUSTOMIZING YOUR KEYSET.......................................................................... |
63 |
AME Password .............................................................................................................. |
63 |
Auto Camp-On ............................................................................................................ |
63 |
Select Ring Tone .......................................................................................................... |
63 |
Change Your Passcode .............................................................................................. |
63 |

Set Answer Mode (Intercom) .................................................................................. |
64 |
Set Answer Mode (CO) .............................................................................................. |
64 |
Automatic Hold............................................................................................................ |
64 |
Headset Operation...................................................................................................... |
64 |
Hot Keypad .................................................................................................................... |
65 |
Key Confirmation Tone.............................................................................................. |
65 |
Rejoining a Page .......................................................................................................... |
65 |
Ring Preference............................................................................................................ |
65 |
Display Speed Dial Name ........................................................................................ |
66 |
Caller ID Review All .................................................................................................... |
66 |
Secure OHVA ................................................................................................................ |
66 |
Configure Mobile Extensions (MOBEX) ........................................................ |
66-67 |
DISPLAY FEATURES .................................................................................................. |
68 |
Directory Information................................................................................................ |
68 |
Display Number Dialed ............................................................................................ |
68 |
Call Duration Timer .................................................................................................... |
68 |
Auto Timer .................................................................................................................... |
68 |
Timer Function ............................................................................................................ |
69 |
Viewing Station Message Indications.................................................................. |
69 |
Personal Speed Dial Names .................................................................................... |
69 |
Station Names .............................................................................................................. |
69 |
Managing Programmable Key Assignments .................................................... |
70 |
LCR with Clear .............................................................................................................. |
70 |
Backspace with LCR .................................................................................................... |
70 |
CALLER ID.......................................................................................................................... |
71 |
Selecting Your Caller ID Display ............................................................................ |
71 |
Viewing the Next Caller ID Call .............................................................................. |
72 |
Inquire Caller ID Park/Hold Info ............................................................................ |
72 |
FEATURE ACCESS CODES .................................................................................... |
73 |
SECTION 6. APPLICATIONS.............................................................................. |
74 |
SAMSUNG VOICEMAIL .......................................................................................... |
75 |
SVMi E-Series Subscriber Services Menu Diagram .................................. |
76–77 |
Accessing Your Mailbox ............................................................................................ |
78 |
Getting Started ............................................................................................................ |
79 |
Listen to your Messages ........................................................................................... |
79 |
Subscriber Services Menu ....................................................................................... |
79 |
Listening to Old or New Messages ...................................................................... |
80 |
Group New or Old Messages .................................................................................. |
81 |
Record and Send a Message .................................................................................. |
81 |
Access Manager .......................................................................................................... |
83 |
Personal Greetings...................................................................................................... |
84 |
Mailbox Administration ............................................................................................ |
87 |
Message Broadcast .................................................................................................... |
89 |
Personal Services ........................................................................................................ |
89 |
Personal Administration Settings ........................................................................ |
90 |
Keyset User Features ................................................................................................ |
91 |
Shortcuts ...................................................................................................................... |
93 |
Interactive Displays .................................................................................................... |
93 |
E-Mail Gateway (EMG) ........................................................................................ |
93–95 |
PERSONAL SPEED DIAL NUMBERS...................................................... |
96–97 |
ABOUT THIS BOOK
The new Samsung Multimedia Telephone SMT-i5210 keyset is part of the OfficeServ 7000 Series.
The SMT-i5210 keyset represents a new concept of Internet phone, in that it uses an IP address to Send/Receive voice and data. For voice communications, the SMTi5210 uses the data network line already in place in most offices and increasing number of homes.
This guide contains 6 sections: Section 1. Caution and Preparation, Section 2. Phone Functions, Section 3. Frequently Used Feature Operation, Section 4. Phone Settings, Section 5. OfficeServ 7000 System Features and Section 6. Applications. Please take the time to study this guide and to become familiar with the operation of your keyset. Keep this guide handy, as you may need to look up instructions for infrequently used features.
This book is written based on factory default settings, for the feature access codes. Sometimes, due to programming requirements, these codes may be changed. If you find that a feature code does not work as described in this book, please contact your installation and service company to determine the correct code.
1

SECTION 1.
CAUTION AND PREPARATION
CAUTION
•Read the installation instructions before connecting the system to its power source.
•If there is dirt or moisture on the pin contact surface of a power plug, pull out the plug and wipe it away with a cloth. If dirt or moisture remains on the product even after wiping, contact the service center.
•For the power connection port of the phone, use the supplied power adapter.(The power adapter is supplied separately.) Use of a power adapter that does not meet the specifications may cause the product to become damaged, to overheat, or to explode.
•Do not place the phone in a location with a lot of dust,in a location that is subject to severe changes in temperature, or near a heating device (cigarette heat, heater, etc.)
•Do not use or store flammable spray or materials near the phone.
•Do not place vases, flowerpots, cups, or a container of cosmetics or drugs near the phone.
•Installation of equipment must not route interconnecting cables or external power supply sources outdoors.
•The LAN cable to the network should be connected to the LAN port of a phone, NOT to the PC connection port.
•Use a soft and dry cloth when cleaning the phone. Do not spray water directly onto the product; and do not use chemicals such as wax, benzene, alcohol, thinner, mosquito killer, perfume spray, lubricant, detergent, etc.
2 |
3 |

PREPARATION
CHECK THE CONTENTS OF THE BOX
Check if the product package box includes all the components as follows:
•Phone body including a base
•Handset
•Handset cord
•Patch cable
NOTE: Power transformer sold separately. If any of these items are missing or damaged, please contact your dealer.
PHONE INSTALLATION
Connecting the Phone Body
1Remove the base of the phone by pressing the [Push] mark on the top of the base.
Note: The base can be used to adjust the phone angle in the high or low position.
2Connect a handset to the handset port of the phone.
3 |
OPTIONAL: Connect the cable |
|
|
|
through the middle hole of the base |
|
|
|
to the PC, as shown in the figure. |
|
q |
|
When connecting to PC, connect one |
|
|
|
end of the cable to the PC port of the |
e |
w |
|
|
||
|
phone, and the other end of the cable |
r |
|
to the LAN port of the PC.
qAC Power wLAN to Phone System ePhone to PC rHeadset
Connect the LAN cable (connected through the middle hole of the base to a network) to the LAN port of the phone, as shown in the figure.
When power is supplied from the LAN port (PoE), the phone is booted upon LAN connection.
If PoE is not supported, connect the power adapter to the power port of the phone by running the cable through the middle hole of the base as shown in the figure below. If the connected power adapter is plugged into an outlet, the phone is booted. (The power adapter is supplied separately.)
4Fix the base to the phone body by fitting the bottom groove and then securing the top side.
5Secure the cable along the cable guideline as shown in the figure. For the cable of power adaptor, give some slack before securing the cable to the guideline to prevent easy disconnect.
OPTIONAL EQUIPMENT
SMT-i5264 [ADD-ON MODULE]
The SMT-i5264 IP AOM can be registered and programmed to function with any ITP 5100 keysets, SMT-i Series, and TDM phones. This add-on module was cosmetically designed to match the SMT-i5000 Series phones. In some applications multiple IP AOMs can be supported per IP phone. For installation instructions, see your System Administrator.
4 |
5 |
SMT-A52GE [GIGABIT ADAPTER]
The SMT-A52GE Gigabit Adapter processes the Gigabit data for a Gigabit LAN connection on the PC connected to the SMT-i5200 Series IP phones. The SMT-A52GE can be installed to function with any of the SMT-i5200 Series IP phones. For installation instructions, see your System Administrator.
WALL MOUNT BRACKET
An optional bracket is available for wall mounting the SMT-i5200 Series phones to the wall. For installation instructions, see your System Administrator.
SMT-A53PW [POWER ADAPTER]
The power adapter is sold separately.
SECTION 2.
PHONE FUNCTIONS
6 |
7 |
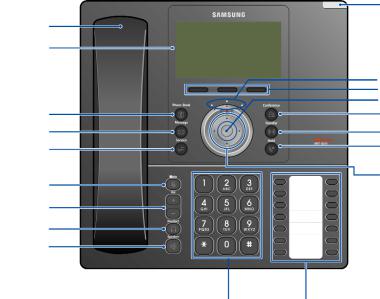
SMT-i5210 LAYOUT |
||
|
qLED (TSI) |
|
Handset ; |
|
|
LCD Screen l |
Selector |
|
|
Switch for |
|
|
FWD/DND/ |
|
|
wAbsent MSG |
|
Phone |
eSoftButtons |
|
rEnter/OK |
||
Book |
||
Button k |
tConference |
|
MessageButton j |
yTransfer |
|
ServiceButton h |
uHold |
|
Mute |
iNavigation |
|
Button |
||
Button g |
|
|
Volume |
|
|
Button f |
|
|
Headset |
|
|
Button d |
|
|
Speaker s |
|
|
Button |
|
|
aDial Button |
o Programmable Buttons |
|
NOTE: The words “key” and “button” are interchangeable.
NAMES AND FUNCTIONS
Button |
Function |
|
|
|
|
q LED (TSI) |
The blinking pattern differs depending on the phone |
|
status (Telephone Status Indicator). |
||
|
||
|
|
|
|
Used to select or deselect the Call Forwarding/DND/ |
|
w Selector Switch for FWD/DND |
Absent Message setting by using the Selector Switch |
|
|
control. |
|
|
|
|
e Soft Button |
Used to select the desired function from the soft |
|
menus displayed at the bottom of the LCD screen. |
||
|
||
|
|
|
r Enter/OK |
Used to make selection or to save an entry. |
|
|
|
|
t Conference Button |
Used for conference calls. |
|
|
|
|
y Transfer Button |
Used to enable the call transfer function. |
|
|
|
|
u Hold Button |
Used to place a call on hold. |
|
|
|
|
i Navigation Button |
Used to move the display cursor up and down, left |
|
and right on certain menus. |
||
|
||
|
|
Button |
Function |
|
o Programmable Buttons |
14 Buttons used to set up function buttons through |
|
interworking with a system. |
||
|
||
|
|
|
a Dial Button |
Used to dial the phone number. |
|
|
|
|
s Speaker Button |
Used to enable/disable the use of a speaker phone. |
|
|
|
|
d Headset Button |
Used to activate and deactivate the headset jack. |
|
|
|
|
f Volume Button |
Used to control the volume settings. |
|
|
|
|
g Mute Button |
Used to silence the transmit voice to the remote party. |
|
|
|
|
h Service Button |
For use with the Unified Communicator Server and to set |
|
Scheduler (optional). |
||
|
||
|
|
|
j Message Button |
Used to access all the messaging options: Voicemail |
|
Messages, Station Messages, SMS, and E-Mail Messages. |
||
|
||
|
|
|
|
Used to search for a phone number saved in the phone, or |
|
k Phone Book Button |
to register a new number. Pressing this button shows the |
|
main screen of the phone book. |
||
|
||
|
Used to move downward on various list screens. |
|
l LCD Screen |
A display showing the phone’s status (busy, ringing, |
|
receiving an internal message, etc.) |
||
|
||
|
|
|
; Handset |
Used for two-way voice conversation. |
|
|
|
8 |
9 |
KEY FUNCTIONS
NETWORK: The SMT-i5210 uses VoIP communication through an alreadyinstalled data network.
LCD SCREEN: Various functions are displayed on the LCD screen,so you can use them conveniently by using the Navigation button on the phone.
SHORT MESSAGE SERVICE (SMS): You can exchange text messages using this function. This function is available on internal IP stations.
TELEPHONE STATUS INDICATOR
The indicators are turned on or off depending on the status of relevant functions.
Screen |
Status |
LED Indicator |
|
When station is busy |
Red colored indicator is |
|
constant. |
|
|
|
|
|
When station is receiving an |
|
|
incoming call |
Red indicator (slow flash). |
|
|
|
|
When there is a message |
|
|
|
|
|
During “Do Not Disturb” |
Red indicator (fast flash). |
|
|
|
|
Incoming Trunk Call |
Green colored indicator |
|
flashes. |
|
|
|
|
|
Hold Recalls |
Amber colored indicator |
|
flashes. |
|
|
|
SCREEN STRUCTURE
The screen consists of three areas.
Icon Area
|
|
|
|
|
Text Area |
|
|
|
|
|
|
Soft Menu Area |
|
|
|
|
|
|
||
|
|
|
|
|
||
|
|
|
|
|
||
Area |
|
Description |
||||
Icon Area |
Displays various icons. |
|||||
|
|
|
|
|||
Text Area |
Displays date, time, extension number, name, message, |
|||||
phone number, etc. |
||||||
|
||||||
|
|
|
|
|||
|
Displays the functions allocated to the 3 soft buttons. |
|||||
|
Service menus are provided depending on the state of the |
|||||
Soft Menu Area |
phone. A user can use the service or feature menus by |
|||||
|
pressing the Menu or Func. soft button, or the AOM for |
|||||
|
more soft keys (99). |
|||||
TEXT INPUT METHOD
Using the dial and direction buttons on the phone, you can enter and modify the English characters, numeric and special characters.
Whenever you press the dial button [ ] on a text input screen, the input mode is changed in sequence.
Text Input Example
A Uppercase Input Mode
a Lowercase Input Mode
1 Numeric Input Mode
$ Special Character Input Mode
•Use the dial buttons to type English text and numbers; and use the Navigation Button to move the cursor left and right and OK buttons to complete input. When removing the typed characters, select the Del soft button.
Alpha Characters Input: Select this mode (uppercase/lowercase) by pressing the [ ] button on keypad,and type text by repeated pressing the dial buttons, characters will auto advance after a time limit.
Number Input: Select this mode by pressing the [ ] button on keypad, move the cursor highlighted to 1, then use the keypad to enter digits.
Special Character Input: Select this mode by pressing the [ ] button on keypad; select a desired character by using the Navigation Button; and press the OK button to enter it.
Keypad Character Entry
Count |
1 |
2 |
3 |
4 |
|
Dial |
A |
a |
1 |
$ |
|
(Uppercase) |
(Lowercase) |
(Numbers) |
(Special Characters) |
||
|
|||||
Dial # |
|
Not Used |
|
||
Dial 0 |
|
Not Used |
|
||
Dial 1 |
|
Not Used |
|
||
Dial 2 |
A |
B |
C |
|
|
Dial 3 |
D |
E |
F |
|
|
Dial 4 |
G |
H |
I |
|
|
Dial 5 |
J |
K |
L |
|
|
Dial 6 |
M |
N |
O |
|
|
Dial 7 |
P |
Q |
R |
S |
|
Dial 8 |
T |
U |
V |
|
|
Dial 9 |
W |
X |
Y |
Z |
|
|
|
|
|
|
|
10 |
11 |
DESCRIPTION OF ICONS
The following icons are displayed on the screen.
Icon |
Description |
|
|
|
Shows that ‘Call Forward’ is enabled. |
|
|
|
Shows that ‘Do Not Disturb’ is enabled. |
|
|
|
Shows that ‘Mute’ function is enabled. When the call ends to |
|
become a standby status or this function is disabled, this icon |
|
disappears. |
|
|
|
Shows that the call is hold state. When call is reconnect or |
|
disconnected, this icon disappears. |
|
|
|
Appears when there are unread short messages in the |
|
message inbox. Once they are read, it disappears. |
|
|
|
Shows that a LAN cable is connected to the PC port. |
|
|
|
Shows that a LAN cable is connected to the LAN port but that |
|
the system is not connected. |
|
|
|
Shows that a LAN cable is connected to the LAN port and |
|
that the system is connected normally. |
|
|
|
Outgoing Call icon. |
|
|
|
Incoming Call icon. |
|
|
|
Missed Call icon. |
|
|
|
Appears when the Speaker button is active. |
|
|
|
Appears when the Headset button is active. |
|
|
|
Shows when there is a Cell phone number for the entry in the |
|
Phone Book. |
|
|
|
Shows when there is a Home phone number for the entry in |
|
the Phone Book. |
|
|
|
Shows when there is a Office phone number for the entry in |
|
the Phone Book. |
|
|
|
Shows when there is an internal Extension number for the |
|
entry in the Phone Book. |
|
|
NAVIGATING THE MENUS
When programming within various menu options, information can be entered via the dial pad keys using [0]-[9] and [Q] dial keys. The button used for editing and their features are summarized below.
BUTTONS |
FEATURES |
Volume + and - |
To move the cursor left and right, up and down. |
|
|
Hold |
To clear/delete an entire field such as station name. |
|
|
Transfer |
To write the changes and exit programming. |
|
|
Speaker |
To write the changes and exit programming. |
|
|
NAVIGATION BUTTON and SELECTOR
SWITCH FOR FWD/DND/ABSENT MSG
The SMT-i5210 phone has a navigation button and a Selector Switch for FWD/DND/ABSENT MESSAGE to allow users to use its functions easily.
Selector Switch |
|
|
|
|
|
Up Navigation Button |
|
|
Left |
Right |
|
Navigation Button |
Navigation |
||
|
Navigation |
Button |
|
Button |
||
OK/Enter Button |
||
|
||
Down Navigation Button |
||
The Selector Switch can be used to manually set and cancel station Call Forwarding and Do Not Disturb. NOTE: Do not use the access codes or the function menu to cancel FWD/DND/ABSENT MESSAGE when the selector switch is set in the left or right position because the switch takes precedence over the access codes/function menu.
BUTTON |
|
FUNCTION |
|
Left |
Users can set the phone to the call forward |
|
state. |
|
|
|
|
Selector Switch |
|
|
Center |
The default standby status. (Normal Mode) |
|
|
|
|
|
Right |
This is set to “Do Not Disturb” and absent |
|
message status. |
|
|
|
|
|
|
|
|
Direction Key |
Users can edit the contents on the screen or |
|
move between menu items. |
|
|
|
|
Navigation |
|
Users can select or save the item where a |
|
OK/Enter |
cursor is placed in a menu mode. |
|
Users can check the caller information |
|
|
|
|
|
|
received from a station line during receiving. |
|
|
|
12 |
13 |

SMT-i5210 SETUP
INITIALIZING THE SMT-i5210
Initially the SMT-i5210 IP keyset will need to be setup to operate within the users network. The Setup Menu is also used to make changes to the keyset, in the event that the system information should change. The option chosen will be highlighted.
The station numbers will be automatically set by the OfficeServ 7000 Series systems once the necessary information has been entered into the IP keyset. Enter ID and password of the server, as described below to register the phone.
See your system administrator for specific Network and Server addresses. The addresses necessary to set up the SMT-i5210 are:
•IP Address of Station
•Network Gateway Address
•IP Address of System’s main processor
•User ID
•Password
SETUP MODE
To get to the Setup Mode unplug the power cord from the SMT-i5210. Press and hold the button while you plug power back into the phone. Release the button when you see Samsung in the display. If you have a PoE (Power over Ethernet) connection, the same procedure can be done by unplugging and plugging the Ethernet cable into the phone while pressing and holding the button.
When the phone reboot is complete, the Language Menu will display. Press the Yes soft button to advance to the Configuration Menu.
Once the Configuration Menu is displayed, you can move to each menu in the Setup by using the navigation button and [1]-[8] dial buttons of the SMT-i5210 IP phone. To learn how to navigate the menus refer to the previous section.
EASY INSTALL WIZARD
By selecting this option, the System Easy Wizard can guide you through setting up your network parameters. If you want to set up these parameters individually, follow the instructions below.
•From the idle phone press Menu, scroll to Phone, and press OK button. Scroll to Phone Information and press OK button. From the keypad, press [ 153#]. Scroll to Easy Install and press OK button.
SELECTING THE STATIC IP OPTION
•When the Static IP option is selected, enter the System Type OSSP (KP), and press OK.
•Enter the Static IP Address for the phone (eg. 192.168.9.193) then press the OK button.
•Enter the Subnet Mask (eg. 255.255.255.0); press OK button.
•Enter Gateway Address (eg. 192.168.9.1), press OK button.
NOTE: Press the key on the dial pad to enter the “.” in the IP address.
•Skip [VLAN-PHONE], [VLAN-PC], [802.1x Setting] by pressing the OK button three times.
•Enter the System IP address (eg. 192.168.9.200), press OK button.
•Enter System ID XXXX (eg. 3201), then press OK button.
•Enter Password XXXX (eg. 1234) then press OK button.
Wait a second for the phone to reboot. The phone should register and authenticate itself to the phone system. Test SMT-i5210 for proper operation.
SETTING UP HOT DESKING [IDLE LOGIN]
Hot Desking allows you to log in and out of your SMT-i5210 IP keyset without rebooting.
•Press the Menu soft button, scroll to Phone then press OK button.
•Scroll to Phone Information and press OK button.
•Enter the administrator’s password (please contact your phone system administrator).
•Scroll to Extension Login then press OK button.
•Choose the ON option and press OK button. (Note: On to allow, Off to deny hot desking).
•Press the Save soft button to complete the setup.
•When the phone restarts, enter the ID (eg; extension 2809) and password.
•Press the Save soft button to complete the login.
14 |
15 |
CONFIGURATION MENU STRUCTURE
The Configuration Menu options are as follows:
1.EASY INSTALL
This option will guide you through setting up all required parameters for connecting the SMT keyset to your system.
2.PHONE INFORMATION
1.Version Info: Provides boot rom, software, DSP, and hardware version information.
2.Network Info: Displays network mode, IP address of phone, network, and gateway information.
3.MAC Address
3.NETWORK
Displays Static IP, Dynamic IP, PPPoE, NAT, 802.1x, VLAN (LAN), and VLAN (PC).
4.SERVER
1.Primary System: The main processor’s IP address.
2.System 1~3: Up to 4 server IPs can be set.
5.EXT. LOGIN
Allows the user to choose the option of permitting the phone either login/logout from idle mode or only register to the server on power up. Once the phone is placed into Extension Login mode,a display will show up to allow you to enter any valid User ID and password. This function is also referred to as hot desking (idle login).
6.S/W UPGRADE
1.TFTP Server: The IP address of the TFTP server containing the IP software.
2.Upgrade: Starts the IP software upgrade process.
7.FACTORY RESET
This option resets the SMT-i5210 to factory default settings.
8.PHONE RESTART
This option reboots the SMT-i5210 phone.
SECTION 3.
FREQUENTLY USED FEATURE
OPERATION
16 |
17 |

This section provides the basic operation of your Samsung Multimedia Telephone
SMT-i5210.
EXTENSION LOG IN & OUT [HOT DESKING]
If enabled, your SMT-i5210 telephone may require you to log in before making or receiving calls. In these cases your telephone system administrator will provide you with an extension number, password, and the feature code used to log out.
TO LOG IN
•Dial your extension number in the ID field (example 3201).
•Press the OK button.
•Dial your password in the password field (example 1234).
•Press Save soft button.
TO LOG OUT
•Dial the feature code provided by your administrator (for example 77).
PLACING CALLS
IMPORTANT: Put your phone in Overlap Mode by pressing the Menu button, select Settings and then select Application Set., press OK, select Call, press OK, scroll to Dial Mode, change it to Overlap by using the Navigation Button. If your phone is not in Overlap mode you must always press the Call soft button after dialing the digits to send the call.
NOTE: All examples of making phone calls are based on the phone being set for overlap dialing mode.
OUTSIDE CALLS - To place a call to an outside party:
•Lift the handset.
•Press an idle outside line button, line group button, or dial a line access code to receive dial tone.
•Dial the telephone number.
•Hang up the handset when the call is completed.
NOTE: Frequently called telephone numbers can be added to the PhoneBook.
When making internal and external calls from AOM (programmable buttons) list, press the AOM soft button to access the programmable button screens. Then use the Navigation button to scroll to and highlight the desired programmable button. Press OK to complete the call.
INTERNAL CALLS - To place a call to another extension at your location:
•Lift the handset.
•Dial the extension number or group number.
•Wait for the party to answer. If you hear a brief tone burst instead of ringback tone, the station called is set for Voice Announce or Auto Answer. Begin speaking after the tone.
•Hang up the handset when the call is completed.
NOTES:
1.If you have a DSS button assigned to an extension or station group, you may press this button instead of dialing the number.
2.If the Hot Keypad feature has been turned off, you must first lift the handset or press the Speaker button before you begin dialing.
SPEAKERPHONE CALLS - Your Samsung SMT-i5210 has full-duplex speakerphone capability. This feature is used for both internal or external calls. To activate this feature:
•Press the Speaker button.
•Place an internal or external call.
•Press Speaker button to disconnect the call.
NOTE: The handset can be used at any time during the conversation. To resume handsfree operation, press the Speaker button, and hang up the handset.
HEADSET CALLS - If a headset is connected to the phone, you need to press the headset key to direct the call to the headset. The headset key will be lit. To use the headset:
•Press the Speaker button.
•Place an internal or external call.
•Press Speaker button to disconnect the call.
NOTES:
1.If you need to switch between the headset and the handset during the call, you need to place the call on hold first.
2.Headset key can be enabled or disabled in the Menu, Settings, Application Setting, Headset.
18 |
19 |
ANSWERING CALLS
OUTSIDE/INTERNAL/VOICE ANNOUNCE CALLS - To answer these three types of calls:
•Lift the handset or press the Speaker button to answer on Speakerphone.
•Hang up the handset when the call is completed.
NOTE: The volume can be adjusted at any time by pressing the up and down buttons on your navigation button.
PLACING A CALL ON HOLD
Calls can be placed on System Hold or Exclusive Hold. A call placed on System Hold can be picked up from any extension. Calls placed on Exclusive Hold can only be picked up from the extension that placed them on hold.
SYSTEM HOLD - To place a call on hold:
• Press the Hold button. The Call button will flash green at your telephone.
•To take the caller off hold, press that button and the red flashing light will go steady red again.
•Resume conversation.
EXCLUSIVE HOLD - To place a call on hold at your telephone so that other users cannot answer it:
•Press the Hold button twice.The call button will flash green at your telephone.
•To retrieve the call, press the flashing red line button or press the line button a third time.
NOTE: Internal calls are always placed on exclusive hold.
TRANSFERRING CALLS
You can transfer a call by notifying the party to which the call is being transferred or without notification.
•While on a call, press the Transfer button then dial an extension number.
•Confirm you hear a ringback tone.
•Wait for the called party to answer and announce the call (optional).
•Replace the handset.
TRANSFERRING WITH CAMP-ON
When you transfer a call to another station and receive a busy signal, you can camp the call on to this station. Hang up when you hear the busy signal.The called party is alerted that a call is waiting.
•Call another internal station.
•When receiving a busy tone, press the Func. soft button.
•Scroll to Camp On and press OK button (here ringback tone).Wait for party to answer the call.
NOTE: If you receive No More Calls tone, that station has no button available to receive another call. Press Transfer to return to the caller.
CALL WAITING
If an outside call is camped-on to your phone or another station is camped-on to you:
•Your keyset rings and the call that is waiting (camped-on) flashes red.
•Press the flashing button to answer; the other call is put on hold automatically if your station has the Automatic Hold feature set. If not, you must press Hold and then the flashing button or finish the first call and hang up; the waiting call will ring.
•Lift the handset or press the Speaker button to answer.
NOTE: Intercom calls will not go on Automatic Hold.
CONFERENCE CALLS
To make a conference call while engaged in a conversation:
•Press the Conference button and receive conference tone.
•Make another call, either intercom or outside, press the Conference button and receive conference tone.
•Make another call or press the Conference button to join all parties. You can conference up to five parties (you and four others).
•Repeat the last step until all parties are added.
•Hang up to leave the conference call.
NOTE: When attempting to add another party to the conference and you are not able to reach the desired person, hang up. Simply press the Conference button again to return to the previous conversation.
To drop a party from your conference call:
•Press the Conference button and dial the extension or line number that is to be dropped.
•Press the Conference button again to reestablish the conference.
20 |
21 |
FORWARDING CALLS  Icon
Icon
You can forward your calls to another station, group of stations, or an external telephone number. Program a destination for the type of forwarding you want by moving the Selector Switch to the left and set the forwarding number for All, Busy, No Answer, and Busy/No Answer.
OTHER FEATURES AND FUNCTIONS
VOLUME CONTROL - Vol button is used to adjust the volume of a handset, speaker and ringing sound.
Volume Control of a Handset
•Adjusts the handset volume while busy (handset offhook).
•To increase the volume of a handset, press the top side [+] of the Vol button.
•To decrease the volume of a handset, press the bottom side [-] of the Vol button.
Volume Control of a Speaker
•Adjusts the speaker volume while busy (handsfree).
•To increase the volume of a speaker, press the top side [+] of the Vol button.
•To decrease the volume of a handset, press the bottom side [-] of the Vol button while ringing.
Volume Control of a Ringing Tone
•To increase the volume of a speaker, press the top side [+] of the Vol button, while ringing.
•To decrease the volume of a handset, press the bottom side [-] of the Vol button, while ringing.
Volume Control of Key Tone
•To increase the volume of the key tones, press the top side [+] of the Vol button.
•To decrease the volume of the key tones, press the bottom side [-] of the Vol button.
NOTE: By pressing the Vol button in idle mode, the user can also adjust the key tone volume.
LAST NUMBER REDIAL - To redial the last dialed telephone number, press the Func. soft key scroll to Last Redial and press OK.
PHONE BOOK BUTTON - Provides direct access to the user’s phonebook of stored contacts.
MESSAGE BUTTON - This function allows users to select which desired type of messages is viewed. Users can select and view the following options: Voicemail Messages, Station Messages, E-Mail (optional with IP-UMS only), and Short Message Service (SMS). Short Message Service is similar to sending text messaging [Function only supported on Samsung IP phones].
SERVICE BUTTON [Scheduler] - Used to allow station users access to setting and editing the scheduler (alarm clock) feature. Also used to connect the OfficeServ Communicator when application is available (UC is optional).
MENU SOFT BUTTON- This menu displays the following options:
NOTE: The Navigation button can be used to scroll through these options.
1.PHONEBOOK: Maintains frequently dialed names and numbers in a PhoneBook. Search and initiate calls by: Speed Dial, Associated Names, Telephone Numbers, Assigned Groups, or Previous Calls registered to your phone.
2.CALL LOG: Provides direct access to a list of most recent calls, outgoing calls, incoming calls, missed calls, and an option to delete/delete all (or clear) calls from the Call Log.
3.MESSAGES: This function allows users to select which desired type of messages is viewed. Users can select and view the following options: Voicemail Messages, Station Messages, E-Mail (optional with IP-UMS only), and Short Message Service (SMS). Short Message Service is similar to sending text messaging [Function only supported on Samsung IP phones].
4.CONFERENCE: Allows a user to setup a conference group to call multiple parties simultaneously to join the conference call.
5.SERVICE: Allows a user to set the scheduler (alarm reminder) function.
6.PHONE: Allows the user to set many phone options for the phone such as ring tones, background screens, languages, forward, DND, etc.
7.SETTINGS: This function allows the user to set the following option:
Application Set., Call Forward, Absent Message, AOM Setting, Network Info., and Clear User Set.
22 |
23 |
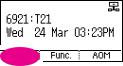
FUNC. SOFT BUTTON - This function allows a user one touch easy access to many of the system features. When pressed, the following options are displayed: Last Number Redial, Save/Repeat, Speed Dial, Directory, VM Message, Station Message, Page Pickup, Direct
Pickup, DND, In/Out Group, Status Message, Hold Pickup, Page, Meet Me Page, OHVA Block, Group Pickup, and My Group Pickup. The Navigation button can be used to scroll up and down the list of features under the Func. button.
NOTE: EXE/SECR MSG is displayed only when the phone is programmed for Boss/Secretary feature.
Example of using the Last Number Redial feature:
•Press the Func. Soft button, scroll to Last Redial, then press OK button. The last number called from the phone is called.
NOTE: For detail operation of the list of features under the Func. soft button, please refer to the System Features section of the user guide.
AOM SOFT BUTTON - This function is used to display all 99 programmable feature buttons of the phone. The Navigation button can be used to scroll up and down the list of 99 programmable feature buttons under the soft AOM.
Example of dialing a Speed Dial Number using the AOM function:
•Press the AOM soft button, scroll to Speed Dial, then press OK button. The number is called from the phone.
NOTE: Some programmed features such as speed dialing and DSS buttons can be used to process calls; other programmed buttons such as Call buttons can only be viewed.
The soft AOM button can also display status indications for station keys, trunks, voice mail messages, etc.
Example of programming a DSS button on the soft AOM:
•Press the Menu soft button.
•Using the Navigation button, scroll to Settings and press OK, then scroll to and select AOM Setting.
•Scroll to the soft AOM button to program (for example: 4).
•Press the Edit soft button (the display will show AOM index 4).
•Press Edit soft button again, scroll to the feature option (for example: DSS).
•Move down and enter the extension number (for example: 2003).
•Move down, use the dial pad to enter name (for example: John Dow). Refer to Text Input Method.
•Press the Save soft button to exit and save the setting.
OK/ENTER BUTTON - This function is used to enter, save or complete the selected option in the display.
SPEAKER BUTTON - This function is used to go on and off hook in the handsfree speakerphone mode.
24 |
25 |
Loading...