


For the U.K. IMPORTANT: THE WIRES IN THIS MAINS LEAD ARE COLOURED IN ACCORDANCE WITH THE FOLLOWING CODE.
BLUE: NEUTRAL
BROWN: LIVE
As the colours of the wires in the mains lead of this apparatus may not correspond with the coloured markings identifying the terminals in your plug, proceed as follows:
The wire which is coloured BLUE must be connected to the terminal which is marked with the letter N or coloured BLACK. The wire which is coloured BROWN must be connected to the terminal which is marked with the letter L or coloured RED. Under no circumstances must either of the above wires be connected to the earth terminal of a three pin plug.

The OCTAPAD Legend
1985 was the year that Roland’s revolutionary percussion instrument was announced — the “OCTAPAD” (PAD-8). A totally unique percussion instrument, the OCTAPAD allowed one to perform on the 8 pads, and via MIDI, control a drum machine (like the TR-909) or an external MIDI module or sampler. This instrument was immediately adopted by musicians around the world, not only for playing drum or percussion sounds, but also using it to perform all styles of music.
1988 saw the release of the “OCTAPAD II” (PAD-80), which not only maintained the exciting features of the first-generation OCTAPAD, but added many new ones like Layering and pedal control.
1990–1998 was the era when musicians used either of the firstgeneration OCTAPADs. As they did not have an on-board sounds, most of the time they were connected to drum machines, (TR-909, R-8 etc) So In 1990, Roland introduced the SPD-8 which had its own on-board sound source.
In 1993, It was followed by the SPD-11 which not only had more sounds but also built-in effects processing.
And then in 1998, the legendary SPD-20 appeared on the scene. Which featured a major enhancement to its sounds.
So throughout the years, the SPD series continued to evolve. And even though the instrument was called and SPD-8/11/20, most people will referred to it as an OCTAPAD.
2010 marks the comeback of the new OCTAPAD (SPD-30) for the 21st century. While maintaining the basic design of the precedent models, this new OCTAPAD features a large display, a friendly user interface, cutting-edge sounds, effects, USB MIDI and the latest pad sensing technology developed for the V-drums series.
The most exciting and evolutionary step of the new OCTAPAD is its “Phrase Loop function” which allows you to turn your inspiration into sound; meaning you can create your own rhythm loops, and layer your performance on top, all in real time.
That alone enhances the potential of the 8 pads on board, and expands the playable combination of percussion instruments.
The quarter-century legend of the OCTAPAD continues.

Contents
Turning the Power On/Off . . . . . . . . . . . . . . . . . . . . . . . .6
Overview |
|
7 |
||
|
|
|
|
|
01 |
Overview of the OCTAPAD . . . . . . . . . . . . . . . . . . |
. |
.8 |
|
|
|
What is an Inst?. . . . . . . . . . . . . . . . . |
|
. 8 |
|
|
What is a Kit? . . . . . . . . . . . . . . . . . . |
|
. 8 |
|
|
What are Ambience and FX?. . . . . . . . . . . |
|
. 9 |
|
|
What is a Phrase Loop?. . . . . . . . . . . . . |
. |
9 |
|
|
Editing and Saving Your Data. . . . . . . . . . |
. |
9 |
|
|
|
|
|
02 |
Panel Descriptions.. . . . . . . . . . . . . . . . . . . . . . . . . |
. |
10 |
|
|
|
Top Panel. . . . . . . . . . . . . . . . . . . . . |
. 10 |
|
|
|
Rear Panel Connections . . . . . . . . . . . . . . |
. 12 |
|
|
|
|
|
|
03 |
Displays and Operations. . . . . . . . . . . . . . . . . . . . |
. |
14 |
|
|
|
KIT Screen . . . . . . . . . . . . . . . . . . . . . |
|
14 |
|
|
QUICK MENU Screens . . . . . . . . . . . . . . . |
. 15 |
|
|
|
MENU Screen . . . . . . . . . . . . . . . . . . . |
. 16 |
|
|
|
PHRASE LOOP Screen . . . . . . . . . . . . . . . |
. 18 |
|
|
|
|
|
|
04 |
FACTORY RESET . . . . . . . . . . . . . . . . . . . . . . . . . . . . |
. |
20 |
|
|
|
|
||
Basic Operation |
|
21 |
||
|
|
|
|
|
01 |
Selecting a Kit.. . . . . . . . . . . . . . . . . . . . . . . . . . . . . |
. |
22 |
|
|
|
[KIT] Buttons. . . . . . . . . . . . . . . . . . . . |
|
22 |
|
|
KIT LIST. . . . . . . . . . . . . . . . . . . . . . |
. 22 |
|
|
|
FAVORITE KITS. . . . . . . . . . . . . . . . . . . |
. 22 |
|
|
|
KIT CHAIN Function. . . . . . . . . . . . . . . |
|
22 |
|
|
Foot Switch. . . . . . . . . . . . . . . . . . . |
|
22 |
|
|
|
|
|
02 |
Selecting an Inst (INST) . . . . . . . . . . . . . . . . . . . . . |
. |
23 |
|
|
|
|
|
|
03 |
MULTI EDIT.. . . . . . . . . . . . . . . . . . . . . . . . . . . . . . . . |
. |
24 |
|
|
|
|
|
|
04 |
Effects Editing (AMBIENCE and FX).. . . . . . . . . . |
. |
25 |
|
|
|
AMBIENCE. . . . . . . . . . . . . . . . . . . . . |
|
25 |
|
|
FX. . . . . . . . . . . . . . . . . . . . . . . . . 25 |
||
|
|
|
||
05 |
Recording a Phrase Loop (PHRASE LOOP). . . . .26 |
|||
|
|
Step 1: Select a Kit. . . . . . . . . . . . . . . . . |
. 26 |
|
|
|
Step 2: Make Settings Before Recording. . . . . . . |
|
26 |
|
|
Step 3: Recording . . . . . . . . . . . . . . . . . |
. 27 |
|
|
|
Re-doing the Recording. . . . . . . . . . . . . . |
. 28 |
|
|
|
Erasing a Track (ERASE). . . . . . . . . . . . . |
. 28 |
|
|
|
Undoing a Recording (UNDO). . . . . . . . . . |
|
28 |
|
|
Clearing the Phrase (CLEAR PHRASE) . . . . . . |
. 28 |
|
|
|
Saving the Phrase (SAVE PHRASE). . . . . . . . . . |
|
28 |
|
|
Exiting Phrase Loop Mode. . . . . . . . . . . . . |
. 28 |
|
Advance Operation 1 (Kit) |
30 |
Creating a Kit . . . . . . . . . . . . . . . . . . . . . . . . . . . . . . . . . . .30
Inst Settings (INST). . . . . . . . . . . . . . . . . 30 Inst and Layer Settings (INST-INST) . . . . . . . . 30 Editing an Inst (INST-EDIT). . . . . . . . . . . . . . . . . . . . . . . 31 Hi-hat Settings (INST-HH CTRL). . . . . . . . . . 32 INST Screen QUICK MENU. . . . . . . . . . . . 33
Settings for the Entire Kit (KIT OTHERS). . . . . . . . 34 Kit Volume, Tempo, and Protect (KIT OTHERS-KIT).34
Phrase Settings Recalled by the Kit
(KIT OTHERS-PHRASE). . . . . . . . . . . . . . 34 Assigning a Name (NAME). . . . . . . . . . . . . . 35 NAME Palette QUICK MENU. . . . . . . . . . . 35 Copying a Kit or Pad (COPY) . . . . . . . . . . . . . 35 Copying a Pad. . . . . . . . . . . . . . . . . . 35 Copying a Kit. . . . . . . . . . . . . . . . . . 36 Exchanging Pads (PAD EXCHANGE) . . . . . . . . . 36
KIT CHAIN . . . . . . . . . . . . . . . . . . . . . . . . . . . . . . . . . . . . . .37
Creating a Kit Chain (KIT CHAIN). . . . . . . . . . . 37 KIT CHAIN Screen QUICK MENU . . . . . . . . . 37 Switching Kit Chains. . . . . . . . . . . . . . . . . 38
Using the Effects (FX).. . . . . . . . . . . . . . . . . . . . . . . . . . .39
FX Settings (FX). . . . . . . . . . . . . . . . . . . 39 Switching the FX Type (FX-TYPE). . . . . . . . . 39 Editing FX Parameters (FX-EDIT). . . . . . . . . 39 Setting the FX Send Level for Each Pad (FX-SEND).40 FX Screen QUICK MENU. . . . . . . . . . . . . 40
Copying FX Settings. . . . . . . . . . . . . . . . . 40 Using the Knobs to Control the FX (FX CONTROL) . . 41
Editing the AMBIENCE.. . . . . . . . . . . . . . . . . . . . . . . . . .42
Ambience Settings (AMBIENCE-AMBIENCE). . . . 42 Equalizer Settings (AMBIENCE-EQ). . . . . . . . 42 Limiter Settings (AMBIENCE-LIMIT). . . . . . . . 42
Copyright © 2010 ROLAND CORPORATION
All rights reserved. No part of this publication may be reproduced in any form without the written permission of ROLAND CORPORATION.
Before using the OCTAPAD, carefully read the sections entitled: “USING THE UNIT SAFELY” (p. 72) and “IMPORTANT NOTES” (p. 73). These sections provide important information concerning the proper operation of the OCTAPAD. Additionally, in order to feel assured that you have gained a good grasp of every feature provided by your new unit, Owner’s Manual should be read in its entirety. The manual should be saved and kept on hand as a convenient reference.
4

Advanced Operation 2 (Phrase Loop)43
Creating a Phrase . . . . . . . . . . . . . . . . . . . . . . . . . . . . . . .43
Measures, Time Signature (Beat) and Metronome (Click) Sound Settings (SETUP). . . . . . . . . . . . 43
Using the [SET LOOP] Button to Set the Loop
Point. . . . . . . . . . . . . . . . . . . . . . 43 Quantize and Tempo Settings (STANDBY). . . . . . 44 STANDBY Screen QUICK MENU. . . . . . . . . . 44 Switching the Part’s Kit (STANDBY) . . . . . . . . 44 Recording a Phrase (REC Mode). . . . . . . . . . . 45
Performing Along with a Recorded Phrase
(PLAY Mode). . . . . . . . . . . . . . . . . . . . 45 REC/PLAY Screen QUICK MENU. . . . . . . . . . 45 Stopping the Phrase (STOP). . . . . . . . . . . . . 45
Editing a Phrase.. . . . . . . . . . . . . . . . . . . . . . . . . . . . . . . .46
What You can do in REC/PLAY Mode. . . . . . . 46 Muting a Track (MUTE). . . . . . . . . . . . . . . . 46 Erasing a Track (ERASE). . . . . . . . . . . . . . . 47 Reserving the Operation at the Next Loop (NEXT). . 47 Adjusting the Volume of Each Part (PART LEVEL). . . 48 Exiting Phrase Loop Mode. . . . . . . . . . . . . . 48
Saving/Loading a Phrase . . . . . . . . . . . . . . . . . . . . . . . .49
Saving a Phrase (SAVE PHRASE). . . . . . . . . . . 49 Loading a Phrase (PHRASE LIST) . . . . . . . . . . . 50 PHRASE LIST Screen QUICK MENU. . . . . . . . 50
Phrase Loop and Metronome (Click) Sound Settings . . . . . . . . . . . . . . . . . . . . . . . . . . . . . . . . . . . . . . . .51
Phrase Loop Settings (PHRASE LOOP SETUP). . . . . 51
Metronome (Click) Sound Settings
(PHRASE LOOP SETUP-CLICK). . . . . . . . . . . . 51
Advanced Operation 3 (Other Settings) 52
Settings for the Entire OCTAPAD (SYSTEM).. . . . . . .52
Screen and Illumination Settings (SYSTEM-OPTIONS).52
Foot Switch and External Pad Settings (SYSTEM-CONTROL). . . . . . . . . . . . . . . . . 53
Connecting Foot Switches . . . . . . . . . . . . 53
Viewing Information About the System (SYSTEM-INFO). . . . . . . . . . . . . . . . . . . 54
Using USB Memory.. . . . . . . . . . . . . . . . . . . . . . . . . . . . .55
Formatting USB Memory (USB-FORMAT). . . . . . . 55 Saving Data to USB Memory (USB-SAVE). . . . . . . 56 Loading Data from USB Memory (USB-LOAD) . . . . 56 Viewing or Deleting USB Memory Data (USB-VIEW). . 57
Connecting to your Computer via USB. . . . . . . . . . .58
Internal Pad Sensitivity Settings . . . . . . . . . . . . . . . . .59
Internal Pad Settings (PAD SETTING-INTERNAL). . . . . . 59
External Pad and Pedal Settings.. . . . . . . . . . . . . . . . .60
Connecting Optional Pads or Pedals . . . . . . . . . 60 External Pad Settings (PAD SETTING-EXTERNAL). . . 60 Specifying the External Pad Type (PAD TYPE) . . . 61 Adjusting the External Pad Sensitivity . . . . . . 61
External Hi-Hat Pedal Settings
(PAD SETTING-HH PEDAL) . . . . . . . . . . . . . . 62 VH-11 Offset Adjustment. . . . . . . . . . . . . 62
MIDI Settings . . . . . . . . . . . . . . . . . . . . . . . . . . . . . . . . . . .63
MIDI Settings for a Kit (KIT MIDI) . . . . . . . . . . . 63 KIT MIDI Screen QUICK MENU. . . . . . . . . . 64 System MIDI Settings (SYSTEM-MIDI). . . . . . . . . 65
Using V-LINK to Control Images. . . . . . . . . . . . . . . . . .66
V-LINK Settings (V-LINK SETTINGS). . . . . . . . . . 66 Turning V-LINK On/Off. . . . . . . . . . . . . . . . 66
Appendix |
67 |
Error Message List.. . . . . . . . . . . . . . . . . . . . . . . . . . . . . . |
68 |
Specifications.. . . . . . . . . . . . . . . . . . . . . . . . . . . . . . . . . . |
68 |
Troubleshooting. . . . . . . . . . . . . . . . . . . . . . . . . . . . . . . . |
69 |
Attaching the Stand (Sold Separately).. . . . . . . . . . . |
69 |
MIDI Implementation Chart.. . . . . . . . . . . . . . . . . . . . . |
70 |
USING THE UNIT SAFELY. . . . . . . . . . . . . . . . . . . . . . . . . |
72 |
IMPORTANT NOTES.. . . . . . . . . . . . . . . . . . . . . . . . . . . . . |
73 |
Index.. . . . . . . . . . . . . . . . . . . . . . . . . . . . . . . . . . . . . . . . . .74
Appendix (Other) 3 .Adv (Phrase) 2 .Adv (Kit) 1 .Adv Operation Basic Overview
5
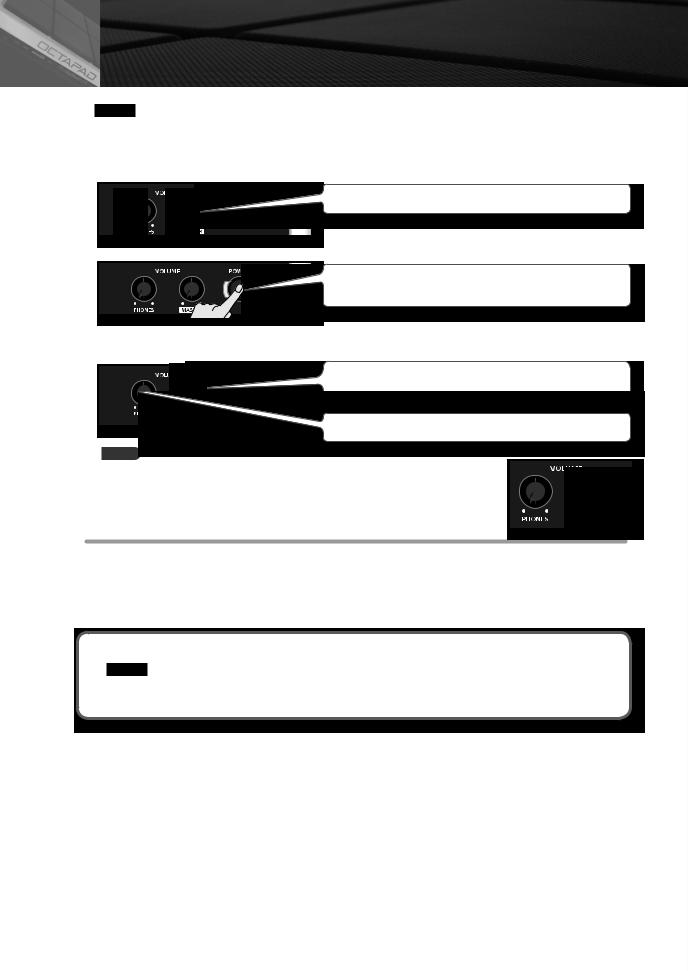
Turning the Power On/Off
NOTE
Once the connections have been completed (p. 12), turn on power to your various devices in the order specified. By turning on devices in the wrong order, you risk causing malfunction and/or damage to amplified speakers (which we’ll simply call “speakers”) and other devices.
1.Lower the volume of the OCTAPAD and amplification system..
Turn the [PHONES] and [MASTER] knob all the way to the left.
2.Press the [POWER] button..
The OCTAPAD is equipped with a protection circuit. A brief interval (a few seconds) after power up is required before the unit will operate normally.
3.Turn on the power of your speakers..
4.Adjust the volume
While playing the pads of the OCTAPAD, slowly turn the [MASTER] knob toward the right, and set the volume on the OCTAPAD and speakers.
Use the [PHONES] knob to adjust the volume of the headphones.
MEMO
Adjust your speaker system so that the volume is appropriate when the [MASTER] knob is approximately at the 3 o’clock position as shown in the illustration. Turn the knob toward the right to increase the volume, or toward the left to decrease it.
Turning the Power Off
1.Minimize the volume of the OCTAPAD and your speakers..
2.Turn off the power of your speakers..
3.Hold down the [POWER] button until the display indicates “See you!”
Be sure to use the [POWER] button to turn off the power!
NOTE
The OCTAPAD automatically saves data during the power-down process. If power is turned off by unplugging the AC adaptor or power cable, data will NOT be saved, and malfunctions may occur.
6
Overview
Welcome to the world of the OCTAPAD..
This chapter provides an overall explanation of the OCTAPAD.. Whether you are a beginner or an experienced user of electronic musical equipment, reading this chapter will help you save time and learn to operate the OCTAPAD smoothly..

01 Overview of the OCTAPAD
What is an Inst?
All the sounds and instruments on board the OCTAPAD are referred to as “INST.”
What is does Layer mean?
Two Insts (Inst A, Inst B) can be assigned to each pad.
“Inst Layer Type” (p. 30) lets you choose how the Layer function will operate. The layered sounds can be mixed equally, or can be controlled by playing dynamics. With a hi-hat for example, by playing softly you can have the closed hi-hat sound, and when playing harder, the open hi-hat sound (p. 33). Or you can use a snare drum sound, so when play softly you hear the head sound, and when playing louder you can have a rim shot.
Volume |
Volume |
|
|
|
|
|
|
|
|
|
Playing |
|
Playing |
|
Dynamics |
|
Dynamics |
When the layer type is “SWITCH” |
When the layer type is “FADE” |
||
What is a Kit?
All instruments assigned to the eight pads and four external pads (p. 60) as well as the effects used, are memorized as a “Kit.”You can select kits by pressing the [KIT] buttons (or foot-switches).
In live performance situations, the Kit Chain function allows you to determine the switching order of selected kits. See p. 37. Also there is a Favorite function, giving you quick access to your favorite kits. See p. 22.
8
What are Ambience and FX?
The “Ambience” selected is a global function, meaning that all kits will use this effect. You can select from various types of rooms and halls.
“FX” is a full blown effects unit that can be used on an individual kit basis.
Multi Effects Processor
Ambience |
FX |
What is a Phrase Loop?
The Phrase Loop function is a recording feature that allows you to loop record something in real time, and then overdub on top. The potential is very exciting for live performances.
As each phrase has three “parts” it means, for example, that you can record a 16-beat phrase on part 1, some Latin percussion on part 2, and a either record or just perform a melodic percussion kit on top. It’s almost like having three OCTAPADs!
Editing and Saving Your Data
The OCTAPAD features some powerful editing tools such as tuning, muffling, tone color etc. Also, the FX for each kit can be edited as well. This allows you to really personalize your sound.
All of your edits are automatically saved internally. If you need to, you can restore an individual kit to the factory settings. See “04 FACTORY RESET” (p. 20).
You can also use a USB memory (sold separately) to save your data. See p. 56.
Appendix (Other) 3 .Adv (Phrase) 2 .Adv (Kit) 1 .Adv Operation Basic Overview
9
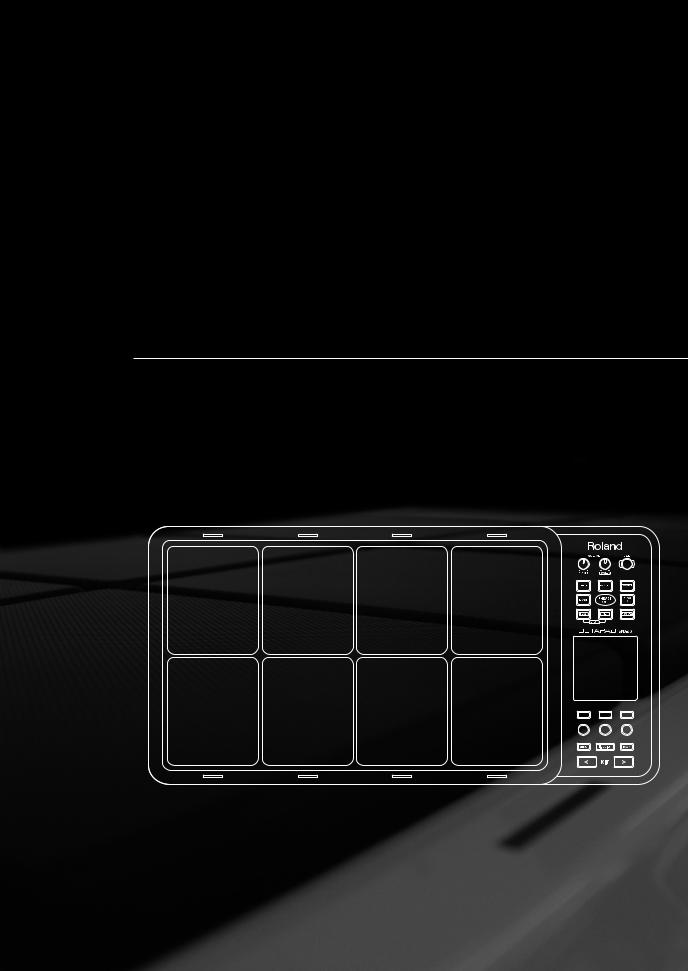
02 Panel Descriptions
Top Panel
Display, Buttons & Knobs
Button 1
Knob 1 |
Knob 2 |
Function button 1–3
These buttons (from left to right) [Button 1], [Button 2], and [Button 3] execute various functions indicated in the bottom of the display.
Function knob 1–3
These knobs (from left to right) [Knob 1], [Knob 2], and [Knob 3] correspond to functions indicated by a knob icon ( ) in the display.
[MENU] button p. 16
To access the main menu screen.
[QUICK] button p. 15
In screens that show a  icon in the upper right, pressing this button will call up various choices relative to the screen you are in.
[BACK] button
This button returns to the previous screen or cancels an operation.
[KIT] buttons p. 22
Use these back-lit buttons to switch kits. When editing, pressing these buttons will return you to the KIT screen.
*Be aware that the screen shots shown in this manual will not necessarily match the factory-set content shown in your screen (Kit names, Inst names, and Effect names).
*You may notice some inconsistency in the contrast of the display; this is not a malfunction.
Adjust “LCD Contrast” (p.. 52) appropriately to minimize the inconsistency in the display’s contrast..
10
Playing area
Pad Status Illumination
The LED indicators can be helpful when playing on a dark stage. See “Illumination” (p. 52).
Pad
Play them with sticks.
* Playing anything other than the pads can cause malfunctions.
Volume & Power
[VOLUME/PHONES] knob |
p. 6 |
Adjusts the headphone volume. |
|
[VOLUME/MASTER] knob |
p. 6 |
Adjusts the volume of the OUTPUT jacks.
[POWER] button p. 6
For turning the power on/off.
Phrase Loop area p. 43
[STANDBY] button p. 43
For entering Phrase Loop mode. The Setup screen appears while holding down this button, and you can use the pads to select the number of measures.
[PLAY]/[REC] ([STOP]) button p. 45
These buttons switch between recording (overdubbing) and playing the Phrase Loop. You can stop the phrase by pressing the [PLAY]/[REC] buttons simultaneously.
[MUTE] button p. 46
While holding down this button and hitting a pad, you can mute or un-mute the corresponding track. Mute status is shown in the display and by the pad’s illumination.
[ERASE] button p. 47
While holding down this button and hitting a pad, you can erase a specific portion of a track. Hit the pad at the moment you want to start erasing, and once again when you want to stop. Erase status is shown in the display and by the pad’s illumination.
[FX CTRL] button p. 41
Press this button to access a screen allowing you to use the knobs to control effects. While in Phrase Loop record mode, these knob movements will be recorded.
[SET LOOP/NEXT] button p. 47
When this button is blinking, you can set the loop point (p. 43).
When this button is lit, it is for reserving the operation (MUTE/PLAY/REC/STOP) that will occur at the beginning of the next loop (p. 47).
[V-LINK] button p. 66
Pushing this button selects V-LINK mode, allowing you to control video devices in real time. This button will function even when not in Phrase Loop Mode.
“PHRASE LOOP” tempo Indicator
This blinks in time with tempo. To turn this function off, see “Tempo Indicator” (p. 52).
Appendix (Other) 3 .Adv (Phrase) 2 .Adv (Kit) 1 .Adv Operation Basic Overview
11
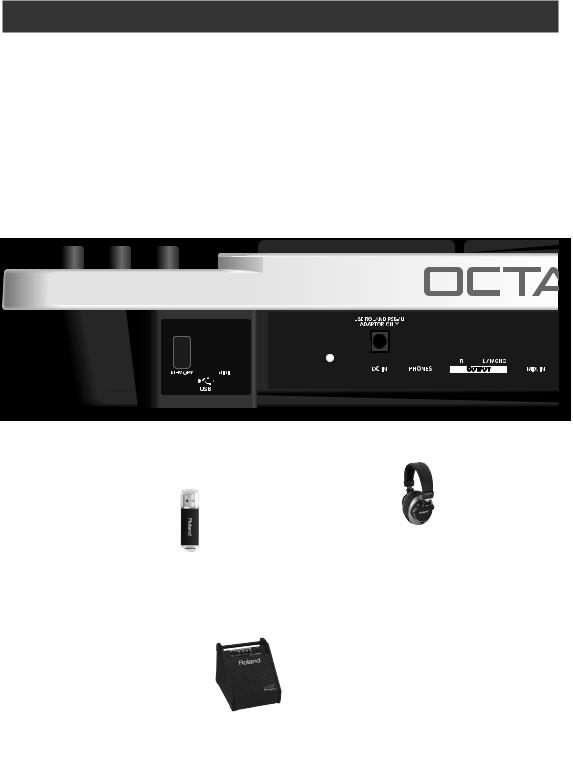
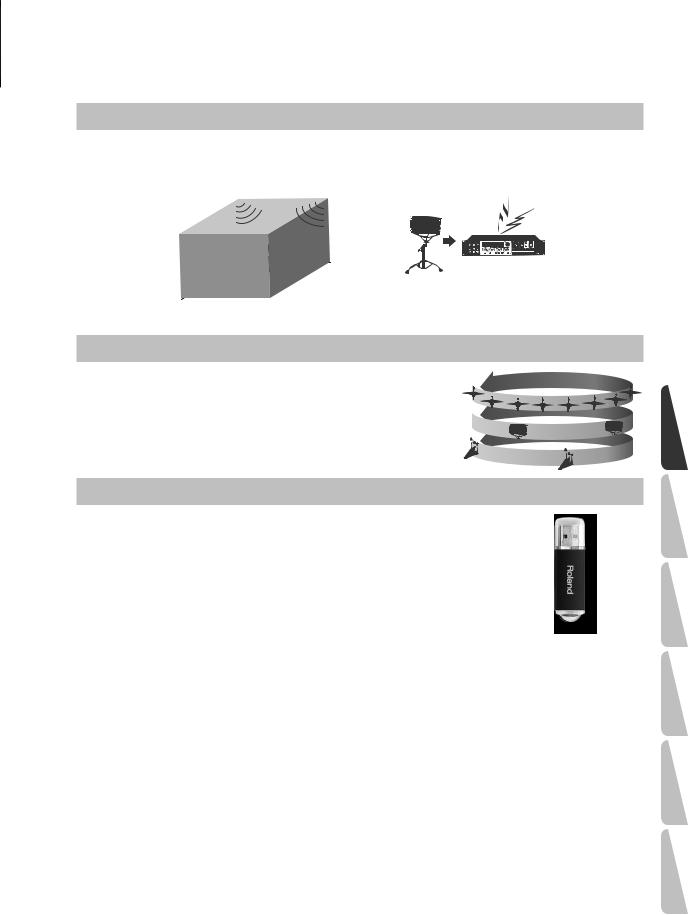
Rear Panel Connections
USB MIDI connector  p. 58
p. 58
With a USB cable, you can connect the OCTAPAD to your computer for triggering sounds or recording MIDI information to your software sequencer (DAW).
DC IN jack
Connect the included AC adaptor here.
Place the AC adaptor so the side with the indicator (see illustration) faces upwards and the side with textual information faces downwards. The indicator will light when you plug the AC adaptor into an AC outlet.
To prevent the inadvertent disruption of power to your unit (should the plug be pulled out accidentally), and to avoid applying undue stress to the AC adaptor jack, anchor the power cord using the cord hook, as shown in the illustration.
USB MEMORY slot  p. 55
p. 55
With a USB memory (sold separately) you can backup and load your data.
OUTPUT jacks
For connection to your amplification or recording system.
If making a MONO connection, use the L/MONO jack.
NOTE
PHONES jack
Even when using your headphones, sound is still output from the OUTPUT jacks.
MIX IN jack
For connecting an external audio device (MP3 player, computer, CD player etc). This audio signal will be sent to the OUTPUT and PHONES jacks.
•To prevent malfunction and/or damage to speakers or other devices, always turn down the volume, and turn off the power on all devices before making any connections.
•When connection cables with resistors are used, the volume level of equipment connected to the inputs (MIX IN) may be low. If this happens, use connection cables that do not contain resistors.
12
FOOT SW jack p. 53 |
Security slot ( ) |
||||
You can connect a pair of foot switches to this input for various possibilities. |
http://www.kensington.com/ |
||||
|
|||||
|
|
|
|
|
|
|
|
|
|
|
|
|
|
|
|
|
|
MIDI connectors p. 63
For connecting MIDI modules/interfaces
|
|
|
|
|
|
|
|
|
|
|
|
|
|
|
|
|
|
|
|
|
|
|
|
|
|
|
|
|
|
|
|
|
|
|
|
|
|
|
|
|
|
|
|
|
|
|
|
|
|
|
|
|
|
|
|
|
|
|
|
|
|
|
|
|
|
|
|
|
|
|
|
|
|
|
|
|
|
|
|
|
|
|
|
|
|
|
|
|
|
|
|
|
|
|
|
|
|
|
|
|
|
|
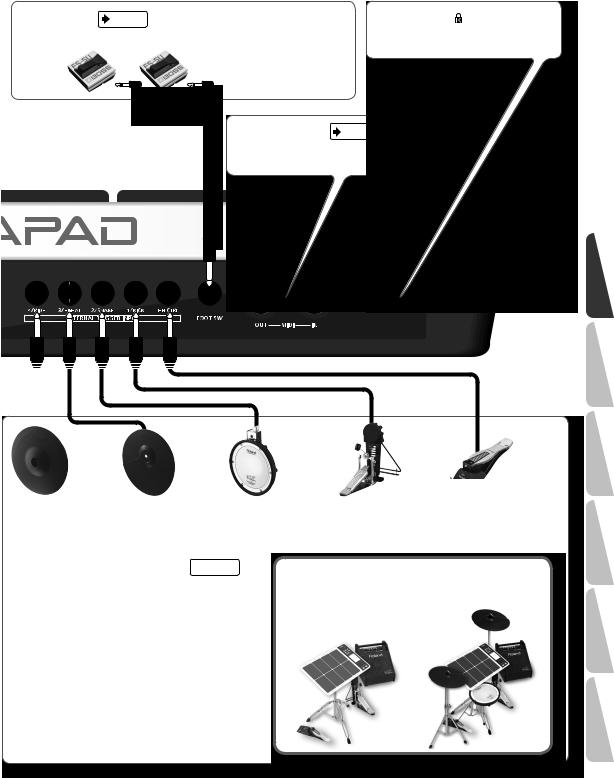
4/RIDE |
|
3/HI-HAT |
|
2/SNARE |
|
1/KICK |
|
HH CTRL |
|
||||||
|
V-cymbal |
|
Cymbal pad |
|
V-pad |
Kick trigger pad |
|
Hi-hat control pedal |
||||||||
|
(e.g., CY-12R/C) |
|
(e.g., CY-5) |
|
(e.g., entire PD series) |
(e.g., KD-8, KD-7) |
|
(FD-8, VH-11) |
||||||||
|
|
|
|
|
|
|
|
|
|
|
|
|
|
|
|
|
EXTERNAL TRIGGER INPUT jacks  p. 60
p. 60
Even though jacks 1–4 have specific indications, you can use them as you like. Make sure you use the respective cables (stereo) for dual trigger pads/cymbals. All these options are for products sold separately.
The HH CTRL jack is for using with compatible controllers such as an FD-8 or VH-11.
Connect optional pedals and pads
You can expand the possibilities of the OCTAPAD by connecting optional pedals and pads. This way you can play with your hands and feet.
Here are some examples.
Appendix (Other) 3 .Adv (Phrase) 2 .Adv (Kit) 1 .Adv Operation Basic Overview
For details on how to attach the pad stand, refer to “Attaching the Stand (Sold Separately)” (p. 69). |
13 |
|
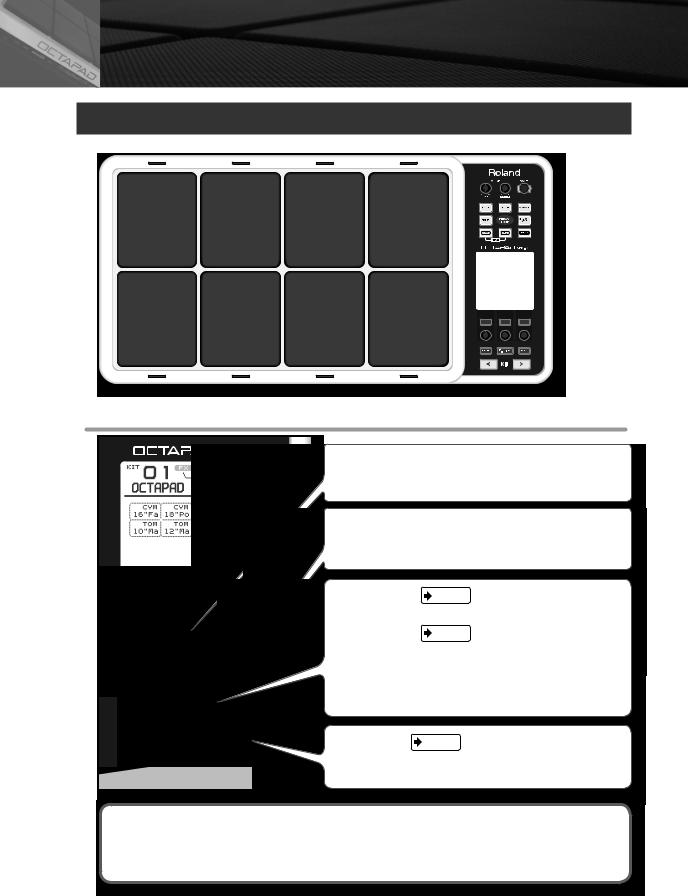
03 Displays and Operations
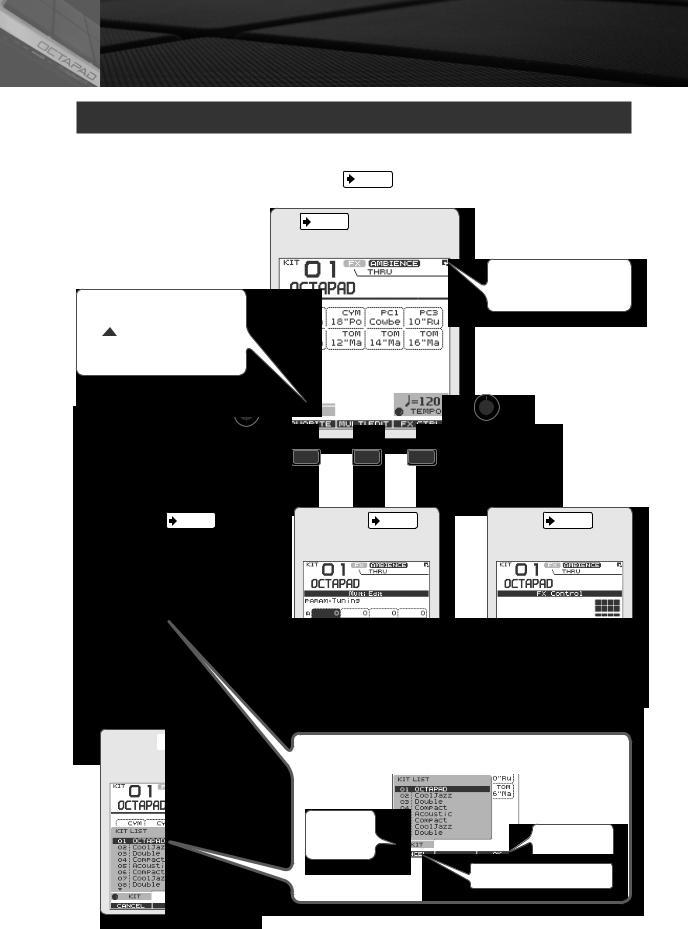
KIT Screen
The KIT screen is the basic screen that appears after powering up the OCTAPAD. The function buttons and knobs below the screen are used to navigate between screens. Press the [BACK] button to return to the KIT screen.
For details on each screen, refer to the indicated pages |
p. |
. |
The  icons indicate which function knob can be used.
The icon means a popup list will appear when you turn the knob.
FAVORITE p. 22
Register/recall favorite kits.
KIT LIST
Use [Knob 1]
KIT p. 22
This is the basic screen for playing a kit.
MULTI EDIT p. 24
Edit various parameters.
The  icon is shown in the upper right of the screen when a quick menu is available.
Use [Knob 3] to adjust the tempo.
FX CTRL p. 41
Use [Knobs 1–3] to control effects.
Basic operations in the list screen
Turn the knob |
|
below the list |
Press [Button 3] |
to choose |
(OK) to confirm |
Press [Button 1] (CANCEL) to cancel
14
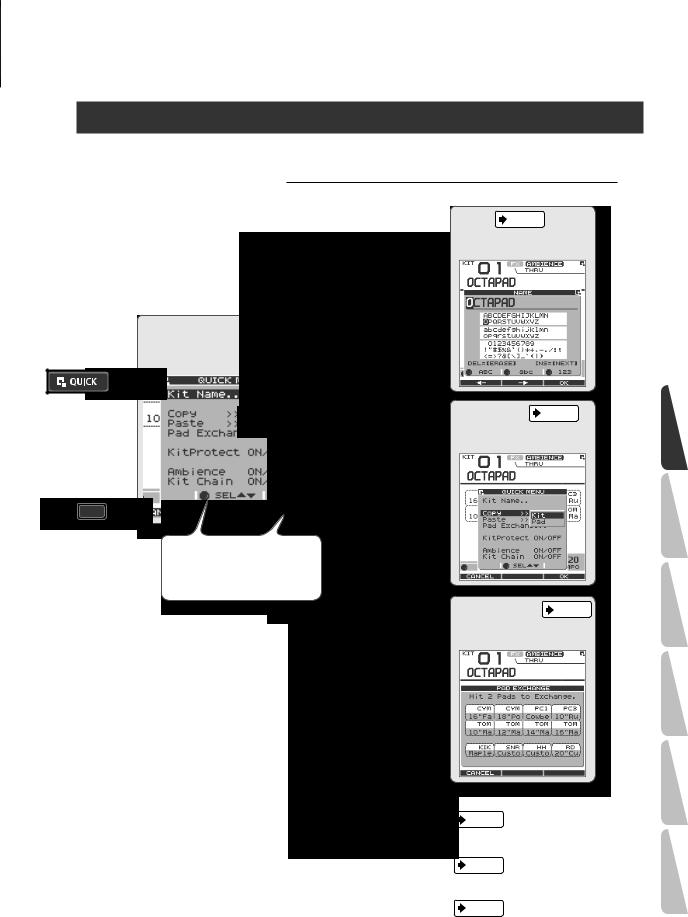
QUICK MENU Screens
When you see the  icon in the upper right of the screen, pressing the [QUICK] button accesses the relative menu. We’ll use the Quick Menu that appears in the KIT screen as an example.
In this manual, we’ll use “QUICK MENU ÚKit Name” to refer to the operation of choosing Kit Name from the QUICK MENU.
NAME p. 35
Assign a name to the kit.
QUICK MENU
This is a menu suitable for each screen.
COPY/PASTE p. 35
Pressing [Button 1] (CANCEL) takes you to the previous screen.
Copy/paste kit or pad data.
Use [Knob 2] (SEL) to select an item, and use [Button 3] (OK) to confirm your choice (i.e., move to that screen).
PAD EXCHANGE p. 36
Exchange pads.
|
Turn kit protect on/off. |
|
p. 34 |
|
Turn ambience on/off. |
* When “Kit Protect” (p.. 34) is on, certain parameters are not |
p. 42 |
|
|
available.. They are highlighted in a grey color.. |
Turn kit chain on/off. |
|
p. 37 |
Appendix (Other) 3 .Adv (Phrase) 2 .Adv (Kit) 1 .Adv Operation Basic Overview
15
MENU Screen
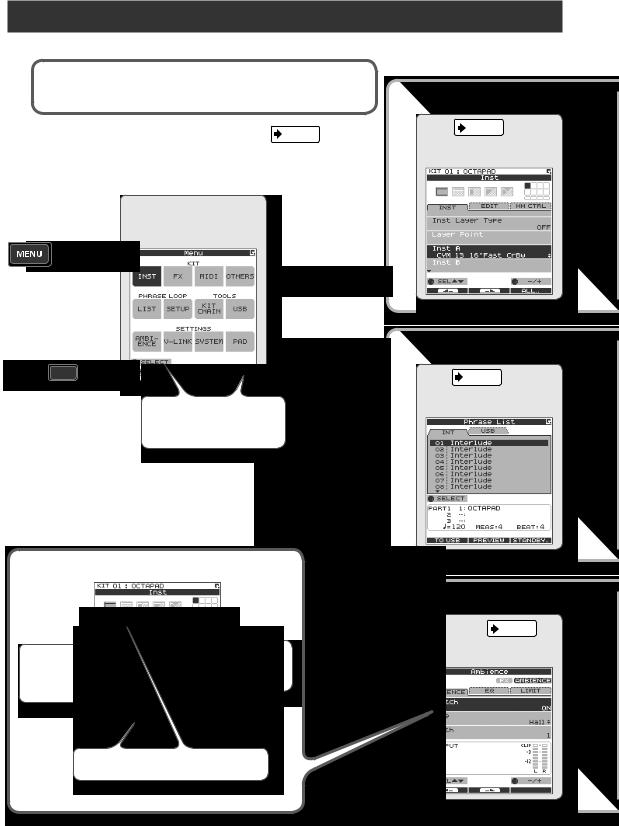
Accessible from any screen pressing the [MENU] button takes you to the OCTAPAD’s main menu.
In various explanations regarding the screens and menus, when you see, |
|
|
||
for example,“choose MENU ÚSYSTEM ÚF.RESET,” the “Ú” points to |
KIT |
|
||
the next selection you should make. |
|
|
||
|
|
INST |
p. 30 |
|
For details on each screen, refer to the pages listed on p. |
. |
|||
|
||||
Edit an Inst.
MENU
This is the main menu screen.
Pressing [Button 1] (CANCEL) takes you to the previous screen.
 PHRASE LOOP
LIST p. 50
Select a phrase.
Use [Knob 1] (SELECT) to choose, and press [Button 3] (ENTER) to confirm.
Basic operations in each screen
|
AMBIENCE p. 42 |
3] |
ambience-related settings. |
Use [Knob 1] to select a parameter
Use [Button 1] or [Button 2] to move to the tab, left or right
* Press the [BACK] button to return to the previous screen..
16

MENU screen Quick Menu
If you press the MENU button and then press the [QUICK] button you will see “Force Save Data” in the pop-up window.
By pressing [Button 3] (OK) current data will be saved. (Also, The OCTAPAD will save your data automatically during the power-off process).
FX p. 39 |
MIDI p. 63 |
OTHERS p. 34 |
Make effect (FX) settings. |
Make MIDI settings for the kit. |
Make other settings such as the |
|
|
kit’s volume or tempo. |
|
|
|
TOOLS
SETUP p. 51 |
KIT CHAIN p. 37 |
USB p. 55 |
Make phrase loop settings. |
Switch kits in an order you |
Save/load data on USB memory. |
|
specify. |
|
V-LINK p. 66 |
SYSTEM p. 52 |
PAD p. 59 |
Make V-LINK settings. |
Make system settings that apply |
Make pad-related settings such |
|
to the entire OCTAPAD. |
as pad sensitivity. |
|
|
|
Appendix (Other) 3 .Adv (Phrase) 2 .Adv (Kit) 1 .Adv Operation Basic Overview
17
PHRASE LOOP Screen
Pressing the [STANDBY] button takes you to a page where you can set parameters of the phrase you are about to create. For details on each screen, refer to the page references shown below  p. .
p. .
If you want to simply learn the operations, refer to “05 Recording a Phrase Loop (PHRASE LOOP)” (p. 26) in the Basic Operation section.
Make settings |
Record |
Press the [STANDBY] button to enter Phrase Loop mode.
Shown while you hold down the [STANDBY] button
SETUP  p. 43
p. 43
Specify the measures, beat, and click.
Enter standby mode 
STANDBY  p. 44
p. 44
Make quantize and tempo settings, and enter record-standby mode.
From the standby state (stopped), pressing the [STANDBY] button will make it go dark.
You will exit Phrase Loop mode and return to the KIT screen.
QUICK MENU  p. 44
p. 44
Load, save, or delete phrases.
REC  p. 45
p. 45
Record your phrase.
Hit a pad to start recording
Play back 
PLAY p. 45
Switch to PLAY mode.
Stop
18
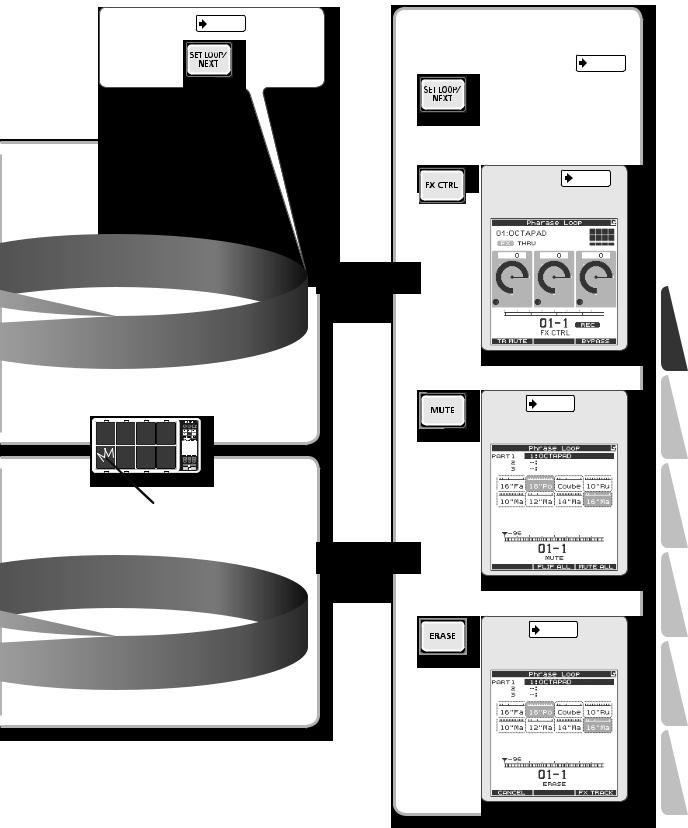
Set loop points p. 43
Loop recording
Record an additional performance
Perform along with the phrase playback
Loop playback
Modify the phrase
Reserve the next operation p. 47
Control the effect
FX CONTROL p. 41
Use [Knob 1–3] to control the effect.
Mute
MUTE p. 46
Mute the selected track.
Erase
ERASE p. 47
Erase the selected track.
Appendix (Other) 3 .Adv (Phrase) 2 .Adv (Kit) 1 .Adv Operation Basic Overview
19
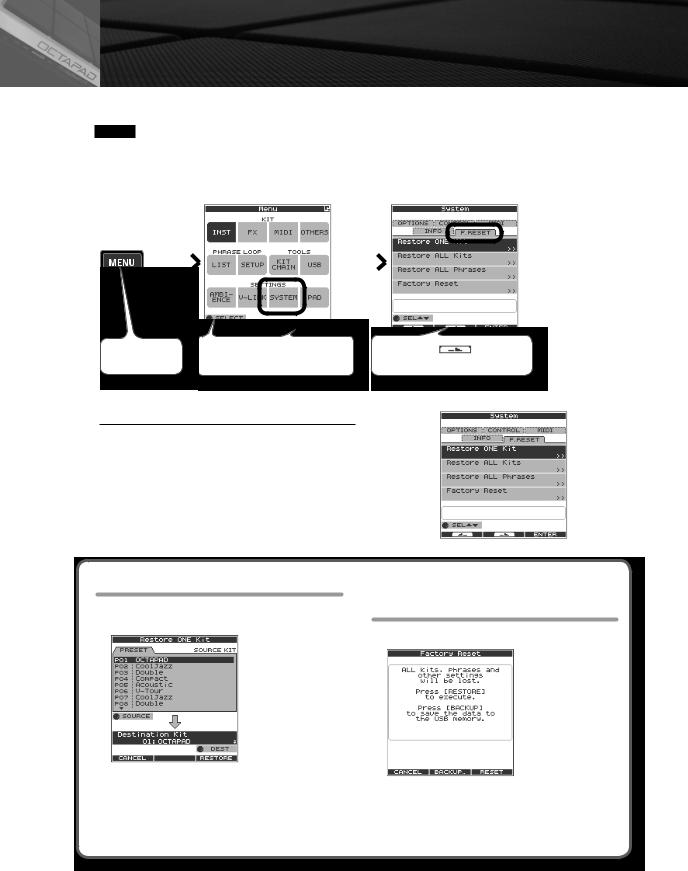
04 FACTORY RESET
The restore function gives you a choice of restoring individual kits or all of them, all phrases, or a full Factory Reset.
NOTE
When you perform the Factory Reset operation, the kits and phrase data saved in the OCTAPAD will be initialized. If there’s any data you want to keep, be sure to back it up to USB memory as described in “Saving Data to USB Memory (USB-SAVE)” (p. 56).
1.Choose MENU ÚSYSTEM ÚF..RESET..
|
|
|
|
|
|
|
|
|
|
|
|
|
|
|
|
|
|
|
|
|
|
|
|
|
|
|
|
|
|
|
|
|
|
|
|
|
|
|
|
|
|
|
|
|
|
|
|
|
|
|
|
|
|
|
Press the [MENU] |
Turn [Knob 1] to select ”SYSTEM,” and |
Press [Button 2] ( |
) to select the |
|||||||
button |
press [Button 3] (ENTER) |
“F.RESET” tab |
|
|
||||||
2.Turn [Knob 1] (SEL) to the reset function and press [Button 3] (ENTER)..
Restore ONE Kit |
Restore a specific kit |
|
|
Restore ALL Kits |
Restore all kits |
|
|
Restore ALL Phrases |
Restore all phrases |
|
|
Factory Reset |
Resets all data |
|
|
*When “Write Protect” (p.. 52) is ON, restore and factory reset functions are not available.. They are highlighted in grey..
3.Proceed as follows..
If you selected “Restore One Kit”
This function actually copies pre-set kit data stored in the OCTAPAD’s internal memory.
If you selected Restore All Kits/ Phrases/Factory Reset
The following screen message will appear.
3-1. Use [Knob 1] (SOURCE) to select the source kit.. 3-2. Use [Knob 3] (DEST) to select the destination kit.. 3-3. Press [Button 3] (RESTORE) to execute..
• [Button 1] (CANCEL) will cancel the operation.
3-1. Press [Button 3] (RESTORE or RESET) to execute..
•Press [Button 2] (BACKUP) to go to the USB-SAVE screen (p. 56).
•[Button 1] (CANCEL) will cancel the operation.
4.When the confirmation message appears, press [Button 3] (OK)..
The reset will be executed. Never turn off the power during the reset process.
20
Basic Operation
It is important to understand the basic operations and functions of the OCTAPAD before using it.. Please read this section fully as you check out the OCTAPAD’S possibilities..
01 Selecting a Kit
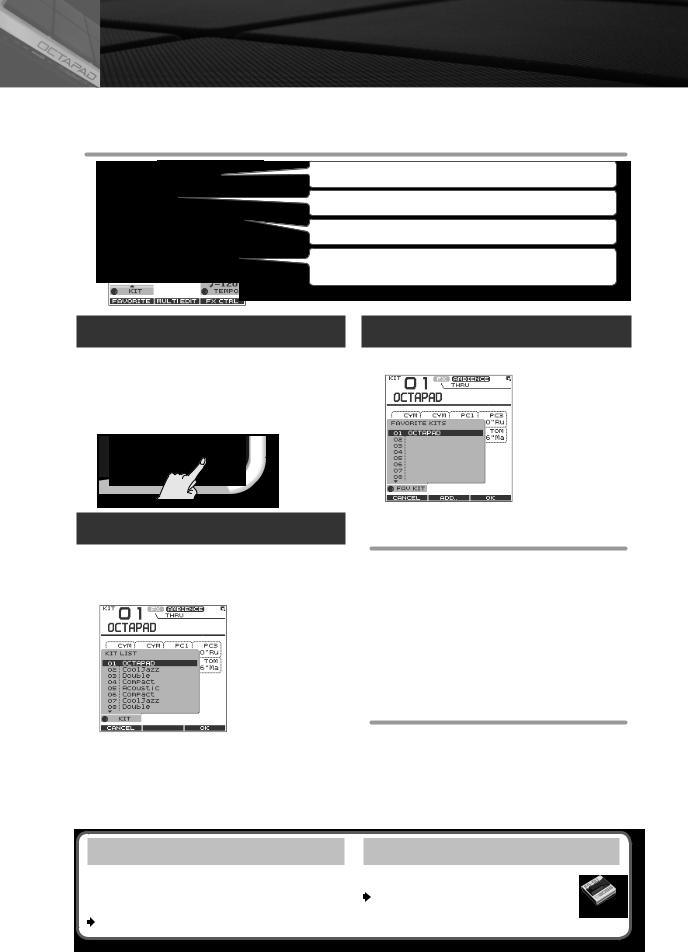
Select any kit. The kit number and name appear in the KIT screen.
Information shown in the KIT screen
Indicates if the FX/ambience are on or off and the FX name.
Kit number/Kit name.
The Inst and group names are highlighted when you play the pads.
The external trigger indicators can be turned on or off.
See “Ext Pad Indicator” (p. 52).
[KIT] Buttons |
FAVORITE KITS |
1.Use the backlit [KIT] buttons to switch kits..
The kit will change immediately, or if you are in any edit screen you will return to the current KIT.
By holding down either of the buttons, scrolling speed increases.
Here’s how to register and recall your favorite kits.
KIT LIST
1.In the KIT screen, turn [Knob 1] (KIT)..
The KIT LIST appears. Turn the same [Knob 1] to move the cursor.
2.Press [Button 3] (OK) to select..
The kit will switch.
How to Register a favorite kit
1.In the KIT screen, press [Button 1] (FAVORITE) and the list appears..
2.Turn [Knob 1] (FAV KIT) to select the destination (10 possibilities)..
3.Press [Button 2] (ADD)..
The “current” Kit you had selected before pressing the FAVORITE button will be assigned to your destination choice.
How to Recall a favorite kit
1.In the KIT screen, press [Button 1] (FAVORITE) and the list appears..
2.Use [Knob 1] (FAV KIT) to choose..
3.Press [Button 3] (OK)..
You’ll switch to the kit that is selected in the list.
KIT CHAIN Function
The Kit Chain function allows you specify the order in which kits will switch. Very convenient for live performance.
For details, refer to “KIT CHAIN” (p. 37).
22
Foot Switch
Foot switches can be used to change kits.
For details, refer to “Foot Switch and External Pad Settings (SYSTEM-CONTROL)”
(p. 53).
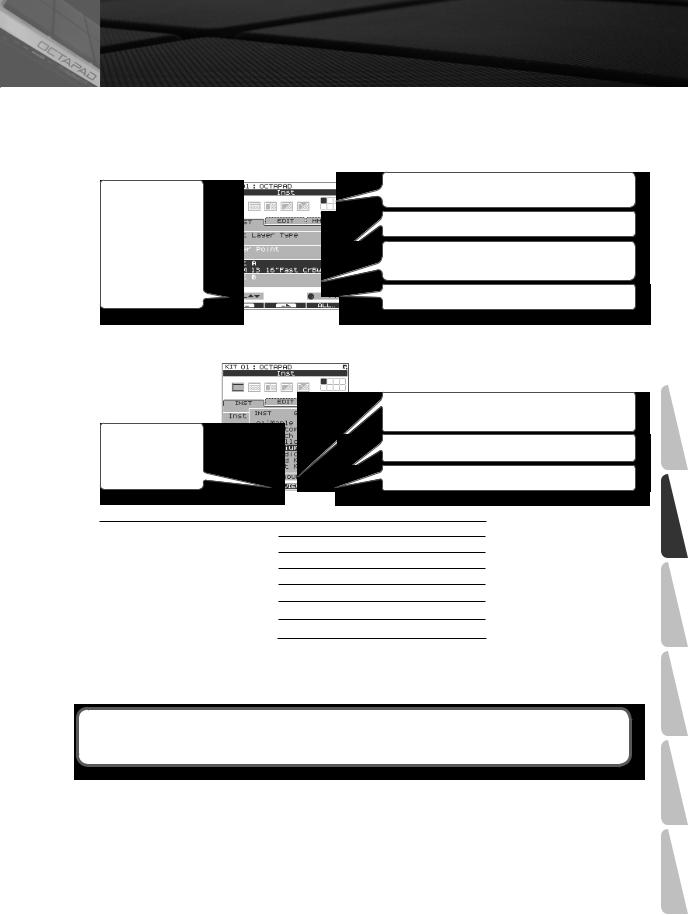
02 Selecting an Inst (INST)
Here’s how to change or assign an Inst to each pad. More about Insts and Layers is here: “What is an Inst?” (p. 8). The changes you make here are saved. You can’t modify a kit whose “Kit Protect” (p. 34) is on.
1.Choose MENU ÚINST ÚINST (p.. 16)..
The INST screen appears.
Use [Knob 1] (SEL) to select a parameter.
The cursor will Initially be at Inst A, so turning
[Knob 3] (–/+) will change Inst A.
2.Play any pad whose Inst you want to change..
3.Turn [Knob 3] (–/+) to select an Inst..
Press
[Button 2] (PREVIEW) to audition the Inst.
Indicates the pad you’re currently editing and will change when you play any pad.
Select Inst A.
Select Inst B.
(This will not work if Inst Layer Type is “OFF”)
Turn [Knob 3] (–/+) to modify the value.
Turn [Knob 2] (GROUP) to select the Inst group.
Turn [Knob 3] (–/+) to select an Inst.
Press [Button 3] (OK) to confirm the selected Inst.
List of Inst groups
KIK |
Kick (bass drum) |
|
|
SNR |
Snare drum |
|
|
TOM |
Tom-tom |
|
|
HH |
Hi-hat cymbal |
|
|
RD |
Ride cymbal |
|
|
CYM |
Crash cymbal |
|
|
|
|
PC1 Percussion with heads
PC2 Metallic percussion
PC3 Miscellaneous percussion
PC4 Melodic percussion
MEL Pitched instruments
SFX Sound effects
OFF Off
4.Repeat steps 2–3 to select the Inst for other pads..
5.Press the [BACK] button to return to the KIT screen..
 Information on layer and other parameters, can be found here: “Inst Settings (INST)” (p. 30)
  You can exchange data between the pads. Refer to “Exchanging Pads (PAD EXCHANGE)” (p. 36).
Appendix (Other) 3 .Adv (Phrase) 2 .Adv (Kit) 1 .Adv Operation Basic Overview
23
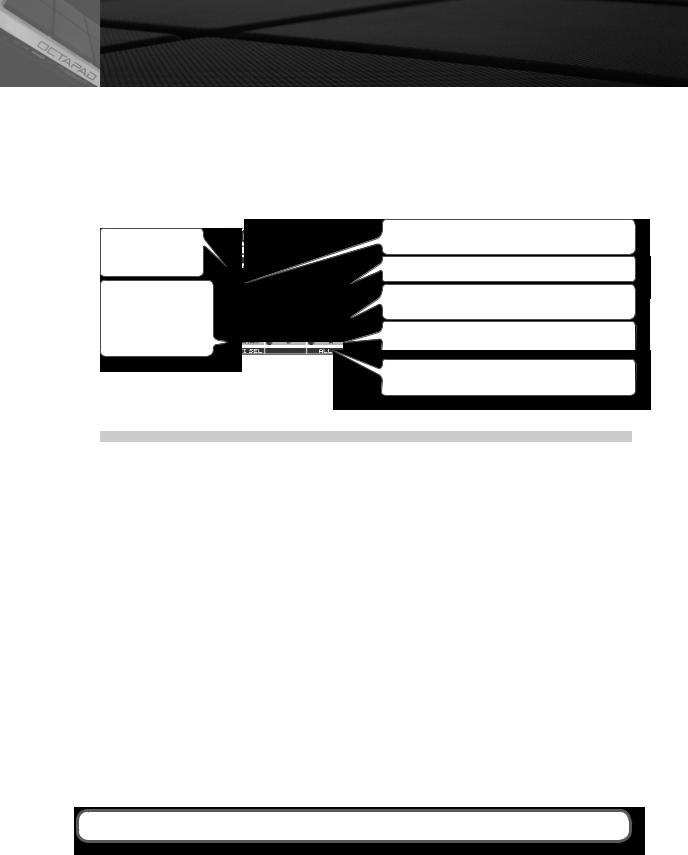
03 MULTI EDIT
What is Multi Edit?
Pushing the Multi Edit button gives you access to 10 different editing parameters. (See the chart below)
1.In the KIT screen, press [Button 2] (MULTI EDIT)..
The Multi Edit screen appears.
Here you can see all the relative values assigned to each pad and external trigger input.
The changes you make are saved in the kit. You can’t edit a kit whose “Kit Protect” (p. 34) is on.
Name of the parameter you’re editing
Turn [Knob 1] (PARAM) and a popup list appears select a parameter here.
Indicates the pad you’re editing and will change when you play a pad.
Value of each pad (Inst A is above, Inst B is below)
Values for external trigger inputs 1–4 (Head is above, Rim is below)
Use [Knob 2] (B) to change the value of Inst B (Rim). Use [Knob 3] (A) to change the value of Inst A (Head).
Press [Button 3] (ALL) to copy the current value to all pads and external triggers.
2.Turn [Knob 1] (PARAM) to select the parameter and press [Button 3] (OK) to confirm your choice..
Parameter |
Value |
Explanation |
|
Tuning |
-2400–+2400 |
Negative (“-”) values will lower the pitch; positive (“+”) values will raise the pitch. The value will change |
|
in steps of 10 as you turn the knob. |
|||
|
|
||
|
|
|
|
Coarse Tune |
-2400–+2400 |
This is the same as Tuning, but the value will change in steps of 100 as you turn the knob. |
|
|
|
|
|
Muffling |
0–50 |
Increasing the value will decrease the resonance and decay. |
|
|
|
|
|
Soft Attack |
0–50 |
Specifies the sharpness of the attack. Increasing the value will soften the sound’s attack. |
|
|
|
|
|
Tone Color |
L50–H50 |
Modifies the brightness of the sound. Higher settings will produce a brighter sound. |
|
|
|
|
|
Pitch Sweep |
-100–+100 |
Positive (“+”) settings will make the pitch change from high to low. Negative (“-”) settings will make the |
|
pitch change from low to high. |
|||
|
|
||
|
|
|
|
Volume |
0–100 |
Specifies the volume. |
|
|
|
|
|
Pan |
L15–CTR–R15 |
Specifies the pan position. CTR is center. |
|
|
|
|
|
Reverse |
OFF, ON |
If this is ON, the pad’s sound will play backward. |
|
* Some Insts will NOT play in reverse.. |
|||
|
|
||
|
|
|
|
FX Send |
0–100 or OFF, ON |
Determines the send level to FX (effect). Adjust accordingly. |
|
|
|
|
3.Hit a pad to select it for editing..
•If you want to edit multiple pads at the same time, hold down [Button 1] (MULTISEL) and play the desired pads.
•If you hit a pad that is not selected, it will cancel the multi selection.
To stay in this multi selection mode, only play the pads you have selected.
4.Use [Knob 3] (A) or [Knob 2] (B) to edit the value..
•[Knob 3] (A) changes the value for Inst A (Head).
•[Knob 2] (B) changes the value for Inst B (Rim).
5.Press the [BACK] button to return to the KIT screen..
 If you want to adjust the pad’s sensitivity, refer to “Internal Pad Sensitivity Settings” (p. 59).
24
 Loading...