


 Loading...
Owner’s Manual Bedienungsanleitung Mode d’emploi Manuale dell'utente Manual del usuario Manual do proprietário Gebruikershandleiding
Nederlands Português Español Italiano Français Deutsch English


Owner’s Manual
* This device contains demo phrases (90–99). Once you delete these, they cannot be recovered. Please back them up as described in “Backing up to your computer” (p. 15).
* This device will enter Sleep mode (power conservation mode) when ten hours have elapsed since the last operation, or since the last audio input while in Stop mode.
If you want to prevent the device from entering Sleep mode, hold down the left pedal while you turn on the power, and continue holding down it down for five seconds (p. 17).
Main Features
Welcome to the Loop Station!
The RC-30 is a pedal-type recorder that lets you record audio phrases from your guitar or vocal etc., and play them back by operating the pedal. You can create a wide variety of performances by layering sound while you record and carry out play back in real time.
•Up to 99 different loop phrases can be saved in phrase memory, for a total of approximately 3 hours (* total for all phrases).
•Multi-track recording allows a wide range of performance possibilities.
•You can input audio in stereo.
•In addition to guitar input, a MIC jack and AUX IN jack are also provided. You can connect a microphone and looprecord your voice, or record sound from your digital audio player.
•Recorded phrases can be copied via USB to your computer, or WAV files from your computer can be loaded into the RC-30 and played back as loops (p. 14).
•You can apply an effect that is synchronized with the tempo of a phrase while you play it back (p. 14).
Before using this unit, carefully read the sections entitled: “USING THE UNIT SAFELY” and “IMPORTANT NOTES” (supplied on a separate sheet). These sections provide important information concerning the proper operation of the unit.
Additionally, in order to feel assured that you have gained a good grasp of every feature provided by your new unit, this manual should be read in its entirety. The manual should be saved and kept on hand as a convenient reference.
Nederlands Português Español Italiano Français Deutsch English

Contents
Main Features . . . . . . . . . . . . . . . . 1
Installing Batteries. . . . . . . . . . . . . . 3
Panel Descriptions. . . . . . . . . . . . . . 4
Turning On the Power. . . . . . . . . . . . . . 7
Basic Operation. . . . . . . . . . . . . . . .8
Selecting a Phrase Memory. . . . . . . . . . . . 8 Selecting the Current Track. . . . . . . . . . . . 8 Recording. . . . . . . . . . . . . . . . . . . . 8 One-Shot Playback. . . . . . . . . . . . . . . . 9 Overdubbing . . . . . . . . . . . . . . . . . . 9 Loop Playback . . . . . . . . . . . . . . . . . . 9
Stop. . . . . . . . . . . . . . . . . . . . . . . 9 Saving a Phrase . . . . . . . . . . . . . . . . . 10 Deleting a Phrase . . . . . . . . . . . . . . . . 10
Specifying How a Phrase Will Play/Stop
(Stop Mode/One-Shot Playback). . . . . . . . . 10
Cancelling an Overdub
(Undo/Redo/Track Clear) . . . . . . . . . . . . 11 Auto Recording/Count-In Recording Functions. . 11
About Rhythm. . . . . . . . . . . . . . . 12
Sounding a Rhythm. . . . . . . . . . . . . . . 12 Setting the Tempo. . . . . . . . . . . . . . . . . . . . . . . . . . . . . . 12
Setting the Rhythm Type. . . . . . . . . . . . 12 Setting the Time Signature . . . . . . . . . . . 13
Using LOOP FX. . . . . . . . . . . . . . . 14
Turning LOOP FX On/Off. . . . . . . . . . . . . 14 Specifying the LOOP FX Type. . . . . . . . . . 14
Connecting to Your Computer via USB . . . . 14
Connecting to an External Footswitch. . . . 16
When Connecting an FS-5U . . . . . . . . . . . 16 When Connecting Two FS-5Us or an FS-6. . . . . 16
Other Settings. . . . . . . . . . . . . . . 17
About Sleep Mode. . . . . . . . . . . . . . . 17 Disabling Sleep Mode . . . . . . . . . . 17 Enabling Sleep Mode (default setting). . . 17
Changing the Switching Order of
Recording gOverdubbing gPlayback. . . . . 17 Formatting the Internal Memory. . . . . . . . . 17
Troubleshooting. . . . . . . . . . . . . . 18
Error Message List. . . . . . . . . . . . . . . . 18 Other Display Indications. . . . . . . . . 19
Specifications. . . . . . . . . . . . . . . . 20
•Recording, duplication, distribution, sale, lease, performance, or broadcast of copyrighted material (musical works, visual works, broadcasts, live performances, etc.) belonging to a third party in part or in whole without the permission of the copyright owner is forbidden by law.
•Do not use this product for purposes that could infringe on a copyright held by a third party. We assume no responsibility whatsoever with regard to any infringements of third-party copyrights arising through your use of this product.
•The copyright of content in this product (the sound waveform data, style data, accompaniment patterns, phrase data, audio loops and image data) is reserved by Roland Corporation.
•Purchasers of this product are permitted to utilize said content for the creating, performing, recording and distributing original musical works.
•Purchasers of this product are NOT permitted to extract said content in original or modified form, for the purpose of
distributing recorded medium of said content or making them available on a computer network.
•BOSS and Loop Station are either registered trademarks or trademarks of Roland Corporation in the United States and/or other countries.
•All product names mentioned in this document are trademarks or registered trademarks of their respective owners.
•The screen shots in this document are used in compliance with the guidelines of the Microsoft Corporation.
•MMP (Moore Microprocessor Portfolio) refers to a patent portfolio concerned with microprocessor architecture, which was developed by Technology Properties Limited (TPL). Roland has licensed this technology from the TPL Group.
•The SD logo (
 ) and SDHC logo (
 ) are trademarks of SD-3C, LLC.
•This product contains eCROS integrated software platform of eSOL Co.,Ltd.
eCROS is a trademark of eSOL Co., Ltd. in Japan.
•Featuring digital fonts by Yourname, Inc. Digital font: Copyright © Yourname, Inc.
Copyright © 2011 BOSS CORPORATION
All rights reserved. No part of this publication may be reproduced in any form without the written permission of BOSS CORPORATION.
2

Installing Batteries
Insert the included batteries as shown in the diagram, being careful to observe the correct polarity.
|
|
English |
|
|
|
Deutsch |
|
• |
Incorrect handling of batteries, rechargeable batteries, or a battery charger can cause leakage, overheating, |
Français |
|
|
|||
|
fire, or explosion. Before use, you must read and strictly observe all of the precautions that accompany the |
|
|
|
batteries, rechargeable batteries, or battery charger. |
|
|
• |
Batteries are supplied with the unit. The life of these batteries may be limited, however, since their primary purpose |
|
|
|
was to enable testing. |
Italiano |
|
• |
Be sure to observe the correct + (positive) and – (negative) orientation of the batteries. |
||
|
|||
• |
When turning the unit upside-down, get a bunch of newspapers or magazines, and place them under the four corners |
|
|
|
or at both ends to prevent damage to the buttons and controls. Also, you should try to orient the unit so no buttons or |
|
|
|
controls get damaged. |
|
|
• |
When turning the unit upside-down, handle with care to avoid dropping it, or allowing it to fall or tip over. |
Español |
|
• |
If the batteries run low, the display will indicate “bt” and the POWER indicator will become dim. When this occurs, |
||
|
|||
|
install fresh batteries as soon as possible. |
|
|
• |
The use of an AC adaptor is recommended as the unit’s power consumption is relatively high. Should you prefer to use |
|
|
|
batteries, please use the alkaline type. |
|
|
• |
Rechargeable Ni-MH batteries cannot be used. |
Português |
|
• |
In some cases, all saved data might be lost if the batteries become depleted during recording or overdubbing (p. 7). |
||
|
|||
• |
When replacing the batteries, use six (AA, LR6) batteries. |
|
|
• |
The contents of internal memory will not be lost when you replace the battery, but we recommend that you make |
|
|
|
regular backups (p. 15) for safety’s sake. |
|
|
|
|
Nederlands |
3

Panel Descriptions
|
|
1 |
|
2 |
|
3 |
|
4 |
|
5 |
|
|
||||||||||
|
|
|
|
|
|
|
|
|
|
|
|
|
|
|
|
|
|
|
|
|
|
|
|
|
|
|
|
|
|
|
|
|
|
|
|
|
|
|
|
|
|
|
|
|
|
|
|
|
|
|
|
|
|
|
|
|
|
|
|
|
|
|
|
|
|
|
|
|
|
|
|
|
|
|
|
|
|
|
|
|
|
|
|
|
|
|
|
|
|
|
|
|
|
|
|
|
|
|
|
|
|
|
|
|
|
|
|
|
|
|
|
|
|
|
|
|
|
|
|
|
|
|
|
|
|
|
|
|
|
|
|
|
|
|
|
|
|
6
7
|
|
|
|
|
|
|
|
|
|
|
|
|
|
|
|
|
|
|
|
|
|
8 |
|
9 |
|
||||
|
|
|
|
|
|
|
|
||
Name |
|
|
|
|
Explanation |
Page |
|||
|
LOOP FX |
|
|
|
|
|
|||
1 |
[TYPE] button |
|
Selects the LOOP FX type. |
p. 14 |
|||||
|
[ON/OFF] button |
|
Turns LOOP FX on/off. |
|
|||||
|
TRACK 1/2 |
|
|
|
|
|
|||
|
[TRACK 1]/ |
|
Adjust the volume of the phrase playback for each track. |
|
|||||
|
[TRACK 2] slider |
|
|
||||||
|
|
|
|
|
|
||||
2 |
|
|
|
|
|
|
p. 8 |
||
STATUS indicator |
|
Light when tracks 1/2 are in recording or playback mode. |
|||||||
|
|
While stopped, they will blink if the track contains data, and will be unlit if |
|
||||||
|
|
|
|
|
|
the track contains no data. |
|
||
|
|
|
|
|
|||||
|
[SELECT] button |
|
These buttons select a track. |
|
|||||
|
MEMORY |
|
|
|
|
|
|||
|
Display |
|
This indicates the current phrase memory number, or various other |
p. 18 |
|||||
|
|
information. |
|
||||||
|
|
|
|
|
|
|
|||
3 |
|
|
|
|
|
||||
[ |
] (DOWN)/ |
|
These decrement or increment the number shown in the display. |
p. 8 |
|||||
|
[ |
] (UP) buttons |
|
|
|
|
|
||
|
[WRITE] button |
|
Press this to save the recorded phrase to internal memory. |
p. 10 |
|||||
|
|
|
|
|
|||||
|
[DELETE] button |
|
Deletes a phrase from internal memory. |
p. 10 |
|||||
|
|
|
|
|
|
|
|
|
|
4

|
|
Panel Descriptions |
||
|
|
|
|
|
|
|
|
|
|
Name |
Explanation |
Page |
||
|
RHYTHM |
|
|
|
|
[OUTPUT LEVEL] knob |
This adjusts the volume level of the rhythm sound. |
|
|
4 |
|
|
|
|
[TYPE] button |
Specifies the rhythm type. |
p. 12 |
||
|
[ON/OFF] button |
This button turns the rhythm sound on/off. |
|
|
|
|
|
|
|
|
[TAP TEMPO] button |
Press this button at the desired timing to set the tempo. |
|
|
|
|
|
|
|
|
MIC |
|
|
|
|
[INPUT LEVEL] knob |
Adjusts the input level from the MIC IN jack. Turning the knob all the way to |
|
|
5 |
the left will turn off the microphone input. |
|
||
|
p. 6 |
|||
|
|
|||
PEAK indicator |
Lights when the input level exceeds the allowable level. Adjust the [INPUT |
|||
|
|
|||
|
LEVEL] knob so that the PEAK indicator lights occasionally when you sing |
|
||
|
|
most loudly into the microphone. |
|
|
|
|
|
|
|
6 |
POWER indicator |
Lights when the power is on. |
p. 7 |
|
|
REC, PLAY indicator |
|
|
|
|
REC (red) indicator |
Lights during recording. |
|
|
|
|
|
|
|
7 |
|
Lights during playback (while loading a phrase memory or performing an |
p. 8 |
|
PLAY (green) indicator |
internal memory operation: blinks rapidly). |
|||
|
During overdubbing, both the REC (red) indicator and the PLAY (green) |
|
||
|
|
|
||
|
|
indicator will light. |
|
|
|
|
|
|
|
|
Left pedal |
|
|
|
|
Switches the unit between |
If the phrase is empty: recording goverdubbing gplayback |
p. 8 |
|
|
recording/overdubbing/ |
|||
|
If the phrase contains data: playback goverdubbing |
|
||
8 |
playback |
|
||
|
|
|||
Undo |
During playback or overdubbing, hold down the left pedal for two or more |
p. 11 |
||
|
||||
|
|
seconds to undo (cancel the recording or the most recent overdubbing). |
|
|
|
|
|
|
|
|
LOOP FX on/off |
Press twice to turn LOOP FX on/off. |
p. 14 |
|
|
|
|
|
|
|
Right pedal |
|
|
|
|
Stop |
Stops the track currently being overdubbed or played. |
p. 9 |
|
9 |
Stop all |
Press twice to stop both tracks simultaneously. |
|
|
|
|
|
||
Tap tempo |
While stopped, press the right pedal repeatedly to set the tempo to the |
p. 12 |
||
|
|
timing at which you pressed it. |
|
|
|
Switch tracks |
To switch the selected track, hold down the right pedal for at least two |
p. 8 |
|
|
seconds. |
|||
|
|
|
||
|
|
|
|
|
Nederlands Português Español Italiano Français Deutsch English
5
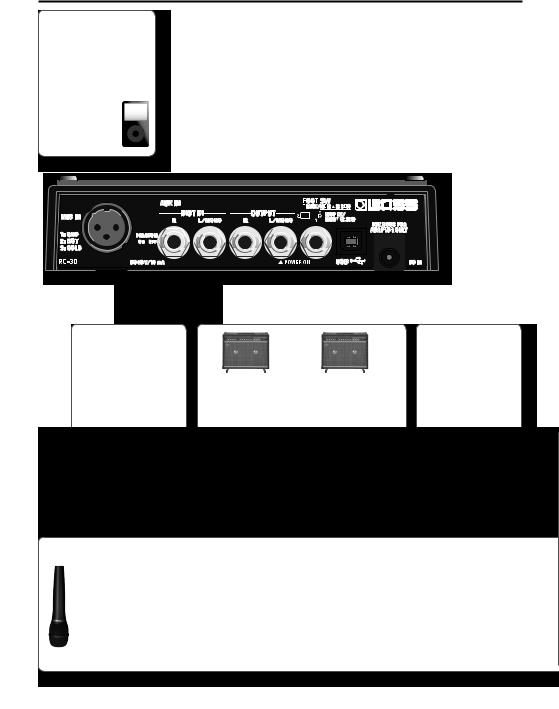
Panel Descriptions
AUX IN jack
Use a stereo mini-plug cable to connect your audio player here.
By using the
Auto recording function(p.11),you can start recording the moment
your audio player begins playback.
USB connector
You can use a commercially available USB cable to connect the RC-30 to your computer, and use the computer to read/write RC-30 phrases (WAV files) (p. 14).
DC IN jack
Accepts connection of an AC Adaptor (PSA series; optional).
By using an AC Adaptor, you can play without being concerned about how much battery power you have left.
*Use only the specified AC adaptor (PSA series), and connect it to an AC outlet of the
correct voltage. Do not use any other AC adaptor, since this may cause malfunction.
INST IN jacks |
OUTPUT jacks |
FOOT SW jack |
Connect your guitar, bass, or effects unit to these jacks.
Use the INPUT L jack and INPUT R jack when connecting a stereooutput effects unit. Use only the INPUT L jack if you’re using a monaural source.
Connect these jacks to your amp or monitor speakers.
If your system is monaural, use only the OUTPUT L jack. Sound that was input in stereo will also be output monaurally.
The OUTPUT L jack also operates as a power switch. The power will be on if a plug is inserted in the OUTPUT L jack. Remove the plug when you’re not using the RC-30.
If you connect a separately available foot switch (FS-5U, FS-6), you can use it to switch phrases or tracks, or to turn the LOOP FX on/off (p. 16).
MIC IN jack
Connect a microphone.
[PHANTOM] switch setting
If you’re using a condenser microphone, choose the “ON” setting. If you’re using a dynamic microphone, choose the “OFF” setting.
Adjusting the microphone level
Adjust the [INPUT LEVEL] knob so that the PEAK indicator lights occasionally when you sing most loudly into the microphone.
6

Panel Descriptions
NOTE
*To prevent malfunction and/or damage to speakers or other devices, always turn down the volume, and turn off the power on all devices before making any connections.
*Before connecting or disconnecting any connection cables, be sure all the volume controls in your system are set to minimum.
*Use connection cables that do not contain a built-in resistor. If you use cables that contain a resistor, there might be insufficient volume from the device connected to the AUX IN jacks, or it might be inaudible.
*Do not connect headphones to the OUTPUT jack. Doing so may damage the headphones.
Turning On the Power
Inserting a connecting plug into the OUTPUT L jack turns on the power to the unit.
Once the connections have been completed, turn on power to your various devices in the order specified. By turning on devices in the wrong order, you risk causing malfunction and/or damage to speakers and other devices.
When powering up |
Turn on the power to your guitar |
|
amp last. |
||
|
||
|
|
|
When powering |
Turn off the power to your guitar |
|
down |
amp first. |
*This unit is equipped with a protection circuit. A brief interval (a few seconds) after power up is required before the unit will operate normally.
Caution when turning off the power
While the RC-30 is in the following states, you must never turn off the power (i.e., disconnect the plug from the OUTPUT L jack).
Doing so may cause all the saved data to be lost.
•While the REC or PLAY indicator is lit
(during phrase recording/playback/overdubbing)
•While the PLAY indicator is blinking rapidly
(while phrase memory is being read, or an internal memory operation is occurring)
Caution when using a microphone
*Howling could be produced depending on the location of microphones relative to speakers. This can be remedied by:
•Changing the orientation of the microphone(s).
•Relocating microphone(s) at a greater distance from speakers.
•Lowering volume levels.
*If the amp and microphone are close together, the sound played back from the amp may be picked up by the microphone. If you record or overdub in such a state, the amp playback picked up by the microphone will also be recorded. You should separate the amp and microphone so that the playback from the amp is not picked up by the microphone.
*Always turn the phantom power off when connecting any device other than condenser microphones that require phantom power. You risk causing damage if you mistakenly supply phantom power to dynamic microphones, audio playback devices, or other devices that don’t require such power. Be sure to check the specifications of any microphone you intend to use by referring to the manual that came with it.
(This instrument’s phantom power: 48 V DC, 10 mA Max)
*This instrument is equipped with balanced (XLR) type jacks. Wiring diagrams for these jacks are shown below. Make connections after first checking the wiring diagrams of other equipment you intend to connect.
Nederlands Português Español Italiano Français Deutsch English
7

Basic Operation
To perform recording, overdubbing, and playback, press the left pedal as shown in the diagram.
Selecting a Phrase Memory
Use the ] / ] buttons to select a phrase memory (1–99).
Recording
Record your guitar or bass performance, or the sound from an audio player connected to the AUX IN jack.
Display
Only number displayed
Dot in lower right
Explanation
Empty phrase
Press the left pedal to start recording
Phrase containing data
Press the left pedal to start loop playback
|
|
One-shot phrase |
|
Number |
|||
When you press the left pedal, |
|||
alternately |
|||
displayed with |
the track for which one-shot |
||
“oL,”“Lo,” or “oo” |
has been specified will play |
||
|
|
only once (it will not loop) |
|
•When shipped from the factory, phrases 90–99 contain demo phrases.
•Auto recording (p. 11) lets you start recording the moment you begin performing.
•You can also record along with rhythm sounds (p. 12).
Selecting the Current Track
There are two tracks for phrases, and the track that is currently selected is called the “current track.” Recording and overdubbing can be performed only on the current track. If you switch the current track during recording or overdubbing, the track that was being recorded will switch to playback.
You can switch the current track as follows.
Press the [SELECT] button for TRACK 1 or TRACK 2
The [SELECT] button you pressed will light, and that button’s track will become the current track.
Hold down the right pedal for two seconds or longer
The current track will switch when you hold down the right pedal for two seconds or longer.
Starting the two tracks simultaneously
When you press the left pedal for a phrase that contains data, only the current track will start playback.
If data exists in both track 1 and track 2, simultaneously pressing the track 1 and track 2 [SELECT] buttons while stopped (or using the right pedal to switch tracks several times) will cause the two buttons to light. If you start playback from this state, the two tracks will start simultaneously. After starting, track 1 will be the current track.
8
Basic Operation
Overdubbing |
Loop Playback |
Layer your performances while |
Play back phrases as loops. |
phrase plays as a loop. |
Pressing the left pedal switches the |
|
|
Pressing the left pedal switches the |
unit to overdubbing. |
unit to playback. |
|
• You can Undo and Redo (p. 11). |
• To use the Memory Shift function, press the |
|
[ ] / [ ] buttons while a phrase is playing; |
|
the phrase memory number will blink, |
|
allowing you to select the next phrase (p. 16). |
Deutsch English
Press the right pedal |
Stop |
|
|
|
Regardless of the timing, |
||||
|
||||
|
the right pedal will stop the current |
|||
|
track. |
|
|
|
|
• If you want the two tracks to stop |
|||
|
simultaneously, press the right pedal twice in |
|||
|
succession. |
|
|
|
-Shot Playback |
|
|
|
|
The track for which one-shot has been specified will play only once. |
Display |
Track 1 |
Track 2 |
|
|
||||
Refer to “Specifying How a Phrase Will Play/Stop |
oL |
One shot |
Loop |
|
(Stop Mode/One-Shot Playback)” (p. 10). |
Lo |
Loop |
One shot |
|
|
||||
|
oo |
One shot |
One shot |
|
NOTE
* While phrase memory is being read, the PLAY (green) indicator will blink rapidly. Never turn off the power while the PLAY indicator is blinking rapidly.
*The minimum recording time for a loop phrase is approximately 1.5 seconds. If you press the pedal within approximately 1.5 seconds after you start recording, recording will continue until the phrase is at least approximately 1.5 seconds long.
*The maximum recording time for a loop phrase is approximately 3 hours (total for all phrases). When the maximum
recording time is exceeded, the display will show “FL” to indicate that internal memory is full, and recording or overdubbing may end before you intended. If this occurs, delete unneeded phrases (p. 10) and then try the operation again.
*If you use the Memory Shift function before saving a phrase, that phrase will be erased. For details on how to save
Nederlands Português Español Italiano Français
a phrase, refer to p. 10. |
9 |
|

Basic Operation
Saving a Phrase
If you select a different phrase memory or turn off the power after recording or overdubbing, the phrase you recorded will be lost. If you want to keep the phrase, you must save it.
1.Press the [WRITE] button.
The display will indicate “ ” (wr).
2.Use the [ ] / [
] / [ ] buttons to specify the save-destination phrase memory.
You can skip this step if you want to save to the currently selected phrase.
You can’t select a phrase memory in which a phrase has already been saved.
The maximum recording time is a total of approximately 3 hours for all phrases (including the phrase that has not been saved). If the phrase cannot be saved because there is insufficient free
memory, the display will indicate “FL” alternately with the phrase memory number. In this case, delete unneeded phrases (p. 10) and then try the operation again.
3.Press the [WRITE] button once again; the phrase will be saved.
If you decide to cancel the save operation, press any button other than [WRITE], [ ], or [
 ], or press a pedal.
While the phrase is being saved, the number in the display and the PLAY indicator will blink rapidly.
NOTE
*Never turn off the power while the PLAY indicator is blinking rapidly. This may cause all saved data to be lost.
*Please be aware that the contents of memory can be irretrievably lost as a result of a malfunction or improper operation of the unit. You should back up important data as described in “Backing up to your computer” (p. 15).
*All due care is taken during repairs to avoid the loss of data. However, in certain cases, such as when there is damage to the memory, it may not be possible to restore the data.
*Unfortunately, it may be impossible to restore the contents of data that was stored in the unit’s memory once it has been lost. Roland Corporation assumes no liability concerning such loss of data.
Deleting a Phrase
*This device contains demo phrases (90–99). Once you delete these, they cannot be recovered. Please back them up as described in “Backing up to your computer” (p. 15).
1.Use the [ ] / [
] / [ ] buttons to select the phrase memory that you want to delete.
2.Press the [DELETE] button.
The display will indicate “dL.”
*At this point, you can’t change the phrase memory number that will be deleted.
3.Press the [DELETE] button once again; the phrase will be deleted.
If you decide to cancel the delete operation, press any button other than [DELETE] or press a pedal.
While the phrase is being deleted, the number in the display and the PLAY indicator will blink rapidly.
*Never turn off the power while the PLAY indicator is blinking rapidly. This may cause all saved data to be lost.
Specifying How a Phrase Will Play/Stop
(Stop Mode/One-Shot Playback)
You can specify how a phrase will play and stop.
1.For two seconds or longer, hold down the [SELECT] button of the track whose setting you want to change.
The display will indicate the currently selected stop mode setting.
2.Use the [ ] / [
] / [ ] buttons to select the desired stop mode.
Display |
Play |
Stop |
Explanation |
|
LP |
Loop |
Stop |
This is regular loop playback |
|
imme- |
||||
play |
(default setting). |
|||
|
|
diately |
|
10

Basic Operation
Display |
Play |
Stop |
Explanation |
|
|
|
|
One-shot playback will play |
|
|
|
|
the phrase once from the |
|
|
|
|
beginning to the end, and |
|
|
|
|
then stop automatically. |
|
|
One-shot |
Stop |
* Overdubbing is disabled |
|
oS |
imme- |
|
when one-shot playback |
|
|
playback |
diately |
|
is in effect. If the left pedal |
|
|
|
|
is pressed during playback |
|
|
|
|
of the phrase, the phrase |
|
|
|
|
starts playing from the |
|
|
|
|
beginning again (retrigger |
|
|
|
|
playback). |
|
|
|
|
|
|
|
Fade- |
The stop effect will be applied |
|
|
|
when you press the right |
||
|
Loop |
out and |
||
Fo |
pedal. |
|||
play |
then |
• |
The PLAY indicator will blink |
|
|
|
stop |
||
|
|
|
|
until the phrase stops. |
|
|
Play to |
• |
You can stop immediately |
|
|
the end |
||
|
|
of the |
|
by pressing the right pedal |
LE |
Loop |
|
once again before the |
|
phrase |
|
|||
play |
|
phrase has stopped. |
||
|
|
and |
* You can’t overdub before |
|
|
|
then |
||
|
|
stop |
|
the phrase has stopped. |
|
|
|
|
|
3.Press the [SELECT] button to return to normal operation.
The stop mode setting is remembered when you save the phrase (p. 10).
Cancelling an Overdub
(Undo/Redo/Track Clear)
You can Undo/Redo by holding down the left pedal for two seconds or longer. You can clear the track by holding down the right pedal and pressing the left pedal.
Operation |
Display |
Explanation |
|
|
Hold down the left pedal for at least |
Undo |
Un |
two seconds during playback or |
overdubbing; the recording or the |
||
|
|
most recent overdubbing will be |
|
|
cancelled. |
|
|
|
|
|
If you want to restore the cancelled |
|
|
sound, hold down the left pedal for at |
Redo |
rE |
least two seconds once again. |
|
|
* You can’t Redo after Undoing a |
|
|
recorded phrase. |
|
|
|
Operation |
Display |
Explanation |
|
|
|
If you hold down the right pedal and |
|
|
|
press the left pedal, the phrase of the |
|
|
|
current track will be cleared. (Clear is |
|
|
|
temporary; phrases saved in phrase |
|
Track |
CL |
memory will not be deleted.) |
|
clear |
|
|
|
|
|
|
|
|
NOTE |
|
|
|
|
|
|
|
|
* If you’re clearing while stopped, |
|
|
|
the phrase will play if you press the |
|
|
|
left pedal first. |
|
|
|
|
|
During Undo/Redo, the PLAY and REC indicators will blink rapidly. During Clear, the PLAY indicator will blink rapidly.
Auto Recording/Count-In
Recording Functions
“Auto recording” starts recording the moment you begin playing your guitar or play back your audio player. “Count-in” sounds the rhythm for one measure before recording starts.
1.Hold down the [TAP TEMPO] button for at least two seconds.
The display will indicate “no.”
2. |
Use the [ |
] / [ ] buttons to select the |
|
|
desired recording mode, and then press |
||
|
the left pedal to start recording. |
||
|
|
|
|
Display |
Mode |
Explanation |
|
no |
|
Normal |
Recording will begin the instant you |
|
recording |
press the left pedal. |
|
|
|
||
|
|
|
|
|
|
|
The REC indicator will blink rapidly, |
|
|
Auto |
and the RC-30 will enter recording- |
AU |
|
standby mode. When you begin |
|
|
recording |
||
|
|
|
playing, the REC indicator will light |
|
|
|
and recording will start. |
|
|
|
|
|
|
|
The [RHYTHM ON/OFF] button will |
|
|
|
blink. When you press the left pedal, |
|
|
|
the REC indicator will blink rapidly, |
|
|
|
and the rhythm will sound for one |
|
|
|
measure. (You can stop by pressing |
Ct |
|
Count-in |
the right pedal during this time.) |
|
recording |
When the one measure of playback |
|
|
|
||
|
|
|
has ended, recording will start. (The |
|
|
|
rhythm will continue sounding even |
|
|
|
after recording has begun.) |
|
|
|
For more about the rhythm settings, |
|
|
|
refer to “About Rhythm” (p. 12). |
|
|
|
|
The recording mode will be reset to Normal recording when you turn off the power.
Nederlands Português Español Italiano Français Deutsch English
11

About Rhythm
Sounding a Rhythm
1.Press the [RHYTHM ON/OFF] button to switch the rhythm sound between playing and stopped.
•Use the [RHYTHM OUTPUT LEVEL] knob to adjust the volume of the rhythm.
•The [TAP TEMPO] button will blink in time with the rhythm (red on the first beat, green on subsequent beats).
•When you save a phrase (p. 10), the rhythm type and time signature selected at that time will also be saved.
Setting the Tempo
When recording, you can set the tempo before you start recording. When playing back a saved phrase, you can change the playback tempo without changing the pitch of the phrase.
1. Use the [ ] / [ ] buttons to select the phrase memory whose tempo you want to set.
2.Press the [TAP TEMPO] button several times at the desired tempo.
The tempo will be set to the interval at which you press the button.
Alternatively, you can set the tempo by pressing the right pedal repeatedly while stopped.
•If the RC-30 is stopped, the rhythm ([RHYTHM ON/ OFF] button) will turn on after you set the tempo.
*You can only change the tempo of phrases that have been saved in phrase memory. If you want to change the tempo of a phrase immediately after recording or overdubbing, you must first save it to phrase memory (p. 10).
*There are limitations on the proportion of the possible tempo change.
*You can’t specify a tempo that would cause the phrase to loop in a shorter time than the minimum recording time (approximately 1.5 seconds).
The tempo setting is stored when you save the phrase (p. 10).
Setting the Rhythm Type
1.Press the [RHYTHM TYPE] button.
The display will indicate “r0” – “r9”; the RC-30 is now in rhythm type selection mode.
2. Use the [ ] / [ ] buttons to select the desired rhythm type (r0–r9).
3.Press the [RHYTHM TYPE] button to return to normal operation.
Rhythm Type List
r0 Hi-Hat
r1 Kick & Hi-Hat
r2 Rock 1
r3 Rock 2
r4 Pop
r5 Funk
r6 Shuffle
r7 R & B
r8 Latin
r9 Percussion
12

About Rhythm
Setting the Time Signature
You can set the time signature before you start recording.
*You can’t change the time signature after recording.
1.Hold down the [RHYTHM TYPE] button for at least two seconds.
The display will indicate “b4” or “b3”; the RC-30 is now in time signature selection mode.
2.Use the [ ] / [
] / [ ] buttons to select the desired time signature.
Display |
Explanation |
b4 |
4/4 beat (default) |
|
|
b3 |
3/4 beat |
|
|
3.Press the [RHYTHM TYPE] button to return to normal operation.
Recording with the rhythm sound
If you record while the rhythm sound is on, recording will start from the beginning of the measure the instant you press the pedal to initiate recording.
By using the “Count-in recording” function (p. 11), you can start recording after the rhythm sound has played back for one measure.
Regardless of the timing at which you press the pedal to end recording, the length of the phrase will automatically be adjusted to units of one measure.
Recording without the rhythm sound
If you record while the rhythm sound is off, the tempo of the phrase will be automatically specified after recording has ended.
The automatic tempo setting is calculated by assuming that you have recorded “1, 2, 4, 8, 16, ... measures in the specified time signature (p. 13).”
Nederlands Português Español Italiano Français Deutsch English
13

Using LOOP FX
You can apply an effect to the phrase playback. The effect will be applied in synchronization with the tempo of the phrase.
*You can’t apply an effect to the sound being recorded (i.e., you can’t record the processed signal).
Turning LOOP FX On/Off
1.Press the [LOOP FX ON/OFF] button to turn LOOP FX on/off.
While stopped or playing, you can turn LOOP FX on/ off by pressing the left pedal twice in succession.
Specifying the LOOP FX Type
1.Press the [LOOP FX TYPE] button to select the desired LOOP FX type.
LOOP FX Type |
Explanation |
|
BEND DOWN |
This effect abruptly lowers the pitch. |
|
|
|
|
STEP PHASER |
This is a phaser that changes in steps. |
|
|
|
|
SWEEP FILTER |
This is a filter whose frequency changes |
|
in synchronization with the tempo. |
||
|
||
|
|
|
TEMPO DELAY |
This produces a tempo-synchronized |
|
delay effect. |
||
|
||
|
|
|
Lo-Fi |
This effect intentionally degrades the |
|
sound to create a distinctive character. |
||
|
||
|
|
Connecting to Your Computer via USB
You can connect the RC-30 to your computer via a commercially available USB cable, and back up RC-30 phrases (WAV files) to your computer or load WAV files from your computer to the RC-30.
Playable WAV file formats
Data Format |
WAV |
|
|
Bit Rate |
16-bit linear, stereo |
Sampling Frequency |
44.1 kHz |
Maximum WAV file size is 1.7 GB (total of all files), maximum time is approximately 3 hours (total of all phrases), and minimum time is approximately 1.5 seconds.
1.Turn on the RC-30’s power (insert a plug into the OUTPUT L jack).
*The RC-30 will not operate on USB bus power. We recommend that you use an AC adaptor (sold
separately) to ensure that the power does not turn off while connected via USB.
2.Use a commercially available USB cable to connect the RC-30’s USB connector to your computer’s USB connector
(a connector that supports USB 2.0 Hi-Speed).
*You can’t make USB connections if the RC-30 is not stopped, or if there is a phrase that has not been saved.
14

|
|
|
|
|
Connecting to Your Computer via USB |
||
|
|
|
|
|
|
|
|
3. Back up the phrases as described below. |
4. When you’ve finished copying WAV files, |
||||||
|
|
|
|
|
disconnect the USB drive as follows. |
||
|
Windows users |
|
|||||
|
|
|
When you have disconnected the USB drive, the |
||||
|
Within My Computer (or Computer), open “BOSS_RC- |
|
|||||
|
|
display will indicate “dC” and the [RHYTHM ON/OFF] |
|||||
|
30” (or Removable Disk). |
|
|||||
|
|
button will blink. |
|||||
|
|
|
|
|
|||
|
Mac OS users |
|
|
|
|
|
|
|
On the desktop, open the “BOSS_RC-30” icon. |
|
Windows 7 users |
|
|
||
|
|
In the lower right of your screen, click the [ ] icon |
|||||
Backing up to your computer |
|
||||||
|
g[ ] icon, and then click “Remove BOSS_RC-30 (or |
||||||
|
Copy the entire “ROLAND” folder from the BOSS_RC- |
|
Removable Disk).” |
||||
|
|
|
|
|
|||
|
30 drive to your computer. |
|
Windows Vista/Windows XP users |
|
|||
Recovering backed-up data from your |
|
In the lower right of your screen, click the [ ] icon |
|||||
|
([ ] in XP) and then click “Safely Remove BOSS_RC-30 |
||||||
computer to the RC-30 |
|
(or Removable Disk).” |
|||||
|
|
|
|
||||
*Performing this operation will erase all phrases that are currently saved in the RC-30. Be sure to make a backup before you proceed.
In the BOSS_RC-30 drive, delete the “ROLAND” folder, and then copy the backed-up “ROLAND” folder from your computer to the BOSS_RC-30 drive.
Writing individual WAV files from your computer to the RC-30’s phrase memory
Mac OS users
On the desktop, right-click (or [Control] + click) the USB drive icon, and then click “Remove BOSS_RC-30.”
5.Press the [RHYTHM ON/OFF] button to return to normal operation.
The “dC” indication will disappear from the display, and the RC-30 will return to normal operation.
6.Disconnect the USB cable from your
You can copy WAV files from your computer to the
“001_1”, “001_2”–”099_1”, “099_2” folders within the “ROLAND”–”WAVE” folder in the BOSS_RC-30 drive (In the folder name “0XX_Y,” the XX is the phrase memory number and the Y is the track number).
NOTE
*Do not delete the folders inside the BOSS_RC-30 drive unless you are performing a recovery operation.
*You can use the following characters in file names. A–Z (uppercase letters), 0–9 (numerals), _ (underscore)
*Do not place more than one WAV file in any folder. If a folder already contains a WAV file, do not overwrite it. Write your WAV files into empty folders
NOTE
*Never perform the following actions until you have completed steps 4–5. Doing so might make your computer freeze, or might result in the loss of all of the RC-30’s data.
•Disconnect the USB cable.
•Allow your computer to enter suspend (standby) or hibernate mode, restart it, or shut it down.
•Turn off the RC-30’s power.
*Unfortunately, it may be impossible to restore the contents of data that was stored in the unit’s memory once it has been lost. Roland Corporation assumes no liability concerning such loss of data.
Italiano Français Deutsch English
15

Connecting to an External Footswitch
Connect your foot switch to the FOOT SW jack as shown in the illustration, and set its POLARITY switch.
|
|
Cable: |
|
|
Stereo 1/4” phone type fg |
|
|
1/4” phone type x 2 |
|
|
Cable: |
|
|
Stereo 1/4” phone type fg |
|
|
Stereo 1/4” phone type |
When Connecting an FS-5U |
When Connecting Two FS-5Us |
When Connecting an FS-6 |
|
or |
or |
Cable:
1/4” phone type fg
1/4” phone type
POLARITY switch |
MODE/POLARITY switch |
When Connecting an FS-5U
* The FS-5L cannot be used.
Operation |
Explanation |
Switch the |
Pressing the foot switch will switch |
current track |
the current track. |
|
|
|
Holding down the foot switch for two |
|
seconds or longer switches you to the |
|
next-numbered phrase memory. |
If you press the foot switch during Memory shift (up) playback, the newly selected phrase
memory number will blink in the display, and the phrase memory will be changed when the currently playing phrase has ended.
*If the current phrase has not been saved, that phrase will be lost when you perform the memory shift. For details on how to save a phrase, refer to p. 10.
•If you perform the memory shift operation near the end of the phrase, there may be cases in which the shift-destination phrase memory will not be selected.
•You can also perform memory shift operations by pressing the [ ] / [
] / [ ] buttons.
When Connecting Two FS-5Us or an FS-6
When you operate an FS-5U connected to the white plug (stereo L side) or pedal B of an FS-6
The operation will be the same as when a single FS-5U is connected.
When you operate an FS-5U connected to the red plug (stereo R side) or pedal A of an FS-6
Operation |
Explanation |
|
LOOP FX on/off |
Pressing the foot switch will turn |
|
LOOP FX on/off. |
||
|
||
|
|
|
Memory shift |
When you hold down the foot |
|
switch for at least two seconds, the |
||
(down) |
previous-numbered phrase memory |
|
|
will be selected. |
|
|
To switch the LOOP FX TYPE, hold |
|
Switching the |
down the B pedal of the FS-6 (FS-5U of |
|
stereo L side) while you press (within |
||
LOOP FX TYPE |
||
2 seconds) the A pedal of the FS-6 |
||
|
||
|
(FS-5U of stereo R side). |
|
|
|
16

Other Settings
About Sleep Mode
When ten hours have elapsed since the last operation or audio input, the RC-30 will enter sleep mode (power
conservation mode; only the bypass sound will be output). From sleep mode, you can press the pedal to return to normal mode.
*Battery power continues to be consumed even in sleep mode. To prevent battery consumption, turn off the power by removing the plug from the OUTPUT L jack.
*The RC-30 will not enter sleep mode if there is a phrase that has not been saved.
Disabling Sleep Mode
1.While holding down the left pedal, turn on the power (insert a plug into the OUTPUT L jack).
2.Continue holding down the left pedal for five seconds.
The display will blink “__” and the POWER indicator will blink.
3.Release the left pedal; the RC-30 will resume normal operation.
Enabling Sleep Mode (default setting)
1.While holding down the left pedal, turn on the power (insert a plug into the OUTPUT L jack).
2.Within two seconds, press the left pedal twice.
The display will blink “SL” and the POWER indicator will blink.
After two seconds, the RC-30 will resume normal operation; sleep mode will be enabled.
Changing the Switching Order of
Recording gOverdubbing gPlayback
When you press the left pedal, the RC-30 will switch its operation in the order of recording goverdubbing g playback (default setting) (p. 8). However, you can change this so that the order is recording gplayback goverdubbing (RC-20XL compatible).
1.While holding down the [TAP TEMPO] button, turn on the power (insert a plug into the OUTPUT L jack).
2.Use the [ ] / [
] / [ ] buttons to select the desired mode.
Display Explanation
Operation will switch in the order of
rd Recording gOverdubbing gPlayback
(default setting).
Operation will switch in the order of
rP Recording gPlayback gOverdubbing
(RC-20XL compatible).
3.Press the [TAP TEMPO] button to return to normal operation.
Formatting the Internal Memory
*When you format the RC-30’s internal memory, all phrase memories that were saved will be erased, and cannot be recovered. Do not format the internal
memory unless the display indicates “Er” and the
RC-30 has stopped operating correctly.
1.While holding down the [WRITE] button and the [RHYTHM ON/OFF] button, turn on the power (insert a plug into the OUTPUT L jack).
The display will indicate “FN.”
2.Press the [RHYTHM ON/OFF] button once again.
The display will blink “FN.”
3.Press the [WRITE] button; formatting of the internal memory will begin.
The indication “FN” in the display and the PLAY indicator will blink rapidly. When formatting is completed, the RC-30 will return to normal operation.
*Never turn off the power while the PLAY indicator is blinking rapidly.
Nederlands Português Español Italiano Français Deutsch English
17

Troubleshooting
Problem |
Action |
Recording does not end If rhythm is on, or if you recorded a phrase that is shorter than the minimum recording time immediately when you (approximately 1.5 seconds), the length of the phrase is adjusted automatically; this may mean press the right pedal that recording does not end immediately when you press the right pedal.
Recording started |
If due to distortion or other causes there is a significant amount of noise, that noise may be |
||
immediately even |
|||
enough to trigger the beginning of recording. Reduce the noise, for example by lowering the |
|||
though Auto recording |
|||
distortion level. |
|||
mode is selected |
|||
|
|
||
|
|
||
|
You cannot change the playback tempo in the following situations. |
||
Cannot change the |
• |
If the phrase has not been saved. |
|
• |
While phrases are being switched (PLAY indicator blinking rapidly). |
||
playback tempo |
|||
|
• |
When you attempt to set the tempo for a phrase that is looped over an interval shorter |
|
|
|
than the minimum recording time (approximately 1.5 seconds). |
|
Error Message List
Display |
Meaning |
Action |
Page |
bt |
The battery has run low. |
Replace the battery. |
p. 3 |
|
|
|
|
FL |
Memory is full. |
Delete unneeded phrases. |
p. 10 |
|
|
|
|
UF |
This WAV file is unplayable. |
Check the format of the WAV file. |
p. 14 |
|
|
|
|
EF |
Further overdubbing is not possible. |
Re-save the phrase. |
p. 10 |
|
|
|
|
Er |
Internal memory must be formatted. |
Format the RC-30’s internal memory. |
p. 17 |
|
|
|
|
dN |
The RC-30 has malfunctioned. |
Contact your dealer. |
|
|
|
|
|
18
Troubleshooting
Other Display Indications
Display |
Explanation |
Page |
|
1–99 |
Phrase memory number |
p. 8 |
|
.(dot) |
Phrase memory containing data |
||
|
|||
oL |
One-shot phrase on track 1 only |
|
|
Lo |
One-shot phrase on track 2 only |
p. 9 |
|
oo |
One-shot phrases on tracks 1 and 2 |
|
|
LP |
Loop playback |
|
|
oS |
One-shot playback |
|
|
Fo |
Fade-out and then stop |
p. 10 |
|
LE |
Play to the end of the phrase and |
|
|
then stop |
|
||
|
|
||
|
|
|
|
Un |
Undo |
|
|
rE |
Redo |
p. 11 |
|
CL |
Tack clear |
|
|
r |
Save phrase |
p. 10 |
|
dL |
Delete phrase |
p. 10 |
|
|
|
|
Display |
Explanation |
Page |
|
no |
Normal recording |
|
|
AU |
Auto recording |
p. 11 |
|
Ct |
Count-in recording |
|
|
r0–r9 |
Rhythm type |
p. 12 |
|
b3–b4 |
Time signature |
p. 13 |
|
Cn |
USB connected |
p. 14 |
|
dC |
USB disconnected |
||
|
|||
SL |
Sleep mode enabled |
p. 17 |
|
__ |
Sleep mode disabled |
||
|
|||
rd |
Switch in the order of record/ |
|
|
overdub/play |
|
||
|
p. 17 |
||
|
|
||
rP |
Switch in the order of record/play/ |
||
|
|||
overdub |
|
||
|
|
||
|
|
|
|
FN |
Format internal memory |
p. 17 |
Nederlands Português Español Italiano Français Deutsch English
19

Specifications
BOSS RC-30 DUAL TRACK LOOPER: Loop Station
Nominal Input
Level
Input Impedance
Nominal Output
Level
Output Impedance
Recommended
Load Impedance
Recording/
Playback
USB Interface
Connectors
Power Supply
Current Draw
MIC IN: -40 dBu (variable)
INST IN: -20 dBu
AUX IN: -10 dBu
MIC IN: 4 k ohms
INST IN: 1 M ohm
AUX IN: 22 k ohms
-20 dBu
1 k ohm
10 k ohms or larger
Maximum recording time: Approx. 3 hours
Maximum number of stored phrases: 99 phrases
Number of tracks: 2
Data format: WAV (44.1 kHz, 16-bit linear, stereo)
USB 2.0/1.1 mass storage device class
MIC IN jack (XLR type/balanced/ phantom power: 48 V DC, 10 mA max)
INST IN jacks (L/MONO, R) (1/4” phone type)
AUX IN jack (Stereo miniature phone type)
OUTPUT jacks (L/MONO, R) (1/4” phone type)
FOOT SW jack (1/4”TRS phone type) USB connector
DC IN jack (DC 9 V)
DC 9 V:
Alkaline battery (AA, LR6) or Carbon-zinc battery (AA, R6) x 6, AC Adaptor (PSA-series: sold separately)
*Rechargeable Ni-MH batteries cannot be used.
Maximum 195 mA (DC 9 V)
Alkaline battery (AA, LR6) : Approx. 7.5 hours
Carbon-zinc battery (AA, R6) : Approx. 1.5 hours
*These figures will vary depending on the actual conditions of use.
Dimensions
Weight
Accessories
Options
(sold separately)
173 (W) x 158 (D) x 57 (H) mm
6-13/16 (W) x 6-1/4 (D) x 2-1/4 (H) inches
1.2 kg/2 lbs 11 oz (including batteries)
Owner’s Manual,
Leaflet (“USING THE UNIT SAFELY,” “IMPORTANT NOTES,” and “Information”),
Alkaline battery (AA, LR6) x 6
*The battery that was supplied with the unit is for temporary use, intended primarily for testing the unit’s operation. We suggest replacing this with an alkaline dry cell.
AC Adaptor (PSA series)
Foot Switch: FS-5U, FS-6
*0 dBu = 0.775 Vrms
*In the interest of product improvement, the specifications and/or appearance of this unit are subject to change without prior notice.
20

 Bedienungsanleitung
* Dieses Gerät enthält Demosequenzen (90-99). Diese können nach dem Löschen nicht wiederhergestellt werden. Bitte sichern Sie die Sequenzen wie unter „Sichern auf dem Computer“ (S. 15) erläutert.
* Dieses Gerät wechselt in den Ruhezustand (Energiesparmodus), wenn für zehn Stunden keine Operation erfolgt, bzw. wenn seit dem Verlassen des Stoppmodus für zehn Stunden keine Audioeingabe erfolgt. Wenn das Gerät nicht in den Ruhezustand wechseln soll, halten Sie das linke Pedal während des Einschaltens für fünf Sekunden gedrückt (S. 17).
Die wichtigsten Features
Willkommen bei der RC-30 Loop Station!
Der RC-30 ist ein pedalgesteuertes Aufnahmegerät, mit dem Sie Audiosequenzen von Ihrer Gitarre oder Gesang usw. aufnehmen und durch Bedienen des Pedals wiedergeben können. Sie können zahlreiche Klangvarianten erzeugen, indem Sie verschiedene Klänge übereinander legen, während Sie in Echtzeit aufnehmen und Klänge wiedergeben können.
•Im Sequenzspeicher können bis zu 99 unterschiedliche Loopsequenzen mit einer Gesamtdauer von ca. 3 Stunden gespeichert werden (* alle Sequenzen insgesamt).
•Der RC-30 verhält sich wie zwei Looper in einem Gehäuse, da immer zwei getrennte Spuren mit individuellen Overdubs zur Verfügung stehen.
•Die Audioeingabe kann in Stereo erfolgen.
•Außer einem Gitarrenanschluss steht auch eine MICund eine AUX IN-Buchse zur Verfügung. Sie können ein Mikrofon anschließen und Ihre Stimme als Loop aufnehmen oder Musik von einem MP3-Player aufnehmen.
•Aufgezeichnete Sequenzen können per USB auf Ihren Computer kopiert werden, oder WAV-Dateien von Ihrem Computer können auf den RC-30 geladen und als Loops wiedergegeben werden (S. 14).
•Sie können Effekte anwenden, die mit dem Tempo einer wiedergegebenen Sequenz synchronisiert werden (S. 14).
Lesen Sie vor der Verwendung dieses Geräts sorgfältig die folgenden Abschnitte:„SICHERER BETRIEB DES GERÄTES“ und „WICHTIGE HINWEISE“ (auf einem gesonderten Blatt beiliegend). Diese Abschnitte enthalten wichtige Informationen über die korrekte Bedienung des Geräts.
Um einen vollständigen Überblick über alle Funktionen des Gerätes zu erhalten, sollten Sie diese Bedienungsanleitung vollständig durchlesen. Bewahren Sie diese Anleitung an einem Ort auf, an dem Sie bei Bedarf schnell darauf zurückgreifen können.
Nederlands Português Español Italiano Français Deutsch English

Inhalt
Die wichtigsten Features. . . . . . . . . . . 1
Einsetzen der Batterien. . . . . . . . . . . . . . . . . . . . . . .3
Beschreibungen zum Bedienfeld. . . . . . . . . . . . . .4
Einschalten des Geräts. . . . . . . . . . . . . . . . . . . . . . . . . . . 7
Grundlegende Bedienung. . . . . . . . . . .8
Auswählen eines Sequenzspeichers. . . . . . . . 8 Auswählen der aktuellen Spur. . . . . . . . . . 8 Aufnahme . . . . . . . . . . . . . . . . . . . . 8 Einmalige Wiedergabe (One Shot) . . . . . . . . 9 Overdubbing . . . . . . . . . . . . . . . . . . 9 Loopwiedergabe. . . . . . . . . . . . . . . . . 9 Stopp. . . . . . . . . . . . . . . . . . . . . . 9
Speichern einer Sequenz. . . . . . . . . . . . 10 Löschen einer Sequenz. . . . . . . . . . . . . 10
Festlegen, wie eine Sequenz wiedergegeben/
gestoppt wird (Einmalige Wiedergabe/ Stoppmodus). . . . . . . . . . . . . . . . . . 10
Löschen eines Overdubs (UNDO/REDO) +
Löschen einer Sequenz (Clear). . . . . . . . . . 11
Aufnahmefunktionen: Automatische Aufnahme
+ Aufnahme mit Einzähler. . . . . . . . . . . . 11
Informationen zum Rhythmus. . . . . . . . 12
Wiedergeben eines Rhythmus. . . . . . . . . . 12 Einstellen des Tempos. . . . . . . . . . . . . . 12 Einstellen des Rhythmustyps . . . . . . . . . . 12 Einstellen der Taktart. . . . . . . . . . . . . . 13
Verwenden von LOOP FX. . . . . . . . . . 14
Einoder Ausschalten von LOOP FX. . . . . . . 14 Festlegen des LOOP FX-Typs. . . . . . . . . . . 14
Anschließen an einen Computer über USB . . 14
Verbinden mit einem externen Fußtaster. . . 16
Beim Anschluss eines BOSS FS-5U . . . . . . . . 16
Beim Anschluss von zwei BOSS FS-5U oder
eines BOSS FS-6. . . . . . . . . . . . . . . . . 16
Sonstige Einstellungen. . . . . . . . . . . 17
Informationen zum Ruhezustand. . . . . . . . 17 Deaktivieren der„Ruhezustand“-Funktion.17
Aktivieren der„Ruhezustand“-Funktion (Standardeinstellung). . . . . . . . . . . 17
Ändern der Umschaltreihenfolge von
Aufnahme gOverdubbing gWiedergabe. . . . 17 Formatieren des internen Speichers. . . . . . . 17
Fehlerbehebung. . . . . . . . . . . . . . 18
Liste der Fehlermeldungen. . . . . . . . . . . 18 Weitere Displayanzeigen. . . . . . . . . 19
Technische Daten. . . . . . . . . . . . . . 20
•Aufnahme, Vervielfältigung, Verteilung, Verkauf, Verleih, öffentliche Aufführung oder Ausstrahlung von
urheberrechtlich geschütztem Material (musikalische Werke, visuelle Werke, Ausstrahlungen, Liveauftritte u.ä.) einer dritten Partei in Teilen oder als Ganzes ohne die Genehmigung des Urheberrechteigners ist gesetzlich verboten.
•Verwenden Sie dieses Produkt nicht auf eine Weise, die das Urheberrecht Dritter verletzen könnte. Wir übernehmen keinerlei Verantwortung bei einer Verletzung des Urheberrechts Dritter, die sich aus der Verwendung dieses Produkts ergibt.
•Die Inhalte dieses Produkts (Klangwellenformdaten, Stildaten, Begleitungsmuster, Sequenzdaten, Audioloops und Bilddaten) unterliegen dem Urheberrecht der Roland Corporation.
•Die Käufer dieses Produkts sind berechtigt, diese Inhalte für die Erstellung, Aufführung, Aufnahme und Weitergabe von musikalischen Originalwerken zu verwenden.
•Die Käufer dieses Produkts sind NICHT berechtigt, diese Inhalte im Original oder in veränderter Form zu extrahieren, um sie auf einem Aufnahmemedium zu verbreiten oder in einem Computernetzwerk verfügbar zu machen.
•BOSS und Loop Station sind eingetragene Marken der Roland Corporation in den USA und/oder anderen Ländern.
•Alle in diesem Dokument erwähnten Produktnamen sind Marken oder eingetragene Marken der jeweiligen Eigentümer.
•Die in diesem Dokument verwendeten Screenshots werden in Übereinstimmung mit den Richtlinien der Microsoft Corporation verwendet.
•MMP (Moore Microprocessor Portfolio) bezeichnet ein Patentportfolio, das sich mit der von Technology Properties Limited (TPL) entwickelten Mikroprozessorarchitektur befasst. Roland hat diese Technologie von der TPL Group lizenziert.
•Das SD-Logo (
 ) und das SDHC-Logo (
 ) sind Marken von SD-3C, LLC.
•Dieses Produkt enthält die integrierte eCROSSoftwareplattform von eSOL Co.,Ltd.
eCROS ist eine Marke von eSOL Co., Ltd. in Japan.
•Das Gerät enthält digitale Schriftarten von Yourname, Inc. Digitale Schriftart: Copyright © Yourname, Inc.
Copyright © 2011 BOSS CORPORATION
Alle Rechte vorbehalten. Diese Publikation darf weder ganz noch teilweise ohne schriftliche Genehmigung durch die BOSS CORPORATION reproduziert werden.
2

Einsetzen der Batterien
Setzen Sie die beigefügten Batterien wie im Diagramm abgebildet ein, und achten Sie auf die richtige Polarität.
|
|
English |
|
|
|
Deutsch |
|
• |
Eine unsachgemäße Handhabung von Batterien, Akkus oder Akkuladegeräten kann zu Undichtigkeiten, Überhitzung, |
Français |
|
|
Feuer und Explosionen führen. Lesen Sie vor der Verwendung alle den Batterien, Akkus oder Akkuladegeräten |
|
|
|
beigefügten Sicherheitshinweise, und beachten Sie diese genau. |
|
|
• |
Im Lieferumfang des Gerätes sind Batterien enthalten. Die Lebensdauer dieser Batterien ist jedoch eingeschränkt, da ihr |
|
|
|
Hauptzweck darin besteht, Produkttests zu ermöglichen. |
Italiano |
|
• |
Achten Sie auf die richtige Ausrichtung der Pole + (positiv) und – (negativ) der Batterie. |
||
|
|||
• Wenn Sie das Gerät umdrehen, legen Sie es auf eine weiche Unterlage (z.B. ein Kissen), um Schäden an den Tastern und Reglern |
|
||
|
zu vermeiden. Achten Sie darauf, das Gerät richtig abzulegen/auszurichten, so dass keine Taster oder Regler beschädigt werden. |
|
|
• |
Gehen Sie vorsichtig mit dem Gerät um, während Sie es umdrehen, damit es nicht herunterfällt oder umkippt. |
|
|
• |
Wenn die Batteriespannung nachlässt, wird im Display„bt“ angezeigt, und die POWER-Anzeige leuchtet schwächer. Setzen Sie |
Español |
|
• |
Da der Stromverbrauch des Geräts relativ hoch ist, wird die Verwendung eines Netzadapters empfohlen. Wenn Sie die |
||
|
in diesem Fall so schnell wie möglich neue Batterien ein. |
|
|
|
Verwendung von Batterien bevorzugen, verwenden Sie bitte Alkalibatterien. |
|
|
• |
Ni-MH-Akkus sind nicht verwendbar. |
|
|
• |
In einigen Fällen können alle gespeicherten Daten verloren gehen, wenn die Batterie während der Aufnahme oder des |
Português |
|
|
Overdubbings erschöpft ist (S. 7). |
||
|
|
||
• Verwenden Sie sechs Batterien vom Typ AA (LR6). |
|
||
• Beim Wechseln der Batterien geht der Inhalt des internen Speichers nicht verloren, es wird jedoch empfohlen, aus |
|
||
|
Sicherheitsgründen regelmäßige Sicherungen auszuführen (S. 15). |
|
|
|
|
Nederlands |
|
3

Beschreibungen zum Bedienfeld
|
|
1 |
|
2 |
|
3 |
|
4 |
|
5 |
|
|
||||||||||
|
|
|
|
|
|
|
|
|
|
|
|
|
|
|
|
|
|
|
|
|
|
|
|
|
|
|
|
|
|
|
|
|
|
|
|
|
|
|
|
|
|
|
|
|
|
|
|
|
|
|
|
|
|
|
|
|
|
|
|
|
|
|
|
|
|
|
|
|
|
|
|
|
|
|
|
|
|
|
|
|
|
|
|
|
|
|
|
|
|
|
|
|
|
|
|
|
|
|
|
|
|
|
|
|
|
|
|
|
|
|
|
|
|
|
|
|
|
|
|
|
|
|
|
|
|
|
|
|
|
|
|
|
|
|
|
|
|
6
7
|
|
|
|
|
|
|
|
|
|
|
|
|
|
|
|
|
8 |
9 |
|
||||
|
|
|
|
||||
Name |
Erläuterung |
Seite |
|||||
|
LOOP FX (Effekte für den Loop) |
|
|
|
|
||
1 |
[TYPE]-Taster |
Wählt den LOOP FX-Typ aus. |
S. 14 |
||||
|
[ON/OFF]-Taster |
Schaltet LOOP FX ein oder aus. |
|
||||
|
|
|
|
|
|
||
|
TRACK 1/2 |
|
|
|
|
||
|
Schieberegler [TRACK 1]/ |
Passt die Lautstärke der Sequenzen für jede Spur an. |
|
||||
|
[TRACK 2] |
|
|||||
|
|
|
|
|
|||
|
|
|
|
|
|
||
2 |
|
|
|
Leuchten, wenn sich die Spuren 1/2 im Aufnahmeoder Wiedergabemodus |
S. 8 |
||
|
|
|
befinden. |
||||
STATUS-Anzeige |
|
||||||
|
Im angehaltenen Modus blinken die Anzeigen, wenn die Spur Daten enthält und |
|
|||||
|
|
|
|
|
|||
|
|
|
|
sind unbeleuchtet, wenn die Spur keine Daten enthält. |
|
||
|
|
|
|
||||
|
[SELECT]-Taster |
Mit diesen Tastern wird eine Spur ausgewählt. |
|
||||
|
|
|
|
|
|
||
|
MEMORY |
|
|
|
|
||
|
Display |
Dieses zeigt die Speichernummer der aktuellen Sequenz oder andere |
S. 18 |
||||
|
Informationen an. |
|
|||||
|
|
|
|
|
|||
|
|
|
|
||||
3 |
Taster [ ] (Nach unten)/ |
Diese ermöglichen eine Verringerung oder Erhöhung der im Display angezeigten |
S. 8 |
||||
[ ] (Nach oben) |
Zahl. |
|
|||||
|
[WRITE]-Taster |
Drücken Sie diesen Taster, um die aufgenommene Sequenz im internen Speicher |
S. 10 |
||||
|
|
|
|
abzuspeichern. |
|
||
|
[DELETE]-Taster |
Löscht eine Sequenz aus dem internen Speicher. |
S. 10 |
||||
4

|
|
Beschreibungen zum Bedienfeld |
||
|
|
|
|
|
|
|
|
|
|
Name |
Erläuterung |
Seite |
||
|
RHYTHM |
|
|
|
|
[OUTPUT LEVEL]-Regler |
Dieser regelt den Lautstärkepegel des Rhythmusklangs. |
|
|
4 |
|
|
|
|
[TYPE]-Taster |
Legt den Rhythmustyp fest. |
S. 12 |
||
|
[ON/OFF]-Taster |
Dieser Taster schaltet den Rhythmusklang ein oder aus. |
|
|
|
|
|
|
|
|
[TAP TEMPO]-Taster |
Tappen Sie auf diesen Taster, um das Tempo einzugeben. |
|
|
|
|
|
|
|
|
MIC |
|
|
|
|
[INPUT LEVEL]-Regler |
Passt den Eingangspegel der MIC IN-Buchse an. Wenn der Regler ganz nach links |
|
|
5 |
gedreht wird, wird der Mikrofoneingang ausgeschaltet. |
|
||
|
S. 6 |
|||
|
|
|||
PEAK-Anzeige |
Leuchtet, wenn der Eingangspegel das zulässige Maximum überschreitet. Stellen |
|||
|
|
|||
|
Sie den [INPUT LEVEL]-Regler so ein, dass die PEAK-Anzeige nur gelegentlich |
|
||
|
|
aufleuchtet, wenn Sie sehr laut in das Mikrofon singen. |
|
|
|
|
|
|
|
6 |
POWER-Anzeige |
Leuchtet, wenn das Gerät eingeschaltet ist. |
S. 7 |
|
|
Anzeige REC, PLAY |
|
|
|
|
REC-Anzeige (rot) |
Leuchtet während der Aufnahme. |
|
|
|
|
|
|
|
7 |
|
Leuchtet während der Wiedergabe (während des Ladens des Sequenzspeichers |
S. 8 |
|
|
oder während einer internen Speicheroption: schnelles Blinken). |
|||
PLAY-Anzeige (grün) |
|
|||
|
Während des Overdubbings leuchtet sowohl die REC-Anzeige (rot), als auch die |
|
||
|
|
|
||
|
|
PLAY-Anzeige (grün). |
|
|
|
|
|
|
|
|
Linkes Pedal |
|
|
|
|
Schaltet das Gerät zwischen |
Wenn die Sequenz leer ist: Aufnahme gOverdubbing gWiedergabe |
S. 8 |
|
|
Aufnahme, Overdubbing und |
|||
|
Wenn die Sequenz Daten enthält: Wiedergabe gOverdubbing |
|
||
8 |
Wiedergabe um |
|
||
|
|
|||
Rückgängig |
Halten Sie zum Rückgängigmachen (Abbrechen der Aufnahme oder des letzten |
S. 11 |
||
|
||||
|
Overdubbings) das linke Pedal für mindesten zwei Sekunden gedrückt. |
|||
|
|
|
||
|
|
|
|
|
|
LOOP FX ein/aus |
Drücken Sie den Taster zweimal, um LOOP FX einoder auszuschalten. |
S. 14 |
|
|
|
|
|
|
|
Rechtes Pedal |
|
|
|
|
Stopp |
Stoppt die zurzeit für Overdubbing oder Wiedergabe verwendete Spur. |
S. 9 |
|
9 |
Alles stoppen |
Drücken Sie zweimal, um beide Spuren gleichzeitig zu stoppen. |
|
|
|
|
|
||
Tempo einstellen |
Tappen Sie im angehaltenen Modus mehrmals auf das rechte Pedal, um das |
S. 12 |
||
|
|
Tempo einzustellen. |
|
|
|
Spuren wechseln |
Um die ausgewählte Spur zu wechseln, halten Sie das rechte Pedal für mindesten |
S. 8 |
|
|
|
zwei Sekunden gedrückt. |
|
|
Nederlands Português Español Italiano Français Deutsch English
5

Beschreibungen zum Bedienfeld
AUX IN-Buchse
Verwenden Sie ein Kabel mit Mini-Stereoklinke, um Ihren MP3-Player anzuschließen.
Mithilfe der automatischen
Aufnahmefunktion
(S. 11) startet die Aufnahme von selbst in dem Moment, in dem Ihr MP3-Player mit der Wiedergabe beginnt.
USB-Anschluss
Sie können ein handelsübliches USB-Kabel verwenden, um den RC-30 an Ihren Computer anzuschließen und diesen zum Lesen/Schreiben von RC-30-Sequenzen (WAVDateien) verwenden (S. 14).
DC IN-Buchse
Ermöglicht den Anschluss eines Netzadapters (optional erhältlich).
Wenn Sie einen Netzadapter benutzen, brauchen Sie sich keine Gedanken über die verbleibende Lebensdauer der Batterie zu machen.
*Verwenden Sie ausschließlich den passenden Netzadapter (BOSS PSA-230 oder BOSS PSB-230), und schließen Sie diesen an eine Netzsteckdose
der richtigen Spannung an. Verwenden Sie keinen anderen Netzadapter, da hierdurch Fehlfunktionen auftreten können.
INST IN-Buchsen |
OUTPUT-Buchsen |
FOOT SW-Buchse |
Schließen Sie an diese Buchsen Ihre Gitarre, Ihren Bass oder ein Effektgerät an.
Verwenden Sie die INPUT L-Buchse und die
INPUT R-Buchse, wenn Sie ein Effektgerät mit Stereoausgabe anschließen. Verwenden
Sie nur die INPUT L-Buchse, wenn Sie eine Monoquelle verwenden.
Schließen Sie an diese Buchsen Ihren Verstärker oder Ihre Monitorlautsprecher an.
Wenn Sie ein Monosystem verwenden, verwenden Sie nur die OUTPUT L-Buchse. In Stereo eingegebene Signale werden ebenfalls als Monosignal ausgegeben.
Die OUTPUT L-Buchse fungiert auch als Ein-/ Aus-Schalter. Das Gerät wird eingeschaltet, wenn in die OUTPUT L-Buchse ein Stecker eingesteckt wird. Ziehen Sie den Stecker heraus, wenn Sie den RC-30 nicht verwenden.
Wenn Sie einen separat erhältlichen Fußtaster (BOSS FS-5U, BOSS FS-6) anschließen, können Sie diesen verwenden, um zwischen Sequenzen oder Spuren zu wechseln oder um LOOP FX einoderauszuschalten(S.16).
MIC IN-Anschluss
Ermöglicht den Anschluss eines Mikrofons.
Einstellungen des [PHANTOM]-Schalters
Wenn Sie ein Kondensatormikrofon verwenden, wählen Sie die Einstellung „ON“ für 48 Volt Phantomspeisung. Wenn Sie ein dynamisches Mikrofon verwenden, wählen Sie die Einstellung „OFF“.
Einstellen des Mikrofonpegels
Stellen Sie den [INPUT LEVEL]-Regler so ein, dass die PEAK-Anzeige nur gelegentlich aufleuchtet, wenn Sie sehr laut in das Mikrofon singen.
6

Beschreibungen zum Bedienfeld
HINWEIS
*Um Fehlfunktionen und/oder Schäden an Lautsprechern oder anderen Geräten zu vermeiden, regeln Sie stets die Lautstärke herunter, und schalten Sie alle Geräte aus, bevor Sie Verbindungen herstellen.
*Stellen Sie sicher, dass alle Lautstärkeregler in Ihrem System auf Minimum gedreht sind, bevor Sie Verbindungskabel anschließen oder trennen.
*Verwenden Sie Verbindungskabel ohne integrierten Widerstand. Wenn Sie Kabel mit integriertem Widerstand verwenden, ist die Lautstärke vom angeschlossenen Gerät zu den AUX IN-Buchsen möglicherweise zu gering oder gänzlich unhörbar.
*Schließen Sie an die OUTPUT-Buchse keine Kopfhörer an. Auf diese Weise könnten die Kopfhörer beschädigt werden.
Einschalten des Geräts
Das Gerät wird eingeschaltet, wenn Sie in die OUTPUT L-Buchse ein Kabel einstecken.
Nachdem Sie die Verbindungen hergestellt haben, schalten Sie Ihre Geräte in der angegebenen Reihenfolge ein. Wenn Sie die Geräte in der falschen Reihenfolge einschalten, besteht die
Gefahr von Fehlfunktionen und/oder Schäden an Lautsprechern und anderen Geräten.
Beim Einschalten: |
Schalten Sie den Gitarrenverstärker |
|
zuletzt ein. |
||
|
||
|
|
|
Beim Ausschalten: |
Schalten Sie den Gitarrenverstärker |
|
zuerst aus. |
||
|
||
|
|
*Dieses Gerät ist mit einer Schutzschaltung ausgestattet. Nach dem Einschalten dauert es einen Moment, bis das Gerät normal arbeitet.
Vorsicht beim Ausschalten des Geräts
Wenn sich das RC-30 in einem der folgenden Zustände befindet, darf das Gerät niemals ausgeschaltet werden (z.B. der Stecker aus der OUTPUT L-Buchse herausgezogen werden).
In diesem Fall können alle gespeicherten Daten verloren gehen.
•Wenn die RECoder PLAY-Anzeige leuchtet
(während der Aufnahme, Wiedergabe oder des Overdubbings einer Sequenz)
•Wenn die PLAY-Anzeige schnell blinkt
(während der Sequenzspeicher gelesen wird oder eine interne Speicheroperation stattfindet)
Vorsicht bei Verwendung eines Mikrofons
*Je nach Aufstellort und Position von Mikrofonen im Verhältnis zu Lautsprechern können Rückkopplungen (laute, sich
aufschaukelnde Heultöne) entstehen. Dies kann vermieden werden durch:
•Neuausrichtung des Mikrofons.
•Aufstellen des Mikrofons in größerer Entfernung von den Lautsprechern.
•Herunterregeln des Lautstärkepegels.
*Wenn sich der Verstärker und das Mikrofon nah bei einander befinden, kann der vom Verstärker ausgegebene Klang vom Mikrofon erfasst werden. Wenn Sie in diesem Fall eine Aufnahme oder Overdubbing ausführen,
wird die vom Mikrofon erfasste
Verstärkerwiedergabe ebenfalls aufgenommen. Wählen Sie den Abstand zwischen Verstärker und Mikrofon so, dass die Verstärkerwiedergabe nicht vom Mikrofon erfasst wird.
*Schalten Sie die Phantomspeisung immer aus (PHANTOM auf
„off“), wenn Sie andere Geräte als Kondensatormikrofone
anschließen, Dynamische Mikrofone, Audiowiedergabegeräte oder Geräte anderer Art, die keine Phantomspeisung benötigen, aber
irrtümlicherweise über diese mit Strom versorgt werden, können hierdurch beschädigt werden. Überprüfen Sie daher die technischen Daten jedes
Mikrofons, das Sie anschließen möchten, anhand der Informationen im Handbuch des jeweiligen Mikrofons. (Phantomspeisung dieses Geräts: 48 V Gleichstrom, 10 mA max.)
* Dieses Gerät besitzt eine symmetrische XLR-Buchse. Ein Anschlussdiagramm für diese Buchse
ist nebenstehend abgebildet. Nehmen Sie die Anschlüsse erst vor, nachdem Sie auch die Anschlussdiagramme der anderen anzuschließenden Geräte überprüft haben.
Nederlands Português Español Italiano Français Deutsch English
7

Grundlegende Bedienung
Drücken Sie das linke Pedal wie im Diagramm dargestellt, um eine Aufnahme, Overdubbing oder eine Wiedergabe auszuführen.
Auswählen eines |
Aufnahme |
||
Sequenzspeichers |
Nehmen Sie Ihr Gitarrenoder |
||
Verwenden Sie die |
Bassspiel auf oder die Musik |
||
eines an die AUX IN-Buchse |
|||
Taster ] / |
], um |
||
angeschlossenen MP3-Players. |
|||
einen Sequenzspeicher |
|||
|
|||
auszuwählen (1-99). |
• Die Automatische Aufnahme (S. 11) ermöglicht |
||
Display |
Erläuterung |
||
den Start der Aufnahme in dem Moment, in dem |
|||
Es wird nur |
Leere Sequenz |
Sie mit dem Spiel beginnen. |
|
|
|
||
die Nummer |
Drücken Sie das linke Pedal, um |
• Sie können auch zusammen mit |
|
angezeigt |
mit der Aufnahme zu beginnen. |
Rhythmusklängen aufnehmen (S. 12). |
|
Punkt unten |
Die Sequenz enthält Daten. |
|
|
rechts |
Drücken Sie das linke Pedal, |
|
|
|
|
||
|
um mit der Loopwiedergabe zu |
|
|
|
beginnen. |
|
|
|
Einmalige Sequenz („One Shot“) |
|
|
Die Nummer wird |
Wenn Sie das linke Pedal |
|
|
abwechselnd mit |
|
||
drücken, wird die Spur, für |
|
||
„oL“,„Lo“ oder |
|
||
die die einmalige Wiedergabe |
|
||
„oo“ angezeigt. |
|
||
ausgewählt wurde, einmal |
|
||
|
wiedergegeben (nicht als Loop). |
|
|
• Werksseitig enthalten die Sequenzen 90-99 Demosequenzen.
Auswählen der aktuellen Spur
Es stehen zwei Spuren für Sequenzen zur Verfügung, und die zurzeit ausgewählte Spur wird als „aktuelle Spur“ bezeichnet. Aufnahmen und Overdubbing können nur auf der aktuellen Spur ausgeführt werden. Wenn Sie die aktuelle Spur währen der Aufnahme oder des Overdubbings wechseln, wechselt sie automatisch zur Wiedergabe.
Die aktuelle Spur kann auf die folgende Weise gewechselt werden:
Drücken Sie den [SELECT]-Taster für TRACK 1 oder TRACK 2.
Der gedrückte [SELECT]-Taster leuchtet, und die zugehörige Spur wird zur aktuellen Spur.
Halten Sie das rechte Pedal mindestens zwei Sekunden lang gedrückt.
Die aktuelle Spur wird gewechselt, wenn Sie das rechte Pedal für mindestens zwei
Sekunden gedrückt halten.
Starten beider Spuren gleichzeitig
Wenn eine Sequenz Daten enthält, startet nach dem Drücken des linken Pedals nur die aktuelle Spur.
Wenn sowohl Spur 1 als auch Spur 2 Daten enthalten, führt das gleichzeitige Drücken der [SELECT]-Taster für Spur 1 und Spur 2 (oder die wiederholte Betätigung des rechten Pedals zum Wechsel der Spuren) im angehaltenen Modus zum Aufleuchten beider Taster. Wenn Sie in diesem Moment die Wiedergabe starten, starten die beiden Spuren gleichzeitig. Nach dem Starten ist Spur 1 die aktuelle Spur.
8
Loading...