


Owner’s Manual (this document)
Read this first. It explains the basic things you need to know in order to use the VR-09.

 PDF Manual (download from the Web)
• Data List
This is a list of the sounds, drum kits, rhythm patterns, and sound effects built into the VR-09.
• MIDI Implementation
This is detailed information about MIDI messages.

 To obtain the PDF manual
1. Enter the following URL in your computer. http://www.roland.com/manuals/
2. Choose “V-Combo VR-09” as the product name.

An Overview of the VR-09
Sound Sections
The VR-09 has three sound sections—organ, piano, and synthesizer—and each section occupies a separate area of the panel.
You can also play two sounds simultaneously, or divide the keyboard into two regions and play different sounds in the left and right regions.
Organ section |
|
Piano section |
|
Synthesizer section |
|
|
|
|
|
|
|
Here you can use the harmonic bars to |
Here you can |
|
Here you can select synthesizer |
||
shape the organ sound to your taste. |
sounds. |
|
sounds. |
||
Introduction
Effect/Rotary
You can apply effects and a rotary speaker simulation.
By operating the knobs and buttons you can make the sound change in real time.
Registration
Sound and effect settings as well as combinations of sounds can be stored as a “registration.”
You can easily switch between sounds by recalling a previously-stored registration.
REFERENCE
“Selecting Your Favorite Sounds (Registration)” (p. 14)
Performing
MODE buttons
Here you can select an individual organ sound, piano sound, or synthesizer sound at a single touch.
|
|
|
• “Modifying |
the Organ Sound” (p. 16) |
Recording |
|
|
|
REFERENCE |
|
|
|
|
|
• “Selecting Sounds” (p. 12) |
|
|
|
|
|
• “ModifyingtheSynthesizerSound”(p.22) |
|
|
|
|
|
• “Combining Two Sounds” (p. 27) |
|
|
|
|
|
|
|
|
|
|
|
|
|
|
|
|
|
|
|
|
Looper
REFERENCE
• “Adding Effects to the Sound” (p. 23)
• “Using the Rotary Effect” (p. 19)
Drum section
The drum section lets you do the |
|
Settings |
following. |
|
|
|
|
|
• Play drum sounds or sound |
|
|
effects from the keyboard (p. 15). |
|
|
• Perform while playing back |
|
|
internal rhythm patterns or |
|
|
songs from a USB flash drive |
|
|
(p. 32, p. 34). |
|
|
• Record your performance (p. 33). |
|
|
|
|
|
• Perform using the looper (p. 37). |
|
|
|
|
Appendix |
|
|
3

Contents
An Overview of the VR-09 |
. . . . . . . . . . . . |
. . . . . . . . . . . . . . . . . . |
. . . . . |
. . |
. . |
. |
. 3 |
|
Combining Two Sounds. . . . . |
. . . . . . . . . . . . . . . . . . . . . . . . . . . . . . |
. . . . . |
. |
.27 |
|
|
|
|
|
|
|
|
|
Layering Two Sounds (Dual) . . . . . . . . . . . . . . . .. . |
|
.27 |
||
Panel Descriptions |
|
|
|
|
|
|
6 |
|
|||||
. . . . . . . . . . . . |
. . . . . . . . . . . . . . . . . . |
. . . . . . |
. . |
. |
. |
|
Layering a Piano Sound and Synthesizer Sound |
. . . . 27 |
|||||
Front Panel . . . . . . . . . . . . . . . . . . . . |
. . . |
. |
. |
|
. 6 |
|
|||||||
|
|
Combining an Organ Sound with a Piano Sound or |
|
|
|
||||||||
Rear Panel (Connecting Devices) . . . . . . . . . |
. . . |
. |
. |
. |
8 |
|
|
|
27 |
||||
|
Synthesizer Sound . |
. . . . . . . . . . . . . . . . . . |
. |
||||||||||
|
|
|
|
|
|
|
|
|
Cancelling Dual. . . . . . . . . . . . . . . . . . . . . |
|
.27 |
||
Getting Ready |
|
|
|
|
|
|
9 |
|
|||||
. . . . . . . . . . . |
. . . . . . . . . . . . . . . . . . |
. . . . . . |
. . |
. |
. |
|
Playing Different Sounds in the Left and Right Hands (Split) |
. 28 |
|||||
Installing Batteries |
. . . . . . . . . . . . . . . . |
. . . |
. |
. |
|
. 9 |
|
||||||
|
|
Assigning the Dual Sounds to the Left and Right Regions |
|
28 |
|||||||||
When to Replace the Batteries . . . . . . . |
. . . |
. |
. |
. |
9 |
|
. |
||||||
|
Combining Two Organ Sounds |
|
|
28 |
|||||||||
Placing the VR-09 on a Stand . . . . . . . . . . . |
. . . |
. |
. |
|
10 |
|
. . . . . . |
. |
|||||
|
|
Combining a Piano Sound and Synthesizer Sound |
. . . 30 |
||||||||||
Using the Included USB Memory Protector . . . . . . . . . .10 |
|
||||||||||||
|
Combining an Organ Sound with a Piano Sound or |
|
|
|
|||||||||
Turning the Power On/Off . . . . . . . . . . . . |
. . . . . .11 |
|
|
|
30 |
||||||||
|
Synthesizer Sound . |
. . . . . . . . . . . . . . . . . . |
. |
||||||||||
Turning the Power On . . . . . . . . . . .. . |
. . . . . .11 |
|
Playing Drum Sounds in the Lower Part . . . . . . .. . |
. 31 |
|||||||||
Turning the Power Off . . . . . . . . . . .. . |
. . . . . .11 |
|
Changing the Split Point . . . . . . . . . . . . . . .. . |
|
.31 |
||||||||
Listening to the Demo Songs . . . . . . . . . . .. . |
. . . . |
. |
|
11 |
|
Cancelling Split . . |
. . . . . . . . . . . . . . . . . . . |
|
.31 |
||||
|
|
|
|
|
|
|
|
|
|
|
|
|
|
Selecting Sounds |
|
|
|
|
|
|
12 |
|
|
|
|
|
|
. . . . . . . . . . . |
. . . . . . . . . . . . . . . . . . |
. . . . . . |
. . |
. |
. |
Performing with Rhythm Pattern . . . . . . . . . . . . . . . . . . . . . . . . . . |
. . . . . . |
|
.32 |
||||
Selecting Sounds with One Touch. |
. . . . . . . . . . . . . . . . . . . |
. . . . . . . |
. . |
. |
. |
12 |
|
Selecting/Playing Rhythm Pattern . . . . . . . . . . . . .. . |
|
.32 |
|||
Selecting Organ Sounds . . . . . . . . . .. . |
. . . . . .12 |
|
Changing the Tempo of the Rhythm Pattern . . . . . . . .. . |
. 32 |
|||||||||
Selecting Piano Sounds . . . . . . . . . . .. . |
. . . . . 13 |
|
Adjusting the Volume of the Rhythm Pattern . . . . . . . .. . |
|
.32 |
||||||||
Selecting Synthesizer Sounds . . . . . . . .. . |
. . . . . 13 |
|
|
|
|
|
|
||||||
Selecting Your Favorite Sounds (Registration) . . .. . |
. . . . . 14 |
Recording Your Performance |
. . . . . . . . . . . . . . . . . . . . . . . . . . . . . . |
. . . . . . |
|
.33 |
|||||||
Recalling a Registration . . . . . . . . . . .. . |
. . . . . 14 |
|
Recording. . . . . . . . . . . . . . . . . . . . . . . . . . . |
|
.33 |
||||||||
Switching Registration Banks . . . . . . . .. . |
. . . . . 14 |
|
Playing a Song. . . . . . . . . . . . . . . . . . . . . . . . |
. |
34 |
||||||||
Storing a registration . . . . . . . . . . . .. . |
. . . . . 15 |
|
Renaming a Song. . . . . . . . . . . . . . . . . . . . . . . |
|
.35 |
||||||||
Selecting Drum Sounds . . . . . . . . . . . . .. . |
. . . . |
. |
.15 |
|
Deleting a Song. . . . . . . . . . . . . . . . . . . . . . . . |
|
.35 |
||||||
|
|
|
|
|
|
|
|
|
|
|
|
|
|
|
|
|
|
|
|
|
|
Using the Looper |
|
|
|
37 |
|
Modifying the Organ Sound. . . . . . . . . . |
. . . . . . . . . . . . . . . . . . |
. . . . . . |
. . |
. |
. |
16 |
. . . . . . . . . . . . . . . . . . . . . . . . . . . . . |
. . . . . . |
|
||||
Using the Harmonic Bars . . . . . . . . . . . . .. . |
. . . . . 16 |
|
Recording with the Looper . . . . . . . . . . . . . . . .. . |
. |
37 |
||||||||
Setting Example of Harmonic Bars . . . . .. . |
. . . . . .18 |
|
Recording While a Rhythm Pattern Plays . . . . . . .. . |
|
.38 |
||||||||
Using the Rotary Effect . . . . . . . . . . . . . .. . |
. . . . . 19 |
|
Saving a Phrase. . . . . . . . . . . . . . . . . . . . . . . . |
|
.38 |
||||||||
Using Twin Rotary . . . . . . . . . . . . .. . |
. . . |
. |
. |
.19 |
|
|
|
|
|
|
|||
Convenient Functions |
|
|
|
39 |
|||||||||
Using Percussion . . . . . . . . . . . . . . . . . |
. . . |
. |
. |
|
20 |
. . . . . . . . . . . . . . . . . . . . . . . . . . . . . |
. . . . . . |
|
|||||
|
|
Making the Power Automatically Turn Off After a Time |
|
|
|
||||||||
Using Vibrato/Chorus . . . . . . . . . . . . . . . |
. . . |
. |
. |
|
21 |
|
|
|
.39 |
||||
|
|
(Auto Off) . . . . . . . . . . . . . . . . . . . . . . . . . |
|
||||||||||
|
|
|
|
|
|
|
|
|
|
||||
|
|
|
|
|
|
|
|
|
Adjusting the Brightness of the Display (LCD Contrast) |
. . . .39 |
|||
Modifying the Synthesizer Sound |
|
|
|
|
|
22 |
|||||||
. . . . . . . . . . . . . . . . . . |
. . . . . . |
. . |
. |
. |
|
Saving Registrations to a USB Flash Drive (Save Registration) |
|
.39 |
|||||
Changing the Volume Envelope (ATTACK, DECAY, RELEASE) |
|
. .22 |
|
|
|||||||||
|
|
Loading Saved Registrations from a USB Flash Drive |
|
|
|
||||||||
Adjusting the Tonal Character (CUTOFF, RESONANCE) |
. . . . 22 |
|
|
|
40 |
||||||||
|
(Load Registration) . . . . . . . . . . . . . . . . . . . . |
. |
|||||||||||
|
|
|
|
|
|
|
|
|
|||||
|
|
|
|
|
|
|
|
|
Deleting Saved Registrations from a USB Flash Drive |
|
|
|
|
Adding Effects to the Sound |
|
|
|
|
|
23 |
|
|
40 |
||||
. . . . . . . . . . . . . . . . . . |
. . . . . . |
. . |
. |
. |
|
(Delete Registration) . . . . . . . . . . . . . . . . . . . |
. |
||||||
Applying Effects (EFX) . . . . . . . . . . . . . . |
. . . |
. |
. |
.23 |
|
||||||||
|
Formatting a USB Flash Drive (Format USB) . . . . . . . . . |
|
.41 |
||||||||||
Modifying the Sound / Producing Sound Effects |
|
|
|
|
|
|
|
||||||
. . . . . .24 |
|
Restoring the Factory Settings (Factory Reset) . . . . . . . |
. 41 |
||||||||||
(D-BEAM controller) . . . . . . . . . . . . . . . |
|
||||||||||||
|
|
|
|
|
|
||||||||
D-BEAM Controller Settings . . . . . . . . . |
. . . |
. |
. |
|
24 |
|
|
|
|
|
|
||
|
|
|
|
|
|
|
|||||||
Changing the Pitch/Applying Vibrato |
. . . . . 25 |
|
|
|
|
|
|
||||||
(Pitch Bend/Modulation Lever) . . |
. . . . . . . . . . |
|
|
|
|
|
|
||||||
Making the Pitch Change Smoothly (Portamento) .. . |
. . . . . 25 |
|
|
|
|
|
|
||||||
Specifying the Time of Pitch Change . . . .. . |
. . . . |
. |
.25 |
|
|
|
|
|
|
||||
|
|
|
|
|
|
|
|
|
|
|
|
|
|
Changing the Key Range. . |
. . . . . . . . . . . |
. . . . . . . . . . . . . . . . . . |
. . . . . . |
. . |
. |
. |
26 |
|
|
|
|
|
|
Raising or Lowering the Range in Octaves (Octave). . |
. . . . . .26 |
|
|
|
|
|
|
||||||
Transposing the Key (Transpose) . . . . . . . . .. . |
. . . |
. |
. |
.26 |
|
|
|
|
|
|
|||
|
|
|
|
|
|
|
|
|
|
|
|
|
|
Before using this unit, carefully read the sections entitled “USING THE UNIT SAFELY” (p. 62) and “IMPORTANT NOTES” (p. 64). These sections provide important information concerning the proper operation of the unit. Additionally, in order to feel assured that you have gained a good grasp of every feature of your new unit, read Owner’s manual in its entirety. This manual should be saved and kept on hand as a convenient reference.
Copyright © 2013 ROLAND CORPORATION
All rights reserved. No part of this publication may be reproduced in any form without the written permission of ROLAND CORPORATION.
4

Contents
Detailed Settings for All Functions (Menu).. . . . . . . . . . . . . . . . . . . . . . . .42
Basic Menu Operations. . . . . . . . . . . . . . . . . . . . . 42
Selecting the Parts to Which Vibrato and Chorus Apply (Vibrato/Chorus Part). . . . . . . . . . . . . . . . . . . 42
Specifying the Amount of Leakage Noise (Leakage Level). .42 Specifying the Level of the Key-On Click (On Click Level). . 42 Specifying the Level of the Key-Off Click (Off Click Level). . 42 Specifying the Low-frequency Boost/Cut (Organ Low Gain). 43
Specifying the High-frequency Boost/Cut
(Organ High Gain). . . . . . . . . . . . . . . . . . . . .43 Selecting the Type of Rotary Effect (Rotary Type) . . . . . .43
Specifying the Rotational Acceleration of the Woofer (Woofer Accel) . . . . . . . . . . . . . . . . . . . . . . 43
Specifying the Rotational Acceleration of the Tweeter (Tweeter Accel). . . . . . . . . . . . . . . . . . . . . . 43
Specifying the Woofer’s Slow Rotation Speed
(Wf Slow Speed). . . . . . . . . . . . . . . . . . . . . .43
Specifying the Tweeter’s Slow Rotation Speed
(Tw Slow Speed) . . . . . . . . . . . . . . . . . . . . . 43
Specifying the Woofer’s Fast Rotation Speed
(Wf Fast Speed) . . . . . . . . . . . . . . . . . . . . . .43
Specifying the Tweeter’s Fast Rotation Speed
(Tw Fast Speed) . . . . . . . . . . . . . . . . . . . . . .43 Selecting the Multi-Effect Type (MFX Type). . . . . . . . .44 Selecting the Type of Delay (Delay Type) . . . . . . . . . .44 Selecting the Type of Reverb (Reverb Type). . . . . . . . .44 Changing the Wall Type (Wall Type). . . . . . . . . . . . 45 Adjusting the Initial Touch Sensitivity (Initial Touch) . . . . 45
Specifying How the Pedal Part Will Be Sounded
(PedalBass Mode) . . . . . . . . . . . . . . . . . . . . .45 Changing How Part 2 Will Be Sounded (Solo Mode). . . . .45
Changing the Function of the Pedal Switch
(Damper Assign) . . . . . . . . . . . . . . . . . . . . . 45
Selecting the Part(s) Affected by the Damper Pedal
(Damper Part). . . . . . . . . . . . . . . . . . . . . . .45
Changing the Function of the Expression Pedal
(Expression Assign). . . . . . . . . . . . . . . . . . . . 46
Selecting the Part(s) Affected by the Expression Pedal (Expression Part) . . . . . . . . . . . . . . . . . . . . . 46
Adjusting the Depth of the Expression Pedal
(Expression Curve) . . . . . . . . . . . . . . . . . . . . 46 Specifying the Pitch Bend Range (Pitch Bend Range) . . . .46 Adjusting the D-BEAM Sensitivity (D-BEAM Sensitivity). . .46
Using the Modulation Lever to Turn the Rotary Effect On/
Off (Modulation Lever) . . . . . . . . . . . . . . . . . . 47
Using a Footswitch to Change Registrations
(Registration Shift) . . . . . . . . . . . . . . . . . . . . 47
Changing the Function of the Footswitches
(L Foot Switch, R Foot Switch). . . . . . . . . . . . . . . 47
Selecting the Part(s) Affected by the Acoustic Sound
Effect (N.Control). . . . . . . . . . . . . . . . . . . . . 47
Preventing the Rhythm Pattern Tempo from Changing Automatically (Auto Std Tempo) . . . . . . . . . . . . . .48
Transposing the Song Playback (Playback Transpose). . . .48 Adjusting the Audio Recording Volume (Audio Rec Gain). .48 Selecting the MIDI Transmit Channel (TxMIDI Channel). . .48 Specifying the MIDI IN Mode (MIDI IN Mode). . . . . . . .48 Enabling PC Number Transmission (Send PC Switch). . . . 48 Specifying PC Numbers (PC Number) . . . . . . . . . . . 48 Controlling Video Devices (Visual Control). . . . . . . . . 49 Matching the Pitch with Other Instruments (Master Tune) . 49 Performing in Atelier Mode (ATELIER Mode). . . . . . . . 50
Connections with Other Equipment.. . . . . . . . . . . . . . . . . . . . . . . . . . . . . .51
Connecting a Computer. . . . . . . . . . . . . . . . . . . . .51 Connecting MIDI Devices. . . . . . . . . . . . . . . . . . . . 51
About the Wireless LAN Function. . . . . . . . . . . . . . . . . . . . . . . . . . . . . . . . .52
What is Wireless LAN Function?. . . . . . . . . . . . . . . . . 52 Basic Connection Method (Connect by WPS). . . . . . . . . . .52 Wireless LAN Function Settings. . . . . . . . . . . . . . . . . 53 Wireless Menu (Wireless) . . . . . . . . . . . . . . . . . 53 Other Settings (Options). . . . . . . . . . . . . . . . . .53
Troubleshooting.. . . . . . . . . . . . . . . . . . . . . . . . . . . . . . . . . . . . . . . . |
. . . . . . . .55 |
Error Messages . . . . . . . . . . . . . . . . . . . . . . . . . . . . . . . . . . . . . . . . . . |
. . . . . . . .58 |
Stored Settings. . . . . . . . . . . . . . . . . . . . . . . . . . . . . . . . . . . . . . . . . . |
. . . . . . . .59 |
Settings That Are Stored After the Power Is Turned Off. . |
. . . . 59 |
Settings That Are Stored in the Registrations. . . . . . |
. . . . .59 |
Main Specifications. . . . . . . . . . . . . . . . . . . . . . . . . . . . . . . . . . . . . . |
. . . . . . . .60 |
Index.. . . . . . . . . . . . . . . . . . . . . . . . . . . . . . . . . . . . . . . . . . . . . . . . . . . |
. . . . . . . .61 |
USING THE UNIT SAFELY.. . . . . . . . . . . . . . . . . . . . . . . . . . . . . . . . . |
. . . . . . . .62 |
IMPORTANT NOTES . . . . . . . . . . . . . . . . . . . . . . . . . . . . . . . . . . . . . . |
. . . . . . . .64 |
Introduction
Performing
Recording
Looper
Settings
Appendix
5

Panel Descriptions
Front Panel
1 |
2 |
3 |
4 |
7 |
9 |
10 |
12 |
|
|
|
5 |
|
|
|
|
|
|
|
|
|
|
|
|
|
|
|
|
|
|
|
|
|
|
8 |
|
|
|
|
13 |
|
|
|
|
|
14 |
|
6 |
|
|
|
11 |
|
|
|
|
|
|
|
|
|
|
|
|
|
|
|
||||
|
|
|
|
|
|
|
|
|
|
|
|
|
|
||
|
|
|
|
|
|
|
|
|
|
|
|
|
|
|
|
|
|
|
|
|
|
|
|
|
|
|
|
|
|
|
|
|
|
|
15 |
|
|
|
|
|
|
|
|
|
|
|
|
|
|
|
|
|
|
|
|
||||||||
Number |
Name |
Explanation |
|
|
|
|
Page |
||||||||
|
|
|
|
|
|
|
|
|
|
|
|
|
|||
|
|
|
|
|
|
|
Connect a USB flash drive (sold separately) here. |
|
|
|
|
|
|||
|
|
|
|
|
|
|
You can save or play back songs you’ve recorded, and save or load registration sets. |
|
|
||||||
|
|
|
|
|
|
|
If you connect a wireless USB adapter (WNA1100-RL; sold separately), you’ll be able to use |
|
|
||||||
|
|
|
|
|
|
|
applications that support wireless. |
|
|
|
|
|
|||
|
|
|
|
|
|
|
* When opening/closing the USB flash drive cover, please be careful not to get your fingers |
|
p. 33 |
||||||
1 |
|
|
USB MEMORY port |
pinched between the movable part and the panel. In places where small children are |
|
p. 39 |
|||||||||
|
|
present, make sure that an adult provides supervision and guidance. |
|
|
|||||||||||
|
|
|
|
|
|
|
|
|
p. 52 |
||||||
|
|
|
|
|
|
|
* Never insert or remove a USB flash drives while this unit is turned on. Doing so may corrupt |
|
|||||||
|
|
|
|
|
|
|
|
|
|||||||
|
|
|
|
|
|
|
the unit’s data or the data on the USB flash drives. |
|
|
|
|
|
|||
*Carefully insert the USB flash drives all the way in—until it is firmly in place.
*Use USB Flash Memory sold by Roland. We cannot guarantee operation if other products are used.
D-BEAM controller
You can apply various effects to the sound by positioning your hand above the D-BEAM controller.
2 |
[PITCH] button |
If this is on, the D-BEAM controller will control the pitch. |
|
|
|
|
|
|
[SFX] button |
If this is on, the D-BEAM controller will control the sound effects. |
p. 24 |
|
|
|
|
|
[CONTROLLER] button |
If this is on, the D-BEAM controller will control the effect you’ve assigned. |
|
|
|
|
|
|
Effect section |
|
|
Here you can apply effects to the sound.
|
[OVERDRIVE] knob |
Applies a distortion effect. |
|
|
|
|
|
|
|
3 |
[TONE] knob |
Adjusts the tonal character. |
|
|
|
|
|
||
[COMPRESSOR] knob |
Makes the sound more consistent. |
p. 23 |
||
|
||||
|
|
|
||
|
[MFX] knob |
Applies a multi-effect (multiple effects). |
||
|
|
|||
|
|
|
|
|
|
[DELAY] knob |
Delays the sound to create an echo-like effect. |
|
|
|
|
|
|
|
|
[REVERB] knob |
Applies reverberation to the sound. |
|
|
|
|
|
|
Organ section
Here you can select organ sounds. You can also create your own organ sounds, and adjust the volume.
|
Harmonic bars |
Use these to shape the organ sound. |
p. 16 |
|
|
You can modify the sound in real time as you play. |
|||
|
|
|
||
|
|
|
|
|
4 |
[LEVEL] bar |
Adjusts the volume of the organ section. |
— |
|
|
|
|
||
[TYPE] button |
Selects the variation of organ sounds. |
p. 12 |
||
|
||||
|
|
|
|
|
|
ORGAN [SPLIT] button |
Divides the organ into two keyboard regions. |
p. 28 |
|
|
|
|
|
|
|
[UPPER/LOWER] button |
Selects the part when using the harmonic bars to shape the sound. |
p. 28 |
|
|
|
|
|
|
|
[PERCUSSION] button |
Turns the percussion effect of the organ sound on/off. |
p. 20 |
|
|
|
|
|
|
|
[VIBRATO/CHORUS] button |
Turns the vibrato or chorus effect of the organ sound on/off. |
p. 21 |
|
|
|
|
|
|
5 |
Display/Other |
|
|
|
|
|
|
||
Display |
Sound names and other settings are shown here. |
— |
||
|
||||
|
|
|
|
|
|
MODE [ORGAN] button |
Allows you to play organ sounds. |
p. 12 |
|
6 |
|
|
|
|
MODE [PIANO] button |
Allows you to play piano sounds. |
p. 13 |
||
|
|
|
|
|
|
MODE [SYNTH] button |
Allows you to play synthesizer sounds. |
p. 13 |
|
|
|
|
|
6

|
|
|
|
|
|
|
|
|
|
|
Panel Descriptions |
|
|
|
|
|
|
|
|
|
|
|
|
|
|
|
Number |
Name |
|
|
|
Explanation |
|
Page |
||||
|
|
|
|
|
|
|
|
|
|
|
||
|
|
CURSOR [ ] [ |
] buttons |
|
Use these to select parameters. |
|
— |
|||||
|
|
|
|
|
|
|
|
|
|
|
|
|
|
|
[VALUE] dial |
|
|
|
Use this to modify a value. |
|
— |
||||
7 |
|
|
|
|
|
|
|
|
|
|
||
[MENU] button |
|
|
|
Accesses the menu screen. |
|
p. 42 |
||||||
|
|
|
|
|
|
|
|
|
|
|
|
|
|
|
[ENTER] button |
|
|
|
Confirms a value or executes an operation. |
|
— |
||||
|
|
|
|
|
|
|
|
|
|
|
|
|
|
|
[EXIT] button |
|
|
|
Returns to the previous screen, or cancels an operation. |
|
— |
||||
|
|
|
|
|
|
|
|
|
|
|
||
8 |
[TRANSPOSE] button |
|
Raises or lowers the keyboard range in steps of one semitone. |
|
p. 26 |
|||||||
OCTAVE [DOWN] [UP] buttons |
|
Raise or lower the keyboard range in steps of one octave. |
|
p. 26 |
||||||||
|
|
|
|
|||||||||
|
|
|
|
|
|
|
|
|
|
|
|
|
|
|
Piano section |
|
|
|
|
|
|
||||
|
|
|
|
|
|
|
|
|
||||
|
|
Here you can select piano sounds and adjust the volume of the piano sound. |
|
|
||||||||
|
|
|
|
|
|
|
|
|
|
|
|
|
|
|
[PIANO] button |
|
|
|
Selects piano sounds. |
|
|
||||
9 |
[E.. PIANO] button |
|
|
Selects electric piano sounds. |
|
p. 13 |
||||||
|
|
[CLAV] button |
|
|
|
Selects clavi sounds. |
|
|||||
|
|
|
|
|
|
|
||||||
|
|
|
|
|
|
|
|
|
|
|
|
|
|
|
[OTHERS] button |
|
|
Selects piano sounds that are not shown on the panel. |
|
|
|||||
|
|
|
|
|
|
|
|
|
|
|
|
|
|
|
PIANO LEVEL [ |
] [ |
] buttons |
|
Adjust the volume of the piano section. |
|
— |
||||
|
|
|
|
|
|
|
|
|
|
|
|
|
|
|
Synthesizer section |
|
|
|
|
|
|||||
|
|
|
|
|
|
|
|
|
||||
|
|
Here you can select synthesizer sounds and adjust the volume of the synthesizer sound. |
|
|
||||||||
|
|
|
|
|
|
|
|
|
|
|||
|
|
SYNTH [SPLIT] button |
|
Divides the keyboard, allowing you to play two different sounds. |
|
p. 28 |
||||||
|
|
|
|
|
|
|
|
|
|
|
|
|
|
|
[BRASS] button |
|
|
|
Selects brass sounds. |
|
|
||||
|
|
|
|
|
|
|
|
|
|
|
|
|
|
|
[STRINGS] button |
|
|
Selects strings sounds. |
|
|
|||||
10 |
[SYNTH LEAD] button |
|
Selects synth lead sounds. |
|
|
|||||||
|
|
|
|
|
|
|
|
|
|
|
||
[BASS] button |
|
|
|
Selects bass sounds. |
|
p. 13 |
||||||
|
|
|
|
|
|
|||||||
|
|
|
|
|
|
|
|
|
|
|
|
|
|
|
[PAD] button |
|
|
|
Selects synth pad sounds. |
|
|||||
|
|
|
|
|
|
|
||||||
|
|
|
|
|
|
|
|
|
|
|
|
|
|
|
[CHOIR] button |
|
|
|
Selects choir sounds. |
|
|
||||
|
|
|
|
|
|
|
|
|
|
|
|
|
|
|
[SFX] button |
|
|
|
Selects sound effects. |
|
|
||||
|
|
|
|
|
|
|
|
|
|
|
|
|
|
|
[OTHERS] button |
|
|
Selects synthesizer sounds that are not shown on the panel. |
|
|
|||||
|
|
|
|
|
|
|
|
|
|
|
|
|
|
|
SYNTH LEVEL [ |
] [ |
] buttons |
|
Adjusts the volume of the synthesizer section. |
|
— |
||||
|
|
|
|
|
|
|
|
|
|
|
|
|
|
|
Registration |
|
|
|
|
|
|
||||
|
|
|
|
|
|
|
|
|
||||
|
|
Here you can store and recall your favorite sound settings. |
|
|
||||||||
11 |
|
|
|
|
|
|
|
|
|
|
||
[BANK] button |
|
|
|
Selects the registration bank. |
|
p. 14 |
||||||
|
|
|
|
|
|
|
|
|
|
|
|
|
|
|
[1]–[4] buttons |
|
|
|
Select a registration (1–4). |
|
p. 14 |
||||
|
|
|
|
|
|
|
|
|
|
|
|
|
|
|
[NEXT] button |
|
|
|
Selects the next registration. |
|
p. 14 |
||||
|
|
|
|
|
|
|
|
|
|
|
|
|
|
|
Drum section |
|
|
|
|
|
|
||||
|
|
|
|
|
|
|
|
|
||||
|
|
Here you can select drum kits or rhythm patterns, and select and play songs. |
|
|
||||||||
|
|
|
|
|
|
|
|
|
|
|
|
|
|
|
[RHYTHM] button |
|
|
Selects drum kits. |
|
p. 15 |
|||||
|
|
|
|
|
|
|
|
|
|
|
|
|
|
|
[TAP TEMPO] button |
|
|
Specifies the tempo of the rhythm pattern. |
|
p. 32 |
|||||
|
|
|
|
|
|
|
|
|
|
|
|
|
|
|
DRUM LEVEL [ |
] [ |
] buttons |
|
Adjust the volume of the drum kit, song, or rhythm pattern. |
|
p. 32 |
||||
|
|
|
|
|
|
|
|
|
|
|
|
|
12 |
[LOOPER] button |
|
|
Turns the looper function on/off. |
|
p. 37 |
||||||
|
|
|
|
|
|
|
|
|
|
|
||
[SONG/RHYTHM] button |
|
Selects songs or rhythm patterns. |
|
p. 32 |
||||||||
|
|
|
|
|||||||||
|
|
|
|
p. 34 |
||||||||
|
|
|
|
|
|
|
|
|
|
|
|
|
|
|
|
|
|
|
|
|
|
|
|
|
|
|
|
[ |
] (REC) button |
|
|
Records your performance. |
|
p. 33 |
||||
|
|
|
|
|
p. 37 |
|||||||
|
|
|
|
|
|
|
|
|
|
|
|
|
|
|
|
|
|
|
|
|
|
|
|
|
|
|
|
[ |
|
|
] (START/STOP) button |
|
Starts/stops recording or playback. |
|
p. 34 |
|||
|
|
|
|
|
|
|||||||
|
|
|
|
|
|
|
|
|
|
|
|
|
|
|
[ |
|
] [ |
|
] buttons |
|
Move the playback position of the song. |
|
p. 34 |
||
|
|
|
|
|
|
|
|
|||||
|
|
|
|
|
|
|
|
|
|
|
|
|
13 |
Controllers at the left of the keyboard |
|
|
|
||||||||
|
|
|
|
|
|
|
|
|
|
|
||
[VOLUME] knob |
|
|
|
Adjusts the overall volume. |
|
— |
||||||
|
|
|
|
|
|
|||||||
|
|
|
|
|
|
|
|
|
|
|
||
|
|
ROTARY SOUND [ON/OFF] button |
|
Turns the rotary speaker (modulation effect) on/off. |
|
p. 19 |
||||||
14 |
|
|
|
|
|
|
|
|
|
|||
ROTARY SOUND [FAST/SLOW] |
|
Changes the speed of the rotary speaker. |
|
p. 19 |
||||||||
|
|
button |
|
|
|
|
||||||
|
|
|
|
|
|
|
|
|||||
|
|
|
|
|
|
|
|
|
|
|
||
15 |
Pitch bend/Modulation lever |
|
You can use the lever to modify the sound in real time. |
|
p. 25 |
|||||||
|
|
|
|
|
|
|
|
|
|
|
|
|
Introduction
Performing
Recording
Looper
Settings
Appendix
7

Panel Descriptions
Rear Panel (Connecting Devices)
DAMPER jack
You can connect a pedal switch or a damper pedal (DP series; sold separately) here.
The pedal switch can be used to sustain the notes.
While you continue holding down the pedal, notes will continue sounding even after you take your fingers off the keys.
You can also use the pedal switch to control the looper (Damper Assign: p. 45).
MIDI connectors |
page 51 |
Connect an external MIDI device here to transfer performance data.
*The MIDI connectors and the MIDI functionality of the USB COMPUTER port cannot be used simultaneously.
EXT INPUT jack
If you use a stereo mini-plug cable to connect your audio player or other audio source here, the sound from the connected device will be output from the OUTPUT jacks. Use the controls
of the connected device to adjust its volume.
*This sound cannot be recorded.
DC IN jack
Connect the included AC adaptor to this jack.
Place the AC adaptor so the side with the indicator faces upwards and the side with textual information faces downwards.
The indicator will light when you plug the AC adaptor into an AC outlet.
EXPRESSION PEDAL jack |
PK IN connector |
Connect an expression pedal (EV series; sold |
Connect a pedalboard (PK-6, PK-9; sold |
separately) to this jack. |
separately) to this connector. |
You can use the expression pedal to control |
This allows you to play the pedal part of the |
the volume. |
organ. |
*Use only the specified expression pedal (EV series; sold separately). By connecting any other expression pedal, you risk causing malfunction and/or damage to the unit.
MEMO
You can also connect a pedal switch (DP-2; sold separately) here to control the looper
(ExpressionAssign:p.45).
PHONES jack
Connect you headphones (sold separately) to this jack.
OUTPUT jacks
Connect an amp or mixer to these jacks to output the sound.
[POWER] switch |
page 11 |
Press this switch to turn it on/off.
USB COMPUTER port |
page 51 |
You can use a commercially available USB cable to connect the VR-09 to your computer so that performance data (MIDI data) can be transmitted and received.
*The MIDI connectors and the MIDI functionality of the USB COMPUTER port cannot be used simultaneously.
*To prevent malfunction and equipment failure, always turn down the volume, and turn off all the units before making any connections.
*When connection cables with resistors are used, the volume level of equipment connected to the inputs (EXT INPUT jack) may be low. If this happens, use connection cables that do not contain resistors.
8

Getting Ready
Installing Batteries
If eight commercially available rechargeable Ni-MH batteries (AA, HR6) are installed, you’ll be able to play the VR-09 without connecting the AC adaptor.
*We recommend that you keep batteries installed in the unit even though you’ll be powering it with the AC adaptor. That way, you’ll be able to continue a performance even if the cord of the AC adaptor gets accidently disconnected from the unit.
Types of batteries that can be used
If operating this unit on batteries, please use rechargeable Ni-MH batteries.
Using rechargeable Ni-MH batteries will allow approximately 5 hours of continuous operation at room temperature. (However, the duration will be approximately 3 hours if
USB flash drive is connected. The duration of continuous operation may differ depending on the conditions of use.)
NOTE
Do not use alkaline batteries or carbon-zinc battery batteries.
Handle leaking batteries carefully
•Incorrect handling of rechargeable batteries, or a battery charger can cause leakage, overheating, fire, or explosion. Before use, you must read and strictly observe all of the precautions that accompany the rechargeable batteries, or battery charger.
•When using rechargeable batteries and a charger, use only the combination of rechargeable batteries and charger specified by the battery manufacturer.
•If used improperly, batteries may explode or leak and cause damage or injury. In the interest of safety, please read and observe the following precautions.
•Carefully follow the installation instructions for batteries, and make sure you observe the correct polarity.
•Avoid mixing different types of batteries.
•Remove the batteries whenever the unit is to remain unused for an extended period of time.
•Never keep batteries together with metallic objects such as ballpoint pens, necklaces, hairpins, etc.
1. While pressing the tabs of the battery compartment cover on the VR-09’s bottom panel, remove the cover..
*When turning the unit upside down, position stacks of magazines (or other materials) under the unit in such a way that they will support its four corners, thus preventing damage to the buttons, knobs, etc. Also, be sure to handle the unit with care so as to avoid dropping it, or allowing it to fall or tip over.
2.Insert the batteries into the battery compartment, taking care to observe the correct polarity (+/- orientation)..
NOTE
Carefully follow the installation instructions for batteries, and make sure you observe the correct polarity.
3. Securely close the battery compartment cover..
When to Replace the Batteries
When the batteries run low, the display will indicate “Charge Battery.”
Stop use, and recharge the batteries.
NOTE
•If you continue using the unit after the “Charge Battery” indication appears, the “Battery Low!” indication will appear, and further operation will not be possible.
•The VR-09 cannot recharge rechargeable Ni-MH batteries.
•You’ll need to use a battery charger designed for rechargeable Ni-MH batteries.
Introduction
Performing
Recording
Looper
Settings
Appendix
9

Getting Ready
Placing the VR-09 on a Stand
Be careful not to pinch your fingers when setting up the stand.
If you place the VR-09 on a stand, you must use the KS-18Z or the KS-12. Place the instrument on the stand as follows.
* If using a pedalboard (PK-9; sold separately), please use the KS-12.
KS-18Z
Align the front of the VR-09 with the front of the stand
Adjust so that the height does not exceed 1 meter (Adjust the stand to a level no higher than the fifth level from the bottom)
Adjust the width of the stand so that the rubber feet of the VR-09 straddle the stand
Top view
KS-12
Adjust the width of the stand so that the rubber feet on the keyboard side of the bottom of the keyboard fit into the holes provided for the rubber feet.
Top view
Using the Included USB Memory Protector
You can use the included USB memory protector to prevent theft of the USB flash drive connected to the VR-09.
NOTE
• You must use the included screws.
• You must use the included Allen wrench to tighten or remove the screws. Using a tool that does not match the screw heads will damage them.
• Be careful not to over-tighten the screws. Doing so may damage the screw’s head, causing the wrench to rotate uselessly.
• To tighten the screws, turn the Allen wrench clockwise. To loosen the screws, turn the Allen wrench counter-clockwise.
loosen |
tighten |
• Keep the removed screws out of the reach of small children to ensure they are not swallowed accidentally.
• Never allow foreign objects (e.g., coins, wires) to enter the USB memory box.
10
Getting Ready
Listening to the Demo Songs
|
Here’s how to listen to the demo songs. |
||
1. |
Turn the power on.. |
||
2. |
Press the |
|
] (START/STOP) button.. |
|
|||
|
|||
The demo screen is shown in the display.
3. Press the [ |
|
] (START/STOP) button.. |
|
||
|
Demo playback starts.
When the selected demo song finishes playing, the next demo song will begin playing.
|
4. Press the |
|
|
|
] (START/STOP) button.. |
||
|
|
|
|
||||
|
|
|
|
||||
|
The demo song will stop playing. |
||||||
|
|
|
|
|
|
||
|
|
MEMO |
|
|
|
|
|
|
|
If |
|
|
|
button or [SONG/RHYTHM] button is lit, pressing |
|
|
|||||||
|
|
screen. |
|
] (START/STOP) button will not bring up the demo |
|||
|
|
|
|||||
|
|
|
|
|
|
||
*All rights reserved. Unauthorized use of this material for purposes other than private, personal enjoyment is a violation of applicable laws.
*No data for the music that is played will be output from MIDI OUT connector and USB COMPUTER port.
Introduction
Performing
Recording
Looper
Settings
Appendix
11

Selecting Sounds
Selecting Sounds with One Touch
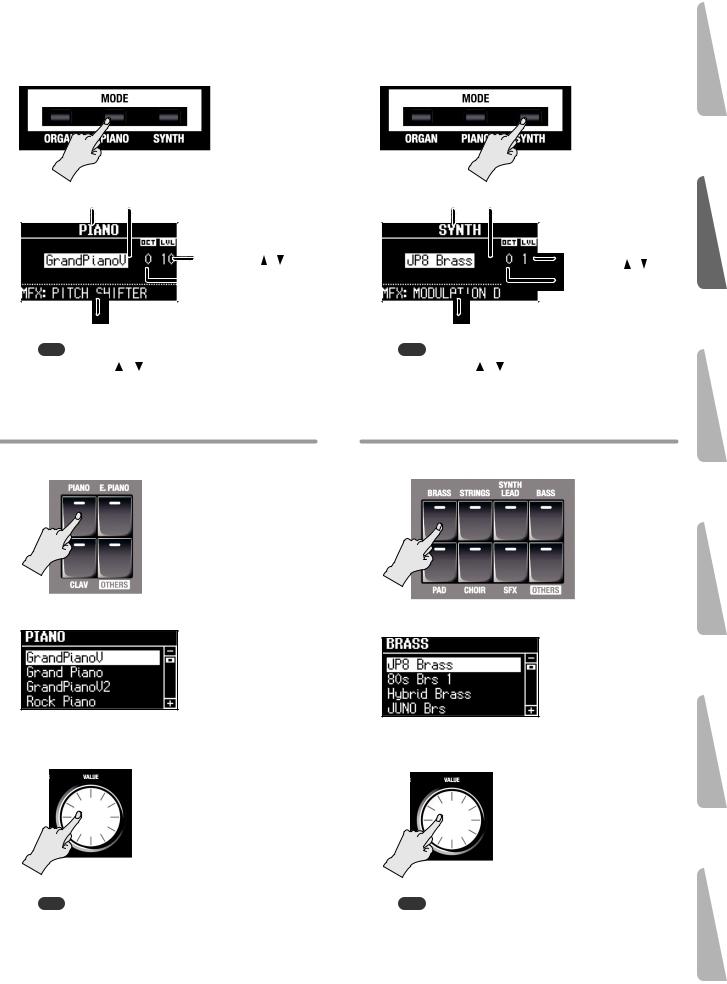
By using the Mode buttons you can play organ, piano, and synthesizer sounds individually.
REFERENCE
For details about the sounds, refer to “Sound List” in the “Data List” (PDF).
You can download the “Data List” (PDF) from the Roland website. http://www.roland.com/manuals/
Selecting Organ Sounds
1. Press the MODE [ORGAN] button..
The MODE [ORGAN] button will light.
Sound Sound variation
Volume ([LEVEL] bar)
Harmonic bars (p.. 16)
Multi-effect type (p.. 44)
MEMO
Use the CURSOR [ ] [ ] buttons to move the cursor to an item, and turn the [VALUE] dial to change the sound variation/multieffect type.
Selecting the organ sound variation
1. In the organ section, press the [TYPE] button..
The ORGAN TYPE screen is shown in the display.
2. Turn the [VALUE] dial to select the desired type of sound..
MEMO
•You can play the keyboard to audition the sound at which the cursor is located.
•The organ sounds of the VR-09 simulate the way in which the keyboard of a vintage organ responds. This is called the “quickfiring keyboard.”
•The organ sounds of the VR-09 are produced by a “virtual tonewheel sound engine” that uses digital technology to faithfully simulate the way in which a tonewheel organ generates sound.
What’s the quick-firing keyboard?
Contacts for traditional organ keys are extremely shallow, meaning that sounds are produced with the slightest touch of the keys. This gives it special qualities that allow glissando and similar performance techniques to be used very effectively.
However, a well-known side effect of this behavior is that when a key is released suddenly, it can rebound, causing that note to be unintentionally triggered a second time.
On the other hand, some performers actively make use of these characteristics to realize a surprising, rapid-fire playing technique.
The VR-09’s quick-firing function faithfully simulates these characteristics. Because the sounds of the organ section are triggered at high speed, rebounding may occur if you release a key suddenly; this is not a malfunction.
*Quick-firing keyboard will not be used when you’re playing non-organ sounds, or when you’re playing a nonorgan sound together with an organ sound.
What’s the virtual tonewheel sound generator?
Traditional tonewheel organs generate sound using 91 toothed wheels called “tonewheels.” Each tonewheel is a toothed, gear-like wheel with a different number of teeth that make it produce a specific pitch. A motor spins these wheels past magnetic coils which generate audio signals at the corresponding pitches. The settings of the harmonic bars in conjunction with the keys played on the keyboard determine which of these pitches are combined to produce the sound of the organ.
The VR-09’s virtual tonewheel sound engine uses digital technology to faithfully recreate the principles by which a tonewheel organ produces its sound.
12
|
|
Selecting Sounds |
|
|
|
|
|
Selecting Piano Sounds |
Selecting Synthesizer Sounds |
||
1. Press the MODE [PIANO] button.. |
|
1. Press the MODE [SYNTH] button.. |
|
The MODE [PIANO] button will light. |
|
The MODE [SYNTH] button will light. |
|
Sound Sound variation |
Sound Sound variation |
|
|
|
|
|
|
|
|
|
|
|
|
Volume |
|
|
|
|
|
|
|
|
|
|
|
|
|
|
|
|
|
|
|
|
|
|
|
|
|
|
|
|
|
|
|
|
|
|
|
|
|
||
|
|
|
|
|
|
|
|
|
|
|
|
|
|
|
|
|
|
|
|
|
|
|
|
||
|
|
|
|
|
|
|
|
|
|
|
|
|
(PIANO LEVEL [ |
] [ ] button) |
|
|
|
|
|
|
|
|
|
||
|
|
|
|
|
|
|
|
|
|
|
|
|
Octave (p.. 26) |
|
|
|
|
|
|
|
|
|
|
|
|
|
|
|
|
|
|
|
|
|
|
|
|
|
|
|
|
|
|
|
|
|
|
|
|
|
|
|
|
|
|
|
|
|
|
|
|
|
|
|
|
|
|
|
|
|
|
|
|
|
|
|
|
|
|
|
|
|
|
|
|
|
|
|
|
|
|
|
|
|
|
|
|
|
|
|
|
||
|
|
|
|
|
|
|
|
|
|
|
|
|
|
|
|
|
|
|
|
|
|
|
|
|
|
|
Multi-effect |
type (p.. 44) |
|
|
Multi-effect |
type (p.. 44) |
|
||||||||||||||||||
|
|
|
|
|
|
|
|
|
|
|
|
|
|
|
|
|
|
|
|
|
|
|
|
||
|
MEMO |
|
|
|
|
|
|
|
|
|
|
|
|
|
|
MEMO |
|
|
|
|
|
|
|
|
|
Volume
(SYNTH LEVEL [ ] [ ] button) Octave (p.. 26)
Use the CURSOR [ ] [ ] buttons to move the cursor to an item, |
Use the CURSOR [ ] [ ] buttons to move the cursor to an item, |
and turn the [VALUE] dial to change the sound variation/multi- |
and turn the [VALUE] dial to change the sound variation/multi- |
effect type. |
effect type. |
Selecting the piano sound variation |
Selecting the Synthesizer sound variation |
1. Press one of the sound buttons in the piano section.. |
1. Press one of the sound buttons in the synthesizer section.. |
The sound variation select screen appears.
2. Turn the [VALUE] dial to select the desired sound variation..
The sound variation select screen appears.
2. Turn the [VALUE] dial to select the desired sound variation..
|
MEMO |
|
|
MEMO |
|
• You can play the keyboard to audition the sound at which the |
• You can play the keyboard to audition the sound at which the |
||||
|
cursor is located. |
|
cursor is located. |
||
• If you press the [TRANSPOSE] button while the sound variation |
• If you press the [TRANSPOSE] button while the sound variation |
||||
|
select screen is shown, the select screen will be held. Press the |
|
select screen is shown, the select screen will be held. Press the |
||
|
[EXIT] button to return to the previous screen. |
|
[EXIT] button to return to the previous screen. |
||
Introduction
Performing
Recording
Looper
Settings
Appendix
13

Selecting Sounds
Selecting Your Favorite Sounds (Registration)
You can assign a name to your favorite organ, piano, and synthesizer sounds (or combination of sounds), and store it as a “registration.”
A registration can be recalled instantly by pressing a single button. This is a convenient way to switch sounds for each song, or to instantly switch between settings during a live performance.
Registrations are organized into banks, with 4 registrations in each bank.
There are 25 banks, allowing you to store a total of 100 registrations.
25
4
Bank |
3 |
|
|
|
||
|
|
|
||||
1 |
2 |
|
|
|
|
|
|
|
|
|
|||
|
|
|
|
|
||
|
|
|
|
|
||
|
|
|
|
|
|
|
|
|
|
|
|
|
|
|
|
|
|
|
|
|
|
|
|
|
|
|
|
|
|
|
|
|
|
|
4 registrations
= Bank
MEMO
•When the VR-09 is shipped from the factory, several banks contain registrations with the same settings.
•Sets of registrations can be saved on a USB flash drive (p. 39).
•Sets of registrations saved on a USB flash drive can be loaded back into the VR-09 (p. 40).
Recalling a Registration
1. Press the [1]–[4] buttons to select a registration..
The registration screen is shown in the display.
Bank number
Registration number
Registration name
 Volume
Octave (p.. 26)
Multi-effect type (p.. 44)
Split or Dual setting (p.. 27)
MEMO
•You can select a registration by moving the cursor to the registration number and turning the [VALUE] dial.
•You can select the next registration by pressing the [NEXT] button.
•If registration 4 is selected, pressing the [NEXT] button will
select registration 1 of the next bank.
Switching Registration Banks
Switching banks (Banks 1–4)
1. Press the [BANK] button..
The BANK screen is shown in the display.
 Currently selected bank number
2. Press the [1]–[4] buttons to select the desired bank..
3. Press the [1]–[4] buttons to select a registration..
You’ll switch to a registration of the bank you selected.
Switching banks (Banks 5–25)
1. Press the [BANK] button..
The BANK screen is shown in the display.
2. Turn the [VALUE] dial to select the desired bank..
3. Press the [ENTER] button..
4. Press the [1]–[4] buttons to select a registration..
You’ll switch to a registration of the bank you selected.
14

Selecting Sounds
Storing a registration
1. Select the desired sounds and effect settings..
2. Hold down one of the [1]–[4] buttons until the following screen appears..
The WRITE REGISTRATION screen is shown in the display.
3. Select the store-destination..
Use the CURSOR [ ] [ ] buttons and the [VALUE] dial to select the store-destination bank and registration number.
4. Specify a name for the registration..
Button/Dial |
Operation |
|
CURSOR [ ] [ ] |
Select the character that you want to change. |
|
buttons |
||
|
||
|
|
|
[VALUE] dial |
Changes the character. |
|
|
|
|
MODE [ORGAN] (Del) |
Delete the character. |
|
button |
||
|
||
|
|
|
MODE [PIANO] (Space) |
Inserts a space. |
|
button |
|
6. Press the [ENTER] button or the MODE [SYNTH] (Write) button..
Your settings will be stored in the selected registration.
REFERENCE
About the settings stored in a registration, refer to “Settings That Are Stored in the Registrations” (p. 59).
Selecting Drum Sounds
You can play drum sounds and sound effects from the VR-09’s keyboard.
A drum kit lets you choose from a selection of sounds.
When you switch drum kits, the sounds assigned to each key will change.
REFERENCE
Refer to “Drum Kit List” in the “Data List” (PDF) for details on the percussion instrument sounds that are assigned to each key. You can download the “Data List” (PDF) from the Roland website.
http://www.roland.com/manuals/
1. Press the [DRUM] button to make it light..
The DRUM screen appears.
2. Turn the [VALUE] dial to select a drum kit..
Drum kit
Volume
(DRUM LEVEL [ ] [ ] button)
Multi-effect type (p.. 44)
MEMO
•By using the looper function (p. 37) to overdub-record drum sounds, you can create rhythm patterns using these sounds.
•You can play the keyboard to audition the sound at which the cursor is located.
•If you press the [TRANSPOSE] button while the DRUM screen is shown, the DRUM screen will be held. Press the [EXIT] button to return to the previous screen.
• You can use the DRUM LEVEL [ ] [ ] buttons to adjust the volume of the drum kit (p. 32).
Introduction
Performing
Recording
Looper
Settings
Appendix
15

Modifying the Organ Sound
Using the Harmonic Bars
The harmonic bars are assigned to sounds of different footage (pitch). You can create a wide variety of organ sounds by layering these sounds.
The volume will be loudest when the harmonic bars are fully lowered; there will be no sound when the harmonic bars are fully raised.
Raised (minimum volume)
Lowered (maximum volume)
Time |
Time |
8’ volume: 8 |
4’ volume: 5 |
Time |
1. Select an organ sound (p.. 12)..
The organ sound editing screen appears.
Harmonic bars and the pitch of the sound
When the middle C (C4) note is pressed, each harmonic bar will sound the following notes.
|
|
|
|
|
|
|
|
|
|
|
|
|
|
|
|
|
|
|
|
16’ |
51/3’ |
|
8’ |
|
4’ |
22/3’ |
|
2’ |
|
13/5’ |
|
11/3’ |
|
1’ |
|||
one octave 5th |
|
root |
|
8th |
12th |
|
15th |
|
17th |
|
19th |
22nd |
||||||
below |
|
|
|
|
|
|
|
|
|
|
|
|
|
|
|
|
||
|
|
|
|
|
|
|
|
|
|
|
|
|
|
|
|
|
|
|
|
|
|
|
|
|
|
|
|
|
|
|
|
|
|
|
|
|
|
|
|
|
|
|
|
|
|
|
|
|
|
|
|
|
|
|
|
|
|
|
|
|
|
|
|
|
|
|
|
|
|
|
|
|
|
|
|
|
|
|
|
|
|
|
|
|
|
|
|
|
|
|
|
|
|
|
|
|
|
|
|
|
|
|
|
|
|
|
|
|
|
|
|
|
|
8’ =
There are three colors of harmonic bars. Those that are in octave multiples of 8’ are white, those that are not octave multiples are black, and the lower-pitched bars are brown.
A tonewheel organ’s overtone structure
In certain regions of a tonewheel organ’s keyboard, the overtones will not correspond to the configuration of the harmonic bars. In order to prevent unpleasantly high or low pitches, the high footage is “folded back down” in one octave units for the high range, while the low footage is “folded back up” in one-octave units for the low range. The VR-09 faithfully reproduces this characteristic of tonewheel organs.
2. Slide the harmonic bars to adjust the sound..
16

When you’ve selected “Transistor Organ” as the organ sound
The footage structure will be different for Transistor organ.
You’ll be able to operate the following harmonic bars. The other harmonic bars will be unavailable.
Part |
Harmonic bars that can be operated |
|
|
Upper part |
16’, 8’, 4’, 2 2/3’, 2’ (5 bars) |
|
|
Lower part |
8’, 4’, 2’, 1 3/5’ (4 bars) |
|
|
The bars at the right with the “ ” and “
 ” icons will respectively adjust the volume of “mellow sound” and “bright sound.”
If these two bars are fully raised, no organ sound will be heard.
Upper part |
|
|
|
Bright |
sound |
||||
Mellow sound |
|
|
|||||||
|
|
|
|
|
|||||
|
|
|
|
|
|
|
|
|
|
|
|
|
|
|
|
|
|
|
|
|
|
|
|
|
|
|
|
|
|
|
|
|
|
|
|
|
|
|
|
Lower part |
|
|
Bright |
sound |
||||
|
Mellow sound |
|
|
|||||
|
|
|
|
|
|
|||
|
|
|
|
|
|
|
|
|
|
|
|
|
|
|
|
|
|
|
|
|
|
|
|
|
|
|
|
|
|
|
|
|
|
|
|
Modifying the Organ Sound
Introduction
Performing
Recording
Looper
Settings
Appendix
17

Modifying the Organ Sound
Setting Example of Harmonic Bars
Hard rock
Here’s a typical setting for hard rock of the ‘70s.
As desired, you can add a bit of 2’ (the 2-foot bar).
Also, add the overdrive (p. 23).
Organ type: Rock Organ
Percussion: On
Pops
Here’s a typical setting for pops of the ‘60s.
Organ type: Jazz Organ
Percussion: On
Progressive rock
Here’s a setting for the progressive rock that was popular in the ‘70s. Add the C-3 chorus (p. 21) and the overdrive (p. 23).
Organ type: Rock Organ Percussion: On
Jazz
This is a standard setting for jazz organ.
Add the C-3 chorus (p. 21).
Organ type: Jazz Organ
Percussion: On
Rock
Here’s a typical setting for rock of the ‘70s.
Add the overdrive (p. 23).
Organ type: Rock Organ
Percussion: On
Blues
Here’s a standard blues sound.
As desired, you can add a bit of 1’ (the 1-foot bar).
Organ type: Jazz Organ
Percussion: Off
Pipe organ
Here’s a setting for a pipe organ sound.
Add the reverb (p. 23).
Organ type: Jazz Organ
Percussion: Off
Jazz (manual bass)
Here’s a setting for a bass sound played in the left hand (manual bass).
Organ type: Jazz Organ Percussion: On
MEMO
For more about manual bass, refer to “Playing the pedal sound with your left hand (manual bass)” (p. 29).
18

Modifying the Organ Sound
Using the Rotary Effect |
Using Twin Rotary |
This effect adds modulation to the sound as if you were using a rotary speaker.
1. Press the ROTARY SOUND [ON/OFF] button to make it light..
The rotary effect will be added to the sound.
2. Press the ROTARY SOUND [FAST/SLOW] button to switch it between lit/unlit..
|
By using the multi-effect “TWIN ROTARY” in conjunction with |
|
the rotary effect, you can obtain a more powerful and three- |
|
dimensional modulation effect as though you were using two |
|
rotary speaker units. |
1. |
Press the MODE [ORGAN] button.. |
2. |
Use the CURSOR [ ] [ ] buttons to select “MFX..” |
3. |
Turn the [VALUE] dial to select “TWIN ROTARY..” |
4. |
Press the ROTARY SOUND [ON/OFF] button to make it |
|
light.. |
5. |
Turn the [MFX] knob to adjust the depth of the twin rotary |
|
effect.. |
As you turn the knob toward the right, the sound of the two rotary speakers will be mixed, producing a complex modulation effect.
MEMO
The rotational speed of the twin rotary effect will follow the setting of the ROTARY SOUND [FAST/SLOW] button.
ROTARY SOUND |
Explanation |
|
[FAST/SLOW] button |
||
|
||
|
|
|
Lit (Fast) |
Produces the effect of making the rotary |
|
speaker spin rapidly. |
||
|
||
|
|
|
Unlit (Slow) |
Produces the effect of making the rotary |
|
speaker spin slowly. |
||
|
||
|
|
When you switch the rotary effect from “Fast” to “Slow,” the modulation will gradually slow down. When you switch it from “Slow” to “Fast,” the modulation will gradually speed up.
MEMO
•You can make separate settings for the tweeter and the woofer to specify their rotation speeds at the fast and slow settings, as well as the time it will take for the tweeter and woofer to change their speed when you switch the rotary effect (ROTARY: p. 43).
•If you’re playing only organ sounds, you can use the Pitch bend/ Modulation lever to control the rotary effect. Moving the lever away from yourself will switch the rotary effect on/off. Moving the lever to left or right will switch between fast/slow speeds.
•You can also use a pedal switch (DP series; sold separately), an expression pedal (EV series; sold separately), the footswitch of a pedal keyboard (PK-9; sold separately), or the D-BEAM controller to switch between fast and slow (p. 24, p. 45, p. 47).
Introduction
Performing
Recording
Looper
Settings
Appendix
19

Modifying the Organ Sound
Using Percussion
This adds an attack to the beginning of each note, making the sound more crisp and percussive.
1. Press the [PERCUSSION] button to make it light..
The PERCUSSION screen appears.
2. Use the CURSOR [ ] [
] [ ] buttons and the [VALUE] dial to select the desired effect..
Parameter |
Value |
Explanation |
|
|
|
|
The percussion sound will be decreased, and |
||
|
|
the harmonic bars will be at their normal |
||
|
|
volume. |
|
|
|
|
Volume |
|
|
|
|
Percussion sound |
||
|
SOFT |
will decay |
Volume of the |
|
|
|
|||
|
|
|
||
|
|
|
harmonic bar |
|
VOLUME (Vol) |
|
|
Time |
|
|
The percussion will be at its normal volume, |
|||
|
|
|||
|
|
and the sound of the harmonic bars will be |
||
|
|
decreased. |
|
|
|
|
Volume |
|
|
|
|
|
Percussion |
|
|
NORMAL |
|
Volume of the harmonic |
|
|
|
|
||
|
|
|
bars will decreases |
|
|
|
|
Time |
|
|
2ND |
Produces a percussion sound at the same |
||
HARMONIC |
pitch as the 4’ harmonic bar. |
|||
|
||||
(Harm) |
3RD |
Produces a percussion sound at the same |
||
|
||||
|
pitch as the 2 2/3’ harmonic bar. |
|||
|
|
|||
Parameter |
Value |
Explanation |
|
|
The percussion sound will decay immedi- |
|
|
ately, producing a sharper attack. |
|
|
Volume Short decay time |
|
FAST |
Percussion |
|
|
|
DECAY |
|
Time |
(Decay) |
|
The percussion sound will decay slowly, |
|
|
|
|
|
producing a softer attack. |
|
|
Volume |
|
|
Long decay time |
|
SLOW |
Percussion |
|
|
|
|
|
Volume of the |
|
|
harmonic bars |
|
|
Time |
*If you turn percussion on, the harmonic bar 1’ sound will not be heard.
MEMO
If you press the [TRANSPOSE] button while the PERCUSSION screen is shown, the PERCUSSION screen will be held. Press the [EXIT] button to return to the previous screen.
Percussion on a tonewheel organ
The percussion sound on a tonewheel organ does not apply to all the keys you play. Percussion will apply only to those keys that are simultaneously pressed from a state of no keys being pressed.
If you play legato, percussion will apply only to the first note you play. If you play staccato, percussion will apply to every note.
20
Using Vibrato/Chorus
Here’s how to apply vibrato (cyclic modulation of the pitch). You can also apply chorus, which mixes vibrato sound with unprocessed sound to produce greater depth and spaciousness.
1. Press the [VIBRATO/CHORUS] button to make it light..
The VIBRATO/CHORUS screen appears.
2. Turn the [VALUE] dial to select the desired effect..
Value |
Explanation |
|
|
V-1 |
Applies a slight vibrato effect. |
|
|
V-2 |
Applies a medium vibrato effect. |
|
|
V-3 |
Applies a strong vibrato effect. |
|
|
C-1 |
Applies a slight chorus effect. |
|
|
C-2 |
Applies a medium chorus effect. |
|
|
C-3 |
Applies a strong chorus effect. |
|
|
MEMO
If you press the [TRANSPOSE] button while the VIBRATO/ CHORUS screen is shown, the VIBRATO/CHORUS screen will be held. Press the [EXIT] button to return to the previous screen.
Modifying the Organ Sound
Introduction
Performing
Recording
Looper
Settings
Appendix
21
 Loading...