


 Loading...
2N-4-’05 03893278
Owner’s Manual
We’d like to take a moment to thank you for purchasing the Roland V-Hi-Hat VH-11.
When using the VH-11, you will need to make the settings for the sound module. Refer to p. 6 or p. 8.
*Hi-hat stand is not included.
For details on compatible stands, refer to p. 9.
201a
Before using this unit, carefully read the sections entitled: “USING THE UNIT SAFELY” and “IMPORTANT NOTES” (p. 2; p. 3). These sections provide important information concerning the proper operation of the unit. Additionally, in order to feel assured that you have gained a good grasp of every feature provided by your new unit, Owner’s manual should be read in its entirety. The manual should be saved and kept on hand as a convenient reference.
Copyright © 2005 ROLAND CORPORATION
All rights reserved. No part of this publication may be reproduced in any form without the written permission of ROLAND CORPORATION.

Used for instructions intended to alert the user to the risk of death or severe injury should the unit be used improperly.
Used for instructions intended to alert the user to the risk of injury or material damage should the unit be used improperly.
* Material damage refers to damage or other adverse effects caused with respect to the home and all its furnishings, as well to domestic animals or pets.
• Before using this unit, make sure to read the instructions below, and the Owner’s Manual.
................................................................................................
• Do not open or perform any internal modifications on the unit.
................................................................................................
•Do not attempt to repair the unit, or replace parts within it (except when this manual provides specific instructions directing you to do so). Refer all servicing to your retailer, the nearest Roland Service Center, or an authorized Roland distributor, as listed on the “Information” page.
................................................................................................
• Never use or store the unit in places that are:
• Subject to temperature extremes (e.g., direct sunlight in an enclosed vehicle, near a heating duct, on top of heat-generating equipment); or are
•Damp (e.g., baths, washrooms, on wet floors); or are
•Humid; or are
•Exposed to rain; or are
•Dusty; or are
•Subject to high levels of vibration.
................................................................................................
•Make sure you always have the unit placed so it is
level and sure to remain stable. Never place it on stands that could wobble, or on inclined surfaces.
................................................................................................
•Do not allow any objects (e.g., flammable material, coins, pins); or liquids of any kind (water, soft
drinks, etc.) to penetrate the unit.
................................................................................................
The symbol alerts the user to important instructions or warnings.The specific meaning of the symbol is determined by the design contained within the triangle. In the case of the symbol at left, it is used for general cautions, warnings, or alerts to danger.
The  symbol alerts the user to items that must never be carried out (are forbidden). The specific thing that must not be done is indicated by the design contained within the circle. In the case of the symbol at left, it means that the unit must never be disassembled.
The ● symbol alerts the user to things that must be carried out. The specific thing that must be done is indicated by the design contained within the circle. In the case of the symbol at left, it means that the powercord plug must be unplugged from the outlet.
• In households with small children, an adult should provide supervision until the child is capable of following all the rules essential for the safe
operation of the unit.
................................................................................................
•Protect the unit from strong impact. (Do not drop it!)
................................................................................................
• Try to prevent cords and cables from becoming entangled. Also, all cords and cables should be placed so they are out of the reach of children.
................................................................................................
•Never climb on top of, nor place heavy objects on the unit.
................................................................................................
• Install the unit only on the hi-hat stand which satisfies the specifications described on p. 9.
................................................................................................
• Should you remove bolts, keep them in a safe place
out of children’s reach, so there is no chance of them being swallowed accidentally.
................................................................................................
• Be careful not to allow your fingers or hands to be caught between the hi-hat and motion sensor unit.
................................................................................................
2

 IMPORTANT NOTES
In addition to the items listed under “USING THE UNIT SAFELY” on page 2, please read and observe the following:
Placement
•Do not expose the unit to direct sunlight, place it near devices that radiate heat, leave it inside an enclosed vehicle, or otherwise subject it to temperature extremes. Excessive heat can deform or discolor the unit.
•When moved from one location to another where the temperature and/or humidity is very different, water droplets (condensation) may form inside the unit. Damage or malfunction may result if you attempt to use the unit in this condition. Therefore, before using the unit, you must allow it to stand for several hours, until the condensation has completely evaporated.
•Do not allow rubber, vinyl, or similar materials to remain on the unit for long periods of time. Such objects can discolor or otherwise harmfully affect the finish.
Maintenance
•For everyday cleaning wipe the unit with a soft, dry cloth or one that has been slightly dampened with water. To remove stubborn dirt, use a cloth impregnated with a mild, non-abrasive detergent. Afterwards, be sure to wipe the unit thoroughly with a soft, dry cloth.
•Never use benzine, thinners, alcohol or solvents of any kind, to avoid the possibility of discoloration and/or deformation.
Additional Precautions
•Use a reasonable amount of care when using the unit’s buttons, sliders, or other controls; and when using its jacks and connectors. Rough handling can lead to malfunctions.
•When connecting / disconnecting all cables, grasp the connector itself—never pull on the cable. This way you will avoid causing shorts, or damage to the cable’s internal elements.
•To avoid disturbing your neighbors, try to keep the unit’s volume at reasonable levels. You may prefer to use headphones, so you do not need to be concerned about those around you (especially when it is late at night).
•This instrument is designed to minimize the extraneous sounds produced when it’s played. However, since sound vibrations can be transmitted through floors and walls to a greater degree than expected, take care not to allow these sounds to become a nuisance to neighbors, especially when performing at night and when using headphones.
•When you need to transport the unit, package it in the box (including padding) that it came in, if possible. Otherwise, you will need to use equivalent packaging materials.
•The hi-hat stand is supported by means of a tripod. When installing the hi-hat, make sure the legs of the tripod are opened wide enough to keep the equipment from falling over.
•The hi-hat’s rubber surface may turn white, but this has no effect on the hi-hat’s function.
•Do not remove the special VH-11 clutch from the hi-hat or disassemble the clutch.
•When not using the hi-hat for extended periods, store the hi-hat in the open position to prevent placing any stress on the motion sensor unit.
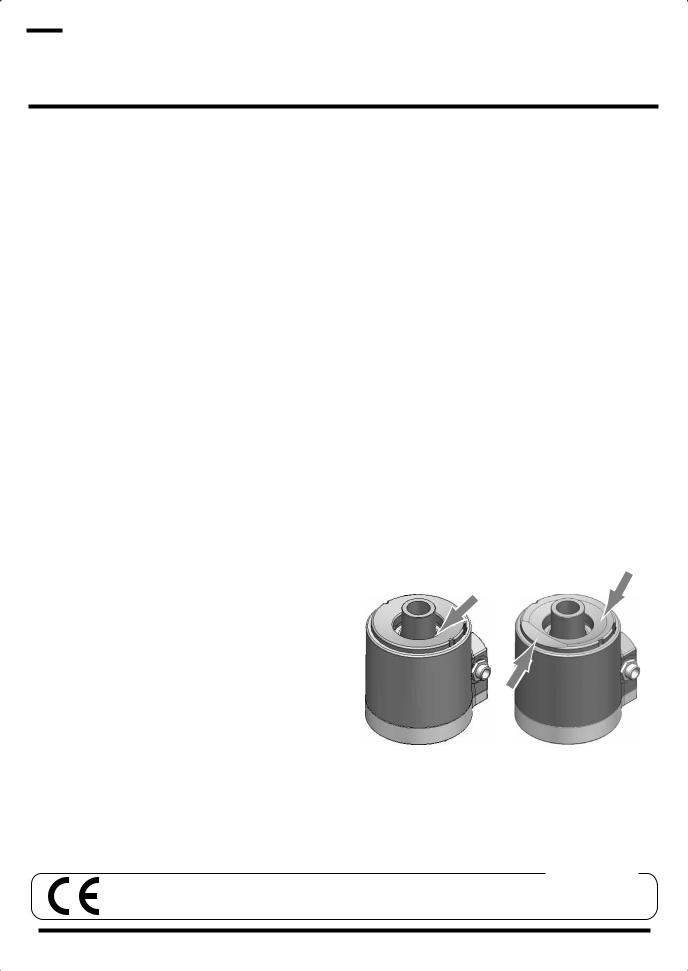
•High-precision sensors are located at the portion of the motion sensor unit indicated by the arrow in the left figure below. Take care not to subject this area to excessive shock, and do not allow any foreign objects to enter any gaps.
Motion Sensor Unit
•Over long periods of use, the portion of the motion sensor unit that comes into contact with the hi-hat (the damper) may become worn at the points indicated by the arrows in the right figure above.
Such damper wear may prevent proper adjustment of the offset and may cause the hi-hat to swing with an unnatural motion. If this occurs, replace the damper. For more information on replacing the damper, contact Roland Service.
For EU Countries
This product complies with the requirements of European Directive 89/336/EEC.
3


 Getting Started
Features
Similar Touch and Feel as with an Acoustic Hi-Hat
The VH-11 is constructed with one floating cymbal, making it compatible with commercially available hi-hat stands and providing the same feel as you get from an acoustic hi-hat, including the stick rebound, the looseness of the cymbal when you strike it, and the vertical action of the cymbal when you press and release the pedal.
Smooth Transition Between Closed
and Open Tones
When you strike the pad while gradually opening the pedal, the tone smoothly opens in response to how much the pedal is opened.
Allows Foot Splashes
You can play foot splashes by pressing the pedal and then instantly opening it.
Quick-Open Tone Changes
With the VH-11 connected to a TD-20/12 sound module, you can get realistic tonal changes by hitting the closed hi-hat and immediately opening it.
Dual Trigger Capability
Sensors in both the top and edge portion make it possible to get different sounds by striking the bow (upper surface) and the edge (p. 9).
Natural-Feeling Action
You can achieve just the pedal feel you like by adjusting the pressure put on the pedal and the tension of the hi-hat stand spring.
They’re Quiet!
Rubber is used on the striking surface for a damping effect.
Compatible with Commercially Available Hi-Hat Stands (p. 9)
Regarding the VH-11’s
Compatibility
Sound Module |
Compatibility |
|
|
TD-20 |
Completely Compatible |
TD-12 |
Completely Compatible |
TD-10 + TDW-1 |
Compatible |
TD-8 |
Compatible |
TD-6V, TD-6 |
Compatible |
Completely Compatible: Tone changes more naturally from open to closed.
Compatible: Although you can control the opening and closing, the expression of the half-open hi-hat differs from that achieved with the completely compatible TD-20/12.
Package Contents
Hi-Hat
Motion Sensor Unit
Insulating Plate
Cable Tie
Tuning Key
4
Loading...