


 Loading...
Owner’s Manual
Before using this unit, carefully read “USING THE UNIT SAFELY” and “IMPORTANT NOTES” (the leaflet “USING THE UNIT SAFELY” and the Owner’s Manual (p. 25)). After reading, keep the document(s) where it will be available for immediate reference.
© 2020 Roland Corporation
 Owner’s Manual (this document)
Read this first. It explains the basic things you need to know in order to use the RD-88.

 PDF Manual (download from the Web)
55 Parameter Guide
This explains all parameters of the RD-88.
55 Sound List
This is a list of the sounds built into the RD-88.
55 MIDI Implementation
This is detailed information about MIDI messages.

 To obtain the PDF manual
1. Enter the following URL in your computer.
http://www.roland.com/manuals/
I
2. Choose “RD-88” as the product name.

Contents
Introduction . . |
. . . . . . . . . . . . . . . . . . . . . |
3 |
||||||
Placing the RD-88 on a Stand. . . . . . . . |
. |
. . . . . . |
|
3 |
||||
Turning the Power On and Off. . . . . . . . . . . . . . . |
3 |
|||||||
|
|
|||||||
Panel Descriptions . . . . . . . . . . . . . . . . . .. . |
4 |
|||||||
Top Panel. . . . . . . |
. . . . . |
. . |
. |
. . . . . . . . . |
|
|
|
4 |
List of Shortcut Keys . . |
. . . . . . . . . . . . . . . . . |
5 |
||||||
Rear Panel (Connecting Your Equipment). . . . . . . . . . |
6 |
|||||||
|
|
|||||||
Overview of the RD-88 . . . . . . . . . . . . . . . .. . |
8 |
|||||||
Basic Organization of the RD-88. . . . . . . . . . . . . . |
8 |
|||||||
About Scenes. . . |
. . . . . |
. . . |
. |
. . . . . . . . . |
. |
|
|
8 |
Basic Operation. . |
. . . . . |
. . . |
. |
. . . . . . . . . |
. |
|
|
9 |
Main Screens. . . . . . . . . . . . . . . . . . . . . . . |
9 |
|||||||
About the Cursor Buttons . |
. |
. . . . . . . . . . . . . . . |
9 |
|||||
Editing a Value . . |
. . . . . |
. . . |
. |
. . . . . . . . |
. |
. |
|
9 |
|
|
|
||||||
Performance . . |
. . . . . . . . . . . . . . . . . . . . . |
10 |
||||||
Listening to the Demo (DEMO PLAY) . |
. |
. . . . . . . . . . |
10 |
|||||
Piano Performances . . |
. . . . . . . . . . . . . . . . . . |
10 |
||||||
Performing with a Variety of Scenes. . . . . . . . . . . . |
11 |
|||||||
Playing Multiple Tones with the Keyboard. . . . . . . . . |
11 |
|||||||
Performing with Layered Tones (Dual Mode). . . . . . . . |
11 |
|||||||
Playing Different Tones in Two Different Sections of the |
|
|||||||
Keyboard (Split Mode) . |
. |
. . . . . . . . . . . . . . . . |
12 |
|||||
Changing the Tone for a ZONE. . . . . . . . . . . . . . . |
12 |
|||||||
Adjusting the Volume Level for Individual Zones. . . . . . |
13 |
|||||||
Changing the Key Touch . . |
|
. . . . . . . . . . . . . . . . |
13 |
|||||
Transposing the Key of the Keyboard (TRANSPOSE). . . . . |
14 |
|||||||
Adding Reverberation to the Sound (REVERB) . . |
. . . . . |
14 |
||||||
Adding Breadth to the Sound (CHORUS/DELAY) . |
. . . . . |
15 |
||||||
Modifying the Sound in Real Time (WHEEL1/2) . . . . . . |
15 |
|||||||
Adding Liveliness to the Sound (COMPRESSOR). . . . . . . |
15 |
|||||||
Adjusting the Character of the Sound (TONE COLOR). . . |
16 |
|||||||
Applying Various Effects to the Sound (MFX) . . . . . . . |
16 |
|||||||
Adjusting the Levels of Each Frequency Range (EQUALIZER). 17 |
||||||||
Disabling the Buttons (Panel Lock) . . |
. . . . . . . . . . . |
17 |
||||||
|
|
|||||||
Using the Convenient Functions in Performances . .. . |
18 |
|||||||
Registering Frequently-Used Sounds (Scenes) to Buttons |
|
|||||||
(FAVORITE). . . . . . . . . . . . . . . . . . . . . . . . |
18 |
|||||||
Registering a Favorite. . . . . . . . . . . . . . . . . . . |
18 |
|||||||
Recalling a Favorite . . . . . . . . . . . . . . . . . . . . |
18 |
|||||||
Switching the Favorite Bank. . . . . . . . . . . . . . . . |
18 |
|||||||
Viewing the Favorite List . . |
|
. . . . . . . . . . . . . . . |
18 |
|||||
Playing Rhythm. . |
. . . . . . |
. . |
. |
. . . . . . . . . |
. |
|
|
19 |
Changing Rhythm Tempos . |
. . . . . . . . . . . . . . . |
19 |
||||||
Changing the Rhythm Pattern. . . . . . . . . . . . . . . |
19 |
|||||||
Playing Songs . . |
. . . . . . . . . . . . . . . . . . . . . |
20 |
||||||
Assigning the Function of Each Controller. . . . . . . . . |
20 |
|||||||
Using the [ONE TOUCH PIANO] Button. . . . . . . . . . . |
20 |
|||||||
Using the RD-88 as a Master Keyboard |
. . |
. . . . . . . . |
|
21 |
||||
What’s MIDI? . . |
. . . . . . . . . . . . . . . . . . . . . |
21 |
||||||
Settings for Controlling an External Sound Module . . . . |
21 |
|||||||
|
|
|
||||||
Making Detailed Settings for Tones . . |
. . . . . . . . . |
22 |
||||||
Editing a Scene. . . . . . . . . . . . . . . . . . . . . . |
22 |
|||||||
Saving a Scene (Write) . |
. |
. . . . . . . . . . . . . . . . |
22 |
|||||
Editing the System Effects. . . . . . . . . . . . . . . . |
22 |
Saving the System Effects (Write) . . . . . . . . . . . . . |
22 |
|
|
Other Functions. . . . . . . . . . . . . . . . . . . . . |
23 |
Convenient Functions (UTILITY) . . . . . . . . . . . . . . |
23 |
Backing Up Data to USB Flash Drive (BACKUP) . . . . . . . |
23 |
Restoring Backup Data (RESTORE) . . . . . . . . . . . . |
23 |
Returning to the Factory Settings (FACTORY RESET). . . . . 23
Formatting a USB Flash Drive (FORMAT USB MEMORY) . . . |
24 |
Editing the System Settings (SYSTEM). . . . . . . . . . . |
24 |
Saving the System Settings (System Write) . . . . . . . . |
24 |
Viewing the Program Version (INFORMATION). . . . . . . |
24 |
|
|
USING THE UNIT SAFELY. . . . . . . . . . . . . . . . . |
25 |
|
|
IMPORTANT NOTES . . . . . . . . . . . . . . . . . . . |
25 |
|
|
Main Specifications. . . . . . . . . . . . . . . . . . . |
26 |
|
|
2
Introduction
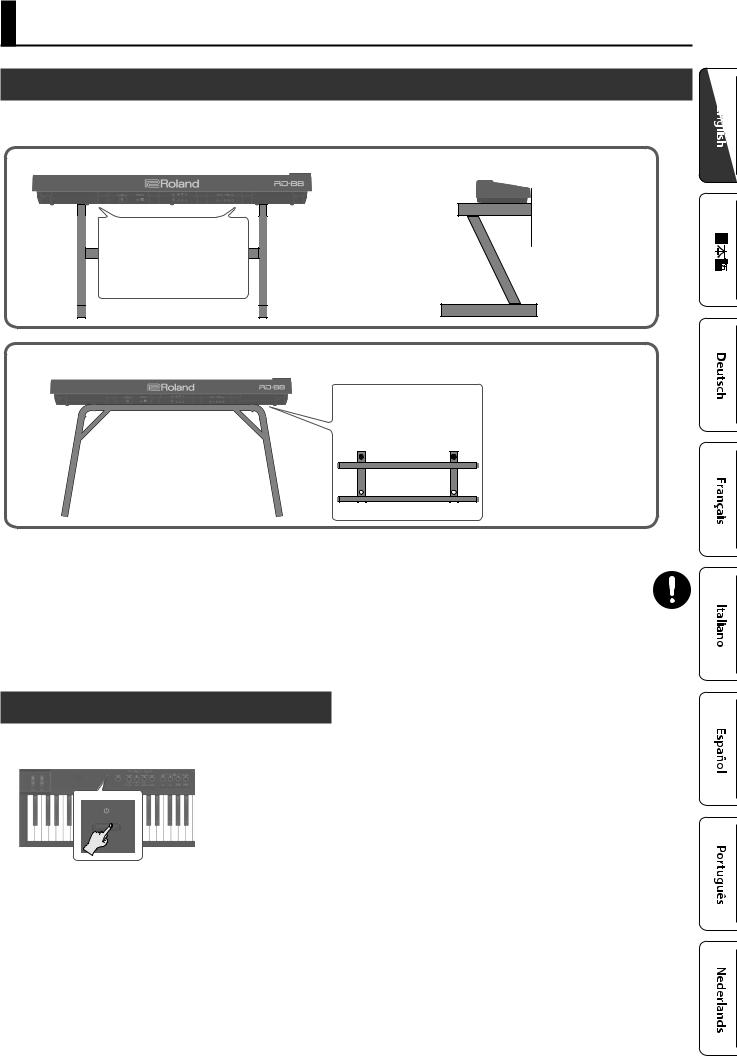
Placing the RD-88 on a Stand
If you want to place the RD-88 on a stand, use the Roland KS-10Z or KS-12. Be careful not to pinch your fingers when setting up the stand.
KS-10Z
Align the horizontal centers of the RD-88 and of the stand.
Adjust the width of the stand to the second stage or wider. It cannot be used in the narrowest screw hole position.
Align the front of the RD-88 with the front of the stand.
KS-12
Adjust the width of the stand so that the rubber feet on the keyboard side of the bottom of the keyboard fit into the holes provided for the rubber.
Top view
Note when placing the RD-88 on a stand
Be sure to follow the instructions in the Owner’s Manual carefully when placing this unit on a stand.
If it is not set up properly, you risk creating an unstable situation which could lead to the unit falling or the stand toppling, and may result in injury.
Be careful not to pinch your fingers when setting up the stand.
Beware of overturning!
To prevent the RD-88 from overturning, do not apply excessive force to it, and never sit or stand on it.
Turning the Power On and Off
Press the [L] (power) button to turn the power on.
Long-press the [L] (power) button to turn the power off.
*The power to this unit will be turned off automatically after a predetermined amount of time has passed since it was last used for playing music, or its buttons or controls were operated (Auto Off function). If you do not want the power to be turned off automatically, disengage the Auto Off function. For detail, refer to “Parameter Guide” (PDF).
*Unsaved data is lost when the power turns off. Before turning the power off, save the data that you want to keep (p. 22).
*Before turning the unit on/off, always be sure to turn the volume down. Even with the volume turned down, you might hear some sound when switching the unit on/off. However, this is normal and does not indicate a malfunction.
3

Panel Descriptions
Top Panel
1 |
2 |
3 |
4 |
5 |
1
WHEEL 1/2
Turn the wheels to modify the sound. You can specify the type of change that occurs (p. 15).
2
[L] switch
Turns the power on/off.
[VOLUME] knob
Adjust the overall volume of the RD-88.
[TONE COLOR] knob
Varies the tonal character or sound image (p. 16).
If the [EQ ADJUST] button is lit, this operates as the EQ [LOW] knob (p. 17).
[MFX] knob
Adjust the depth of the effect (p. 16).
If the [EQ ADJUST] button is lit, this operates as the EQ [MID] knob (p. 17).
[CHORUS/DELAY] knob
Adjust the chorus/delay depth (p. 15).
If the [EQ ADJUST] button is lit, this operates as the EQ [HIGH] knob (p. 17).
[ASSIGN] button
You can assign desired parameters to the knobs for adjustment. When this button is on (lit), the knobs adjust the values of the assigned parameters (p. 20).
[COMPRESSOR] button
Turns the compressor on/off (p. 15).
[TRANSPOSE] button
Lets you transpose your performance (p. 14).
LEVEL [LOWER], [UPPER2], [UPPER1] knobs
Adjust the volume of each zone (p. 13).
LEVEL [MIC/LINE IN] knob
Adjusts the input level of MIC/LINE.
[SPLIT] button
Turns the Split Mode on/off (p. 11).
This lets you divide the keyboard into left and right regions and play a different sound in each.
By pressing this button and the [DUAL] button simultaneously, you can listen to demo songs (p. 10).
[DUAL] button
Turns the Dual Mode on/off (p. 11).
This layers UPPER 1 and UPPER 2 tones together across the entire keyboard.
[REVERB] knob
Adjusts the reverb depth (p. 14).
[EQ ADJUST] button
Turn this on when you want to adjust the EQ. When this button is on (lit), you can use the above three knobs to adjust the EQ (p. 17).
By pressing this button and the [SPLIT] button simultaneously, you can listen to demo songs (p. 10).
[EXTERNAL CTRL SETTING] button
Accesses a screen where you can make settings for controlling an external MIDI sound module (p. 21).
4
Panel Descriptions
[MIC/LINE IN SETTING] button
Accesses the MIC/LINE input setting screen. You can apply EQ and reverb to the MIC/LINE input (p. 7).
3
Display
Shows the Scene names and the values of various settings, etc.
4
[<] [>] [ ] [ ] buttons
Press these to switch pages and to move the cursor.
[INC] [DEC] buttons
Modify values. If you keep on holding down one button while pressing the other, the value change accelerates.
[SHIFT] button
You can easily call up Edit screens for related parameters by holding down this button while pressing buttons, turning knobs, or operating other controllers (refer to “List of Shortcut Keys” ). If you edit a parameter value while holding down this button, the value will change more greatly.
[EXIT] button
Press to return to a previous screen or to cancel a procedure that is in progress.
[ENTER] button
Press this to confirm a value or execute an operation.
5
[ONE TOUCH PIANO] button
Recalls a piano sound (Scene).
You can also make settings so that a favorite sound is recalled instead of a piano sound (p. 11).
NOTE
Note that when you press this button to recall a piano sound, the settings you’re editing are lost.
FAVORITE [ON] button
Turns on/off the function (FAVORITE function) that recalls favorite sounds you’ve registered (p. 18).
FAVORITE [BANK] button
Selects the bank of FAVORITE memories (p. 18) in which you can register your favorite sounds.
[MENU] button
The MENU screen appears.
[WRITE] button
The WRITE screen appears.
[KEY TOUCH] button
Accesses a screen where you can make keyboard touch settings (p. 13).
SONG/RHYTHM [SELECT] button
Accesses a screen where you can select songs or rhythms (p. 19, p. 20).
SONG/RHYTHM [s] button
Starts/stops playback of the song or rhythm (p. 19, p. 20).
[SPEAKER ON] button
Turns the internal speakers on/off.
The internal speakers turn off when headphones are plugged into the headphone jack, but pressing this button turns on the speakers even if headphones are connected. You can also turn off the speakers even if headphones are not connected.
[PANEL LOCK] button
Long-press this button to turn panel lock on/off (a function that disables panel operations)(p. 17).
[PIANO]–[OTHER] buttons/[0]–[9] buttons
Select Tone (Scene) categories (p. 11).
If the [FAVORITE] button or the [BANK] button are lit, these buttons operate as [0]–[9] buttons (p. 18).
List of Shortcut Keys
*“[A]+[B]” indicates the operation of “holding down the [A] button and pressing the [B] button.”
Shortcut |
Explanation |
|
|
|
|
[SHIFT] + [DEC] |
Changes the value in steps of 10. When the |
|
Scene screen is shown, this changes the Scene |
||
[SHIFT] + [INC] |
||
category. |
||
|
||
[SHIFT] + Favorite [BANK], or |
Accesses the Favorite list. |
|
[SHIFT] + Favorite [ON] |
||
|
||
[SHIFT] + operate a knob 1–4 |
Jumps to the parameter edit screen for the |
|
corresponding knob. |
||
|
||
[SHIFT] + operate a knob 1–8 |
* If the [ASSIGN] button is on |
|
Jumps to the knob assignment edit screen. |
||
|
||
[SHIFT] + operate a WHEEL 1/2 |
Jumps to the wheel assignment screen. |
|
[SHIFT] + operate a pedal |
Jumps to the pedal assignment screen. |
5
Panel Descriptions
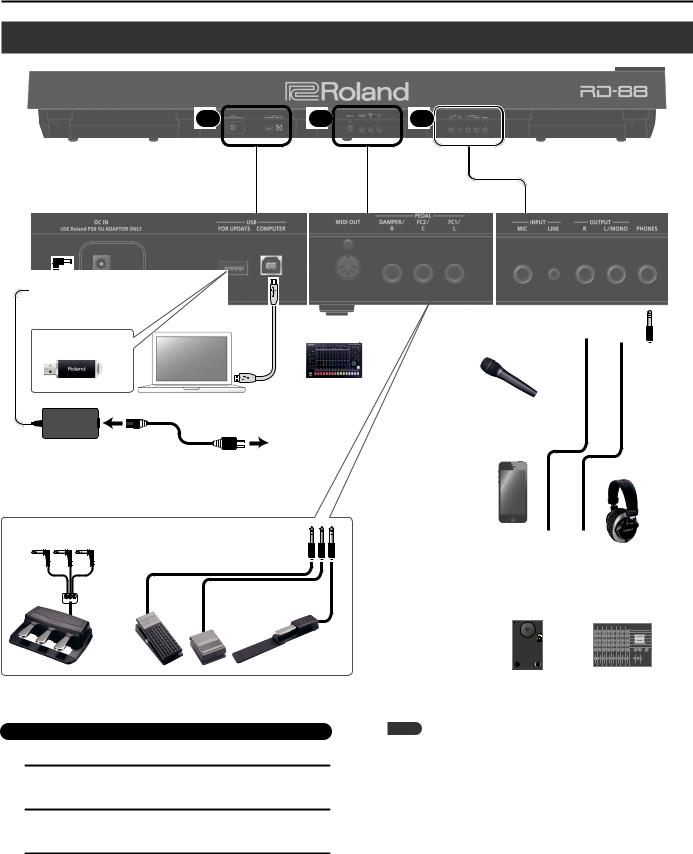
Rear Panel (Connecting Your Equipment)
6  7
7  8
8
Mic
External MIDI Device
AC Adaptor
Audio player
headphones
Pedal unit (RPU-3) |
Expression pedal (EV Series) |
|
or |
|
Pedal switch (DP Series) |
Monitor speakers |
|
(powered) |
Mixer etc. |
|
* To prevent malfunction and equipment failure, always turn down the volume, and turn off all the units before making any connections.
6
DC IN jack
Connect the included AC adaptor here.
USB MEMORY port
You can connect a USB flash drive here.
USB COMPUTER port
You can connect this to your computer so that it can exchange performance data and audio signal with the RD-88.
MEMO
55 The RD-88 supports USB MIDI and USB Audio. In order to use USB Audio, the dedicated USB driver must be installed on your computer. You can download the driver from the Roland website.
55 For details on USB driver settings and USB MIDI/Audio settings, refer to “Parameter Guide” (PDF).
55 You can use a dedicated plugin to control software on your computer in more sophisticated ways. For details, refer to the Roland website.
6
Panel Descriptions
7
MIDI OUT connector
Transmits MIDI messages to an external MIDI device connected here.
PEDAL jacks (DAMPER/R, FC2/C, FC1/L)
Connecting the pedal switch provided with the RD-88 to the DAMPER jack allows you to use the switch as a damper pedal.
With a pedal connected to the FC1 or FC2 jack, you can then assign a variety of functions to the pedal (p. 20).
*Use only the specified expression pedal. By connecting any other expression pedals, you risk causing malfunction and/or damage to the unit.
8
INPUT jacks (MIC, LINE)
You can connect a mic or external audio device, and use the mic to sing while you perform, or perform along with a song that plays back from your external audio device
Jack |
Explanation |
|
|
|
|
MIC |
Connect a mic (sold separately) to this jack. |
|
LINE |
This is an audio input jack. You can connect your audio player or |
|
other audio source here. |
||
|
||
|
|
MEMO
55 Use the [MIC/LINE IN] knob to adjust the volume.
55 The RD-88 supports dynamic mics. Condenser mics are not supported.
55 You can apply EQ and reverb to the input audio. Press the [MIC/ LINE IN SETTING] button to access the setting screen. You can also access the same screen via [MENU]0[INPUT SETTING]. For details on the parameters that can be set, refer to “Parameter Guide” (PDF).
OUTPUT jacks (L/MONO, R)
These are connected to an amp or other device. For mono output, use the L/MONO jack.
PHONES jack
You can connect a set of headphones here.
7
Overview of the RD-88
Basic Organization of the RD-88
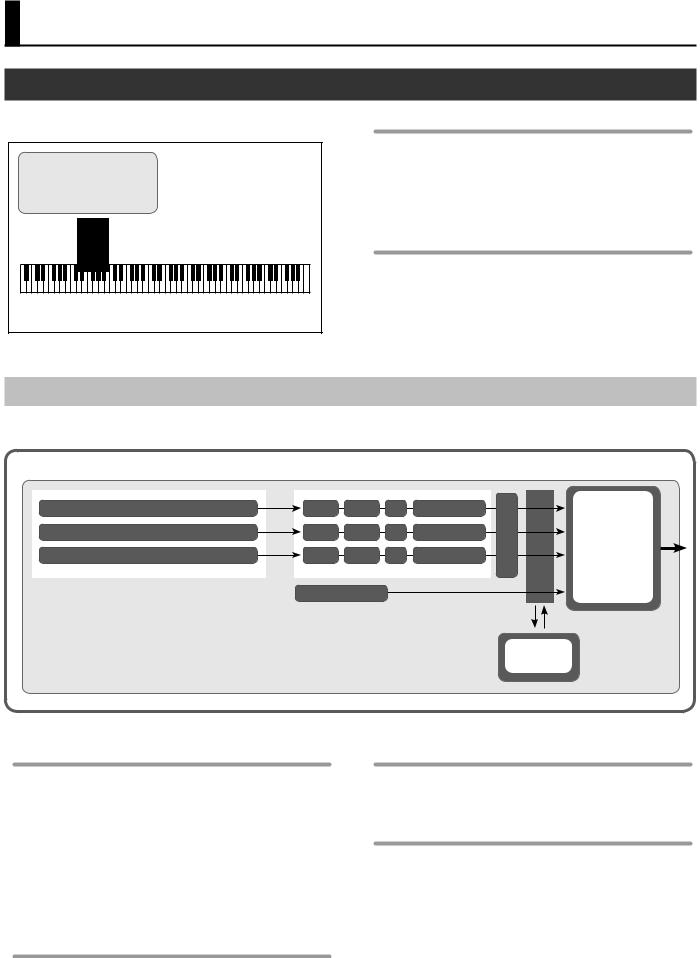
RD-88 can be divided into two sections: a controller section and a sound generator section.
Sound Generator Section
Play
Controller Section
(controllers such as keyboard, modulation wheels, etc.)
Controller Section
This section includes the keyboard, the modulation wheels, the panel knobs, the sliders, and any pedal connected to the rear panel. Actions such as pressing and releasing of keys on the keyboard, depressing a damper pedal, and so forth, are converted to MIDI messages and sent to the sound generator section, or to an external MIDI device.
Sound Generator Section
The sound generator section produces the sound. Here, MIDI messages received from the controller section or external MIDI device are converted to musical signals, which are then output as analog signals from the OUTPUT and PHONES jacks.
About Scenes
RD-88 lets you store the sounds that you create.
A sound you create is called a “Scene”; you can use the buttons to recall a Scene and then play it.
Scene
Zone (UPPER 1) |
Tone |
MFX |
EQ |
Tone Color |
Zone (UPPER 2) |
Tone |
MFX |
EQ |
Tone Color |
Zone (UPPER 3) |
Tone |
MFX |
EQ |
Tone Color |
Rhythm
IFX/Sympathetic
Resonance
Reverb
Chorus
Compressor
Equalizer
Zone
The RD-88 features three parts (UPPER 1, UPPER 2, and LOWER) that you can use for freely controlling the internal parts with the RD-88’s buttons and keyboard. These three parts that are used for controlling the internal parts are collectively known as the “Zone.”
Furthermore, you can freely control external MIDI sound generators with the RD-88 in the same manner as with the Zone. You can likewise control the external MIDI sound generator with the three parts (UPPER 1, UPPER 2, and LOWER), with this group of three parts being referred to as the “EXTERNAL Zone.”The external MIDI sound generator is assigned to these three parts for control.
Rhythm
Drum patterns for a variety of musical genres such as jazz and rock are built in. You can play back these patterns.
Effects
Each zone 1–3 provides a MFX, EQ, and Tone Color that can be set independently for each zone.
There are also reverb, Chorus, and IFX/Sympathetic Resonance that can be used in common by all zones.
Tone
The individual sounds used when playing the RD-88 are referred to as “Tones.”Tones are assigned to each zone.
8
Loading...