


Contents
* The illustration shows the TD-1KV.
Owner’s Manual
Before using this unit, carefully read the sections entitled “USING THE UNIT SAFELY” and “IMPORTANT NOTES” (Leaflet "USING THE UNIT SAFELY" and Owner's Manual p. 16). These sections provide important information concerning the proper operation of the unit. Additionally, in order to feel assured that you have gained a good grasp of every feature of your new unit, read Owner's Manual in its entirety. This manual should be saved and kept on hand as a convenient reference.
Let’s Learn About Drums . . . . . . . . . . . . . . . . . . . . 2
Drum Set Elements. . . . . . . . . . . . . . . . . . . . . . .2 The Basics of Playing. . . . . . . . . . . . . . . . . . . . . .2
Assembly. . . . . . . . . . . . . . . . . . . . . . . . . . . . 4
Kit Assembly. . . . . . . . . . . . . . . . . . . . . . . . . .4 Connecting the Cables. . . . . . . . . . . . . . . . . . . . .7
Quick Start . . . . . . . . . . . . . . . . . . . . . . . . . . . 8
Connecting Your Equipment. . . . . . . . . . . . . . . . . . 8 Front Panel. . . . . . . . . . . . . . . . . . . . . . . . . . .8 Switching the Power On and Off. . . . . . . . . . . . . . . . 8 Playing . . . . . . . . . . . . . . . . . . . . . . . . . . . . 9 Selecting a Drum Kit. . . . . . . . . . . . . . . . . . . 9 Playing with the Metronome . . . . . . . . . . . . . . .9
Practicing . . . . . . . . . . . . . . . . . . . . . . . . . . .10
Practicing in Coach Mode . . . . . . . . . . . . . . . . . . 10 Correctly Playing in Time with the Beat. . . . . . . . . 10 Playing Along with a Changing Rhythm. . . . . . . . . 10 Playing Along with a Changing Tempo. . . . . . . . . 11 Developing Internal Timing Sense . . . . . . . . . . . 11 Continuing to Play at a Steady Tempo. . . . . . . . . . 11
Matching the Striking Strength of the Right and Left Hands. . . . . . . . . . . . . . . . . . . . . . . . . . . . . . . . . . . . . . . . . . . . . . . . . 12
Practicing for a Specified Time. . . . . . . . . . . . . 12 Recording and Checking Your Own Performance. . . . 12 Practicing Along with a Song. . . . . . . . . . . . . . . . . 13 Selecting a Song. . . . . . . . . . . . . . . . . . . . 13 Playing/Stopping the Song. . . . . . . . . . . . . . . 13
Connecting to your Computer/iPad. . . . . . . . . . . . . . .13
Making Detailed Settings. . . . . . . . . . . . . . . . . . . . . . . . . . . . . . . . . . . . . .14
Adjust the Pad Sensitivity. . . . . . . . . . . . . . . . 14 Changing the Type of Pad . . . . . . . . . . . . . . . 14 Changing the Time of Auto Off. . . . . . . . . . . . . 14 Changing MIDI Note Number of the Pad . . . . . . . . 14 Restoring the Factory Settings. . . . . . . . . . . . . . . . 14
Appendix. . . . . . . . . . . . . . . . . . . . . . . . . . . 15
Troubleshooting. . . . . . . . . . . . . . . . . . . . . . . 15 Main Specifications. . . . . . . . . . . . . . . . . . . . . . 15 USING THE UNIT SAFELY. . . . . . . . . . . . . . . . . . . 16 IMPORTANT NOTES. . . . . . . . . . . . . . . . . . . . . . 16

 To obtain the PDF manual
1. Enter the following URL in your computer.
http://www.roland.com/manuals/
I
2. Choose “TD-1KV” or “TD-1K” at the product name.
Copyright © 2014 ROLAND CORPORATION
All rights reserved. No part of this publication may be reproduced in any form without the written permission of ROLAND CORPORATION.
ENG
JPN
DEU
FRA
ITA
ESL
POR
NLD
Let’s Learn About Drums
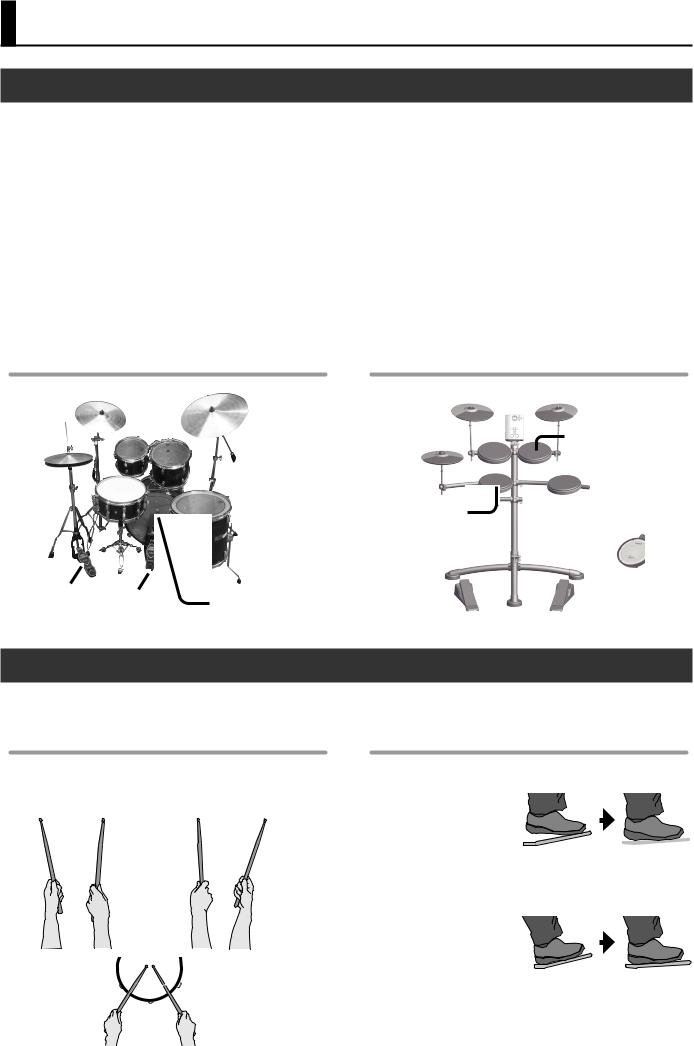
Drum Set Elements
Here are some basic terms related to drum sets.
Bass drum/Kick Pedal
Played with a kick pedal, it’s the largest drum in the kit.
Snare drum
The snare drum is the main “voice” of a drum kit.
Hi-hat/Hi-hat pedal
An acoustic hi-hat uses 2 cymbals mounted on a hi-hat stand. Pressing the hi-hat pedal opens and closes it.
* The TD-1KV/TD-1K uses a single pad.
Tom (Tom 1, Tom 2)
These are usually mounted above the bass drum.
Floor tom (Tom 3)
Sometimes called a bass tom, it either stands on it’s own legs or is mounted on a stand.
Ride cymbal
Usually mounted on the right side of the kit, the ride cymbal is principle elements in keeping time.
Crash cymbal
Smaller than the ride, the crash cymbal is mainly used for accents.
Acoustic drum
Crash |
Ride |
Tom
Hi-hat
Snare
Floor tom
Hi-hat pedal |
Kick pedal |
|
|
Bass drum |
|
|
|
TD-1KV/TD-1K
Crash (CR1)
Tom 1 (T1)
Hi-hat (HH)
Snare (SNR)
Hi-hat pedal (HHC)
Ride (RD)
 Tom 2 (T2)
Tom 3 (T3)
*The illustration shows the TD-1K. The TD-1KV has a different snare pad.
Kick pedal (KIK)
The Basics of Playing
Drums are played using both hands and both feet.
Here we’ll explain how to hold the sticks and use the pedals.
Holding the sticks
The most common way to hold the sticks is called the “matched grip” as shown in the illustrations below.
Left hand |
Right hand |
Using the kick pedal
The kick pedal can be pressed in either of two ways: “heel up” or “heel down.”
Heel up
In this method, your heel
floats above the pedal.  With your heel off the
  pedal, lower your entire foot to push down the pedal.
This method applies the full weight of your leg to the pedal, making it easier for you to produce a stronger sounds than the heel down method. This is often used in rock and pop.
Heel down
In this method, the entire bottom of your foot from heel to toe stays in contact
with the pedal. Use your ankle joint to make your toes push down the pedal. This method allows more precise control of the volume, and is often used in jazz and bossa nova.
2
Let’s Learn About Drums
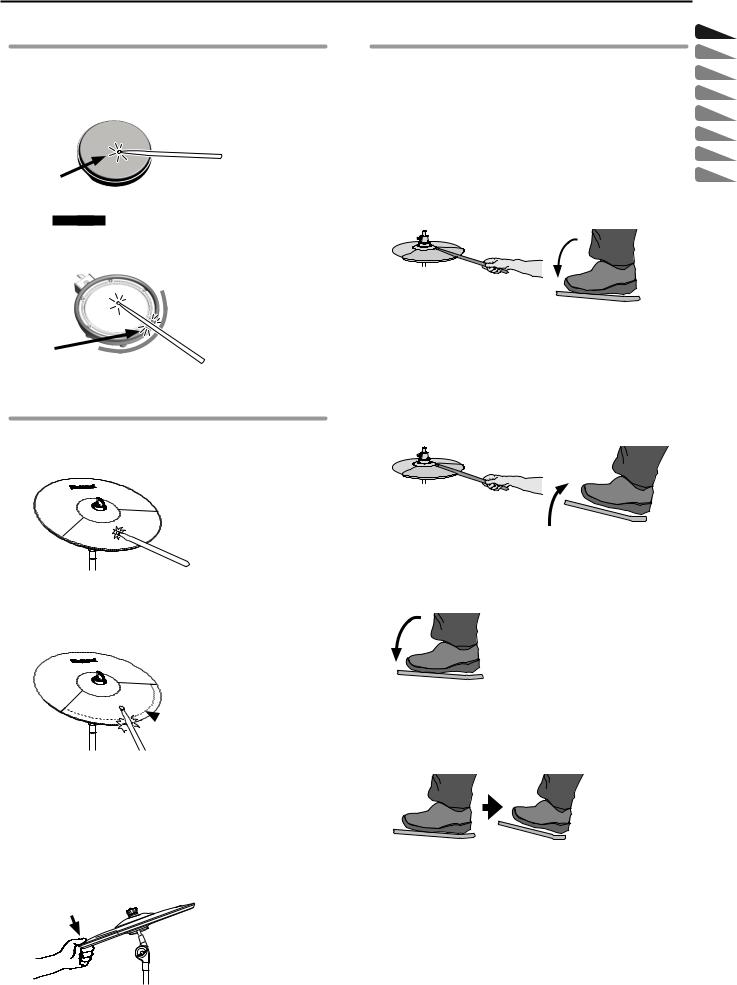
Using the snare
Head shot
Hit only the head of the pad. This is the most common method to play the snare.
Head
Rim shot TD-1KV only
Strike the head and the rim of the pad simultaneously.
A sound (rim sound) different than the head shot will be heard.
Suitable position for rim shots
Rim
Using the cymbals
Bow shot
The most common method, playing the middle area of the cymbal.
Edge shot
Use the shoulder of the stick to hit the edge of the cymbal pad (Hit the edge sensor as shown in the illustration).
 Edge sensor
* Bow shots and edge shots can also be played on the hi-hat.
Choking a cymbal
Choking (pinching) the cymbal’s edge with the hand immediately after hitting the cymbal will mute or choke the sound, just like with a real cymbal.
*The Choke function only works when you grasp in the area (where the edge sensor is) as shown in the illustration. If you do otherwise, it will not work.
Edge sensor
Using the hi-hat
In an acoustic drum set, the hi-hat consists of two cymbals placed facing each other vertically on a hi-hat stand. The two cymbals can be closed together by pressing the pedal.
A variety of playing techniques are possible, such as playing the cymbals with the pedal and/or playing them with sticks.
When you press the pedal, the two cymbals will come together (closed). When you release the pedal, the two cymbals will separate (opened).
Closed
With the hi-hat pedal pressed firmly, strike the pad with a stick. A short “chick” sound will be heard.
Half-open
With the hi-hat pedal pressed gently, strike the pad with a stick. A slightly longer “swish” sound will be heard.
Open
With the hi-hat pedal completely released, strike the pad with a stick. An even longer “sound” than the half-open sound will be heard.
Foot closed
Just press the pedal without using a stick. This sound will be softer and shorter than the closed sound played with a stick. Useful for keeping time with this tight sound.
Foot splash
Press and immediately release the pedal without using a stick. This is equivalent to momentarily clashing the two cymbals of an acoustic hi-hat. It produces a “splash” sound that is softer than the open strike.
ENG
JPN
DEU
FRA
ITA
ESL
POR
NLD
3
Assembly
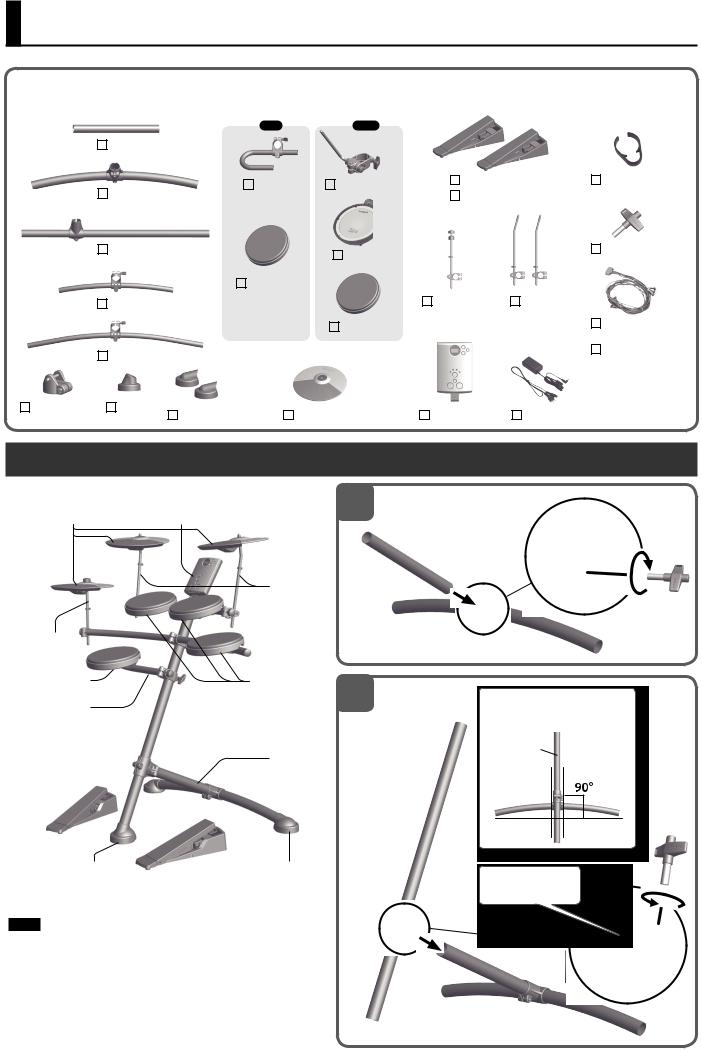
Check the included items
As soon as you open the package, check to see that all items are included. If anything is missing, please contact your dealer.
|
|
|
TD-1K |
|
|
|
TD-1KV |
|
|
|
|
|
Pipe A |
|
|
|
|
|
|
|
|
|
|
|
|
|
Snare arm |
Snare arm |
Kick pedal |
Cable clip × 4 |
|||||
|
Pipe B |
|
Hi-hat pedal |
|
|||||||
|
|
|
|
|
|
|
|
|
|||
|
Pipe C |
|
|
|
|
|
Snare pad |
|
Drum key |
||
|
|
|
|
|
|
|
|
|
|||
|
|
Snare/Tom |
|
|
|
|
|
|
|||
|
Pipe D |
pad × 4 |
|
|
|
|
Hi-hat arm |
Cymbal |
|||
|
|
|
|
|
|
|
|
||||
|
|
|
|
|
|
|
|
|
|
arm × 2 |
|
|
|
|
|
|
|
|
Tom pad × 3 |
|
Connection cable |
||
|
|
|
|
|
|
|
|
|
|||
|
Pipe E |
|
|
|
|
|
|
|
|
Owner’s manual |
|
|
|
|
|
|
|
|
|
|
|
||
Sound module |
Rubber |
Rubber foot B × 2 |
Cymbal pad × 3 |
Sound module |
AC adaptor |
||||||
holder |
foot A |
||||||||||
|
|
|
|
|
|
|
|
|
|||
Kit Assembly
Completed setup
Cymbal pad
Hi-hat arm
Snare pad
Snare arm
Hi-hat pedal
Rubber foot A
Note
Sound module
Cymbal arm
 Pipe D
 Pipe E
Tom pad
 Pipe C
Pipe A
 Pipe B
Kick pedal |
Rubber foot B |
* The illustration shows the TD-1K.
•If you set up this unit in an unstable location, it may fall over. Be sure to set it up in a stable and level location.
•When you operate the kick pedal or hi-hat pedal, please be careful not to get your fingers pinched between the movable parts. In places where small children are present, make sure that an adult provides supervision and guidance.
1
|
2 |
|
Pipe A |
|
1 |
|
Pipe B |
2 |
Adjust so that the pipes form a |
right angle as shown.
Pipe C
Pipe B
Pipe C
Do not loosen this |
2 |
|
|
screw. |
|
Pipe A |
|
1 |
|
4

Assembly
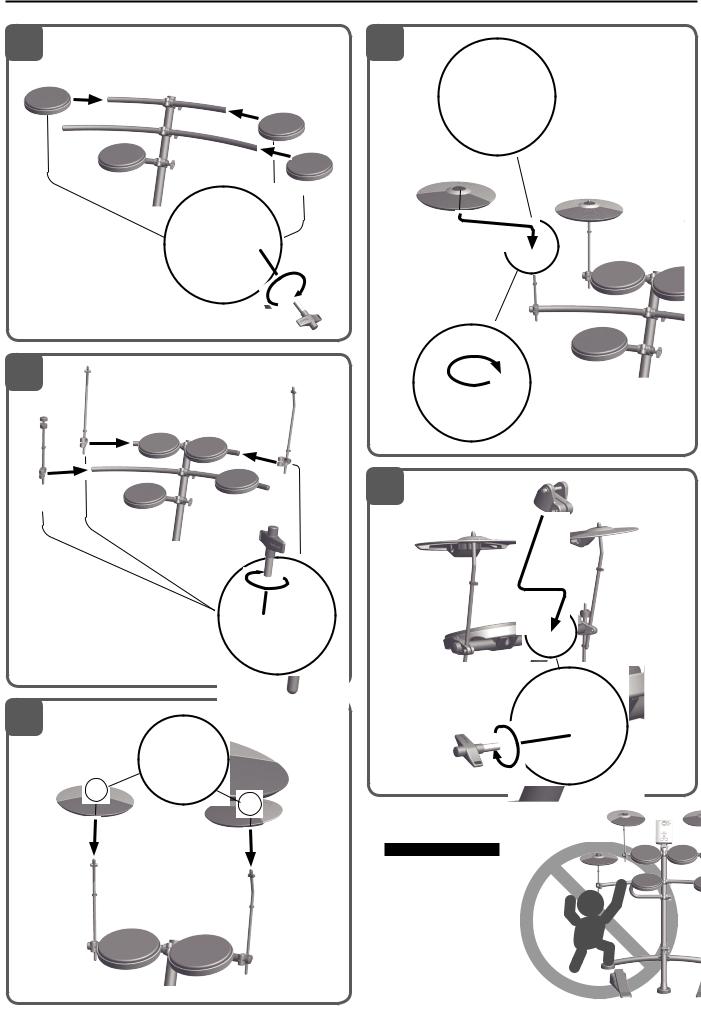
3 |
|
5 |
|
|
2 |
|
|
Pipe D |
2 |
|
|
3 |
|
|
Rubber foot B |
|
|
|
|
|
Pipe E |
|
|
|
|
|
|
1 |
|
1 |
|
|
|
|
|
Rubber foot B |
|
|
|
|
Rubber foot A |
|
|
|
|
|
|
|
|
4 |
|
|
|
Adjust pipe D and pipe E so that they |
|
|
|
are level with the floor. |
|
|
Snare arm |
|
|
|
TD-1K |
1 |
|
|
|
|
|
Pipe C |
|
|
2
Pipe C
6
TD-1K
TD-1KV
3
TD-1KV Adjusting the head tension
Use the drum key to evenly tighten the tuning bolts a
little at a time in the order shown in the illustration. Adjust the tension so that the pad responds to your strikes with the appropriate feel.
Snare pad
1
 2
2
Underside of the pad
TD-1KV
Snare pad
2
 1
1
ENG
JPN
DEU
FRA
ITA
ESL
POR
NLD
5
Assembly
7 |
|
|
|
10 |
1 |
Tom pad |
|
|
|
|
|
|
|
|
|
|
|
|
1 |
|
Tom pad |
|
|
|
|
2 |
|
|
|
|
|
|
|
|
|
|
|
|
3 |
Cymbal pad |
|
|
|
|
Tom pad |
|
|
|
|
|
|
|
2 |
|
|
|
|
|
Hi-hat arm |
|
|
Underside of the pad |
|
|
|
8 |
|
|
|
|
3 |
|
Cymbal arm |
Cymbal arm |
|
|
|
|
|
|
|
|
|
|
|
1 |
2 |
|
|
3 |
|
|
|
|
|
|
|
|
11 |
|
|
Hi-hat arm |
|
|
|
Sound module |
|
|
|
|
holder |
1
9 |
2 |
Cymbal pad
Cymbal pad
1 |
2 |
|
|
Cymbal arm |
|
|
Cymbal arm |
Beware of overturning
The unit may overturn if a child pushes it or hangs on it. Make sure that an adult is supervising and providing guidance.
6
 Loading...