


QSDR84TRTC
Q-See QSDR84TRTC, QSDR1744LRC, QSDR168GRTC, QSDR1616GRC, QSDR174RTC Remote Monitoring Guide
...
1
SETUP GUIDE FOR REMOTE INTERNET AND SMARTPHONE
MONITORING, MYQ-SEE DDNS, AND EMAIL NOTIFICATION
Remote Monitoring Setup Guide
DVR MODELS QR, QSDR & QSD9004
iPHONE
ANDROID
BLACKBERRY*
* Select Models
PC WITH WINDOWS
OPERATING SYSTEM

2
Thank you for purchasing this Q-See product.
Every effort has been made to make this DVR simple to assemble
and use. However, if you should run into any difficulties during its
installation or operation, we are here for you.
Make sure you register your product.
Visit www.q-see.com, click “support”, then “online registration form”.
Complete the product registration form to receive warranty/technical
support benefits, and to be notified of product updates and free
downloadable firmware updates to your DVR.
CUSTOMER SERVICE
Phone: 877-998-3440 x 538 (M-F, 8-5 PST)
Email: cs@dpsi-usa.com
Live Chat at www.q-see.com (M-F, 8-5 PST)
GENERAL TECH SUPPORT
Phone: 877-998-3440 x 539 (M-F, 8-5 PST)
Email: ts@dpsi-usa.com
Live Chat at www.q-see.com (M-F, 8-5 PST)
REMOTE MONITORING SUPPORT
Phone: 877-998-3440 x 540
ADDRESS
Q-See Products
Digital Peripheral Solutions, Inc.
8015 E. Crystal Drive
Anaheim, CA 92807
FAX
714-998-3509
WEBSITE
http://www.Q-See.com
© 2010 Q-See. Reproduction in whole or in part without written permission is prohibited. All rights
reserved. This manual and software and hardware described herein, in whole or in part, may not be
reproduced, translated, or reduces to any machine-readable form without prior written approval.
Q-See cannot warrant that the functions described in this guide will be uninterrupted or error-free.
Q-See is a registered trademark of Digital Peripheral Solutions, Inc.
All other trademarks are trademarks or registered trademarks of their respective owners.

3
TABLE OF CONTENTS
TABLE OF CONTENTS
NETWORK SETUP 4
DHCP 4
PPPoE 4
Static 5
DDNS Setup 6
Port Forwarding 7
To access the DVR from a remote computer 7
To access the DVR through Internet Explorer 8
EMAIL NOTIFICATION SET-UP 11
Yahoo smtp setting 12
Hotmail smtp setting 12
SMARTPHONE SETUP 13
Windows 13
iPhone 15
Android 16
Blackberry 17
Supported Blackberry Models 17
Setup and operation on the Blackberry phone viewer 18
Q-SEE PRODUCT WARRANTY 22

4
NETWORK SETUP
The Network Setup menu options need to be configured in order to access the DVR remotely
over a network or the internet. From the Network Setup menu, select the Network Type
(DHCP, PPPoE, or Static), Port and Web Port (80 and 9000 by default).
To configure the Network settings of the DVR, from the Main Menu, select the Network icon
and the Network Setup menu opens (IMAGE 12).
Type can be set to DHCP, PPPoE or Static. To have the router assign the IP address, use
DHCP. To select the address, use static. To attach directly to a modem instead of using a
router, use PPPoE. For more information, please see the remote access guide.
DHCP
When selecting DHCP as the Network type, the router automatically generates a DVR IP
address once the Network Setup menu is exited. Write down this IP address. Then switch the
Network Type to “Static” and re-enter the IP address to avoid any discrepancies that might
occur in the event the router auto generates a different IP address in the future.
IMAGE 12 IMAGE 13
PPPOE
When selecting PPPoE as the Network type, input the username and password provided by
your internet service provider. You would use this option if you are attaching the DVR directly
to DSL or cable modem instead of a router.

5
STATIC
When selecting Static as the Network type, set the Network setting on the DVR to match the
settings on your router.
1. Type “cmd” on your computer’s run program to bring up the command prompt on any
computer attached to your Router (IMAGE 14)
2. At the prompt, type: “ipconfig” (see red arrow on IMAGE 14) to access the router
settings
3. Write down the gateway and subnet mask numbers (Green arrows on IMAGE 14) so
you can enter them into the network settings of the DVR (IMAGE 15)
4. From the Network Setup, select the STATIC option from the “TYPE” drop-down list
5. Enter the DVR’s IP address, using the same first 3 sets of numbers as the gateway
from the ipconfig (second green arrow in IMAGE 14)
6. Select a fourth set of numbers that is different than any other device attached to the
same router. If the IP address of your computer in the ipconfig (BLUE arrow in Image
14) was a single or two digit number any three digit number is OK. If the computer IP
address ends with a number in the 100s, then use a number in the 200s.
7. Select OK
IP ADDRESS
NETMASK
GATEWAY
IMAGE 14 IMAGE 15

6
DDNS SETUP
Dynamic Domain Name Service (DDNS) provides the capability for a networked device using
the Internet Protocol Suite to notify a DDNS host to change the active DNS configuration of
its hostnames or addresses. This is a useful feature that your Q-See DVR system is equipped
with and can be helpful in avoiding any issues that might occur due to frequent or unplanned
changes to your Public/WAN IP address. Enabling DDNS on your Q-See DVR system will
allow you to connect to your device through a DDNS host such as myq-see.com. In order
to facilitate this ability on your Q-See DVR system, you must first set up Port Forwarding as
directed in the following pages. Once you have enabled Port Forwarding, you can configure
your DDNS information by following these steps:
1. Using a computer that is connected to the same network as your Q-See DVR, use
your IE Browser to go to http://myq-see.com.
2. Click on the NEW USER Link at the bottom of your page (http://myq-see.com/reg.asp).
3. Complete the registration process by following the on-screen directions and click the
SUBMIT button at the bottom of your screen. IMAGE 16
4. The next screen will ask you to create a domain name. Domain names must start
with an (a-z) or (0-9) and cannot contain a hyphen. Once you choose your domain
name, click on the REQUEST DOMAIN button. This will generate a confirmation
screen which tells you if your Domain name is available and list an IP address (IMAGE
17
). Verify that this is your current IP Address by going to www.myipaddress.com and
checking that it is the same address listed in your confirmation screen (IMAGE 17).
IMAGE 16 IMAGE 17
5. Once you have completed steps 1-4, go to the DVR and select NETWORK from the
main menu.
6. Clicking on NETWORK will generate a Network settings dialog box (IMAGE 12). Click
on the DDNS SETUP button to generate a DDNS setting dialog box (IMAGE 18).
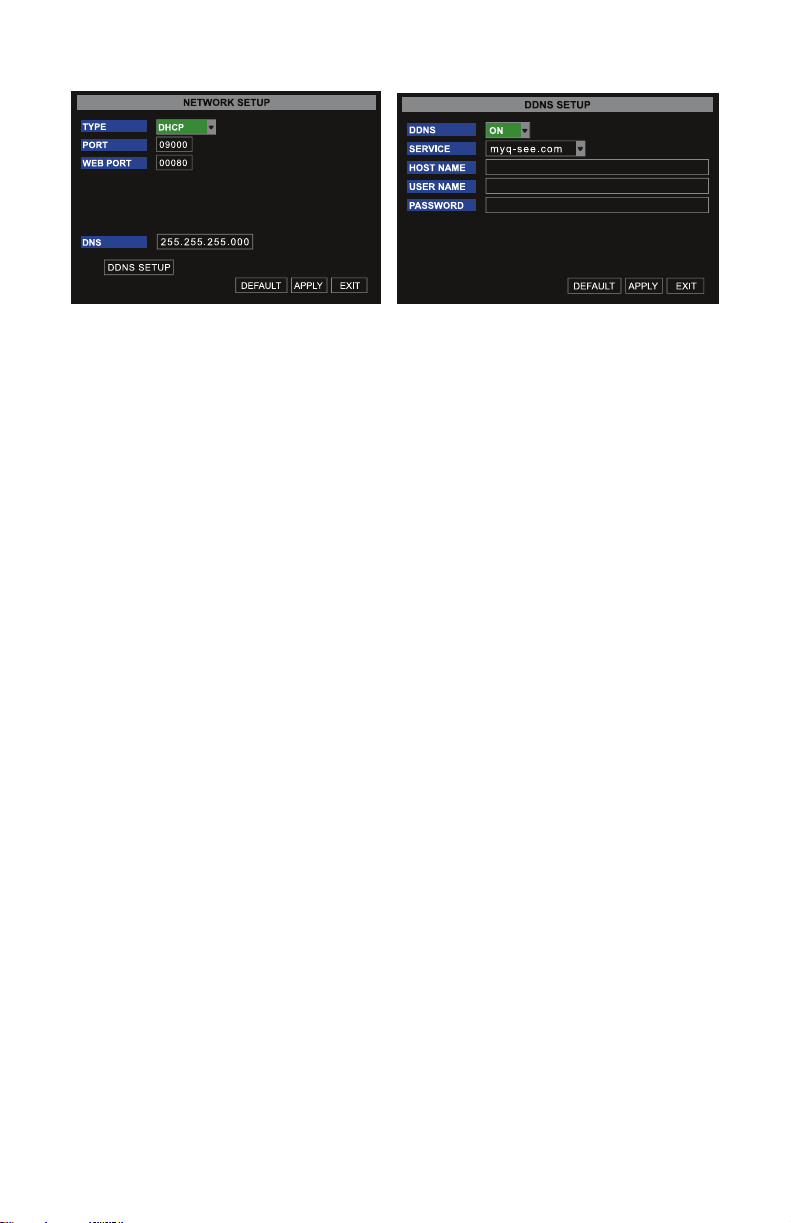
7
IMAGE 12 IMAGE 18
NOTICE: You need to put your public DNS. This can be found in your Router Status tab.
Usually there are 2 DNS entries (DNS1 & DNS2). Use DNS 1 only. If you router does
not list the DNS address get it from your Internet Service Provider.
7. Enter the User Name, Password and Domain Name that you registered for through
http://myq-see.com. Click the APPLY button at the bottom of the screen and then the
EXIT button. This should return you to the Network Setup menu.
8. Click the APPLY button and then the EXIT button at the bottom of the Network Setup
Screen and your DDNS setup is complete.
PORT FORWARDING
To access the DVR from a remote computer
You need to forward ports 80 and 9000 from the router the DVR is attached to, to the IP
address of the DVR.
First connect your DVR to the Router and power on DVR, then follow these steps to configure
your DVR and Set up port forwarding on your router
1. Go to www.portforward.com/qsee
2. Choose your DVR or Series (QT, QSDT, QR, QS etc) from the list provided
3. Select the make and model of your router from the list
4. Click on the ‘Click here to skip this advertisement…’ link in the upper right corner
of the screen.
Note: When you go to the www.portforward.com website you will see an ad for a software
program that will setup port forwarding for you. You do not need to buy this software.
Above the ad there is a link to skip the ad, if you click on the link it will take you to the
instructions which are free. You can purchase the software if you want to, but you do not
need to pay to get the port forwarding instructions.

8
5. Follow the instruction on the website (The top set of instructions are done on the DVR.
The bottom set of instructions are done on the router)
6. Verify the ports are open and traffic is allowed
A. Go to www.canyouseeme.org
B. Type the port number that your DVR requires in the box.
By default these DVRs use ports 80 and 9000.
C. Verify that the port(s) is open.
i. If the port is open, you will see the following message:”Success. I can see
your service…”
ii. Go to the section below: To access the DVR through Internet Explorer
iii. Otherwise, if the ports are not open, you will get the following message:
“Error: I could not see your service on 64.206.234.34 on port (80) -
Reason: Connection refused”. If you get this error, call your Internet
Service Provider (ISP) and ask them to unblock those ports for you.
iv. After your ISP unblocks those ports for you, repeat steps i and ii.
When you access the DVR from a remote computer you also need to use a different address
in the Internet Explorer browser window. Instead of entering the IP address of the DVR
you need to enter the public IP address of the router the DVR is attached to. You can get
this address by going to www.myipaddress.com from a computer that is attached to the
same router as the DVR. This website will display the box in IMAGE 19 below that shows
the IP address you need to use. It will be in the space where the below example shows
76.254.183.54.
IMAGE 19
To access the DVR through Internet Explorer
Once you have setup the network settings on the DVR to match the settings of your router
and forwarded the ports needed by the DVR (for remote access over the internet), you need
to modify your browser controls.
 Loading...