


Quick Installation Guide
MMOODDEELL QQTT442288--880033
8 Channel H.264 Compressi on DV R with
(CIF) Real-Time Recording and
8 Color CCD Camera Kits

Q-SEE QUICK INSTALLATION GUIDE
8 - Color CCD Cameras
PART 1 - PACKAGE CONTENTS
QT428 DVR
Power Supply
For DVR
Software
CD
QSDS14273W (3.6mm)
MMOODDEELL NNUUMMBBEERR QQTT442288--88003
with Stands
Power Supply &
8 -Way Splitter
For Cameras
Ethernet
Cable
3
Pre-Installed
Hard Drive
Camera Cables
(8 Included)
USB 2.0
Mouse
User’s
Manual
BNC (M) - RCA (F)
Adapter
Remote
Control
2 | Page

Q-SEE QUICK INSTALLATION GUIDE
MMOODDEELL NNUUMMBBEERR QQTT442288--88003
PART 2 - DVR CAMERA AND POWER CONNECTIONS
3
Please note that it is STRONGLY recommended to use a surge protector that is UL-1449 rated.
Look for a clamping voltage of 330 or lower, a Joule rating of at least 400 and a response time
of 10 nanoseconds or less.
3 | Page

Q-SEE QUICK INSTALLATION GUIDE
MMOODDEELL NNUUMMBBEERR QQTT442288--88003
PART 3 - CONNECTING THE DVR TO YOUR TV
The primary display on th e DVR is VGA. To use with a VGA mo nitor :
1. Plug the VGA cable (not inclu ded) t o t he VGA port on the DVR.
2. Connect the other end of the VGA cable (not included) to t he mon it or .
To use with a TV:
1. Plug the VGA cable (not included) t o t he VGA port on the DVR.
2. Connect the other end of the VGA cable (not include d) t o a VGA monitor.
3. Go to the login screen on the VGA monitor and log in to the DVR.
4. Attach the RCA cable from the DVR to the RCA video in port on the TV.
5. Hold down the ESC button on the DVR for 10 seconds to transfer the video feed from the VGA monitor to the
TV.
6. You will now be able to view the cameras and access the menu s on the TV but not the VGA monitor .
NOTE: You cannot view the cameras and control the menu on a TV and VGA monitor at the same time. Please note
that you need to use a monitor that is 19” or larger.
3
4 | Page

Q-SEE QUICK INSTALLATION GUIDE
-
DIRECTION/
MULTISCREEN
1.Change direction to sele c t item s
2. Change screen display mo de from 1/4/9/16 channel
MMOODDEELL NNUUMMBBEERR QQTT442288--88003
PART 4 - DVR CONTROLS: FRONT PANEL
Item
Number
1 LED INDICATORS Working indicators for power, HDD, NET, etc
Name/Symbol Description
3
2 POWER
3
4
5
6
7
8
9
10
11
12
Power On/Off
RECORD Record Manually
PLAY/SEARCH Enter Play Interface/Search Files
REW Rewind Key
FF Fast Forward
+/MENU Increase the value in setup/Enter menu in live view
/BACKUP
STOP/ESC Quit play mode/Exit the current interface or status
ENTER Confirm selection
Decrease the value in set up/ Ent er backup mode in live view
To connect external USB devices like USB flash, USB HDD for backup or update
firmware
5 | Page

Q-SEE QUICK INSTALLATION GUIDE
MMOODDEELL NNUUMMBBEERR QQTT442288--88003
PART 5 - ACCESSING THE DVR MENUS
Right click on the screen with the mouse or push the ESC button on the front panel of the DVR to bring up the
Menu Bar shown as Pic 5.1.
3
Pic 5.1
Click on the function menu icon to bring up the Login screen shown as Pic 5.2. Enter the user name and password
which is admin and 123456 by default. This will bring up the Main Menu screen in Pic 5.3. Click on the Setup icon
(Red box in Pic 5.3) to access t he S etup Menu shown as Pic 5. 4.
Pic 5.2 Pic 5.3
This is the section of the menu where you go to setup the main functions of the DVR. If you click on the Basic icon it
will display the screen in Pic 5.5 where you set time and date as well as Language, video format, VGA resolution, and
password check. You will also come to the Setup menu to adjust the display settings, enable and setup cameras for
recording, set up Pan-Tilt-Zoom cameras, set up users on the system, and setup the unit for remote access. See
Chapter 4 in the user’s manua l for instr uc tions on how to setup these f eat ur es.
Pic 5.4 Pic 5.5
6 | Page

Q-SEE QUICK INSTALLATION GUIDE
MMOODDEELL NNUUMMBBEERR QQTT442288--88003
PAR T 6 - SETTING UP THE DVR TO RECORD
There are 4 modes for recording: manual, schedule, motion detection, and external sensor. In this Quick Start Guide
we will cover manual, schedule, and motion detection. If you want to use external sensor alarms refer to sections
4.4.3 through 4.5.1 of the user’s manual for information on how to set these up. To setup any type of recording you
need to select Record in the Setup menu (RED square in Pic 6.1) which will bring up the RECORD screen (Pic 6.2).
Here you can enable recording on the channels you want to record by putting checkmarks in the boxes of the
cameras that you want to recor d.
3
Pic 6.1 Pic 6.2
Selecting the Record Bitrate tab will open the window in Pic 6.3 where you can select the resolution, frame rate, and
quality setting for each ca mera.
Pic 6.3
7 | Page

Q-SEE QUICK INSTALLATION GUIDE
MMOODDEELL NNUUMMBBEERR QQTT442288--88003
1. Manual Recording :
Once you have setup and enabled the cameras you want to record, push the RECORD button on the front of the
DVR. It will start recording and will continue recording until you push the RECORD button again. If the system is
password protected it will ask for a password to stop r ecor di ng.
2. Time Schedule Recording.
Follow instructions in Part 5 to go to Setup menu. Click on the Schedule icon (Green box in Pic 6.4). This will display
the screen in Pic 6.5. Go to the Schedule Tab (highlighted in Blue) and select the channel you want to create a
schedule for in the drop down box and then double click the mou s e.
3
Pic 6.4 Pic 6.5
This will display the screen s how n as Pic 6.6. Click the add button and set the times for the day that you want to setup
for and click on OK when you have set the times. You can return to the screen in Pic 6.5 to copy the settings to other
days or all days.
Pic 6.6
8 | Page
Q-SEE QUICK INSTALLATION GUIDE
MMOODDEELL NNUUMMBBEERR QQTT442288--88003
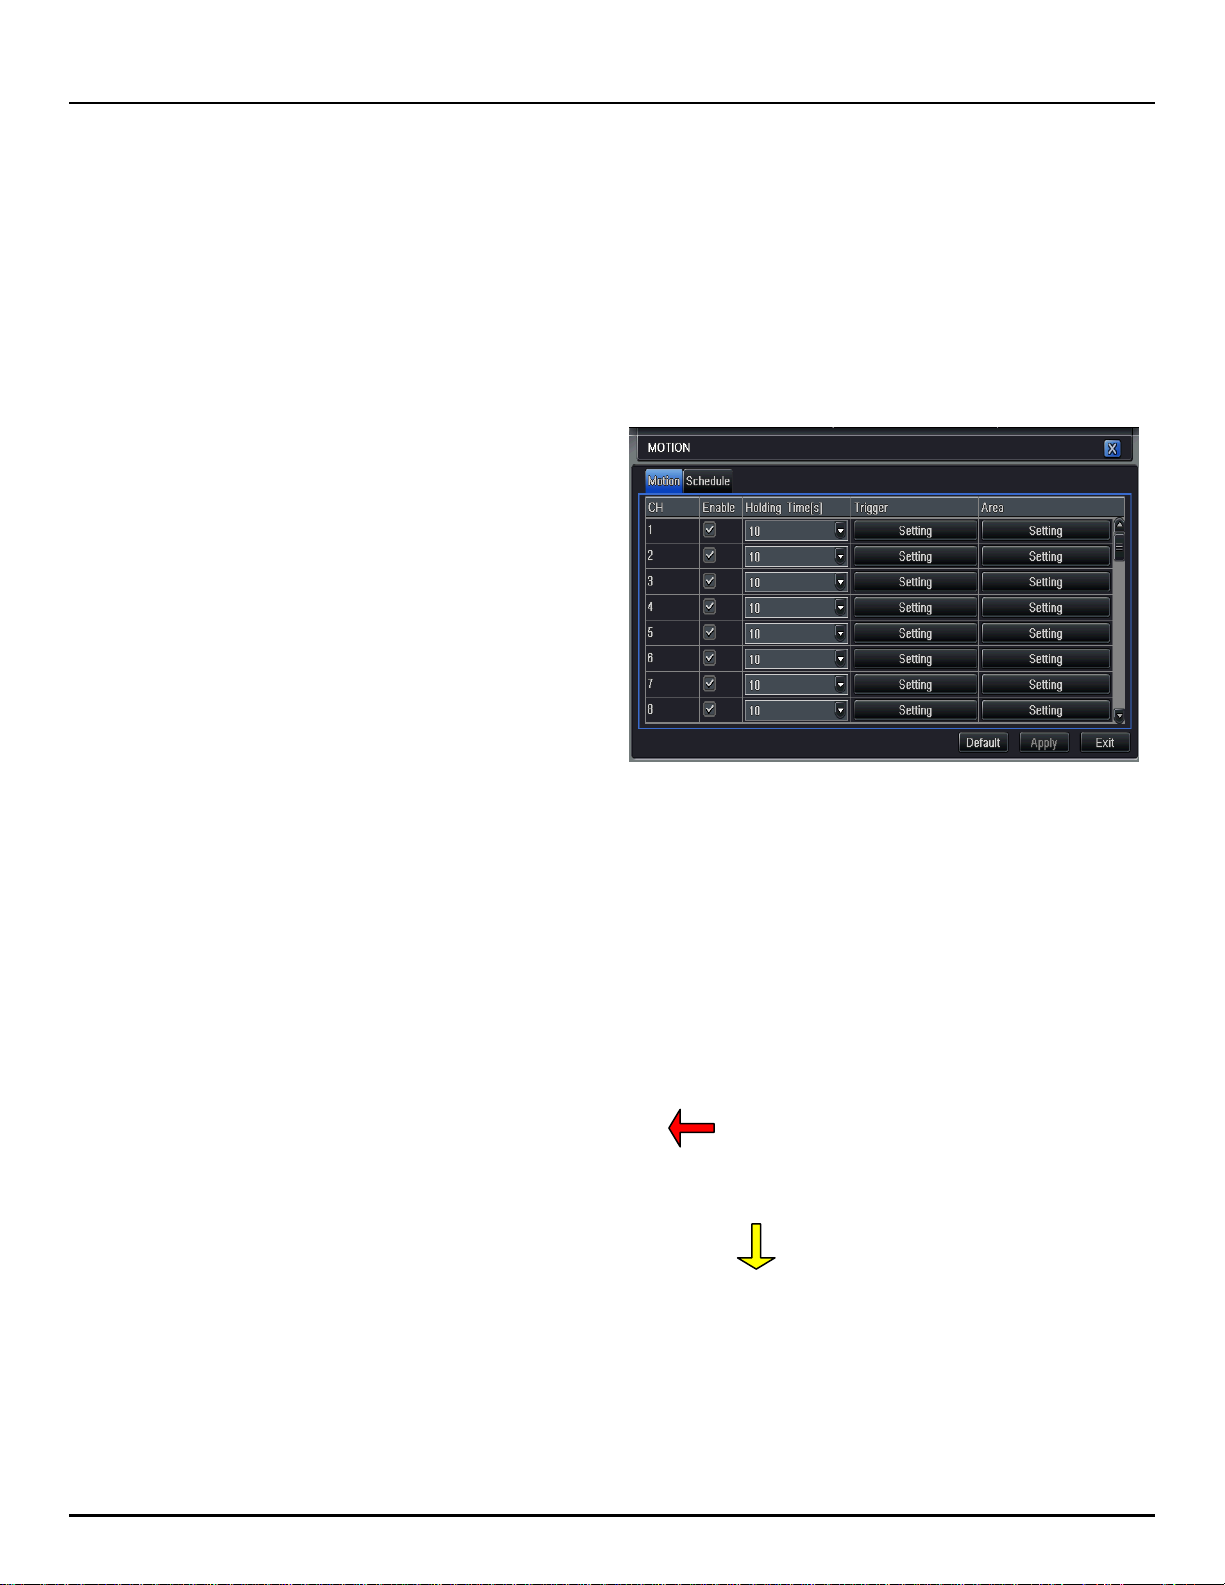
3. Motion Detection Recording:
Go to the Main menu, Setup, and click on the Alarm icon (Blue Box in Pic 6.7) and select Motion which will bring up
the screen shown as Pic 6.8. Go to the Motion options (Blue tab in Pic 6.8). Put a checkmark in the box for the
cameras that you want to record on motion detection. Next set the holding time (the length of time the file stays open
after motion stops) for each of the cameras. Then go to the trigger setting and select the cameras that you want to
record when each camera detects motion. For example, under channel one if you only want channel one to start
recording when it detects motion then select channel one only. If you also want cameras 2 and 3 to start recording
when channel 1 detects mot ion then select channels 1, 2, and 3.
3
Pic 6.7 Pic 6.8
Next click on the Area setting option to select the area that you want to be sensitive to motion on the camera and the
level of sensitivity you want for the camera. When you select the setting option it will open the screen shown in Pic
6.9. If you click on the star icon (Green box in Pic 6.9) the entire area will be sensitive to motion. You can also use the
mouse to select an area that you want to be sensitive. You can use the slide bar at the bottom of the screen to set the
level of sensitivity you want, the higher the number, the more sensitive the motion detection. Click on the icon
showing a silhouette of a person (yellow arrow in Pic 6.9) and an illustration of a walking figure will appear (red arrow
in Pic 6.9). Drag the walking figure across the blue grid to adjust the sensitivity levels of specific areas that are
captured in the field of view of your camera. Once you have identified a field of view that suits your needs, click on the
save icon (red box in Pic 6.9) t o save your settings. Repeat this f or each camera.
Next you need to setup the schedule for when you want the cameras to record on motion detection. Click on the
Schedule tab (Black tab in Pic 6.8) to setup the schedule. You would setup the schedule here the same way you do in
2. Time Schedule Recording.
Pic 6.9
9 | Page

Q-SEE QUICK INSTALLATION GUIDE
MMOODDEELL NNUUMMBBEERR QQTT442288--88003
PAR T 7 - SETTING UP THE DVR TO PLAYBACK FI LE S
Go to the Main menu and click on the Search icon (Green box in Pic 7.1). If the system is password protected, you
will be prompted to enter a user name and password. This will bring up the Search screen shown as Pic 7.2. There
are 3 search tabs in this dialo g box; Time Search, Event Sear ch, and File Manager.
3
Pic 7.1
TO SEARCH BY TIME: Go to the Time Search tab (Blue tab in Pic 7.2). Select a channel and display mode. The
highlighted days on the calendar to the right of the screen will contain a list of files with recorded data. Select a date,
press the Search button and click on the time grid to set the start time or manually enter it in the Start Time box. Click
on the Play button to playback the video and open the contro l pan el shown as Pic 7.3.
Pic 7.2
Pic 7.3
10 | Page

Q-SEE QUICK INSTALLATION GUIDE
MMOODDEELL NNUUMMBBEERR QQTT442288--88003
TO SEARCH BY EVENT: Go to the Event Search tab (Blue tab in Pic 7.4), if the system is password protected it will
ask you to enter a user name and password. Click on the Search button, the event list will be displayed in the box on
the left. Select date, channel, and checkmark the motion, alarm, or all option. Double click on the file you would like to
playback, the file will play and t he control panel shown in Pic 7.3 w il l be displayed.
3
Pic 7.4
FILE M ANAGE R: You can also go to the File Manager tab (Blue Box in Pic 7.5) which will give you a list of the all of
the files on the hard drive. Click on the Search button and a list of the all of the files will be displayed in the left hand
box. Double click on a file to play it and di s play the control panel in Pic 7.3.
NOTE: Recording will not be int er rupted while you are in Playback mode.
Pic 7.5
11 | Page

Q-SEE QUICK INSTALLATION GUIDE
MMOODDEELL NNUUMMBBEERR QQTT442288--88003
PART 8 - SETTING UP THE DVR TO BACKUP FILES
The DVR supports backin g up to a USB flash drive, USB hard dr iv e, and USB burner. You can also backup to a PC
through an Internet Explor er br owser (refer to 7.6.2 Rem ot e Backup in the user’s manual). Go to the Main menu and
click on the Backup icon (O r ange box in Pic 8.1). This will op en t he Backup screen shown as P ic 8. 2. Set the start
time and end time and click on the Search button (Blue button in Pic 8.2). The files from the search period will be
displayed in the left hand w indow . Put a checkmark in the box on t he left side of the channel number for the file or
files you want to backup, or put a checkmark in the All box on the bott om of the window to select the fi le s that you
want to backup (Green checkmarks in Pic 8.2). Click on the Backup button (Red box in Pic 8.2), the Backup Inf o box
shown as Pic 8.3 will be di splay ed that gives you the infor mation about the backup. There is a dr opdown box where
you can select the backup device, and a drop down box to select t he file type. If you select DVR as Fi le Type, then
You need to Check the BackUp player option. Also you can select AVI as File type, this File can be played in
Windows Media Player direct ly. Click on apply to start the backup and a process bar at the bottom of the screen will
display the progress of the backup (refer to Pic 8.3).
NOTE: If you stop r e cording while backing up th e files, the backup will go faster.
3
Pic 8.1 Pic 8.2
Pic 8.3
12 | Page

Q-SEE QUICK INSTALLATION GUIDE
MMOODDEELL NNUUMMBBEERR QQTT442288--88003
3
Questions or Comments?
Contact Us:
Mailing Address: Customer Service:
DPS, Inc. Phone: 877-998-3440 x 538
8015 E. Crystal Dr. Email: cs@dpsi-usa.com
Anaheim, CA 92807 Live Chat from our Website
Website: Tech Support:
http://www.q-see.com Phone: 877-998-3440 x 539
Fax: Email: ts@dpsi-usa.com
714-998-3509 Live Chat from our Website
REVISED 9/1/2010
13 | Page
 Loading...