

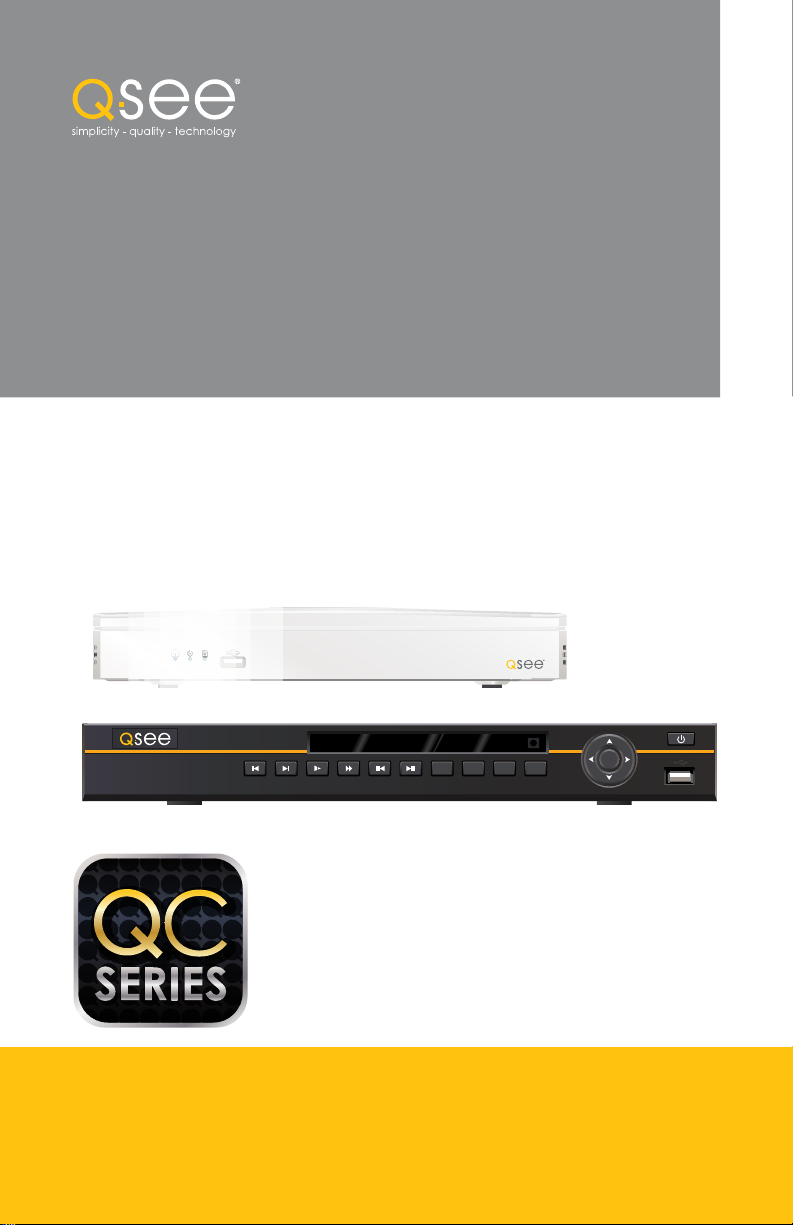
User Manual
QC SERIES
NVRS
QC828 NVR 8 Channels
H.264 NETWORK VIDEO RECORDERS
720P and 1080P Recording Options
POWERHDD1 2 3 4 5 6 7 8 9 10 11 12 13 14 15 16 NET
ESCFNRECSHIFT
ENTER
1

Thank You for Choosing a Q-See Product!
All of our products are backed by a conditional service warranty covering all hardware for 12
months from the date of purchase. Additionally, our products also come with a free exchange
policy that covers all manufacturing defects for one month from the date of purchase.
Permanent upgrading service is provided for the software and is available at www.Q-See.com.
Be certain to make the most of your warranty by completing the registration form online. In
addition to warranty and technical support benefits, you’ll receive notifications of product
updates along with free downloadable firmware updates for your NVR. Register today at
www.Q-See.com!
Please see the back of this manual for exclusions.
About this Manual
This manual is written for the QC800 Series of Network Video Recorders (NVRs) and was
accurate at the time it was completed. However, because of our ongoing effort to constantly
improve our products, and the different capabilities of the models covered in this manual,
additional features and functions may have been added since that time and on-screen
displays may change. We encourage you to visit our website at www.Q-see.com to check for
the latest firmware updates and product announcements.
Your NVR is pre-configured in a way that most users find sufficient to their needs. However,
because we understand that everyone’s individual situation differs and because we are
committed to providing the best value possible, our products contain a full range of features
which may be tailored to custom-fit most situations. It is unlikely that you will need to use all of
the features to meet your security needs, but they are available for when you do.
This manual covers the setup and local operation of the NVR. Instructions for configuring the
NVR for remote access, along with instructions for monitoring the NVR using a computer or
mobile device, are contained within the Remote Monitoring Guide which is included on the
CD that accompanied your NVR and which can also be found on www.Q-See.com/support.
Throughout the manual we have highlighted warnings and other important information that will
assist you in operating your new system in a safe and trouble-free manner. Please take the
time to read and follow all instructions and pay attention to alerts as shown below:
IMPORTANT! Red boxes with this icon indicate warnings. To prevent
possible injury or damage to the product, read all warnings before use.
NOTE! Text in blue boxes with the Information icon offer additional guidance
and explanations about how to make the most out of your system.
© 2011-2013 Q-See. Reproduction in whole or in part without written permission is
prohibited. All rights reserved. This manual and software and hardware described herein, in
whole or in part, may not be reproduced, translated, or reduced to any machine-readable
form without prior written approval.
Trademarks: All brand names and products are trademarks or registered trademarks of their
respective owners.
Q-See is a registered trademark of DPS, Inc.
Disclaimer: The information in this document is subject to change without notice. The
manufacturer makes no representations or warranties, either express or implied, of any kind
with respect to completeness of its contents.
Manufacturer shall not be liable for any damages whatsoever from misuse of this product.
Version 2.6 11/7/13
2 3

TABLE OF CONTENTS
1. INTRODUCTION 7
Features and Specifications 8
2. CONNECTIONS AND CONTROLS 10
2.1 Connections 10
QC804, 808 and 8016 10
QC814 12
QC824 13
QC818 14
QC828 16
QC8116 18
2.2 Mouse Control 20
Virtual Keyboard 21
2.3 Remote Control 22
2.4 IP Cameras 24
Locally Connected Cameras 24
Cameras Connected througha Network 25
Adding and Removing Cameras in Your Display 26
A Note About Resolution and Recording 26
3. BASIC OPERATION 27
3.1 Operation 27
3.2 Live View 27
Navigation Bar 28
Shortcut Video Controls 29
3.3 Login, Logout and Main Menu 30
Login 30
Shortcut Menu 31
Main Menu 32
Shutdown 32
Auto Resume 32
3.4 Recording 33
Manual Recording 33
Camera Settings 34
Schedule 37
Alarm 38
Motion, Video Loss and Camera Masking Detection 39
3.5 Search and Playback 42
Search 44
Playback 46
Digital Zoom 48
Back-Up 49
3.6 Backup 50
4. MENUS 52
4.1 Main Menu 53
4.2 Info Menu 53
HDD Information 53
Log 54
Online Users 55
Remote Device Info 56
Network Resource Info 57
4.3 Setting Menu 58
RS232 60
Alarm 60
Network 60
PTZ 60
Display 61
Default 62
4.4 Remote Device 63
Edit 65
Configuring IP Cameras 65
Adding and Deleting Remote Devices 67
4.5 Advanced 68
HDD Manage 68
Error Alerts 69
Account 70
Auto Maintenance 70
4.6 Backup 71
4.7 Shutdown 71
5. PAN/TILT/ZOOM CAMERAS 72
5.1 Connecting a PTZ Camera 72
5.2 PTZ Control and Setup 73
Setup 73
Control 74
Setting Preset/Patrol/Pattern/Scan 75
Running PTZ Functions 77
6. ALARMS 78
6.1 Alarm Input 78
6.2 Alarm Output 80
6.3 Alarm Setup and Activation 81
7. HARD DISK DRIVE 84
7.1 Installation/Removal 84
(Continued Next Page)
4 5
APPENDIX 86
A.1 Troubleshooting 86
A.2 Specifications 89
Q-SEE PRODUCT WARRANTY 92
Questions or Comments? Contact Us 93
INTRODUCTION
To prevent damage to your Q-See product or injury to yourself or to others, read and
understand the following safety precautions in their entirety before installing or using this
equipment. Keep these safety instructions where all those who use the product will read them.
CHAPTER 1
WARNING! ELECTRIC SHOCK RISK!
nCheck the unit and any accessories included in the package immediately after opening. If
items are missing or damaged, repackage and return to the point of purchase.
n Use the proper power source. Only use the power adapter supplied with your system. Do
not use this product with a power source that applies more than the specified voltage (100240V AC).
nNever insert anything metallic into the NVR. Inserting anything into the NVR or its case can
be a source of dangerous electric shock.
nDo not operate in dusty areas. Avoid placing the NVR in places that are dusty.
nDo not expose this product to rain or use near water. If this product accidentally gets wet,
unplug it and contact Q-See immediately.
nKeep product surfaces clean and dry. To clean the outside case of the NVR, gently wipe
using a lightly dampened cloth (only use water, do not use solvents).
nDo not operate this NVR without the cover securely in place. Do not attempt to do any
repairs to the NVR yourself. If there are unusual sounds or smells coming from the NVR,
unplug it immediately and contact Q-See technical support. Under no circumstances
should the cover be removed while the device is connected to a power source. You should
only remove the cover to install/replace the hard disk drive (See Chapter 6) or replace the
standard 3v lithium cell battery on the motherboard. These are the only user serviceable
parts. You may need to replace the battery if the internal clock resets itself after a power
outage
nHandle NVR box carefully. If you accidentally drop your NVR on any hard surface, it may
cause a malfunction. If the NVR doesn’t work properly due to physical damage, contact
Q-See for repair or exchange.
nMake sure there is proper air circulation around the unit. This NVR system uses a hard drive
for video storage which generates heat during operation. Do not block air holes located on
the sides of the NVR as they are designed to keep the system cool while running. Install or
place this product in an area where there is ample air circulation.
nProvide proper ventilation. This NVR has a built-in fan that properly cools the processor. Do
not cover or impede this fan.
6 7
FEATURES AND SPECIFICATIONS
Your NVR (Network Video Recorder) contains professional-grade features and flexibility that
allows the do-it-yourselfer to easily setup and maintain a reliable and secure security system
for home and office.
It utilizes a dual-core CPU running an embedded Linux operating system to maintain stable
operation and a popular H.264 compression algorithm to produce high-quality, low bitstream
footage that is easy to manage and efficient to transfer over the internet. It can use various
functions such as record, playback, and monitoring at the same time and produces audio and
video synchronization. This product has advanced network technology and data transmission
functions allowing you to control and monitor your system remotely.
This product offers the following features:
Smartphone Compatible
Access live footage directly from your iPhone, iPad, Android phone and tablet or other
supported mobile device. Your NVR can also be set to e-mail your hand held-device
whenever specific activity occurs, such as motion detection.
Connect to a TV or PC Monitor Easily
This system comes with VGA and HDMI video output ports to allow you to connect to a
computer monitor or HD display for viewing purposes. Some models also include a BNC
video port to allow the use of an analog television as a video display.
Individually Configurable User Controls
Create up to 20 individual user accounts giving specific users access to only certain functions,
cameras and etc.
24/7 Scheduled Recording
Choose which days of the week and hours of the day you want to set your NVR to record or
not record.
Included Mouse and Remote Control
In addition to the front panel button controls, system can also be booted up and shut down
using the included remote control or mouse. Mouse operation function supports intelligent
operation by enabling copy and paste functions.
Dual Video Streams
The NVR will record high definition video directly to its internal hard drive, while streaming a
more compact, lower resolution video feed over the network or Internet for real-time viewing
on a computer or mobile device.
Built-in Power Over Ethernet (POE) Blocks
The POE Block allows you to power and view a number of cameras directly connected to the
NVR without the need for additional power supplies or wiring. Connecting through the POE
allows instantaneous video feed from your cameras.
View Your Video Feed Online with No Additional Service Fees
View your NVR’s live or recorded video footage on any Internet accessible computer with
Internet Explorer, Apple Safari, Mozilla Firefox and Google Chrome (using IE plug-in).
Stay Notified with Customizable Email Alerts
Set your system up to notify you when an event has occurred at the location you are
monitoring. Notification alerts can easily be adjusted to your specifications.
Advanced Motion Detection Activated Recording
Advanced motion detection settings ensure that false alarms are not triggered. The easy to
use motion detect set up screen allows you to mask out certain areas which experience heavy
movement in order to avoid false alarms and avoid unnecessary record triggering.
Multiple Backup Options
A built-in USB port gives you the option of backing up and transferring your video footage
using a flash drive or external USB hard drive. You can also connect to an external CD/
DVD writer to burn your file footage right onto a compact disc or DVD disc. Files can also be
accessed from your NVR system to a remote computer location by logging on remotely.
Storage Function
Encrypted file format to ensure data security and avoid vicious data modification.
Multiple Playback Options and Advanced Search Functions
Supports real-time recording on each channel independently. Search through recorded files
while you are playing live footage, monitoring through a remote location using a supported
internet browsing application and backing up system files. A variety of playback modes
include: slow play, fast play, backward play and frame by frame play.
Network Monitoring
Supports network remote real-time monitoring (available bandwidth permitting) and remote
record search.
Alarm Activation Function
Several relay alarm outputs enable you to pair your system with an on-site alarm system.
Communication Ports
Standard Ethernet port allows you to access the NVR from a network or the Internet.
NOTE! Depending on your point of purchase, your NVR may have the hard
disk drive already installed. If your drive was packaged separately, or if you
wish to upgrade your installed drive up to a 3TB drive, please see Chapter 6
at the back of this manual which covers installing the drive.
8 9
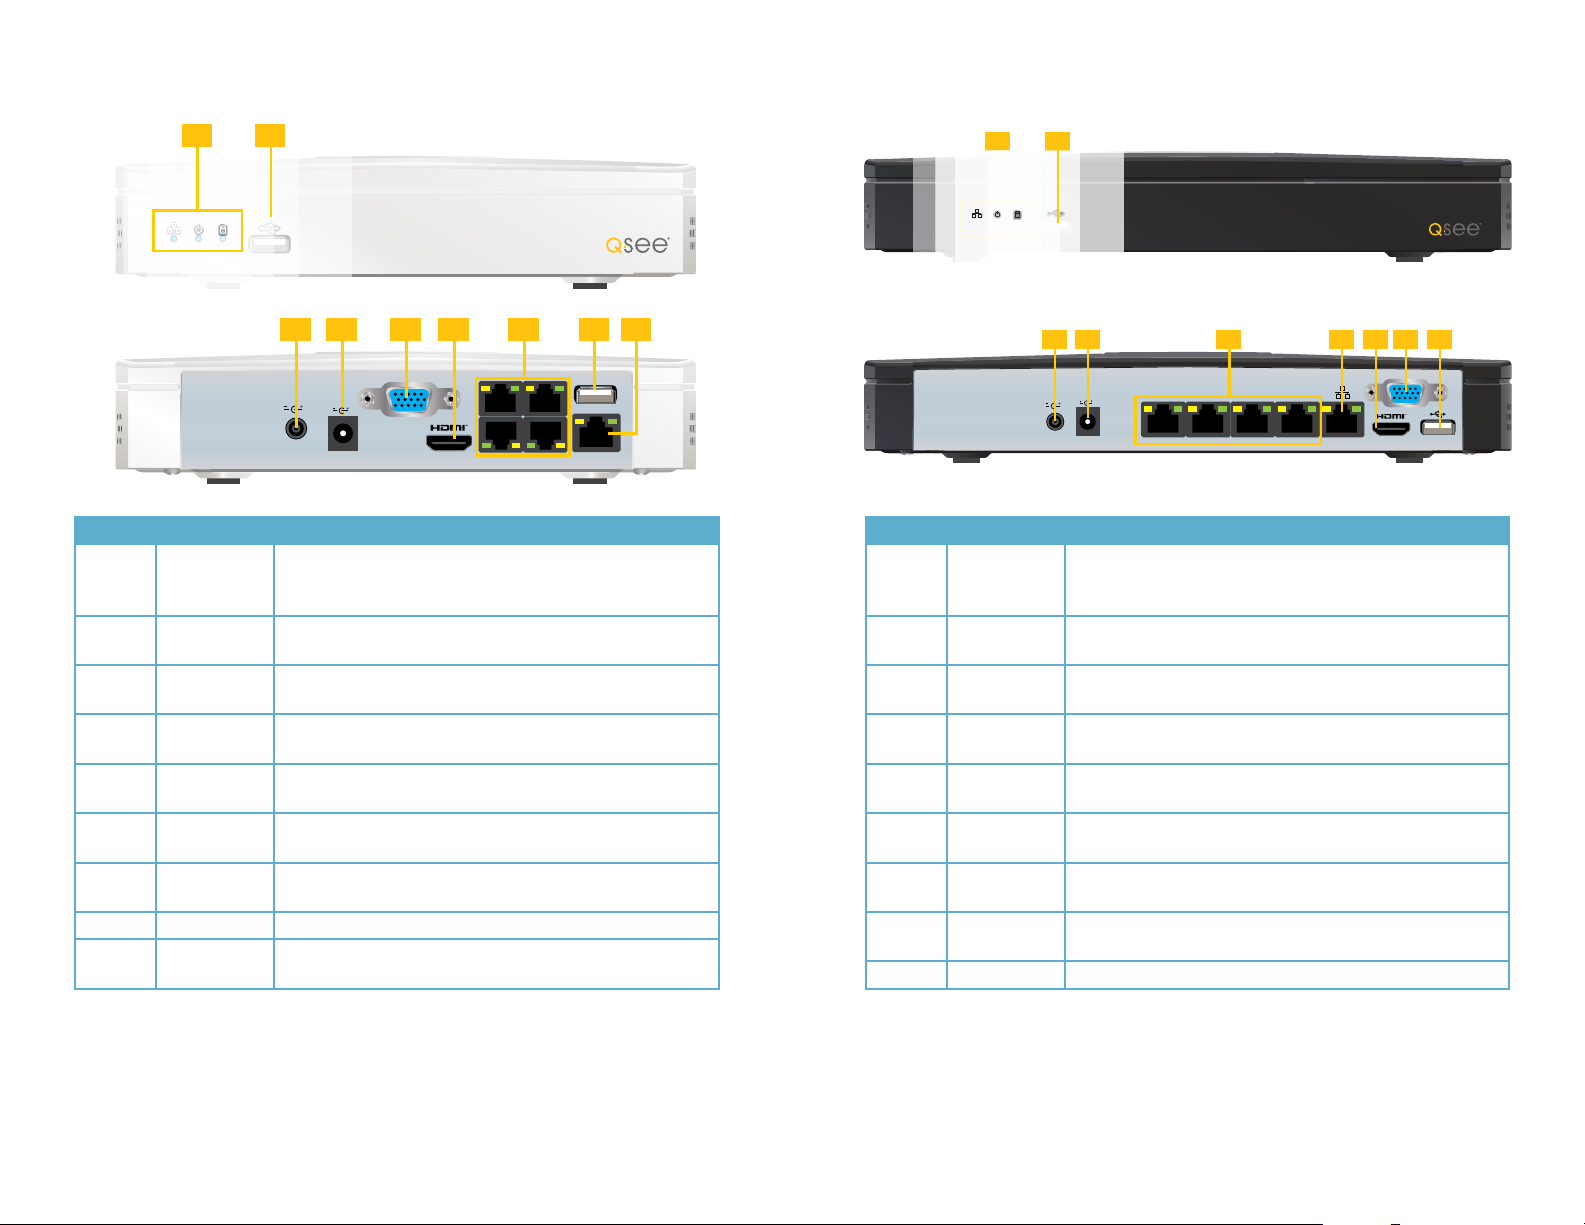
CONNECTIONS AND CONTROLS
2.1 CONNECTIONS
QC804, 808 AND 8016
Front Panel
1 2
QC808 NVR 8 Channels
3 4 65
POWERHDD1 2 3 4 5 6 7 8 9 10 11 12 13 14 15 16 NET
ESCFNRECSHIFT
ENTER
CHAPTER 2
Rear Panel
1 4 85 72 3 6
AUDIO
DC 48V
POE PORTS
VIDEO OUT
OUT
IN
RS232
VGA
NO C
NO C NO C
A91102113124135146157168B
DC 12V
7 8 9 10 11 1312 14
Number Item Function
Channel
1
Status Lights
2 Status Lights
3 IR Sensor Infrared Receiver for Remote Control
Directional
4
Buttons
5 Enter Button
6 Power Button Puts NVR into Standby mode or wakes it up.
Directional
7
Play Buttons
Playback
8
Speed
Frame
9
Playback
10 Shift Button For use in Virtual Keyboard
11 Record Button Begins manual recording on all channels
Function
12
Button
13 Escape Button Exit any menu or current operation
14 USB Port
These lights will illuminate to indicate that a particular channel
is recording.
Net and HDD will illuminate if there are problems with the
network connection or hard drive, respectively. The power
light will illuminate when the NVR is powered up.
Navigate through menus.
Change selections in pull down menus (Up/Down buttons)
Toggle settings (Up/Down buttons)
Viewing Mode: Go To Menu
In Menu: Acts as mouse click
Play back video forwards or backwards. Pressing the same
button a second time will pause the video.
Slow or speed up playback - 1/4 speed to 4x speed.
Move forward or backwards frame-by-frame through video.
Works when video is paused.
Single Channel Viewing Mode: Opens Color Adjustment
Virtual Keyboard: Backspace function
For use with flash drive when backing up or updating
firmware. Not for use with mouse.
10
9
11 12
13
Number Item Function
POE Power
1
Input
2 POE Block
48V power input for the Power Over Ethernet (POE) block.
Powers directly-connected cameras and receives video
images.
3 Video Out BNC Connector to television
4 Audio Out BNC Connector for audio output
5 RS232 Reserved for use by manufacturer.
6 Alarm Input
Connect up to 16 external alarm sensors to this block. The
top row of numbers is for the upper block.
Connect up to 3 external alarms using the Normally Open
(NO) or Closed (C) port
Connect the data cables for a PTZ camera into the ports
labeled A and B to control it. “A” is positive (+) and “B” is
7
PTZ and Alarm
Out
negative (-).
8 Power Switch
Turns NVR on or off. Use Shutdown menu function or front
panel power button before switching off.
9 USB Connect the USB mouse to this port
10 Audio In BNC input for audio feed from microphone
11 Network Ethernet cable connection to network
12
HDMI Video
Out
To connect to an HD display
13 VGA Video Out To connect to a VGA monitor (19” or larger)
14
NVR Power
Input
Connect 12V DC power supply here
14
If the user is logged out, pressing the Enter button will open the Login window. Pressing the
Function button will open the Virtual Keyboard which can be navigated using the directional
buttons. Click Enter to enter a keystroke. Press the Escape button to close the Virtual Key-
Your NVR comes with two power supplies. The 48V is exclusively for use in powering the POE
block while the 12V 5A supply is for the NVR itself. The plugs and receptacles are different to
aid in connecting the proper power supply. Do not force or alter these connectors.
board and then press the Enter button to submit your password.
10 11
QC814
Front Panel
QC824
Front Panel
1 2
Rear Panel Rear Panel
3
DC 48V
DC 12V
Number Item Function
These show the status of the network connection, power and
1 Status Lights
hard drive respectively. The Network and Power lights will
normally be on. The Hard Drive light will normally be off.
2 USB Port
POE Power
3
Input
NVR Power
4
Input
VGA Video
5
Out
HDMI Video
6
Out
7 POE Block
For use with flash drive when backing up or updating
firmware. Not for use with mouse.
48V power input for the Power Over Ethernet (POE) block.
12V power input for the NVR itself
To connect to a VGA monitor (21.5” or larger)
To connect to an HD display (21.5” or larger)
Powers directly-connected cameras and receives video
images.
8 USB Connect the USB mouse to this port
9 Network
Ethernet cable connection to network. You cannot connect a
camera to this port.
5 7 84 6 9
VGA
Number Item Function
1 Status Lights
2 USB Port
3
4
5 POE Block
6 Network
7
8
9 USB Connect the USB mouse to this port
1 2
POE Power
Input
NVR Power
Input
HDMI Video
Out
VGA Video
Out
3
DC 48V
DC 12V
5 7 94 6 8
VGA
These show the status of the network connection, power and
hard drive respectively. The Network and Power lights will
normally be on. The Hard Drive light will normally be off.
For use with flash drive when backing up or updating
firmware. Not for use with mouse.
48V power input for the Power Over Ethernet (POE) block.
12V power input for the NVR itself
Powers directly-connected cameras and receives video
images.
Ethernet cable connection to network. You cannot connect a
camera to this port.
To connect to an HD display (21.5” or larger)
To connect to a VGA monitor (21.5” or larger)
For full 1080P resolution video preview, you must use a 21.5 inch or larger monitor with
1920x1080 resolution.
Your NVR comes with two power supplies. The 48V is exclusively for use in powering the POE
block while the 12V 5A supply is for the NVR itself. The plugs and receptacles are different to
aid in connecting the proper power supply. Do not force or alter these connectors.
12 13
QC818
Front Panel
QC818 NVR 8 Channels
1 2
3 4 65
POWERHDD1 2 3 4 5 6 7 8 9 10 11 12 13 14 15 16 NET
ESCFNRECSHIFT
ENTER
7 8 9 10 11 1312 14
Rear Panel
1 4 85 72 3 6
AUDIO
VIDEO OUT
OUT
DC 48V
IN
10
9
11 12
RS232
VGA
13
NO C
NO C NO C
A91102113124135146157168B
DC 12V
14
Number Item Function
1
Channel
Status Lights
These lights will illuminate to indicate that a particular channel
is recording.
Net and HDD will illuminate if there are problems with the
2 Status Lights
network connection or hard drive, respectively. The power
light will illuminate when the NVR is powered up.
3 IR Sensor Infrared Receiver for Remote Control
Directional
4
Buttons
5 Enter Button
Navigate through menus.
Change selections in pull down menus (Up/Down buttons)
Toggle settings (Up/Down buttons)
Viewing Mode: Go To Menu
In Menu: Acts as mouse click
6 Power Button Puts NVR into Standby mode or wakes it up.
7
8
9
Directional
Play Buttons
Playback
Speed
Frame
Playback
Play back video forwards or backwards. Pressing the same
button a second time will pause the video.
Slow or speed up playback - 1/4 speed to 4x speed.
Move forward or backwards frame-by-frame through video.
Works when video is paused.
10 Shift Button For use in Virtual Keyboard
11 Record Button Begins manual recording on all channels
12
Function
Button
Single Channel Viewing Mode: Opens Color Adjustment
Virtual Keyboard: Backspace function
13 Escape Button Exit any menu or current operation
14 USB Port
For use with flash drive when backing up or updating
firmware. Not for use with mouse.
Number Item Function
POE Power
1
Input
2 POE Block
48V power input for the Power Over Ethernet (POE) block.
Powers directly-connected cameras and receives video
images.
3 Video Out BNC Connector to television
4 Audio Out BNC Connector for audio output
5 RS232 Reserved for use by manufacturer.
6 Alarm Input
Connect up to 16 external alarm sensors to this block. The
top row of numbers is for the upper block.
Connect up to 3 external alarms using the Normally Open
(NO) or Closed (C) port
Connect the data cables for a PTZ camera into the ports
labeled A and B to control it. “A” is positive (+) and “B” is
7
PTZ and Alarm
Out
negative (-).
8 Power Switch
Turns NVR on or off. Use Shutdown menu function or front
panel power button before switching off.
9 USB Connect the USB mouse to this port
10 Audio In BNC input for audio feed from microphone
11 Network Ethernet cable connection to network
12
HDMI Video
Out
To connect to an HD display
13 VGA Video Out To connect to a VGA monitor (19” or larger)
14
NVR Power
Input
Connect 12V DC power supply here
If the user is logged out, pressing the Enter button will open the Login window. Pressing the
Function button will open the Virtual Keyboard which can be navigated using the directional
buttons. Click Enter to enter a keystroke. Press the Escape button to close the Virtual Key-
Your NVR comes with two power supplies. The 48V is exclusively for use in powering the POE
block while the 12V 5A supply is for the NVR itself. The plugs and receptacles are different to
aid in connecting the proper power supply. Do not force or alter these connectors.
board and then press the Enter button to submit your password.
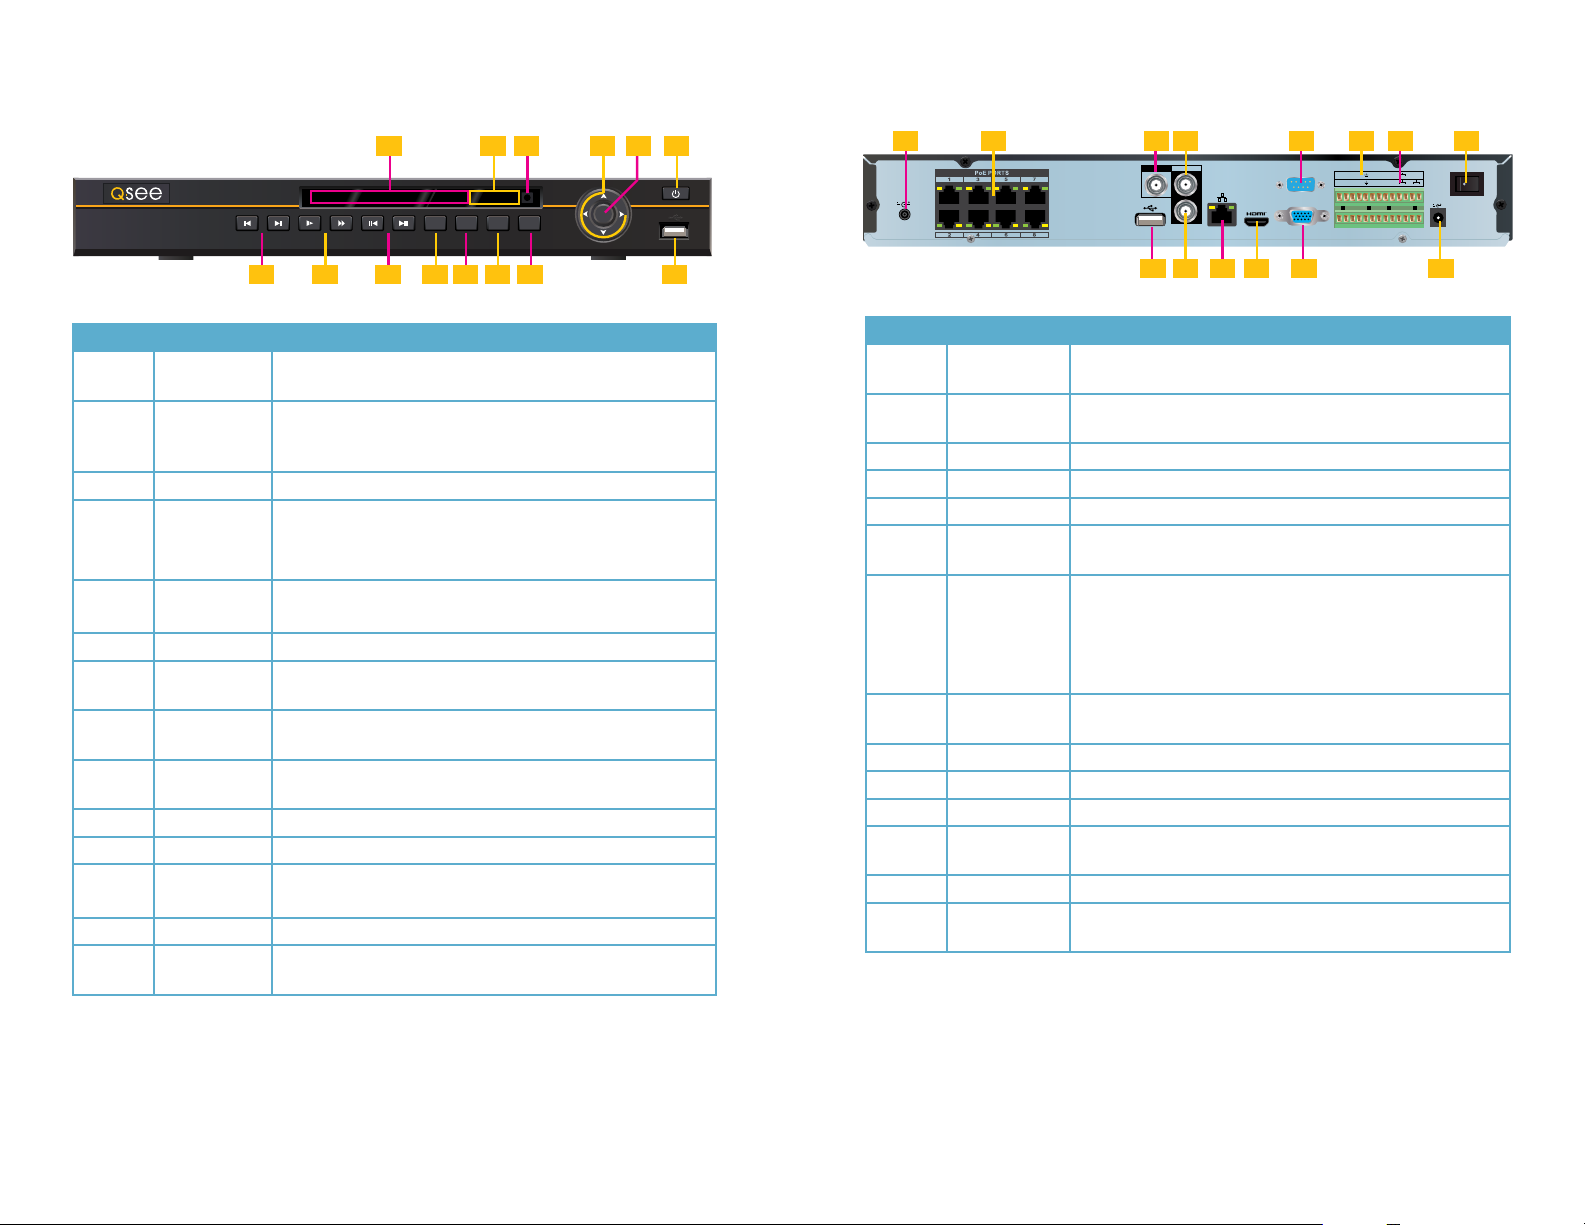
14 15
QC828
Front Panel
QC828 NVR 8 Channels
1 2
3 4 65
POWERHDD1 2 3 4 5 6 7 8 9 10 11 12 13 14 15 16 NET
ESCFNRECSHIFT
ENTER
Rear Panel
1 4 85 72 3 6
AUDIO
VIDEO OUT
DC 48V
OUT
IN
RS232
VGA
DC 12V
7 8 9 10 11 1312 14
Number Item Function
Channel
1
Status Lights
2 Status Lights
3 IR Sensor Infrared Receiver for Remote Control
Directional
4
Buttons
5 Enter Button
6 Power Button Puts NVR into Standby mode or wakes it up.
Directional
7
Play Buttons
Playback
8
Speed
Frame
9
Playback
10 Shift Button For use in Virtual Keyboard
11 Record Button Begins manual recording on all channels
Function
12
Button
13 Escape Button Exit any menu or current operation
14 USB Port
These lights will illuminate to indicate that a particular channel
is recording.
Net and HDD will illuminate if there are problems with the
network connection or hard drive, respectively. The power
light will illuminate when the NVR is powered up.
Navigate through menus.
Change selections in pull down menus (Up/Down buttons)
Toggle settings (Up/Down buttons)
Viewing Mode: Go To Menu
In Menu: Acts as mouse click
Play back video forwards or backwards. Pressing the same
button a second time will pause the video.
Slow or speed up playback - 1/4 speed to 4x speed.
Move forward or backwards frame-by-frame through video.
Works when video is paused.
Single Channel Viewing Mode: Opens Color Adjustment
Virtual Keyboard: Backspace function
For use with flash drive when backing up or updating
firmware. Not for use with mouse.
10
9
11 12
Number Item Function
POE Power
1
Input
2 POE Block
48V power input for the Power Over Ethernet (POE) block.
Powers directly-connected cameras and receives video
images.
3 Audio Out BNC Connector for audio output
4 Video Out BNC Connector to television
5 RS232 Reserved for use by manufacturer.
6 Alarm Input
Connect up to 8 external alarm sensors to this block. The top
row of numbers is for the upper block.
Connect up to 3 external alarms using the Normally Open
(NO) or Closed (C) port
Connect the data cables for a PTZ camera into the ports
labeled A and B to control it. “A” is positive (+) and “B” is
7
PTZ and Alarm
Out
negative (-).
8 Power Switch
Turns NVR on or off. Use Shutdown menu function or front
panel power button before switching off.
9 Network Ethernet cable connection to network
10 Audio In BNC input for audio feed from microphone
11 USB Connect the USB mouse to this port
12 VGA Video Out To connect to a VGA monitor (19” or larger)
13
14
HDMI Video
Out
NVR Power
Input
To connect to an HD display
Connect 12V DC power supply here
13
14
If the user is logged out, pressing the Enter button will open the Login window. Pressing the
Function button will open the Virtual Keyboard which can be navigated using the directional
buttons. Click Enter to enter a keystroke. Press the Escape button to close the Virtual Key-
Your NVR comes with two power supplies. The 48V is exclusively for use in powering the POE
block while the 12V 5A supply is for the NVR itself. The plugs and receptacles are different to
aid in connecting the proper power supply. Do not force or alter these connectors.
board and then press the Enter button to submit your password.
16 17

QC8116
Front Panel
Rear Panel
1 2 6
HD
HD NVR 16 Channels QC8116
Number Item Function
1
Channel
Status Lights
These lights will illuminate to indicate that a particular channel
is recording.
Net and HDD will illuminate if there are problems with the
2 Status Lights
network connection or hard drive, respectively. The power
light will illuminate when the NVR is powered up.
3 IR Sensor Infrared Receiver for Remote Control
Directional
4
Buttons
5 Enter Button
Navigate through menus.
Change selections in pull down menus (Up/Down buttons)
Toggle settings (Up/Down buttons)
Viewing Mode: Go To Menu
In Menu: Acts as mouse click
6 Power Button Puts NVR into Standby mode or wakes it up.
Video
7
Playback
Play back video forwards or backwards. Pressing the same
button a second time will pause the video.
Buttons
Playback
8
Speed
Frame
9
Playback
Slow or speed up playback - 1/4 speed to 4x speed.
Move forward or backwards frame-by-frame through video.
Works when video is paused.
Rec - Begins manual recording on all channels
Esc - Exit any menu or current operation
Shift - For use in Virtual Keyboard
Fn - Single Channel Viewing Mode: Opens Color Adjustment
10
Funtion
Buttons
Virtual Keyboard: Backspace function
11 USB Port
For use with flash drive when backing up or updating
firmware. Not for use with mouse.
192103114125136147158 ACT POWER
/9/7/
/0/8/
7 8 10 11
16
STATUS
ESCREC
5
6
FNSHIFT
9
3 4 5
1
2
ENTER
3
4
1 2 6
3 4 8 95 7
RS232
10 12 1411 13 1615
Number Item Function
1 Power Switch
Turns NVR on or off. Use Shutdown menu function or front
panel power button before switching off.
2 Fan Cooling fan exhaust port. This should not be blocked
3 POE Block
Powers up to 16 directly-connected cameras and receives
video images.
4 Audio In BNC input for audio feed from microphone
5 VGA Video Out To connect to a VGA monitor (19” or larger)
6 Video Out BNC Connector to television
7 USB (x2) Use for USB mouse and external USB hard drive.
8 RS232 Reserved for use by manufacturer.
9 RS485 For controlling peripherals using the RS485 standard
10 Power input Attachment point for power cord
11 Network Ethernet cable connection to network
12 Audio Out BNC Connector for audio output
13
HDMI Video
Out
To connect to an HD display
14 eS ATA Connection for external eSATA hard drive for backup
15 Alarm Input Connect up to 16 external alarm sensors to this block.
16 Alarm Out
Connect up to 4 external alarms using the Normally Open
(NO) or Closed (C) port
If the user is logged out, pressing the Enter button will open the Login window. Pressing the
Function button will open the Virtual Keyboard which can be navigated using the directional
buttons. Click Enter to enter a keystroke. Press the Escape button to close the Virtual Key-
board and then press the Enter button to submit your password.
18 19

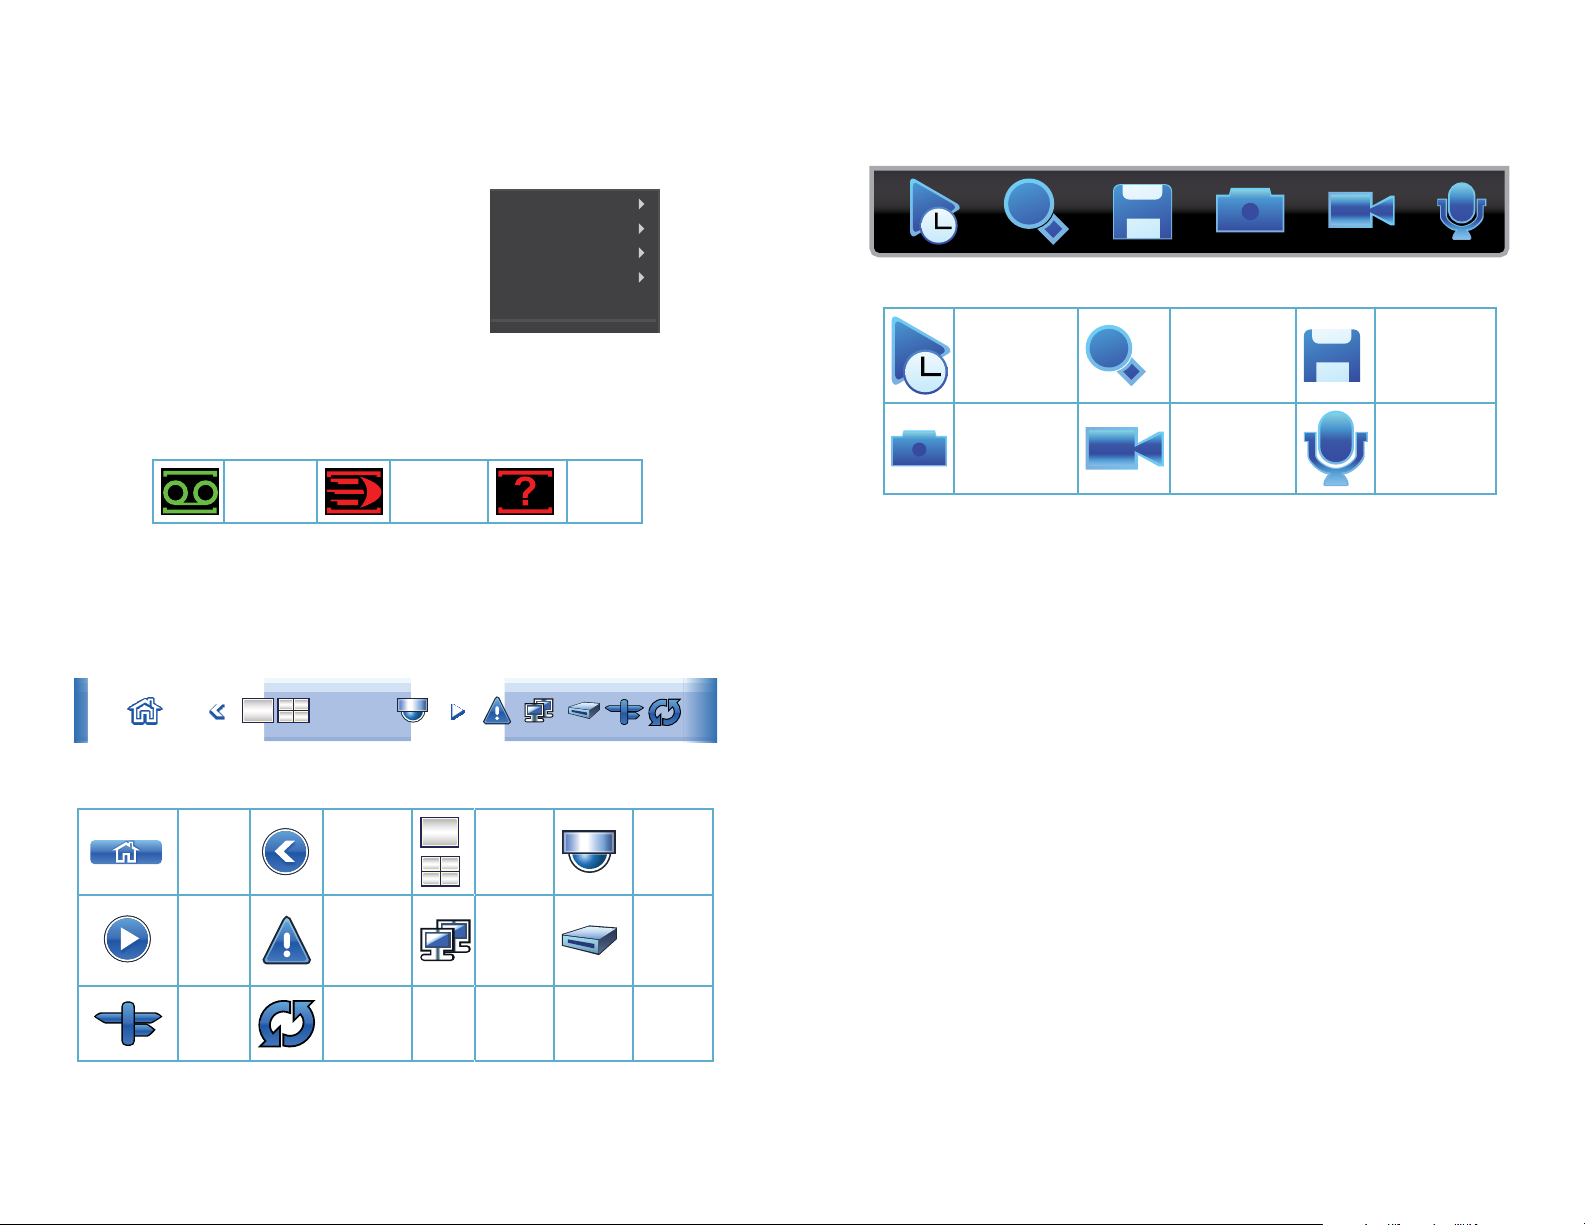
2.2 MOUSE CONTROL
SYSTEM LOGIN
User Name
Password
admin
Your NVR is mainly controlled through the USB mouse. Some models can also be controlled
through a remote control or by using the buttons on the front panel of the device. We have
found that the majority of our customers prefer to operate their NVRs using the USB mouse
because of its ease of use and flexibility and our manual is set up with this in mind. The remote
control, if included, allows you to perform most of the day-to-day functions from a convenient
distance. It functions as a typical remote control with additional buttons allowing you to
navigate through menus and control functions. Please note that NVRs without an IR Sensor
on the front panel (see your model’s illustration in the previous Connection section) cannot
be controlled via remote control and none will be provided. Also, the sensor must not be
blocked or obstructed in order for the remote to function. We recommend that you configure
your NVR using the mouse controls, reserving the remote control for operations such as live
viewing, file search and playback.
The mouse operates in a manner similar to how it is used on a conventional computer; pointand-click, right-click, double click and so on. How these functions are used is based on the
context of where they are used. Some examples are:
LEFT CLICK: Selecting an item
Opening a menu
Checking a box or motion detection status
Selecting letters, numbers or symbols on the virtual keyboard.
VIRTUAL KEYBOARD
Whenever a menu field requires text - such as a password, new user name, or other setting
- clicking on that field will bring up the virtual keyboard. It operates as regular keyboard using
the point and click function of the mouse to select individual characters. Clicking the shift key
allows access to the upper-case characters.
Spaces are entered using the symbol and characters are deleted with the key.
Clicking Enter or clicking outside of the keyboard will close it.
! ? @ # $ % ^ + * - _
q w e r t y u i o p |
a s d f g h j k l ; Enter
z x c v b n m , .
PICTURE 2-2
Shift
1 2 3
54 6
87 9
0
DOUBLE CLICK: Selecting an event for
playback
Selecting a screen to
zoom into from multiscreen mode
View 1
View 4
View 8
View 9
View 16
Pan/Tilt/Zoom
RIGHT CLICK Exits any window. Exits
any menu or reopens
previous menu.
Opens Pop-Up
Shortcut Menu. The
options available especially multi-channel
viewing options - will
vary by model
MOUSE WHEEL Page up or page down
Switch items in check box
Increase or decrease numerical value in numerical input box
CLICK-AND-DRAG Select motion detection zone
Select privacy mask zone
Auto Focus
Color Setting
Search
Record Status
Tour Setup
Remote Device
Alarm Output
Main Menu
PICTURE 2-1
20 21

2.3 REMOTE CONTROL
The buttons on the Remote Control operate in the same manner as on a conventional video player
remote. Some buttons have multiple functions depending on which menu is being accessed.
If your DVR cannot use a remote control, none will be provided.
Num. Name Function
1 Power Button Turn on or shut down the NVR before turning it off with the
power switch.
2 Address An additional security feature. You can require the NVR to
ask you to enter the Device Number (found in the General
Settings menu) before being able to access the log-in
screen.
3 Fast Forward Multiple fast forward speeds in Playback mode.
Zoom in when in PTZ mode.
4 Next Record Goes to next video in Playback mode.
Adjust focus when in PTZ mode.
5 Slow Play Multiple slow playback speeds and resumes normal
playback.
Zoom out when in PTZ mode.
6 Play/Pause Will open Playback/Search mode.
Begins playback of selected video or pauses current video.
Adjust Iris (light level) in PTZ mode.
7 Previous Record Goes to previous video in Playback mode.
Adjust focus when in PTZ mode.
8 Reverse/Pause “Rewind” current video or resume normal playback.
Adjust Iris (light level) in PTZ mode.
9 Escape Cancel current function or exit current menu.
10 Enter Select default button. Go to main menu.
11 Multi-view mode Cycle through available multi-screen display modes.
12 Record Opens recording interface. Use directional keys to select
recording mode and channel.
13 Directional Keys Navigate through menus.
Cycle through channels in single- or 8-screen viewing
mode.
Control Playback progress bar in Playback mode
Control PTZ camera and switch menus in PTZ mode.
14 Function Opens volume control.
Switches PTZ control menu
Use with Directional keys to set up Motion Detection
15 0-9 Keys Use in similar manner to phone keypad to enter password,
etc.
Push number to select desired channel for viewing.
1 2
3
4
5
6
7
8
9 12
10
13
11
14
15
PICTURE 2-3
NOTE! The QC814 and QC824 cannot be operated using a remote control
and your package will not include one.
22 23

2.4 IP CAMERAS
NVR
POE
Block
POE
Block
Network
Network
Port
POE
Router
NVR
POE
Block
POE
Block
POE
Router/
Modem
POE
Router/
Modem
NetworkNetwork
Port
Internet
Internet
NVR
POE
Block
POE
Block
POE
Router/
Modem
POE
Router/
Modem
NetworkNetwork
Port
Internet
Internet
Internet Protocol (IP) or Network cameras differ from conventional video cameras in that each
is a stand-alone device with a built-in processor of its own. This allows it communicate directly
with the NVR by using standard internet protocols whether it is connected directly to the
NVR or over a network or even the Internet. It is for this reason that the NVR treats them as
peripheral or remote devices with the NVR serving as the interface and recording system.
Your NVR features an industry-exclusive built-in Power Over Ethernet (POE) block that allows
you to connect up to four IP cameras directly to it up to 200 feet away using RJ-45 (Ethernet)
cables without the need to purchase a separate power block or to locate the cameras near
power outlets. The Ethernet cable will both power the camera and deliver the video signal to
your system.
The NVR will assign cameras to channels in the order they were connected. Therefore, if
you have a particular sequence that you want for your cameras, it is recommended that you
connect them one at a time.
Cameras connecting to your system over a network (local or Internet) will also ultimately
connect through your network’s router and their signal will be received by the NVR through its
Network port. These cameras will need to be powered on their side of the network.
Whenever possible, it is best to use a continuous length of cable rather than multiple short
segments as each intervening connection could result in a small loss of power and signal.
As of this writing, this NVR supports IP cameras made by: Dahua, Arecont Vision, Axis,
Canon, Dynacolor, Panasonic, Samsung, Sanyo, Sony and Onvif.
LOCALLY CONNECTED CAMERAS
For the purposes of these instructions, “locally connected cameras” are those that are
plugged directly into the NVR’s POE ports.
Using the Power Over Ethernet Block
Your NVR’s POE block will power up to four
cameras while receiving their video signals.
This is the primary and preferred method to
connect cameras to your NVR. This feature
cannot be expanded through use of a
network switch. These ports are also not to
be used to connect the NVR to a network
router. When an IP camera is connected to
the NVR through the POE port, it will receive
power immediately, but there may be a
delay of up to a minute before the camera’s
signal appears on the screen as the system
establishes connectivity.
NVR
POE
POE
Block
Block
PICTURE 2-4
If you are unsure, and if your camera has infrared LEDs, you may cup your hand over the lens
area to activate the infrared night vision mode. You will see a faint red glow from the LEDs
confirming that the camera has power.
CAMERAS CONNECTED THROUGHA NETWORK
There are two types of networks – local (LAN or Intranet) and Internet (or WAN). Cameras can
be accessed by the NVR over both types.
Local Networks
For cameras positioned too far away to reasonably run a network cable directly to the NVR,
you can connect it to the same network as the NVR and the system will be able to access
and use them.
Ultimately, each camera will have to connect
to the same router that the NVR is connected
to. They will need to be connected to a
power source on their side of the network preferably a POE - as the POE block on the
NVR itself is unable to provide power through
the network.
Alternately, if your NVR was bundled with
cameras, they may include a power input
as additional power option. You will need to
acquire a power adapter that matches the
ratings listed on the camera itself if you are
not connecting them to a POE.
The NVR will connect to these cameras
through the same cable that it uses to
communicate with the network.
Connections Over the Internet
A third connection option is via the Internet.
This method is more complicated, but it
allows the user to view cameras that are
located in a completely different building –
or region – from the NVR itself. In essence,
your NVR will be remotely monitoring those
cameras. As such, the user will need to
forward ports using the IP Tool software
included on the Manuals and Software
CD to obtain the IP address for any camera
that will be accessed over the Internet. Full
instructions are included in the manual for
that software.
NVR
NVR
Network
Network
Port
POE
POE
Block
Block
PICTURE 2-5
Router/
NetworkNetwork
Modem
Port
POE
POE
Block
Block
PICTURE 2-6
Router
Internet
Internet
Router/
Modem
POE
POE
POE
24 25
ADDING AND REMOVING CAMERAS IN YOUR DISPLAY
As stated earlier, your NVR will automatically show video from cameras connected to it directly
through the POE Block as they are connected - assigning them to channels sequentially
regardless of which port is used to connect them. Cameras sharing the network with the NVR
will not automatically connect. There are two ways to connect them - through the use of the
Add Camera icon in the Live View window and the Remote Device window located in the
Main Menu. The latter method will be covered in detail in Section 4.4.
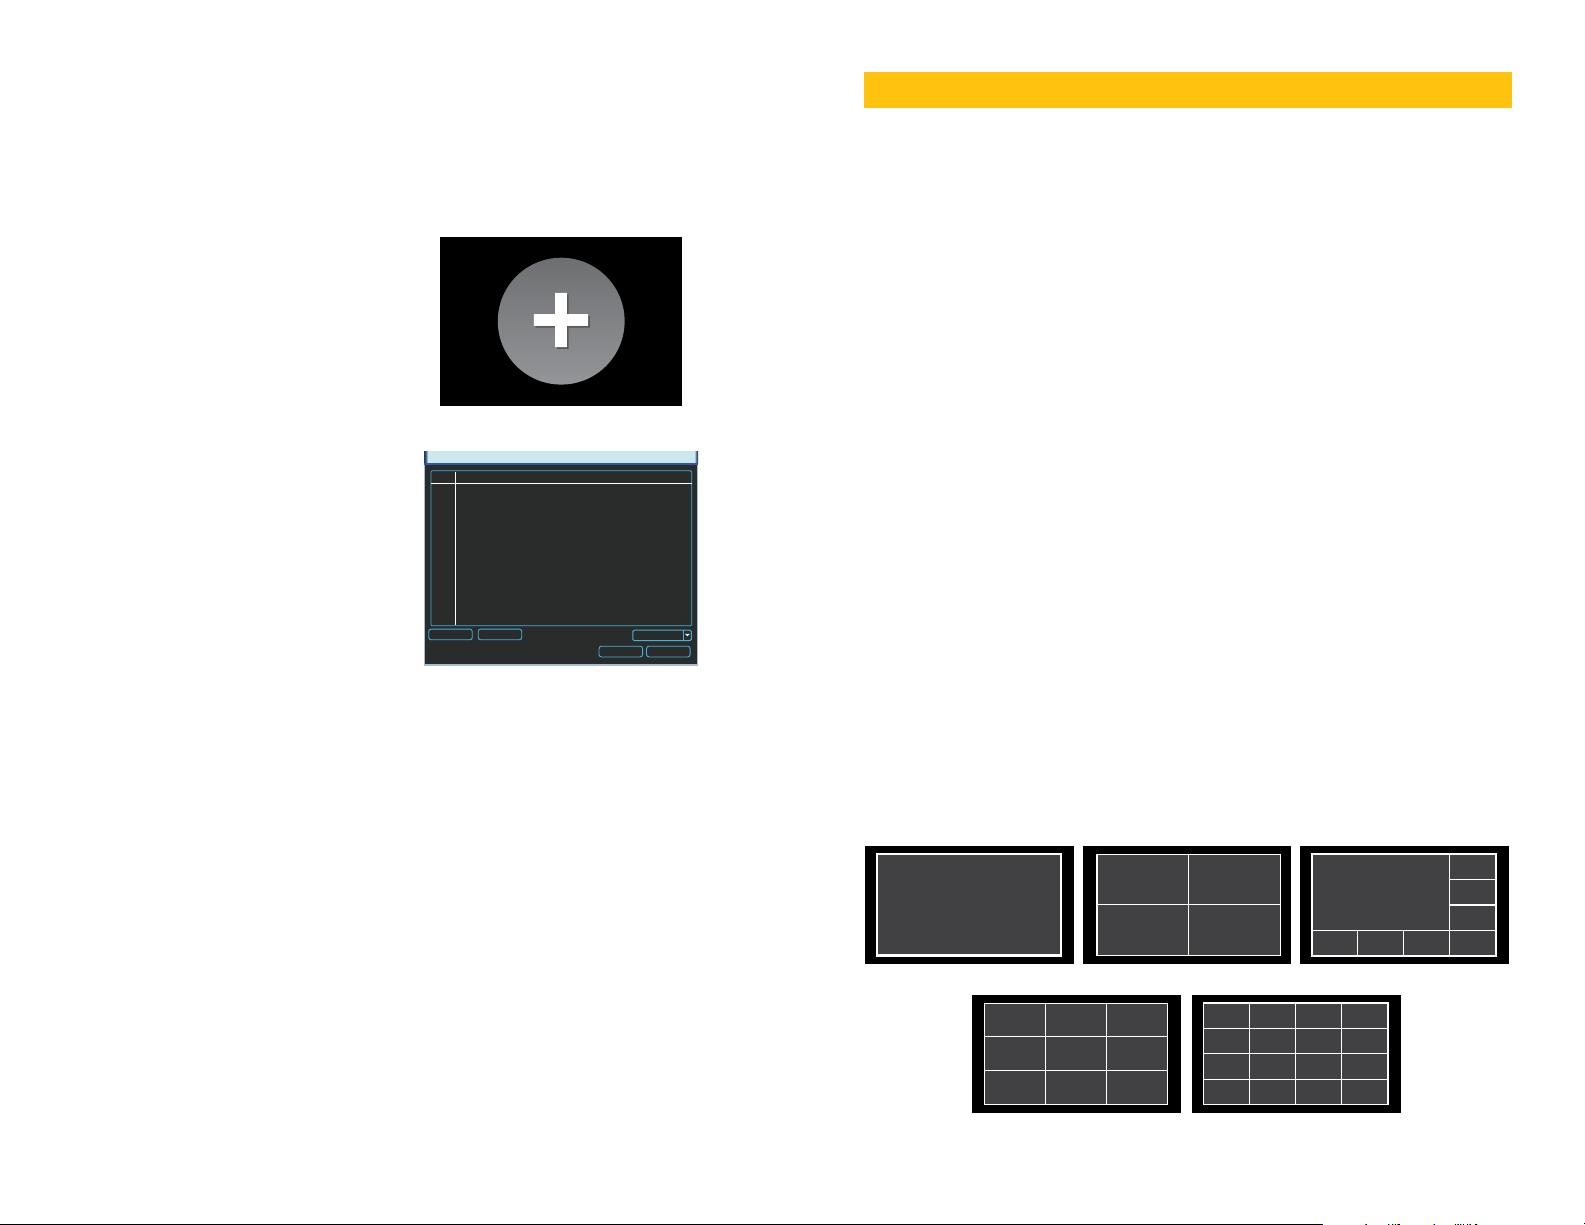
Add Camera
Moving the cursor to the center of any empty
BASIC OPERATION
This chapter is intended to get your system operational in a baseline format now that you’ve
connected your system and turned it on after following the instructions on the Quick Start
Poster that came with your system. This chapter combines information and instructions on
several submenus and settings but may not mention all of the functions or options available
in a given menu. For many users, these basic operating instructions may be all they need to
operate their security system. But, because this system offers many more features, the next
chapters will cover additional and more advanced operations in greater detail.
CHAPTER 3
channel will reveal the Add Camera icon
shown in Picture 2-7. Clicking on this will
open a window listing available cameras.
As stated on page 3 of this manual, certain screen shots may not exactly match the images
that appear on your screen. You may see a reference to a feature, menu or setting that is
not available on your system. This is due to our continued upgrading of the NVR’s firmware,
along with not all models sharing the same features. We welcome requests as well as user
feedback as part of our ongoing effort to improve our products. These may be made through
our Knowledge Base - which is where you will also find questions to the vast majority of your
questions - at www.Q-See.com/Support.
3.1 OPERATION
This NVR can be controlled through the USB mouse, the remote control or by using the
buttons on the front of the device. For the purposes of this manual, instructions will be given
for using the mouse.
Clicking on IP Search will refresh this list.
Simply click on the desired camera from the
list and it will become the camera for that
channel. Please note that it is possible to load
PICTURE 2-7
2 IP Address Port Device ID Manufacturer Type
1 10.1.1.65 1 YZC2OC061966 Private IPC-HFW210
2 10.1.1.67 2 YZCAU192012 Private IPC-HFW321
REMOTE DEVICE
a camera which is already in use by another
channel. In which case, you will have two
identical channels.
IP Search Manual Add
None
Filter
Add Cancel
In operation, the mouse functions in the same manner as one would use a mouse attached
to a computer; point, click, right-click, and etcetera. In fields where data needs to be entered,
clicking on the field will bring up a virtual keyboard. (See Section 2.3 Mouse Control)
PICTURE 2-8
A NOTE ABOUT RESOLUTION AND RECORDING
IP cameras are available from Q-See in the two common high definition standards - 720P
and 1080P. These resolutions differ in the number of pixels (individual dots that make up the
image) available. The more pixels in an image, the larger, more clearer it will be. Cameras with
720P resolution will produce video 1280 pixels wide by 720 pixels high while that from 1080P
cameras will measure 1920 pixels by 1080 pixels.
3.2 LIVE VIEW
Live View is the default mode for the NVR. It will display the video feeds from up to four, eight
or 16 cameras depending on model. You do not need to be logged into the NVR to view
or change the channel(s) on the screen. The actual number of channels displayed depends
on the number of cameras you own. You can view a single channel in full-screen mode or
multiple channels simultaneously in a variety of layouts.
Of course, the larger the video image, the larger the video file size and the more processing
power that is required to handle the video. For this reason, you may decide to have a 1080P
camera record at a lower resolution to save drive space using the Camera Settings menu
(see Section 3.4).
While all Q-See NVRs are designed to work with both 720P and 1080P cameras, certain
considerations may affect the recording rate which is expressed in terms of Frames Per
Single Screen 4 Screens 8 Screens
Second (FPS). The human eye sees 30FPS as “real time” with lower frame rates being
increasingly more “jerky”. Cameras connected directly through the POE will have smoother
video than those connecting over the Internet simply due to network transfer rates.
Additionally, certain models such as the QC814 and QC818 are optimized for 720P cameras.
While they can process the larger video from 1080P cameras, they will do so at the lower
frame rate of 15FPS. Individual users may also decide to lower the recording frame rate of
a camera to save disk space, or to improve the frame rate from another camera, such as a
remote camera.
9 Screens 16 Screens
PICTURE 3-1
26 27
Clicking on any one screen in multi-view mode will bring that screen to full-screen single-view
mode. The exception is in eight-view where clicking on one of the smaller displays will move it
to the larger display. You can also drag channels to a different position on the screen with the
displaced channel relocating to the position of the one that was moved.
In addition to selecting the viewing mode
from the Shortcut Menu using the mouse,
you can also cycle through the modes using
the up and down arrows on the remote or
the front of the NVR. The left and right arrows
on both the remote and NVR front panel will
cycle through which channels are displayed.
In Live View, along with the channel(s), you will see the system date and time displayed along
with the name and icons indicating the status of each channel. Setting the system date and
time and changing the channel names is covered in Section 4.3 under the Settings menu.
Recording
Motion
detected
View 1
View 4
View 8
View 9
View 16
PICTURE 3-2
Video
loss
NAVIGATION BAR
Left-clicking on the screen in Live View mode will open the Navigation Bar allowing you
shortcut access to select menus and functions. It also serves as an easy-to-view status bar
showing the current situation with alerts, network, and drives.
PICTURE 3-3
Opens
Main
Menu
Opens
Search
Menu
Startup
Wizard
Minimize/
Maximize
Bar
Alarm
Status
Opens
Tour
Setup
Window
Screen
Display
Mode
Network
Status/
Opens
Network
Window
PTZ
Controls
Manage
Hard
Drive
SHORTCUT VIDEO CONTROLS
When the mouse cursor is in the top-center portion of a channel with a live video stream, a
set of shortcut controls will appear. These allow you to perform quick playback and backup
functions, digitally zoom in and add another camera.
PICTURE 3-4
Realtime
Playback
Snapshot
(not available
on all models)
Clicking the Realtime Playback icon will cause the window to play back the most recent
video clip recorded by that camera. The duration of this clip is set in the General Settings
menu.
Click the Digital Zoom icon and then select an area of interest within that channel’s video
feed to enlarge the area. Right-click with the mouse to exit the zoom.
Quick Backup allows you to save the current live video to a USB drive inserted into the front
USB port. If no drive is present, you will receive an error message.
Snapshot allows you to take still images which will be saved onto the hard drive. You can
search for these using the same Search and Playback window used to search for video.
See Section 3.5 for full instructions.
Use Add Remote Device to replace the current camera with another camera - or QC DVR -
from your list of connected cameras shown in the Remote Device menu. You cannot add a
camera that is already being displayed using this tool.
If you have a speaker and microphone located near your camera and you have a microphone
located at your DVR, clicking on the Two-Way Talk icon will allow you to talk anyone within
the same area as the camera. The icon will be green while this feature is active. Unclick it to
hear any responses. You can set the number of pictures taken with each click in the General
Settings menu (see Section 4.3).
You can close the controls either by either right-clicking or by moving the mouse out of the
area.
Digital Zoom Quick Backup
Add Remote
Device
Two-Way
Talk
The icons on the navigation bar will also alert you to issues with the status of your drive,
network connection and alarms with red icons when a situation arises.
28 29

3.3 LOGIN, LOGOUT AND MAIN MENU
LOGIN
When the NVR starts up, the default video display is multiple window mode. Right-clicking the
mouse or pressing the Enter button on the front of the NVR will bring up the Shortcut Menu
(covered on the next page) allowing you to select an action, however before you can access
certain functions, the System Login screen will open to allow you to log in.
SYSTEM LOGIN
User Name
Password
! ? @ # $ % ^ + * - _
q w e r t y u i o p |
a s d f g h j k l ; Enter
z x c v b n m , .
Using the mouse or remote control, select your user name and enter your password.
Whenever the cursor is over a text field, a keyboard icon will appear to the right. Clicking
within the field itself will open the virtual keyboard as explained in Section 2.2. Clicking on
the keyboard icon allows you to cycle between numbers, letters (upper and lower case) and
symbols when appropriate.
Until new accounts are added, there are two pre-configured accounts available to users who
log into the NVR:
• Administrator (local and network) User name: admin Password admin
• User name user Password user
You must have access rights – whether as the system administrator or logged-in user –
in order to change settings. See Account in Section 4.5 for information regarding user
accounts.
IMPORTANT! It is highly recommended that you change your system
password after you complete the setup of your system to ensure the security
of your system. Record your changes and keep that information stored
securely as the system will prevent access if the incorrect login information
is attempted three times within a 30-minute period. If you find yourself locked
out of the NVR because of this, wait 30 minutes, reboot the NVR and attempt
to log into it again.
admin
PICTURE 3-5
Shift
1 2 3
54 6
87 9
0
Once you have logged in, the NVR will display one or more camera channels in Live View.
How many channels are displayed will depend on how many cameras you have connected as
well as what multi-view mode you have chosen.
After a period of inactivity – configurable in the General Setting submenu described in
Section 4.3 – the NVR will log users out. This will require the current user to re-enter their
password.
SHORTCUT MENU
In Live View mode, right-clicking anywhere
on the screen will bring up the Shortcut
Menu.
This menu allows you to quickly change your
viewing mode as well as moving directly to
a selection of menus, including the Main
Menu.
View 1
View 4
View 8
View 9
View 16
Pan/Tilt/Zoom
Auto Focus
Color Setting
View - This allows you to view a group of
cameras on screen at the same time. The
number of cameras available will depend on
how many cameras your NVR will support.
The shortcut menu on a 4-channel NVR
will not offer the 8, 9 or 16 camera options,
for example. The arrows to the right of the
options will allow you to select specific
cameras.
Pan/Tilt/Zoom - This will take you directly to the PTZ Control window (See Section 5.1).
The controls will only work with PTZ cameras.
Auto Focus - This option will only work with cameras equipped with auto focus. This feature
is not available on all models.
Color Settings - You can adjust the camera’s brightness, color balance, contrast and other
aspects to best suit its operating environment. These changes can be made using the sliders
or by selecting a pre-generated color mode.
Search - This opens the Search and Playback window (See Section 3.5).
Record Status - This opens the Recording Status window which shows how each camera
is programmed to record. It allows the user to quickly change the current status of each
camera. (See Section 3.4).
Tour Setup - This is a shortcut to the Tour Setup window located in the Display window.
This window is used to create a “tour” of channels that your NVR will cycle through. See
Display in Section 4.3 for more information.
Remote Device - This opens the Remote Device window which allows you to access IP
cameras which are located on a different network from your NVR. (See Section 4.4).
Alarm Output - This will take you to the Alarm Output menu - which is also available
through the Advanced Menu. This menu allows you to change how the alarms operate as well
as check on their status. See Chapter 6 for full details.
Main Menu - This opens the Main Menu - see below.
Search
Record Status
Tour Setup
Remote Device
Alarm Output
Main Menu
PICTURE 3-6
30 31

MAIN MENU
After logging in, you can view – and access - the NVR’s functions through the Main Menu.
MAIN MENU
There are eight submenus available; Search,
Record Settings, Setting, Remote Device,
Advanced, Backup, Info, and Shutdown.
SEARCH
RECORD SETTINGS
SETTING
Clicking on an icon will take you to that
function or the submenu it represents.
ADVANCED BACKUPREMOTE DEVICE
INFO
SHUTDOWN
PICTURE 3-7
SHUTDOWN
Selecting the Shutdown icon in the Main Menu will open the Shut Down window.
This window allows you to choose to log out
as a user, shut down the system, restart the
system or switch users.
In addition, the NVR can also be shut down
by pressing on the front panel power button
for three seconds. The system will stop
operating and it can then be turned off via the
Power button on the rear of the NVR.
Logout menu user
Password is needed to re-enter the menu
after logout.
SHUTDOWN
OK Cancel
PICTURE 3-8
3.4 RECORDING
Your NVR is factory set to record when motion is detected. Most users prefer this as it means
that it is easier to locate an event using the Search function (see Section 3.5) and it will take
longer before the DVR will need to overwrite older files on the hard drive. You can override
this in the Record menu, as discussed below, or you can schedule the hours when the NVR
captures motion.
MANUAL RECORDING
This window allows you to override the scheduled recording times of selected cameras. You
can access the Record Status menu via the Shortcut menu or by pushing the Record
button on the remote.
There are three status modes: Schedule, Manual and Stop. The status of each channel is
shown by the filled circle under its number. Each camera can only have one status at a time.
Changes take effect once the OK button is selected.
Manual – The selected cameras will begin recording
Schedule – Cameras record based on your settings made in the Schedule Menu or Detect
Menus (see following pages)
Stop – All selected cameras stop recording
These same settings can be applied
separately to the Extra Stream. This is the
video data that is sent by the NVR through
the Internet to enable remote monitoring.
This stream has a lower bandwidth than the
main stream which is recorded to the DVR.
Having a lower bandwidth makes it easier for
mobile devices to display the video feeds in
real-time.
Record Mode All 1 2 3 4
Schedule
Manual
Stop
Extra Stream
Schedule
Manual
Stop
RECORD STATUS
OK Cancel
PICTURE 3-10
You can assign the same values to all cameras by selecting the desired status in the “All”
PICTURE 3-9
column.
AUTO RESUME
In the event of a power failure, the NVR will automatically save any video files it is currently
recording and will then resume scheduled operations once power is restored.
32 33

CAMERA SETTINGS
This window allows you to manage the quality of the recording from each channel as well as
the transmission rate and whether there’s an accompanying audio feed.
As with other windows described earlier, each
channel can be set individually or all at the
same time. Settings can be copied from one
channel and pasted to another. Your settings
will only be saved if you exit the window by
clicking OK. Right-clicking or hitting Cancel
will leave the system with your previous
settings.
There are settings both for the Main Stream
Channel
Type
Compression
Resolution
Frame Rate (FPS)
Bit Rate Type
Bit Rate (Kb/S)
Reference Bit Rate 4096-8192Kb/S 192-1024Kb/S
Audio/Video
- the video files that record directly onto the
NVR’s hard drive, and the Extra Stream which
is the signal accessed by mobile and remote
Copy OK Cancel
devices. These streams run in parallel with
the main stream sent to the hard drive and
they do not affect each other.
Type – You are able to change the recording quality based on the type of recording taking
place. For instance, you may have the NVR record at a slower frame rate and/or
resolution during Regular recording to save disk space with the system switching to a
higher resolution and frame rate when the system detects motion or an alarm triggers
an event. Your selections in the pull down are; Regular, MD (Motion Detection) or
Alarm.
Compression – The default setting is H.264, which is an industry-standard format that greatly
reduces the file size of recordings while maintaining the maximum amount of visual
clarity. It cannot be changed.
Resolution – This is generally dependent upon the camera connected to the NVR. When the
NVR connects to a camera it’ll determine the maximum resolution. You can always
set this to a lower value. In the Extra Stream, the resolution will be much less - the
320x240 pixel CIF resolution - to allow the video feeds to be uploaded.
Frame Rate (FPS) – Like Resolution, this is dependent upon the camera. It is variable
between 1 to 30 frames per second. The higher the number, the smoother the
playback.
Bit Rate Type – Variable versus Constant. Variable provides better compression, but issues
may arise when streaming for remote viewing.
Bit Rate (KB/S) –Also based on the camera that is connected to your system, this is the
maximum bit rate the selected channel can utilize. You may use the options provided,
or you may customize the bit rate to best suit your network’s capabilities. Your
network may not have enough bandwidth to handle maximum rates from all of your
cameras. Adjusting these settings to suit your network will improve performance and
on-screen image quality.
CAMERA SETTINGS
Main Stream Extra Stream
1
Regular
H.264 H.264
1.3M
25
Constant
8192
OVERLAY
SNAPSHOT
CIF
7
Constant
256
PICTURE 3-11
NOTE! Generally, the trade-off for higher quality and increased frame rate is
the amount of room a video file will take on the drive along with how much
“bandwidth” the signal takes up within the system. The larger the files, the
sooner the hard drive will fill up. Setting the drive to overwrite older files will
allow you to maximize the capabilities of your system and cameras.
Audio/Video – Set by default to enable your system to send both video and audio feeds
(audio requires a microphone located at or near the camera) to your Extra Stream
for use by mobile and remote devices. Disabling a channel can be done to prevent
remote users from accessing a specific camera, but this is better handled in Account
(see Section 4.5 Advanced Settings).
Overlay – This window allows you to
configure on-screen displays from
the camera as well as providing
the ability to mask off areas from
view. This latter feature is useful
in circumstances such as when a
camera’s field of view includes a
Cover-Area Monitor
Time Display Monitor
Channel Display Monitor
OVERLAY
1
2 3 4
Set
Set
Set
combination lock or other similar
situation. The local user will be able
to view the area but remote viewers
cannot see the area. These privacy
Save Cancel
PICTURE 3-12
blocks affect both the live view and
playback.
Cover Area - Clicking the Monitor button will
reveal four numbered buttons. These
are the four on-screen areas that you
can set to cover.
Click Set to reveal a live view of
the camera’s feed. There will be a
numbered area on the display which
can be moved and re-sized. You
can deactivate any of these areas by
deselecting the numbered button.
PICTURE 3-13
Both time and channel display show content from the IP cameras, rather than the NVR. In
addition to having their own clock, each camera also self-identifies. The default for this is
“Channel 1”. This can be changed using the included PSS software (see the PSS User
Manual included on the Manuals and Software disk) but we have set the NVR to not
display the names by default. Instead, it will show the NVR’s internal channel identification
which will not appear during playback.
34 35

Time Display – This allows you to display the
SCHEDULE
system time on the channel’s screen
during playback or not. In addition,
by clicking the Set button, the time
SCHEDULE
The Schedule menu allows you to determine when your cameras will record and under what
circumstances. While the settings in this menu can be generally overridden by the user in the
Record menu, the settings made in the Schedule menu are more detailed and flexible.
display can be relocated anywhere on
the screen by clicking and dragging.
A “Before” and “After” example is
shown in Picture 3-14.
PICTURE 3-14
Channel Display – Like time display, this toggles the appearance of the channel’s number on
the screen during playback as well as allowing it to be repositioned in a similar fashion.
Snapshot
In addition to taking video of an event, the NVR can be set to record - and transmit - still
images from whichever cameras are enabled in the Schedule window (next pages).
The actual settings for the Snapshot feature are configured in the Snapshot window which can
be opened by clicking on the Snapshot button at the bottom of the Camera Setting window.
Mode - You can chose to have the NVR take
snapshots on a set schedule using
Timing, or when Triggered by an
event such as motion detection or
alarm input.
Mode
Image Size
Image Quality
Snapshot Frequency
SNAPSHOT
Trigger
1.3M
4
1 SPL
Save Cancel
PICTURE 3-15
Image Size - The image size depends upon the capabilities of the camera, but they are listed
in descending order of size in the pull-down. Obviously, the higher the resolution, the
larger the file. You can chose to use a different format for snapshots than the format
that camera is configured to record video.
Image Quality - With a range of 1 to 6, this controls the quality of the snapshot(s). A setting
of “4” provides better images, but at an increased file size. You may have to lower the
Channel – The first setting is which channel
you wish to configure. In addition to
selecting a channel number, you can
globally configure all of your cameras
by selecting the All option.
Pre-Record – This allows you to capture the
moments before an event occurs.
You can set the lead time from 1 to
30 seconds depending on the bit
stream you are recording at.
Redundancy – This will only appear if your
NVR has more than one hard drive
installed. When you enable this
setting, the NVR will create a backup
copy of an event recording on the
second hard drive.
Snapshot –
By selecting this feature, you
enable the NVR to take a still image
“snapshot” when an alarm occurs. This
snapshot is for uploading to an FTP
site. Snapshots for e-mail attachments
are set under the Record Setting and
Alarm menus. (See Sections 3.4 &
4.3 respectively.)
NOTE! It is possible to have the Snapshot feature set to occur both on
schedule and when triggered by an event such as Motion Detection. The
triggered activation will take priority over the scheduled event.
SCHEDULE
Channel
Period
Period 1
Period 2
Period 3
Period 4
Period 5
Period 6
0 3 6 9 12 15 18 21 24
Copy Default OK Cancel
PreRecord sec.
1 4
Holiday Setting
Wed
Record Type Regular MD Alarm MD/Alarm
00 :00 -24 :00
00 :00 -24 :00
00 :00 -24 :00
00 :00 -24 :00
00 :00 -24 :00
00 :00 -24 :00
Regular
Redundancy
MD Alarm MD/Alarm
Snapshot
PICTURE 3-18
SCHEDULE
Channel
Week Day
Period 1
Period 2
Period 3
Period 4
Period 5
Period 6
0 3 6 9 12 15 18 21 24
Copy Default OK Cancel
PreRecord sec.
1 4
Holiday Setting
Wed
00 :00 -24 :00
Su Mo Tu We Th Fr Sa
00 :00 -24 :00
00 :00 -24 :00
00 :00 -24 :00
15 16 17 18 19 20 21
00 :00 -24 :00
00 :00 -24 :00
22 23 24 25 26 27 28
Regular
29 30 31
06-24-2012
Record Type Regular MD Alarm MD/Alarm
Jan 2012 ><
1 2 3 4 5 6 7
8 9 10 11 12 13 14
MD Alarm MD/Alarm
OK Cancel
Snapshot
PICTURE 3-19
quality if the file size exceeds your e-mail in-box’s capacity.
Snapshot Frequency - This will allow you to take 1-7 shots in sequence.
Each camera can be individually configured. These settings are what will be used when you
enable the Snapshot feature in any window that offers that option. Examples are highlighted
in yellow in Pictures 3-16 and 3-17.
Channel
Period
Period 1
Period 2
Period 3
Period 4
Period 5
Period 6
0 3 6 9 12 15 18 21 24
PreRecord sec.
1 4
Holiday Setting
Wed
Record Type Regular MD Alarm MD/Alarm
00 :00 -24 :00
00 :00 -24 :00
00 :00 -24 :00
00 :00 -24 :00
00 :00 -24 :00
00 :00 -24 :00
Regular
MD Alarm MD/Alarm
Snapshot
PICTURE 3-16
Event Type
Enable
Region
Trigger Period
Alarm Out
Show Message Alarm upload Send Email
Record Channel
PTZ Activation
Tour
Snapshot
Buzzer
MOTION EVENTS
Motion Detect 1
Select
1 2 3
1 2 3 4
Select
1 2 3 4
1 2 3
Channel
Sensitivity
Hold Time
Set
Alarm Continue
5
6
7
8
Rec. Continue sec.
5
6
7
8
4
5
6
7
8
PICTURE 3-17
3
0
0
10
sec.
sec.
Holiday Setting – You are able to set up a recording schedule that will be utilized on any day
that you set as a holiday in the calendar accessible through this button. This schedule
can be different from weekday and weekend schedules.
Period – You are able to set a recording schedule that will apply to specific days, to weekdays
or weekends in general, to holidays, or a blanket schedule that applies to every day.
Use the pull-down to select which day(s) you wish to apply a particular schedule.
Record Types – You can schedule which type of recording occurs at what time of the day.
There are six blocks of time that can be scheduled, and the duration of those blocks
can be determined as well. There are four types of recordings that can be made;
Regular (always recording), MD (motion detection) which is the NVR’s default setting,
Alarm and a combination of Motion and Alarm.
A white-filled box underneath a Record type indicates that it has been selected for that block
of time. If no boxes are selected, that camera will not record although you will be able to see
its video feed in Live View.
36 37

NOTE! Motion Detection can also be set up in the Motion Events menu as
described in Motion Video Loss and Camera Masking Detection,
below. If you need the NVR to do more than just record motion events, then
follow those instructions. You do not need to set up motion detection in both
menus.
You may set more than one type of recording to occur at the same time but it should be
noted that when regular recording is selected, the NVR will be already be recording whether a
Motion Detection event occurs or not.
Copy – This allows you to duplicate a
channel’s setting and apply them to
another channel. When you click on
the Copy button the Copy2Paste
popup window will open allowing you
to select which channel(s) you wish to
apply the settings to.
Default – Returns your NVR’s recording
settings to the factory default of
recording all the time.
Channel
1 4
Holiday Setting
Wed
Period
Period 1
00 :00 -24 :00
Period 2
00 :00 -24 :00
Period 3
00 :00 -24 :00
Period 4
00 :00 -24 :00
Period 5
00 :00 -24 :00
Period 6
00 :00 -24 :00
Regular
0 3 6 9 12 15 18 21 24
Copy Default OK Cancel
SCHEDULE
PreRecord sec.
Record Type Regular MD Alarm MD/Alarm
conf.copy2paste
1All
2 3 4
OK Cancel
MD Alarm MD/Alarm
Snapshot
PICTURE 3-20
You must check the OK button to apply your settings. Right-clicking or hitting Cancel will
leave your settings unchanged.
MOTION, VIDEO LOSS AND CAMERA MASKING DETECTION
The DVR can be programmed to alert the user - and take specific actions - when motion is
detected, the NVR loses connection to a camera or someone is physically covering a camera.
The responses to these events are found in the Motion Event menu. Each channel can be
individually configured to respond to each event as you chose, or you can give all cameras
identical settings.
The upper portion of this window is for setting the type of event, whether it is activated, and
specific parameters relating to event detection. The bottom portion of this window allows you
to choose how the system will respond to these events.
Motion Detection
With the Event Type drop-down set to
Motion Detect, you can configure your NVR
to record when someone or something
moves through a camera’s field of view.
Please note that this is an alternate way to
schedule motion detection to the method laid
out in the previous pages.
Event Type
Enable
Region
Trigger Period
Alarm Out
Show Message Alarm upload Send Email
Record Channel
PTZ Activation
Tour
Snapshot
Buzzer
This menu offers further refinements including what actions the NVR will take when motion
is detected. Such actions include having other cameras begin recording, how long they’ll
continue to record and even whether cameras will take still image snapshots and e-mail them
to selected addresses. You do not need to set up Motion Detection in both sections but the
MOTION EVENTS
Motion Detect 1
1 2 3
1 2 3 4
1 2 3 4
1 2 3
Copy Save Cancel
Channel
Sensitivity
Select
Hold Time
Set
Alarm Continue
5
6
7
Select
8
Rec. Continue sec.
5
6
7
8
4
5
6
7
8
3
0
0
10
PICTURE 3-21
sec.
sec.
NVR will use the schedules from both menus to determine when to record Motion events.
ALARM
The use of alarms with your DVR is covered in Chapter 6 Alarms.
Channel – You can select an individual channel to configure or select All to give all of
your cameras the same settings. You must have set that channel to record motion
detection in the Schedule menu as described in the previous section.
Region – Clicking the Region button will bring up a grid overlaying that camera’s view.
By default, each “block” of the grid will have a
red hue indicating that it is sensitive to motion
detection. Clicking in a block will make it clear
meaning that motion detection has been
turned off for that area. Turning off motion
detection in selected areas is useful for
situations when there is frequent movement
by inanimate objects such as flags or windblown trees and this will reduce false alerts.
You can click and drag the mouse to turn
off multiple blocks at the same time and you
can deactivate motion detection in multiple,
separate, areas of the screen.
PICTURE 3-22
To reactivate motion detection, simply repeat the process in the deactivated blocks and they
will regain their red hue and detect motion as normal.
You cannot use Copy/Paste in Motion Detection because each channel will have a different
display. Right-clicking will exit the screen and your settings will be saved.
Sensitivity – The system supports six levels of sensitivity with Level 6 being the most sensitive.
38 39

Set
Video Loss
By default, this is enabled. In the event that the NVR detects a loss of signal from a camera,
it will send out a notification or activate other functions based on your settings in the lower
portion of the Event window.
Camera Masking
This is also enabled by default. If the system detects that something has covered a camera, it
will respond based on your settings in the lower portion of the window.
Event Response
The lower portion of the Event window determines what actions the NVR will initiate upon
detection of one of the three event types. Responses to a specific type of event can be
individually tailored to each camera, but the response to different types of events must be set
independently of each other. (ie: The response settings for a motion detection event do not
change the settings for a video loss event – even if you’ve set identical responses.)
MOTION EVENTS
Motion Detect 1
Select
1 2 3
1 2 3 4
Select
1 2 3 4
1 2 3
Copy Save Cancel
Channel
Sensitivity
Hold Time
Set
Alarm Continue
5
6
7
8
Rec. Continue sec.
5
6
7
8
4
5
6
7
8
3
0
0
10
PICTURE 3-23
sec.
sec.
Trigger Period - This is where you set the
schedule of when you want the NVR
to record motion events. It operates
in the same manner as the Schedule
menu as described in Section
3.4 with six blocks of time that can
be laid out for recording to occur
during a day. Not all blocks have to
be configured or enabled. You can
configure each day individually, or
Event Type
Enable
Region
Trigger Period
Alarm Out
Show Message Alarm upload Send Email
Record Channel
PTZ Activation
Tour
Snapshot
Buzzer
you can make separate schedules for
week days and weekends.
Mon
00 :00 -24 :00
00 :00 -24 :00
00 :00 -24 :00
0 3 6 9 12 15 18 21 24
Sun
Mon
Tue
Wed
Thu
Fri
Sat
Set
00 :00 -24 :00
00 :00 -24 :00
00 :00 -24 :00
The Set button will appear when either
Work Day or Free Day is selected in the
drop-down. This allows you to arrange the
schedule to reflect your business’ weekly
Sun Mon Tue Wed Thu Fri Sat
Work Day
Free Day
Save Cancel
schedule.
PICTURE 3-25
The Copy and Paste buttons allow you to duplicate a day’s settings on another day while the
Default button returns the NVR to recording Motion Detection events 24/7.
Once you have made your settings, select OK to save them and you will be returned to the
Event menu. Hitting Cancel or right-clicking to exit the menu will not save your changes.
Hold Time – This is the length of time that the NVR will watch for another motion event before
treating a second event as a separate alarm. The delay can be from 0 to 600 seconds
(10 minutes).
Record Continue – The NVR will continue to record for a period after the event has ended.
This can be set to last up to 5 minutes.
Show Message – When this is enabled, the system will bring up the Alarm Status window
whenever an event is detected. You can configure this to display when motion, video
loss or masking is detected.
Alarm Upload – Your NVR can upload an alert message to the FTP server. Please see
Advanced Network Setup in Section 1.2 of the Remote Monitoring Guide
for instructions on setting up the NVR to work with an FTP server.
Send E-mail – E-mail notifications can be sent a single e-mail address. Please see
Advanced Network Setup in Section 1.2 of the Remote Monitoring Guide
for instructions on how to set up the e-mail alerts including recipient address.
Record Channel – When one camera detects an event, you can set the NVR to activate
recording on other cameras.
PTZ Activation – When selected, this will cause a connected Pan-Tilt-Zoom camera to
perform a pre-set action. This would be the first action programmed for the camera in
the PTZ menu. Please see Chapter 5 for instructions on setting up a PTZ camera.
Tour – This will cause the NVR to cycle through selected channels on the display in live view.
Snapshot – The NVR is capable of taking still images which can be sent via e-mail or FTP
(See Advanced Network Setup in Section 1.2 of the Remote Monitoring
Guide for full instructions.)
Buzzer – When selected, the NVR’s internal alarm will sound when an event occurs.
Copy Paste Default Save Cancel
PICTURE 3-24
40 41

3.5 SEARCH AND PLAYBACK
The Search and Playback window can be accessed through the Shortcut menu. You can
view the playback from any camera that was activated during the recording session. You are
also able to view the playback from multiple cameras simultaneously.
As your NVR will have begun recording video from the cameras from the moment they were
connected and movement was detected, you may wish to familiarize yourself with the Search
function at this time since it will be simple to locate a specific video from the small number
that will have been recorded.
From R/W HDD
1
5
6 879
Stop Sync All Record Normal Alarm Motion
15 1714 16
PICTURE 3-26
REC
2
Interval
Jan
Su Mo Tu We Th Fr Sa
1 2 3 4 5 6 7
8 9 10 11 12 13 14
3
15 16 17 18 19 20 21
22 23 24 25 26 27 28
29 30 31
4
132
10 12
11 13
00: 00: 00 - 00: 00: 00
24hr 2hr 1hr 30min
PIC
1
2012 ><
4
18
# Item Function
1 Playback Window Displays the video from one or more channels
2 File Source/Type You can chose to search for videos or snapshots recorded on the
hard drive or an external USB device.
3 Calendar Shows dates that contain recordings
4 Screen Display
Mode
Select the number of screens to display simultaneously. You can
also select which screens are played back.
5 Play/Pause Play video forward or backward.
6 Frame Advance Each click advances or reverses the playback by one second.
7 Slow/Fast Play Speed up or slow down playback. Four speeds each.
8 Volume Adjust playback volume. Requires a microphone equipped
camera or microphone co-located with a camera and connected
to the NVR.
9 Playback
Shows the progress of the video playback.
Indicator
10 Create Video Clip Set the start and end points within a video to create a shorter
video clip.
11 Time Indicator Shows the start and end points of the video clip.
12 File List Search This allows you to search for a video occurring around a specific
time.
13 Backup Save the video clip to a removable USB flash drive or external
USB hard drive.
14 Status Indicator Indicates video playback status - playing, paused, etc.
15 Sync When unchecked, allows simultaneous playback of different
242322212019181716151401211109876543210
channels starting at different points in time.
16 Record Modes Allows selection of which type of video recordings to search.
17 Video Indicator
and Progress Bar
Shows the time period(s) that video was recorded, along with the
recording mode of that video.
18 Time Scale These adjust the scale of the Video Indicator and Progress Bar
from 24 hours down to 30 minutes.
42 43

From R/W HDDREC
Jan
132
4
2012 ><
Su Mo Tu We Th Fr Sa
1 2 3 4 5 6 7
8 9 10 11 12 13 14
15 16 17 18 19 20 21
22 23 24 25 26 27 28
29 30 31
24hr
00: 00: 00 - 00: 00: 00
Motion
2423222120191817161514012
1
3
2
4
1
3
2
4
SEARCH
There are two ways to search for an event - by recording block and by starting time in the
Event List:
Recording Block Search
STEP 1. The calendar in the upper right
of the Video Search window will
show dates containing recorded
video in blue.
STEP 2. Color-coded blocks indicating
recorded video will appear in the
Video Indicator and Progress bar.
STEP 3. Click on a recording block to
begin playing back from that time, or
you can click on the Start button to
commence playback from the first
video recorded that day.
STEP 4. If needed, you can further
refine the search to specific channels
by choosing a single- or multiplechannel display format and then
selecting the desired channels to
view simultaneously using the pull
down menu.
Additionally, you can check or
uncheck the colored boxes below
the Video Indicator and Progress
bar to choose which types of record
(Motion Detection, Alarm, etc.) you’re
interested in.
STEP 5. Once you have refined your
search parameters, click on the
Search button to refresh your results.
You can then start your video
playback as described in Step 3,
above.
Jan 2012 ><
Su Mo Tu We Th Fr Sa
1 2 3 4 5 6 7
8 9 10 11 12 13 14
15 16 17 18 19 20 21
22 23 24 25 26 27 28
29 30 31
PICTURE 3-27
Sync All Record Normal Alarm
PICTURE 3-28
1
3
2
4
1
2
PICTURE 3-29
PICTURE 3-30
Event List Search
This search format allows you to easily find
a specific event and play it back on a single
channel. If an additional channel recorded
during that time, its video will play as well.
STEP 1. As with Recording Block
Search, use the calendar in the upper
right of the of the Video Search
window to locate dates with video
records.
PICTURE 3-31
00 : 00 : 00
1 2 3 4
STEP 2. Click the Event List button to
bring up a list of recorded events.
They will be listed in order of starting
time and will have a one-letter code
111098765432
after the time to indicate the event
type:
R = Regular recording
A = External alarm triggered recording
M = Motion detection recording
Start Time Type
02:24:05 M
08:19:52 M
10:01:02 R
10:06:56 A
13:04:46 M
Start Time
02-24-12 10:01:02
End Time
STEP 3. Each channel will have a tab
showing when video events were
recorded by that camera. You can
start playback of an event by doubleclicking on it. The Playback Indicator
(a vertical white bar) will appear in
the Video Indicator and Progress bar
at the corresponding point. You can
adjust the playback using the controls
as normal (see Playback on the
following page).
The File Information window below the file list shows details about that particular
clip.
STEP 4. You can refine your search by entering a more exact time above the list and then
clicking the Search button (magnifying glass). This will refresh the list and eliminate
events occurring before that time.
Using the playback controls will close the Event List, but you can return to it without losing
the search results. You may also exit the Event List by clicking on the arrow below the File
Information window.
02-24-12 10:02:14
Size(KB) 1701
PICTURE 3-32
44 45

PLAYBACK
Once you’ve selected your video(s), you can control the playback in the same manner as
using a VCR or computer’s media playback software. The playback interface includes features
that add an extra level of control, including the ability to play in reverse as well as forward,
frame-by-frame movement and multiple playback speeds. Certain buttons will be grayed out
depending on the playback mode.
Double-clicking on a screen in a multi-channel display format will switch to a single-channel
display. Double-clicking again will enlarge it to full screen mode, hiding the Search area on the
right and the Video Indicator and Progress bar below, although the latter will pop up if the
mouse is moved to the bottom of the screen. Double-clicking a third time will revert back to
the multi-channel display mode that you had selected. Right-clicking when in single screen or
full-screen mode will reverse the process. Right-clicking while in your original viewing mode will
end the video playback.
In most circumstances, the control buttons affect the video on all screens in a multi-channel
display. Unchecking the Sync box at the bottom of the screen will allow independent control
of each channel. In this case, the controls will only affect the screen highlighted in green. Click
once on a camera’s view to select that channel. It should also be noted that certain functions
only work - or work best - in single-channel viewing mode.
1/23/12 08:19:021/23/12 08:19:02
CAM 1
CAM 1 CAM 2
1/23/12 08:19:02
1/23/12 08:19:02
CAM 2
1/23/12 08:19:02
1/23/12 08:19:02
1/23/12 08:19:02
1/23/12 08:19:02
From R/W HDD
REC
Interval
Jan
Su Mo Tu We Th Fr Sa
1 2 3 4 5 6 7
8 9 10 11 12 13 14
15 16 17 18 19 20 21
22 23 24 25 26 27 28
29 30 31
PIC
1
2012 ><
132
4
Play
Forward
Play
Reverse
Stop Frame
Adv/Rev
Slow/Fast
Play
Volume
Control
PICTURE 3-34
Start, Stop and Play
Clicking either of the Play buttons will start the playback in the desired direction. The button’s
icon will change to a Pause icon to allow you to freeze the playback as needed. If you have
Sync unchecked, clicking Stop will end the playback of the video in the selected screen
while any other videos will continue to play. Otherwise, Stop will end the video playback on all
screens.
Frame Advance/Reverse
These buttons are only active when the playback has been paused. They allow you to move
forward or backward in 2-second increments.
Slow/Fast Play
There are four speed settings for each button. Clicking these buttons will increasingly slow
or speed up the playback as appropriate. When the after the fourth setting is reached, a
subsequent click will return the playback to normal speed. You can also decrease the effect of
one button on speed by clicking the other. Example: With playback set on “Fast 3”, you can
slow it down to “Fast 2” by clicking on the Slow Play button.
Volume
If you have a microphone-equipped camera or a microphone co-located with your camera you
can play back any audio that was recorded along with the video. Adjust the volume with the
slider as needed.
CAM 3 CAM 4
CAM 3 CAM 4
Stop Sync All Record Normal Alarm Motion
00: 00: 00 - 00: 00: 00
24hr
2hr 1hr 30min
242322212019181716151401211109876543210
PICTURE 3-33
46 47

Jan
1
3
2
4
2012 ><
Su Mo Tu We Th Fr Sa
1 2 3 4 5 6 7
8 9 10 11 12 13 14
15 16 17 18 19 20 21
22 23 24 25 26 27 28
29 30 31
BACKUP
DIGITAL ZOOM
Digital zoom in video playback operates differently than it does in Live View as described
at the beginning of this chapter. Both are digital zooms where the image is electronically
enlarged - usually in exchange for a decrease in image clarity. You can digitally enlarge an area
of a video by clicking and dragging with the cursor on the area of interest. This action will draw
a green rectangle on the screen. When you release the mouse button, the cursor will change
to a magnifying glass.
Click within the border to zoom into the area.
If you need to re-draw the box, merely click
outside the area to dismiss the box and then
re-select the area.
In the case of a multi-screen viewing mode,
the zoomed-in view will fill only that portion
of the screen occupied by that channel. You
can switch to single-screen mode by doubleclicking on the screen as described earlier.
You can also go to full-screen mode and back
to multi-screen mode as well. Right-clicking
with the mouse will return you to the full
channel view.
PICTURE 3-35
VIDEO CLIP
This allows you to save only a portion of a video clip. For example; if you have a camera set
to record all the time and it captures some action in a five-minute segment, you can clip only
that portion and back it up. In addition to making an incident readily available, saving only the
portion of interest will reduce the amount of disk space needed to back it up.
STEP 1. Select a file to view in the normal manner.
STEP 2. Find the section of interest and press the Clip button (a)
STEP 3. Drag the playback bar to the end of the section, or allow the video playback to
progress to the desired endpoint and press the Clip button again.
STEP 4. Press the Backup button (b) to save the file to a USB drive connected to the
USB back-up port on the front of the NVR. It is not possible to save the edited clip to
the NVR’s hard drive.
BACK-UP
This process is different than the backup procedure described in Section 3.6 Backup at the
end of this chapter where one can back up saved files located across multiple days. Instead,
this procedure allows you to quickly save files or clips that you have located without having to
search for them again. Once you have backed up these files to an external USB device they
can be played back on a computer.
00 : 00 : 00
You must have a USB device connected to
the USB port on the front of the NVR before
proceeding.
STEP 1. In your file list to the right of the
playback screen, check the box next
to the file(s) you wish to save.
STEP 2. Click on the Backup button
(item b in Picture 3-36) and the
Backup window will open.
1 2 3 4
Start Time Type
02:24:05 M
08:19:52 M
10:01:02 R
10:06:56 A
13:04:46 M
Start Time
01-24-12 10:01:02
End Time
01-24-12 10:02:14
Size(KB) 1701
PICTURE 3-37
STEP 3. Your device will be listed at
the top of the window showing how
much space is available. Below it,
the list of file(s) you wish to back up
will be displayed along with type,
start and end times and size. At the
bottom of the window, the space
required to save the file(s) will be
displayed. You may uncheck any files
you do not wish to back up at this
time. The Remove button will remove
all the files from your list.
STEP 4. Press Start to back up your selected files.
11Name (Type) Left Space/Total Space Device Status
sdb (USB DISK 972.50 MB/980.00 MB Ready
2
CH Type Start Time End Time Size (KB)
1
1 M 01-24-12 10:01:02 01-24-12 10:02:14 1701
2
1 M 01-24-12 10:06:56 01-24-12 10:18:23 21483
Page Up Page Down Select/Cancel backup device or file.
Space Required / Space Remaining: 23.18/949.32
PICTURE 3-38
Remove
Start
a
00: 00: 00 - 00: 00: 00
PICTURE 3-36
24232221201918
b
Right-clicking the mouse will exit this window without saving the files.
NOTE! The video files are in a proprietary format that will not play outside
the NVR without being converted to .avi format using the included General
Player software included on the Manuals and Software disc that came with this
NVR or available for free download at Q-See.com by searching for your model
number and looking under Software.
Right-clicking with the mouse will exit the playback window.
48 49

3.6 BACKUP
SHUTDOWN
This NVR supports backing up files from the hard drive to both an external USB storage
device as well as over a network. Network downloads are covered in the Remote
Monitoring Guide.
MAIN MENU
The Backup menu can be reached through
the Main menu.
The Backup window will display any
connected devices along with available space
and status. If you have a device connected
to the USB port on the front of the NVR and
it does not appear, press the Detect button.
If it still does not appear, then use a different
USB device.
NOTE! External USB hard drives used for backing up data will need to be
in the FAT32 format. Most new drives will need to be reformatted before use
with this DVR. Formatting instructions are provided at the end of this chapter.
SEARCH
ADVANCED BACKUP
RECORD SETTINGS
PICTURE 3-39
11Name (Type) Left Space/Total Space Device Status
sdb (USB DISK 972.50 MB/980.00 MB Ready
Page Up Page Down Select/Cancel backup device or file.
Detect Backup Erase Stop
BACKUP
PICTURE 3-40
SETTING
INFO
Once you have selected the files, press Start
to begin the download. A progress bar will be
displayed showing estimated time remaining.
During the download, the Start button will
change to Stop. You can stop the process at
any time by pressing the button again.
You can also right-click out of the menu once
the file transfer has begun to go on to other
activities without cancelling the download.
Selected Device
All
Type
Start Time
End Time
02 - 13 - 2012 19 : 06 : 06
20
CH Type Start Time End Time Size (KB)
1
1 M 01-24-12 10:01:02 01-24-12 10:02:14 1701
2
1 M 01-24-12 10:06:56 01-24-12 10:18:23 21483
3
1 M 01-24-12 14:32:18 01-24-12 14:58:36 45842
4
1 M 01-25-12 06:56:12 01-25-12 07:14:16 38249
5
1 M 01-25-12 23:19:01 01-25-12 23:48:13 56921
6
1 M 01-27-12 03:04:54 01-27-12 03:07:52 2309
7
1 M 01-27-12 03:11:43 01-27-12 03:14:27 2217
8
1 M 01-27-12 08:06:07 01-27-12 08:53:09 32181
9
1 M 01-29-12 01:39:19 01-27-12 01:43:06 2101
10
1 M 01-29-12 02:30:36 01-27-12 02:36:36 2412
Page Up Page Down Select/Cancel backup device or file.
sdb(USB DISK)
BACKUP
1
Channel
Remaining time 0:6:44
File Format
Onekey Backup
DAV
AddRemove01 - 24 - 2012 10 : 01 : 02
Stop
PICTURE 3-42
The files will be saved with the following naming format:
SN_CH(channel number)_TYPE_TIME(Year, Month, Date, Hour, Minute, Second)
Therefore, a file shown on the DVR as being a regular record (R), being recorded on 01/04/11
starting at 2:00:00 would have a file name of:
1_01_R_010411020000.dav
The Year Date Month format is the same as you have set in the General interface. The files
can be played back using the software included on the CD accompanying this NVR.
FORMATTING A USB DRIVE IN FAT32
To format a USB flash drive with FAT32, plug it into a PC running Windows XP or later. Go
to My Computer to locate the drive’s icon. Right click on it and select Format in the list of
available options. Select FAT32 and check the box marked Quick Format before clicking
Start.
For USB drives over 32GB in size, you should use a FAT32 format utility such as those
available through CNET.com.
On a Macintosh computer, you will need to reformat the USB flash drive using the Disk Utility
app located in the Utilities folder within the Applications folder. Connect your drive to a USB
port on the Mac and it should appear in the list on the left of the window.
Select your drive from the list, making sure
Once an external USB device is detected,
pressing the Backup button will open a new
window allowing you to select which files to
back up. You can select by channel, start and
end times, as well as which type of event;
regular recording, alarm, motion detection or
all of them.
Only files with a check mark in front of
them will be backed up. You can deselect
whichever files you choose or select them all
by selecting the box at the top of the list.
Selected Device
All
Type
Start Time
End Time
Space Required / Space Remaining: 227.83 MB/972.52 MB
02 - 13 - 2012 19 : 06 : 06
20
CH Type Start Time End Time Size (KB)
1
1 M 01-24-12 10:01:02 01-24-12 10:02:14 1701
2
1 M 01-24-12 10:06:56 01-24-12 10:18:23 21483
3
1 M 01-24-12 14:32:18 01-24-12 14:58:36 45842
4
1 M 01-25-12 06:56:12 01-25-12 07:14:16 38249
5
1 M 01-25-12 23:19:01 01-25-12 23:48:13 56921
6
1 M 01-27-12 03:04:54 01-27-12 03:07:52 2309
7
1 M 01-27-12 03:11:43 01-27-12 03:14:27 2217
8
1 M 01-27-12 08:06:07 01-27-12 08:53:09 32181
9
1 M 01-29-12 01:39:19 01-27-12 01:43:06 2101
10
1 M 01-29-12 02:30:36 01-27-12 02:36:36 2412
Page Up Page Down Select/Cancel backup device or file.
sdb(USB DISK)
BACKUP
Channel
1
File Format
Onekey Backup
PICTURE 3-41
DAV
Start
AddRemove01 - 24 - 2012 10 : 01 : 02
that it is highlighted before proceeding.
In OSX 10.6, you can set the format to
MS-DOS (FAT) in the Erase tab. In OSX 10.7,
you will use the Partition tab.
Click the Apply or Erase button, depending
on your system, to reformat the USB drive
PICTURE 3-43
If you need to clear space on your external drive, you can use the Erase button. This will
IMPORTANT! Reformatting a drive will erase ALL data on the drive!
delete ALL files on that device.
50 51

MENUS
Once you’re ready to move beyond basic operation, the other menus in the system will allow
you to configure the NVR to your individual needs.
CHAPTER 4
4.1 MAIN MENU
The Main Menu can be accessed at any time from the Live View by right-clicking the mouse
and bringing up the Short Cut Menu. Pressing the Return button on the side of the NVR will
also bring up the Main Menu.
MAIN MENU
MAIN
MENU
Backup
Information
Setting
Record
Settings
Remote
Device
Search
Advanced
Shutdown
HDD Info
Log
Version
Online Users
Remote Device Info
General
RS232
Network
Pan/Tilt/Zoom
Display
Default
Record Setting
Schedule
Alarm
Events
HDD Mgmnt
Alarm Output
Error Alert
Account
Auto Maint.
Config Backup
There are eight submenus available; Search,
Record Settings, Setting, Remote Device,
Advanced, Backup, Info and Shutdown.
Clicking on an icon will take you to that
function or the submenu it represents.
The Search menu is covered in Section 3.5
Search and Playback.
SEARCH
INFO
RECORD SETTINGS
ADVANCED BACKUPREMOTE DEVICE
SHUTDOWN
PICTURE 4-1
SETTING
4.2 INFO MENU
Double-clicking on the Info icon will open the Info window. There are either five or six options
depending on your model: HDD (Hard Disk Drive) Info, Log, Version, Online Users,
Remote Device Info and Net Resource Info.
HDD INFORMATION
This window displays information on the type, size, available space and status of the system’s
internal hard drive.
The system supports a single A/V-rated SATA
hard drive and it will be designated SATA
1. Below the drive name is the drive status
indicator.
“O” Drive is operating normally.
“X” Indicates an error
“-“ Hard drive not installed
“?”Hard drive is damaged
PICTURE 4-2
PICTURE 4-3
5352

In the case of a hard drive error, the system will come directly to this menu. An error may be
indicated if the hard drive time and system time do not match. To resolve this issue, adjust
the time in the General setting menu located in the Setting menu (See Section 4.3) and
restart the system. Formatting the drive, using HDD Manage as described in Section 4.5
Advanced is another possible solution to drive errors.
If the drive is damaged or missing, you will need to install a drive. Please see Chapter 6 for
hard drive installation instructions.
Select View Recording Times to show files recorded on the NVR.
LOG
Any activity on the NVR is logged and
recorded on the system. This information can
be viewed and searched from this window.
PICTURE 4-4
Information on user access, system
shutdowns, changes in recording status,
video loss and etcetera are listed. You can
search for activity in a similar manner to the
file search. This information can be backed
up to an external USB drive in the same
manner as video files and it will be saved as
a text document that can be opened by a
word processor, NotePad or other text reader
application.
PICTURE 4-5
VERSION
This display shows system hardware and firmware specifications.
The hardware data shows the number of
channels the system is configured for along
with the number of alarms in and out that can
be utilized. The system’s serial number is also
displayed, along with the version and build
date of the firmware.
PICTURE 4-6
You can update the firmware using this menu. Check your product’s page at www.Q-See.
com/Support to see if you have or need the latest version of the firmware. If your system is
operating without problems, we recommend that you do not update the firmware unless there
is an added feature that you need. To update the firmware, you must download the file from
our website and save it onto a removable USB drive that is otherwise empty. Connect the USB
drive to the port on the front of the NVR and press Start.
ONLINE USERS
A list of users accessing the NVR from over the network or through the Internet is shown in
this menu.
The user’s name as well as the IP address
used to access the NVR is displayed.
If you have proper system management rights
(Configured in Account, See Section 4.5
Advanced for full instructions), you can
disconnect or block a user. The maximum
time a user can be disconnected is 18 hours
(65,535 seconds).
PICTURE 4-7
54 55

REMOTE DEVICE INFO
This menu has three tabs to provide you with information about the status (past and current)
of the devices connected to your NVR. As the name implies, these windows only provide
information and no settings can be made or changed within them.
Channel Status
When selected, this tab shows the current
status of all connected cameras, including
their IP address, the name you’ve assigned
it, the manufacturer and the model. Icons
will indicate the “health” of the camera and
any alerts that it is operating under, such as
motion being detected.
Connection Log
Like the Log menu discussed earlier, this tab
documents activity on the devices connected
to your NVR. It’ll show when users logged
into or out of a particular camera, or when
that camera was offline.
By default, this window will display a
summary of all activity across all channels
upon opening. You have the option to search
by a specific time period and channel by
setting the criteria and pressing Search.
Network Load
You can track the traffic load of your system
on your network in real time by clicking
on this tab. It displays both upload and
download speeds to and from your NVR
graphically and numerically.
Channel Status Connection Log Net Load
Device Status
Channel Status IP Address Motion Video Lost Mask Alarm In Channel Name Manufacturer Type
1 10.1.1.65 Channel 1 Private IPC
2 10.1.1.67 Channel 2 Private IPC
Refresh
Channel Status Connection Log Net Load
Channel
Start Time
End Time
18
1
2
3
4
5
6
7
8
9
10
11
12
13
14
Channel Status Connection Log Net Load
32 Mb/S
REMOTE DEVICE INFO
PICTURE 4-8
REMOTE DEVICE INFO
All
01 - 24 - 2012 10 : 01 : 02
02 - 13 - 2012 19 : 06 : 06
channel Time IP Address Connection
3 02-12-12 10:06:56 192.10.19.66 User logged in
3 02-12-12 10:01:02 192.10.19.66 User logged out
2 01-29-12 02:30:36 196.62.08.19 Offline
1 01-29-12 09:17:01 192.10.19.66 User logged in
1 01-28-12 01:39:19 192.10.19.66 User logged in
2 01-27-12 08:06:07 196.62.08.19 User logged out
2 01-27-12 03:11:43 196.62.08.19 User logged in
1 01-27-12 03:04:54 192.10.19.66 User logged in
4 01-26-12 23:19:01 196.62.08.19 User logged out
4 01-26-12 06:56:12 196.62.08.19 User logged in
2 01-26-12 14:32:18 192.10.19.66 User logged in
1 01-25-12 13:15:46 196.62.08.19 User logged out
1 01-25-12 10:48:49 196.62.08.19 User logged in
1 01-24-12 17:32:23 192.10.19.66 User logged out
Search
PICTURE 4-9
REMOTE DEVICE INFO
NETWORK RESOURCE INFO
This window shows the network activity of your NVR. While the Network Load tab covered
previously shows the upload and download speeds, this window shows the communications
between your system and the network and how they rate compared to the NVR’s capacity.
If either send or receive capacities are reached, video may not stream smoothly either to the
NVR or to remote users attempting to access video from the system.
The first three subjects are related to
incoming data - and each other.
Receive Capacity - This is the total
bandwidth your NVR has to receive
data from your cameras. Please note
Type
Receive Capacity
Channel Input
Receive Remain
Send Capacity
Remote Preview
Remote Play/Download
Send Remain
that it is shown in terms of Megabits
per second (Mbps) or 1 million bits
per second.
Channel Input - This is the amount of data coming from all cameras. The more cameras
connected, the higher this number will be. This is displayed in Kilobits per second
(Kbps) which is 1,000 bits per second, or about .001Mbps. If you are having problems
with video streaming at a smooth rate, you may need to adjust the frame rate or
resolution of one or more cameras. See Camera Settings in Section 3.4 for
instructions.
Receive Remain - This is the remaining capacity that the NVR is able to receive.
The remaining four subjects relate to how much data the NVR can send and how much data it
is currently uploading.
Send Capacity - This is the total bandwidth that the NVR can stream to the network.
Remote Preview - This shows how much bandwidth is being used by remote users watching
the live feed from the NVR.
Net Resource Info
Bandwidth
80Mbps
0Kbps
81930Kbps
160Mbps
0Kbps
0Kbps
16384Kbps
OK
PICTURE 4-11
Remote Play/Download - Recorded video being played back or downloaded for backup is
shown separately from live viewing in this field.
Send Speed 0 Mb/S Receive Speed 24 Mb/S
PICTURE 4-10
Send Remain - This shows any additional capacity that is currently available after subtracting
remote live viewing, playback and downloading.
56 57

4.3 SETTING MENU
SETTING
Double-clicking on the Setting icon will
open the Setting menu window. This menu
contains a number of the settings that are not
GENERAL NETWORKRS232
related to recording video, but rather affect
how the NVR operates in general. Additional
settings are available in the Advanced menu
covered in Section 4.5. Available interfaces
PAN/TILT/ZOOM DISPLAY DEFAULT
are: General, RS232, Network, Pan/Tilt/
Zoom, Display and Default.
PICTURE 4-12
GENERAL
This window is where the basic settings for the NVR are configured. They are divided into
three general categories. Your settings will be saved when you click OK to close the window.
IMPORTANT! You MUST stop all recording before changing the date or time.
System Time – Set the date and time and
click the Save button to the right before
continuing with the rest of the settings in this
window.
Basic Settings
Date Format – Choose from Year-
Month-Day, Month-Day-Year or
Day-Month-Year
Date Separator – The three options are a dot
(.), dash (-) or slash (/)
DST – This allows you to set up Daylight
Savings Time so your system will
automatically reset the time when
it begins or ends. You can set it to
change on a specific date, or on the
first Sunday in a particular month, for
example.
Time Format – Chose between 24-hour
(military-style) or 12-hour (AM/PM)
formats
System Time
Basic Settings
Date Format
Date Seperator
NTP
Set
Device Settings
Language
Video Standard
Device No.
Device ID
Other Settings
Mouse Property
Setup Wizard
Navigation
Default OK
Day of Week Date
Mar
Start
End
Nov
Day of Week Date
2012 - 03 - 11 02 : 00
Start
End
2012 - 11 - 04 02 : 00
GENERAL
2012 - 03 - 15 10 : 06 : 12
YYYY MM DD
-
ENGLISH
NTSC
8
NVR
Mouse Set
DST
Time Format
HDD Full
Pack Duration
Realtime Play
Auto Logout
IPC Time Sync
Snap Time
PICTURE 4-13
DST
2nd
Sun
1st
Sun
OK Cancel
PICTURE 4-14
DST
OK Cancel
02 : 00
02 : 00
Set
24-HOUR
Overwrite
60
15
15
15
1 P/T
Save
Cancel
min.
Hours
NTP – This stands for Network Time Protocol which is allows an NVR that is connected to
the Internet to automatically maintain accurate time - including adjustments due to
Daylight Savings Time - in the same way that a computer does.
Server IP - The default server used to
obtain accurate time is the Windows
server, but you can manually enter in
another.
Port - This is the port that the NVR
will use to contact the server.
Server IP
Port
Time Zone
Update Period
OK Cancel Synchronize
NTP
time.windows.com
123
GMT-8:00
24
Hours
PICTURE 4-16
Time Zone - You will need to set your time zone. For North America these are:
Eastern Time Zone = GMT-5 Central Time Zone = GMT-6
Mountain Time Zone = GMT-7 Pacific Time Zone = GMT-8
Alaskan Time Zone = GMT-9 Hawaii Time Zone = GMT-10
Update Period - This is the frequency at which the NVR will check the time with the
server.
Synchronize - Clicking this will cause the NVR to update the time immediately.
Device Settings
Language – The system currently supports English, Spanish or French. The system will need
to be restarted for the language change to take effect.
Video Standard – By default, this NVR operates using the NTSC standard common to North
America. Video output can be switched to PAL for areas where that is used.
Device No. – If you are controlling more than one NVR with a single remote, this allows you to
give each NVR a separate numerical ID.
Device ID – If you are monitoring more than one NVR remotely, giving each an identifying
name will assist in keeping track of which system is being monitored.
HDD Full – Depending on the number of cameras recording, the size of your hard drive, how
many cameras are recording and how often, image quality and other factors, your
NVR’s hard drive can be completely full of recordings in one to four weeks. When it is
full, the NVR will stop recording unless you set it to overwrite older files.
IMPORTANT! The overwrite features should be enabled before you begin
recording or the NVR may not delete files created before that point. If this
occurs, reformatting the hard drive will fix the situation.
WARNING! Overwritten files can not be recovered. Important files should be
backed up onto another device to prevent loss.
PICTURE 4-15
58 59

Pack Duration – Rather than creating 24-hour long files when a channel is set to record all
the time, this allows you to set the maximum record length between one to two hours
(measured in minutes).
Realtime Play – This sets the duration of the video clip that will play when the Realtime Play
icon (See Section 3.2) is activated in Live View.
Other Settings
Mouse Property – Just like with a computer,
you may adjust how fast you need to
double-click with the mouse in order
Double-Click Speed
Slow Fast
Mouse Setup
to control the NVR.
Setup Wizard – You should deselect this
box after you’ve set up your NVR,
otherwise the Startup Wizard will
Default OK Cancel
PICTURE 4-17
launch each time your system is
restarted.
Navigation – This is enabled by default and allows you to open the Navigator Bar by left-
clicking on the Live View screen.
Auto Logout – This sets how long the NVR will go before automatically logging a user out of
the system due to inactivity.
IPC Time Synch – Each IP camera has its own internal clock. These can be set using the
included PSS software (see the PSS User Manual included on the Manuals and
Software disk) or you can allow the NVR to set the time by enabling this feature.
Snap Times – This is the number of still
images the NVR will take when you
click on the Snapshot icon at the
top of each camera’s video. You can
take up to five shots at a time and
the images can be found through the
Search and Playback window.
PICTURE 4-18
RS232
The RS232 port on the back of the NVR is used during the manufacturing process as a way to
configure the system. It has no user functions.
ALARM
Connecting and operating external alarms with your system will be covered in Chapter 6 Alarms.
NETWORK
Accessing the NVR from within a Local Area Network, over the Internet or via a Smartphone
along with setting up e-mail notifications and other online features will be covered in full in the
Remote Monitoring Guide included on the CD that came with your NVR or available for
download from www.Q-See.com.
PTZ
Please see Chapter 5 for instructions on connecting and operating a PTZ camera.
DISPLAY
This window contains the settings that control the Graphical User Interface (GUI) as well as
how you view the NVR. Depending upon your model, the menu will look like either Picture
4-19 or Picture 4-20.
GUI
Transparency
Time Display
Resolution
Enable Tour
All
View 1
View 4
View 8
Motion Tour Type
Copy Save Cancel
DISPLAY
255
1024x768
1 2 3 4 5 6 7 8
1 2
1
View 1 View 1
Channel Name
Channel Display
Image Enhance
Interval
Alarm Tour Type
Modify
5
GUI
Transparency
Time Display
Resolution
sec.
Tour
Copy Save Cancel
PICTURE 4-19 PICTURE 4-20
Transparency – You can choose to make
the menu screens more transparent
or opaque with 128 being the
most transparent and 255 being
completely opaque.
Channel Name – You can name each
channel - up to 25 characters. An
example is naming the channels
based on where they’re located.
Time Display and Channel Display – These
buttons enable their respective
displays on the video during
playback.
Resolution – There are four pre-set options; 1920x1080, 1280x1024 (default), 1280x720 and
1024x768. The NVR will need to reboot in order for changes you make to take place.
Image Enhance – Enabling this feature will allow the NVR to adjust the on-screen video
image for clarity and color balance. It will not affect the recorded video.
Tours - If motion is detected or an alarm is triggered, the NVR can be set to cycle through all
or some of the cameras. Depending on your model, this can be configured within this
menu a submenu reached by clicking on the Modify button next to “Tour.”
Enable Tour – Selecting this box will cause the screen to cycle through displaying channels
selected in the following fields.
Interval – This is the time – from 5 to 120 seconds – that the NVR will display each channel or
group of channels before moving to the next group in the tour.
View – You may select which channels and groups of channels will be displayed during a tour.
Channels selected in View 1 will appear in sequence, followed by pages of multiple
channel views if those are selected. Enabling All will activate all available display
modes for the tour.
Motion Tour Type – If a motion detection event occurs, and the Tour button is selected in
Motion Events (See Section 3.4) the NVR will switch a single-screen view tour or
an eight-screen view tour displaying the channels that were selected in that menu.
DISPLAY
255
1024x768
Modify
PICTURE 4-21
Channel Name
Channel Display
Image Enhance
Modify
60 61

Alarm Tour Type - As with Motion Tour,
Tour Setup
View 1
View 4
View 8
View 9
View 16
Pan/Tilt/Zoom
Auto Focus
above, but activates when an external
alarm is triggered (see Chapter 6
Alarms for instructions on operating
alarms connected to your system.
Select which channels you want and set the
amount of time that the channels will display
on screen before moving to the next one.
Motion Tour Type
Enable Tour
Window Split
2 Channel Group
1 1 2 3 4
2 5 6 7 8
Add Delete Up Down
View 1
View 4
AlarmTour Type
Interval
PICTURE 4-22
View 1
View 1
OKDefault Cancel
sec.
In Tour mode, you will see an icon in the upper right corner of the display which allows you to
control the tour by right-clicking upon it. Clicking upon the icon will cause the tour to pause or
resume.
Window switching mode
enabled
CAM1
CAM2
CAM3
2012-02-24 10:06:56
CAM4
Window switching mode
stopped
CAM5
CAM9
CAM6
CAM10
CAM7
CAM11
CAM8
CAM12
4.4 REMOTE DEVICE
While cameras connected directly to the NVR through the POE ports will automatically
connect and display video, remote cameras connected to your system must be located
and added manually. This can be done through the process described in Section 2.4 IP
Cameras at the beginning of this manual or through the Remote Device window.
Use of remote devices requires that your NVR is connected to a router. These devices can
be IP cameras or even QC-series DVRs. If you intend to connect to devices that are located
outside of your local network, then this router must be able to access the Internet. Instructions
for connecting your system to the Internet are presented in the Remote Monitoring Guide
that also came on the CD with your system. It is also available from our online resource at
www.Q-See.com/Support.
Similarly, the remote devices must be able to communicate with the local network or Internet.
This will be covered in Chapter 4 of the Remote Monitoring Guide as well.
MAIN MENU
This window can be reached by clicking on
the Remote Device icon in the Main menu...
SEARCH
RECORD SETTINGS
SETTING
CAM13
CAM14
PICTURE 4-23
CAM15
CAM16
ADVANCED BACKUPREMOTE DEVICE
DEFAULT
The options in this window will allow you to return various settings back to their default
configuration.
DEFAULT
ENCODE
RS232
ALARM
PAN/TILT/ZOOM
Channel Name
The settings that will be changed are
self-explanatory.
Please select setting entries that you want to default
Select all
GENERAL
SCHEDULE
NETWORK
DETECT
DISPLAY
REMOTE DEVICE
WARNING! Language, time display mode, video format, IP address, and user
account will not retain your settings after being reset back to default values!
OK Cancel
PICTURE 4-24
INFO
...or through the Shortcut menu by rightclicking on the screen and selecting Remote
Device.
SHUTDOWN
PICTURE 4-25
Color Setting
Search
Record Status
Tour Setup
Remote Device
Alarm Output
PICTURE 4-26
62 63

When the window opens, you will be presented with a list of all connected devices in the
IPC Config
lower portion. This section, marked Device Added, indicates the status of each device along
with other information about it.
REMOTE DEVICE
4 IP Address Port Device ID Manufacturer Type
1 10.1.1.65 Port 1 YZC2OC061966 Private IPC
2 10.1.1.67 Port 2 YZCAU192012 Private IPC
3 10.1.1.68 Port 4 TC2FW25600095 Private IPC
4 196.219.8.50 4000 Private
IP Search Add
Device Added
channel Edit Delete IPC Config Status IP Address Port Device ID
1 196.610.6.46 37777
2 10.1.1.67 Port 2 YZCAU192012
3 10.1.1.68 Port 4 TC2FW25600095
4 10.1.1.65 Port 1 YZC2OC061966
Delete Manual Add
Show Filter
None
OK Cancel
PICTURE 4-27
Icon Meaning Description
Editable
You may edit the settings on this device by double-clicking on it
EDIT
Double-clicking on a device in the Device Added portion of the window will display
information regarding the connected remote device. Making any changes within this window
will not change anything on the camera or remote device itself. To make those changes, you
will need to access the camera or other remote device (such as a DVR) directly, or through
one of the remote methods described in the Remote Monitoring Guide.
Once you have made those changes, you will need to update the user name and password
within the Edit window. Failing to change these in this window will result in an on-screen
message about incorrect password and may lock you out of the IP camera for a period of 30
minutes in the case of QC-Series cameras - other brands may vary.
It is important that you do not remove the
device you are making the changes upon
from the list of connected devices before
editing the information in the Edit window. If
you later remove the device from the list and
wish to reconnect, you will need to do so
using the Manual Add feature as described
below.
Channel
Manufacturer
User
Password
Remote Channel
Decoder Buffer
Auto TCP UDP
1
Private
admin
1
280
EDIT
IP Address
TCP Port
msec
OK Cancel
PICTURE 4-28
IPC.myq-see.com
37777
Cannot
Delete
Removable
Configure
IP Camera
Device
This device is connected directly to the NVR and must be physically
unplugged to be removed from this list.
This device may be deleted from the list by checking the box next
to it and clicking on the Delete button below.
Clicking on this icon will allow you to configure the video from this
camera.
The connected device is operating normally.
Status OK
Device
Error
There is an issue with the connected device that is preventing it
from operating normally.
Clicking on IP Search under the upper portion of the window will generate a list of all devices
that the NVR was able to locate - both directly connected as well as connected to the same
network as your system. Items showing a short IP address beginning with “10” are cameras
directly connected to the NVR and who’s IP addresses were assigned by the NVR itself. Care
should be taken that you do not attempt to connect a device that is already connected to the
system as it will create a duplicate video feed and could cause connectivity issues.
IMPORTANT! To avoid connection issues, you should not change the
information within the Edit window unless you have first made those changes
to the remote device itself.
CONFIGURING IP CAMERAS
You can configure the settings of an IP camera by clicking on the appropriate camera icon
under the IPC Config column. This will open a new window allowing you access to the
camera’s settings. You can optimize your camera’s video to compensate for unusual lighting
in the area or other factors. Unlike making similar changes on a monitor or other display,
changing these settings will affect the video itself and the video will be recorded to the hard
drive according to your settings.
Gain - This is electronic amplification of the
video signal. It is used to brighten the
image by amplifying the signal, but it
comes at the risk adding “noise” to
the video. When the Manual radio
button is selected, you can adjust the
gain using the slider.
Brightness, Contrast, Hue and Saturation -
These adjustments operate similarly
to those on a television or monitor.
Channel
1
Gain Mode Auto Manual
Mirror
Flip
BLC Mode
Profile
Day & Night
Exposure Auto Manual
On Off
On Off
Off
Auto
Auto
PICTURE 4-29
Gain
Brightness
Contrast
Hue
Saturation
Save CancelDefault Refresh
50
50
50
50
50
64 65

Mirror and Flip - Individual circumstances can force users to mount their cameras in non-
standard or less-than-ideal positions. And, sometimes, a user will realize that they
mounted their camera upside down after they’ve put the ladder and tools away.
Enable Mirror to switch the image left to right. Flip will turn the image upside down.
BLC Mode - BLC, or Back Light Compensation enables the camera to adjust its settings so
that a subject in front of a light source - such as a window - does not appear as a
darkened, featureless figure.
Profile - These are a combination pre-configured settings that allow you to quickly optimize
a camera to certain lighting conditions. It is useful if the area where your camera is
located has a unique lighting situation. There is also the option to set up your own
User-Defined settings. In this mode, you can adjust the red and blue balance, set
when the camera will switch over to day (color) or night (black and white) mode and
adjust the camera’s electronic shutter speed using the Exposure option. This latter
setting will increase or decrease the amount of light entering the camera.
After making your changes, click on Save to preserve them. You can also revert back to the
factory settings by clicking Default.
ADDING AND DELETING REMOTE DEVICES
The lower portion of the window shows all devices currently connected to your NVR. If all of
your channels are occupied, you will need to delete one of the connected devices from this
list by selecting the check box next to it and clicking delete. Items with a gray “X” are directly
connected to your NVR and may only be removed by physically disconnecting them from your
system.
Clicking on the IP Search button will create a list of all remote devices that the NVR was able
to detect. You may limit this search to only IP cameras by selecting IPC in the Filter pulldown. Items being accessed by your NVR over the Internet will not appear in the list at the top
of the window. They must be added manually (see below).
If you have an available channel, you may add a device by selecting the check box next
to it and then clicking Add. Please note that the NVR will connect automatically only with
devices from compatible manufacturers (see Section 2.4 IP Cameras or Section A.2
Specifications for a list of compatible manufacturers) using their default user names and
passwords. If these have been changed, you will need to use the Manual Add feature instead.
Manual Add
If you have changed the default settings of any remote device which you wish to use with
your NVR, you will need to use the Manual Add button at the bottom of the window to
add this device to the list of connected devices. This applies to cameras and DVRs which
were previously connected but later removed from the list of connected items. Items being
accessed from outside your local network will also need to be added using this button.
Within the Manual Add window, some information may already be displayed but it may not be
correct for the device you are intending to connect.
Channel - Select an available channel to
which you want to assign this device.
Manufacturer - You can leave this
unchanged.
IP Address - If this device is connected to
the same network as the NVR, the IP address
will appear in upper portion of the Remote
Device window along with the device name.
If this device is located outside of your local
network, you will need to determine the
IP address locally to the device (see the
Remote Monitoring Guide).
TCP Port - The default is 3777. Devices
being accessed over the Internet may
be using a different port. You will have
determined this during setup.
4 IP Address Port Device ID Manufacturer Type
1 10.1.1.65 Port 1 YZC2OC061966 Private IPC
2 10.1.1.67 Port 2 YZCAU192012 Private IPC
3 10.1.1.68 Port 4 TC2FW25600095 Private IPC
Channel
4 196.219.8.50 4000 Private
Manufacturer
IP Address
IP Search Add
TCP Port
Device Added
User
channel Edit Delete Status IP Address Port Device ID
Password
1 196.610.6.46 37777
Remote Channel
2 10.1.1.67 Port 2 YZCAU192012
Decoder Buffer
3 10.1.1.68 Port 4 TC2FW25600095
4 10.1.1.65 Port 1 YZC2OC061966
Delete Manual Add
REMOTE DEVICE
Manual Add
1
Private
IPC.myq-see.com
37777
admin
1
280
Save Cancel
PICTURE 4-30
None
Filter
OK Cancel
User/Password - Enter the user name and password you set for the device. The default user
name and password for QC-Series IP cameras are admin and admin. For other brands,
please consult your product manual.
Remote Channel - Leave this unchanged.
Decoder Buffer - Ranges from 80 to 480, but it is better to leave it at the default value of 280.
66 67

4.5 ADVANCED
The settings in this menu cover user accounts, hard disk management, video display, and
system maintenance.
The next section of the HDD Info window allows you to set any installed hard drives to one of
four states:
Read/Write
Normal operation. The device records (writes) files to disk and plays (reads)
them.
Read Only No more files can be recorded onto the drive, but existing files can be viewed.
Format Reformats the hard drive.
CAUTION! Reformatting the hard drive will erase all recorded events.
PICTURE 4-31
HDD MANAGE
This displays some of the same information found in the HDD Info window in the Info menu
(see Section 4.2) but this window allows you to make additional settings.
The drive name and status is displayed.
The status indicators are:
O Drive is operating normally.
X Indicates an error
SATA 1 2
1
HDD No.
Type
Status
Capacity
Record Time
- -
- Hard drive not installed
? Hard drive is damaged
Clicking on Alarm Set opens the Abnormality window which is covered immediately
following this section.
Alarm Release – this turns off any disk alarm that may be occurring.
HDD Setting - When you have multiple drives installed, you can designate which drive is the
primary and which is secondary. Multiple drives may be assigned to the same group
which means that the NVR will continue writing onto the next drive in the group after
the first one is filled before going back and overwriting old records on the first.
HDD Channel - If you have more than one
hard drive installed in your NVR, you
can determine which drive video and
still images are recorded on. Clicking
Main Stream Ext Stream Snap Picture
channel HDD Group
1
1
1
5
HDD Channel will open a new
window with three tabs: Main Stream,
Extra Stream (the lower bandwidth
video used for remote monitoring)
and Snap Picture (the still images
captured with the Snapshot function.
Within each tab, you can set the
destination for each channels’ output.
HDD MANAGE
Alarm Set
Alarm Release HDD Channel
Read/Write
Set to
OK
PICTURE 4-32
HDD Channel
channel HDD Group
1
2
1
6
PICTURE 4-33
HDD Setting
channel HDD Group
1
3
1
7
CancelSave
Execute
channel HDD Group
1
4
1
8
Recover
If you are having problems with the hard drive, including corrupted files,
selecting Recover causes the drive to re-set, but does not erase its contents.
No changes will take place unless the Execute button is pressed once you’ve made your
selection. The drive’s status will be displayed next to the Type heading below the pull-downs.
If you make changes and press Execute, the NVR will restart once you press OK to exit. You
cannot right-click out of the menu.
ERROR ALERTS
This window allows you to set up alarms for disk and system disconnection errors as well as
how these alarms are handled. Each type of alarm can be independently enabled along with
what events that type of alarm will trigger.
Event type – Chose from No Disk, Disk Error,
Disk No Space, Net Disconnected
and IP Conflict.
Event Type
Enable
Show Message – When enabled, this will
display the event notification on the
Show Message Alarm upload Send Email
NVR’s screen.
Alarm Upload – This feature is not available
Buzzer
on this model.
Send E-mail – this will send an e-mail notification to the recipient address set up in the
Network menu (see Section 1.2 Advanced Network Setup in the Remote
Monitoring Guide).
ERROR ALERTS
No Disk
Save Cancel
PICTURE 4-34
68 69

ACCOUNT
This is the account management window which allows you to add or delete users, create user
groups, modify the access privileges of users, and create or change passwords.
There are two pre-configured default
users; Admin, and 666666. Only Admin has
administrator rights.
When adding a user, you not only create their
user name and password, but you can grant
or deny control over specific activities on the
NVR, including which cameras that user can
view or play back. These privileges can be
changed later by an administrator-level user
using the Modify User button. Administrator
Users have control over 60 different functions
while basic Users have 35 functions that can
be allowed or denied.
A user or group name can consist of at most eight characters and no two users may have the
same user name. There is no limit to the number of users or groups.
The Memo field allows you to include a note about the user or group that is only visible in this
window.
Toggling the Reusable box allows more than one user to log in using this account
Creating a group gives you the ability to set the access privileges for as many users and any
users’ rights cannot exceed that of the group they are in.
Selecting Modify Password opens a new window which allows you to select the user whose
password you want to change. Enter the old password and then the new password twice.
PICTURE 4-35
4.6 BACKUP
This window was covered in Section 3.6 Backup
4.7 SHUTDOWN
This is the preferred method to use when shutting down the NVR.
When this window is opened, you have the
option of logging out as a user, switching the
user, shutting down the system or restarting
it.
After selecting Shutdown, the NVR will stop
recording, the hard drive will stop and you will
be able to turn it off using the power switch
on the back panel.
PICTURE 4-37
AUTO MAINTENANCE
Much like a regular computer, this NVR
benefits from being restarted after extended
periods of operation.
You can determine when the system will
automatically reboot and you can optionally
have it auto-delete old files at that time as
well. You can set this option to delete files
that are 1-31 days old.
PICTURE 4-36
70 71

PAN/TILT/ZOOM CAMERAS
CHAPTER 5
5.1 CONNECTING A PTZ CAMERA
Unlike conventional PTZ cameras, IP PTZ cameras do not require a control wire in order
to operate. The NVR can send commands directly through the RJ-45 (Ethernet) cable that
5.2 PTZ CONTROL AND SETUP
The NVR is set by default for the PTZ functions to be disabled for each channel. Therefore, if
you are not using an IP PTZ camera, you must enable these settings before you can control
your PTZ device through the RS485 cable. If you are using an IP PTZ camera, then skip to
Control on the next page.
connects the camera to the POE, or via the network. If you are using an IP PTZ camera,
please skip to the section entitled Control in Section 5.2.
There are still a number of legacy camera mounts and other systems in use which require a
RS485 digital control wire to operate. For that reason your system still includes the option
This system supports 26 of the most common protocols including Pelco-D and Pelco-P. The
following instructions are based on the Pelco-D protocol. You will need to have the manual for
your PTZ camera at hand to ensure the proper settings within the NVR.
to connect an RS485 control wire to the back of the NVR. The RS485 connector is used to
connect and control the motion of these platforms. It uses a single-direction protocol meaning
that it can send commands out to the camera(s) but not receive any data back from the unit.
The NVR is set by default for RS485 to be disabled for each channel. Therefore, PTZ settings
must be enabled before the RS485 can be utilized. This system supports 26 of the most
SETUP
For ease of set-up, the PTZ camera’s video
feed should be displayed on the screen.
GENERAL NETWORKRS232
SETTING
common protocols including Pelco-D and Pelco-P.
When connecting a PTZ device, the following should be taken into account:
• Shielded twisted wire is recommended with the shielded layer being used to connect to the
ground. Improper grounding may result in chip damage. We recommend using CAT 5 or CAT
PAN/TILT/ZOOM DISPLAY DEFAULT
6 wire for this purpose.
• The 485 port oj75
f this NVR cannot parallel connect with the 485 port of another device
• The voltage between the A and B lines of the camera should be less than 5V.
STEP 1. The two wires of the data cable from
the PTZ camera must be inserted into the
ports labeled A & B as shown in Picture 5-1.
A B
Multiple control wires can be connected to this
STEP 1. Open the Pan/Tilt/Zoom
Menu from the Settings menu. You
cannot use the Shortcut Menu to
access the PTZ controls until after
you have configured a channel to use
PTZ.
Channel
PTZ Type
PICTURE 5-2
PAN/TILT/ZOOM
1
Remote
port, but you may require an expander port to
do so.
STEP 2. The color of these leads will vary by
manufacturer but they should be labeled “+” or
positive and “-” or negative. The positive wire
Copy Paste Default Save Cancel
PICTURE 5-3
should be inserted into port A with the negative
going into port B.
PICTURE 5-1
The insulation on both leads should be stripped to expose about 1/8” or 4mm of bare
metal. You must push in the orange tab above the port with a small item like the end of
a paperclip while inserting the wire lead. When the wire is sufficiently inserted, release
the orange tab. Pull gently on the wire to ensure that it is locked in the port.
STEP 3. Connect the other end of the cable to the proper pins in the connector on the
camera
STEP 4. Connect the camera video and power cables as you would any other camera.
STEP 2. If the PTZ Camera is to be
connected directly to the NVR, then
select Local in the PTZ Type pull
down. Otherwise, select Remote. Be
certain that the channel listed at the
top is the one which the PTZ camera
will be connected to.
For a local PTZ camera, you will need
to enter data into the other fields
according to the data provided in
your PTZ camera’s manual, including
protocol, data bits, stop bits and
PAN/TILT/ZOOM
Channel
PTZ Type
Protocol
Address
Baudrate
Data Bits
Stop Bits
Parity
1
Local
PELCOD
1
115200
8
1
None
Copy Paste Default Save Cancel
PICTURE 5-4
parity.
72 73

PAN/TILT/ZOOM
Speed
Zoom
Focus
Iris
1
Channel
Set
1
View 1
View 4
View 8
STEP 3. Click the save button once you have entered the settings. If you are operating an
identical PTZ camera on another channel, you may use the Copy and Paste buttons
to apply those settings to the channel that camera is connected to. Be sure to check
that the camera’s address did not change as well. Each PTZ camera must be on a
different channel and have a different ID.
CONTROL
Right-click the mouse to bring up the
Shortcut Menu. Select Pan/Tilt/Zoom to
access the Pan/Tilt/Zoom control panel
(Picture 5-6)
View 9
View 16
Pan/Tilt/Zoom
Auto Focus
Color Setting
IMPORTANT! If your NVR is set to record when motion is detected, the
movement of your PTZ camera can create false alarms. You should adjust the
channel’s mode of recording as well as how it sends notifications to avoid this.
SETTING PRESET/PATROL/PATTERN/SCAN
Clicking the Set button in the PTZ Control Panel (Picture 5-6) opens a new window in
addition to leaving the PTZ Control Panel active.
This window allows you to set up the PTZ’s Preset, Tour, Pattern and Border functions.
Preset
STEP 1. Start by using the eight direction arrows on the PTZ Control Panel (Picture
5-6) to position the camera where you want.
Use the mouse to control the direction of
the camera’s movements by clicking on the
arrows.
Speed – From 1 to 8
Intelligent Positioning Key
If your protocol supports it, clicking on the
blue area at the center of the directional
controls will hide the control panel and allow
you to select an area to zoom in on with the
cursor. Right-clicking with the mouse will
return you to the control panel.
and adjust zoom, focus and iris
Channel
SIT
Page Switch
Search
Record Status
Tour Setup
PICTURE 5-5
PAN/TILT/ZOOM
1
Speed
PTZ Trace
PICTURE 5-6
SIT
PICTURE 5-7
Zoom
Focus
Iris
Set
STEP 2. Click the Preset button in the
Function list and enter the number
you want to assign to this preset.
Function
To create another preset point, change the
Preset Number and repeat steps 1 and 2.
Your camera supports up to 255 Preset
Points. When you have created the desired
1
preset points, you may use them to create a
tour.
Tour
A tour is the sequence of points that your
camera will move to automatically before
returning to its starting point and repeating.
You can create up to 8 tours.
Preset
Tour
Pattern
Border
Function
Preset
STEP 1. Click the Tour button in the
Function list and enter the number
of the preset you wish to add to it.
STEP 2. Click Add Preset to enter it
into the tour. You can have up to 80
presets in a single patrol.
STEP 3. Assign the tour a number
Tour
Pattern
Border
PAN/TILT/ZOOM
Preset
Patrol No.
Set
Del Preset
PICTURE 5-8
PAN/TILT/ZOOM
Preset
Patrol No.
Add Preset
Del Preset
Del Tour
PICTURE 5-9
1
0
1
0
74 75
You can remove a preset point by clicking on the Del Preset button and an entire tour can be
deleted using the Del Tour button.

Pattern
A Pattern is similar to a tour. However,
instead of creating Preset Points, you move
the camera through the pattern you want it to
follow. You can create up to 5 patterns.
STEP 1. Click the Pattern button in the
Function list.
Function
Preset
Tour
Pattern
Border
PAN/TILT/ZOOM
Preset
Patrol No.
Begin
End
RUNNING PTZ FUNCTIONS
Clicking on the Page Switch button in the PTZ Control Panel (Picture 5-6) will switch to a
new window (Picture 5-12) which allows you to activate the functions created above as well
1
0
as the Auto Pan and Flip functions.
Enter the number of the function you wish to
activate and select the function button to run
that function.
STEP 2. Click the Begin button
STEP 3. Modify the zoom focus and
iris settings using the PTZ Control
Panel (Picture 5-6)
STEP 4. Click the End button to save the changes.
STEP 5. Enter the desired number for this pattern into the field.
Border (Auto Scan)
Using this feature will cause the camera to scan back and forth between two points. You can
create up to 5 scans.
STEP 1. Click the Border button in the
Function list
Function
STEP 2. Select either the Left or Right
button to indicate which edge you are
defining.
Preset
Tour
Pattern
Border
STEP 3. Use the direction arrows in the
PTZ Control Panel (Picture 5-6) to
move the camera to the limit desired.
STEP 4. Repeat for the other border.
PICTURE 5-10
PAN/TILT/ZOOM
Preset
Patrol No.
Left
Right
PICTURE 5-11
1
0
In addition, there are other functions that can
be engaged in this window.
AutoPan - This will cause the camera to
automatically rotate.
Flip - Most PTZ cameras have a mechanical
stop which will prevent the camera
from rotating a full 360°. If the camera
is tracking someone or some thing
and it reaches this stop, pressing Flip
will bring the camera around the other
direction to continue tracking. Some
PTZ cameras have “E-flip” which will
do this automatically.
Page Switch - returns you to the PTZ
Control Panel (Picture 5-6)
Reset - This ends the currently running
function.
PICTURE 5-12
In the PTZ Control Panel (Picture 5-6), clicking the PTZ Trace button will begin the auto
scan. The button will convert to a Stop button which can be used to end the scan.
76 77

ALARMS
This NVR features connections for external alarms – both input and output. When an event is
detected the system can notify local users or send notification to a monitoring service. At the
same time, the system can accept signals from motion detectors, smoke detectors or other
alarms and begin recording based on that input and your settings.
You will need to have the manual for your alarm(s) handy to ensure the proper settings within
the NVR.
CHAPTER 6
The accompanying diagram (Picture 6-2), along with your alarm’s manual should be
consulted to ensure proper connection.
• Normal open or Normal close type
• Parallel connect COM end and GND end of the alarm detector (Provide external power to
the alarm detector).
• Parallel connect the Ground of the combo NVR and the ground of the alarm detector.
• Connect the NC port of the alarm sensor to the combo NVR alarm input(ALARM)
• Use the same ground with that of combo NVR if you use external power to the alarm device.
Alarm input public end should jump out with device power end.
Alarm Device Connection Terminal
6.1 ALARM INPUT
When attaching alarms, the following criteria
must be met:
1. The alarm input must be grounded.
2. A grounding signal is required for the
alarm input
3. When connecting the NVR to another
device - including another NVR - through
the alarm input, a relay should be used to
separate them.
Parameter Grounding Alarm
Alarm Input 1, 2, …, 8 becomes valid in low voltage.
1-NO C
2-NO C
CTRL 12V Controls the power output
Ground line
Two NO activation outputs.
You need to close the device power to
cancel the alarm.
ALARM IN
1
NO C
1 2 3 4 5 6 7 8
2
NO C
PICTURE 6-1
CNTRL
12V
+12V GND COM PC
Alarm Device
Connection Terminal
ALARM
GND
+12V GND
PICTURE 6-2
A B
78 79

6.2 ALARM OUTPUT
The alarm output port should not be directly connected to a higher power load (greater than
1A) to avoid high current which may damage the relay. Use the co-contactor to establish the
connection between the alarm output port and the load.
• 2 way relay alarm output (NO contact). Provides external power to external alarm device.
• To avoid overloading, please read the following relay parameters sheet carefully.
• RS485 A/B cable is for the A/B cable of the PTZ camera.
Relay Specification
Model: JRC-27F
Material of the contact Silver
Rating (Resistance Load) Rated switch capacity 30VDC 2A, 125VAC 1A
Maximum switch power 125VA 160W
Maximum switch voltage 250VAC, 220VDC
Maximum switch currency 1A
Insulation Between contacts with same polarity 1000VAC 1minute
Between contacts with different
polarity
Between contacts and winding 1000VAC 1minute
Surge voltage Between contacts with same polarity 1500V (10×160us)
Length of open time 3ms max
Length of close time 3ms max
Longevity Mechanical 50×106 times (3Hz)
Electrical 200×103 times (0.5Hz)
Temperature -40°C ~+70°C (-40°F to +158°F)
1000VAC 1minute
6.3 ALARM SETUP AND ACTIVATION
Once external alarms are properly connected, you can configure the NVR to activate them.
SETTING
The Alarm interface can be selected from the
Setting menu.
The upper portion of this window is used to choose an alarm, its configuration and its type.
Event Type – Choose between Local and
Remote input. Remote input must be
connected through an IP camera.
Alarm In – Select the alarm channel you are
configuring.
Enable – When this is selected the alarm
response(s) in the bottom portion of
this window are enabled.
Type – Alarms are either Normally Open (NO)
or Normally Closed (NC)
GENERAL NETWORKRS232
PAN/TILT/ZOOM DISPLAY DEFAULT
PICTURE 6-3
ALARM
Event Type
Enable
Trigger Period
Alarm Out
Show Message
Record Channel
PTZ Activation
Tour
Snapshot
Buzzer
Default Copy Save Cancel
Local Alarm 1
Set
1 2 3
Alarm Upload
1 2 3 4
Set
1 2 3 4
1 2 3 4
Alarm In
Type
Hold Time
Alarm Continue
Send Email
Rec. Continue
Normal Open
5
10
10
PICTURE 6-3
sec.
sec.
sec.
80 81
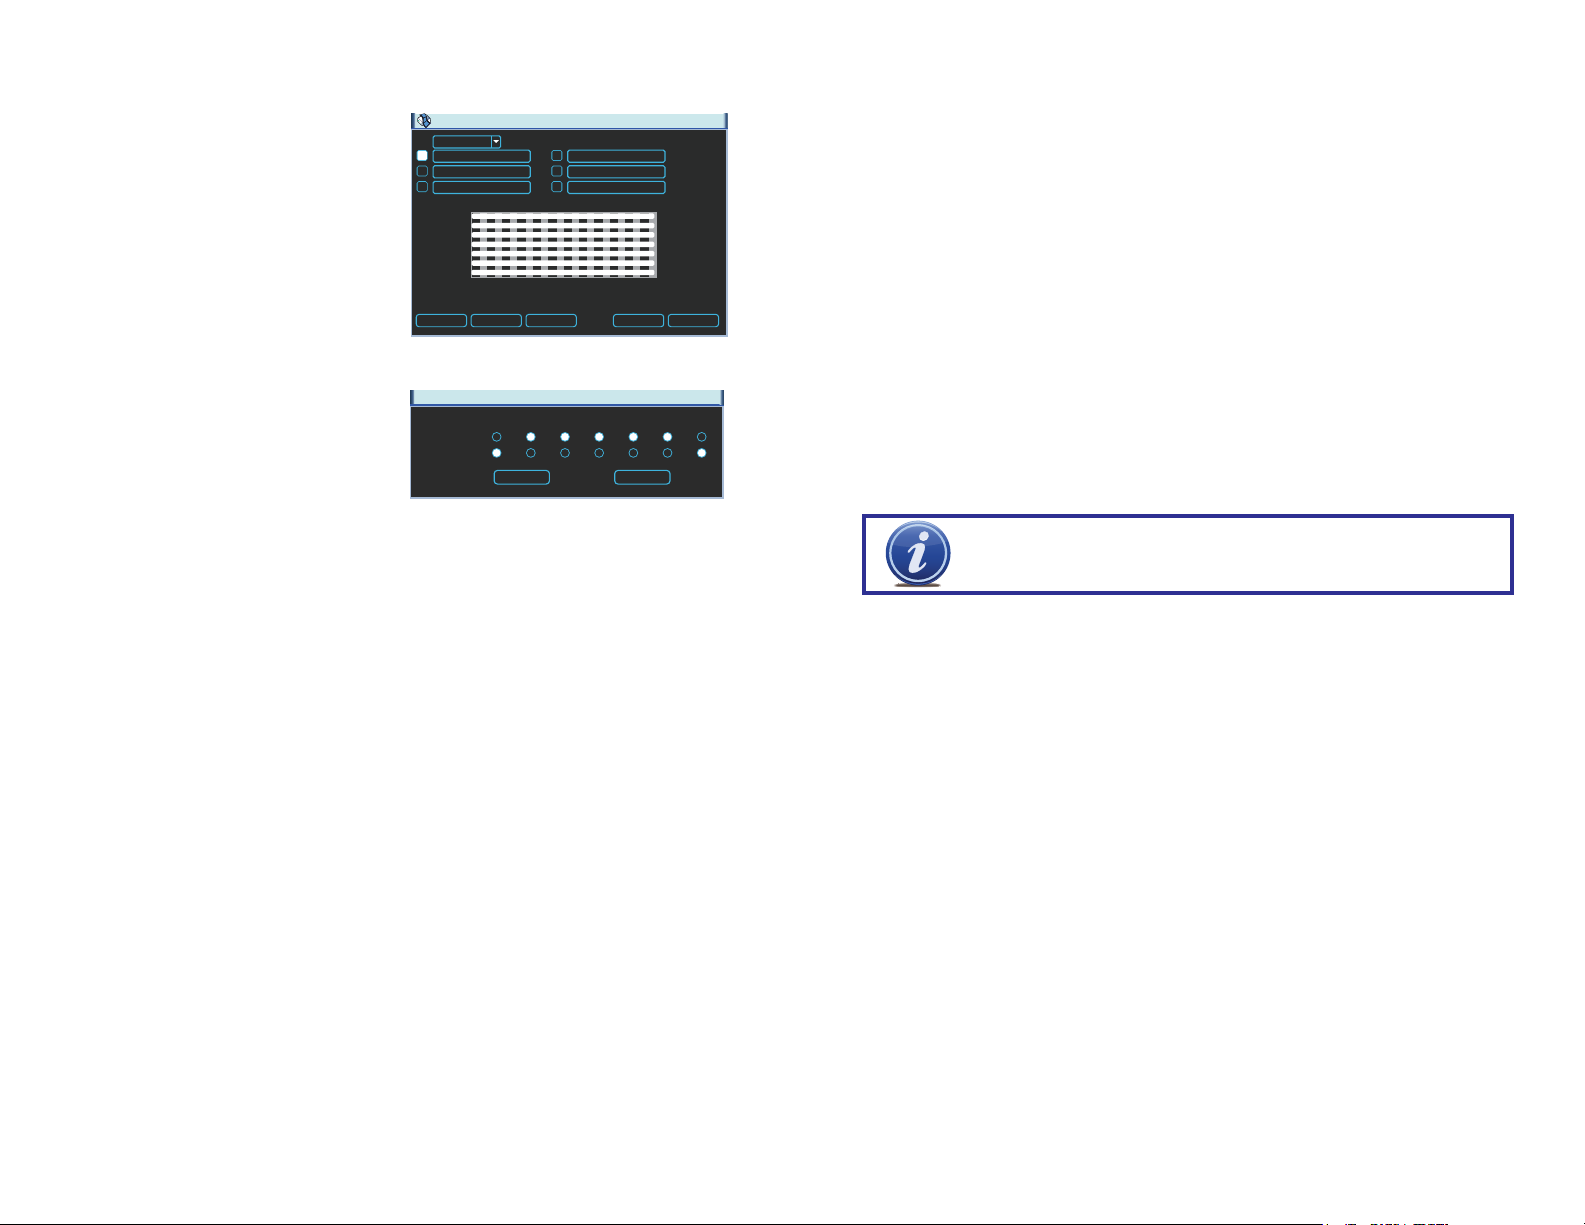
The bottom portion of the window allows you to choose what actions the NVR will initiate
Set
when an alarm is activated along with scheduling when the alarms are active.
Set
00 :00 -24 :00
00 :00 -24 :00
00 :00 -24 :00
PICTURE 6-4
Trigger Period – This is for setting the
schedule for when alarms are active.
Clicking the Set button opens up
a new window. Its operation is
exactly like the setting window used
to schedule motion detection and
covered in Section 3.4.
You can set the schedule in up to six blocks
of time for specific days of the week or by
Mon
00 :00 -24 :00
00 :00 -24 :00
00 :00 -24 :00
0 3 6 9 12 15 18 21 24
Sun
Mon
Tue
Wed
Thu
Fri
Sat
Copy Paste Default Save Cancel
weekday and weekend.
Clicking the Set button next to the day drop
down allows you to specify which days are
work days and which are not.
Sun Mon Tue Wed Thu Fri Sat
Work Day
Free Day
Save Cancel
PICTURE 6-5
Hold Time – This is the length of time you want the system to delay before beginning
recording on an alarm.
Alarm Out – This will send an alarm signal to up to three connected external alarms when
enabled.
Alarm Continue – This is the time that the NVR will wait before starting a new event (10
seconds to 300 seconds (5 minutes)) after the alarm is ended.
Show Message – When this is enabled, an alert message will be displayed on the NVR’s
screen.
Show Message – When this is enabled, the system will bring up the Alarm Status window
whenever an event is detected. You can configure this to display when motion, video
loss or masking is detected.
Alarm Upload – The system can upload the alarm to the network including an alarm
monitoring service.
Send E-mail – E-mail notifications can be sent a single e-mail address. Please see the
Section 1.2 Advanced Network Setup in the Remote Monitoring Guide for
instructions on how to set up the e-mail alerts including recipient address.
Record Channel – When one camera detects an event, you can set the NVR to activate
recording on other cameras.
PTZ Activation – If you have Pan-Tilt-Zoom
cameras connected to the NVR, you
can cause them to be activated when
an alarm occurs. You can further
instruct it to perform one of 255 preset activities. You can also allow a
delay of 0 to 300 seconds before
the PTZ camera(s) activates. Setting
up these pre-programmed functions
is covered in Section 5.2 PTZ
PICTURE 6-6
Control and Setup.
Tour - When enabled, this causes the NVR’s display to cycle through selected Live View
channels while maintaining the selected recording functions. Instructions for
configuring this feature are found in the Motion Events menu as shown in Section
3.4 Recording.
Snapshot - When this is selected, the NVR will begin recording still images, in addition
to whatever video is being recorded, and it will upload or e-mail these images as
configured in in the Motion Events menu as well.
Buzzer - When enabled, the NVR will sound an audible alert when an alarm is triggered.
IMPORTANT! When you have completed your setup in the Alarm menu,
you should also review your settings in the Record Settings menu to enable
any other desired alarm-related features.
82 83

HARD DISK DRIVE
Your NVR uses a standard computer A/V-rated SATA (Serial Advanced Technology
Attachment) hard disk drive and will support up to a 3TB (terabytes) drive. These drives are
the current industry standard and may be purchased wherever computer parts are sold.
Depending on where you purchased your NVR, it may come with a pre-installed drive. But,
we recognize that you may wish to upgrade or replace your drive in the future so this NVR is
designed to make installation and replacement easy for the average user.
It should be noted that while this and the battery are the only user-serviceable parts within the
case, and you will not void your warranty by installing or upgrading your hard disk drive, care
must be taken to avoid damage to the other components within the case.
WARNING! ELECTRIC SHOCK RISK!
The NVR MUST be unplugged from all power sources as well
as from the cameras before opening the case. Failure to do so
can result in damage to the NVR or its components as well as
injury or death.
CHAPTER 7
7.1 INSTALLATION/REMOVAL
It is strongly advised against opening the case when atmospheric conditions present the risk
of static discharge which can damage electronic components.
Whether installing the drive for the first time or removing the old one to install a new one, the
steps are largely the same:
STEP 1. Disconnect the NVR from the power source as well as any other connections.
PICTURE 7-3
STEP 4
. Line up hard drive mounting
screws with mounting holes at the
bottom of the NVR and slide the
hard drive to move the screws to the
narrow part of the holes.
PICTURE 7-4
STEP 5. Carefully turn NVR over taking
care not to allow the drive to slide
out.
PICTURE 7-1
STEP 2. Loosen the cover screws on the
rear and side panels.
PICTURE 7-2
STEP 3. Insert four screws into the
mounting holes on the hard drive.
DO NOT fully tighten, but give three
twists each.
PICTURE 7-5
STEP 6.
Tighten the mounting screws firmly.
PICTURE 7-7
STEP 8. Replace the cover onto the
NVR.
STEP 7. Flip the NVR right side up and
STEP 9. Secure the screws in the rear
PICTURE 7-6
connect the data and power cables
to the hard drive.
PICTURE 7-8
and side panels.
84 85

APPENDIX
A.1 TROUBLESHOOTING
1. The NVR does not boot up properly Possible Causes:
a. Input power is not correct, check power supply.
b. Power switch button is damaged.
c. Updated firmware using wrong file.
d. Hard drive malfunction or something wrong with hard drive cable.
e. Front panel error.
f. Main board is damaged.
2. NVR often automatically shuts down or stops running. Possible Causes:
a. Input voltage is not stable or it is too low.
b. Hard drive malfunction or something is wrong with the cable.
c. Device is not getting enough power.
d. Front video signal is not stable.
e. Working environment is too hot, or too much dust.
f. System board malfunction.
3. System cannot detect hard drive. Possible Causes:
a. No hard drive is installed
b. Hard drive is damaged.
c. Hard drive cable connection is loose.
d. Main board SATA port is damaged.
4. There is no video output to one or more channels. Possible Causes:
a. Updated firmware using wrong file.
b. Brightness is 0. Please restore factory default setup.
c. There is no video input signal or it is too weak.
d. Check privacy mask setup.
e. Combo NVR hardware malfunctions.
5. Real-time video color is distorted. Possible Causes:
a. When using BNC output, NTSC and PAL setup is not correct. The real-time video
becomes black and white.
b. NVR and monitor resolution settings are not compatible.
c. Video cable is too long signal is becoming degraded.
d. Combo NVR color or brightness setup is not correct.
8. There is no audio when monitoring. Possible Causes:
a. Channel with audio is not full screen, make the channel you want to hear audio on full
screen.
b. Audio cable is damaged.
c. Combo NVR hardware malfunction.
9. There is audio when monitoring but there is no audio when system plays back.
Possible Causes:
a. Setup is not correct. Please enable audio function
b. Corresponding channel has no audio input.
10. Time display is not correct. Possible Causes:
a. Setup is not correct
b. Battery contact is not good or voltage is too low. Replace battery.
c. Crystal is broken.
11. Motion detection function does not work. Possible Causes:
a. Period setup is not correct.
b. Motion detection zone setup is not correct.
c. Sensitivity is too low.
12. Cannot log in client-end or web. Possible Causes:
a. For Windows 98 or Windows ME user, please update your system to Windows XP or
later.
b. ActiveX control has not been enabled.
c. Video card driver on computer may need to be upgraded.
d. Network connection error.
e. Network setup error.
f. Password or user name is invalid.
13. There is only mosaic no video when previewing or playing back video file remotely.
Possible Causes:
a. Network bandwidth is not sufficient.
b. Computer does not have enough resources to handle video flow.
c. There is multiple-cast group setup in combo NVR. This mode can result in mosaic.
Usually we do not recommend this mode.
d. There is privacy mask or channel protection setup.
e. Current user does not have monitoring rights.
f. NVR local video output quality is not good.
6. Cannot search local records. Possible Causes:
a. HDD ribbon is damaged.
b. HDD has failed.
c. The recorded file has been overwritten.
d. Record function has been disabled.
7. Video is distorted when searching local records. Possible Causes:
a. Video quality setting is too low.
b. Program read error, bit data is too small. There is mosaic in the full screen. Please restart
the NVR to solve this problem.
c. Hard drive data cable error.
d. Hard drive malfunction.
e. NVR hardware malfunction.
14. Network connection is not stable. Possible Causes:
a. Network is not stable.
b. IP address conflict.
c. MAC address conflict.
d. PC or combo NVR network card is not good.
15. Burn error /USB backup error. Possible Causes:
a. System uses too much CPU resources. Try stopping recording first and then begin
backup.
b. Data amount exceeds backup device capacity. It may result in burner error.
c. Backup device is not compatible.
d. Backup device is damaged.
86 87

16. Remote control does not work. Possible Causes:
a. Need to enter the correct Device ID on the remote control.
b. Distance is too far or control angle is too wide.
c. Remote control battery power is low.
d. Remote control is damaged or NVR front panel is damaged.
17. Can not playback the downloaded file. Possible Causes:
a. There is no media player.
b. Need Divx Codec in file player
18. Forgot local menu operation password or network password
a. Contact Q-See tech support and we can generate a new password for the unit.
A.2 SPECIFICATIONS
Parameter QC804 QC808 QC8016
Control Mode Front panel, USB mouse, IR remote control,
Keyboard, Network
Compression Compression
Format
Video Video In 4 channel input directly through POE block
Video Out VGA x 1, BNC x 1, HDMI x1
VGA Resolution 1920×1080, 1280×1024, 1280×720, 1024×768
Record Resolution 1080P(1920×1080) / 720P(1280×720) / D1
Record Frame Rate D1:
Record Bit Rate Up to 32Mbps
Supported IP
Cameras
Audio Audio Input 1 channel, RCA(200-2800mV, 30KΩ)
Audio Output 1 channel, RCA(200-3000mV, 5KΩ)
Alarm Alarm Input 16 Channel
Alarm Output 3 Channel
Storage Record Mode Manual/Sensor/Schedule/Motion Detection/Camera
Multi-Function Simultaneously Record, View Live or Recorded Video,
Interface Network Interface RJ45 (LAN, Internet)
Communication
Interface
Controls Front panel, USB mouse, IR remote control,
Disk info Disk Type SATA x 2 (up to 3TB)
Other info Voltage DC12V/3.3A
Optimal
Temperature
Power Usage 20W (without Hard Drive)
H.264 and MPEG-4 dual codec
4 additional
channels
through network
(704×576/704×480)
30fps/camera
720p:
30fps/camera
1080p:
30fps/camera
Q-See QC-series IP Cameras, Arecont Vision, AXIS,
Canon, Dynacolor, Panasonic, Samsung, Sanyo,
Sony, Onvif
Loss/Camera Block/Alarm
Playback, Back-up files, Monitor Remotely
RS485, RS232
USB 2.0 x 2 (One for Backup, One for USB Mouse)
Keyboard, Network
14°F to 131°F /-10°C to 55°C
10% to 90% Humidity
D1:
30fps/camera
720p:
30fps/camera
1080p:
15fps/camera
12 additional
channels
through network
D1:
30fps/camera
720p:
15fps/camera
1080p:
7fps/camera
88 89

Parameter QC814 QC824
Control Mode USB mouse, Network
Compression Compression
Format
Video Video In
4 cameras max
Video Out VGA x 1, HDMI x1
VGA Resolution 1920×1080, 1280×1024, 1280×720, 1024×768
Record Resolution 1080P(1920×1080) / 720P(1280×720) / D1
Record Frame Rate D1:
Record Bit Rate Up to 32Mbps
Supported IP
Cameras
Audio Audio Input 0
Audio Output 00
Alarm Alarm Input 0
Alarm Output 0
Storage Record Mode Manual/Schedule/Motion Detection/Camera Loss/
Multi-Function Simultaneously Record, View Live or Recorded
Interface Network Interface RJ45 (LAN, Internet)
Communication
Interface
Controls Front panel, USB mouse, IR remote control,
Disk info Disk Type SATA x 1 (up to 3TB)
Other info Voltage DC12V/2A 48V/1A (POE)
Optimal
Temperature
Power
Consumption
H.264 and MPEG-4 dual codec
4 channel input directly through POE block
Remote cameras may be accessed through network
(704×576/704×480)
D1:
30fps/camera
720p:
30fps/camera
1080p:
15fps/camera
Q-See QC-series IP Cameras, Arecont Vision, AXIS,
Canon, Dynacolor, Panasonic, Samsung, Sanyo,
Sony, Onvif
Camera Block
Video, Playback, Back-up files, Monitor Remotely
RS485, RS232
USB 2.0 x 2 (One for Backup, One for USB Mouse)
Keyboard, Network
14°F to 131°F /-10°C to 55°C
10% to 90% Humidity
20W (without Hard Drive)
30fps/camera
720p:
30fps/camera
1080p:
30fps/camera
Parameter QC818 QC828 QC8116
Control Mode Front panel, USB mouse, IR remote control, Network
Compression Compression
Format
Video Video In
8 cameras max
Video Out BNC x 1, VGA x 1, HDMI x1
Video Resolution 1920×1080, 1280×1024, 1280×720, 1024×768
Record
Resolution
Record Frame
Rate
Record Bit Rate Up to 32Mbps Up to 128Mbps
Supported IP
Cameras
Audio Audio Input 1 channel, RCA(200-2800mV, 30KΩ)
Audio Output 1 channel, RCA(200-3000mV, 5KΩ)
Alarm Alarm Input 8 Channel 16 Channel
Alarm Output 3 Channel 6 Channel
Storage Record Mode Manual/Sensor/Schedule/Motion Detection/Camera
Multi-Function Simultaneously Record, View Live or Recorded Video,
Interface Network Interface RJ45 (LAN, Internet)
Communication
Interface
Controls Front panel, USB mouse, IR remote control, Network
Disk info Disk Type SATA x 2 (up to 4TB) SATA x 4 (up to
Other info Voltage DC12V/5A 48V/2.5A (POE) 110/240V
Optimal
Temperature
Power
Consumption
H.264 and MPEG-4 dual codec
8 channel input directly through
POE block
Remote cameras may be accessed through network
1080P(1920×1080) / 720P(1280×720) / D1
(704×576/704×480)
D1:
30fps/camera
720p:
30fps/camera
1080p:
15fps/camera
Q-See QC-series IP Cameras, Arecont Vision, AXIS,
Canon, Dynacolor, Panasonic, Samsung, Sanyo, Sony,
Onvif
Loss/Camera Block/Alarm
Playback, Back-up files, Monitor Remotely
RS485, RS232
USB 2.0 x 2 (One for Backup, One for USB Mouse)
14°F to 131°F /-10°C to 55°C
10% to 90% Humidity
20W (without Hard Drive) 40W (without Hard
D1:
30fps/camera
720p:
30fps/camera
1080p:
30fps/camera
16 channel input
directly through
POE block
4TB)
Drive)
90 91

Q-SEE PRODUCT WARRANTY
Q-See is proud to back all of our products with a conditional service warranty covering all
hardware for 12 months from the date of purchase. Additionally, our products also come with
a free exchange policy that covers all manufacturing defects for one month from the date of
purchase. Permanent upgrading service is provided for the software.
Liability Exclusions:
Any product malfunction or abnormalities in operation or damage caused by the following
reasons are not within the free service scope of our company:
1. Equipment damage caused by improper operation.
2. Improper equipment operation environment and conditions (e.g., improper power,
extreme environmental temperatures, humidity, lightning and sudden surges of
electricity).
3. Damage caused by acts of nature (e.g., earthquake, fire, etc).
4. Equipment damage caused by the maintenance of personnel not authorized by Q-See.
5. Product sold over 12 months ago.
In order to fulfill the terms of your warranty, you must complete the registration process after
purchasing our product. To do this, simply fill out the User’s Information Card on our website
at www.Q-See.com
QUESTIONS OR COMMENTS? CONTACT US
PRODUCT SUPPORT, DOWNLOADS,
FIRMWARE UPDATES & MANUALS
24/7 Technical Resources
Live Chat (M-F, 9-5 PST)
www.Q-See.com/Support
92 93

Digital Peripheral Solutions, Inc.
8015 E. Crystal Drive
Anaheim, CA 92807
94
 Loading...