


Q-See QP1341 User Manual
PLAYBACK
The images and videos can be accessed by
inserting the USB plug into computer’s USB port.
Open it as you would any other drive or external
USB flash memory device.
Video files are located in the VIDEO folder.
Still images can be found in the IMAGE folder.
Audio files are saved in the RECORD folder.
It is recommended that you save these files to your
hard drive before editing or playing back.
Unwanted files can be removed from the drive
through the normal means.
VIDEO PLAYBACK
Because of the many different video playback
programs available and their constantly updating
nature, we cannot provide a complete list of
compatible software. Windows Media Player will
generally play the video files created by this pen
depending on your particular configuration.
If your default media player does not properly
play back the video, then you can either
download a codec (plug-in) to allow it to work
with M-JPEG (or MJPG) video, or you can
download a standalone player. A simple web
search will yield useful results.
At the time of this writing, the DivX codec
plug-in for Windows Media Player has been
demonstrated to provide good results.
For both Mac and PC computers, a free video
playback option is DivX Plus Player which is
available at http://www.divx.com.
The free KMPlayer software will open and play
your videos on a Windows PC. It is available for
free online at http://download.cnet.com where
you can search for it by that name.
STILL IMAGES
Still images can be opened in Windows’ Image
Viewer, Apple’s Preview and commonly available
photo editing software.
AUDIO PLAYBACK
Double-clicking on an audio recording will launch
your default audio playback software. If you wish
to use another program instead, you should first
launch that software and then open the file from
within that program.
Apple’s iTunes software has been demonstrated
to work with these audio files on both the Mac
and PC platforms.
PEN
Rotate the metal collar at the tip to
extend or retract the writing nib.
USB DRIVE
The pen can be used as a standard USB Flash
memory stick for transporting and transferring
files.
INSUFFICIENT MEMORY OR BATTERY
When the camera’s memory is full or the battery has run out of power, the Status Indicator
light will alternately flash amber and blue for five
seconds. It will then save the current file and
shut down. You must remove the files stored on
the memory to make space available to record
further or recharge the battery as appropriate.
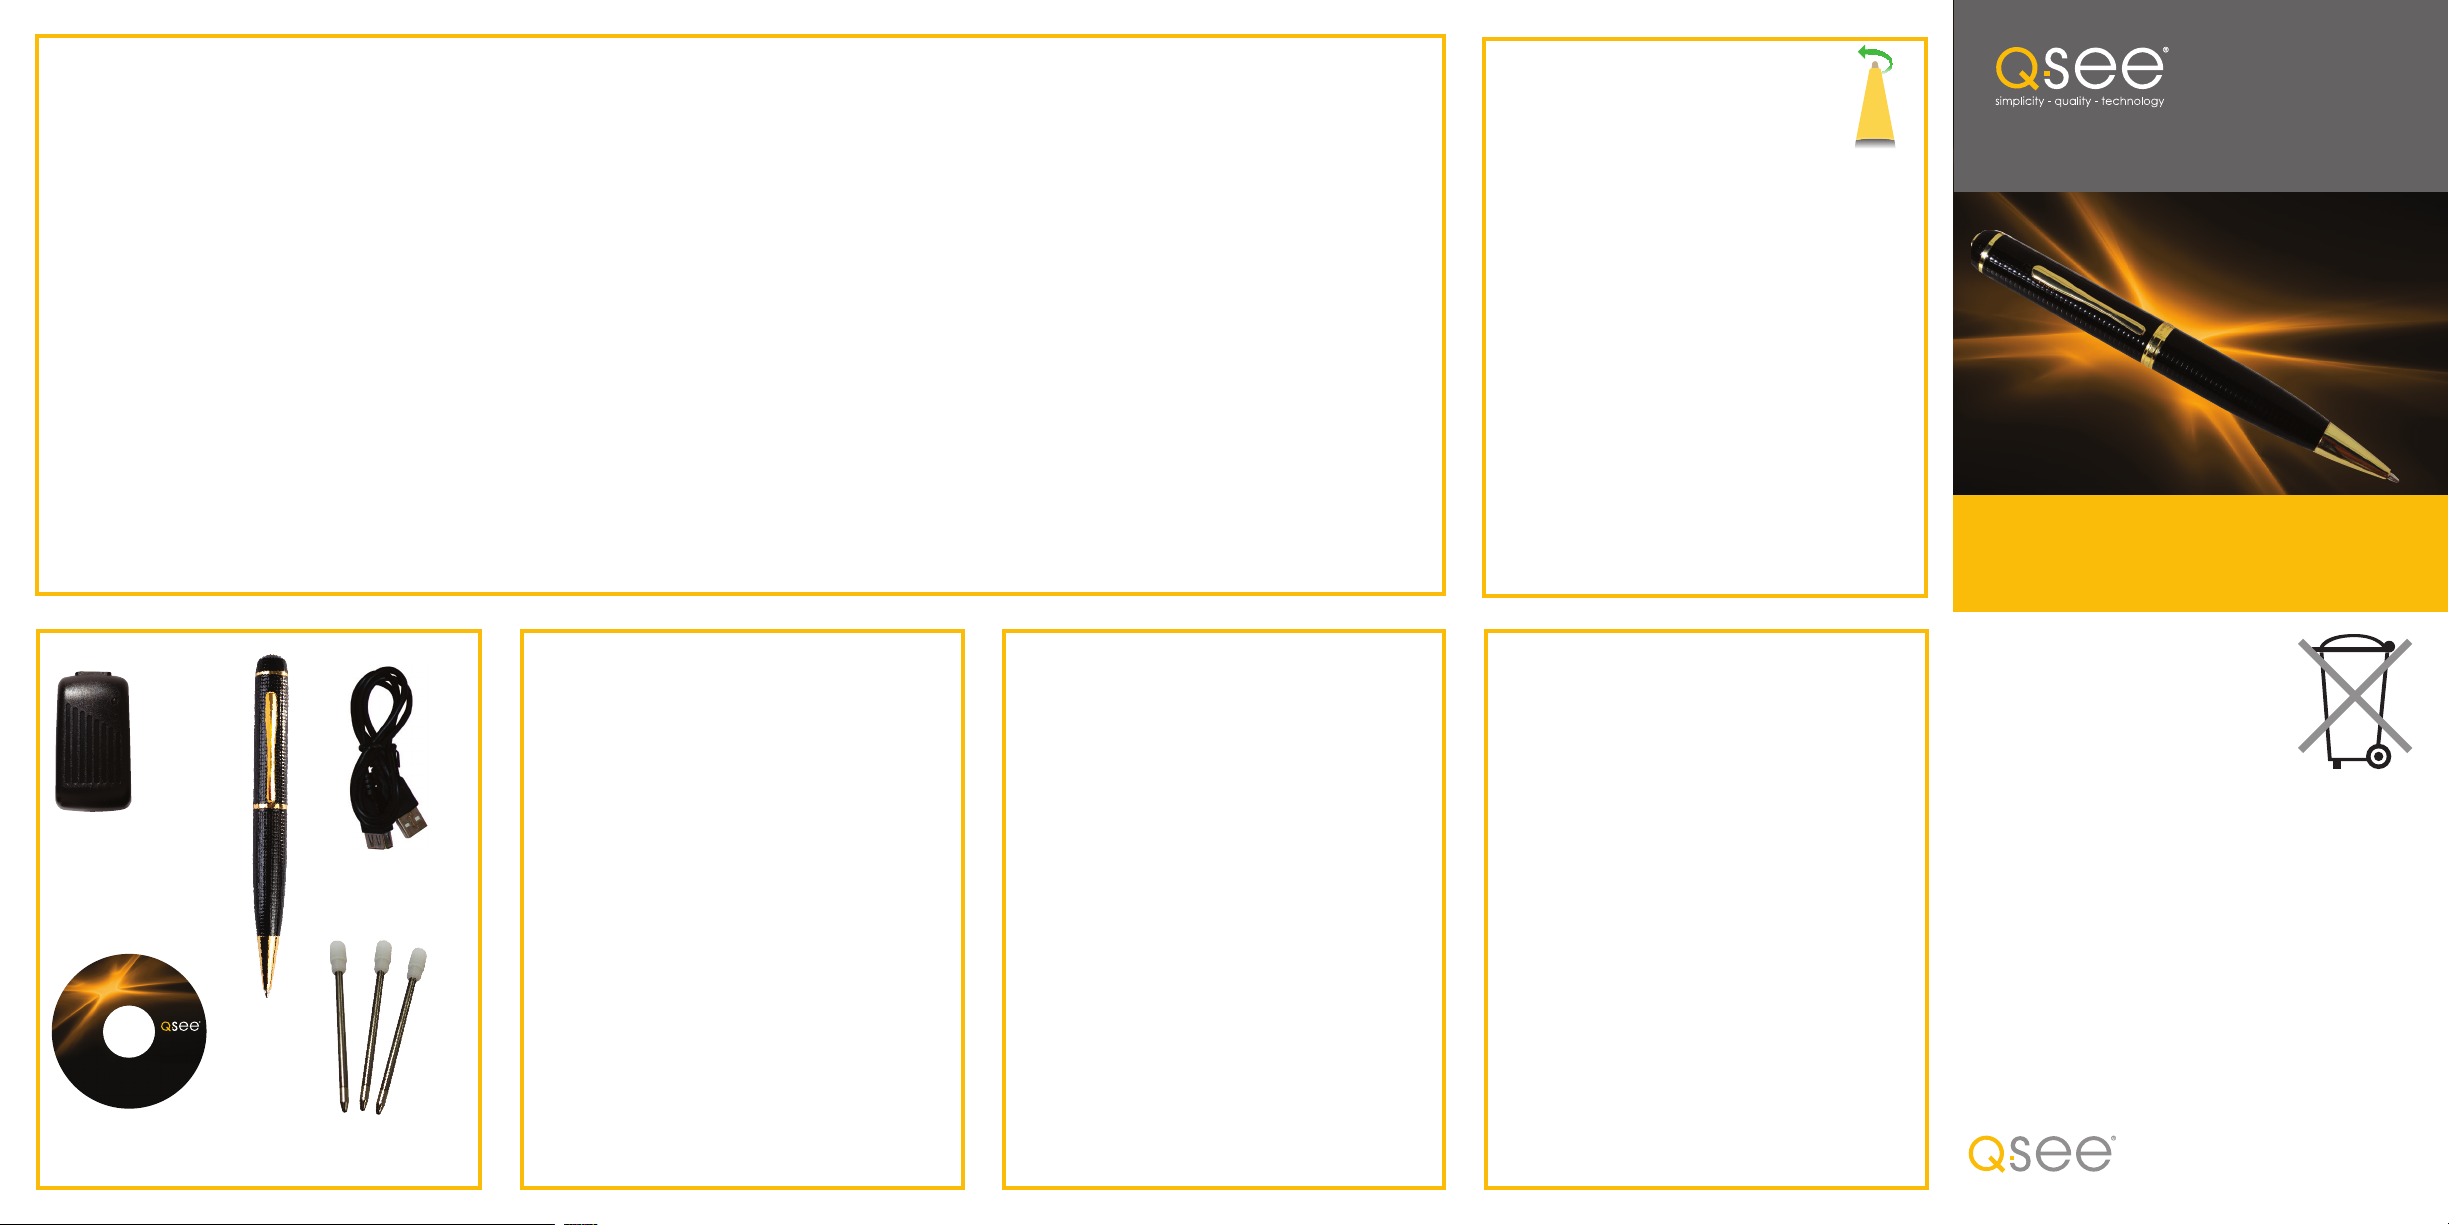
User Manual
Shadow 1
Surveillance Pen
Model QP1341
COMPONENTS
POWER
ADAPTER
QP1341
manuals and
software
SOFTWARE
AND MANUAL
MINI-CD
USB
CABLE
3 REPLACEMENT
INK
CARTRIDGES
SPECIFICATIONS
Video Format AVI
Video Encoding M-JPEG
Video Resolution 1280x960 VGA
Video Frame Rate 30fps ± 1 fps
Picture Format JPG
Image Resolution 1.3 Megapixels
1280x1024
Image Aspect Ratio 4:3
Audio File Format WAV
Operating Systems Windows XP/Vista/7
and 10.7
Power Input DC5V
Interface Type USB
Apple Macintosh OSX 10.6
HELPFUL HINTS
• When taking pictures, you will get the best
results if both you and your subject are
relatively still.
• The camera should be at least one foot from
your subject when taking pictures.
• While recording video, you should try to
keep the camera steady and avoid rapid
movements for best video quality.
• You should not hold the pocket clip while
taking video or recording audio in order to
avoid blocking the microphone or lens.
TROUBLESHOOTING
If the pen’s functions stop responding, use a
suitable, NON-METALLIC tool to depress the
reset button located below the status light.
Or, in the case of a steady amber light, simply
allow the battery to drain and then recharge.
WARNINGS
• Obey applicable laws. You are responsible for
using this recorder in accordance with all local,
state and Federal laws.
• Performs best at room temperature. This
recorder will operate in environments between
32° and 104° F (0°-40°C). Use or storage in
extreme temperatures can reduce the life of this
product.
• Avoid excessive moisture. Optimal operating
environment is 20-80% humidity. This camera
is not waterproof. High humidity or immersion
could fog up the lens or cause damage to
internal components.
• Avoid strong light. Do not aim camera at the
sun or aim a strong light source directly into the
lens as it could cause damage.
• Avoid contamination. Do not use this camera in
excessively dusty environments or other areas
where fine particles could get into the lens or
other components.
DISPOSAL
If the device no longer functions or can no
longer be repaired, it must be disposed
of according to regulations regarding
electronic waste. By not disposing of
electronic items in household waste
you will not only be following the law,
but contributing to the protection of the
environment.
LEGAL
Trademarks: All brand names and products are
trademarks or registered trademarks of their respective
owners.
Q-See is a registered trademark of DPS, Inc.
Disclaimer: The information in this document is subject
to change without notice. The manufacturer makes
no representations or warranties, either express or
implied, of any kind with respect to completeness of
its contents.
Manufacture shall not be liable for any damages
whatsoever from misuse of this product.
Q-See Tech Support (USA)
FAQ, videos, guides 24/7 & live chat
(M-F 9-5pm PST) at www.q-see.com/support
INTRODUCTION
Thank you for your purchase of the Q-See
Shadow 1 Surveillance Pen. This versatile
tool is built around an ultra-mini camera which
combines 1.3-megapixel still photography and
high-resolution real-time video with audio in a
compact, discrete package. Store nearly 4,000
pictures or 2 hours of video on the internal 4GB
memory. View or save your files on any Windows
or Macintosh computer with a USB port. Recharge the pen with the included charger or from
a computer’s USB port.
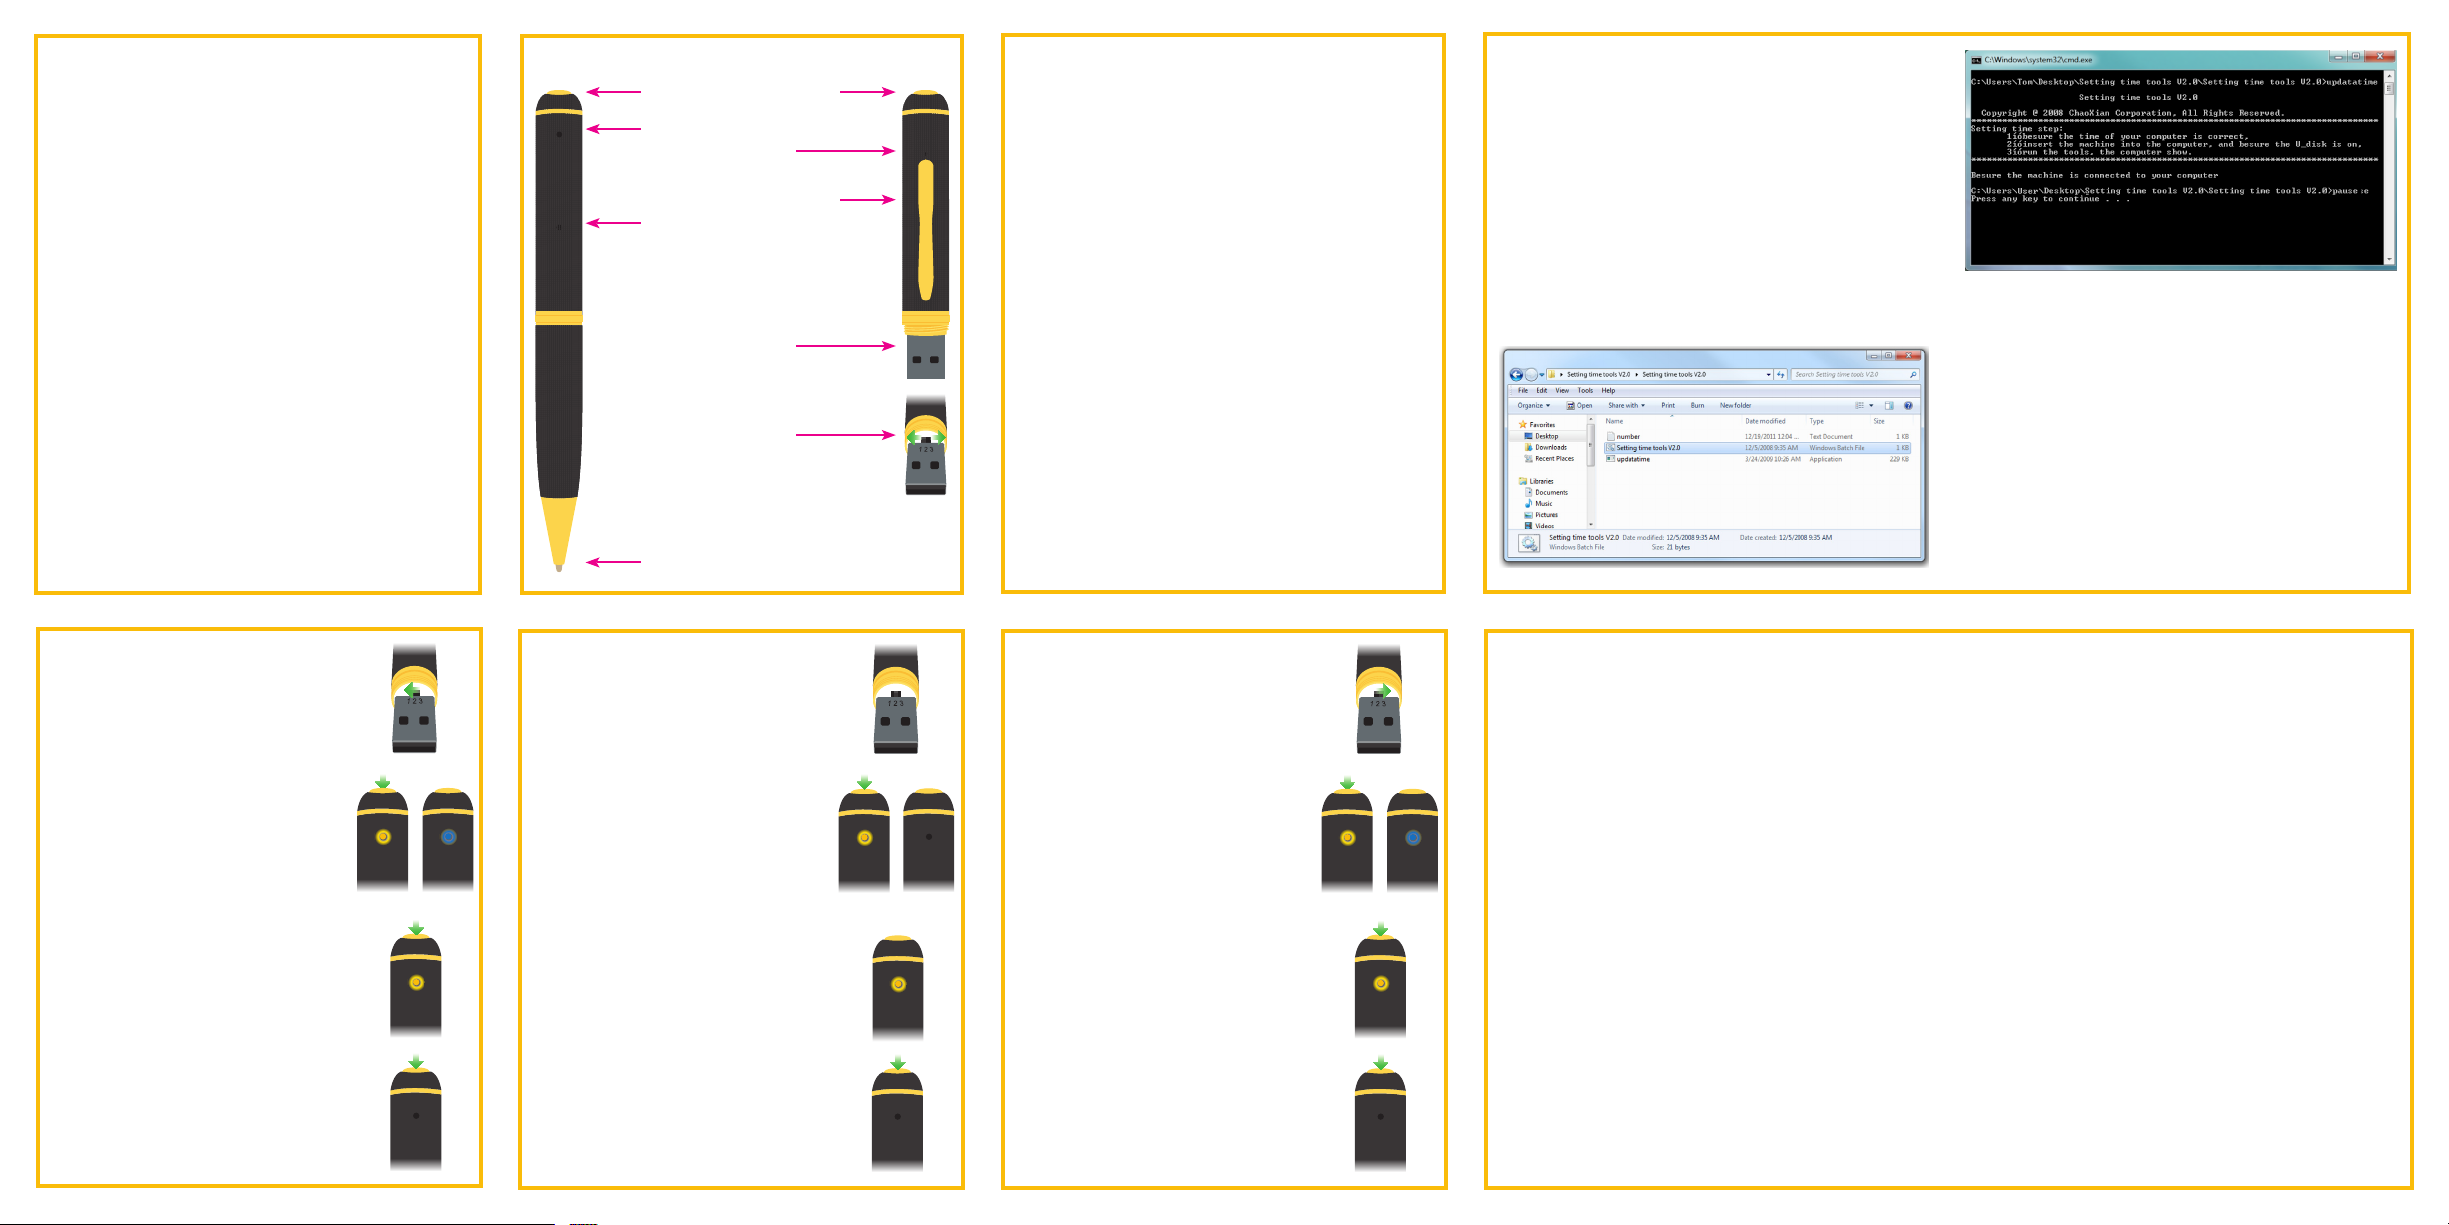
PARTS OPERATION
1. Operation Button
2. Status indicator light
3. Camera lens
4. Microphone
(behind pocket clip)
5. Reset button
6. USB plug
7. Mode Switch
1 Left = Video
2 Center = Still Image
3 Right = Audio Recording
8. Ball-point pen
CHARGING
The pen features a high-capacity rechargable
lithium polymer battery. This form of battery
does not have a “memory” effect meaning that
it can be recharged at any time without loss
of capacity. However, it is recommended that
you fully charge the battery and then use the
camera normally until it is fully discharged before
recharging. Cycling the battery in this manner for
the first five times will ensure maximum battery
capacity and operation time.
When charging the battery – whether using the
included charger, or plugged into an active USB
port – the status light will flash amber until the
battery is fully charged. During the first few uses,
allow the pen to continue charging for an hour
after the light stops flashing.
When using the charger, the green light will
illuminate to indicate that it is receiving power.
When the battery is fully charged, the pen’s
status light will shine a steady amber.
SETTING DATE & TIME
To ensure that your camera records the proper
date and time on the files, you should run the
Setting Time Tools V2.0 program located in the
folder of the same name on the included mini-CD.
Your pen must be turned off before connecting
it to the PC and this application will only function
on a computer running the Windows operating
system.
When the program launches, a Command
window will open and the program will update the
date and time based on your computer’s settings.
Depending upon your computer’s settings,
you may see a warning about the pen’s drive
not being available. The warning is normal
as the program re-mounts the pen. Click
“Continue” and the status of the update will
be displayed in the Command window. Keep
clicking “Continue” until you see the “Success”
message in the window. Your pen now is set to
the proper date and time.
VIDEO RECORDING
1. Move the Mode Switch to Position 1
(use the pen’s tip if needed).
2. Press the Operation Button briefly.
The Status Indicator light will
illuminate amber and blink once to
indicate that it is ready to record.
3. Clicking the Operation Button again
will begin the recording. The status
light will turn blue to indicate that
the pen is recording video.
4. Press the Operation Button again
Standby
to end the recording. The Status
Indicator light will switch from
blue to amber indicating that the
recording has been saved and the
camera is now on “standby” and
ready to record more video.
5. To turn off the camera, press and
hold the Operation Button until the
Status Indicator light goes off. To
conserve energy, the camera will
automatically turn off after a few
minutes of inactivity as well.
Standby
Recording
STILL IMAGE CAPTURE AUDIO RECORDING TETHERED (WEBCAM) OPERATION
1. Move the Mode Switch to
Position 2 in the center (use the
pen’s tip if needed.)
2. Press the Operation Button
briefly to turn the camera on.
The Status Indicator light will
illuminate amber and blink once
to indicate readiness.
3. Press once on the Operation
Button to take a picture. The
Status Indicator light will darken
to indicate that the picture
is being recorded. When it
illuminates again, the camera is
ready to take another picture.
4. To turn off the camera, press
and hold the Operation Button
until the Status Indicator light
goes off. To conserve energy,
the camera will automatically
turn off after a few minutes of
inactivity as well.
Standby Standby
Recording
Image
Standby Standby
1. Move the Mode Switch to Position
3 on the right (use the pen’s tip if
needed.) The effective range is 30’.
2. Press the Operation Button briefly
to turn the camera on. The Status
Indicator light will illuminate amber
and blink once to indicate readiness.
3. Press once on the Operation Button
to begin recording. The Status
Indicator light will change to blue
and continue blinking during the
recording session.
4. To stop recording, press on the
Operation Button again and the light
will return to a steady amber color.
5. To turn off the camera, press and
hold the Operation Button until the
Status Indicator light goes off. To
conserve energy, the camera will
automatically turn off after a few
minutes of inactivity as well.
Recording
(Blinking)
The Shadow 1 can be used as web camera when
connected to a Windows PC via a USB cable. Users of Windows Vista and Windows 7 will need to
use the AMCap software on the included mini-CD.
Please note that you should have your pen turned off
prior to connecting to the computer. It also does not
matter which mode your pen is set (video, camera,
audio) as the software will control the camera. The pen
does not record sound in webcam mode so you will
need to use a headset with a microphone if you wish to
include audio. You will also not be able to use the pen
as a USB storage device while it is in this mode.
Windows XP
Connect your pen to your computer. When the
“New Device” message pops up, press and hold the
Operation Button until the light glows steady (not
blinking) amber. You should then see a new pop-up
stating “New USB Video Device found.” Go to My
Computer and click on the icon labelled USB Video
Camera to begin using it.
Windows Vista and Windows 7
Drag the WebCam Software folder to your hard drive
before using it.
Launch the AMCap software. You will receive a pop-up
message stating, “Sorry, you have no video capture
hardware.” Click on OK to dismiss this message and
click and hold the Operation Button until the light glows
a steady (not blinking) amber. Select “UVC” or “USB
Video Device” from the Devices menu in the AMCap
window to see the video from your pen’s camera. As
with the video recording mode, you will have best
results if the camera is steady.
You have the option to create a file to save video
captured by the pen in web camera mode. This video is
saved on the computer rather than on the pen. You can
use “Set Capture File...” under the File menu to create
this file, along with the maximum size. Or, you may
create this same file by Selecting “Start Capture” from
the Capture menu.
The basic Windows Media Player will be able to play
back the saved .avi file to view the video.
Previously-recorded video will be overwritten in this file
so it is best to “Save As” when playing the AVI file back
in your media player software.
 Loading...