


DVD Navigation Unit
ENGLISH
Operation Manual
AVIC-9DVD

The screen shown in the example may differ from the actual screen.
The actual screen may be changed without notice for performance and function improvements.

Introduction
License Agreement
■PIONEER AVIC-9DVD
THIS IS A LEGAL AGREEMENT BETWEEN YOU, AS THE END USER, AND PIONEER CORP.(JAPAN) (“PIONEER”). PLEASE CAREFULLY READ THE TERMS AND CONDITIONS OF THIS AGREEMENT BEFORE USING THE SOFTWARE INSTALLED ON THE PIONEER PRODUCTS. BY USING THE SOFTWARE INSTALLED ON THE PIONEER PRODUCTS, YOU ARE AGREEING TO BE BOUND BY THE TERMS OF THIS AGREEMENT. THE SOFTWARE INSTALLED ON THE PIONEER PRODUCTS INCLUDES DATABASE OF NAVTECH Data OF Navigation Technologies Corporation (“NAVTECH”) AND SEPARATE TERMS ATTACHED SHALL BE APPLIED TO THE DATABASE BY THE NAVTECH Data BY NAVTECH RESPECTIVELY. IF YOU DO NOT AGREE WITH THESE TERMS, PLEASE RETURN THE PIONEER PRODUCTS (INCLUDING THE SOFTWARE AND ANY WRITTEN MATERIALS) WITHIN FIVE (5) DAYS OF RECEIPT OF THE PRODUCTS, TO THE PLACE FROM WHICH YOU PURCHASED THEM, FOR A FULL REFUND OF THE PURCHASE PRICE OF THE PIONEER PRODUCTS.
1. GRANT OF LICENSE
Pioneer grants to you a non-transferable, non-exclusive license to use the software installed on the Pioneer products (the “Software”) and the related documentation solely for your own personal use or for internal use by your business, only on such Pioneer products.
You shall not copy, reverse engineer, translate, port, modify or make derivative works of the Software. You shall not loan, rent, disclose, publish, sell, assign, lease, sublicense, market or otherwise transfer the Software or use it in any manner not expressly authorized by this agreement. You shall not derive or attempt to derive the source code or structure of all or any portion of the Software by reverse engineering, disassembly, decompilation, or any other means. You shall not use the Software to operate a service bureau or for any other use involving the processing of data for other persons or entities.
Pioneer and its licensor(s) shall retain all copyright, trade secret, patent and other proprietary ownership rights in the Software. The Software is copyrighted and may not be copied, even if modified or merged with other products. You shall not alter or remove any copyright notice or proprietary legend contained in or on the Software.
You may transfer all of your license rights in the Software, the related documentation and a copy of this License Agreement to another party, provided that the party reads and agrees to accept the terms and conditions of this License Agreement.
1

2. DISCLAIMER OF WARRANTY
The Software and related documentation are provided to you “AS IS”. PIONEER AND ITS LICENSOR(S) (for the purpose of provisions 2 and 3, Pioneer and its licensor(s) shall be collectively referred to as “Pioneer”) MAKES AND YOU RECEIVE NO WARRANTY, WHETHER EXPRESS OR IMPLIED, AND ALL WARRANTIES OF MERCHANTABILITY AND FITNESS FOR ANY PARTICULAR PURPOSE ARE EXPRESSLY EXCLUDED. SOME STATES DO NOT ALLOW EXCLUSION OF IMPLIED WARRANTIES, SO THE ABOVE EXCLUSION MAY NOT APPLY TO YOU. The Software is complex and may contain some non-conformities, defects or errors. For example, the voice recognition function as implemented by the Software may not recognize your voice. Pioneer does not warrant that the Software will meet your needs or expectations, that operation of the Software will be error free or uninterrupted, or that all non-conformities can or will be corrected. Furthermore, Pioneer does not make any representations or warranties regarding the use or results of the use of the Software in terms of its accuracy, reliability or otherwise.
3. LIMITATION OF LIABILITY
IN NO EVENT SHALL PIONEER BE LIABLE FOR ANY DAMAGES, CLAIM OR LOSS INCURRED BY YOU (INCLUDING, WITHOUT LIMITATION, COMPENSATORY, INCIDENTAL, INDIRECT, SPECIAL, CONSEQUENTIAL, OR EXEMPLARY DAMAGES, LOST PROFITS, LOST SALES OR BUSINESS, EXPENDITURES, INVESTMENTS, OR COMMITMENTS IN CONNECTION WITH ANY BUSINESS, LOSS OF ANY GOODWILL, OR DAMAGES) RESULTING FROM THE USE OF OR INABILITY TO USE THE SOFTWARE, EVEN IF PIONEER HAS BEEN INFORMED OF, KNEW OF, OR SHOULD HAVE KNOWN OF THE LIKELIHOOD OF SUCH DAMAGES. THIS LIMITATION APPLIES TO ALL CAUSES OF ACTION IN THE AGGREGATE, INCLUDING WITHOUT LIMITATION BREACH OF CONTRACT, BREACH OF WARRANTY, NEGLIGENCE, STRICT LIABILITY, MISREPRESENTATION, AND OTHER TORTS. IF PIONEER’S WARRANTY DISCLAIMER OR LIMITATION OF LIABILITY SET FORTH IN THIS AGREEMENT SHALL OR FOR ANY REASON WHATSOEVER BE HELD UNENFORCEABLE OR INAPPLICABLE, YOU AGREE THAT PIONEER’S LIABILITY SHALL NOT EXCEED FIFTY PERCENT (50%) OF THE PRICE PAID BY YOU FOR THE ENCLOSED PIONEER PRODUCT.
Some states do not allow the exclusion or limitation of incidental or consequential damages, so the above limitation or exclusion may not apply to you. This warranty disclaimer and limitation of liability shall not be applicable to the extent that any provision of this warranty is prohibited by any federal, state or local law which cannot be preempted.
4. EXPORT LAW ASSURANCES
You agree and certify that neither the Software nor any other technical data received from Pioneer, nor the direct product thereof, will be exported outside the country or district (the “Country”) governed by the government having jurisdiction over you (the “Goverment”) except as authorized and as permitted by the laws and regulations of the Goverment. If the Software has been rightfully obtained by you outside of the Country, you agree that you will not re-export the Software nor any other technical data received from Pioneer, nor the direct product thereof, except as permitted by the laws and regulations of the Goverment and the laws and regulations of the jurisdiction in which you obtained the Software.
5. TERMINATION
This Agreement is effective until terminated. You may terminate it at any time by destroying the Software. The Agreement also will terminate if you do not comply with any terms or conditions of this Agreement. Upon such termination, you agree to destroy the Software.
2

6. MISCELLANEOUS
This is the entire Agreement between Pioneer and you regarding its subject matter. No change in this Agreement shall be effective unless agreed to in writing by Pioneer. If any provision of this Agreement is declared invalid or unenforceable, the remaining provisions of this Agreement shall remain in full force and effect.
3

■TERMS AND CONDITIONS for the NAVTECH Data
THIS IS A LEGAL AGREEMENT (“AGREEMENT”) BETWEEN YOU, THE END USER, AND NAVIGATION TECHNOLOGIES CORPORATION (NAVTECH) AND ITS SUPPLIERS, THE TERMS AND CONDITIONS OF WHICH ARE SET FORTH BELOW. BY USING YOUR COPY OF THE NAVTECH DATA, YOU AGREE TO THE TERMS AND CONDITIONS OF THIS AGREEMENT.
Personal Use Only. You are granted a non-exclusive, personal license to use this information solely for your personal, non-commercial purposes, and not for service bureau, time-sharing or other similar purposes. You may make one copy of the NAVTECH Data for archival or backup purposes only. You may not otherwise reproduce, copy, modify, decompile, disassemble or reverse engineer any portion of the NAVTECH Data, and may not transfer or distribute it in any form, for any purpose.
Ownership. You acknowledge that the NAVTECH Data, related documentation and other proprietary rights therein are owned by NAVTECH and/or its suppliers. All rights not expressly granted in this Agreement are expressly retained by and for NAVTECH and its suppliers.
No Warranty. This NAVTECH Data is provided to you “as is,” and you agree to use it at your own risk. NAVTECH and its licensors (and their licensors and suppliers) make no guarantees, representations or warranties of any kind, express or implied, arising by law or otherwise, including but not limited to, content, quality, accuracy, completeness, effectiveness, reliability, fitness for a particular purpose, usefulness, use or results to be obtained from the NAVTECH Data.
Disclaimer of Warranty: NAVTECH AND ITS LICENSORS (INCLUDING THEIR LICENSORS AND SUPPLIERS) DISCLAIM ANY WARRANTIES, EXPRESS OR IMPLIED, OF QUALITY, PERFORMANCE, MERCHANTABILITY, FITNESS FOR A PARTICULAR PURPOSE OR NON-INFRINGEMENT. Some States, Territories and Countries do not allow certain warranty exclusions, so to that extent the above exclusion may not apply to you.
Disclaimer of Liability: NAVTECH AND ITS LICENSORS (INCLUDING THEIR LICENSORS AND SUPPLIERS) SHALL NOT BE LIABLE TO YOU: IN RESPECT OF ANY CLAIM, DEMAND OR ACTION, IRRESPECTIVE OF THE NATURE OF THE CAUSE OF THE CLAIM, DEMAND OR ACTION ALLEGING ANY LOSS, INJURY OR DAMAGES, DIRECT OR INDIRECT, WHICH MAY RESULT FROM THE USE OR POSSESSION OF THE NAVTECH DATA; OR FOR ANY LOSS OF PROFIT, REVENUE, CONTRACTS OR SAVINGS, OR ANY OTHER DIRECT, INDIRECT, INCIDENTAL, SPECIAL OR CONSEQUENTIAL DAMAGES ARISING OUT OF YOUR USE OF OR INABILITY TO USE THE NAVTECH DATA, ANY DEFECT IN THE NAVTECH DATA, OR THE BREACH OF THESE TERMS OR CONDITIONS, WHETHER IN AN ACTION IN CONTRACT OR TORT OR BASED ON A WARRANTY, EVEN IF NAVTECH OR ITS LICENSORS HAVE BEEN ADVISED OF THE POSSIBILITY OF SUCH DAMAGES. Some States, Territories and Countries do not allow certain liability exclusions or damages limitations, so to that extent the above may not apply to you.
Limitation of Liability. Without limiting the foregoing, in no event shall NAVTECH’s and/or its suppliers’ liability to you for any cause under any theory exceed the amount paid by you for your copy of the NAVTECH Data.
4

Termination. NAVTECH and its suppliers may terminate this Agreement at any time upon your breach of any term of this Agreement. Upon any such termination, you shall return your copy of the NAVTECH Data and all related documentation to NAVTECH and/or its suppliers.
Export Control. You agree not to export from anywhere any part of the NAVTECH Data except in compliance with, and with all licenses and approvals required under, applicable export laws, rules and regulations.
Government End Users. If the NAVTECH Data is being acquired by or on behalf of the United States government or any other entity seeking or applying rights similar to those customarily claimed by the United States government, the Data is licensed with “Restricted Rights.” Utilization of the Data is subject to the restrictions specified in the “Rights in Technical Data and Computer Data” clause at DFARS 252.227-7013, or the equivalent clause for non-defense agencies. Manufacturer is Navigation Technologies Corporation, 10400 West Higgins Road, Rosemont, Illinois 60018.
Indemnity. You agree to indemnify, defend and hold NAVTECH and its licensors (including their respective licensors, suppliers, assignees, subsidiaries, affiliated companies, and the respective officers, directors, employees, shareholders, agents and representatives of each of them) free and harmless from and against any liability, loss, injury (including injuries resulting in death), demand, action, cost, expense, or claim of any kind or character, including but not limited to attorney’s fees, arising out of or in connection with any use or possession by you of the NAVTECH Data.
Entire Agreement. These terms and conditions constitute the entire agreement between NAVTECH (and its licensors, including their licensors and suppliers) and you pertaining to the subject matter hereof, and supersedes in their entirety any and all written or oral agreements previously existing between us with respect to such subject matter.
Governing Law. The above terms and conditions shall be governed by the laws of the Illinois [insert “Netherlands” where European NAVTECH data is used], without giving effect to (i) its conflict of laws provisions, or (ii) the United Nations Convention for Contracts for the International Sale of Goods, which is explicitly excluded. You agree to submit to the jurisdiction of Illinois [insert “The Netherlands” where European NAVTECH Data is used] for any and all disputes, claims and actions arising from or in connection with the information provided to you hereunder.
5

Table of Contents |
|
Introduction.............................................................................. |
1 |
License Agreement............................................................................................................. |
1 |
PIONEER AVIC-9DVD ................................................................................................. |
1 |
TERMS AND CONDITIONS for the NAVTECH Data................................................... |
4 |
Table of Contents................................................................................................................. |
6 |
Important Safety Information.......................................................................................... |
11 |
Notes Before Using the System..................................................................................... |
12 |
Precaution .................................................................................................................. |
12 |
About the main unit battery ........................................................................................ |
14 |
How to Read This Manual................................................................................................ |
15 |
How to use this manual .............................................................................................. |
15 |
Terminology................................................................................................................ |
16 |
Chapter 1 |
|
Getting Started ...................................................................... |
17 |
Setup 1: Preparing the Remote Control....................................................................... |
17 |
Selecting dipswitches ................................................................................................. |
17 |
Inserting the batteries to the Remote Control............................................................. |
18 |
Setup 2: Getting to Know the Components and What They Do ............................ |
19 |
The Remote Control ................................................................................................... |
19 |
Microphone................................................................................................................. |
21 |
Main unit ..................................................................................................................... |
22 |
Setup 3: Installing the Program...................................................................................... |
24 |
Chapter 2 |
|
Basic Operation...................................................................... |
27 |
Switching On and Off........................................................................................................ |
27 |
Types of Menu.................................................................................................................... |
28 |
Main menu.................................................................................................................. |
28 |
Shortcut menu ............................................................................................................ |
29 |
Basic Navigation................................................................................................................ |
30 |
How to Use the Map.......................................................................................................... |
36 |
How to view the map of the current location .............................................................. |
36 |
Changing the scale of the map................................................................................... |
39 |
Moving the map to the location you want to see ........................................................ |
39 |
6

Chapter 3 |
|
Setting a Route to Your Destination.................................... |
43 |
Basic Flow of Route Calculation.................................................................................... |
43 |
Selecting the country where you want to search ....................................................... |
44 |
Perform the route calculation of the several route options, and select one ............... |
44 |
Route Calculation to Your Home Location or to Your Favourite Location ......... |
47 |
Selecting your Destination from the Address Book................................................. |
47 |
Searching for your Destination by Address ............................................................... |
48 |
Specifying an Intersection as Your Destination......................................................... |
50 |
Finding Your Destination by Selecting the Type of Facility.................................... |
51 |
Searching for Points of Interest (POI) ........................................................................ |
51 |
Finding POI in your surroundings .............................................................................. |
52 |
Finding Your Destination by Specifying the Postal Code....................................... |
53 |
Setting an Entrance or Exit of a Motorway as Your Destination............................ |
54 |
Chapter 4 |
|
Guidance to Your Destination............................................... |
55 |
Route Guidance by Your Navigation System............................................................. |
55 |
Route guidance by display and voice ........................................................................ |
55 |
When receiving traffic information ahead on the set route ........................................ |
56 |
Checking the Suggested Route..................................................................................... |
57 |
Checking the Suggested Route from the Information menu ...................................... |
57 |
Recalculating the Route to Your Destination ............................................................. |
58 |
Cancelling the Route Guidance..................................................................................... |
59 |
Delete the current route, and cancel the route guidance........................................... |
59 |
Changing your destination ......................................................................................... |
59 |
Adding Via Points to the Current Route ...................................................................... |
60 |
Adding a via point ...................................................................................................... |
60 |
Skipping a via point.................................................................................................... |
61 |
Deleting a via point from the route ............................................................................. |
61 |
Displaying Certain Points Of Interest on the Map ..................................................... |
62 |
7

Chapter 5 |
|
Utilising Various Information ............................................... |
63 |
Editing the Address Book ............................................................................................... |
63 |
Registering a previous location in the Address Book ................................................. |
63 |
Editing a location’s information................................................................................... |
65 |
Deleting the data in the Address Book ....................................................................... |
66 |
Confirming the location contained in the Address Book on the map.......................... |
67 |
Registering Your Home and Your Favourite Location............................................. |
68 |
Registering a location ................................................................................................. |
68 |
Changing or deleting your home or your favourite location ........................................ |
70 |
Registering a Password................................................................................................... |
71 |
Setting Areas to Avoid...................................................................................................... |
72 |
Registering an Area to Avoid...................................................................................... |
72 |
Changing or deleting an Area to Avoid....................................................................... |
73 |
Using Traffic Information................................................................................................. |
74 |
Confirming traffic information relevant to the current route ........................................ |
74 |
Selecting the radio station .......................................................................................... |
76 |
Using a PC Card................................................................................................................. |
78 |
Initialising a PC card................................................................................................... |
78 |
Storing the data of registered locations in the PC card .............................................. |
78 |
Loading data from a PC card ..................................................................................... |
79 |
Deleting PC card data ................................................................................................ |
80 |
Checking the Navigation Status..................................................................................... |
81 |
Checking positioning information by satellite ............................................................. |
81 |
Checking sensor learning status and driving status ................................................... |
82 |
Checking the connections of leads and installation positions .................................... |
83 |
Chapter 6 |
|
Customising Your Navigation System ................................ |
85 |
Modifying the Default Settings ....................................................................................... |
85 |
Items Users can Change.................................................................................................. |
86 |
Route Guidance menu ............................................................................................... |
86 |
Map Display menu...................................................................................................... |
88 |
Hardware menu .......................................................................................................... |
88 |
Others menu............................................................................................................... |
88 |
RDS - TMC menu ....................................................................................................... |
90 |
8
Chapter 7 |
|
Operating Your Navigation System with Voice |
..................91 |
Basics of Voice Operation............................................................................................... |
91 |
Available voice commands ........................................................................................ |
92 |
An example of voice operation .................................................................................. |
92 |
Tips for Voice Operation.................................................................................................. |
95 |
Chapter 8 |
|
Playing DVD/CD ..................................................................... |
97 |
To Ensure Safe Driving.................................................................................................... |
97 |
Before Using....................................................................................................................... |
98 |
Compatible DVD, CD Formats................................................................................... |
98 |
What the Symbols on DVDs Indicate......................................................................... |
99 |
How to Listen to a CD..................................................................................................... |
101 |
How to use the Remote Control............................................................................... |
101 |
Basic method of listening to CD............................................................................... |
102 |
Basic of CD-Function ............................................................................................... |
102 |
How to Watch DVD.......................................................................................................... |
104 |
How to use the Remote Control............................................................................... |
104 |
Basic method of watching DVD ............................................................................... |
105 |
Operation of menu ................................................................................................... |
106 |
Stop playing ............................................................................................................. |
107 |
Move the chapter forward/backward........................................................................ |
107 |
Specifying a title or a chapter .................................................................................. |
107 |
Fast-forward / fast-rewind ........................................................................................ |
108 |
Viewing One Frame at a Time ................................................................................. |
108 |
Selecting a sound track type, subtitles or camera angles........................................ |
109 |
To Operate While Checking on the Screen ............................................................. |
111 |
Adjusting Settings........................................................................................................... |
114 |
Basic Operation of the default setting screen .......................................................... |
114 |
Setting the subtitle ................................................................................................... |
115 |
Setting the audio language ...................................................................................... |
116 |
Setting the menu language...................................................................................... |
117 |
Setting viewing restriction ........................................................................................ |
118 |
Setting aspect ratio of the screen ............................................................................ |
119 |
Setting the display of the angle selection mark ....................................................... |
119 |
Language code list.......................................................................................................... |
120 |
9

Appendix .............................................................................. |
121 |
Positioning Technology................................................................................................. |
121 |
Handling Large Errors.................................................................................................... |
123 |
When the positioning by GPS is impossible ............................................................. |
123 |
Conditions likely to cause noticeable positioning errors ........................................... |
124 |
Handling and Care of the Disc...................................................................................... |
125 |
Resetting the System...................................................................................................... |
126 |
Troubleshooting............................................................................................................... |
127 |
Messages and how to react to them........................................................................... |
130 |
Route Setting Information ............................................................................................. |
133 |
Route search specifications ..................................................................................... |
133 |
Route highlighting..................................................................................................... |
134 |
Intersection enlargement .......................................................................................... |
134 |
Tracking.................................................................................................................... |
134 |
About traffic information ........................................................................................... |
134 |
Copyright........................................................................................................................... |
135 |
Specifications................................................................................................................... |
136 |
Glossary............................................................................................................................. |
137 |
Display Information......................................................................................................... |
139 |
10

Important Safety Information
Before using your Navigation System, be sure to read and fully understand the following safety information:
•Read the manual before operating this Navigation System.
•This Navigation System is intended solely as an aid to you in the operation of your vehicle. It is not a substitute for your attentiveness, judgement, and care when driving.
•Do not operate this Navigation System if doing so in any way will divert your attention from the safe operation of your vehicle. Always observe safe driving rules and follow all existing traffic regulations.
•Never allow others to use the system unless they have read and understood the operating instructions.
•Never use this Navigation System to route to hospitals, police stations, or similar facilities in an emergency. The map data may not include a comprehensive list of emergency service facilities.
•Route and guidance information displayed by this equipment is for reference purposes only. It may not accurately reflect the latest permissible routes, road conditions, or traffic restrictions.
•Traffic restrictions and advisories currently in force should always take precedence over guidance given by this product. Always obey current traffic restrictions, even if this product provides contrary advice.
•Failure to input correct information about the local time may result in the product providing improper routing and guidance instructions.
•Never set the volume of your Navigation System so high that you cannot hear outside traffic and emergency vehicles.
•Keep your password secure and confidential. Knowledge of your password can give someone else access to personal information stored by the system, such as the history of destinations you have been to and your home address.
•To promote safety, certain functions are disabled unless the handbrake is on.
•The data encoded in the disc provided with this product is the intellectual property of the provider, and the provider is responsible for such content.
•As with any accessory in your vehicle’s interior, you should not allow this Navigation System to divert your attention from the safe operation of your vehicle. If you experience difficulty in operating the system or reading the display, please make adjustments while safely parked.
11

Notes Before Using the System
■Precaution
•This product complies with the EMC Directives (89/336/EEC, 92/31/EEC) and CE Marking Directive (93/68/EEC).
•This product does not work correctly in the areas other than Europe.
•Pay close attention to all warnings in this manual and keep this manual handy for future reference.
•Should this product fail to operate properly, contact your dealer or the nearest authorised Pioneer service facility.
CLASS 1
LASER PRODUCT
On the top of the unit.
•The Pioneer CarStereo-Pass is for use only in Germany.
•Always keep the volume low enough for outside sounds to be audible.
•Protect this product from moisture.
Handbrake interlock
Certain functions offered by this Navigation System could be dangerous if used while driving. To prevent them being used while in motion, there is an interlock with your vehicle’s handbrake. If you attempt to use these functions while driving, the message “You cannot use this function while driving” will be displayed. Find a safe place to stop and apply the handbrake.
12
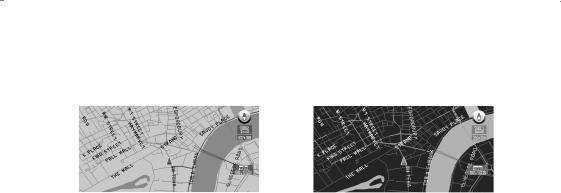
Colour difference of the map display between day and night
To prevent the normal display from appearing too bright and distracting you when driving after dark or in dull conditions, the map background changes automatically to a darker colour when you switch on your vehicle lights. You can, however, turn off this automatic switching (see “Map Display” on page 88).
|
|
|
Daytime display |
|
Night display |
The examples in this manual are illustrated using the daytime display. When driving at night, the colours you see may differ from those shown.
To use this function, the Orange/white lead to this unit must be connected correctly.
Avoiding low battery
When using this unit, make sure to start your engine first. Using this unit without starting the engine will run down the battery.
About this disc
Only use the Pioneer DVD Map disc with the product. You cannot use other discs. See page 98 and 125 for playing DVD-VIDEO or CD other than Map Disc.
13

■About the main unit battery
The main unit of your Navigation System has a lithium battery for memory backup. Please dispose of the battery properly by following the instructions below.
 WARNING
•Keep the lithium battery out of the reach of the children. Should the battery be swallowed, immediately consult a doctor.
 CAUTION
•Do not recharge, disassemble, heat or dispose of the battery in a fire.
•Use a CR2450 (3V) lithium battery only. Never use other types of battery with this unit.
•Do not handle the battery with metallic tools.
•Do not store the lithium battery with metallic materials.
•When disposing of used batteries, please comply with governmental regulations or environmental public institution’s rules that apply in your country/area.
•Always check carefully that you are loading the battery with its (+) and (-) poles facing in the proper directions.
How to remove the battery
PRECAUTION:
• Remove the battery from the main unit using a non-metallic tapered instrument.
1Using a screwdriver, remove the screw at the side of the main unit.
2Using a pointed tool, pull out the tray on which the battery is set, and remove the battery.
14

How to Read This Manual
This manual provides all the information you need to make full use of your new Navigation System. The first few sections give an overview of the system and explain how to prepare it for use. The remainder is in the form of a function reference giving full details of every feature. A comprehensive list of all sections of the manual is provided in the table of contents at the beginning of this introduction.
■How to use this manual
For reasons of safety, it is particularly important that you fully understand your Navigation System before using it. However, you don’t have to read the whole manual before obtaining guidance to your first destination. The following summary indicates which chapters you should read now and which you can come back to later.
Read the chapters marked * before attempting to obtain guidance to your first destination.
1. Getting Started*
This chapter introduces the components of your Navigation System and takes you through the initial setup process. You should read this chapter first.
2. Basic Operation*
Read this chapter after going through the setup process. It explains what you see on the display and how to use the menus. You will then be ready to navigate to your first destination.
3. Setting a Route to Your Destination*
This chapter describes a number of ways to choose a destination. Choose the one that suits your first destination and read that section; you can then come back and read the rest of the chapter later.
4. Guidance to Your Destination*
Before actually setting out toward your chosen destination, read this chapter to learn how to interpret the guidance given by your Navigation System.
5. Utilising Various Information
This chapter provides information about the various information available. Read it to learn more about the useful features available to you.
6. Customising Your Navigation System
The behaviour of your Navigation System depends on a number of settings. If you need to change any of the initial settings (default settings), read the relevant section of this chapter.
7. Operating Your Navigation System with Voice
This chapter gives details of the voice recognition capabilities of your Navigation System. Read it when you are ready to begin giving voice commands while under guidance.
8. Playing DVD/CD
With this unit, you can play DVD or CD. This chapter describes how to use the disc, such as play/pause, single frame step.
Appendix
Read the appendix to learn more about your Navigation System, the technology it uses, and such information as the availability of after-care. Please see “Display Information” in the end of this manual for checking the details of each item on the menu.
15

■Terminology
Before moving on, take a few minutes to read the following information about the conventions used in this manual. Familiarity with these conventions will help you greatly as you learn how to use your new equipment.
•Buttons on your Remote Control are referred to as: NAVI button, MENU button.
•Items in various menus are referred to like this: “New Destination” and “Settings”.
•Extra information, alternative use and other notes are presented like this:
After removing the disc from the slot, keep it in the case.
16
Chapter 1
Getting Started
Setup 1: Preparing the Remote Control
You generally use the Remote Control to operate the Navigation System. Before using the Remote Control, set the dipswitches and insert the batteries as described in the following sections.
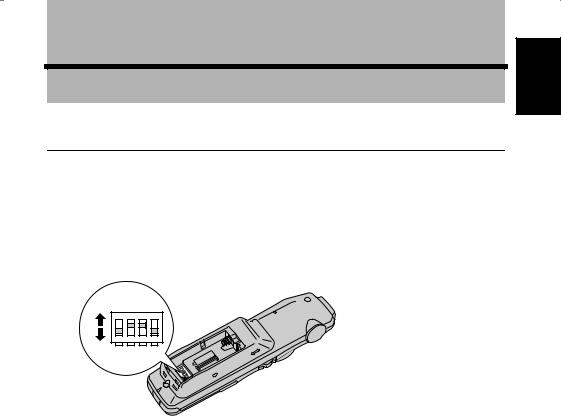
■Selecting dipswitches
When you remove the battery cover of the Remote Control, you will see the dipswitches as shown in the following illustration. You can set each dipswitch using the tip of a ballpoint pen.
ON
ON
1 2 3 4
OFF
Started Getting 1 Chapter
Setting Switch 1
Set Switch 1 depending on the display used.
ON : This is set if turning this on is recommended for a display used with this unit. OFF : When the following Pioneer displays are used for navigation display:
AVX-P7000CD, AVX-7000, AVD-W8000, AVD-W6000, AVD-W6010, AVX-7300, AVX-P7300DVD
Setting Switch 2
Set switch 2 depending on the equipment’s volume which you alter the VOL dial.
ON : Volume of Pioneer Head Unit (including Pioneer AV master unit) is adjusted. OFF : Volume of the voice guidance of Navigation system is adjusted.
Setting Switch 3
Set Switch 3 depending on the audio equipment used:
ON : When combining with Pioneer AV master unit (AVM-P9000R, AVM-P8000R) OFF : When combining with Pioneer Head Unit with IP-BUS
When combining with AVM-P7000R
Switch 4 is not to be used (It does not matter whether it is ON or OFF).
Please set the switches correctly according to the combination of your equipment. Please make sure that the setting is correct, otherwise the Navigation System will not work properly.
17

■Inserting the batteries to the Remote Control
Remove the battery cover, and insert two alkaline (UM-4, AAA, LR03, 1.5V) batteries.
 Caution
•Take care to insert the batteries the right way round as shown by the + and - marks in the diagram.
•Do not mix new batteries with old.
•Do not mix different types of batteries. Even batteries of the same size may have different voltages.
•If the Remote Control will be out of use for a long period, remove the batteries.
•If a battery leaks, completely clean any liquid or deposits from the battery compartment before inserting new batteries.
•The supplied batteries cannot be recharged.
•We recommend using alkaline batteries as replacements.
•When disposing of used batteries, please comply with governmental regulations or environmental public institutional rules that apply in your country/area.
18
Setup 2: Getting to Know the Components and What They Do
Before using this unit, get to know the name of each component and how it is used.
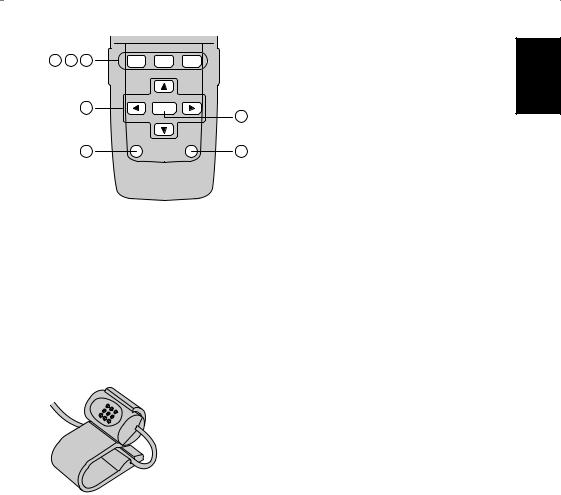
■The Remote Control
1 |
(1) Transmitter |
|
Signals of the Remote Control are transmitted |
|
from here. |
|
NEXT |
|
(2) Scale control |
|
|
|
You use the scale control to enlarge or reduce the |
||
|
|
|
||
2 |
ZOOM |
|
displayed map. When you move the scale control |
|
|
|
|||
|
3 downwards, the scale of the displayed map is |
|||
|
|
|||
|
PREV |
|
enlarged and a more detailed map is displayed. |
|
|
|
|
Conversely, moving it upwards reduces the dis- |
|
|
|
|
played map, and a wider area is displayed. In |
|
4 |
O K |
5 |
menus, when a list is longer than one screen, this |
|
control is used for indicating the next screen or |
||||
|
|
|
||
|
|
|
previous screen. |
|
6 |
NAVI |
|
VoL |
7 |
(3) TALK button |
|
|
||||
MENU |
|
TOP |
|
||
|
|
MENU |
|
You use the TALK button to start voice recogni- |
|
|
DVD |
|
|
||
|
|
|
|
||
|
|
|
MENU |
9 |
|
8 |
NAVI |
|
tion, allowing you to command the Navigation |
||
|
|
|
|||
|
|
DISPLAY |
|
|
System by speech. When a voice command is |
10 11 12 |
DETOUR |
GUIDE |
|
given, you can cycle through possible matches by |
|
ROUTE |
|
||||
|
|
CANCEL |
|
|
|
|
|
|
|
|
clicking down this button. |
|
1 |
2ABC |
3 DEF |
|
With the “CD-SR80” Steering Remote Control |
|
|
(sold separately), you can press the BAND but- |
|||
|
4 GHI |
5 JKL |
6MNO |
|
ton and the F button to switch on the operation |
13 |
|
mode of the Steering Remote Control. When the |
|||
|
|
|
|
||
P |
|
W |
|
operation mode is switched on, by pressing the |
|
|
8 TUV |
|
|||
|
7QRS |
9 XYZ |
|
BAND button of the Steering Remote Control, |
|
|
|
|
|
|
|
|
+10 |
0 |
CLEAR |
|
you can activate voice operation, which is |
|
|
|
|
|
equivalent of pressing the TALK button. |
14 |
|
DELETE |
OK |
16 |
(4) Joystick/OK button |
AUDIO |
SUB.T |
ANGLE |
|||
|
|
|
|
|
|
|
|
|
|
|
Use the joystick to select items in the display and |
|
|
|
|
|
to scroll the map. The joystick is also the OK but- |
|
|
|
|
|
ton; simply press it to select a location on the map |
|
|
15 |
|
|
or an option displayed on the screen. |
|
|
|
|
|
|
|
|
|
|
|
Used as the joystick : |
|
|
|
|
|
Directions of movements indi- |
|
|
|
|
|
cated by arrows are possible. |
Used as the OK button :
Press straight down.
Started Getting 1 Chapter
19

(5) BACK button
While using a menu, pressing this button cancels the present operation and returns you to the previously displayed menu or list.
(6) Mode switch
Using the Remote Control, you can switch to operate either the Navigation System or the DVD/CD. If switching the operation mode, the function of each button on the Remote Control is also switched (see “How to Listen to a CD” on page 101 and “How to Watch DVD” on page 104).
(7) VOL dial
When you turn the dial downwards, the volume decreases. Turning it upwards increases the volume.
•When the Dipswitch 2 is OFF, the volume of the voice guidance of the Navigation System is adjusted.
•When the Dipswitch 2 is ON, the volume of Pioneer Head Unit is adjusted. If the dial is pressed, the volume is reduced to around 1/10th of the volume (ATT function). When pressed again, the volume returns to its previous level.
(8) NAVI button
You press the NAVI button to view the map or return to guidance. Also, when the map is scrolled, pressing this button returns to the display of the map of your surroundings.
(9) MENU button
Pressing the MENU button displays a menu of options.
(10) DETOUR button
Press this button to restart route calculation, such as calculating a detour. If this button is pressed for more than two seconds, you can see the information (passing roads and driving distance, and so on) of the route down which you are currently being guided
(see Chapter 4 “Guidance to Your Destination”).
(11) CANCEL ROUTE button
Press this button to cancel the route guidance. When pressed for more than two seconds, the next via point is recognised as already being passed, and a new route calculation starts
(see Chapter 4 “Guidance to Your Destination”).
(12) GUIDE button
Press this button if you want to hear the voice guidance again. If this button is pressed for more than two seconds, you can listen to traffic information on your route (where available.).
(13) Numeric keypad
You use this pad for entering characters or numbers.
(14) • (AUDIO) button
Not used.
(15) DELETE button
Press to delete the character you just entered. If you press this button for more than two seconds, all the characters entered will be deleted.
(16) OK button for numeric keypad
This works in the same way as “OK” on the text palette.
20
17 18 19
20
22
PROGRAM V.CHANGE SOURCE
PGM |
V |
S |
|
CH/DISC |
|
|
|
TRK/ |
|
|
SEEK |
|
AUDIO |
|
FUNC |
|
BAND |
/BACK |
|
/ESC |
(17)PROGRAM button (for audio operation)
(18)V.CHANGE button (for audio operation)
21 (19) SOURCE button (for audio operation)
(20) Cross Key / 5, ∞, 2, 3 button 23 (for audio operation)
(21)AUDIO button (for audio operation)
(22)FUNC/BACK button (for audio operation)
(23)BAND/ESC button (for audio operation)
When the Mode switch is set to “NAVI”, each button from (17) to (23) has the same function as the ones for Pioneer’s Head Unit, and so you can operate the Head Unit using the Remote Control. However, some buttons become invalid depending on the combination of the models.
V.CHANGE button is for switching images from Pioneer AV master unit or the display units that are to be sold in the near future. (This button is different from the V.SEL button installed on some Pioneer products, so that it may not work in some cases.)
■Microphone
(1) Microphone
After pressing the TALK button to start voice operation, this microphone hears your commands.
Started Getting 1 Chapter
21
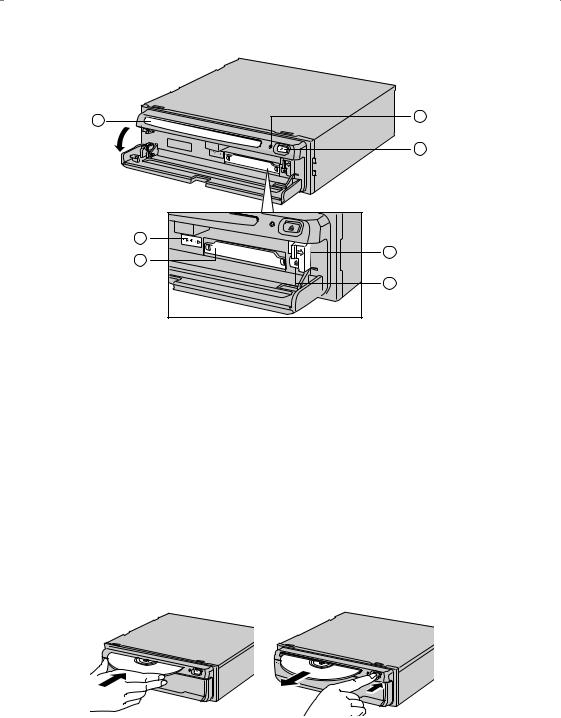
■Main unit
1 |
2 |
|
|
|
3 |
7 |
6 |
4 |
5 |
(1)Disc loading slot
(2)Reset button
If the system goes wrong, reset it by pressing this recessed button with a ballpoint pen or similar pointed object. (See “Resetting the System” on page 126).
(3)Disc eject button
(4)PC card slot
(5)PC card eject button
Remove the PC card by pressing this button.
(6) PC card lock lever
This lever is used when you remove the PC card.
(7) PC card lock lamp
The red light goes on when the PC card is inserted and a proper connection is made.
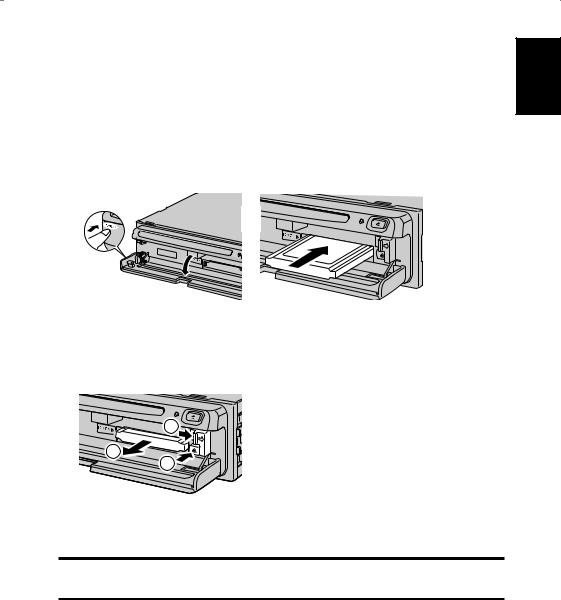
Setting and removing the disc
Insert the disc to the disc slot with the label-side up. To remove the disc, press the disc eject button on the right-hand side of the disc loading slot.
22
Do not try to use discs other than a disc designed for this system. Please use only the disc specified by Pioneer.
Do not attempt to use discs that are cracked, scratched, bent, or otherwise damaged.
Treat your disc carefully. See “Handling and Care of the Disc” on page 125 for advice on proper handling and use.
After removing the disc from the slot, keep it in the case.
Setting the PC card
Open the cover at the front of the main unit. Hold the PC card label-side up: the arrow shows the direction of insertion. Insert the card firmly until the PC card eject button pops out. If the main unit power is on, the PC card lock lamp changes from green to red, showing that the PC card is inserted correctly and ready for use.
Removing the PC Card
Open the cover on the front of the main unit. Slide the PC card lock lever to the right (1), and hold it there. Check that the PC card lock lamp has changed to green, and then press the PC card eject button (2). (Keep holding the PC card lock lever to the right until the PC card is removed completely.)
1
3
2
Started Getting 1 Chapter
 Caution
Do not remove the PC card while the PC card lock lamp is red. It may damage the main unit of the Navigation System or the PC card.
PC card can be set or removed regardless of the power ON/OFF of the main unit (ON/OFF of the engine).
You can only use a card that conforms to the PCMCIA Type II (5V) standard. If you attempt to use a card complying with a different standard, the card slot may be damaged, or a malfunction may occur.
Do not remove the card while editing the data on the PC card. You may damage the main unit of the navigation system, or corrupt the data stored on the PC card.
23
Setup 3: Installing the Program
The program is installed to the main unit of the Navigation System using the disc provided. When installing the program, you carry out the following operations. When all the setup procedures are completed, the map of your surroundings appears, and you can use the Navigation System.
1.Insert the disc while the vehicle is parked.
2.Select the language used for the Navigation System.
3.Setting the clock.
1Park your vehicle in a safe place.
Leave the engine on, and make sure that the handbrake is on.
2Insert the disc to the main unit of the Navigation System.
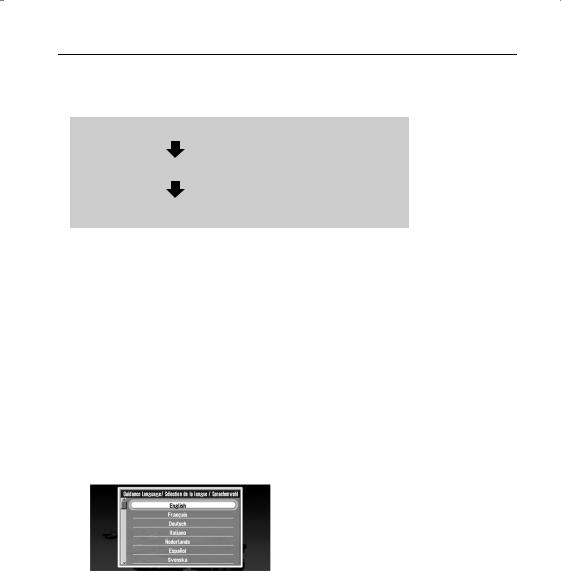
3Select “Yes” and click the OK button.
When you start this unit for the first time, the message confirming if you select another language.
English is the default language of the Navigation System. If desired, you can select another language.
To keep English, move the joystick down to highlight “No”, and click the OK button. After this, proceed to Step 6.
When you want to select another language, highlight “Yes”, click the OK button, and proceed to the next step.
4Select the language from the list.
The list of the languages you can use appears. Move the joystick up or down to highlight the language you want.
5Click the OK button.
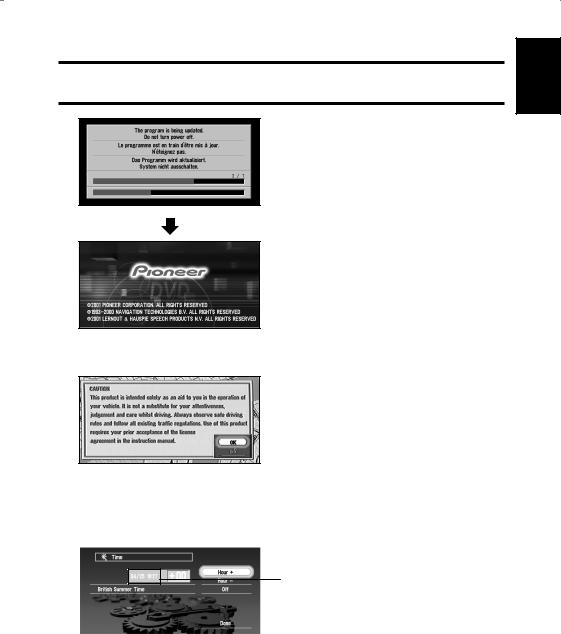
Installation of the program, in the language you chose, begins. During the installation, the following display appears to show the progress.
When the installation is complete, the opening display appears.
24
 Caution
Once the installation of the program starts, do not stop the engine of your vehicle until the installation is completed.
Started Getting 1 Chapter
6Check the details of the cautionary message and click the OK button.
You can also proceed to the next step by pressing the TALK button.
A message asking to set the clock appears.
7Click the OK button.
The clock setting display appears.
8Set the clock.
Paris Standard Time
The time difference between the time originally set in this unit (Paris Standard Time) and the current location of your vehicle is shown. If necessary, adjust the time difference. Move the joystick to select “Hour +” or “Hour -” and click the OK button to change the time difference by one hour. Set the time difference between the current location of your vehicle and the Paris Standard Time.
25
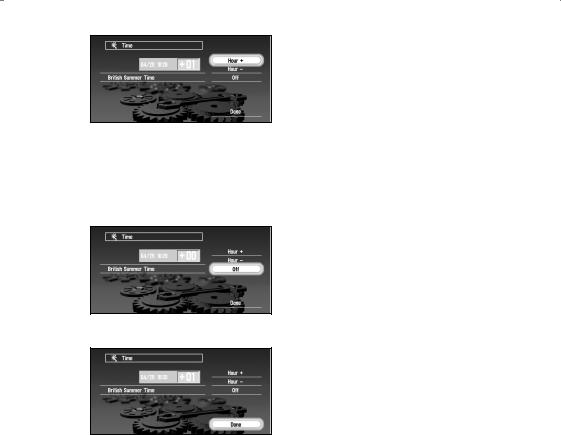
9If necessary, set to summer time.
Summer time is off by default. “Off” is shown on the right-hand side of “British Summer Time”.
If summer time is in effect, move the joystick to select “Off” and click the OK button. When the list of selectable options (“On” and “Off”) appears, move the joystick to select “On” and click the OK button. The summer time setting is then turned On.
10 Select “Done” and click the OK button.
The map of your surroundings appears.
This completes the setup of your Navigation System. Chapter 2 explains the basic operation of your Navigation System.
To change the language and time later, see Chapter 6 “Customising Your Navigation System”.
26

Chapter 2
Basic Operation
Switching On and Off
Switching On
When the engine of your vehicle is running, the power of the main unit of your Navigation System is turned on. After the opening screen appears for a few seconds, a cautionary message appears. Read this message and click the OK or the TALK button; the map of your surroundings appears, and you can now use the Navigation System.
If the disc is not set, the message asking to insert the disc appears. After you set the disc correctly, your Navigation System starts up.
When the password is set
After your Navigation System starts and the cautionary message appears, you are asked to enter the password. Enter your password and select “OK”, and click the OK button. (You cannot enter your password using numeric keypad of the Remote Control.) The map of your surroundings appears, and you can use your Navigation System.
For the details of setting the password, see “Registering a Password” on page 71.
Switching Off
When you turn your vehicle’s engine off, your Navigation System is also switched off.
If you have not arrived at the vicinity of your destination, the route set will not be deleted even if you turn the power to your Navigation System off.
Operation Basic 2 Chapter
27

Types of Menu
You perform most tasks through using menus. A typical sequence of steps is as follows: “Select a menu, Select a menu item with the joystick, and Click the OK button”.
There are two types of menu: the “Main menu” and the “Shortcut menu”.
■Main menu
With the map displayed, press the MENU button and the Main menu appears. You use this menu for basic operation of your Navigation System.
New Destination
The destination is searched and the route to this destination is set (see “Finding a destination on the map” on page 41).
Address Book
Past destinations, via points, and the list of the registered locations are shown. If you select your destination from this menu, your route is calculated (see Chapters 3 and 5).
Return Home
Set your home as your destination and your route is calculated (see Chapter 3).
Go to ...
Set your favourite location, such as your workplace, as your destination and your route is calculated (see Chapter 3).
Settings
Customise the functions of your Navigation System for your own selections (see Chapters 5 and 6). When using PC card, you use this menu (see Chapter 5).
Information
To get information, such as traffic information along the route you are travelling (where available), or the condition of the navigation, you use this menu (see Chapter 5).
28
 Loading...