


AVIC-W8400NEX
AVIC-W6400NEX
MULTIMEDIA NAVIGATION RECEIVER
Operation Manual
English
Notice to all users:
This software requires that the product is properly connected to your vehicle’ s parking brake and depending on your vehicle, additional installation may be required. For more information, please contact your Authorized Pioneer Electronics retailer or call us at (800) 421-1404.
Be sure to read Important Information for the User first!
Important Information for the User includes the important information that you must understand before using this product.

Contents
Thank you for buying this Pioneer product.
Please read through these instructions so you will know how to operate your model properly. After you have finished reading the instructions, keep this document in a safe place for future reference.
 Important
The screen shown in the examples may differ from actual screens, which may be changed without notice for performance and function improvements.
■Precaution ......................... |
5 |
Notes on internal memory........................................ |
5 |
About this manual ....................................................... |
5 |
■Parts and controls............. |
6 |
Main unit ......................................................................... |
6 |
Remote Control............................................................. |
7 |
Protecting your product against theft.................. |
8 |
■Basic operation ............... |
10 |
Notes on using the LCD panel............................... |
10 |
Adjusting the LCD panel angle ............................. |
10 |
Resetting the microprocessor ............................... |
10 |
Preparing the remote control................................ |
11 |
Starting up the unit................................................... |
12 |
Starting up the navigation system ...................... |
13 |
Using the touch panel.............................................. |
14 |
Top menu screen........................................................ |
17 |
■Navigation....................... |
19 |
Menu screen view and operations....................... |
19 |
Map Screen................................................................... |
20 |
Searching for a destination..................................... |
26 |
Starting the navigation............................................ |
34 |
Checking and modifying the current route...... |
34 |
Storing a location in [Saved Location] ............... |
40 |
Storing a route in [Saved Routes] ........................ |
42 |
Receiving real-time traffic information |
|
(TMC)....................................................................... |
43 |
Checking useful information about your |
|
trip............................................................................ |
46 |
Navigation Settings .................................................. |
51 |
Updating the map ..................................................... |
61 |
■Bluetooth ......................... |
63 |
Bluetooth connection.............................................. |
63 |
Bluetooth settings..................................................... |
63 |
Hands-free phoning.................................................. |
64 |
Bluetooth audio ......................................................... |
69 |
■Wi-Fi.................................. |
72 |
Wi-Fi connection........................................................ |
72 |
Wi-Fi settings............................................................... |
72 |
Wi-Fi audio ................................................................... |
73 |
■AV source ......................... |
74 |
Supported AV source................................................ |
74 |
Displaying the AV operation screen.................... |
74 |
Selecting a source ..................................................... |
75 |
Changing the display order of source................ |
75 |
Adjusting the range of favorite source icons |
|
area .......................................................................... |
76 |
■Setup for iPod®/iPhone® or |
|
smartphone ..................... |
77 |
iPod/iPhone ................................................................. |
77 |
Smartphone (Android™ device) ........................... |
78 |
■HD Radio™ Technology ... |
79 |
About HD Radio stations......................................... |
79 |
Starting procedure.................................................... |
80 |
Basic operation........................................................... |
80 |
Storing the strongest broadcast frequencies |
|
(BSM) ....................................................................... |
81 |
Radio settings ............................................................. |
82 |
■Disc ................................... |
83 |
Inserting and ejecting a disc ................................. |
83 |
English
- 2 -

Basic operation ........................................................... |
84 |
■Compressed files............. |
88 |
Inserting and ejecting media................................. |
88 |
Starting procedure .................................................... |
90 |
Basic operation ........................................................... |
91 |
■iPod .................................. |
96 |
Connecting your iPod............................................... |
96 |
Basic operation ........................................................... |
96 |
■AppRadio Mode + ......... |
100 |
Using AppRadio Mode + ...................................... |
100 |
Starting procedure ................................................. |
101 |
Using the keyboard (for iPhone users) ............ |
102 |
Using the audio mix function ............................. |
103 |
■Apple CarPlay™ ............. |
104 |
Using Apple CarPlay............................................... |
104 |
Setting the driving position ................................ |
104 |
Starting procedure ................................................. |
105 |
Adjusting the volume............................................ |
106 |
■Android Auto™ .............. |
107 |
Using Android Auto................................................ |
107 |
Setting the driving position ................................ |
107 |
Starting procedure ................................................. |
108 |
Adjusting the volume............................................ |
109 |
Setting the auto-launch function...................... |
109 |
■Pandora®........................ |
111 |
Listening to Pandora.............................................. |
111 |
Basic operation ........................................................ |
112 |
■SiriusXM® Satellite |
|
Radio.............................. |
114 |
Subscribing to the SiriusXM Satellite Radio |
|
service .................................................................. |
114 |
Listening to SiriusXM ............................................. |
115 |
Basic operation ........................................................ |
115 |
TuneScan™................................................................. |
117 |
SportsFlash™ ............................................................. |
118 |
SmartFavorites ......................................................... |
118 |
Using Featured Favorites Band........................... |
119 |
Parental lock.............................................................. |
119 |
Using the content alerts function ..................... |
119 |
SiriusXM settings..................................................... |
120 |
■HDMI .............................. |
122 |
Starting procedure.................................................. |
122 |
Basic operation......................................................... |
122 |
■AUX................................. |
123 |
Starting procedure.................................................. |
123 |
Basic operation......................................................... |
124 |
■AV input ......................... |
125 |
Starting procedure.................................................. |
125 |
Basic operation......................................................... |
126 |
■Wireless Mirroring......... |
127 |
Starting procedure.................................................. |
127 |
Basic operation......................................................... |
128 |
■iDatalink......................... |
129 |
Using iDatalink.......................................................... |
129 |
Activating iDatalink Maestro ............................... |
129 |
Starting procedure.................................................. |
130 |
Displaying obstacle detection information |
... 132 |
iDatalink settings ..................................................... |
132 |
■Settings.......................... |
134 |
Displaying the setting screen.............................. |
134 |
System settings ........................................................ |
134 |
Theme settings......................................................... |
143 |
Audio settings........................................................... |
145 |
Video settings ........................................................... |
152 |
■Favorite menu................ |
156 |
Creating a shortcut ................................................. |
156 |
Selecting a shortcut................................................ |
156 |
Removing a shortcut .............................................. |
156 |
■Other functions ............. |
157 |
Setting the time and date..................................... |
157 |
Changing the wide screen mode....................... |
157 |
Selecting the video for the rear display........... |
158 |
Setting the anti-theft function............................ |
159 |
Restoring this product to the default |
|
settings ................................................................. |
160 |
■Appendix ....................... |
161 |
Troubleshooting....................................................... |
161 |
Error messages.......................................................... |
164 |
Positioning technology ......................................... |
170 |
English
- 3 -

Handling large errors............................................. |
171 |
Route setting information.................................... |
175 |
Handling and care of discs................................... |
176 |
Playable discs............................................................ |
177 |
Detailed information for playable media ....... |
177 |
Bluetooth ................................................................... |
182 |
SiriusXM® Satellite Radio ...................................... |
182 |
Wi-Fi ............................................................................. |
183 |
HD Radio™ Technology......................................... |
183 |
SDXC ............................................................................ |
183 |
WMA/WMV ................................................................ |
183 |
FLAC............................................................................. |
183 |
DivX.............................................................................. |
184 |
AAC............................................................................... |
184 |
Google™, Google Play, Android ......................... |
184 |
Android Auto ............................................................ |
184 |
Detailed information regarding connected iPod |
|
devices ................................................................. |
184 |
Using app-based connected content.............. |
185 |
Pandora®..................................................................... |
186 |
HDMI............................................................................ |
186 |
IVONA Text-to-Speech........................................... |
186 |
Notice regarding video viewing ........................ |
186 |
Notice regarding DVD-Video viewing ............. |
187 |
Notice regarding MP3 file usage ....................... |
187 |
Notice regarding open source licenses........... |
187 |
Map coverage........................................................... |
187 |
Using the LCD screen correctly .......................... |
187 |
Specifications............................................................ |
188 |
English
- 4 -

Precaution
Notes on internal memory |
|
• If the battery is disconnected or discharged, the memory will be erased and must be |
English |
|
|
reprogrammed. |
|
• The information will be erased by disconnecting the yellow lead from the battery (or |
|
removing the battery itself). |
|
• Some of the settings and recorded contents will not be reset. |
|
|
|
About this manual |
|
|
|
This manual uses diagrams of actual screens to describe operations. However, the screens on some units may not match those shown in this manual depending on the model used.
 Meanings of symbols used in this manual
This indicates model names that are supported by the described operations.
0000NEX
This indicates to touch the appropriate soft key on the touch screen.
This indicates to touch and hold the appropriate soft key on the touch screen.
- 5 -
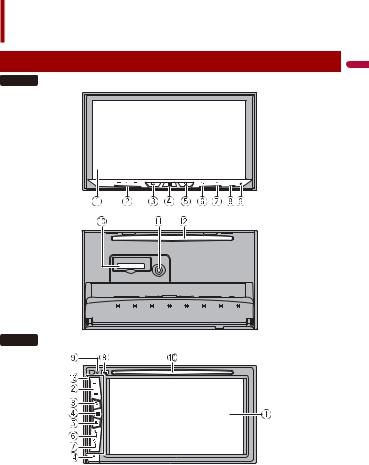
Parts and controls
Main unit
W8400NEX
W6400NEX
English
- 6 -

LCD screen
VOL (+/-)
|
|
|
|
Press to switch between the Application screen and the AV operation screen. |
|
|
|
|
|
Press and hold to switch to the camera view mode. |
|
|
|
|
|
|
|
|
|
|
|
NOTE |
|
|
|
|
|
To activate the camera view mode with this button, set [Back Camera Input] to |
|
|
|
|
|
[On] or [AV Input] to [Camera] (page 135). |
|
|
|
|
|
|
|
|
|
|
|
Press to display the top menu screen. |
|
|
|
|
|
Press and hold to power off. To power back on, press any button. |
|
|
|
|
|
|
|
|
|
|
|
Press to display the menu bar (page 15). |
|
|
|
|
|
Press and hold to mute or unmute. |
|
|
|
|
|
Press to display the top menu screen or back to previous screen. |
|
|
|
|
|
Press and hold to turn off the display. |
|
|
|
|
|
|
|
|
|
|
|
Press to activate the voice recognition mode with a connected iPhone or |
|
|
|
|
|
smartphone. |
|
|
|
|
|
Press and hold to display the connectable device list screen or device search |
|
|
|
|
|
screen. |
|
|
|
|
|
||
|
|
|
|
||
RESET |
Press to reset the microprocessor (page 10). |
||||
|
|
|
|
||
SD card slot |
Refer to Inserting and ejecting an SD memory card (page 88). |
||||
|
|
|
|
|
|
Auto EQ |
|
Use to connect a microphone for acoustical measurement (sold separately). |
|||
microphone |
|
|
|
||
input jack |
|
|
|
||
Disc-loading |
|
Refer to Inserting and ejecting a disc (page 83). |
|||
slot |
|
|
|
||
|
|
|
|
|
|
Detachable faceplate
Press to remove the detachable faceplate from this product.
Remote Control
VOLUME (+/-)
REAR SRC |
Press to cycle through all the available rear sources. |
|
Press and hold to turn the rear source off. |
|
|
English
- 7 -

|
SRC |
Press to cycle through all the available sources. |
|
|
|
|
Press and hold to turn the source off. |
|
|
|
|
|
TOP MENU |
Press to return to the top menu during DVD playback. |
|
|
|
|
|
|
Source mode |
Use to switch the source mode between the front source and the rear source. |
|
|
select switch |
|
|
|
|
|
|
|
Thumb pad |
Use to select a menu on the DVD menu. |
|
|
|
|
|
|
MUTE |
|
|
|
|
|
|
|
MENU |
Displays the DVD menu during DVD playback. |
|
|
|
|
|
|
AUDIO |
Press to change the audio language, subtitle language or viewing angle |
|
|
SUBTITLE |
during DVD playback. |
|
|
ANGLE |
|
|
|
BAND/ESC |
Press to select the tuner band when tuner is selected as a source. |
|
|
|
|
Press to switch between media file types when playing the following types of |
|
|
|
data: |
|
|
|
• Disc |
|
|
|
• External storage device (USB, SD) |
|
|
|
|
|
RETURN |
Press to return to the specified point and start playback from there. |
|
|
|
|
|
|
|
|
Press to pause or resume playback. |
|
|
or |
For audio: Press and hold to perform fast reverse or fast forward. |
|
|
|
For video: Press to perform fast reverse or fast forward. |
|
|
|
|
|
|
or |
Press to return to the previous track (chapter) or go to the next track (chapter). |
|
|
|
Press to answer or end a call. |
|
|
|
Press to stop playback. |
|
|
|
|
|
|
|
If you resume playback, playback will start from the point where you stopped. |
|
|
|
Press the button again to stop playback completely. |
|
|
|
|
|
FOLDER/P.CH |
Press to select the next or previous title or folder. |
|
|
|
|
Press to recall radio station frequencies assigned to preset channel keys. |
|
|
|
Press to answer or end a call. |
|
|
|
|
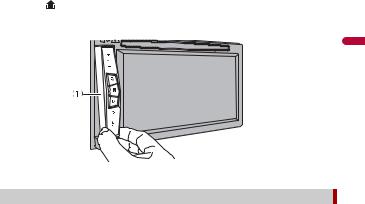
Protecting your product against theft
W6400NEX
 CAUTION
•Do not expose the detachable faceplate to excessive shock or disassemble it.
•Never grip the buttons tightly or use force when removing or attaching the detachable faceplate.
•Keep the detachable faceplate out of reach of small children to prevent them from placing it in their mouths.
•After removing the detachable faceplate, keep it in a safe place so it is not scratched or damaged.
•Do not expose the detachable faceplate to direct sunlight and high temperatures.
•When removing or attaching the detachable faceplate, do so after turning off the ignition switch (ACC OFF).
-8 -
English
|
Removing the detachable faceplate |
1 |
Press the button. |
2 |
Gently grip the bottom of the detachable faceplate and slowly pull it outward. |
English
 Detachable faceplate
 Attaching the detachable faceplate
1 Slide the detachable faceplate all the way into this product.
2 Push the lower part of the detachable faceplate until you hear a click.
- 9 -

Basic operation
Notes on using the LCD panel
W8400NEX
 WARNING
•Keep hands and fingers clear of this product when opening, closing, or adjusting the LCD panel. Be especially cautious of children’s hands and fingers.
•Do not use with the LCD panel left open. It may result in injury in the event of an accident.
•Close the LCD panel before putting the vehicle in motion. Driving with the LCD panel open may damage the unit, and any backup camera image shown through the LCD panel will not be visible.
 CAUTION
•Do not open or close the LCD panel forcefully. It may cause a malfunction.
•Do not operate this product until the LCD panel has completely opened or closed. If this product is operated while the LCD panel is opening or closing, the LCD panel may stop at that angle for safety.
•Do not place glass or can on the open LCD panel.
Adjusting the LCD panel angle
W8400NEX |
|
|
|
|
|||||
1 |
Press . |
|
|
|
|
||||
2 |
|
|
|
|
|
|
|
|
|
Touch |
|
|
|
or |
|
|
to adjust the angle of the LCD panel. |
||
3 |
|
|
|
|
|
|
|
|
|
|
|
|
|
|
|
||||
Touch |
|
|
. |
|
|
|
|||
Returns to the previous screen.
Resetting the microprocessor
 CAUTION
•Pressing the RESET button resets settings and recorded contents to the factory settings.
–Do not perform this operation when a device is connected to this product.
–Some of the settings and recorded contents will not be reset.
•The microprocessor must be reset under the following conditions:
–Prior to using this product for the first time after installation.
–If this product fails to operate properly.
–If there appears to be problems with the operation of the system.
–If your vehicle position is shown on the map with a significant positioning error.
1 Turn the ignition switch OFF.
English
- 10 -
2Press RESET with a pen tip or other pointed tools.
Settings and recorded contents are reset to the factory settings.
Preparing the remote control
Remove the insulation sheet before use.
How to replace the battery
Insert the CR2025 (3 V) battery with the plus (+) and minus (-) poles orientated properly.
 WARNING
•Do not ingest the battery, Chemical Burn Hazard.
(The remote control supplied with) This product contains a coin/button cell battery. If the coin/ button cell battery is swallowed, it can cause severe internal burns in just 2 hours and can lead to death.
Keep new and used batteries away from children.
If the battery compartment does not close securely, stop using the product and keep it away from children.
If you think batteries might have been swallowed or placed inside any part of the body, seek immediate medical attention.
•Batteries (battery pack or batteries installed) must not be exposed to excessive heat such as sunshine, fire or the like.
 CAUTION
•Remove the battery if the remote control is not used for a month or longer.
•There is a danger of explosion if the battery is incorrectly replaced. Replace only with the same or equivalent type.
•Do not handle the battery with metallic tools.
•Do not store the battery with metallic objects.
•If the battery leaks, wipe the remote control completely clean and install a new battery.
•When disposing of used batteries, please comply with governmental regulations or environmental public institutions’ rules that apply in your country/area.
•“Perchlorate Material – special handling may apply. See www.dtsc.ca.gov/hazardouswaste/ perchlorate. (Applicable to California, U.S.A.)”
-11 -
English

 Using the remote control
Point the remote control in the direction of the front panel to operate.
NOTE
The remote control may not function properly in direct sunlight.
 Important
•Do not store the remote control in high temperatures or direct sunlight.
•Do not let the remote control fall onto the floor, where it may become jammed under the brake or gas pedal.
Starting up the unit
1Start the engine to boot up the system.
The [Select Program Language] screen appears.
NOTES
•From the second time on, the screen shown will differ depending on the previous conditions.
•From the second time on, enter the password for the anti-theft function if the password entry screen appears.
2 Touch the language.
3Touch 

 .
.
The [Speaker Mode Settings] screen appears.
4Touch the speaker modes.
[Standard Mode]
4-speaker system with front and rear speakers, or a 6-speaker system with front and rear speakers and subwoofers.
[Network Mode]
3-way system with a high range speaker, middle range speaker and subwoofer (low range speaker) for reproduction of high, middle and low frequencies (bands).
 WARNING
Do not use the unit in Standard Mode when a speaker system for 3-way Network Mode is connected to the unit. This may cause damage to the speakers.
5Touch 

 .
.
Initial Legal Disclaimer screen appears.
6Touch [OK].
The top menu screen appears.
English
- 12 -
NOTE
Once the speaker mode is set, the setting cannot be changed unless this product is restored to the default settings. Restore the default settings to change the speaker mode setting (page 160).
 Switching the speaker mode
To change the speaker mode, you need to restore this product to the default settings.
1 Restore the default setting (page 160).
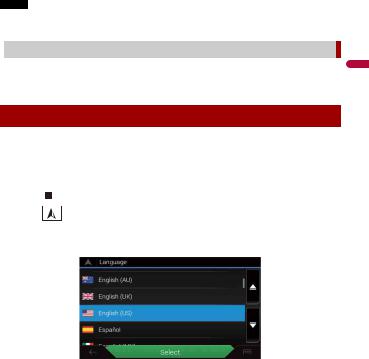
Starting up the navigation system
When you use the navigation function for the first time, an initial setup process starts automatically. Follow the steps below.
TIP
You can change the language later using [Regional] in the [Settings] screen. Other settings can be restarted later using [Start Configuration Wizard] in the [Settings] screen.
1 |
|
|
|
|
|
Press |
|
|
. |
|
|
2 |
|
|
|
|
|
Touch |
. |
||||
3Touch the language that you want to use on the navigation screen, then touch [Select].
4Read the terms carefully, check the details, and then touch [Accept] if you agree to the conditions.
5 Touch [Next].
6Touch the language that you want to use for voice guidance messages, then touch [Next].
7 If needed, modify the unit settings, then touch [Next].
8If needed, modify the default route planning options, then touch [Next].
-13 -
English
9 Touch [Finish].
Using the touch panel
You can operate this product by touching the keys on the screen directly with your fingers.
NOTE
To protect the LCD screen from damage, be sure to touch the screen only with your finger gently.
 Common touch panel keys


 : Returns to the previous screen.

 : Close the screen.
 Operating list screens
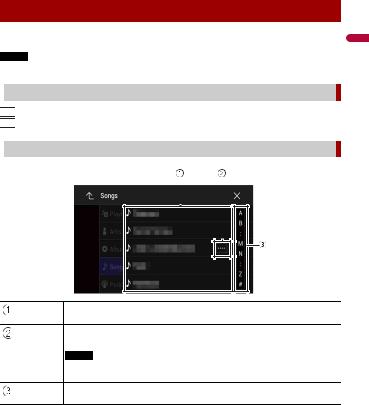
Touching an item on the list allows you to narrow down the options and proceed to the next operation.
Appears when all characters are not displayed on the display area.
If you touch the key, the rests are scrolled for display.
NOTE
This function is available only when you stop your vehicle in a safe place and apply the parking brake.
Appears when items cannot be displayed on a single page.
Drag the side bar, the initial search bar or the list to view any hidden items.
English
- 14 -

 Operating the time bar
You can change the playback point by dragging the key.
The playback time corresponding to the position of the key is displayed while dragging the key.
 Operating the menu bar
1Press 

 .
.
The menu bar pops up on the screen.
NOTE
The menu bar availability may vary depending on the activating source.
Switches the dimmer duration by day or night.
NOTE
When AppRadio Mode + is on, AppRadio Mode + SideControlBar is displayed.
Switches between playback and pause.
Skips files forward or backward.
Performs fast reverse or fast forward.
Displays setting menu screen (page 134).
Closes the menu bar.
 Switching the operation panel
1 Touch 


 or
or 


 .
.
- 15 -
English
The hidden function keys appear.
NOTE
This key does not appear for some AV sources.
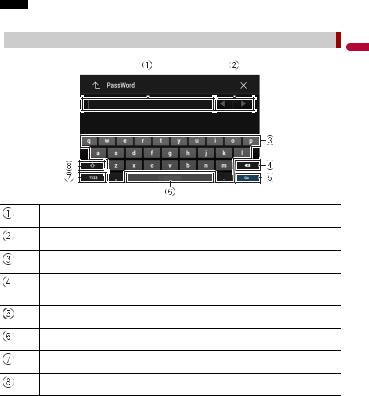
 Operating the on-screen keyboard
English
Displays the characters that are entered.
Moves the cursor to the right or left for a number of characters equivalent to the number of touches.
Enters the characters in the text box.
Deletes the input text to the left of the cursor one letter at a time.
Touching and holding the key deletes the letters to the left of the cursor in rapid succession.
Confirms the entry and proceeds to the next step.
Enters a space.
Switches between alphabet and numbers/symbols.
Switches between capital and lower case letters.
- 16 -
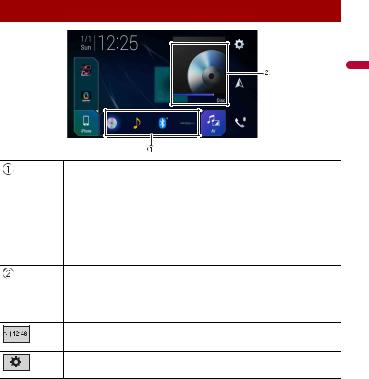
Top menu screen
English
Favorite source icons
TIPS
•When you connect the external navigation system to this unit, the navigation mode key is displayed at the middle of the right side of the display.
•If you select [Power OFF], you can turn off almost all functions. The [Power OFF] mode is released in the following cases.
–An incoming call is received (only for hands-free phoning via Bluetooth).
–A rear view camera image is input when the vehicle is in reverse.
–A button on this unit is pressed.
–The ignition switch is turned off (ACC OFF), then turned on (ACC ON).
AV/Device source operation key.
Displays the current source.
TIP
When the last source is displayed behind the key, you can switch the source by touching the key.
Setting the time and date (page 157)
Settings (page 134) and Favorite menu (page 156)
- 17 -
Connected device key
Displays connected device.
Switches the source or application with connected devices such as AppRadio Mode +, external navigation system, Apple CarPlay, Android Auto.
TIPS
•When a device with a compatible application is connected, the favorite application key appears. Once the key appears, you can adjust the range of the favorite application key area with the following steps.
1 Touch and hold 

 .
.
 appears at the top right of the favorite application key.
2Drag  to the desired position.
To finish the adjusting, touch any place of the display except for the
favorite application key.
• You can also switch the mobile device to be connected with the following steps.
1 Touch 

 .
.
2 Touch 

 .
.
3Select desired device then follow the instruction.
Touch 

 for the first wireless connection with the device.
NOTE
This function is available only when you stop your vehicle in a safe place and apply the parking brake or the vehicle is completely stopped.
AV source (page 74)
Hands-free phoning (page 64)
Displays the map screen.
English
- 18 -

Navigation
Menu screen view and operations
1 Press  .
.
2Touch  .
.
The main menu screen appears.
Main screen
Returns to the map screen.
Notifications that contain important information.
Displays the previous or next page of the navigation menu.
The locations that you saved as favorites.
Switches between 2D, 3D, and 2D North up view modes.
The [User Profiles] screen where you can create new profiles or edit the existing profiles. If multiple drivers are using this product, they can create their own profiles with their own settings. If you select a new profile, this product restarts so that the new settings can take effect.
English
- 19 -
Navigation items
Searches for a destination using various methods (page 26).
Builds your route or edits the route currently set (page 34).
Displays the traffic screen (page 43).
Displays useful information to support your driving (page 46).
Configures the navigation-related settings (page 51).
Displays information about your navigation system (e.g. the version information or license).
Main menu screen icons with a planned route (only appear when a route is planned)
Adds a waypoint (page 36).
Displays route alternatives, parts of the route to avoid, or specific roads in your planned route to avoid.
Displays the route in its full length on the map, and displays route parameters and route alternatives.
Deletes your route or removes a waypoint.
Suspends and resumes the route guidance.
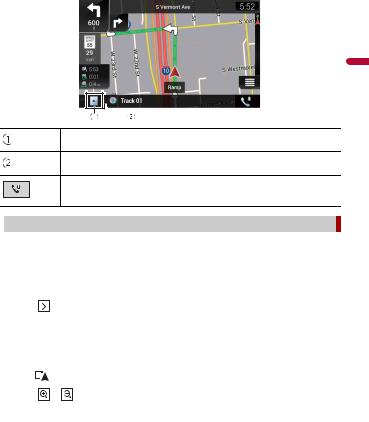
Map Screen
Most of the information provided by your navigation system can be seen on the map. You need to become familiar with how information appears on the map.
English
- 20 -
 How to read the map screen
English
NOTE
Depending on the conditions and settings, some items may not be displayed.
 * Shows the number and name of the street to be used (or next guidance point).
 *
*
 * Shows the distance to the next guidance point (maneuver).
 * Shows the maneuver after the next maneuver.
 * Indicates the current route. The route currently set is highlighted in color on the map.
 * Indicates the progress to the final destination.
* The information appears only when a route is set.
AV information bar
AV information is displayed at the bottom of the map screen.
- 21 -
English
Touch to display the AV source list.
Shows the current status of AV source briefly.
Touch to display the phone menu screen (page 64).
 Changing the scale or the map manually
By default, even if the map scale is changed on the scrolled map, it will return to the preset scale (according to the setting in [Viewpoint] of the [Navigation Map] settings) when the current position map is displayed. To change the scale of the current position map, perform the following procedure.
1 Press  then touch
  .
.
2 |
Touch |
then [Settings]. |
3 |
Touch [Navigation Map] then [Map Display]. |
|
4 |
Touch [Viewpoint]. |
|
5 |
Drag the pop-up window and touch [Manual]. |
|
6 |
Press |
. |
7 |
Touch |
or . |
Smart Zoom
Your navigation system features "Smart Zoom" that works in two ways.
•When the route is set:
When approaching a turn, "Smart Zoom" will zoom in and raise the view angle to enable you to easily recognize your maneuver at the next junction. If the next turn is at
-22 -
a distance, it will zoom out and lower the view angle to be flat so you can see the road in front of you.
•When the route is not set:
"Smart Zoom" will zoom in if you drive slowly and zoom out when you drive at high speed.
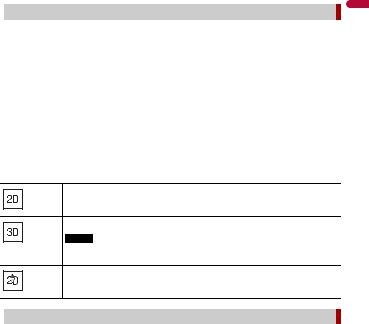
 Switching between 2D, 3D, and 2D North up views
You can switch how the map is displayed. For 2D map view mode, you can select between “Heading up” and “North up”.
Heading up |
The map display always shows the vehicle’s direction as proceeding toward |
||
|
|
the top of the screen. |
|
|
|
|
|
North up |
|
The map display always has north at the top of the screen. |
|
|
|
|
|
|
|
NOTE |
|
|
|
The map orientation is fixed at “Heading up” when the 3D map screen is displayed. |
|
|
|
|
|
1 Press  .
.
2 Touch  .
.
3Touch the following key.
Each time you touch the key, the setting changes.
Indicates 2D Heading up view mode is currently selected.
Indicates 3D Heading up view mode is currently selected.
NOTE
There is a limit to map scaling in 3D map view mode. If the map scale is zoomed out further, the map is zoomed out in 2D map.
Indicates 2D North up view mode is currently selected.
English
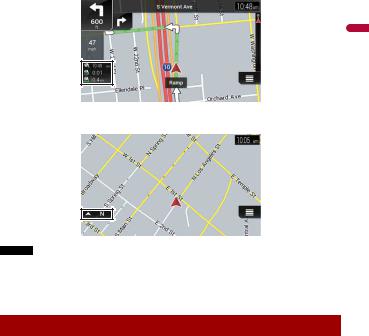
 Scrolling the map to the position you want to see
1 Press  .
.
2Touch anywhere on the map or touch and drag the map in the desired direction to scroll.
If you place the cursor on the desired location, a brief overview about the location will appear at the top of the screen, showing the street name and other information for the location.
-23 -

3Touch 

 .
.
The map returns to the current position.
TIP
If you press  , the map returns to the current position.
Control keys on the scrolled map
Map screen (scrolled map)
Changes the map view mode.
The current map mode is shown on the control key.
Zooms in or out on the map.
You can also zoom out or in by pinching or expanding the map.
Rotates the map clockwise or counterclockwise.
Cancels map rotation.
Tilts the map angle up or down.
You can change the vertical view angle of the map in 3D mode only.
 Route guidance
Once the route guidance begins, the system provides various guides by voice, text indications and signs.
Frequently shown route events
The following are some examples of the maneuvers that are displayed.
Turn left, turn right, turn back.
Go left on the traffic circle, 3rd exit (next maneuver).
English
- 24 -
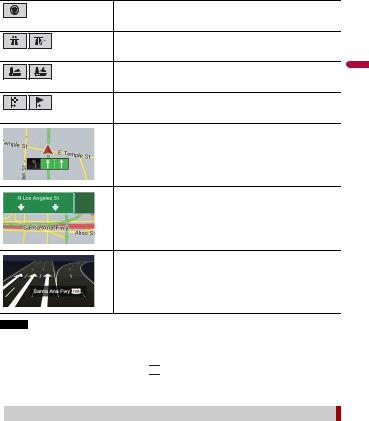
Enter traffic circle (maneuver after the next maneuver).
Freeway entrance or freeway exit.
Board ferry or leave ferry.
Approaching the destination or a waypoint.
Lane information
When navigating on multilane roads, you will need to make sure to take the proper lane for the recommended route.
Signposts
Signs are displayed at the top of the map.
Junction view
If you are approaching a complex intersection, the map is replaced with a 3D view of the junction.
NOTE
If the data for these items is not contained in the map data, the information is not available even if there are signs on the actual road.
TIP
When you set [Offer Freeway Services] to on,

 appears while you are driving on freeways. Touch the icon to open the details of the next few exits or service stations. In addition, touch an item to show its location on the map. You can set it as a waypoint easily.
 Browsing the data field
The data fields are different when you are navigating a route and when you have no specified destination. For example, the data field provides the following information.
English
- 25 -
•When the route is set:
Distance to final destination, time needed to reach the final destination and estimated arrival time are shown.
English
•When the route is not set: Direction or altitude is shown.
NOTES
•Touching and holding the field allows you to display the setting screen for the field. For details, refer to page 57.
•The estimated time of arrival is an ideal value calculated based on the speed limit value set in [Max. Speed] of vehicle type setting and the actual driving speed. The estimated time of arrival is only a reference value, and does not guarantee arrival at that time. For details, refer to page 51.
Searching for a destination
Search for a destination or waypoint using the address or another method. You can also set a destination by touching the map on the screen.
Once the destination is set, the system can start the navigation by touching [Start Navigation] (page 34).
 CAUTION
For safety reasons, these route-setting functions are not available while your vehicle is in motion. To enable these functions, you must stop in a safe place and put on the parking brake.
- 26 -
NOTE
Some information regarding traffic regulations depends on the time when the route calculation is performed. Thus, the information may not correspond with a certain traffic regulation when your vehicle actually passes through the location in question. Also, the information on the traffic regulations provided applies for a passenger vehicle, and not for a truck or other delivery vehicles. Always follow the actual traffic regulations when driving.
1 Press  .
.
2 Touch  .
.
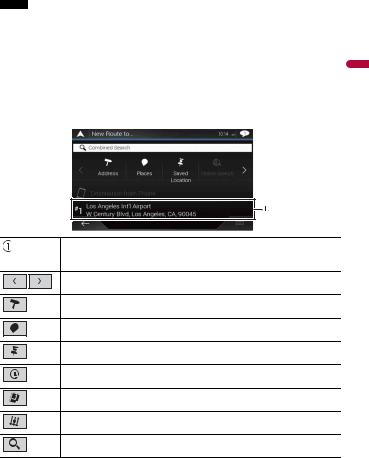
3Touch [New Route].
The following screen appears.
Suggests a destination based on your navigation habits, using parameters such as current time of day, day of week and current location.
Displays the previous or next page of the searching for a destination menu.
Searches for a location by entering the specific address (page 28).
Searches for various facilities (Points Of Interest - POI) such as gas stations accommodations, etc. by selecting the category (page 28).
Selects a destination from the stored locations (page 30).
Searches for a location from the recently visited places (page 31).
Selects a destination from the stored routes (page 30).
Searches for a location by entering a latitude and longitude (page 31).
Searches for a location using multiple factors (page 31).
English
- 27 -

 Searching for a location by address
Search a destination in which the address is specified.
TIP
Depending on the search results, some steps may be skipped.
1 Touch [Address].
2Select the [Country].
Proposes the country where you are as a default.
If you want to change the search area, set another country.
3Select the [City or ZIP code].
Proposes the city/town where you are as a default.
You can select the city/town using its postal code instead of its name.
4Select the [Street].
If the street name is not available, touch [Go to City] and select the city/town. This way the center of the selected city/town becomes the destination of the route.
5Select [Select House Number or Intersection].
This item will be displayed after a street is set. If the house number is not available, touch [Go to Street] and select the street. This way the center of the selected street becomes the destination of the route.
After you touch the selected address to finish the address search, the searched location appears on the map screen.
6 Touch [Select as Destination].
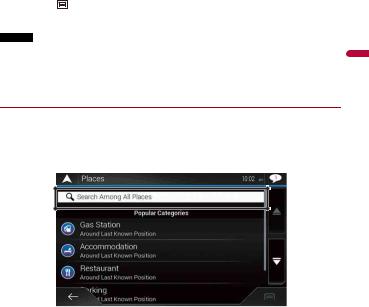
 Searching for Points of Interest (POI)
You can search for various facilities (Points Of Interest – POI). by selecting the category such as gas stations, accommodation or restaurant.
Searching for POIs using preset categories
The preset search allows you to quickly find the most frequently selected types of POIs.
1 Touch [Places].
2Touch the category.
The preset search categories are as follows.
•[Gas Station]
•[Accommodation]
•[Restaurant]
•[Parking]
3Touch the POI.
The searched location appears on the map screen.
English
- 28 -
TIP |
|
|
If you touch , you can sort the results or show the locations of all facilities on the map. |
|
|
4 Touch [Select as Destination]. |
|
|
NOTES |
|
|
• When a route is not set, POIs are searched for around the current position. |
|
|
• When the current position is not available either (no GPS signal), POIs are searched for around the last |
English |
|
known position. |
||
|
• When a route is set, [Gas Station] and [Restaurant] are searched for along the route, and [Accommodation] and [Parking] are searched for around the destination.
Searching for POIs by category or directly from the name of the facilities
You can search for POIs by their categories and subcategories. You can also search for POIs by their names in each of their categories.
1 Touch [Places].
2 Touch [Search Among All Places].
3Touch [Around Here] and then select the area in which the POIs should be searched for.
•[Category View]:
You can select whether or not POI categories are displayed.
•[Around Here]:
Searches around the current position. Or, around the last known position if the current position is not available. The results will be listed in order of the distance from this position.
•[In a City]:
Searches for a place within a selected city/town. The results will be listed in order of the distance from the center of the selected city/town.
•[Around Destination]:
Searches for a place around the destination of the current route. The results will be
-29 -

listed in order of the distance from the destination. (This key is active only when the route is set.)
•[Along Route]:
Searches along the current route, and not around a point already set. This is useful when searching for a stopover that results in a minimal detour, such as searching for gas stations or restaurants. The results will be listed in order of the length of the
necessary detour. (This key is active only when the route is set.)
4 Select one of the categories, subcategories or brands to narrow down the places.
TIP
Use the keyboard to enter the name of the place if you touch [Search by Name].
5Touch the POI.
The searched location appears on the map screen.
TIP
If you touch 

 , you can change the sort method of the results.
6 Touch [Select as Destination].
 Selecting a destination from stored locations
Storing locations you visit frequently saves time and effort.
Selecting an item from the list provides an easy way to specify the position.
NOTE
This function is available if locations have been registered in [Saved Location] that contains two preset categories: [Home] and [Work] (page 40).
1 Touch [Saved Location].
2Touch the entry.
The searched location appears on the map screen.
3 Touch [Select as Destination].
TIP
You can edit the details of saved locations by touching 

 and then [Edit].
 Selecting a destination from stored routes
Storing routes you use frequently saves time and effort.
NOTE
This function is available if routes have been registered in [Saved Routes] (page 42).
1 Touch [Saved Routes].
2 Touch the entry.
English
- 30 -
 Loading...