


Operation Manual
ENGLISH
DVD AV NAVIGATION HEAD-UNIT
AVIC-X1

The screen shown in the example may differ from the actual screen.
The actual screen may be changed without notice for performance and function improvements.

Introduction
Licence Agreement
PIONEER AVIC-X1
THIS IS A LEGAL AGREEMENT BETWEEN YOU, AS THE END USER, AND PIONEER CORP.(JAPAN) (“PIONEER”). PLEASE READ THE TERMS AND CONDITIONS OF THIS AGREEMENT CAREFULLY BEFORE USING THE SOFTWARE INSTALLED ON THE PIONEER PRODUCTS. BY USING THE SOFTWARE INSTALLED ON THE PIONEER PRODUCTS, YOU AGREE TO BE BOUND BY THE TERMS OF THIS AGREEMENT. THE SOFTWARE INCLUDES A DATABASE LISENSED BY THIRD PARTY SUPPLIER(S) (“SUPPLIERS”), AND YOUR USE OF THE DATABASE IS COVERED BY THE SUPPLIERS’ SEPARATE TERMS, WHICH ARE ATTACHED TO THIS AGREEMENT (Refer to page 3). IF YOU DO NOT AGREE WITH ALL OF THESE TERMS, PLEASE RETURN THE PIONEER PRODUCTS (INCLUDING THE SOFTWARE, AND ANY WRITTEN MATERIALS) WITHIN FIVE (5) DAYS OF RECEIPT OF THE PRODUCTS, TO THE AUTHORISED PIONEER DEALER FROM WHICH YOU PURCHASED THEM.
1. GRANT OF LICENCE
Pioneer grants to you a non-transferable, nonexclusive licence to use the software installed on the Pioneer products (the “Software”) and the related documentation solely for your own personal use or for internal use by your business, only on such Pioneer products.
You shall not copy, reverse engineer, translate, port, modify or make derivative works of the Software. You shall not loan, rent, disclose, publish, sell, assign, lease, sublicence, market or otherwise transfer the Software or use it in any manner not expressly authorized by this agreement. You shall not derive or attempt to derive the source code or structure of all or any portion of the Software by reverse engineering, disassembly, decompilation, or any other means. You shall not use the Software to operate a service bureau
or for any other use involving the processing of data for other persons or entities.
Pioneer and its licensor(s) shall retain all copyright, trade secret, patent and other proprietary ownership rights in the Software. The Software is copyrighted and may not be copied, even if modified or merged with other products. You shall not alter or remove any copyright notice or proprietary legend contained in or on the Software.
You may transfer all of your licence rights in the Software, the related documentation and a copy of this Licence Agreement to another party, provided that the party reads and agrees to accept the terms and conditions of this Licence Agreement.
2. DISCLAIMER OF WARRANTY
The Software and related documentation are provided to you “AS IS”. PIONEER AND ITS LICENSOR(S) (for the purpose of provisions 2 and 3, Pioneer and its licensor(s) shall be collectively referred to as “Pioneer”) MAKES AND YOU RECEIVE NO WARRANTY, WHETHER EXPRESS OR IMPLIED, AND ALL WARRANTIES OF MERCHANTABILITY AND FITNESS FOR ANY PARTICULAR PURPOSE ARE EXPRESSLY EXCLUDED. SOME STATES DO NOT ALLOW EXCLUSION OF IMPLIED WARRANTIES, SO THE ABOVE EXCLUSION MAY NOT APPLY TO YOU. The Software is complex and may contain some non-conformi- ties, defects or errors. For example, the voice recognition function as implemented by the Software may not recognize your voice. Pioneer does not warrant that the Software will meet your needs or expectations, that operation of the Software will be error free or uninterrupted, or that all non-conformities can or will be corrected. Furthermore, Pioneer does not make any representations or warranties regarding the use or results of the use of the Software in terms of its accuracy, reliability or otherwise.
1
3. LIMITATION OF LIABILITY
IN NO EVENT SHALL PIONEER BE LIABLE FOR ANY DAMAGES, CLAIM OR LOSS INCURRED BY YOU (INCLUDING, WITHOUT LIMITATION, COMPENSATORY, INCIDENTAL, INDIRECT, SPECIAL, CONSEQUENTIAL, OR EXEMPLARY DAMAGES, LOST PROFITS, LOST SALES OR BUSINESS, EXPENDITURES, INVESTMENTS, OR COMMITMENTS IN CONNECTION WITH ANY BUSINESS, LOSS OF ANY GOODWILL, OR DAMAGES) RESULTING FROM THE USE OF OR INABILITY TO USE THE SOFTWARE, EVEN IF PIONEER HAS BEEN INFORMED OF, KNEW OF, OR SHOULD HAVE KNOWN OF THE LIKELIHOOD OF SUCH DAMAGES. THIS LIMITATION APPLIES TO ALL CAUSES OF ACTION IN THE AGGREGATE, INCLUDING WITHOUT LIMITATION BREACH OF CONTRACT, BREACH OF WARRANTY, NEGLIGENCE, STRICT LIABILITY, MISREPRESENTATION, AND OTHER TORTS. IF PIONEER’S WARRANTY DISCLAIMER OR LIMITATION OF LIABILITY SET FORTH IN THIS AGREEMENT SHALL OR FOR ANY REASON WHATSOEVER BE HELD UNENFORCEABLE OR INAPPLICABLE, YOU AGREE THAT PIONEER’S LIABILITY SHALL NOT EXCEED FIFTY PERCENT (50%) OF THE PRICE PAID BY YOU FOR THE ENCLOSED PIONEER PRODUCT.
Some states do not allow the exclusion or limitation of incidental or consequential damages, so the above limitation or exclusion may not apply to you. This warranty disclaimer and limitation of liability shall not be applicable to the extent that any provision of this warranty is prohibited by any federal, state or local law which cannot be preempted.
4. EXPORT LAW ASSURANCES
You agree and certify that neither the Software nor any other technical data received from Pioneer, nor the direct product thereof, will be exported outside the country or district (the “Country”) governed by the government having jurisdiction over you (the “Goverment”) except as authorized and as permitted by the laws and regulations of the Goverment. If the Software has been rightfully obtained by you outside of the Country, you agree that you will not re-export the Software nor any other technical data received from Pioneer, nor the direct product thereof, except as permitted by the laws and regulations of the Goverment and the laws and regulations of the jurisdiction in which you obtained the Software.
5. TERMINATION
This Agreement is effective until terminated. You may terminate it at any time by destroying the Software. The Agreement also will terminate if you do not comply with any terms or conditions of this Agreement. Upon such termination, you agree to destroy the Software.
6. MISCELLANEOUS
This is the entire Agreement between Pioneer and you regarding its subject matter. No change in this Agreement shall be effective unless agreed to in writing by Pioneer. If any provision of this Agreement is declared invalid or unenforceable, the remaining provisions of this Agreement shall remain in full force and effect.
2
Terms and conditions in relation to the Tele Atlas navigation data
Object and right of use: This agreement relates to the digital map data (the ‘data’) included in the accompanying package. Tele Atlas grants the buyer the right to use the data combined with one (1) car navigation system. The buyer only becomes the owner of the material data carrier and does not acquire the ownership of the data. The buyer is not permitted to fully or partly modify the data, to combine it with software, to analyse it by means of reverse-engineering, or to make products derived from it. The buyer is explicitly prohibited from downloading the digital maps and programs contained in the data or from transferring these to another data carrier or computer. If the buyer should sell or otherwise part with the data carrier, he must impose the obligations contained in this agreement on the receiver. Unauthorized hiring, lending, public performance and broadcasting is prohibited.
Guarantee and liability: The use of the data in a navigation system means that calculation errors can occur caused by local environmental conditions and/or incomplete data. For the above mentioned reasons Tele Atlas can not warrant that the data operates error-free. To the extent permitted by national laws, Tele Atlas shall not be liable for any damages arising out of the use of the data, except for damages caused by gross negligence or intent.
THE TELE ATLAS DATA ARE PROVIDED ON AN “AS IS” AND “WITH ALL FAULTS BASIS”
TELE ATLAS AND ITS LICENSORS :
—EXPRESSLY DISCLAIM ALL WARRANTIES, EXPRESS OR IMPLIED, INCLUDING BUT NOT LIMITED TO, THE IMPLIED WARRANTIES OF NON-INFRINGEMENT, MERCHANTABILITY, MERCHANTABLE QUALITY, EFFECTIVENESS, COMPLETENESS, ACCURACY, TITLE AND FITNESS FOR A PARTICULAR PURPOSE. NO ORAL OR WRITTEN ADVICE OR INFORMATION PROVIDED BY TELE ATLAS OR ITS LICENSORS, SHALL CREATE A WARRANTY, AND LICENSEE IS NOT ENTITLED TO RELY ON ANY SUCH ADVICE OR INFORMATION, AND
—SHALL IN NO EVENT BE LIABLE TO LICENSEE FOR MATTERS ARISING OUT OF THE SUBJECT MATTER OF THE AGREEMENTS, WHETHER IN CONTRACT, TORT OR OTHERWISE , AND
—SHALL NOT BE LIABLE TO LICENSEE FOR ANY SPECIAL, INDIRECT, CONSEQUENTIAL, OR INCIDENTAL DAMAGES (INCLUDING DAMAGES FOR LOSS OF BUSINESS PROFITS, BUSINESS INTERRUPTION, LOSS OF BUSINESS INFORMATION, AND THE LIKE) ARISING OUT OF THE AGREEMENTS OR THE USE OF OR INABILITY TO USE THE TELE ATLAS DATA, EVEN IF THEY HAVE BEEN ADVISED OF THE POSSIBILITY OF SUCH DAMAGES.
Licensee shall indemnify Tele Atlas and its licensors and their respective officers, employees and agents, from and against all claims, demands or actions, irrespective of the nature of the cause of the claim, demand or action alleging loss, costs, expenses, damages or injuries (including injuries resulting from death) arising out of the use of the Tele Atlas data.
3

Table of Contents
Introduction
Licence Agreement 1 PIONEER AVIC-X1 1
Terms and conditions in relation to the Tele Atlas navigation data 3
Table of Contents 4
Important Safety Information 7
Notes Before Using the System and Additional Safety Information 7
Features (Characteristics of this software) 8 Manual Overview 10
How to use this manual 10 Terminology 11
Chapter 1
Basic Operation
Flow from Startup to Termination 13
Basic Navigation 14
Memory navi mode 17
How to listen to a CD 18
The buttons 19
Chapter 2
Menu and Map Display
How to Use Menu Screens 21 Main menu 21
Shortcut menu 22 How to Use the Map 23
Switching the current position screen display mode 23
How to view the map of the current location 23
Changing the scale of the map 26
Moving the map to the location you want to see 26
Chapter 3
Setting a Route to Your Destination
Finding Your Destination by Selecting the Type of Facility 29
Searching for Points of Interest (POI) 29 Finding a POI in your surroundings 30 Searching the facilities around the cross pointer 30
Displaying certain points of interest on the map 30
Setting an Entrance or Exit of a Motorway as Your Destination 31
Finding Your Destination by Specifying the Post
Code 32
Route Calculation to Your Home Location or to Your Favourite Location 32
Selecting Destination from the Destination History and Address Book 33
Modifying the Route Calculation Conditions 33 Items that users can change 33
Perform the route calculation of the several route options, and select one 34
Checking the Set Route 35
Checking the set route with the map 35 Checking the set route with text 36 Checking the set route from the Information menu 36
Recalculating the Route to Your Destination 37 Cancelling the Route Guidance 37
Adding Way Points to the Current Route 38 Adding a way point 38
Skipping a way point 38
Deleting a way point from the route 38
Chapter 4
Editing the Navigation Utilities
Editing Registered Locations 39
Registering your home and your favourite location 39
Registering a previous location in the Address Book 40
Editing a location’s information 40
Deleting Address Book or Destination History Information 42
Changing the position of locations registered in the Address Book 42
Loading registered locations data from a CD- R 43
Setting Areas to Avoid 43 Registering an Area to Avoid 43
Changing or deleting an Area to Avoid 44 Using Traffic Information 44
Viewing traffic information 44
Information on avoiding traffic jam on route ahead 46
When checking traffic information manually 46
Selecting the radio station 47 Changing Background Picture 48 Checking the Navigation Status 49
Checking sensor learning status and driving status 49
Checking the connections of leads and installation positions 50
Setting the Vehicle Dynamics Display 50
4
Chapter 5
Customising Your Navigation System
Modifying the Default Settings 53 Items Users can Change 53
Chapter 6
Using the AV Source (Built-in DVD drive and Radio)
Basic Operation 57
Activating the touch panel keys 57 How to display each menu 57
Operating the Built-in DVD drive 59 Touch key operation 60
Operation using the FUNCTION menu 62 Other DVD video function 63
Radio 65
Listening to the radio 65 Advanced radio operation 66
Storing and recalling broadcast stations 66 Tuning in strong signals 67
Storing the strongest broadcast frequencies 67
RDS 67
RDS operation 67
Switching the RDS display 68 Selecting alternative frequencies 68 Limiting stations to regional programming 68
Receiving traffic announcements 69 Using PTY functions 69
Using radio text 70 PTY list 71
Chapter 7
Using the AV Source (Pioneer AV Equipments)
Multi-CD Player 73 Listening a CD 73
50-disc multi-CD player 73
Advanced multi-CD player operation 74 Repeating play 74
Playing tracks in a random order 74 Scanning CDs and tracks 74 Pausing CD playback 74
Using ITS playlists 74 Using CD TEXT functions 75
Using compression and bass emphasis 76 DAB tuner 76
Listening to the DAB 76
AS (Announcement support) icon status (ex: Traffic icon) 77
Advanced DAB tuner operation 77
Switching the DAB display 77 Storing and recalling broadcast frequencies 77
Setting the announcement support interruption 78
Selecting services from the available service list 78
Searching for service by available PTY information 78
Switching primary or secondary service component 78
Switching the service follow 78 Using dynamic label 78
TV tuner 79
Watching the TV tuner 79 Advanced TV tuner operation 80
Storing and recalling broadcast stations 80 Storing the strongest broadcast stations sequentially 80
Selecting the country group 80 DVD Player (S-DVD) 81
Playing a disc 81 Selecting a disc 81
Advanced DVD player operation 81 Repeating play 81
Pausing disc playback 82
Playing tracks in a random order 82 Scanning tracks of a CD 82
Using ITS playlists 82
Chapter 8
Customising the Audio Source Setting
Audio Adjustments 83
Introduction of audio adjustments 83 Using the equaliser 83
Using balance adjustment 83 Adjusting equaliser curves 84 Adjusting bass and treble 84 Adjusting loudness 85
Using subwoofer output 85 Using non fading output 85 Using the high pass filter 85 Adjusting source levels 86
Compensating for equaliser curves (EQEX) 86
Setting Up the DVD Player 86 DVD setup adjustments 86 Setting the language 86
Setting assist subtitles on or off 87 Setting angle icon display 87 Setting the aspect ratio 87
Setting the parental lock 87 Initial Settings 88
Adjusting initial settings 88 Setting the FM tuning step 88 Switching Auto PI Seek 89
5
Switching the auxiliary setting 89 Selecting the illumination colour 89 Setting the rear output and subwoofer controller 89
Switching the sound muting/attenuation 89 Switching the automatic disc playback 90 Switching the dimmer setting for subdisplay 90
Changing the voice output of the navigation guidance 90
Other Functions 90 Setup adjustments 90
Setting the video input 90 Setting for rear view camera 90
Selecting the video of rear display 91 Setting the slide back function 91 Setting the automatic open function 91 Using the AUX source 92
Switching the background display 92 Switching the Screen Using the DISP Button 92 Language Code Chart for DVD 94
Chapter 9
Operating Your Navigation System with Voice
Basics of Voice Operation 97 Flow of voice operation 97
Voice Commands 98 Common commands 98
Commands for display change 98 Available voice commands related to navigation 98
Available voice commands related to audio 98
An Example of Voice Operation 99 Tips for Voice Operation 100
Appendix
Installing the Program 101 Memory Navi Mode 102
Navigation in the memory navi mode 103 About the icon for the memory navi mode 104
Major difference between the memory navi mode and the DVD navi mode 104 Cautions relating to auto reroute in memory navi mode 105
TMC icon during the memory navi mode 105 Operation outside the memorised area 105 Deleting the memory data 105
Conditions Likely to Cause Noticeable Positioning Errors 105
About the Data being Deleted 105
Troubleshooting 106
Problems in the Navigation screen 106 Problems in the Audio screen (common) 108 Problems in the Audio screen (during DVD video playback) 108
Messages and how to react to them 109 Error Messages 110
Route Setting Information 111 Route search specifications 111 Route highlighting 112
Non routable roads (Pink colour road) 112 Intersection enlargement 112
Tracking 113
About traffic information 113 About folders and MP3 files 113
Copyright 114
Glossary 114
Display Information 117 Main menu 117 Shortcut menu 119
Menu in the audio screen 119 AUDIO menu 119 INITIAL menu 120
SET UP menu 120 FUNCTION menu 121
6

Important Safety Information
Before using your Navigation System, be sure to read and fully understand the following safety information:
Read the entire manual before operating this Navigation System.
The navigation features of this unit (and rear view camera option if purchased) is intended solely as an aid to you in the operation of your vehicle. It is not a substitute for your attentiveness, judgement, and care when driving.
Do not operate this Navigation System (or the rear view camera option if purchased) if doing so in any way will divert your attention from the safe operation of your vehicle. Always observe safe driving rules and follow all existing traffic regulations. If you experience difficulty in operating the system of reading the display, park your vehicle in a safe location and make necessary adjustments.
Never allow others to use the system unless they have read and understood the operating instructions.
Never use this Navigation System to route to hospitals, police stations, or similar facilities in an emergency. Please call the appropriate emergency number.
Route and guidance information displayed by this equipment is for reference purposes only. It may not accurately reflect the latest permissible routes, road conditions, one way streets, road closures, or traffic restrictions.
Traffic restrictions and advisories currently in force should always take precedence over guidance given by this product. Always obey current traffic restrictions, even if this product provides contrary advice.
Failure to input correct information about the local time may result in the product providing improper routing and guidance instructions.
Never set the volume of your Navigation System so high that you cannot hear outside traffic and emergency vehicles.
To promote safety, certain functions are disabled unless the handbrake is on.
The data encoded in the disc for this product is the intellectual property of the provider, and the provider is responsible for such content.
Keep this manual handy as a reference for operating procedures and safety information.
Pay close attention to all warnings in this manual and follow the instructions carefully.
Do not install the display where it may (i) obstruct the driver’s vision, (ii) impair the performance of any of the vehicle’s operating systems or safety features, including air bags, hazard lamp buttons or (iii) impair the driver’s ability to safely operate the vehicle.
Do not attempt to install or service your display by yourself. Installation or servicing of the display by persons without training and experience in electronic equipment and automotive accessories may be dangerous and could expose you to the risk of electric shock or other hazards.
Please remember to wear your seat belt at all times while operating your vehicle. If you are ever in an accident, your injuries can be considerably more severe if your seat belt is not properly buckled.
Using the most current map DVDs will allow for most accurate destination mapping. Update DVDs are available through your local Pioneer dealer.
Never use headphones while driving.
Notes Before Using the System and Additional Safety Information
In case of trouble
Should this product fail to operate properly, contact your dealer or nearest authorised Pioneer Service Station.
Handbrake interlock
Certain functions offered by this Navigation System could be dangerous if used while driving. To prevent them being used while in motion, there is an interlock with your vehicle’s handbrake. If you attempt to use these functions during driving, their onscreen touch keys may be indicated in
7
grey and inoperable. If so, stop in a safe place, apply the handbrake, then operate.
Update DVD
Updated Navigation DVDs are available for purchase from your local Pioneer dealer that includes the most current map and point of interest information. Contact your local Pioneer dealer for details.
To ensure safe driving
•To avoid the risk of accident and the potential violation of applicable laws, this unit is not for use with a video screen that is visible to the driver.
•In some countries or states the viewing of images on a display inside a vehicle even by persons other than the driver may be illegal. Where such regulations apply, they must be obeyed.
This unit detects whether your vehicle’s handbrake is engaged or not, and prevents you from watching a DVD or TV on this display while driving. When you attempt to watch a DVD or TV, the warning VIDEO VIEWING IS NOT AVAILABLE WHILE DRIVING will appear on the screen.
To watch a DVD or TV on this display, park your vehicle in a safe place and apply the handbrake.
Colour difference of the map display between day and night
Night display
The examples in this manual are illustrated using the daytime display. When driving at night, the colours you see may differ from those shown. To use this function, the Orange/white lead of the navigation unit must be connected correctly.
“Day/Night Display” Page 54
•Do not use with vehicles that do not feature an ACC position.
Rear View Camera
With an optional rear view camera, you are able to use this product as an aid to keep an eye on trailers, or backing into a tight parking spot.
•SCREEN IMAGE MAY APPEAR REVERSED
•USE INPUT ONLY FOR REVERSE OR MIRROR IMAGE REAR VIEW CAMERA. OTHER USE MAY RESULT IN INJURY OR DAMAGE.
About this disc
Only use the Pioneer Map disc with Pioneer DVD Navigation Unit. You cannot use other discs. DVD videos and CDs etc. can be played on AVIC-X1.
When using AVIC-X1, refer to the “Hardware Manual”.
Features (Characteristics of this software)
Touch panel key operation
It is possible to operate the navigation function and the Audio function by using touch panel key.
Compatible with the memorised navigation
Memorised navigation functions are provided to the hardware, which supports the memorised navigation mode.
Compatible with the Voice Recognition System
Using a separately sold Pioneer voice recognition kit (CD-VC1) will enable voice operation for both the navigation and AV functions.
Variety of View Modes
Various types of screen display can be selected for navigation guidance.
– Map mode, Driver’s view, Street List mode, Mixed mode
Two split screen modes are also available.
8
–Rear View mode (Rear view camera screen and Navigation map screen)
–AV Status (Audio status screen and Navigation map screen)
You can also display information on vehicle speed, acceleration, and voltage, etc.
–Vehicle Dynamics
•The rear view mode is for monitoring the rear, for example, when towing a boat. Do not use this function for entertainment purposes.
Wide Variety of Facility Information for POI Search
You can search your destination from all areas. About one million and three hundred thousand items of facility information are supported.
Auto Reroute Function
If you deviate from the set route, the system will re-calculate the route from that point so that you remain on track to the destination.
This function may not work for certain areas.
You can set an Original Image as a Background Image
Your can store your own pictures on a CD-R in JPEG format and import original images in this format. These imported images can be set as a background image.
Imported original images will be stored in the memory, but saving cannot be guaranteed completely. If original image data is deleted, set the CD-R again and re-import the original image.
Auto CD title and MP3 file listing
Title lists will automatically be displayed when a CD TEXT or MP3 disc is played. This system provides easy-to-operate audio functions that allow playback simply by selecting an item from the list.
Station name auto display
While tuning to an RDS station, you can display a list of the stations you are receiving with the program service names. This facilitates selection of stations.
If the system cannot receive the program service name, the frequency will be displayed instead.
Resume play
The resume point can be memorised while playing a DVD video/CD/MP3 disc on the built-in DVD drive. You can resume playback from the memorised section.
9

Manual Overview
This manual provides the important information you need to make full use of your new Navigation System. The beginning sections outline the Navigation System and describe its basic operation. The later sections describe the details of the navigation functions.
Chapters 6, 7 and 8 describe how to operate the AV functions. Please read these chapters when you use a disc in the built-in DVD drive or operate the Pioneer audio equipment connected to the navigation unit.
Please note that when you have decided what you want to do, you can find the page you need from the “Table of Contents”.
If you want to check the meaning of each item displayed on the screen, you will find the necessary page from the “Display Information” at the end of the manual.
How to use this manual
For reasons of safety, it is particularly important that you fully understand your Navigation System before using it. Be sure to read Chapter 1 in particular.
1 |
Basic Operation |
If you want to use the Navigation System immediately, please read this section. It |
|
will explain the basis of operating the system. |
This section also describes the basic operations for playing a CD with the navigation unit.
2
3
4
5
6
7
Menu and Map Display
Describes how to display the menu screen, and the method of changing map mode or map scale.
Setting a Route to Your Destination
This section describes various ways of searching the destination, changing the route search conditions, and the route operation during route guidance.
Editing the Navigation Utilities
Describes convenient functions for navigation, including how to organise information on places you have visited.
Customising Your Navigation System
The behaviour of your Navigation System depends on a number of settings. If you need to change any of the initial settings (default settings), read the relevant section of this chapter.
Using the AV Source (Built-in DVD drive and Radio)
Describes how to use a DVD video, CD, MP3 disc and the radio.
Using the AV Source (Pioneer AV Equipments)
When Pioneer audio equipment is connected to the navigation unit, that equipment can be operated from the navigation unit. This chapter describes the operation of the audio source that can be used when Pioneer audio equipment is connected.
10

8
9
Customising the Audio Source Setting
Using the audio source, various settings are available to suit your audio-visual taste. This chapter describes how to change the settings.
Operating Your Navigation System with Voice
Describes navigation operations such as searching the destination and performing audio operations by voice.
Appendix
Read the appendix to learn more about your Navigation System and such information as the availability of after-care. Please see “Display Information” at the end of this manual for checking the details of each item on the menu.
Terminology
Before moving on, take a few minutes to read the following information about the conventions used in this manual. Familiarity with these conventions will help you greatly as you learn how to use your new equipment.
•Buttons on your Navigation Unit are referred to as: Ex.) POS button, NAVI MENU button.
•Items in various menus or touch keys displayed on the screen are referred to like this: Ex.) “Destination”, “Settings”.
•Extra information, alternative use and other notes are presented like this: Ex.)
After removing the disc from the slot, keep it in the case.
•The references are indicated like this: Ex.)
Setting the Route Options Page 33
11
12

Basic Operation
Chapter 1
NAVI/AV
Flow from Startup to Termination
•If the program is not installed, see page 101 and install the program.
At first, please confirm the positions of the following features using the “Hardware Manual”.
•Disc loading slot
•NAVI/AV button
•NAVI MENU button
1 Start the engine.
After a little time, the navigation opening screen comes on for a few seconds. Then, a message screen is displayed.
If the disc is not set, the message asking to insert the disc appears. After you set the disc correctly, your Navigation System starts up.
2 Insert the Pioneer DVD map disc to the disc loading slot.
3 Press the NAVI/AV button to switch the Navigation map screen.
Pressing the NAVI/AV button switches between the navigation map screen and the audio screen.
4 Check the details of the cautionary message and touch “OK”.
You can operate the Navigation System by touching keys displayed on the screen.
If the route is already set, it changes to route guidance mode. The map of your surroundings is displayed.
How to read the current position screen Page 23
Time settings Page 102
Starting the operation with voice commands only Page 55
The text of touch keys which are not effective is indicated in grey.
Be sure to touch the touch keys with a finger. Touch keys cannot be operated by a pen or similar object.
5 Press the NAVI MENU button.
Displays the main menu.
6 Searches the destination and gives route guidance.
Specifying the address and searching the destination Page 14
Searching the destination by map Page 27
Other search methods Chapter 3
7 Turn off the vehicle engine.
This Navigation System also turns off.
Until the vicinity of the destination is reached, the set route will not be deleted even if the power is turned off.
Operation Basic 1 Chapter
13
NAVI/AV
Basic Operation Chapter 1
Basic Navigation
The most frequently used function is the Address Search, in which the address is specified and the destination searched. This section describes how to use the Address Search and the basics of using the Navigation System. Also, the method of playing CDs is used as an example of switching to the audio source.
•For safety reasons, you cannot use these basic navigation functions while your vehicle is in motion. To enable these functions, you must stop in a safe place and put on the handbrake.
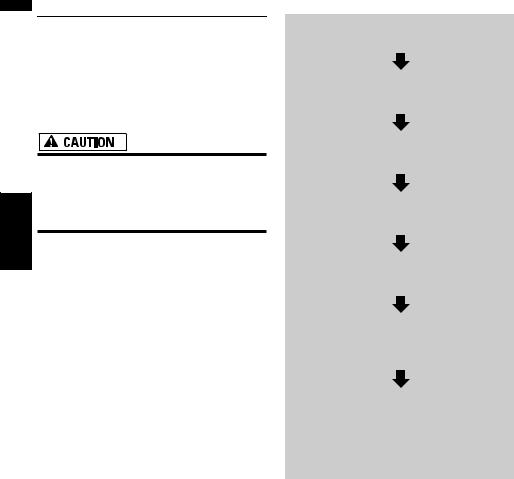
Basic flow of operation
1 Insert the Pioneer DVD map disc to the disc loading slot.
2 Press the NAVI MENU button to display the Main menu.
3 Select “Destination” from the Main menu.
4 Select the method of searching for your destination.
5 Enter the information about your destination.
6 Your Navigation System sets the route to your destination, and the map of your surroundings appears.
7 After releasing the handbrake, drive in accordance with the navigation information, subject of course to the important safety instructions noted on page 7-8.
14
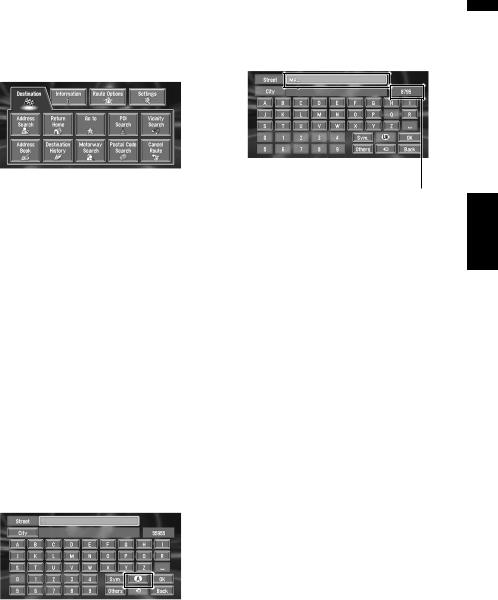
1 Press the NAVI MENU button to display the main menu.
2 Touch “Address Search”.
Selects the method for searching the destination.
Return Home Page 32
Go to Page 32
POI Search Page 29
Vicinity Search Page 30
Address Book Page 33
Destination History Page 33
Motorway Search Page 31
Postal Code Search Page 32
Cancel Route Page 37
There are two methods of address search: one involves first specifying the street name and the other specifying the name of the town or area first. This description uses the method of specifying the street name first as an example.
3 Touch “Country key”.
If the destination is in another country, this changes the country setting.
Once the Country has been selected in the setting up of the system you only have changing country when your destination is outside your existing country.
Country key
4 Touch the country codes of the destination country and touch “OK”.
Modifies the country setting and returns you to the previous display.
5 Input the street name.
Touch the letter you wish to input. If the next screen is not automatically displayed even though the street name is entered, try touching “OK”.
The input text.
The number of applicable candidates.
“City” :
Touch if you wish to first specify the destination town or area.
 :
:
The input text is deleted letter by letter from the end of the text. Continuing to press deletes all of the text.
“Others” :
You can input text with accents and umlauts.
“Sym.” :
You can input text with marks such as “&”and “+”.
“0-9” :
You can input text with numbers.
“Back” :
Returns you to previous screen.
For example, for “West Higgins Road”, you can just enter part of the name, such as “Higgins”.
While entering characters, if there is only one possible character following the next, that character is automatically entered.
When touching “Back” on the text input screen to return to the previous screen, you may not be able to input text. In such case, delete the letters entered in the text box.
NAVI/AV
Operation Basic 1 Chapter
15
|
Searching your destination after |
|||
NAVI/AV |
||||
specifying the name of city or area |
||||
|
||||
|
You can narrow down the searching candidates |
|||
|
by initially specifying the name of city or area |
|||
|
where your destination is located. Inputting the |
|||
|
name of the town or area then selecting the desti- |
|||
|
nation town or area from the list returns you to |
|||
|
the Street Name input screen. Now input the |
|||
|
street name, select the street from the list, and |
|||
|
proceed to step 9. |
|||
|
|
|
|
|
Chapter 1 |
In the selected country, if you touch “City” with- |
|||
|
out entering the name of city or area, you can |
|||
Operation |
||||
check the list of the cities or areas, which you |
||||
|
||||
|
have searched in the past. (This item cannot be |
|||
|
selected when searching for the first time with |
|||
Basic |
this system or when you have selected a country |
|||
that you have never searched before.) |
||||
|
6 Touch the street from the list. |
|||
|
|
|
|
|
|
|
|
|
|
Scroll bar
Touching the  or
or  on the scroll bar scrolls you through the list and allows you to view the remaining items.
Searching the destination by map Page 27
In the case of an item that cannot be displayed in a single line, touching the  to the right of the item allows you to see the whole line.
If only one location is found from the list, route calculation starts.
•Touching the  specifies the selected street and streets intersecting it, allowing you to set an intersection as your destination. This is useful when you don’t know the house number of your destination or cannot input the house number of the specified street.
•Touching the  displays a map of the place you have selected.
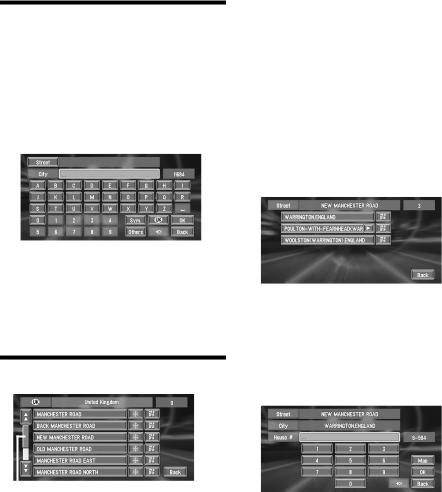
7 Input the destination town or area.
If the list screen is displayed, proceed to step 8.
8 Touch the city or area where your destination is located.
If the area has no house number, a route calculation starts. Proceed to step 10.
If the selected street is very long, and passes through several cities or area, the screen for entering the name of city or area appears.
9 Input the house number and touch “OK”.
On this display, you can select the following item:
Map :
A map for the input house number is displayed.
If there are 0 or more than one locations corresponding to the entered house number, a list of house number ranges appears. To start the route calculation, touch the range within the list you wish to specify as the destination. You can also
see the destination on the map by touching the  to the right of the list.
16
Searching the destination by map Page 27
10Route calculation starts automatically.
Route calculation starts. When the route calculation is completed, the map of your surroundings appears. (The route is displayed in green.)
If you press the POS button during route calculation, the calculation is cancelled and the map display appears.
When performing a destination search with the route already set, select whether to make the specified area your destination and search for a new route, or search for a route via that area.
Adding way points to the route Page 38
Once searched for, a location is automatically stored in the “Destination History”Page 40
Once the route is entered the map data for a certain distance is stored in the navigation unit. Thus, route guidance can take place even when the map disc is removed.
Memory navi mode Page 102
11Drive in accordance with the screen and voice information.
Your Navigation System gives you the following information with the timing adjusted to the speed of your vehicle:
•Distance to the next turning point
•Direction of travel
•Road number of the motorway
•Way point (If this is set)
•Your destination
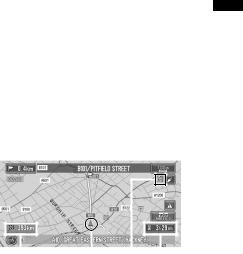
How to view the screen Page 23
Searching for another route Page 37
Cancelling route guidance Page 37
Touching the  allows you to hear the information again.
If you deviate from the route with the Guidance set to St.List Mode or Mixed Mode and enter a street not recorded on the disc, the screen changes to Map Mode. When you return to the route, returns to the original mode and resumes route guidance.
If you stop at a petrol station or a restaurant
during the route guidance, your Navigation |
NAVI/AV |
|
System remembers your destination and |
||
|
||
route Information. When you start the engine |
|
|
and get back on the road, the route guidance |
|
|
resumes. |
|
|
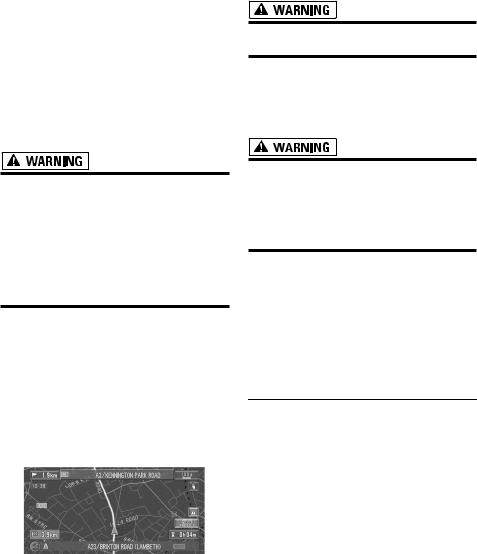
How to view Map Mode screen |
|
|
This section describes only the items that are dis- |
|
|
played on the Map Mode screen. |
|
|
Details of the map screen Page 23 |
|
|
|
|
|
|
|
|
|
|
|
|
|
|
|
|
|
|
|
|
|
|
|
|
|
|
|
|
1 Chapter |
|
|
|
|
|
|
|
|
|
|
|
|
|
|
|
|
|
|
|
|
|
|
|
|
|
|
|
|
|
(2) |
|
(1) |
(4) |
(3) |
|
|||||||
|
|
|
|
||||||||||
(1) |
Current location |
|
|
|
|
|
|
|
|
Basic |
|||
|
|
|
|
|
|
|
|
|
|
|
|
|
|
(2) |
Distance to the destination (or distance |
Operation |
|||||||||||
to way point) |
|
|
|
|
|
|
|
|
|||||
(3) |
Estimated time of arrival (or travel time to |
||||||||||||
your destination) |
|
|
|
|
|
|
|
|
|||||
|
|
|
|
|
|
|
|
|
|||||
(4) Memory navi indicator
Flashing green indicates that the data is being read. When the data reading has completed, this indicator disappears from the screen.
Memory navi mode Page 102
Memory navi mode
While the map disc is inserted, you can store the data on the map disc into the memory of the navigation unit. If the map disc is removed from the navigation unit after the data is stored, navigation is performed using the data in the memory (memory navi mode). In the memory navi mode, you can play a music CD or DVD video on the navigation unit while navigation is taking place. The operation is automatically switched to the memory navi mode when the map disc is removed from the navigation unit.
Navigation in the memory navi mode
During the memory navi mode, navigation is performed only using the data read into the memory. Therefore, some functions are restricted compared with navigation using the map disc (DVD
17
NAVI/AV
Basic Operation Chapter 1
navi mode). These functions buttons, which cannot be used in the memory navi mode, are indicated in dark grey. (For details, see page 19.) If you want to use these functions, please insert the map disc again. In addition, you may need to insert the map disc and store new data in the memory during navigation operation, such as when the destination is far away. The memory navi mode uses the following map data to perform navigation.
Memory navi indicator
When new route guidance starts, the route data from the map disc is read into the memory of the navigation unit. The status of the memory navi mode is indicated by the following icons on the top left of the map screen.
 (green flashes): Reading the data
 (green is lit): Operated in memory navi mode
  (red is lit): Operated in memory navi mode,
but the distance for guidance is 20 km or less.
Where the distance for navigation guidance is unknown, the icon flashes red. In that case, the guidance may suddenly fail. It is therefore recommended to reinsert the map disc.
When  disappears, memory navi mode is ready. You can now remove the map disc and use the memory navi mode function.
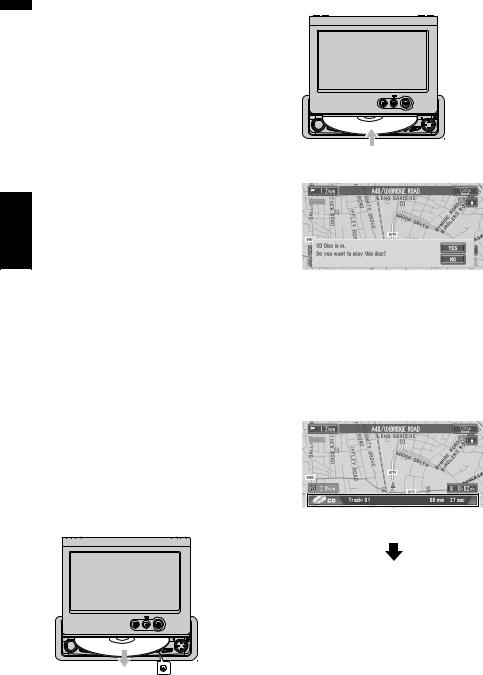
How to listen to a CD
You can listen to a CD by removing the map disc from the navigation unit.
About Memory Navigation “Memory Navi Mode” on page 17. (For details, see page 102.)
1 Press the EJECT button to remove the map disc.
2 Insert the CD to the disc loading slot.
3 Touch “YES”.
The audio CD set in the navigation unit is played.
DISC AUTO is off in the default setting.
DISC AUTO Page 90
4 Press the NAVI/AV button to switch the Audio screen.
Pressing the NAVI/AV button switches between the navigation map screen and the audio screen.
Information of Audio
18
Information of Audio source being played
Current direction of travel
Distance to the guidance point
Next direction of travel
5 Touch the screen to display the touch keys.
The track list and the touch keys are displayed.
6 Touch the track you want to listen to in the track list.
The selected track is played.
Information of track being played
You can also skip backward or forward to another track by moving the joystick left or right.
You can also operate with or of the touch keys.
7 To perform fast forward or reverse, touchthen keep touching or .
You can also perform fast reverse/fast forward by holding the joystick left or right.
Stopping playback
1 Touch . |
NAVI/AV |
||
|
|||
When you stop CD playback by touching , |
|
||
that location on the disc is memorised ena- |
|
||
bling playback from that point when you play |
|
||
the disc again. |
|
||
To play back the disc again, touch . |
|
||
|
|
|
|
For details on the functions, which can be used |
|
|
|
in the audio source, please see Chapters 6, 7 |
|
|
|
and 8. |
|
|
|
|
|
|
|
The buttons |
|
||
The status of the buttons appearing on the |
Chapter |
||
forming, you can touch some buttons, while |
|||
screen is indicated by their colour. |
|
||
Depending on the function the navigation is per- |
|
||
other buttons are not available. |
1 |
||
|
|||
|
|
|
|
Blue touch key: |
Basic |
||
Operation |
|||
The button is operable. |
|||
|
|||
Dark grey touch key: |
|
||
The function is not available (e.g., operation is |
|
||
prohibited while driving). |
|
||
Light grey touch key: |
|
||
The function is not available during memory navi |
|
||
mode. |
|
||
Touching this button activates a message indi- |
|
||
cating that the function is not available. |
|
||
19
Basic Operation |
Chapter 1 |
NAVI/AV |
|
|
|
|
|
20

Chapter 2
Menu and Map Display
This section describes the basic operations, including how to display the main menu and how to use the shortcut menu and the map screen.
How to Use Menu Screens
Specifying the address and searching the destination Page 14
Searching the destination by map Page 27
Other search methods Chapter 3
Information menu
The basic operation of the navigation is performed by using menus.
There are two types of menu: the “Main menu” and the “Shortcut menu”.
The functions that cannot be used based on certain conditions are indicated in grey.
The functions that cannot be used during the memory navi mode are indicated in dark grey. If you want to use such functions, insert the map disc.
Main menu
You use this menu for basic operation of your Navigation System.
1 With the map displayed, press the NAVI MENU button.
2 To change to the menu you want to use, touch the name of the menu displayed at the top of the screen.
The main menu is divided into four: “Destination”, “Information”, “Route Options”, and “Settings”.
3 If you want to return to the map, press the POS (or NAVI MENU) button.
Destination menu
Used to check the route you set or check the navigation status. You can also check traffic information or select the RDS-TMC station.
You can use “Route Profile” and “Route Scroll” only when a route has been entered.
Checking the set route Page 35
Checking the navigation status Page 49
Route Options menu
Used to specify the conditions for setting the route to the destination.
Setting the Route Options Page 33
Settings menu
Select the destination search method. Also the |
Set the navigation functions so they can be used |
route has set can be cancelled from this menu. |
easily. |
|
Settings menu Chapter 5 |
NAVI
Display Map and Menu 2 Chapter
21

If the contents of the menu are not fully dis-
NAVI |
played on the screen, touch “Next” to view the |
|
remaining contents. |
||
|
Shortcut menu
Shortcuts allow you to perform various tasks, such as route calculation for the location indicated by the cross pointer, or registering a location in the Address Book, faster than using the Main menu.
1 When the map is displayed, briefly touch any part of the map.
If you continue to touch the map, it will start scrolling.
Moving the map to view the part you want to see Page 26
Chapter 2 |
|
|
|
:Destination |
|
Display |
||
Displayed when the map is scrolled. Set the |
||
|
||
|
route to the place specified with the cross |
|
Map |
pointer. |
|
Searching the destination by map |
||
and |
||
Page 27 |
||
Menu |
:Chg.Route |
|
|
||
|
Can be selected only during route guidance. |
|
|
You can add changes to the route in the route |
|
|
guidance. |
|
|
Searching another route Page 37 |
|
|
Detour for a specified distance Page 37 |
|
|
Checking the route Page 35 |
|
|
Cancelling the route guidance Page 37 |
|
|
Skipping a way point Page 38 |
|
|
:Registration |
|
|
Registering the location indicated by the |
|
|
cross pointer to Address Book. |
|
|
Touching “Registration” and selecting |
|
|
“Save” allows you to register the location |
|
|
to Address Book. |
|
|
Registering a place Page 40 |
 :Area Search
You select a location with the cross pointer. Nearby POIs (Points Of Interest) will also be found.
Searching the facilities surrounding a certain place Page 30
 :Overlay POI
Displays on the map the mark for surrounding facilities (POI).
Viewing POI information Page 27
22
How to Use the Map
Most of the information provided by your Navigation System can be seen on the map. You need to get to know how the information appears on the map.
Switching the current position screen display mode
This section describes how to display the current position screen and change the map display mode.
There are four types of map display and three additional view modes.
•Map Mode
•Driver’s View
•Mixed Mode (during route guidance only)
•St.List Mode (during route guidance only)
•AV Status
•Vehicle Dynamics
•Rear View (Only possible when the “CAMERA” is set to “ON”)
1 Press the POS button to display a map of the area around your current position.
2 Press the POS button again.
3 Touch the mode name or press the POS button to select the mode you want to display.
How to view the map of the cur-
rent location |
NAVI |
|
|
||
|
|
|
|
|
|
|
|
|
•In Driver’s View, a small gauge with no scale is depicted, but is not intended to be used as a speedometer. Use the actual speedometer of your car to confirm speed.
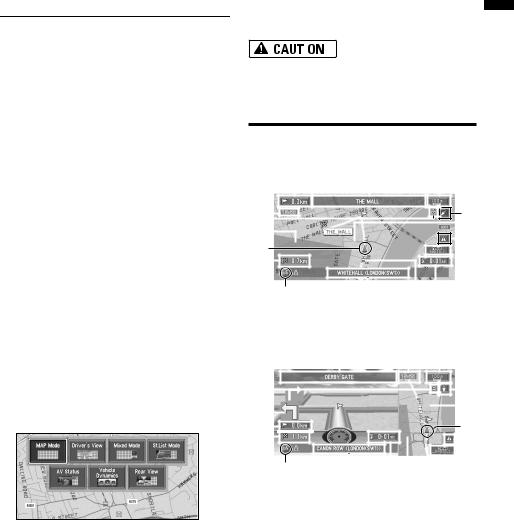
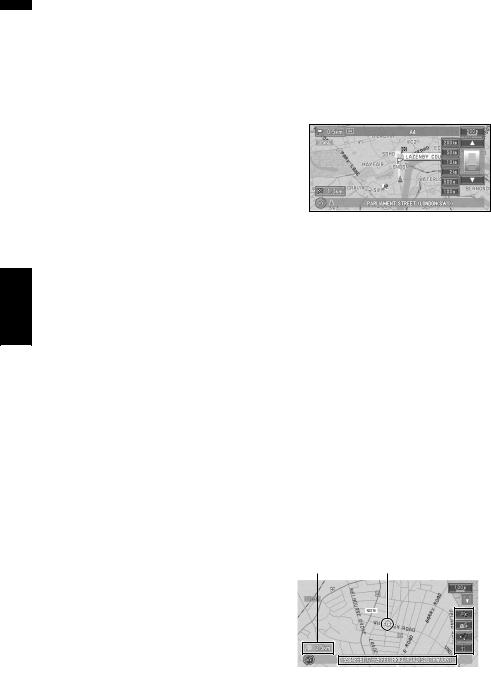
Map Mode
Displays standard map.
(11) |
(2) |
|
(1) |
(7) |
(6) |
|
|||||||||||||||||||
(19) |
|
|
|
|
|
|
|
|
|
|
|
|
|
|
|
|
|
|
|
|
|
|
|
|
|
|
|
|
|
|
|
|
|
|
|
|
|
|
|
|
|
|
|
|
|
|
|
|
|
||
|
|
|
|
|
|
|
|
|
|
|
|
|
|
|
|
|
|
|
|
|
|
|
|
||
|
|
|
|
|
|
|
|
|
|
|
|
|
|
|
|
|
|
|
|
|
|
(18) |
|
||
|
|
|
|
|
|
|
|
|
|
|
|
|
|
|
|
|
|
|
|
|
|
|
|||
(17) |
|
|
|
|
|
|
|
|
|
|
|
|
|
|
|
|
|
|
|
|
|
|
(9) |
|
|
|
|
|
|
|
|
|
|
|
|
|
|
|
|
|
|
|
|
|
|
|
|
||||
(3) |
|
|
|
|
|
|
|
|
|
|
|
|
|
|
|
|
|
|
|
|
|
|
|
||
|
|
|
|
|
|
|
|
|
|
|
|
|
|
|
|
|
|
|
|
|
|
(10) |
|
||
|
|
|
|
|
|
|
|
|
|
|
|
|
|
|
|
|
|
|
|
|
|||||
(4) |
|
|
|
|
|
|
|
|
|
|
|
|
|
|
|
|
|
|
|
|
|
|
|
|
|
|
|
|
|
|
|
|
|
|
|
|
|
|
|
|
|
|
|
|
|
|
|
||||
|
|
|
|
|
|
|
|
|
|
|
|
|
|
|
|
|
|
|
|
|
|
|
|
Chapter |
|
|
|
|
|
|
|
|
|
|
|
|
|
|
|
|
|
|
|
|
|
|
|
|
|
||
|
|
|
(8) |
|
|
|
|
(5) |
(13) (12) |
|
|
||||||||||||||
|
|
|
|
|
|
|
|
|
|
||||||||||||||||
Driver’s View |
|
|
|
|
|
|
|
|
|
|
|
|
|
|
|
|
2 |
||||||||
The map from the driver’s viewpoint is shown. |
|||||||||||||||||||||||||
|
|||||||||||||||||||||||||
(1)(11) (7) (6)
|
|
|
|
|
|
|
|
|
|
|
|
|
|
|
|
|
|
|
|
|
|
|
|
|
|
Menu |
|
|
|
|
|
|
|
|
|
|
|
|
|
|
|
|
|
|
|
|
|
|
|
|
|
|
|
|
|
|
|
|
|
|
|
|
|
|
|
|
|
|
|
|
|
|
|
|
|
|
|
|
|
|
(19) |
|
|
|
|
|
|
|
|
|
|
|
|
|
|
|
|
|
|
|
|
|
|
|
|
|
and |
|
|
|
|
|
|
|
|
|
|
|
|
|
|
|
|
|
|
|
|
|
|
|
|
|
||
(16) |
|
|
|
|
|
|
|
|
|
|
|
|
|
|
|
|
|
|
|
|
|
|
|
(14) |
Map |
|
(2) |
|
|
|
|
|
|
|
|
|
|
|
|
|
|
|
|
|
|
|
|
Display |
|||||
|
|
|
|
|
|
|
|
(3) |
||||||||||||||||||
(4) |
|
|
|
|
|
|
|
|
|
|
|
|
|
|
|
|
|
|
|
|
|
|
|
|
|
|
(8) |
|
|
|
|
(5) |
|
|
|
|
|
|
|
|
|
|
|
|
|||||||||
|
|
|
|
(12)(17) (13)(10) (9) |
|
|||||||||||||||||||||
If the mode is selected by pressing the POS button, the screen soon automatically switches to the selected map display mode.
23

NAVI
Mixed Mode
The map of your surroundings is shown on the left, and an arrow indicating the direction of travel is shown on the right.
(1) |
(7) (16) |
(6) |
|
|
|
|
|
|
|
|
|
(11) 

(3)
(17)
(18)
(4) 
(8) |
(13) |
(5) |
(12) (10) (2) |
(9) |
AV Status
Information on the audio source currently being played is indicated on the left-hand side of the screen, while the map of your surroundings is indicated on the right.
 (6)
(6)
 (14)
(14)
 (9)
(9)
(16) |
(2) |
(19) (3) |
(10) |
Menu and Map Display Chapter 2
St.List Mode
Displays the name of the street you will next travel along and an arrow indicating the direction of travel.
Normal condition
(1) |
(12) |
(11) |
|
|
(7) |
(6) |
|||||||||||||||||||||||
|
|
|
|
|
|
|
|
|
|
|
|
|
|
|
|
|
|
|
|
|
|
|
|
|
|
|
|
|
|
|
|
|
|
|
|
|
|
|
|
|
|
|
|
|
|
|
|
|
|
|
|
|
|
|
|
|
|
|
|
|
|
|
|
|
|
|
|
|
|
|
|
|
|
|
|
|
|
|
|
|
|
|
|
|
|
|
|
|
|
|
|
|
|
|
|
|
|
|
|
|
|
|
|
|
|
|
|
|
|
|
|
|
|
|
|
|
|
|
|
(2) |
|
|
|
|
|
|
|
|
|
|
|
|
|
|
|
|
|
|
|
|
|
|
|
|
|
|
|
|
(14) |
|
|
|
|
|
|
|
|
|
|
|
|
|
|
|
|
|
|
|
|
|
|
|
|
|
|
|
|
||
|
|
|
|
|
|
|
|
|
|
|
|
|
|
|
|
|
|
|
|
|
|
|
|
|
|
|
|
||
|
|
|
|
|
|
|
|
|
|
|
|
|
|
|
|
|
|
|
|
|
|
|
|
|
|
(3) |
|||
(16) |
|
|
|
|
|
|
|
|
|
|
|
|
|
|
|
|
|
|
|
|
|
|
|
|
|
|
|||
|
|
|
|
|
|
|
|
|
|
|
|
|
|
|
|
|
|
|
|
|
|
|
|
|
|
||||
(4) |
|
|
|
|
|
|
|
|
|
|
|
|
|
|
|
|
|
|
|
|
|
|
|
|
|
|
|
|
|
|
|
|
|
|
|
|
|
|
|
|
|
|
|
|
|
|
|
|
|
|
|
|
|
|
|
|
|
|
|
|
|
|
|
|
|
|
|
|
|
|
|
|
|
|
|
|
|
|
|
|
|
|
|
|
|
|
|
|
|
|
|
|
|
|
|
|
|
|
|
|
|
|
|
|
|
|
|
|
|
|
|
|
|
|
|
|
|
|
|
(8)(5) (17) (13) (10) (9)
When approaching an intersection (When “Close-up of Junction” is off)
(16)
(15) 
(4) |
(12) |
(14) |
Vehicle Dynamics Display
Indicates the status of your vehicle.
You can change the items indicated to the meters on the left and right.
In the Vehicle Dynamics Display mode, the speedometer display may show a different speed than your vehicle’s actual speedometer, because your unit measures speed in a different way.
Vehicle Dynamics cannot be displayed if sensor initialisation is not complete.
Setting the Vehicle Dynamics Display Page 50
Rear View
Rear view image is displayed on the left-hand side of the screen, while the map of your surroundings is indicated on the right.
(7)
 (6)
(6)
(14)
 (9)
(9)
(3) (10)
24
If the “CAMERA” is set to “OFF”, the rear view image is not displayed. Please set it to “ON”.
Camera setting Page 90
When using a camera set to turn OFF/ON in conjunction with the reversing signal, no camera images will be displayed in rear view mode if the camera is connected normally.
If the camera is set always ON, it can display images in rear view mode when the vehicle is moving forward. In that case, you should ask the camera maker or dealer whether the camera’s functions or longevity would be affected.
Rear View can be displayed at all times (e.g. when monitoring an attached trailer, etc.) as a split screen where map information is partially displayed. Please beware that in this setting, camera image is not resized to fit, but that a portion of what is seen by the camera is not viewable.
Enlarged map of the intersection
When “Close-up of Junction” in the Settings menu is “On”, an enlarged map of the junction appears. If driving on motorway, the special guide illustration is displayed.
(15)
(14)
When set to Driver’s View and Vehicle Dynamics, cannot be changed to an enlarged intersection map.
City Map
When driving in a city, the detailed city map is indicated if the map scale is set to 50m or lower (only those cities whose detailed city maps are registered in the map disc).
(2) |
(1) |
(7) |
|
(6) |
|
|||||||||||
(11) |
|
|
|
|
|
|
|
|
|
|
|
|
|
|
|
NAVI |
|
|
|
|
|
|
|
|
|
|
|
|
|
|
|
||
|
|
|
|
|
|
|
|
|
|
|
|
|
|
|
||
|
|
|
|
|
|
|
|
|
|
|
|
|
|
|
(9) |
|
(3) |
|
|
|
|
|
|
|
|
|
|
|
|
|
|
(10) |
|
(4) |
|
|
|
|
|
|
|
|
|
|
|
|
|
|
|
|
|
|
|
|
|
|
|
|
|
|
|
|
|
|
|
|
|
|
|
|
|
|
|
|
|
|
|
|
|
|
|
|
|
|
|
|
|
|
|
|
|
|
|
|
|
|
|
|
|
|
|
(8) |
|
|
|
(5) |
(12) |
|
|
|
|
|||||||
Detailed city map is not displayed during the memory navi mode.
Display items
 Guidance point*
The next guidance point (next turning point, etc.) is shown by a yellow flag.
Destination* |
Chapter |
|
The checker-flag indicates your destination. |
||
|
||
(1) Name of the next street to be used* |
|
|
(2) Distance to the guidance point* |
2 |
|
Touch to access the next information. |
||
|
||
The current location of your vehicle. The tip of the |
Menu |
|
(3) Current location |
|
|
triangular mark indicates your heading and the |
and |
|
|
||
display moves automatically as you drive. |
Map |
|
(4) Distance to the destination (or distance |
||
Display |
||
to way point)* |
||
|
||
If way points are set, the display changes with |
|
|
each touch. |
|
(5)Name of the street your vehicle is travelling along (or City Name, etc.)
(6)Compass
The red arrow shows North. Each touch changes the map’s display direction. (North is UP or Heading Up.)
(7) Map scale
The scale of the map is indicated at distance. In
St.List Mode and Driver’s View, AV Status,
Rear View, it shows the scale of the map displayed on the right-hand side of the screen. Touch to change the map’s scale.
Changing the map’s scale Page 26
(8) VOICE icon
Touch to change to voice recognition mode.
25
NAVI
Menu and Map Display Chapter 2
This is displayed only when the microphone for voice recognition is connected.
The voice operation of the navigation systemChapter 9
(9) NEW Info icon
Displays the presence of updated traffic information. Touch to display the updated item of the traffic list.
Using traffic information Page 44
(10) TMC icon
When a route has been calculated, touch to check whether there is any traffic information on your route. When no route has been calculated, touch to display the traffic list.
(11)Current time
(12)Estimated time of arrival (or travel time to your destination)*
The display changes with each touch.
(13)Tracking mark
The tracking mark shows the route your vehicle has travelled.
Select the tracking setting Page 54
(14)Map of your surroundings (Side map)
Touching this takes you to the map scroll screen.
(15)Distance to an intersection*
Displayed on the enlarged intersection map. The green bar gets shorter as your vehicle approaches an intersection.
(16)Next direction of travel*
(17)Area to Avoid*
About detour area Page 43
(18) Direction line
The direction towards the location set in (4) is indicated with a straight line.
(19) Memory navi indicator
About memory navi indicator Page 104
Information with the mark (*) appears only when the route is set.
Depending on the conditions and settings, some items may not be displayed.
Changing the scale of the map
Touching the “Map scale” key displayed on the upper right of the screen displays the scale
gauge and “Map scale” key. Directly touching the “Map scale” key changes the map to the selected scale. Touching  or
or  on the scale gauge allows you to specify the scale in greater detail within a range of 25 metres - 500 kilometres (25 yards - 250 miles).
Selection of the scales is limited during the memory navi mode.
The icon of a registered location and TMC icon are indicated when the map scale is 20 km (10 miles) or lower.
POI icon and the traffic jam line are indicated when the map scale is 1 km (0.75 miles) or lower.
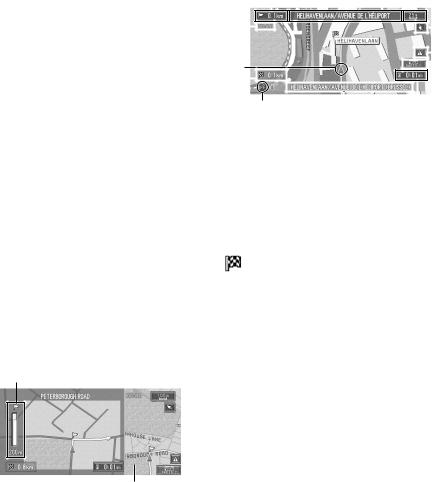
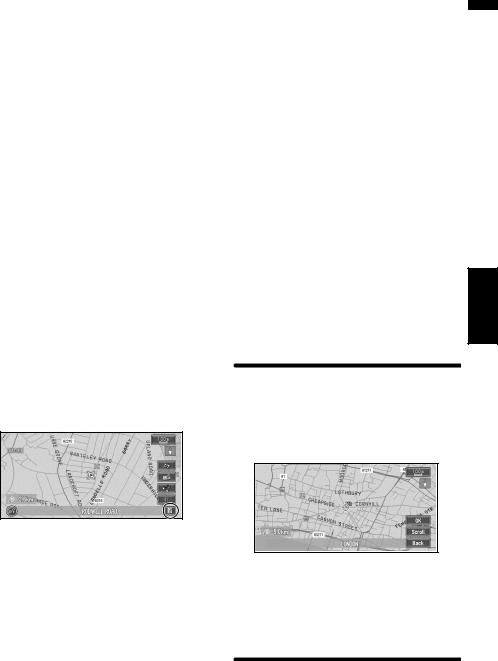
Moving the map to the location you want to see
Touching anywhere on the map for at least 2 seconds changes the map to Scroll mode and the map begins scrolling in the direction you touched. The scrolling stops when you remove your finger from the screen. At this time, the cross pointer appears at the centre of the screen. Also a line connecting between the current location and cross pointer appears.
Pressing the POS button returns you to the map of your surroundings.
Touch the area close to the centre of the screen to scroll slowly; touch near the sides of the screen to scroll through quickly.
(2)(1)
 (4)
(4)
(3)
26
(1) Scroll location
The position of cross pointer shows the location selected on the current map.
(2) Distance from the current location
Shows the distance in a straight line between the location indicated by the cross pointer and your current location.
(3) The street name, city name, area name and other information for this place.
(The case of a map scale of 200 m (0.25 mile) or lower.)
Touching the  on the right displays hidden text.
Displaying information on the specified location Page 27
(4) Shortcut menu
How to view shortcut menu Page 22
Viewing the information of a specified location
An icon appears at registered places (home location, specific places, address book entries) and places where there is a POI icon or traffic information icon. Place the cross pointer over the icon to view detailed information.
1 Scroll the map and move the cross pointer to the icon you want to view.
2 Touch  .
.
Information for a specified location appears. The information shown varies according to the location. (There may be no information for that location.)
Registering places Page 39
Displaying facilities (POI) mark on the mapPage 30
Using traffic information Page 44
3 Touch “Back”.
You are returned to the previous display.
In the memory navi mode, you can only see detailed information for registered points (when available).
Finding a destination on the map
If you search the location you want to visit by scrolling the map, and touch  in the Shortcut menu, you can specify your destination on the map.
1 Press the POS button to access the map screen.
2 Touch the map for at least 2 seconds.
The map display changes to Scroll mode.
3 Scroll the map and move the cross pointer to the place you want to make your destination.
Moving the map to view the part you want to see Page 26
4 Touch  .
.
If you press the POS button during route calculation, the calculation is cancelled and the map display appears.
When the  appears on the right of the list
You can also set a destination by touching the  to the right of the list. Touch “OK” to confirm.
The location pointed by the cross pointer will be set as a destination.
Alternative option:
Scroll :
The map display changes to Scroll mode, and the Shortcut menu appears.
Shortcut menu Page 22
NAVI
Display Map and Menu 2 Chapter
27
Menu and Map Display |
Chapter 2 |
NAVI |
|
|
|
|
|
28
 Loading...