


 Loading...
English 4
Español 23
Français 44
Português 65
 105
105


 124
124
HQ7782, HQ7780

English
Introduction
The shaver comes with two different kinds of NIVEA FOR MEN cartridges: Extra Fresh Shaving Gel for a fresh sensation during and after shaving and Moisturising Shaving Lotion for sensitive skin. This gives you the opportunity to try them out and discover which one suits your skin type best.
Important
Read this user manual carefully before you use the appliance and save it for future reference.
-This appliance is not intended for use by persons (including children) with reduced physical, sensory or mental capabilities, or lack of experience
and knowledge, unless they have been given supervision or instruction concerning use of the appliance by a person responsible for their safety.
-Children should be supervised to ensure that they do not play with the appliance.
-Only use the powerplug and the charging stand supplied.
-The powerplug transforms 100-240 volts to a safe low voltage of less than 24 volts.
-The powerplug contains a transformer. Do not cut off the powerplug to replace it with another plug, as this causes a hazardous situation.
-Do not use a damaged powerplug or charging stand.
-If the powerplug or charging stand is damaged, always have it replaced with one of the original type in order to avoid a hazard.
-Charge, store and use the appliance at a temperature between 5°C and 35°C.
-Make sure the powerplug does not get wet.

English
-Never immerse the charging stand in water nor rinse it under the tap.
-Do not leave the shaver in the plugged-in charging stand for more than 24 hours.
-The appliance is watertight and can be cleaned under the tap.
Be careful with hot water. Always check if the water is not too hot, to prevent your hands from getting burnt.
-The appliance complies with the internationally approved IEC safety regulations and can be safely used in the bath or shower.
-Check if the gel and lotion supplied with the appliance contain ingredients (see back of cartridge) to which you are allergic before you start using the appliance. Do not use the gel and/or lotion if you are allergic to one or more ingredients.
Electromagnetic fields (EMF)
This Philips appliance complies with all standards regarding electromagnetic fields (EMF). If handled properly and according to the instructions in this user manual, the appliance is safe to use based on scientific evidence available today.
The display
Living Light Display
This model features the unique Living Light display. This 3D colour LED display gives you all the information you need with special ‘living light’ effects.
,Remove any sticker or protective foil from the Living Light Display.

English
Demonstration program
The appliance has a unique demonstration program.
1 Press the on/off button for 7 seconds.
The demonstration will start automatically.
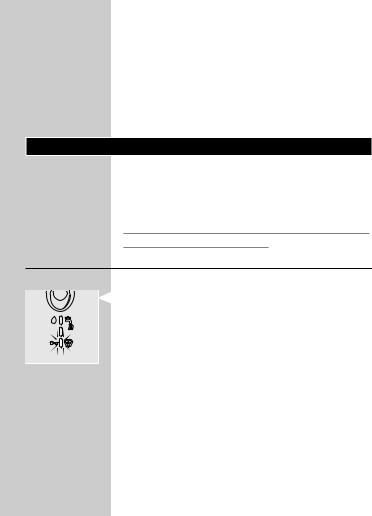
,When the demonstration starts, all indications light up at the same time.Then all indications of the shaver are shown separately for 3 seconds in
the following order:
ãCharging/Battery full indication æShaving
± Shaving gel indication
å Cleaning reminder/ ã Battery capacity æShaving
± Shaving gel indication
ãBattery low indication
å Cleaning reminder/ ã Battery low indication Î Shaving head check indication
ä Travel lock indication
Note:The whole demonstration program lasts approx. 1 minute (including intervals).
2You can stop the demonstration by pressing the on/off button.
Indications during use
All indications mentioned below are shown during every shaving session and they are always displayed in the same order, which makes it very easy for you to maintain a regular shaving ritual
As a result, some symbols will light up even when you have already taken the appropriate action.
Note:When you switch the appliance on, the battery capacity indication appears briefly.After this,the shaving gel indication flashes three times.If you have
English
already applied enough shaving gel or lotion, you can ignore this indication.
Note:When you switch the appliance off,the cleaning reminder is displayed.This cleaning reminder consists of a green tap (lights up) and a green water jet (flashes). If you have already cleaned the shaver before switching it off,you can ignore the cleaning reminder.
After the cleaning reminder has been displayed, the battery capacity indication appears briefly.
Charging
When you charge the shaver for the first time or after a long period of disuse, let it charge continuously for 4 hours. Charging normally takes approx. 1 hour.
Do not leave the shaver in the plugged-in charging stand for more than 24 hours.
Charge indications
Battery running low
,When the battery is running low, the bottom battery light burns red during shaving.
,When you switch the shaver off while the battery is nearly empty, the bottom battery light flashes red twice.This will happen four times with brief pauses in between.
,When you start charging the shaver while the battery is running low, the bottom battery light flashes red for max.3 minutes.
Battery fully charged
,During charging the three battery lights flash green until the shaver is fully charged (approx.1 hour).
English
,The three battery lights burn green continuously when the battery is fully charged.
Battery indications during shaving
The three battery lights show the remaining battery capacity for 5 seconds after you switch the shaver on or off.
-The lower two battery lights burn green: 66% of the entire battery capacity is left.
-The bottom battery light burns green: 33% of the battery capacity is left.
-The bottom battery light burns red: the battery is almost empty (see also section ‘Battery running low’).
Charging the appliance
Charge the shaver before using it for the first time and when the shaver indicates that the battery is running low.
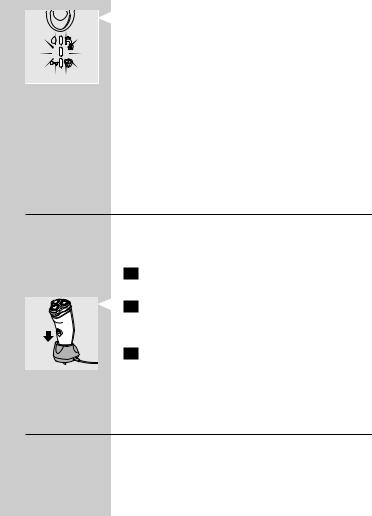
1Insert the small plug into the charging stand and put the powerplug in the wall socket.
2 Place the shaver in the charging stand.
The shaver automatically switches off when it is placed in the charging stand.
3 Remove the powerplug from the wall socket and pull the small plug out of the charging stand when the battery has been fully charged. You can then leave the appliance in the charging stand.
Cordless shaving time
A fully charged shaver has a cordless shaving time of up to 55 minutes.

English
Cartridges
2
 1
1
Cartridges with NIVEA FOR MEN shaving gel/lotion are available in boxes containing five cartridges and one small plastic pump.
The NIVEA FOR MEN shaving gel/lotion in the cartridges will keep for 32 months when stored at temperatures between 0 cC and +40 cC.
Only use Philips NIVEA FOR MEN Cool Skin (HQ170 and HQ171) cartridges.
One Philips NIVEA FOR MEN Cool Skin cartridge contains enough gel/lotion for approx. 10 shaves. For hygienic reasons, we advise you to insert a new pump when you start using a new set of five cartridges.
Do not throw the pump away when you replace an empty cartridge.You will need it for all five cartridges.
Remove the shaving gel/lotion cartridge from the appliance when you are not going to use the shaver for more than one week.
When you have run out of shaving gel/lotion cartridges and you do not know where to buy them, contact the Customer Care Centre in your country (see ‘Guarantee & service’).
Inserting cartridges
When you start using a new set of cartridges, take the pump out of its bag and push it into a cartridge until it locks into position with a click.
Press the release button (1) and open the cover of the cartridge compartment (2).

10 English
2
 1
1
Slide the cartridge with the pump into the shaver.It only fits properly if the white side of the pump is pointing upwards.
4Close the cover (you will hear a click).
5Press the yellow pump button a few times until the NIVEA FOR MEN shaving gel/lotion appears.The shaver is now ready for use.
Replacing cartridges
Do not throw the pump away when you replace an empty cartridge.You will need it for the other cartridges.
Press the release button (1) and open the cover of the cartridge compartment (2).
2Remove the empty cartridge and pull out the pump.
Push the pump into a new cartridge until it locks into position with a click.
Slide the cartridge with the pump into the shaver.It only fits properly if the white side of the pump is pointing upwards. Close the cover.
Storing cartridges
You can conveniently store the other cartridges by attaching them to the wall holder supplied. The holder has suction caps which allow you to attach it to the wall easily. In this way you always have the cartridges close at hand, which is very convenient, especially when you shave in the shower.

English 11
The wall holder is only suitable for storing cartridges. Never hang or place the shaver on the wall holder. If you do, the shaver may fall!
Using the appliance
Shaving
Switching on the shaver
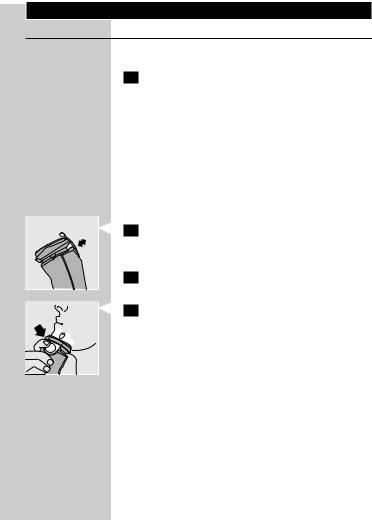
1Press the on/off button once to switch on the shaver.
After the battery capacity has been shown briefly, the yellow teardrop-shaped shaving gel light ± flashes 3 times to indicate that shaving gel/lotion can be applied.
If the shaver does not go on when you press the on/ off button, the travel lock may have been activated. Deactivate the travel lock (see chapter ‘Travel lock’).
Press the yellow pump button to apply NIVEA FOR MEN shaving gel/lotion to your skin.
3Move the shaving heads over your skin, making both straight and circular movements.
While shaving, press the pump button frequently to apply more NIVEA FOR MEN shaving gel/lotion so that the shaver keeps
gliding smoothly over your face.
Do not press the shaver too hard against your skin while shaving. If you prefer, you can wet your face before shaving.
,For the best shaving results, shaving gel/lotion should be pumped up frequently.
,The shaver will not perform optimally when used without shaving gel/lotion.
,Your skin may need 2 or 3 weeks to get accustomed to the Philips shaving system.

12 English
Switching off the shaver
1Press the on/off button once to switch off the shaver.
The cleaning reminder å (green tap symbol with flashing water jet) lights up for 6 seconds to indicate that the shaver should be cleaned.
After this, the remaining battery capacity is shown for 5 seconds.
2 Clean the shaver (see chapter ‘Cleaning and maintenance’).
Rinse the shaver after each shave. Remove the cartridge if you are not going to use the appliance for more than one week.
3
5
If necessary, check the remaining battery capacity by pressing the on/off button. One or more battery lights will go on for 5 seconds to indicate the remaining battery capacity.
Put the protection cap on the shaver every time you have used it, to prevent damage.
If necessary, activate the travel lock (see chapter ‘Travel lock’).
Trimming
For grooming sideburns and moustache.
Attaching the trimmer
1 Switch off the shaver.
Clean the shaver before you attach the trimmer (see chapter ‘Cleaning and maintenance’).
|
English 13 |
|
Press the release button (1) and pull the |
2 |
shaving unit off the shaver (2). |
1 
Tilt the trimmer slightly backwards.
the trimmer onto the shaver (you will hear click).The trimmer is now ready for use.
5 Activate the trimmer by pressing the on/off button once.
Removing the trimmer
1
2
3
Switch off the shaver.
Remove the trimmer by pressing the release button again and pulling the trimmer off the shaver.
Put the shaving unit back onto the shaver.
Travel lock
If you are going to store the shaver for a longer period or if you are going to travel, it is possible to lock the shaver.The travel lock prevents the shaver from being switched on by accident.

14 English
Activating the travel lock
1Press the on/off button for 3 seconds.The motor is switched off.
2The travel lock indication ä, a yellow key symbol,flashes 3-4 times and then burns continuously for 4 seconds.The travel lock has now been activated.
The yellow key symbol goes out.
Deactivating the travel lock
1Press the on/off button for at least 3 seconds. The yellow key symbol lights up.
2The yellow key symbol flashes 3-4 times.Then the motor starts running to indicate that the
shaver has been unlocked.The shaver is now ready for use again.
The yellow key symbol goes out.
Note:The shaver unlocks automatically when you place the shaver in the plugged-in charging stand.
Checking if the appliance is locked
1Press the on/off button briefly (less than 3 seconds).
2The yellow key symbol lights up for 3 seconds to confirm that the travel lock is active.
Cleaning and maintenance
Regular cleaning guarantees better shaving performance.
To maintain optimal shaving performance and to keep the shaver clean, you have to thoroughly rinse the shaving unit and hair chamber with hot water after every shave.
English 15
Be careful with hot water.Always check if the water is not too hot, to prevent your hands from getting burnt.
Cleaning reminder
,When you have switched off the shaver, the cleaning reminder å (green tap symbol with flashing water jet) lights up for 6 seconds to remind you that the shaver should be cleaned.
,If the red shaving unit symbol Î and the cleaning reminder å light up together, the shaving heads have become so dirty or damaged that they might cause the motor to become blocked. If the shaving heads are dirty, you have to clean them. If the shaving heads are damaged, you have to replace them (see chapter ‘Replacement’).
Note:We advise you to avoid this situation by cleaning the shaving heads regularly.
Cleaning
The shaver reminds you that it needs to be cleaned by showing the cleaning reminder å after every shaving session.
Shaving unit:Quick Clean after every shave
1Make sure the appliance is switched on.
2Keep the shaving unit closed.
3Rinse the shaving unit and the hair chamber under a hot tap by letting the water run through the openings below the shaving unit for at least 30 seconds.
4Shake off excess water.
Never dry the shaving unit with a towel or tissue, as this may damage the shaving heads.

16 English
Shaving unit and hair chamber:every week
We advise you to clean the appliance thoroughly at least once a week to maintain optimal shaving performance.
You can also follow this procedure when the shaving heads have to be cleaned.
1 Switch off the shaver.
Press the release button to open the shaving unit.
Rinse the inside of the shaving unit.
Rinse the outside of the shaving unit.
Rinse the hair chamber.
6 Make sure the inside of the shaving unit and the hair chamber have been cleaned properly.
7 Close the shaving unit and shake off excess water.
8Open the shaving unit again and leave it open to let the appliance dry completely.
Charging stand
1Unplug the charging stand.
2Clean the charging stand with a moist cloth.

English 17
Trimmer
1Clean the outside of the trimmer with the brush supplied after every use.
The trimmer can also be cleaned by rinsing it under the tap.
the trimmer is used frequently, lubricate the trimmer teeth with a drop of sewing machine oil every six months.
Storage
stand
shaver can be stored in the charging stand, when it is wet.
Always unplug the charging stand before storing the wet or dry shaver in it.
Pouch
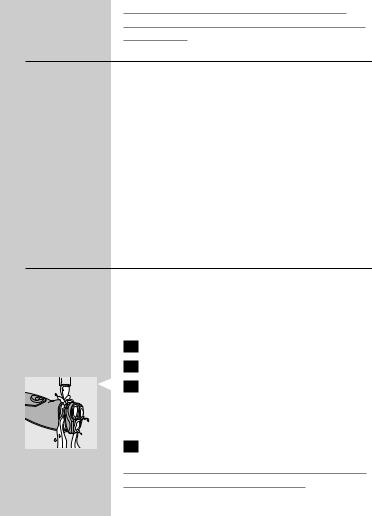
,The shaver can be stored in the pouch supplied. There is also room for two NIVEA FOR MEN Cool Skin cartridges.The pouch will provide extra protection during travel.
Hanging cord
,The shaver can also be stored by hanging it from the hanging cord supplied. Storing the shaver
by means of the hanging cord ensures optimal drying conditions.
Replacement
Replace the shaving heads every two years for optimal shaving results.
Replace damaged or worn shaving heads with HQ177 Philips Cool Skin shaving heads only.

18 English
Shaving head check indication
After two years of use the red shaving unit symbol
Î will flash for 30 seconds during 7 shaves to indicate that you should check the condition of the shaving heads.This indication is based on an average shaving time of 3 minutes per shave.When the shaving head symbol flashes, all other symbols and lights are out.When the shaver is switched off, the shaving unit symbol disappears.
When the red shaving unit symbol starts flashing, you should check the shaving heads for possible damage. If the shaving heads are damaged in any way, they must be replaced in order to obtain optimal shaving results.
Replacing the shaving heads
|
1 Switch off the shaver. |
|
Press the release button to open the shaving |
|
unit. |
2 |
Turn the wheel anticlockwise (1) and remove |
1 |
the retaining frame (2). |
|
|
|
Remove the shaving heads and place new ones |
|
in the shaving unit. |

English 19
15 Put the retaining frame back into the shaving unit, press the wheel (1) and turn it clockwise
2 |
(2). |
Accessories
The following accessories are available:
-HQ8500/HQ8000 powerplug.
-HQ177 Philips Cool Skin shaving heads.
-HQ170 NIVEA FOR MEN Cool Skin Moisturising Shaving Lotion.
-HQ171 NIVEA FOR MEN Cool Skin Extra Fresh Shaving Gel.
Environment
- Do not throw away the appliance with the normal household waste at the end of its life, but hand
it in at an official collection point for recycling. By doing this, you help to preserve the environment.
- The built-in rechargeable shaver battery contains substances that may pollute the environment. Always remove the battery before you discard and hand in the shaver at an official collection point. Dispose of the battery at an official collection point for batteries. If you have trouble removing the battery, you can also take the shaver to a Philips service centre.The staff of this centre will remove the battery for you and will dispose of it in an environmentally safe way.
Disposal of the battery
Only remove the battery if it is completely empty.

20 English
Let the shaver run until it stops, undo the screws and open the shaver.
2 Remove the battery.
Do not put the shaver back into the charging stand after the battery has been removed.
Guarantee & service
If you need information or if you have a problem, please visit the Philips website at www.philips.com or contact the Philips Customer Care Centre
in your country (you find its phone number in the worldwide guarantee leaflet). If there is no
Customer Care Centre in your country, go to your local Philips dealer or contact the Service Department of Philips Domestic Appliances and Personal Care BV.
Troubleshooting
1The shaving heads do not move smoothly over the skin.
-Cause: not enough shaving gel/lotion has been applied.
Press the pump button a few times until sufficient
NIVEA FOR MEN shaving gel/lotion has been released to allow the shaving heads to move smoothly over your face again.
2Reduced shaving performance
-Cause 1: the shaving heads are dirty.
The shaver has not been cleaned immediately after use and/or has not been rinsed long enough and/or the water used to rinse the shaver was not hot enough.

English 21
Clean the shaver thoroughly before you continue shaving. See chapter ‘Cleaning and maintenance’.
-Cause 2: long hairs are obstructing the shaving heads.
Press the release button to open the shaving unit. Turn the wheel anticlockwise (1) and remove the retaining frame (2).
Clean the cutters and guards.
Do not clean more than one cutter and guard at a time, since they are all matching sets. If you accidentally mix up the cutters and guards, it may take several weeks before optimal shaving performance is restored.
Remove the hairs with the brush supplied.
Put the shaving heads back into the shaving unit. Put the retaining frame back into the shaving unit and turn the lock clockwise.
To prevent long hairs from obstructing the shaving heads, remove the shaving heads once a month and clean them with the brush supplied.
- Cause 3: the shaving heads are damaged or worn. Replace the shaving heads. See chapter ‘Replacement’.
3The shaver does not work when the on/off button is pressed.
-Cause 1: the battery is empty.
Recharge the battery. See chapter ‘Charging’.
-Cause 2: dried-up shaving gel/lotion is blocking the shaving heads.
Clean the shaving heads thoroughly. See chapter ‘Cleaning and maintenance’.
- Cause 3: the shaving heads are damaged. Replace the shaving heads. See chapter ‘Replacement’.

22 English
4The cover of the cartridge compartment cannot be closed
-Cause 1: the cartridge has not been inserted correctly.
Insert the cartridge correctly. It only fits properly into the shaver if the white side of the pump is pointing upwards.
- Cause 2: the cartridge has not been pushed far enough into the shaver.
Press the cartridge until it is properly seated.
5The NIVEA FOR MEN shaving gel/lotion has changed colour or has turned watery.
-Cause: the NIVEA FOR MEN shaving gel/lotion has not been stored at the right temperature.
Insert a new cartridge.
6Skin irritation occurs
-Cause 1: your skin has not yet become accustomed to this shaving system.
Allow 2-3 weeks for your skin to get accustomed to this shaving system.
- Cause 2: the shaving gel/lotion irritates your skin. Try the other type of NIVEA FOR MEN cartridge. Wet your face before shaving with the shaving gel/lotion.
If the irritation does not disappear within 24 hours, we advise you to stop using the shaving gel/lotion.
Español 23
Introducción
La afeitadora se suministra con dos tipos diferentes de cartuchos NIVEA FOR MEN: un gel extrarefrescante que proporciona una sensación de frescor durante y después del afeitado, y una loción hidratante especialmente indicada para pieles sensibles. De este modo podrá comprobar cuál de los dos se adapta mejor a su tipo de piel.
Importante
Antes de usar el aparato, lea atentamente este manual del usuario y consérvelo por si necesitara consultarlo en el futuro.
-Este aparato no debe ser usado por personas (adultos o niños) con su capacidad física, psíquica o sensorial reducida, ni por quienes no tengan los conocimientos y la experiencia necesarios, a menos que sean supervisados o instruidos acerca del uso del aparato por una persona responsable de su seguridad.
-Asegúrese de que los niños no jueguen con este aparato.
-Utilice sólo la clavija adaptadora y el soporte de carga suministrados.
-La clavija adaptadora transforma la corriente de 100 - 240 voltios en un bajo voltaje de seguridad inferior a 24 voltios.
-La clavija adaptadora tiene un transformador. No corte la clavija adaptadora para sustituirla por otra clavija, ya que ello podría provocar situaciones de peligro.
-No utilice una clavija adaptadora dañada o un soporte de carga dañados.

24 Español
-Si la clavija adaptadora o el soporte de carga están dañados, sustitúyalos siempre por otros del modelo original para evitar situaciones de peligro.
-Cargue, guarde y utilice el aparato a una temperatura entre 5°C y 35°C.
-Asegúrese de que la clavija adaptadora no se moje.
-No sumerja nunca el soporte de carga en agua ni lo enjuague bajo el grifo.
- No deje la afeitadora en el soporte de carga enchufado durante más de 24 horas.
- El aparato es hermético y puede lavarse bajo el grifo.
Tenga cuidado con el agua caliente. Compruebe siempre que el agua no esté demasiado caliente para evitar quemarse las manos.
- El aparato cumple las normas de seguridad IEC aprobadas internacionalmente, y se puede utilizar de manera segura en el baño o en la ducha.
-Antes de comenzar a utilizar el aparato, compruebe que ni el gel ni la loción que se suministran con el aparato (consulte el dorso del cartucho) contienen componentes a los que usted sea alérgico. No utilice el gel ni la loción si es alérgico a uno o más de sus componentes.
Campos electromagnéticos (CEM)
Este aparato Philips cumple todos los estándares sobre campos electromagnéticos (CEM). Si se utiliza correctamente y de acuerdo con las instrucciones de este manual, el aparato se puede usar de
forma segura según los conocimientos científicos disponibles hoy en día.

Español 25
El display
Display Living Light
Este modelo incorpora el exclusivo display Living Light. Este display LED 3D a color le proporciona toda la información que necesita con efectos especiales.
,Quite cualquier pegatina o lámina protectora del display Living Light.
Programa de demostración
El aparato tiene un exclusivo programa de demostración.
1Pulse el botón de encendido/apagado durante 7 segundos.
La demostración comenzará automáticamente.
,Cuando comience la demostración, todas las indicaciones se iluminarán a la vez. Después, las indicaciones de la afeitadora se irán mostrando por separado durante 3 segundos en el siguiente
orden:
ãIndicación de carga/batería llena æAfeitado
± Indicación de gel para el afeitado
å Recordatorio de limpieza / ã carga disponible en la batería
æAfeitado
± Indicación de gel para el afeitado
ãIndicación de batería baja
åRecordatorio de limpieza / ã Indicación de batería baja
ÎIndicación de comprobación del cabezal de afeitado
äIndicación de bloqueo para viajes

26 Español
Nota: El programa de demostración completo dura
1 minuto aproximadamente (incluyendo los intervalos).
2Puede parar la demostración pulsando el botón de encendido/apagado.
Indicaciones durante el uso
Las indicaciones que se mencionan a continuación aparecen durante todas las sesiones de afeitado y siempre en el mismo orden, lo que le facilita seguir siempre el mismo ritual de afeitado.
Como resultado, algunos símbolos se iluminarán incluso cuando ya haya realizado la acción adecuada.
Nota: Cuando encienda el aparato, la indicación de carga disponible en la batería aparecerá brevemente.
A continuación,la indicación de gel para el afeitado parpadeará tres veces.Si ya ha aplicado suficiente gel o loción, ignore esta indicación.
Nota: Cuando apague el aparato, se mostrará el recordatorio de limpieza,que consiste en un grifo de color verde (que se ilumina) y un chorro de agua también verde (parpadeando). Si ya ha limpiado la
afeitadora antes de apagarla,no tenga en cuenta esta indicación.
Una vez mostrado el recordatorio de limpieza, la indicación de carga disponible en la batería aparecerá brevemente.
Carga
Al cargar la afeitadora por primera vez, o después de un largo período sin usarla, deje que la afeitadora se cargue durante 4 horas seguidas. Normalmente la carga se realiza en aproximadamente 1 hora.
No deje la afeitadora en el soporte de carga enchufado durante más de 24 horas.

Español 27
Indicaciones de carga
La batería se está agotando
,Cuando la batería se está agotando, el piloto inferior de la batería se ilumina en rojo durante el afeitado.
,Cuando la batería está a punto de agotarse, al apagar la afeitadora el piloto inferior de la batería parpadeará en rojo dos veces.Esto sucederá cuatro veces con breves pausas intercaladas.
,Si empieza a cargar la afeitadora cuando la batería se está agotando, el piloto inferior de la batería parpadeará en rojo durante 3 minutos como máximo.
Batería completamente cargada
,Durante la carga, los tres pilotos de la batería parpadearán en verde hasta que la afeitadora esté completamente cargada (aproximadamente
1 hora).
,Los tres pilotos de la batería permanecen encendidos en verde cuando la batería está completamente cargada.
Indicaciones de la batería durante el afeitado
Los tres pilotos de la batería muestran la carga disponible en la batería durante 5 segundos después de encender o apagar la afeitadora.
-Los dos pilotos inferiores de la batería se iluminan en verde: queda el 66% de la carga total de la batería.
-El piloto inferior de la batería se ilumina en verde: queda un 33% de carga en la batería.

28 Español
-El piloto inferior de la batería se ilumina en rojo: la batería está casi agotada (consulte también la sección “La batería se está agotando”).
Carga del aparato
Cargue la afeitadora antes de usarla por primera vez o cuando el aparato indique que se está agotando la batería.
1Inserte la clavija pequeña en el soporte de carga y enchufe la clavija adaptadora a la toma de corriente.
Coloque la afeitadora en el soporte de carga. afeitadora se apaga automáticamente cuando se
coloca en el soporte de carga.
3 Desenchufe la clavija adaptadora de la toma de corriente y la clavija pequeña del soporte de carga cuando la batería esté completamente cargada.Después puede dejar el aparato en el soporte de carga.
Tiempo de afeitado sin cable
Una afeitadora completamente cargada proporciona un tiempo de afeitado sin cable de hasta 55 minutos.
Cartuchos
Los cartuchos con gel o loción para el afeitado
NIVEA FOR MEN están disponibles en cajas que contienen cinco cartuchos y una pequeña bomba de plástico.
El gel o loción para el afeitado NIVEA FOR MEN de los cartuchos se conservará en buenas condiciones durante 32 meses si se almacena a temperaturas entre 0cC y +40cC.

2
 1
1
Español 29
Use sólo cartuchos Philips NIVEA FOR MEN Cool Skin (HQ170 y HQ171).
Un cartucho Philips NIVEA FOR MEN Cool Skin contiene gel o loción suficiente para unos 10 afeitados.
Por razones higiénicas, le aconsejamos que inserte una nueva bomba cuando empiece a usar un nuevo paquete de cinco cartuchos.
No tire la bomba cuando sustituya un cartucho vacío. La necesitará para los cinco cartuchos. Cuando no vaya a usar la afeitadora durante más de una semana, saque del aparato el cartucho de gel o loción.
Cuando se le acaben los cartuchos de gel o loción para el afeitado y no sepa dónde adquirirlos, póngase en contacto con el Servicio Philips de Atención al Cliente de su país (consulte “Garantía y servicio”).
Cómo insertar los cartuchos
Cuando comience a usar un paquete nuevo de cartuchos, saque la bomba de la bolsa e insértela en el cartucho hasta que encaje en su posición con un clic.
Pulse el botón de liberación (1) y abra la cubierta del compartimento del cartucho (2).
Deslice el cartucho con la bomba en la afeitadora. Sólo se acopla adecuadamente si el lado blanco de la bomba está hacia arriba.
4 Cierre la cubierta (oirá un clic).

30 Español
2
 1
1
5Presione el botón amarillo de la bomba unas cuantas veces hasta que aparezca el gel o la loción para el afeitado NIVEA FOR MEN. La afeitadora está ahora lista para usar.
Cómo sustituir los cartuchos
No tire la bomba cuando sustituya un cartucho vacío. La necesitará para los otros cartuchos.
1Pulse el botón de liberación (1) y abra la cubierta del compartimento del cartucho (2).
2Saque el cartucho vacío y quite la bomba.
3Coloque la bomba en un cartucho nuevo y empújela hasta que encaje en su posición con un clic.
4Deslice el cartucho con la bomba en la afeitadora. Sólo se acopla adecuadamente si el lado blanco de la bomba está hacia arriba. Cierre la cubierta.
Cómo guardar los cartuchos
,Puede guardar cómodamente los otros cartuchos colocándolos en el soporte de pared que se suministra. El soporte tiene ventosas que permiten fijarlo fácilmente a la pared.De este modo siempre tendrá los cartuchos a mano, lo cual es muy cómodo, sobre todo si se afeita en la ducha.
El soporte de pared sólo es adecuado para guardar cartuchos. Nunca cuelgue ni ponga la afeitadora en el soporte de pared. Si lo hace, la afeitadora podría caerse.
Español 31
Uso del aparato
Afeitado
Cómo encender la afeitadora
1Pulse el botón de encendido/apagado una vez para encender la afeitadora.
Después de mostrar brevemente la carga de la batería, el símbolo amarillo con forma de gota ± parpadeará 3 veces para indicar que ya se puede aplicar el gel o la loción para el afeitado.
Si la afeitadora no se enciende cuando pulsa el botón de encendido/apagado, puede que esté activado el bloqueo para viajes. Desactive el bloqueo para viajes (consulte el capítulo “Bloqueo para viajes”).
Presione el botón amarillo de la bomba para aplicar gel o loción para el afeitado NIVEA FOR MEN sobre la piel.
3Desplace los cabezales de afeitado sobre la piel, realizando movimientos rectos y circulares.
Mientras se afeita, presione con frecuencia el botón de la bomba para aplicar más gel o loción para el afeitado NIVEA FOR MEN, de
modo que la afeitadora se deslice suavemente sobre el rostro.
Mientras se afeita, no ejerza demasiada presión con la afeitadora sobre la piel. Si lo prefiere, puede mojarse la cara antes de comenzar a afeitarse.
,Para obtener los mejores resultados de afeitado, bombee gel o loción frecuentemente.
,La afeitadora no funcionará de forma óptima si se utiliza sin gel o loción para el afeitado.

32 Español
,Puede que su piel necesite de 2 a 3 semanas para acostumbrarse al sistema de afeitado Philips.
Cómo apagar la afeitadora
1 Pulse el botón de encendido/apagado una vez para apagar la afeitadora.
El recordatorio de limpieza å (símbolo de grifo verde con chorro de agua parpadeando) se ilumina durante 6 segundos para indicar que se debe limpiar la afeitadora.
A continuación, la carga disponible en la batería se muestra durante 5 segundos.
2Limpie la afeitadora (consulte el capítulo “Limpieza y mantenimiento”).
Enjuague la afeitadora después de cada uso. Quite el cartucho si no va a usar el aparato durante más de una semana.
3
5
Si fuera necesario, compruebe la carga disponible en la batería pulsando el botón de encendido/apagado. Uno o más pilotos se iluminarán durante 5 segundos para indicar la carga disponible en la batería.
Después de usar la afeitadora, coloque siempre la tapa protectora para evitar que se deteriore.
Si es necesario,active el bloqueo para viajes (consulte el capítulo“Bloqueo para viajes”).
Cortapatillas
Para arreglar las patillas y el bigote.
Cómo colocar el cortapatillas
1 Apague la afeitadora.
Loading...