


Philips GC6268/02, GC6265/02, GC6263/02, GC6259/03, GC6257/03 User Manual [tr]
...Provapor
GC6268, GC6265, GC6263, GC6259, GC6257, GC6068,
GC6065, GC6063, GC6059, GC6057, GC6029, GC6021,
GC6018
2

3
J G I N
M
H
A
 C
C
K
B
F 
E
O
L D

4

GC6268, GC6265, GC6263, GC6259, GC6257, GC6068, GC6065, GC6063, GC6059, |
GC6057, GC6029, GC6021, GC6018 |
5
ENGLISH 6
DEUTSCH 15
NORSK 25
SVENSKA 34
SUOMI 43
DANSK 52
61
TÜRKÇE 71

6 ENGLISH
General description
A Cap of the steam tank
B Steam tank
C Iron stand
D On/off switch with built-in pilot light
E'Steam tank heating up' pilot light (types GC6268/GC6265/ GC6068/GC6065 only).The pilot light goes out when the appliance
is ready for steam ironing
FSteam control (types GC6268/GC6265/GC6068/GC6065/ GC6029 only).
q = moderate steam
R = maximum steam
G Temperature pilot light
H Steam activator button
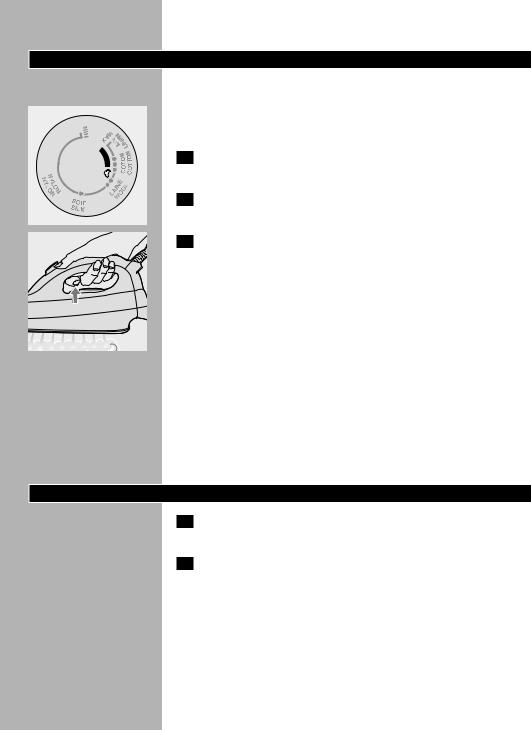
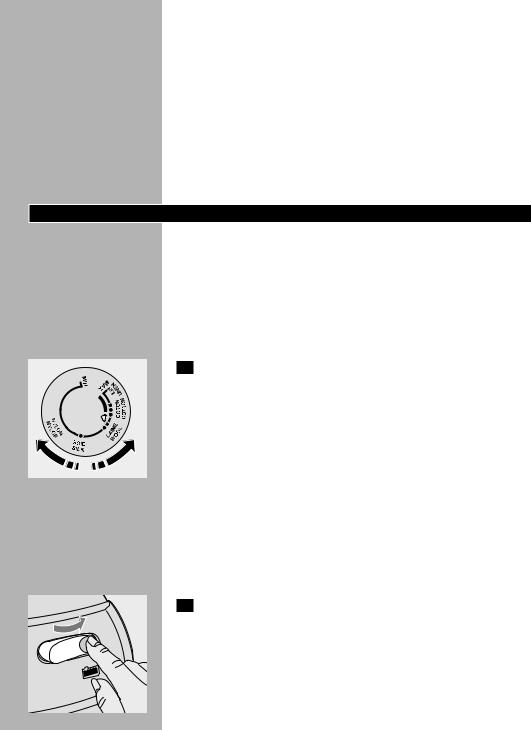
I Temperature dial
J Supply hose
K Soleplate
L Mains cord
M Anti-calc funnel (types GC6268/GC6068/GC6029 only)
N Shot of steam (types GC6268/GC6068/GC6029 only)
OBack rest for iron (types GC6268/GC6265/GC6263/GC6068/ GC6065/GC6063 only)
Important
For optimal safety, read these instructions carefully and look at the illustrations before you start using the appliance.
-Do not put perfume, vinegar, starch, descaling agents or other chemicals in the steam tank.
-Never use the appliance if it is damaged in any way. Regularly check if the mains cord and the supply hose are still undamaged and safe.
-If the mains cord is damaged, it must be replaced by Philips, a service centre authorised by Philips or similarly qualified persons in order to avoid a hazard.
-Do not use any other cap on the steam tank than the cap that has been supplied with the appliance, as this cap also functions as a safety valve.
-Check if the voltage indicated on the bottom of the steam tank corresponds to the mains voltage in your home before you connect the appliance.
-Only connect the appliance to an earthed wall socket.
-Never immerse the iron or the steam tank in water.
-Never leave the iron unattended when it is connected to the mains.
-When you have finished ironing and even when you leave the iron
for a short while, unplug the iron and put it on the iron stand.
-Always place the steam tank on a stable, level and horizontal surface. Do not put the steam tank on the soft part of the ironing board.
-Always place the iron on the iron stand. Do not put the hot iron on the supply hose or the mains cord.
ENGLISH 7
-The iron stand and the soleplate of the iron can become extremely hot and may cause burns if touched. If you want to move the steam tank, do not touch the iron stand.
-Do not allow the cord to come into contact with the soleplate when it is hot.
-Infirm persons should not be allowed to use the appliance without supervision. Keep an eye on children to make sure that they do not play with the appliance.
-If steam escapes from under the steam tank cap when the appliance is heating up, switch the appliance off and contact a service centre authorised by Philips.
-Do not remove the cap from the steam tank when the steam tank is under pressure. Follow the instructions under 'Fast refill' before removing the cap.
Preparing the appliance for use
1Check if the voltage indicated on the bottom of the steam tank corresponds to the mains voltage in your home before you connect the appliance.
2Remove any sticker or protective foil from the soleplate and clean the soleplate with a soft cloth.
3Fully unwind the mains cord (L) and supply hose (J).
4Place the steam tank (B) on a stable, level surface.
5Place the iron on the iron stand (C).
Filling the steam tank
Never immerse the steam tank in water.
Do not open the cap when the appliance is hot and the steam tank is still under pressure.
C |
|
Make sure the on/off switch (D) has been set to 'off' and |
1 |
||
|
|
remove the plug from the wall socket. |
C |
|
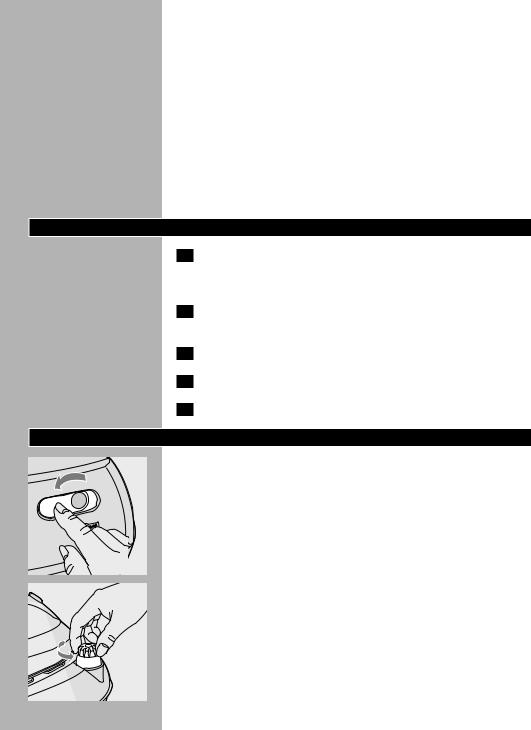
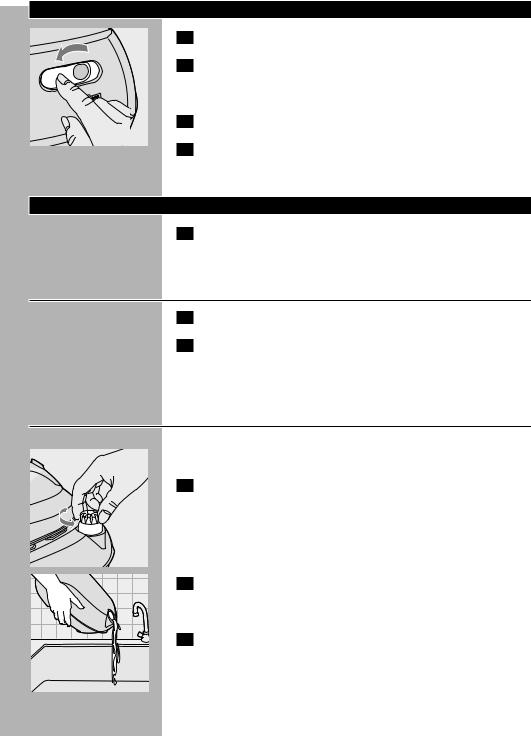
Slowly unscrew the cap (A) of the steam tank. |
2 |
||
|
You may hear a sound when you remove the cap.This sound is caused by the cold tank being under vacuum.This is perfectly normal.
8 ENGLISH
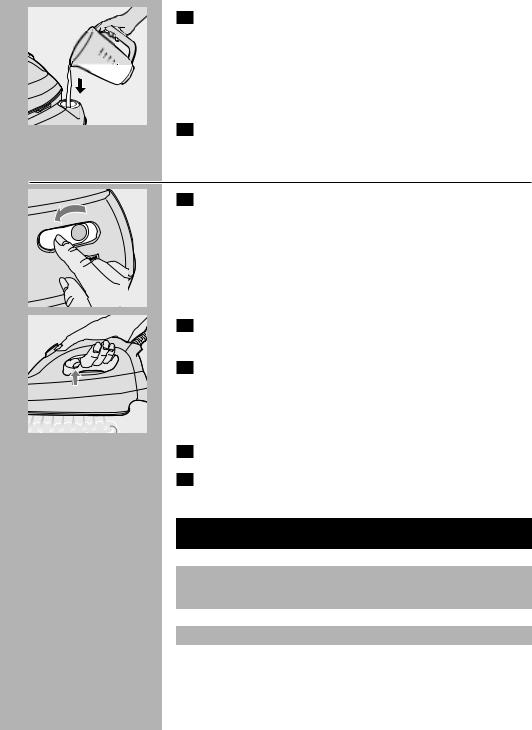
C 3 Pour water into the steam tank (max. 1 litre).
Use tap water to fill the tank up to the maximum level.
If the tap water in your area is very hard, we advise you to mix tap water with an equal portion of distilled water, or to use distilled water only.
Do not use perfume, vinegar, starch or chemically descaled water.
4Screw the cap tightly onto the filling aperture of the steam tank.
Fast refill
C 1 First set the on/off switch (D) to 'off'.
C 2 Press the steam activator button until you no longer hear any steam escaping from the appliance.
3 Keep the steam activator button pressed in and slowly unscrew the cap of the steam tank by turning it anti-clockwise.This will depressurise the steam tank.
Make sure there is no remaining steam left in the steam tank. Place a piece of rug over the cap while unscrewing.
4Remove the mains plug from the wall socket.
5Fill the steam tank as described in section 'Filling the steam tank' and let the appliance heat up again.
Label with ironing |
Type of fabric |
Temperature |
Steam |
instructions |
|
dial |
control |
B |
Synthetic fabrics, e.g. acetate, |
1 |
- |
|
acrylic, viscose, polyamide, |
|
|
|
polyester, and silk |
|
|
C |
Wool |
2 |
q |
D |
Cotton, linen |
3 |
R |
ZPlease note: Z in the table means that the article cannot be ironed.
ENGLISH 9
Setting the temperature
Always place the steam tank on a stable, level and horizontal surface
Do not put the steam tank on the soft part of the ironing board.
Always place the iron on the iron stand. Do not put the hot iron on the supply hose or the mains cord. Make sure the cord does not come into contact with the hot soleplate.
|
C |
|
|
|
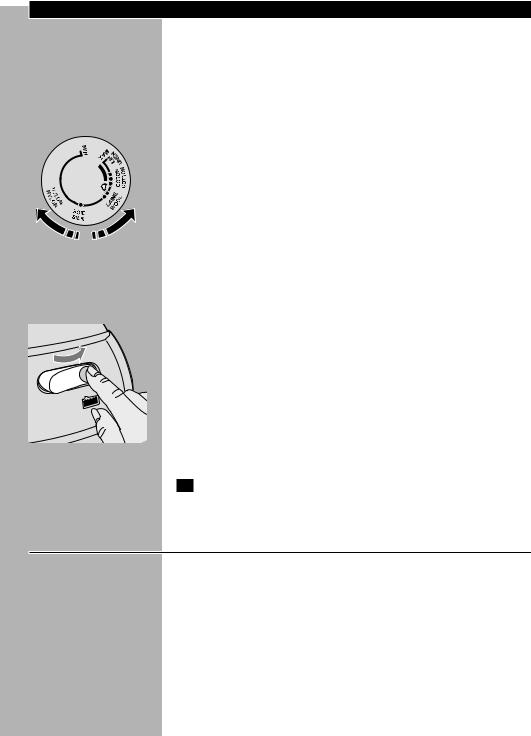
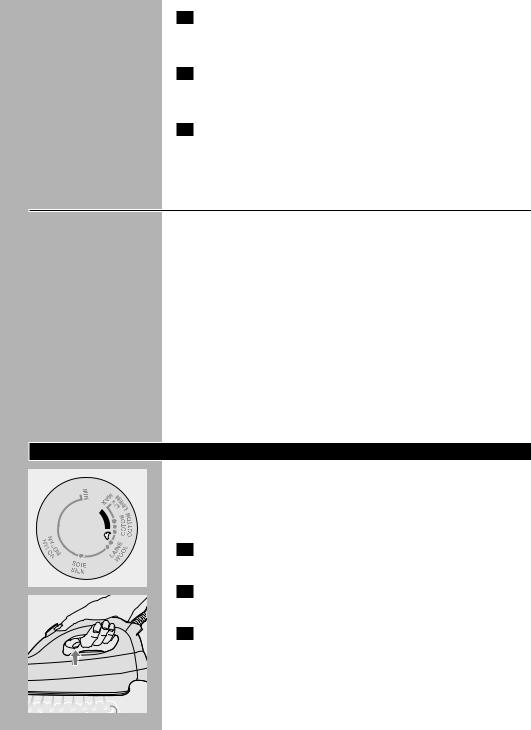
Set the temperature dial to the required ironing temperature |
|
1 |
|
|
||
|
|
|
|
|
by turning it to the appropriate temperature indication. |
|
- |
Check the garment label for the required ironing temperature: |
|||
|
- |
1 |
Synthetic fabrics (e.g. acrylic, viscose, polyamide, polyester) |
||
|
- |
1 |
Silk |
||
|
- |
2 Wool |
|||
|
- |
3 Cotton, linen |
|||
|
- |
When you do not know what kind of fabric the article is made of, |
|||
|
|
|
try to iron a spot which will be invisible when you wear it. |
||
|
|
|
|||
-Silk, woollen and synthetic materials: iron the reverse side of the fabric to prevent shiny patches.
-Start ironing the articles that require the lowest ironing temperature, such as those made of synthetic fibres.
|
|
C |
|
Put the plug in the wall socket and let the appliance heat up by |
|
|
2 |
||
|
|
|
|
setting the on/off switch (D) to 'on'. |
|
|
|
|
Cold start: the steam tank and the soleplate will now be heated |
|
3 |
|||
|
|
|
|
up.The soleplate takes approximately 2 minutes to heat up and |
|
|
|
|
the steam tank takes approximately 8 minutes to heat up. |
|
|
|
|
Quick reheat: if you refill the steam tank during the ironing |
|
4 |
|||
|
|
|
|
process, the water in the steam tank will take approximately |
|
|
|
|
|
|
|
|
|
6 minutes to heat up. |
5Types GC6268/GC6265/GC6068/GC6065/GC6029 only: as soon as the water in the steam tank is hot enough for steam ironing, the pilot light (E) will go out.You can now start ironing.
Tips
If the fabric consists of various kinds of fibres, always select the temperature required by the most delicate fibre, i.e. the lowest temperature. For example: if an article consists of 60% polyester and 40% cotton, it should be ironed at the temperature indicated for polyester (1) and without steam.
When steam ironing woollen fabrics, shiny patches may occur.You can prevent this by using a dry pressing cloth or by turning the article inside out and ironing the reverse side.
Velvet and other fabrics that tend to acquire shiny patches should be ironed in one direction only (along with the nap) while applying very little pressure.
10 ENGLISH
Do not use steam when you are ironing coloured silk.This could cause stains.
Steam ironing
Make sure that there is enough water in the steam tank.
C Steam ironing is only possible at higher ironing temperatures (temperature settings 2 to MAX).
1 Set the temperature dial to the recommended position.
See 'Setting the temperature'.
2 Wait until the 'steam tank heating up' pilot light has gone out.
C 3 Keep the steam activator button (H) pressed in while you are steam ironing.
Types GC6268/GC6265/GC6068/GC6065/GC6029 only: During steam ironing, pilot light G will go on from time to time to indicate that the steam tank and the iron are being heated up to the right temperature and pressure.You can simply continue ironing while this happens.
If you have not used the steaming facility for some time, the steam that was still present in the supply hose will have condensed into water. When you start steam ironing again, this may cause some spluttering in the appliance and a few droplets of water may escape from the soleplate.
BTo prevent droplets from falling onto your garments, hold the iron over an old cloth and press the steam activator button (H) until the steam production has normalised before you start steam ironing again.
Ironing without steam
1Set the temperature dial to the recommended position.
See 'Setting the temperature'.
2Do not press the steam activator button (H).
Some steam will escape if you press the steam activator button by accident while you are ironing. If the steam tank is empty or has not heated up yet, you will hear a clicking sound inside the tank. This phenomenon is caused by the opening of the steam valve and is perfectly harmless.
If you have been ironing at a high temperature and subsequently set the temperature dial (I) to a lower setting, wait until the temperature pilot light (G) goes on again before you continue ironing.This will prevent damage to your fabrics.
ENGLISH 11
Other features
Steaming in vertical position
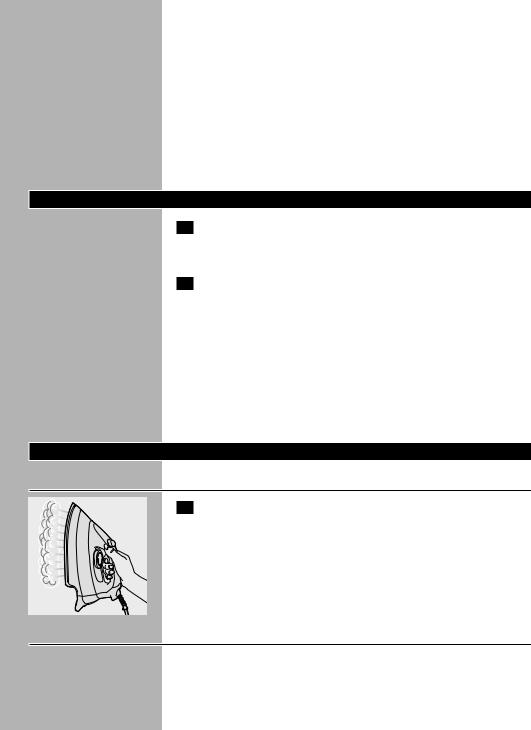
C 1 Hanging curtains and clothes (jackets, suits, coats) can be steam ironed by holding the iron in vertical position.
Never direct the steam at people.
Shot of steam (types GC6268/GC6068/GC6029 only)
A powerful 'shot' of steam helps remove stubborn creases.
C 1 For a shot of steam: set the steam control (F) to R (the large cloud) and set the temperature dial (l) to position 3 or MAX.
C 2 Press both the steam activator button (H) and the shot-of- steam button (N).
Variable steam (types GC6268/GC6265/GC6068/GC6065/ GC6029 only)
You can set the steam control (F) to q for moderate steam or to R for maximum steam.
Anti-calc funnel (type GC6268/GC6068/GC6029 only)
To ensure a longer lifetime of the iron.
1Use the anti-calc funnel (M) when you fill the steam tank with water.
12 ENGLISH
After ironing
C 1 Switch the appliance off by setting the on/off switch (D) to 'off'.
2 Depressurise the steam tank by pressing the steam activator button until you no longer hear any steam escaping from the appliance.
3 Remove the mains plug from the wall socket.
4Put the iron on the iron stand (C), set the steam control to position q and let the appliance cool down before you put it away.
Cleaning and maintenance
1Remove the mains plug from the wall socket and let the iron cool down before you start cleaning it. If you want to clean the steam tank, follow the first four steps of the 'Fast refill' section.
Iron
1Clean the iron with a damp cloth.
2Wipe scale and any other deposits off the soleplate with a damp cloth and a non-abrasive (liquid) cleaner.
Never immerse the iron in water nor rinse it under the tap.
Steam tank
Rinse the steam tank once a month or after you have used the appliance approximately 10 times.
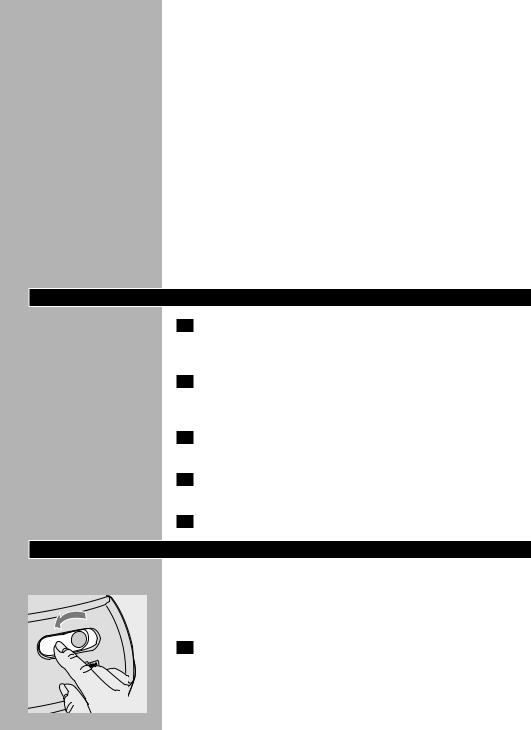
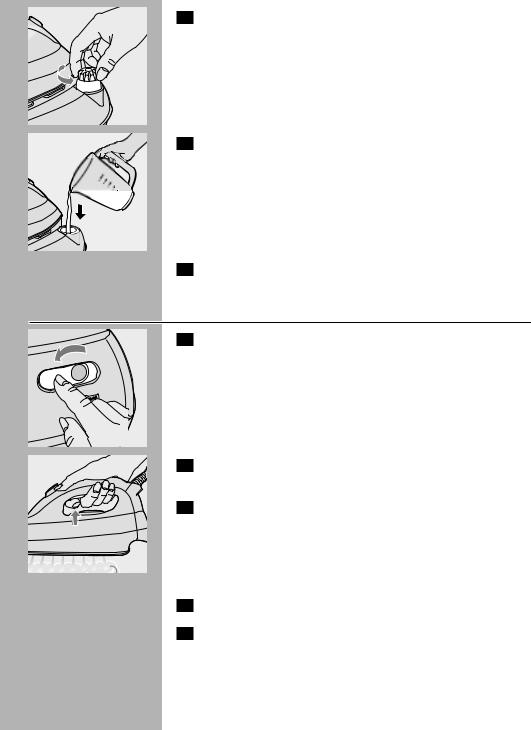
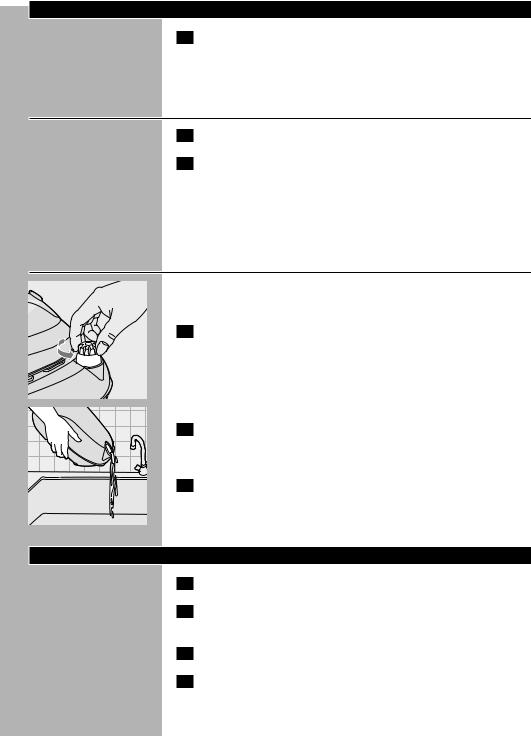
C 1 Remove the cap carefully.
C 2 |
Rinse the steam tank with only 500 ml of fresh water. Pour out |
|
the water by holding the steam tank upside down over the |
|
sink. |
3 |
Screw the cap back onto the steam tank. |

ENGLISH 13
Storage
1Make sure the iron has cooled down sufficiently before you put it away.
2Remove the mains plug from the wall socket and let the iron cool down.
3Empty the steam tank.
4There are handgrips on either side of the steam tank for easy transport.
5Regularly check if the mains cord and the supply hose are still undamaged and safe.
Guarantee & service
If you need information or if you have a problem, please visit the Philips Web site at www.philips.com or contact the Philips Customer Care Centre in your country (you will find its phone number in the worldwide guarantee leaflet). If there is no Customer Care Centre in your country, turn to your local Philips dealer or contact the Service Department of Philips Domestic Appliances and Personal Care BV.
Troubleshooting
This chapter summarises the most common problems you could encounter with your iron. Please read the different sections for more details. If you are unable to solve the problem, please contact the Philips Customer Care Centre in your country (you will find its phone number in the worldwide guarantee leaflet). If there is no Customer Care Centre in your country, turn to your local Philips dealer or the nearest Philips service centre.

14 ENGLISH
Problem
Some smoke comes out of the appliance after you have switched the appliance on for the first time.
White particles come out of the soleplate of your new iron.
Possible cause(s)
This is normal. Some parts of the iron have been greased lightly in the factory.
This is normal with a new iron.
Solution
This phenomenon will cease after a short while.
These particles are harmless and they will stop coming out of the soleplate when you have used the iron a few times.
Droplets of water escape from the |
The temperature dial (I) has been set |
soleplate. |
to a temperature that is too low for |
|
steam ironing. |
|
The steam tank has been placed on an |
|
unstable and/or uneven surface. |
|
When you start steam ironing, the |
|
hose is cold. Steam condenses in the |
|
hose, causing droplets of water to |
|
escape from the soleplate. |
Select the required ironing temperature as indicated in these instructions and the table.
Put the steam tank on a stable and even surface.
This is normal. Hold the iron over an old cloth and press the steam activator button (H).The cloth will absorb the drops. After a few seconds the steam production will have normalised.
The appliance does not produce |
The steam tank has not been switched |
Set the on/off switch (D) to 'on'. |
steam. |
on. |
|
|
The 'steam tank heating up' pilot light |
Wait until the pilot light has gone out. |
|
is still on (types GC6268/GC6265/ |
|
|
GC6068/GC6065/GC6029 only). |
|
|
|
|
I don't see any steam coming out of |
Superheated (i.e. high-quality) steam is |
To check if the iron is really producing |
the soleplate. |
hardly visible, especially when the |
steam, hold a (cold) mirror in front of |
|
temperature dial has been set to |
the soleplate vents. |
|
maximum position and even less so |
|
|
when the ambient temperature is |
|
|
relatively high. |
|
The soleplate is dirty. |
Impurities or chemicals present in the |
Clean the soleplate with a damp cloth. |
|
water have deposited on the soleplate. |
|
|
|
|
|
You have been ironing at too high |
Clean the soleplate with a damp cloth. |
|
temperatures. |
Select the recommended ironing |
|
|
temperature. |
|
|
|

DEUTSCH 15
Allgemeine Beschreibung
A Verschluss des Wassertanks B Wassertank
C Abstellfläche für das Bügeleisen
D Ein-/Aus-Schalter mit integrierter Kontrolllampe
E Kontrolllampe "Wassertank heizt auf" (nur Typen GC6268/GC6265/ GC6068/GC6065); die Kontrolllampe erlischt, sobald das Gerät zum Dampfbügeln bereit ist
FDampfregler (nur Typen GC6268/GC6265/GC6068/GC6065/ GC6029);
q = wenig Dampf,
R = viel Dampf
G Temperatur-Kontrolllampe
H Drucktaste für die Dampfzufuhr I Temperaturregler
J Verbindungsschlauch K Bügelsohle
L Netzkabel
M Antikalktrichter (nur Typen GC6268/GC6068/GC6029) N Dampfstoß (nur Typen GC6268/GC6068/GC6029)
ORückwärtige Bügeleisen-Halterung (nur Gerätetypen GC6268/ GC6265/GC6263/GC6068/GC6025 und GC6063)
Wichtig
Lesen Sie zu Ihrer Sicherheit zuerst diese Gebrauchsanweisung durch, bevor Sie das Gerät zum ersten Mal benutzen.
-Füllen Sie weder Parfüm, Essig, Stärke, Entkalker noch andere Chemikalien in den Wassertank.
-Verwenden Sie das Gerät niemals, wenn es in irgendeiner Hinsicht defekt oder beschädigt ist. Prüfen Sie regelmäßig den Verbindungsschlauch und das Netzkabel auf Unversehrtheit und Sicherheit.
-Wenn das Netzkabel defekt oder beschädigt ist, darf es nur von einem Philips Service-Center oder einer von Philips autorisierten Werkstatt ausgetauscht werden, um ein Sicherheitsrisiko zu vermeiden.
-Verwenden Sie zum Verschließen des Wassertanks ausschließlich den mitgelieferten Schraubverschluss. Dieser Verschluss dient auch als Sicherheitsventil.
-Prüfen Sie vor dem ersten Gebrauch, ob die Spannungsangabe unter dem Wassertank mit der örtlichen Netzspannung übereinstimmt.
-Verwenden Sie das Gerät ausschließlich an einer Schukosteckdose.
-Tauchen Sie das Bügeleisen oder den Wassertank niemals in Wasser.
-Lassen Sie das Gerät niemals unbeaufsichtig, solange es am Stromnetz angeschlossen ist.
-Ziehen Sie stets den Netzstecker und stellen Sie das Bügeleisen auf die Abstellfläche, wenn Sie das Bügeln beendet haben oder den Raum - sei es auch nur für kurze Zeit - verlassen.
16 DEUTSCH
-Stellen Sie den Wassertank stets auf eine feste, ebene und waagerechte Arbeitsfläche. Stellen Sie ihn nicht auf die weiche,
-gepolsterte Fläche des Bügelbretts.
-Stellen Sie das Bügeleisen immer auf die Abstellfläche. Stellen Sie das heiße Bügeleisen nie auf den Verbindungsschlauch oder das Netzkabel.
-Die Abstellfläche und die Bügelsohle können sehr heiß werden und bei Berührung zu Verbrennungen führen. Achten Sie beim Bewegen des Wassertanks darauf, die Abstellfläche nicht zu berühren.
-Achten Sie darauf, dass das Netzkabel nicht mit der heißen Bügelsohle in Kontakt kommt.
-Behinderte Personen sollten bei Benutzung des Geräts beaufsichtigt
werden. Achten Sie darauf, dass Kinder nicht mit dem Gerät spielen.
-Sollte während des Aufheizens aus der Einfüllöffnung Dampf entweichen, schalten Sie das Gerät aus und setzen Sie sich mit einem Philips Service Center in Verbindung.
-Nehmen Sie den Verschluss keinesfalls vom Wassertank, während dieser unter Druck steht. Befolgen Sie die Anweisungen im Abschnitt 'Schnell-Nachfüllung', bevor Sie den Verschluss öffnen.
Vorbereitung zum Gebrauch
1Prüfen Sie vor dem ersten Gebrauch, ob die Spannungsangabe unter dem Wassertank mit der örtlichen Netzspannung übereinstimmt.
2Entfernen Sie die Schutzfolie und alle Aufkleber von der Bügelsohle und reinigen Sie die Bügelsohle mit einem weichen Tuch.
3Ziehen Sie das Netzkabel (L) und den Verbindungsschlauch (J) ganz heraus.
4Stellen Sie den Wassertank (B) auf eine feste, ebene und waagerechte Fläche.
5Stellen Sie das Bügeleisen auf die Abstellfläche (C).
Den Wassertank füllen
Tauchen Sie den Wassertank niemals in Wasser.
Öffnen Sie den Verschluss nicht, wenn das Gerät heiß ist und der Wassertank noch unter Druck steht.
C 1 Achten Sie darauf, dass der Ein/Aus-Schalter (D) auf "Off" (=
Aus) steht. Ziehen Sie außerdem den Netzstecker.
DEUTSCH 17
C 2 Schrauben Sie den Verschluss (A) des Wassertanks langsam auf.
Möglicherweise hören Sie beim Lösen des Verschlusses ein Zischen Das ist absolut normal. Ursache ist das Vakuum im kalten Wassertank.
C 3 Gießen Sie maximal 1 Liter Wasser in den Wassertank.
Füllen Sie den Tank mit Leitungswasser bis zur Höchststandsmarkierung.
Wenn das Leitungswasser in Ihrer Gegend sehr hart ist, mischen Sie es zu gleichen Teilen mit destilliertem Wasser oder verwenden Sie ausschließlich destilliertes Wasser.
Verwenden Sie weder Parfüm, Essig, Stärke noch chemisch entkalktes Wasser.
4Schrauben Sie den Verschluss fest auf die Einfüllöffnung des Wassertanks.
Schnell-Nachfüllung
C 1 Stellen Sie zuerst den Ein/Aus-Schalter (D) auf "Off" = Aus.
C 2 |
Drücken Sie die Taste für die Dampfzufuhr, bis kein |
|
entweichender Dampf mehr vernehmbar ist. |
3 |
Halten Sie die Taste für die Dampfzufuhr gedrückt und öffnen |
|
Sie den Verschluss des Wassertanks langsam, indem Sie ihn |
|
gegen den Uhrzeigersinn drehen. Dabei entweicht der |
|
Überdruck aus dem Tank. |
Im Wassertank darf sich kein Dampf mehr befinden. Halten Sie beim Öffnen ein Stück Stoff über den Verschluss.
4Ziehen Sie den Netzstecker aus der Steckdose.
5Füllen Sie den Wassertank gemäß der Beschreibung im Abschnitt 'Den Wassertank füllen' und lassen Sie das Gerät wieder aufheizen.
18 DEUTSCH
Bügelvorschriften |
Gewebeart |
Temperaturregler |
Dampfregler |
|
|
|
|
B |
Synthetics, z. B. Azetat, |
1 |
- |
|
Akryl,Viskose, Polyamid, |
|
|
|
Polyester und Seide |
|
|
C |
Wolle |
2 |
q |
|
|
|
|
D |
Baumwolle, Leinen |
3 |
R |
|
|
|
|
ZWichtig: Das Zeichen Z in der Tabelle bedeutet, dass dieser Artikel nicht gebügelt werden darf.
Einstellen der Bügeltemperatur
Stellen Sie den Wassertank stets auf eine feste, ebene und waagerechte Arbeitsfläche. Stellen Sie ihn nicht auf die weiche, gepolsterte Fläche des Bügelbretts.
Stellen Sie das Bügeleisen stets auf die Abstellfläche zurück. Achten Sie darauf, dass Sie das heiße Bügeleisen nicht auf den Verbindungsschlauch oder das Netzkabel stellen. Das Netzkabel darf nicht mit der heißen Bügelsohle in Berührung kommen.
C 1 Stellen Sie den Temperaturregler auf die erforderliche
Bügeltemperatur, indem Sie ihn auf die entsprechende
|
|
Markierung drehen. |
- Prüfen Sie das Etikett im Wäsche-/Kleidungsstück auf die |
||
|
erforderliche Bügeltemperatur: |
|
- |
1 |
Synthetische Stoffe, z. B. Akryl,Viskose, Polyamid, Polyester |
- |
1 |
Seide |
- |
2 |
Wolle |
-3 Baumwolle, Leinen
-Ist Ihnen das Gewebe unbekannt, prüfen Sie die Bügeltemperatur an einer Stelle, die unter normalen Bedingungen nicht sichtbar ist.
-Materialien aus Seide,Wolle und synthetischen Fasern: Bügeln Sie diese Teile auf der Rückseite (von links), um zu vermeiden, dass glänzende Stellen auftreten.
-Beginnen Sie stets mit den Textilien, die eine niedrige Temperatureinstellung erfordern (z. B. Kunstfasern).
C 2 Stecken Sie den Netzstecker in die Steckdose und stellen Sie den Ein/Aus-Schalter (D) auf "On" = Ein, damit sich das Gerät aufheizt.
DEUTSCH 19
3Kaltstart: Der Wassertank und die Bügelsohle werden aufgeheizt. Dies dauert bei der Bügelsohle ca. 2 Minuten und beim Wassertank ca. 8 Minuten.
4Nachheizen:Wenn Sie den Tank während des Bügelns nachfüllen, dauert es ca. 6 Minuten, bis das Wasser im Wassertank aufgeheizt ist.
5Nur Typen GC6268/GC6265/GC6068/GC6065/GC6029: Sobald das Wasser im Wassertank die erforderliche Temperatur zum Dampfbügeln erreicht hat, erlischt die Kontrolllampe (E). Nun können Sie mit dem Bügeln beginnen.
Hinweise
Besteht das Gewebe aus verschiedenen Materialien, so wählen Sie die Temperatur für das empfindlichste der Materialien, also die niedrigste Temperatur. Besteht das Gewebe z. B. aus einer Mischung von 60 % Polyester und 40 % Baumwolle, muss es mit der Temperatur für Polyester (1) und ohne Dampf gebügelt werden.
Beim Dampfbügeln von Wollstoffen können sich glänzende Stellen bilden. Das lässt sich durch die Verwendung eines trockenen Bügeltuchs verhindern oder dadurch, dass Sie das Gewebe von der Rückseite, von links, bügeln.
Samt und andere Gewebe, die leicht glänzende Stellen bilden, dürfen nur in einer Richtung (mit dem Strich) und unter nur leichtem Druck gebügelt werden.
Gefärbte Seide darf nicht mit Dampf gebügelt werden. Das könnte Flecken verursachen.
Dampfbügeln
Achten Sie darauf, dass sich genügend Wasser im Wassertank befindet.
C Das Dampfbügeln ist nur bei höheren Temperaturen möglich (zwischen 2 und MAX).
1Stellen Sie den Temperaturregler auf die empfohlene Position.
Vgl. den Abschnitt "Die Temperatur einstellen".
2Warten Sie, bis die Kontrolllampe "Wassertank heizt auf" erlischt.
C 3 Beim Dampfbügeln muss die Drucktaste für die Dampfzufuhr
(H) gedrückt bleiben.
Nur Typen GC6268/GC6265/GC6068/GC6065/GC6029: Beim Dampfbügeln leuchtet gelegentlich die Kontrolllampe (G) auf, wenn Wassertank und Bügelsohle wieder auf
20 DEUTSCH
die richtige Temperatur und den erforderlichen Druck gebracht werden. Sie können das Bügeln ohne Unterbrechung fortsetzen.
Wenn Sie das Gerät längere Zeit nicht zum Dampfbügeln benutzt haben, kann sich im Verbindungsschlauch Kondenswasser gebildet haben. In diesem Fall können einige Tropfen Wasser aus der Bügelsohle entweichen, sobald Sie wieder mit dem Dampfbügeln beginnen.
BDamit das Kondenswasser nicht auf das Gewebe tropft, halten Sie, bevor Sie mit dem Bügeln beginnen, das Bügeleisen über ein altes Stück Stoff und drücken Sie die Taste für die Dampfzufuhr (H), bis sich die Dampfentwicklung normalisiert hat.
Trockenbügeln
1Stellen Sie den Temperaturregler auf die empfohlene Temperatur.
Vgl. den Abschnitt "Die Temperatur einstellen".
2Drücken Sie NICHT die Taste für die Dampfzufuhr (H).
Drücken Sie während des Bügelns versehentlich die Taste für die Dampfzufuhr, entweicht etwas Dampf. Ist der Wassertank leer oder noch nicht aufgeheizt, hören Sie nur ein Klicken aus dem Tank. Dieses Klicken rührt vom Öffnen des Dampfventils her und ist völlig harmlos.
Wenn Sie nach dem Bügeln mit höherer Temperatur am Temperaturregler (I) eine niedrigere Temperatur einstellen, müssen Sie warten, bis die Kontrolllampe (G) wieder aufleuchtet, bevor Sie mit dem Bügeln fortfahren, um Schäden am Gewebe zu vermeiden.
Weitere Merkmale und Funktionen
Vertikaler Dampfstoß
C 1 Hängende Kleidung (Jacken,Anzüge, Mäntel) und Vorhänge können mit senkrecht gehaltenem Bügeleisen aufgedämpft werden.
Richten Sie den Dampstoß niemals auf Personen!
Dampfstoß (nur Typen GC6268/GC6068/GC6029)
Ein kräftiger Dampfstoß hilft, hartnäckige Falten zu beseitigen.
DEUTSCH 21
C

 C
C
1Dampfstoß: Stellen Sie den Dampfregler (F) auf Position R (große Wolke) und den Temperaturregler (I) auf Position 3 oder MAX.
2Drücken Sie die Taste für die Dampfzufuhr (H) und die Dampfstoßtaste (N).
Variodampf (nur Typen GC6268/GC6265/GC6208/GC6065/
GC6029)
Stellen Sie den Dampfregler (F) auf q, wenn wenig Dampf erzeugt werden soll. In der Position R wird die maximale Menge Dampf erzeugt.
Antikalktrichter (nur Typen GC6268/GC6068/GC6029)
Verlängert die Lebensdauer des Geräts.
1Verwenden Sie den Antikalktrichter (M) beim Füllen des Wassertanks.
Nach dem Bügeln
C 1 Schalten Sie das Gerät aus, indem Sie den Ein/Aus-Schalter (D) auf "Off" = Aus stellen.
2Lassen Sie den Druck aus dem Wassertank ab, indem Sie die Taste für die Dampfzufuhr drücken, bis Sie keinen Dampf mehr aus dem Gerät entweichen hören.
3Ziehen Sie den Netzstecker aus der Steckdose.
4Stellen Sie das Bügeleisen auf die Abstellfläche (C), bringen Sie den Dampfregler in Position q und lassen Sie das Gerät abkühlen, bevor Sie es wegräumen.
22 DEUTSCH
Reinigung und Wartung
1Ziehen Sie den Netzstecker aus der Steckdose und lassen Sie das Bügeleisen abkühlen, bevor Sie es reinigen.Führen Sie zum Reinigen des Wassertanks die ersten 4 Schritte im Abschnitt "Schnell-Nachfüllung" durch.
Das Bügeleisen
1Reinigen Sie das Bügeleisen mit einem feuchten Tuch.
2Wischen Sie Kalk und andere Ablagerungen auf der Bügelsohle mit einem feuchten Tuch ab, auf das Sie ein mildes Spülmittel auftragen können.
Tauchen Sie das Bügeleisen niemals in Wasser; spülen Sie es auch nicht unter fließendem Wasser ab.
Der Wassertank
Spülen Sie den Wasertank mindestens einmal monatlich oder nach ca. 10 Benutzungen aus.
C 1 Schrauben Sie vorsichtig den Verschluss auf.
C 2 |
Spülen Sie den Wassertank mit nur 500 ml frischem Waser aus. |
|
Gießen Sie das Wasser aus, indem Sie den Tank umgekehrt über |
|
ein Spülbecken halten. |
3 |
Schrauben Sie den Verschluss wieder auf den Wassertank. |
Aufbewahrung
1Lassen Sie das Bügeleisen abkühlen, bevor Sie es wegräumen.
2Ziehen Sie den Netzstecker aus der Steckdose und lassen Sie das Bügeleisen abkühlen.
3Leeren Sie den Wassertank.
4Mit den beiden Griffen an den Seiten des Wassertanks lässt sich das Gerät bequem transportieren.

DEUTSCH 23
5Prüfen Sie Verbindungsschlauch und Netzkabel regelmäßig auf Unversehrtheit und Sicherheit.
Garantie und Kundendienst
Weitere Informationen erhalten Sie im Internet unter www.philips.com. Wenden Sie sich mit Problemen, Fragen und Wünschen gegebenenfalls an das Philips Service Center in Ihrem Land (die Telefonnummer finden Sie in der beiliegenden internationalen Garantieschrift). Gibt es in Ihrem Land kein Philips Service Center, setzen Sie sich mit der Kundendienstabteilung (Service Department) von Philips Domestic Appliances and Personal Care B.V. in Verbindung.
Fehlerbehebung
In diesem Kapitel werden Probleme beschrieben, die gelegentlich bei der Benutzung des Bügeleisens auftreten können. Details finden Sie in den einzelnen Abschnitten. Können Sie ein Problem nicht lösen, setzen Sie sich mit einem Philips Service Center in Verbindung (die Telefonnummer finden Sie in der internationalen Garantieschrift). Gibt es in Ihrem Land kein Philips Service Center, wenden Sie sich an Ihren Philips Händler.

24 DEUTSCH
Problem |
Vermutliche Ursache(n) |
Abhilfe |
Aus dem Gerät tritt nach dem ersten |
Das ist normal. Einige Teile des |
Das tritt nach kurzer Zeit nicht mehr |
Einschalten etwas Rauch aus. |
Bügeleisens sind in der Fabrik leicht |
auf. |
|
eingefettet worden. |
|
|
|
|
Aus der Bügelsohle des neuen |
Das ist bei einem neuen Bügeleisen |
Die Partikel sind harmlos und |
Bügeleisens treten weiße Partikel aus. |
ganz normal. |
verschwinden, nachdem Sie das |
|
|
Bügeleisen einige Male benutzt haben. |
|
|
|
Wasser tropft aus der Bügelsohle.
Der Temperaturregler (I) ist auf eine zum Dampfbügeln zu niedrige Temperatur eingestellt.
Stellen Sie die Temperatur ein, die nach den Angaben in dieser Gebrauchsanweisung und der Tabelle erforderlich ist.
Der Wassertank wurde auf eine instabile oder unebene Unterlage gestellt.
Stellen Sie den Wassertank auf eine stabile und ebene Fläche.
|
Der Verbindungsschlauch ist zu Beginn |
|
des Dampfbügelns noch kalt. Dann |
|
kondensiert im Schlauch Dampf, der in |
|
Tropfenform aus der Bügelsohle |
|
austritt. |
Das Gerät entwickelt keinen Dampf. |
Der Wassertank ist nicht eingeschaltet. |
|
Die Kontrolllampe "Wassertank heizt |
|
auf" leuchtet noch (nur Typen |
|
GC6268/GC6265/GC6068/GC6065/ |
|
GC6029). |
Das ist normal. Halten Sie das Bügeleisen über ein altes Tuch und drücken Sie die Taste für die Dampfzufuhr (H). Das Tuch saugt das Kondenswasser auf. Nach wenigen Sekunden normalisiert sich die Dampfzufuhr.
Stellen Sie den Ein/Aus-Schalter (D) auf Position "On" = Ein.
Warten Sie, bis die Kontrolllampe erlischt.
Aus der Bügelsohle tritt kein Dampf |
Sehr heißer Dampf ist kaum sichtbar, |
Halten Sie einen (kalten) Spiegel vor |
aus. |
besonders wenn der Temperaturregler |
die Löcher in der Bügelsohle, um zu |
|
auf der Maximalposition steht und die |
überprüfen, ob Dampf austritt. |
|
Umgebungstemperatur ebenfalls relativ |
|
|
hoch ist. |
|
|
|
|
Die Bügelsohle ist verschmutzt. |
Verunreinigungen oder Chemikalien im |
Reinigen Sie die Bügelsohle mit einem |
|
Wasser haben Rückstände |
feuchten Tuch. |
|
hinterlassen. |
|
|
|
|
|
Sie haben bei zu hoher Temperatur |
Reinigen Sie die Bügelsohle mit einem |
|
gebügelt. |
feuchten Tuch. Stellen Sie die |
|
|
empfohlene Bügeltemperatur ein. |
|
|
|

NORSK 25
Generell beskrivelse
A Lokk til damptank
B Damptank
C Sokkel for dampjernet
D Av/på-bryter med innebygd indikatorlampe
EIndikatorlampe for damptanken under oppvarming (bare GC6268/GC6265/GC62068/GC6065). Indikatorlampen slukker når
apparatet er klart for dampstryking.
F Dampregulator (bare GC6268/GC6265/GC6068/GC6065/ GC6029).
q = moderat damp R = maksimal damp G Indikatorlampe for temperatur
H Dampaktiveringsknapp I Temperaturskive
J Tilførselsslange K Strykesåle
L Nettledning
M Anti-kalkkanal (bare GC6268/GC6068/GC6029) N Dampstøt (bare GC6268/GC6068/GC6029)
OHælstøtte for strykejern (bare GC6268/GC6265/GC6263/ GC6068/GC6065/GC6063)
Viktig
Av sikkerhetshensyn bør De lese denne bruksanvisningen nøye og se på illustrasjonene før De begynner å bruke apparatet.
-Ha ikke parfyme, eddik, stivelse, avkalkingsmiddel eller andre kjemikalier i damptanken.
-Dersom apparatet er skadet, må det ikke brukes. Sjekk regelmessig at nettledningen og tilførselsslangen er uskadde og i forsvarlig stand.
-Dersom nettledningen er ødelagt, må den skiftes ut av Philips, et servicesenter autorisert av Philips eller liknende kvalifisert personell slik at man unngår farlige situasjoner.
-Ikke bruk andre lokk på damptanken enn det som fulgte med apparatet. Lokket fungerer nemlig også som sikkerhetsventil.
-Kontroller at spenningen som er angitt nederst på damptanken, er den samme som i Deres hjem før apparatet kobles til strøm.
-Apparatet skal bare kobles til jordet stikkontakt.
-Strykejernet og damptanken må aldri senkes ned i vann.
-La aldri strykejernet stå uten tilsyn mens det er koblet til strømnettet.
-Når De er ferdig med å stryke, må De trekke støpselet ut av stikkontakten og sette strykejernet på sokkelen, selv om De bare går fra strykejernet en kort stund.
-Damptanken må settes på et stabilt, jevnt og vannrett underlag. Damptanken må ikke settes på den myke delen av strykebrettet.
-Plasser alltid strykejernet på den tilhørende sokkelen. Plasser ikke et varmt strykejern på tilførselsslangen eller nettledningen.
-Sokkelen og strykesålen kan bli ekstremt varme og kan forårsake brannskader dersom de berøres. Dersom De vil flytte på damptanken, må De ikke berøre sokkelen.
 Loading...