

Mistral
GC2225, GC2220, GC2215, GC2120, GC2115, GC2110, GC2105

2
ENGLISH 4
ESPAÑOL 12
PORTUGUÊS 22
GC2225, GC2220, GC2215, GC2120, GC2115, GC2110, GC2105
Important
Read these instructions for use carefully before using the appliance and
save them for future reference.
◗ Check if the voltage indicated on the type plate corresponds to
the local mains voltage before you connect the appliance.
◗ Only connect the appliance to an earthed wall socket.
◗ Do not use the appliance if the plug, the cord or the appliance
itself shows visible damage, or if the appliance has been dropped
or is leaking.
◗ Check the cord regularly for possible damage.
◗ If the mains cord is damaged, it must be replaced by Philips, a
service centre authorised by Philips or similarly qualified persons
in order to avoid a hazard.
◗ Never leave the appliance unattended when it is connected to the
mains.
◗ Never immerse the iron and the stand, if provided, in water.
◗ Keep the appliance out of the reach of children.
◗ The soleplate of the iron can become extremely hot and may
cause burns if touched.
◗ Do not allow the cord to come into contact with the soleplate
when it is hot.
◗ When you have finished ironing, when you clean the appliance,
when you fill or empty the water tank and also when you leave
the iron even for a short while: set the steam control to position
O, put the iron on its heel and remove the mains plug from the
wall socket.
◗ Always place and use the iron and the stand, if provided, on a
stable, level and horizontal surface.
◗ Do not put perfume, vinegar, starch, descaling agents,ironing aids
or other chemicals in the water tank.
◗ This appliance is intended for household use only.
Before first use
1 Check if the voltage indicated on the type plate corresponds to
the local mains voltage before you connect the appliance.
C
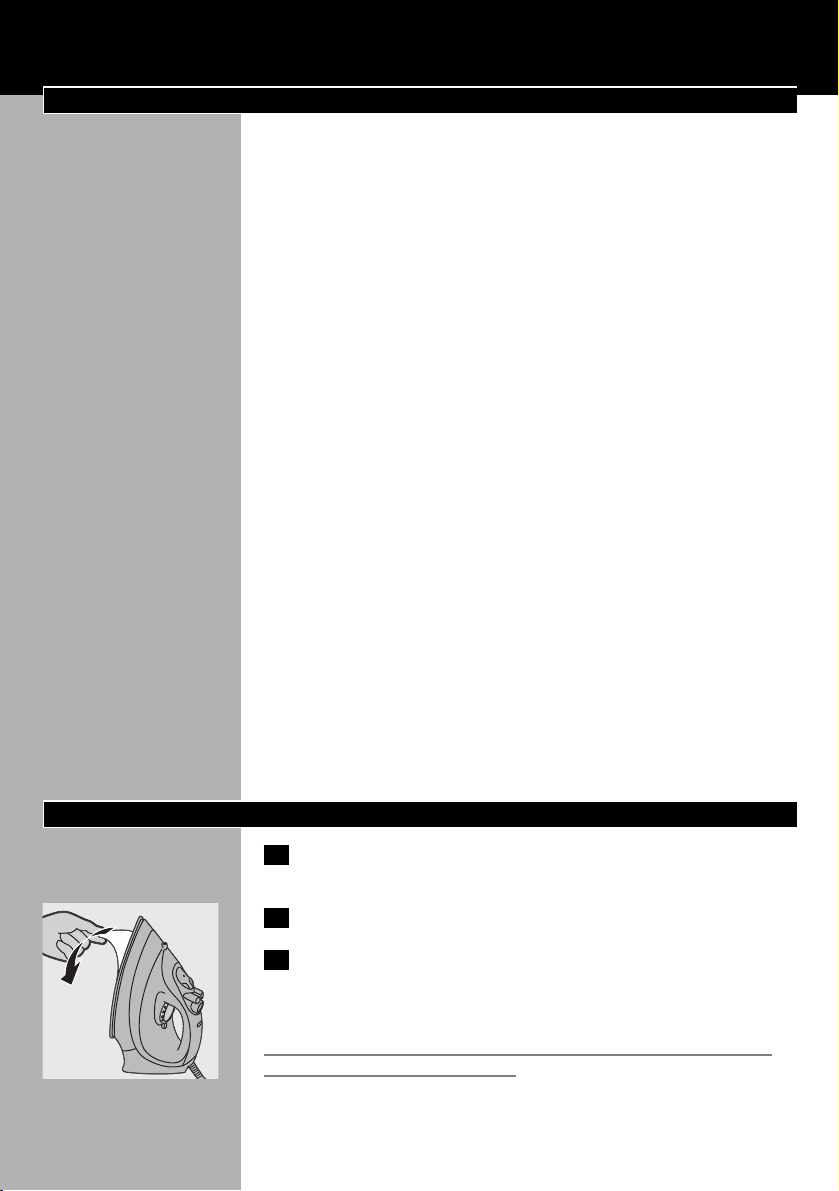
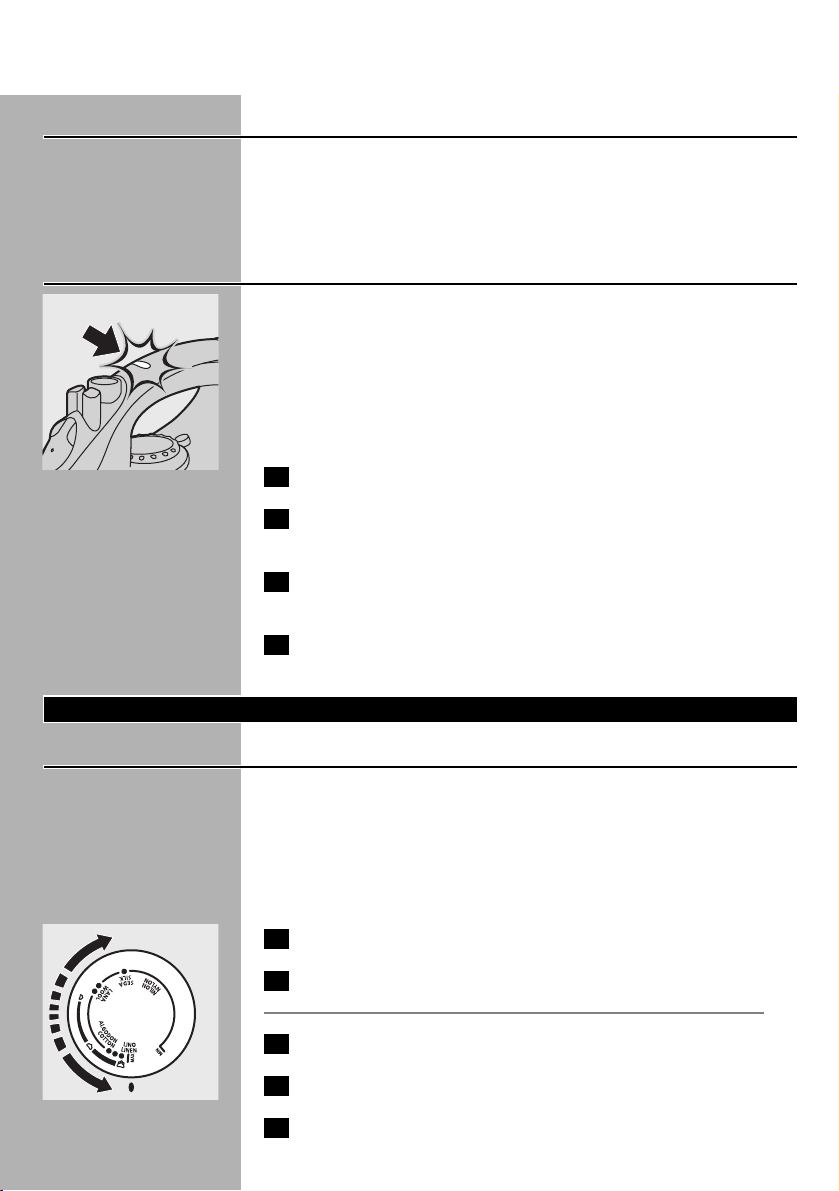
2 Remove any sticker or protective foil from the soleplate.
3 Heat up the iron to maximum temperature and pass the iron
over a piece of damp cloth for several minutes to remove any
residues from the soleplate.
The iron may give off some smoke when you use it for the first time
This will cease after a short while.
ENGLISH4

Preparing for use
Filling the water tank
1 Remove the mains plug from the wall socket.
C
2 Set the steam control to position O (= no steam).
3 Open the filling cap.
(types GC2225, GC2220, GC2215 and GC2120 only)
4 Tilt the iron.
C
5 Use a measuring cup to fill the water tank up to maximum level.
6 Close the filling cap (click!).
(types GC2225, GC2220, GC2215 and GC2120 only)
If the tap water in your area is very hard, we advise you to use distilled
water. Do not use vinegar, starch or chemically descaled water.
Do not fill the water tank beyond the MAX indication.
Setting the temperature
1 Put the iron on its heel.
C
2 Set the temperature dial to the required ironing temperature
by turning it to the appropriate position.
- Check the garment label for the required ironing temperature.
- 1 Synthetic fabrics (e.g. acrylic, viscose, polyamide, polyester)
- 1 Silk
- 2 Wool
- 3 Cotton, linen
- If you do not know what kind of fabric(s) a garment is made of,
determine the right ironing temperature by ironing a part that will
be invisible when you wear the garment.
- Silk, woollen and synthetic materials; iron the reverse side of the
fabric to prevent shiny patches.Avoid using the spray function to
prevent stains.
3 Put the mains plug in an earthed wall socket.
4 When the amber temperature light has gone out, wait a while
before you start ironing.
B
The amber pilot light will go on from time to time during ironing.
ENGLISH 5

For versions with auto shut-off (type GC2225 only) (see
also 'Other features')
C
◗ If the automatic shut-off function has been activated (red pilot
light blinks), move the iron slightly to deactivate this function (red
pilot light stops blinking).
Using the appliance
Steam ironing
Make sure that there is enough water in the water tank.
1 Set the temperature dial to the recommended position.
See 'Setting the temperature'.
C
2 Set the steam control to the appropriate steam position.
- Á for minimum steam (temperature settings 2 and 3).
- Ë for moderate steam (temperature settings 3 to MAX) (Types
GC2225, GC2220, GC2215 and GC2120 only).
- È for maximum steam (temperature settings 3 to MAX).
B
Steaming will start as soon as the set temperature has been reached.
Types GC2215, GC2120, GC2115, GC2110 and GC2105 only
Water may leak from the soleplate if the set temperature is too low
(MIN to 2).
GC2225 and GC2220 only.
The iron is equipped with a drip stop system (see also 'Other features).
Ironing without steam
1 Set the steam control to position O (= no steam).
2 Set the temperature dial to the recommended position.
See 'Setting the temperature'.
Other features
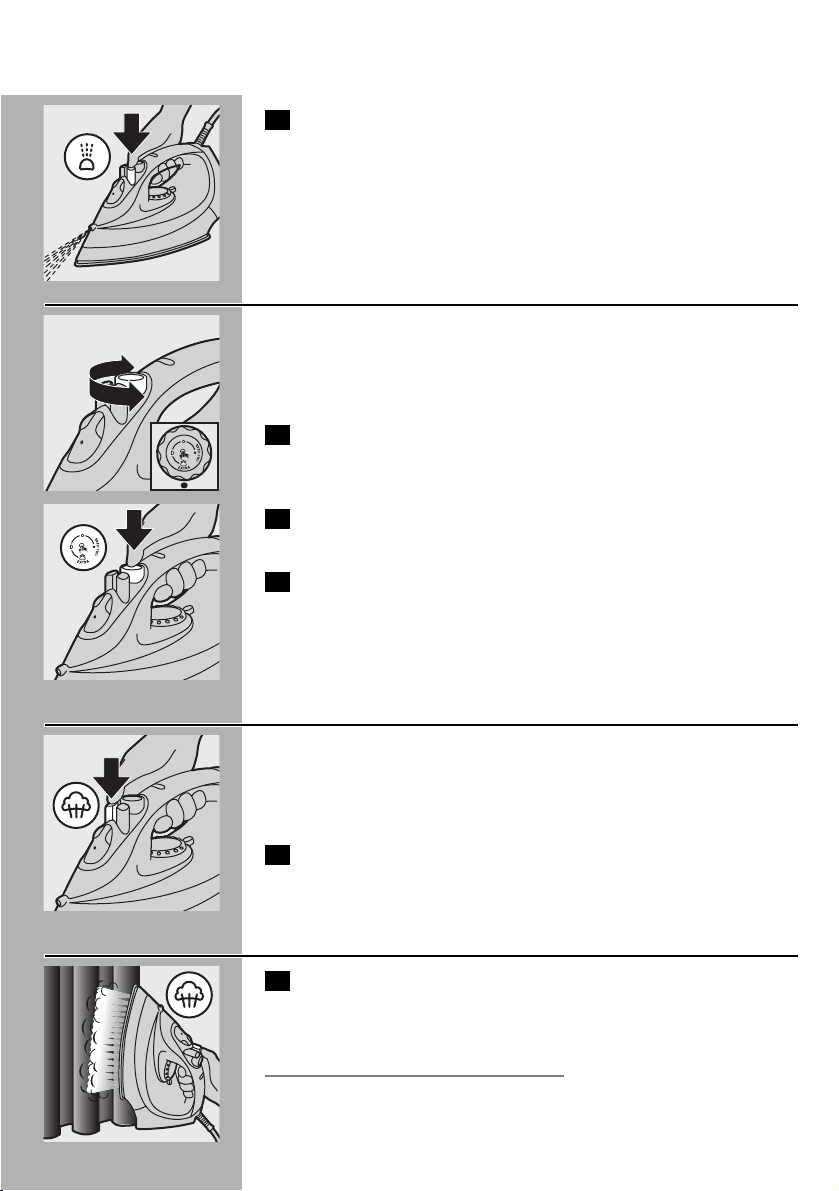
Spraying
To remove stubborn creases at any temperature
1 Make sure that there is enough water in the water tank.
ENGLISH6
C
2 Press the spray button several times to moisten the garment to
be ironed.
Extra Steam (type GC2105 only)
This function provides extra steam to remove really stubborn creases.
The Extra Steam function only works at temperature settings between
3 and MAX.
C
1 Set the steam control to maximum position È.
C
2 Press and hold the Steam Control button down for max.5
seconds.
3 Wait at least 1 minute before using Extra Steam again to
prevent water from dripping out of the soleplate.
Shot of Steam (GC2225, GC2220, GC2215, GC2120, GC2115
and GC2110 only)
A powerful shot of steam helps to remove very stubborn creases.
The Shot-of-Steam function only works at temperature settings
between 2 and MAX.
C
1 Press and release the Shot-of-Steam button.
Vertical Shot of Steam (types GC2225, GC2220, GC2215,
GC2120 and GC2115 only)
C
1 The Shot-of-Steam function can also be used when you are
holding the iron in vertical position.This is useful for removing
creases from hanging clothes, curtains, etc.
Never direct the steam towards people.
ENGLISH 7
Drip Stop (types GC2225, GC2220 only)
This iron is equipped with a drip stop function: the iron automatically
stops steaming when the temperature is too low to prevent water
from dripping out of the soleplate. When this happens you will hear a
click.
Automatic shut-off (type GC2225 only)
An electronic safety device will automatically switch the heating
element off if the iron has not been moved for a while.
C
◗ To indicate that the heating element has been switched off, the
red auto-off pilot light will start blinking.
To heat up the iron again:
1 Pick up the iron or move it slightly.
2 The red auto-off pilot light will go out.The amber temperature
pilot light will go on, depending on the soleplate temperature.
3 If the amber pilot light goes on after the iron has been moved,
wait for it to go out before you start ironing.
4 If the amber light does not go on after the iron has been
moved, the iron is ready for use.
Cleaning and maintenance
Calc-Clean
The Calc-Clean function removes scale and impurities.
Use the Calc-Clean function once every two weeks. If the water in
your area is very hard (i.e. when flakes come out of the soleplate
during ironing), the Calc-Clean function should be used more
frequently.
1 Set the steam control to position O.
2 Fill the water tank to the maximum level.
Do not pour vinegar or other descaling agents into the water tank..
C
3 Set the temperature dial to MAX.
4 Put the plug in the wall socket.
5 Unplug the iron when the amber pilot light has gone out.
ENGLISH8
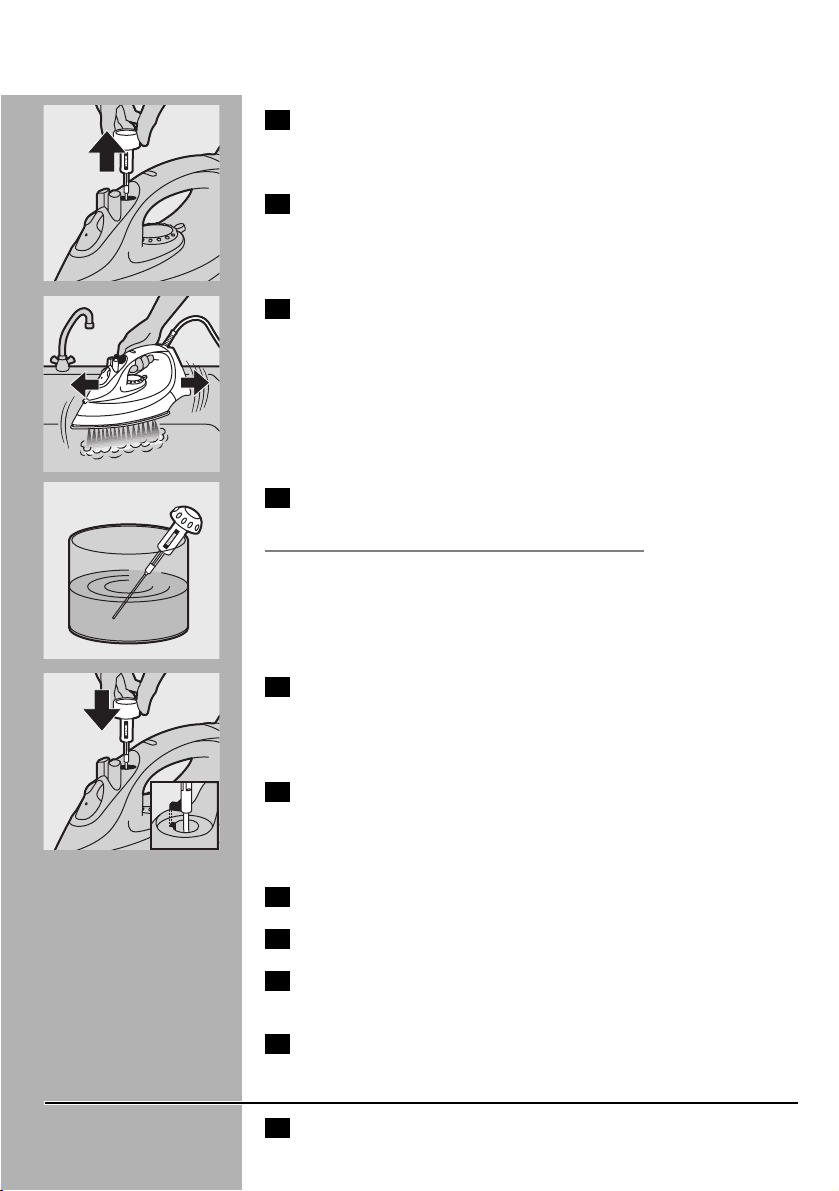
6 Hold the iron over the sink and set the steam control to
position 1 (Calc-Clean).The steam control knob will spring up
slightly.
C
7 Pull the steam control knob upwards to remove the steam
control needle.
C
8 Move the iron to and fro.
B
Steam and boiling water will come out of the soleplate. Impurities and
scale (if any) will be flushed out.
C
9 Use vinegar to remove scale, if any,from the needle.
Do not bend or damage the steam control needle.
C
10 Put the steam control needle back by inserting the point of the
needle exactly in the centre of the hole and by fitting the small
projection on the side of the needle into the slot. Set the
steam control knob to position O.
11 Repeat the Calc-Clean process if the iron still contains a lot of
impurities.
After the Calc-Clean process
1 Plug the iron in to let the soleplate dry up.
2 Unplug the iron when the amber pilot light has gone out.
3 Move the iron gently over a piece of used cloth to remove any
water stains that may have formed on the soleplate.
4 Let the iron cool down before you store it.
After ironing
1 Remove the mains plug from the wall socket and let the iron
cool down.
ENGLISH 9

2 Wipe scale and any other deposits off the soleplate with a
damp cloth and a non-abrasive (liquid) cleaner.
Keep the soleplate smooth: avoid hard contact with metal objects.
Never use a scouring pad, vinegar or other chemicals.
3 Clean the upper part of the appliance with a damp cloth.
4 Regularly rinse the water tank with water. Empty the water
tank after cleaning.
Storage
1 Remove the mains plug from the wall socket, let the iron cool
down and set the steam control to position O.
C
2 Empty the water tank.
C
3 Wind the mains cord round the cord storage facility.
4 Always store the iron standing on its heel in a safe and dry
place.
Environment
C
◗ Do not throw the appliance away with the normal household
waste at the end of its life, but hand it in at an official collection
point for recycling. By doing this you will help to preserve the
environment.
Guarantee & service
If you need information or if you have a problem, please visit the Philips
Web site at www.philips.com or contact the Philips Customer Care
Centre in your country (you will find its phone number in the
worldwide guarantee leaflet). If there is no Customer Care Centre in
your country, turn to your local Philips dealer or contact the Service
Department of Philips Domestic Appliances and Personal Care BV.
ENGLISH10

11
Solution
Check the mains cord, the plug and
the wall socket.
Set the temperature dial to the
required position.
Tilt the iron during filling.
Fill the water tank (see 'Preparing for
use'; section 'Filling the watertank'.)
Set the steam position to Á, Ë or È
(see 'Using the appliance', section
'Steam ironing').
Set the temperature dial to a position
in the steam area (2 to MAX). Put
the iron on its heel and wait until the
amber pilot light has gone out before
you start ironing.
Put the iron in horizontal position and
wait a while before using the (Vertical)
Shot of Steam function again.
Set the temperature dial to a position
in the steam area (2 to MAX). Put
the iron on its heel and wait until the
amber pilot light has gone out before
you start ironing.
Use the Calc-Clean function a few
times (see 'Cleaning and maintenance',
section 'Calc-Clean').
Shake the iron lightly to deactivate the
auto shut-off function: the pilot light
will stop blinking.
Press the filling cap until you hear a
click.
Set the temperature dial to a position
in the steam area (2 to MAX). Put
the iron on its heel and wait until the
amber pilot light has gone out before
you start ironing.
Empty the water tank before you store
the iron. Set the steam control to
position O and store the iron standing
on its heel.
Possible cause(s)
Connection problem
Temperature dial set at MIN
You have tried to fill the iron in
horizontal position.
Not enough water in the water tank.
The steam control has been set to
position O.
The soleplate is not hot enough
and/or the Drip stop function (types
GC2225 and GC2220 only) has been
activated.
The (Vertical) Shot of Steam function
has been used too often within a very
short period.
The soleplate is not hot enough.
Hard water forms flakes inside the
soleplate.
The auto shut-off function has been
activated. See "Automatic shut-off"
section.
The filling cap has not been closed
properly.
The temperature has been set too
low.
The iron has been put in horizontal
position while there was still water in
the water tank.
Problem
The iron is plugged in but the soleplate
is cold.
I'm unable to fill the water tank to
maximum level.
No steam
No shot of steam (types GC2225,
GC2220, GC2215,GC2120, GC2115
and GC2110 only) or no Vertical Shot
of Steam (types GC2225, GC2220,
GC2215, GC2120 and GC2115 only).
Flakes and impurities come out of the
soleplate during ironing.
Red pilot light is blinking (type
GC2225 only).
Water droplets on fabric (types
GC2225, GC2220,GC2215 and
GC2120 only)
Water droplets on fabric (types
GC2215, GC2120,GC2115, GC2110
and GC2105 only)
Water drips from the soleplate after
the iron has been stored or cooled
down.
Troubleshooting
This chapter summarises the most common problems you could encounter with your iron. Please
read the different sections for more details. If you are unable to solve the problem, please contact the
Philips Customer Care Centre in your country.
ENGLISH

Importante
Antes de utilizar el aparato, lea atentamente estas instrucciones de uso
y consérvelas por si necesitara consultarlas en el futuro.
◗ Antes de conectar la plancha, compruebe si el voltaje indicado en
la placa de modelo se corresponde con el voltaje de red local.
◗ Conecte el aparato sólo a un enchufe con toma de tierra.
◗ No utilice el aparato si la clavija, el cable o el mismo aparato
tuvieran algún daño visible, o si el aparato se hubiera caído o
tuviera alguna fuga.
◗ Compruebe regularmente el cable por si estuviera dañado.
◗ Si el cable de red está dañado, siempre debe ser sustituido por
Philips, por un Servicio de Asistencia Técnica autorizado por
Philips o por personal cualificado, para evitar que se produzcan
situaciones peligrosas.
◗ No deje el aparato sin vigilancia mientras esté conectado a la red.
◗ No sumerja nunca en agua la plancha ni el soporte, si lo hubiera.
◗ Mantenga el aparato lejos del alcance de los niños.
◗ La suela de la plancha puede alcanzar temperaturas muy altas y, si
se toca, puede causar quemaduras.
◗ No permita que el cable de red entre en contacto con la suela
cuando ésta esté caliente.
◗ Cuando haya acabado de planchar, cuando limpie el aparato,
cuando llene o vacíe el depósito de agua y, también,cuando deje la
plancha aunque sea durante un momento, ponga el control del
vapor en la posición "O", ponga la plancha sobre su talonera y
desenchúfela de la red.
◗ Coloque y utilice siempre la plancha y su soporte, si lo hubiera, en
una superficie estable, plana y horizontal.
◗ No eche en el depósito de agua perfume, vinagre, almidón,
productos descalcificadores, productos que ayuden al planchado ni
otros productos químicos.
◗ Este aparato está diseñado sólo para uso doméstico.
Antes del primer uso:
1 Antes de conectar la plancha, compruebe si el voltaje indicado
en la placa de modelo se corresponde con el voltaje de red
local.
C
2 Quite cualquier etiqueta o lámina protectora de la suela.
3 Calienten la Plancha a la temperatura máxima y pásenla sobre
una pieza de ropa humedecida durante varios minutos para
eliminar cualquier residuo de la suela.
La Plancha puede producir un poco de humo al usarla por vez
primera. Ello cesará al cabo de un momento.
12 ESPAÑOL

Cómo preparar la plancha
Cómo llenar el depósito del agua
1 Desenchufen el aparato de la red.
C
2 Coloquen el control del vapor en la posición O (Sin vapor).
3 Abra la tapa de llenado
(sólo modelos GC2225, GC2220, GC2215 y GC2120)
4 Inclinen la Plancha
C
5 Utilice el recipiente de medir para llenar el depósito de agua
hasta su nivel máximo.
6 Cierre la tapa de llenado (oirá un clic).
(sólo modelos GC2225, GC2220, GC2215 y GC2120)
Si el agua de su zona es demasiado dura, le aconsejamos que utilice
agua destilada. No utilice vinagre, almidón o agua descalcificada
químicamente.
No llenen el depósito por encima de la indicación "MAX".
Cómo ajustar la temperatura
1 Pongan la Plancha sobre su talonera.
C
2 Coloque el dial de la temperatura en la temperatura de
planchado adecuada girándolo hasta la posición que
corresponda.
- Para conocer la requerida temperatura de planchado,comprueben
la etiqueta de la prenda
- 1 Tejidos sintéticos (Por ejemplo, acrílico, viscosa, poliamida,
poliester)
- 1 Seda
- 2 Lana
- 3 Algodón, lino
- Si no saben de que tipo de tejido(s) está fabricada la prenda,
determinen la correcta temperatura de planchado planchando un
trozo que no se vea cuando vistan la prenda.
- Planche las prendas de seda, lana y fibras sintéticas por el revés para
evitar que salgan brillos. No utilice el pulverizador para evitar la
aparición de manchas.
3 Enchufen el aparato a la red en un enchufe con toma de tierra.
4 Cuando el piloto ámbar de la temperatura se apague, espere un
momento antes de comenzar a planchar.
13ESPAÑOL

14
B
El piloto ámbar se encenderá de cuando en cuando mientras esté
planchando.
Para los modelos con desconexión automática (sólo
modelo GC2225) (consulte también 'Otras funciones')
C
◗ Si se activa la desconexión automática (el piloto rojo parpadea),
mueva ligeramente la plancha para desactivar esta función (el
piloto rojo deja de parpadear).
Cómo utilizar la plancha
Cómo planchar con vapor
Asegúrense de que haya suficiente agua en el depósito del agua.
1 Ajusten el dial de la temperatura a la posición recomendada.
Consulten la sección "Cómo ajustar la temperatura".
C
2 Ajusten el control del vapor a la apropiada posición de vapor.
- Á para vapor mínimo (posiciones de temperatura 2 y 3).
- Ë para vapor moderado (posiciones de temperatura de 3 a
MAX) (Sólo modelos GC2225, GC2220, GC2215 y GC2120).
- È para vapor máximo (posiciones de temperatura de 3 a
MAX).
B
El vaporizado empezará tan pronto como se haya alcanzado la
temperatura seleccionada.
Sólo modelos GC2215, GC2120, GC2115, GC2110 y
GC2105.
Puede que salga agua de la suela si la temperatura seleccionada es
demasiado baja (MIN a 2).
Sólo modelos GC2225 y GC2220.
La plancha está equipada con un sistema antigoteo (consulte también
'Otras funciones').
Cómo planchar sin vapor
1 Coloquen el control del vapor en la posición O (Sin vapor).
2 Ajusten el dial de la temperatura a la posición recomendada.
Consulten la sección "Cómo ajustar la temperatura".
ESPAÑOL

Otras funciones
Pulverizador
Para eliminar arrugas rebeldes a cualquier temperatura
1 Asegúrense de que haya suficiente agua en el depósito del agua.
C
2 Presione el botón pulverizador varias veces para humedecer la
prenda.
Vapor extra (sólo modelo GC2105)
Esta función proporciona vapor extra para eliminar las arrugas
rebeldes.
La función de Vapor extra sólo funciona a una temperatura entre 3
y MAX.
C
1 Coloque el control de vapor en la posición máxima È.
C
2 Mantenga pulsado el botón de control de vapor durante 5
segundos como máximo.
3 Espere al menos 1 minuto antes de volver a usar el Vapor extra
para evitar que salga agua de la suela.
Supervapor (sólo modelos GC2225, GC2220, GC2215,
GC2120, GC2115 y GC2110)
Este potente chorro de vapor ayuda a eliminar las arrugas realmente
rebeldes.
La función Chorro de Vapor solo funciona a posiciones de temperatura
entre 2 y MAX.
C
1 Presionen y suelten el botón del Chorro de Vapor.
15ESPAÑOL

16
Supervapor vertical (sólo modelos GC2225, GC2220,
GC2215, GC2120 y GC2115)
C
1 También puede utilizar el Supervapor con la plancha en vertical.
Es muy útil para eliminar las arrugas de prendas colgadas,
cortinas, etc.
No dirijan nunca el vapor hacia las personas.
Antigoteo (sólo modelos GC2225 y GC2220)
Esta Plancha está equipada con una función de antigoteo. Para evitar
pédidas de agua por la suela, la Plancha deja automáticamente de
vaporizar cuando la temperatura es demasiado baja. Cuando esto
suceda, oiran un "click".
Desconexión automática (sólo modelo GC2225)
Un dispositivo electrónico de seguridad desconectará automáticamente
el elemento calefactor si la Plancha no ha sido movida durante algún
tiempo.
C
◗ Para indicar que el elemento calefactor ha sido desconectado, la
lámpara piloto roja de la desconexión automática empezará a
parpadear.
Para volver a calentar la Plancha :
1 Cojan la Plancha o muévanla ligeramente.
2 El piloto rojo de la desconexión automática se apagará. El
piloto ámbar de la temperatura se encenderá, dependiendo de
la temperatura de la suela.
3 Si la lámpara piloto ambar se enciende después de haber
movido la Plancha, esperen a que se apague antes de empezar a
planchar.
4 Si la lámpara piloto ambar no se enciende después de mover la
Plancha, esta está lista para el uso.
ESPAÑOL

Limpieza y mantenimiento
Función Calc-Cleaning (Limpieza de la Cal)
La función Calc-Cleaning (Limpieza de la Cal) elimina las incrustaciones
y las impurezas.
Usen la función Calc-Cleaning (Limpieza de la Cal) una vez cada dos
semanas. Si el agua de su zona es muy dura (Por ejemplo, cuando
durante el planchado salen escamas por la suela), la función CalcCleaning (Limpieza de la Cal) debs ser usada más a menudo.
1 Ajusten el control del vapor a la posición O.
2 Llenen el depósito del agua hasta el nivel máximo.
No pongan vinagre u otros agentes desincrustantes en el depósito del
agua.
C
3 Ajusten el dial de la temperatura a la posición MAX.
4 Enchufen el aparato a la red.
5 Desenchufen la Plancha tan pronto como se haya apagado la
lámpara piloto ambar.
6 Sujete la plancha sobre el fregadero y coloque el control de
vapor en la posición 1 (Calc-Clean). El botón de control de
vapor se levantará ligeramente.
C
7 Tire del botón de control del vapor hacia arriba y saque la
aguja de control de vapor.
C
8 Mueva la plancha de un lado a otro.
B
Vapor y agua caliente saldrán por la suela. Las impurezas y las
incrustaciones (Si las hay) serán arrastradas.
C
9 Si hubiera cal en la aguja, utilice vinagre para eliminarla.
No tuerzan o deterioren la aguja de control del vapor.
17ESPAÑOL

18
C
10 Vuelvan a poner la aguja de control del vapor, insertándola
exactamente en el centro del agujero y fijando el pequeño
saliente del lado de la aguja en su ranura. Lleven el botón de
control del vapor a la posición "O".
11 Repitan el proceso Limpieza de la Cal (Calc-Cleaning) si la
Plancha contiene muchas impurezas.
Después del proceso Limpieza de la Cal (Calc-Cleaning)
1 Enchufen el aparato a la red y dejen que la suela se caliente.
2 Desenchufen la Plancha tan pronto como se haya apagado la
lámpara piloto ambar.
3 Muevan suavemente la Plancha sobre una pieza de ropa usada
para eliminar cualquier mancha de agua que se haya podido
formar en la suela.
4 Dejen que la Plancha se enfríe antes de guardarla.
Después del planchado
1 Desenchufen el aparato de la red y dejen que se enfríe.
2 Con un paño húmedo y un limpiador (líquido) no abrasivo,
limpien (frotando) las incrustaciones y cualesquiera otros
posos de la suela de la Plancha.
Mantengan la suela lisa : Eviten contactos fuertes con objetos metálicos.
No utilice nunca estropajo, vinagre u otros productos químicos.
3 Limpien la parte superior del aparato con un paño húmedo.
4 Periódicamente, enjuaguen el depósito del agua con agua.
Vacíen el depósito del agua después de limpiarlo.
Cómo guardar la Plancha
1 Desenchufen el aparato de la red, dejen que se enfríe y pongan
el control del vapor en la posición O.
C
2 Vacíen el depósito del agua.
ESPAÑOL

19
C
3 Enrolle el cable de red alrededor del recogecable.
4 Guarden siempre la Plancha sobre su talonera y en un lugar
seco y seguro.
Medio ambiente
C
◗ Cuando vaya a deshacerse de este aparato, no lo tire con la
basura normal del hogar; deposítelo en un punto de recogida
oficial para su reciclado.Al hacerlo, contribuirá a preservar el
medio ambiente.
Garantía y servicio
Si necesita información o si tiene algún problema, visite la página Web
de Philips en www.philips.com o póngase en contacto con el Servicio
Philips de Atención al Cliente de su país (hallará el número de teléfono
en el folleto de la Garantía Mundial). Si en su país no hay Servicio
Philips de Atención al Cliente, diríjase a su distribuidor local Philips o
póngase en contacto con el Service Depar tment of Philips Domestic
Appliances and Personal Care BV.
ESPAÑOL

20
Solución
Comprueben el cable de red, la clavija
y la base de enchufe.
Coloque el dial de la temperatura en
la posición adecuada.
Incline la plancha mientras la llena.
Llene el depósito de agua (consulte
'Cómo preparar el aparato', sección
'Cómo llenar el depósito de agua').
Colocar el control de vapor en la
posición Á, Ë o È (consulte 'Cómo
utilizar el aparato', sección 'Cómo
planchar con vapor').
Coloque el dial de la temperatura en
la zona de vapor (de 2 a MAX).
Coloque la plancha sobre la talonera y
espere hasta que el piloto ámbar se
haya apagado, antes de empezar a
planchar.
Ponga la plancha en posición
horizontal y espere un momento antes
de volver a utilizar la función de
supervapor (vertical).
Coloque el dial de la temperatura en
la zona de vapor (de 2 a MAX).
Coloque la plancha sobre la talonera y
espere hasta que el piloto ámbar se
haya apagado, antes de empezar a
planchar.
Utilice la función Calc-Clean unas
cuantas veces (consulte 'Limpieza y
mantenimiento', sección 'Función CalcClean').
Agiten ligeramente la Plancha para
desactivar la función Desconexión
Automática. La lámpara piloto dejará
de parpadear.
Presione el tapón de llenado hasta que
oiga un clic.
Posible(s) causa(s)
Problema de conexión.
Dial de la temperatura en MIN
Ha intentado llenar el depósito con la
plancha en horizontal.
No hay suficiente agua en el depósito
del agua
El control de vapor ha sido ajustado a
la posición O.
La suela no está lo suficientemente
caliente y/o se ha activado la función
antigoteo (sólo modelos GC2225 y
GC2220).
El Chorro de Vapor (Vertical) ha sido
usado demasiado a menudo en un
muy corto espacio de tiempo.
La suela no está suficientemente
caliente.
El agua dura forma escamas en el
interior de la suela.
La función Desconexión Automática
se ha activado.Vean la sección
"Desconexión automática".
El tapón de llenado no se ha cerrado
correctamente.
Problema
La Plancha está enchufada pero la
suela está fría.
No puedo llenar el depósito de agua
hasta el nivel máximo.
No produce vapor
No sale supervapor (sólo modelos
GC2225, GC2220,GC2215, GC2120,
GC2115 y GC2110) ni supervapor
vertical (sólo modelos GC2225,
GC2220, GC2215,GC2120 y
GC2115).
Escamas e impurezas salen de la suela
durante el planchado.
El piloto rojo parpadea (sólo modelo
GC2225).
Caen gotas en la prenda (sólo
modelos GC2225, GC2220,GC2215 y
GC2120)
Guía de problemas
En este capítulo se resumen los problemas más frecuentes que se puede encontrar al utilizar esta
plancha. Lea los distintos capítulos para obtener más información. Si no es capaz de solucionar el
problema, póngase en contacto con el Centro de Atención al Cliente de Philips de su país.
ESPAÑOL

21
Solución
Coloque el dial de la temperatura en
una posición de la zona de vapor (de
2 a MAX). Coloque la plancha sobre
la talonera y espere hasta que el piloto
ámbar se haya apagado, antes de
empezar a planchar.
Vacíe el depósito de agua antes de
guardar la plancha. Coloque el control
de vapor en la posición O y guarde la
plancha sobre la talonera.
Posible(s) causa(s)
La temperatura está ajustada
demasiado baja.
Se ha colocado la plancha en posición
horizontal cuando aún había agua en el
depósito.
Problema
Caen gotas en la prenda (sólo
modelos GC2215, GC2120,GC2115,
GC2110 y GC2105)
Pérdidas de agua por la suela después
de haber guardado o enfriado la
plancha.
ESPAÑOL

Importante
Antes de começar a usar o aparelho leia atentamente as instruções e
guarde-as para uma eventual consulta futura.
◗ Antes de ligar à corrente, verifique se a voltagem indicada na placa
de tipo corresponde à voltagem do local.
◗ Este aparelho só deverá ser ligado numa tomada com terra.
◗ Não se sirva do aparelho se a ficha, o cabo de alimentação ou o
próprio aparelho se apresentarem danificados, ou se o aparelho
tiver caído ao chão ou tiver indícios de fugas.
◗ Verifique regularmente o estado de conservação do fio.
◗ Se o fio estiver estragado, só deverá ser substituído pela Philips,
por um concessionário autorizado pela Philips ou por pessoal
igualmente qualificado para se evitarem situações de perigo para o
utilizador.
◗ Nunca deixar o aparelho ligado à corrente, sem vigilância.
◗ Nunca mergulhar o ferro, nem a base, se fornecida, na água.
◗ Mantenha o aparelho fora do alcance das crianças.
◗ A base do ferro pode ficar muito quente e causar queimaduras
sérias se for tocada inadvertidamente.
◗ Não deixe que o cabo de alimentação fique em contacto com a
base quente do ferro.
◗ Quando terminar de passar, quando proceder à limpeza do ferro,
quando encher ou esvaziar o reservatório da água e também
quando sair de perto do ferro por algum tempo: regule o
controlo do vapor para a posição O, coloque o ferro em posição
de descanso e retire a ficha da tomada de corrente.
◗ Guardar sempre o ferro e a base, se fornecida, numa superfície
estável e a nível horizontal.
◗ Não deite perfume, vinagre, lixívia, produtos descalcificantes,
produtos para ajudar a passar a ferro ou outros químicos no
reservatório da água.
◗ Este aparelho destina-se apenas a uma utilização doméstica.
Antes de usar
1 Antes de ligar à corrente, verifique se a voltagem indicada na
placa de tipo corresponde à voltagem do local.
C
2 Retire todos os autocolantes ou película de protecção da base
do ferro.
3 Aqueça o ferro na temperatura máxima e passe-o sobre um
pedaço de pano húmido durante alguns minutos para retirar
todos e quaisquer resíduos da base.
O ferro poderá libertar algum fumo quando da primeira utilização. É
normal e pára passado algum tempo.
22 PORTUGUÊS

Preparação
Enchimento do reservatório
1 Retire a ficha da tomada de corrente.
C
2 Rode o controlo do vapor para a posição 0 (= sem vapor).
3 Abra o bocal de enchimento.
(apenas mod. GC2225, GC2220, GC2215 e GC2120)
4 Incline o ferro.
C
5 Use a medida para encher o depósito com água até ao nível
máximo.
6 Feche o bocal (clique!).
(apenas mod. GC2225, GC2220, GC2215 e GC2120)
Se a água da torneira da sua zona for muito dura, aconselha-se o uso
de água destilada. Não adicione vinagre, lixívia ou água descalcificada
quimicamente.
Não ultrapasse a indicação MAX.
Selecção da temperatura
1 Coloque o ferro em posição de descanso.
C
2 Rode o botão da temperatura para a posição pretendida.
- Verifique a etiqueta da peça de roupa para saber qual a temperatura
adequada.
- 1 Tecidos sintéticos (p.ex.: acrílico, viscose, poliamide, polyester)
- 1 Seda
- 2 Lã
- 3 Algodão, linho
- Se não conhecer o(s) tipo(s) de tecido(s), calcule a temperatura
certa passando o ferro sobre uma parte da peça de roupa que não
fique à vista.
- Tecidos em seda, lã e sintéticos: passe pelo lado do avesso para
evitar a formação de lustro. Evite usar o borrifador para não
manchar o tecido.
3 Ligue a ficha numa tomada com terra.
4 Quando a luz âmbar da temperatura se apagar, aguarde um
pouco antes de começar a passar.
B
A luz âmbar acende-se de tempos a tempos durante o trabalho.
23PORTUGUÊS

24
Nas versões com desligar automático (mod. GC2225) (vidé
também 'Outras características')
C
◗ Se a função de desligar automático tiver sido activada (a lâmpada
encarnada pisca), movimente o ferro ligeiramente para desactivar
a função (a lâmpada piloto encarnada deixa de piscar).
Utilização
Passar com vapor
Verifique se existe água suficiente no reservatório.
1 Regule o botão da temperatura para a posição recomendada.
Consulte o capítulo 'Selecção da temperatura'.
C
2 Coloque o controlo do vapor na posição adequada.
- Á para vapor mínimo (temperaturas entre 2 e 3).
- Ë para vapor moderado (temperaturas entre 3 e MAX)
(Apenas mod. GC2225, GC2220, GC2215 e GC2120).
- È para vapor máximo (temperaturas entre 3 e MAX).
B
O vapor começa a sair logo que a água atinge a temperatura
seleccionada.
Apenas nos mod. GC2215, GC2120, GC2115, GC2110 e
GC2105
A água pode pingar da base do ferro se a temperatura for muito baixa
(MIN a 2).
Apenas GC2225 e GC2220.
O ferro está equipado com um sistema anti-pingos (vidé 'Outras
características').
Passar sem vapor
1 Rode o controlo do vapor para a posição 0 (= sem vapor).
2 Regule o botão da temperatura para a posição recomendada.
Consulte o capítulo 'Selecção da temperatura'.
PORTUGUÊS

Outras características
Borrifador
Para remover rugas difíceis em qualquer temperatura.
1 Verifique se existe água suficiente no reservatório.
C
2 Prima o botão do borrifador várias vezes para humedecer a
peça de roupa que for passar.
Vapor Extra (apenas GC2105)
Esta função fornece vapor extra para remover vincos realmente
difíceis.
A função de Vapor Extra só funciona com temperaturas entre 3 e
MAX.
C
1 Regule o controlo do vapor para a posição máxima È.
C
2 Prima e mantenha premido o botão de Controlo do Vapor
durante 5 segundos.
3 Aguarde pelo menos 1 minuto antes de voltar a usar a função
Vapor Extra para evitar que pingue água da base do ferro.
Jacto de Vapor (GC2225, GC2220, GC2215, GC2120, GC2115
e GC2110)
Um potente jacto de vapor ajuda a remover os vincos mais difíceis.
A função de Jacto de Vapor só funciona com temperaturas entre 2 e
MAX.
C
1 Prima e solte o botão do Jacto de Vapor.
25PORTUGUÊS

26
Jacto de Vapor Ver tical (modelos GC2225, GC2220, GC2215,
GC2120 e GC2115)
C
1 A função Jacto de Vapor pode ser usada quando se tem o ferro
na posição vertical. Isto é particularmente útil para remover
vincos da roupa pendurada, de cortinados, etc.
Nunca vire o jacto de vapor na direcção de ninguém.
Anti-Pingos (apenas GC2225 e GC2220)
Este ferro está equipado com um sistema anti-gotejamento: o ferro
deixa automaticamente de emitir vapor quando a temperatura é
demasiado baixa para evitar que a água pingue da base do ferro.
Quando isso acontece ouvir-se-á um 'clique'.
Corte automático (apenas GC2225)
Um dispositivo electrónico de segurança desligará automaticamente a
resistência se o ferro não for mexido durante algum tempo.
C
◗ Para indicar que a resistência foi desligada, a luz encarnada
começará a piscar.
Para voltar a aquecer o ferro:
1 Pegue no ferro ou movimente-o ligeiramente.
2 A lâmpada piloto encarnada apaga-se.A luz âmbar da
temperatura acende-se, dependendo da temperatura da base
do ferro.
3 Se a luz âmbar se acender depois do ferro ter sido
movimentado, aguarde que ela se apague antes de recomeçar o
trabalho.
4 Se a luz âmbar não se acender depois de o ferro ser
movimentado, o ferro está pronto para ser usado.
Limpeza e manutenção
Limpeza do Calcário
A função 'Calc-Clean' remove o calcário e as impurezas.
Use a função 'Calc-Clean' todos os quinze dias. Se a água da sua área
de residência for muito dura (isto é, se sairem partículas da base do
PORTUGUÊS

27
ferro quando estiver a passar a roupa), a função 'Calc-Clean' deve ser
usada com maior frequência.
1 Rode o controlo do vapor para a posição O.
2 Encha o reservatório com água até ao nível máximo.
Não deite vinagre ou qualquer outro descalcificante para dentro do
reservatório da água.
C
3 Regule a temperatura para a posição MAX.
4 Ligue a ficha à corrente.
5 Desligue o ferro quando a luz âmbar se apagar.
6 Segure o ferro sobre o lava-loiça e regule o controlo do vapor
para a posição 1 (Calc-Clean). O botão do controlo do vapor
salta ligeiramente.
C
7 Puxe o botão do controlo do vapor para cima para retirar a
agulha.
C
8 Movimente o ferro de um lado para o outro.
B
O vapor e a água a ferver sairão pela base do ferro. As impurezas e o
calcário (se os houver) serão expulsos.
C
9 Use vinagre para remover o calcário da agulha,caso exista
algum.
Não dobre nem estrague a agulha do controlo do vapor.
C
10 Volte a colocar a agulha no seu lugar, introduzindo a ponta da
agulha exactamente no centro do orifício e encaixando a
pequena saliência lateral da agulha na ranhura. Regule o
controlo do vapor para a posição O.
11 Repita o procedimento de limpeza (Calc-Clean) se ainda
houver muitas impurezas no ferro.
PORTUGUÊS

28
Depois de proceder à limpeza do calcário (Calc-Clean)
1 Ligue o ferro e deixe a base secar.
2 Desligue o ferro quando a luz âmbar se apagar.
3 Movimente o ferro levemente sobre um pedaço de pano usado
para lhe retirar todas as manchas de água que se tenham
formado na base.
4 Deixe arrefecer o ferro antes de o arrumar.
Quando terminar
1 Retire a ficha da tomada de corrente e deixe o ferro a
arrefecer.
2 Limpe o calcário e quaisquer outros resíduos da base do ferro
com um pano húmido e um líquido de limpeza não abrasivo.
Mantenha a base do ferro macia: evite o contacto com objectos
metálicos.
Nunca use esfregões, vinagre ou produtos químicos.
3 Limpe a parte de cima do ferro com um pano húmido.
4 Regularmente, enxague o reservatório com água limpa.Após a
limpeza, esvazie o reservatório.
Arrumação
1 Retire a ficha da tomada de corrente e deixe o ferro arrefecer.
Rode o controlo do vapor para a posição O.
C
2 Esvazie o reservatório da água.
C
3 Enrole o cabo no local próprio.
4 Arrume sempre o ferro na vertical e em local seguro e seco.
PORTUGUÊS

29
Meio ambiente
C
◗ Quando chegar a altura de se desfazer do aparelho, não o deite
fora juntamente com o seu lixo doméstico normal. Deverá
colocá-lo num ponto de recolha oficial para efeitos de reciclagem.
Ao fazê-lo, estará a contribuir para a preservação do meio
ambiente.
Garantia e assistência
Se necessitar de informações ou se tiver qualquer problema, por favor
visite a página Philips na Internet em www.philips.pt ou contacte o
Centro de Informação ao Consumidor Philips do seu país (o número
de telefone encontra-se no folheto da garantia mundial). Se não existir
um Centro de Informação ao Consumidor no seu país, dirija-se a um
agente Philips local ou ao Departamento de Service da Philips
Domestic Appliances and Personal Care BV.
PORTUGUÊS

30
Solução
Verifique o fio, a ficha e a tomada
eléctrica.
Regule a temperatura para a posição
adequada.
Incline o ferro para o encher.
Encha o depósito (vidé 'Preparação',
secção 'Enchimento do depósito').
Regule o vapor para a posição Á, Ë
ou È (vidé 'Utilização', secção 'Passar
com vapor').
Regule a temperatura para a posição
de vapor (2 a MAX). Coloque o
ferro em posição de descanso e
aguarde que a lâmpada piloto âmbar
se apague antes de começar a passar.
Coloque o ferro na horizontal e
aguarde um pouco antes de usar
novamente a função Jacto de Vapor
(Vertical).
Regule a temperatura para a posição
de vapor (2 a MAX). Coloque o
ferro em posição de descanso e
aguarde que a lâmpada piloto âmbar
se apague antes de começar a passar.
Use a função 'Calc-Clean' mais vezes
(vidé 'Limpeza e manutenção', secção
'Anti-Calcário').
Agite ligeiramente o ferro para
desactivar a função de desligar
automático: a lâmpada deixará de
piscar.
Pressione o bocal de enchimento até
ouvir um clique.
Regule a temperatura para a posição
de vapor (2 a MAX). Coloque o
ferro em posição de descanso e
aguarde que a lâmpada piloto âmbar
se apague antes de começar a passar.
Esvazie o depósito antes de arrumar o
ferro. Regule o vapor para a posição O
e guarde-o na posição de descanso.
Causa(s) provável(eis)
Problema de ligação
Botão da temperatura na posição MIN
Está a tentar encher o depósito com o
ferro na horizontal.
O reservatório não tem água
suficiente.
O controlo do vapor está na posição
O.
A base do ferro não está bem quente
e/ou a função Anti-Pingos (mod.
GC2225 e GC2220) foi activada.
O Jacto (Vertical) de Vapor foi usado
muitas vezes num curto período de
tempo.
A base do ferro não está
suficientemente quente.
A água dura forma depósitos no
interior da base do ferro.
A função de desligar automático foi
activada.Vidé 'Desligar automático'.
O bocal de enchimento não está bem
fechado.
A temperatura seleccionada é muito
baixa.
O ferro foi colocado na posição
horizontal e o depósito ainda tinha
água.
Problema
O ferro está ligado mas a base
continua fria.
Não se consegue encher o depósito
até ao nível máximo.
Não sai vapor
Não sai jacto de vapor (mod. GC2225,
GC2220, GC2215,GC2120, GC2115
e GC2110 ou Jacto de Vapor Vertical
(mod. GC2225,GC2220, GC2215,
GC2120 e GC2115).
Sai calcário e impurezas da base do
ferro durante o trabalho.
A lâmpada piloto encarnada está a
piscar (mod. GC2225).
Caiem pingos de água sobre o tecido
(mod. GC2225,GC2220, GC2215 e
GC2120)
Caiem pingos de água sobre o tecido
(mod. GC2215,GC2120, GC2115,
GC2110 e GC2105)
Saiem pingos de água da base do ferro
depois de o arrumar ou de ter
arrefecido.
Resolução de problemas
Este capítulo resume os problemas mais comuns que poderá encontrar. Por favor, leia os diferentes
capítulos para ter mais informações. Se não conseguir resolver o problema,queira dirigir-se ao
Centro de Informação ao Consumidor Philips do seu país.
PORTUGUÊS

31

u
4239 000 53562
www.philips.com
 Loading...