

Steam Iron
GC2650, GC2640, GC2620,
GC2560, GC2530, GC2520, GC2510
2 3 4 5
6 7 8 9
10 11 12 13
14 15 16 17
L J
A D F GECB
I
H
K
ENGLISH
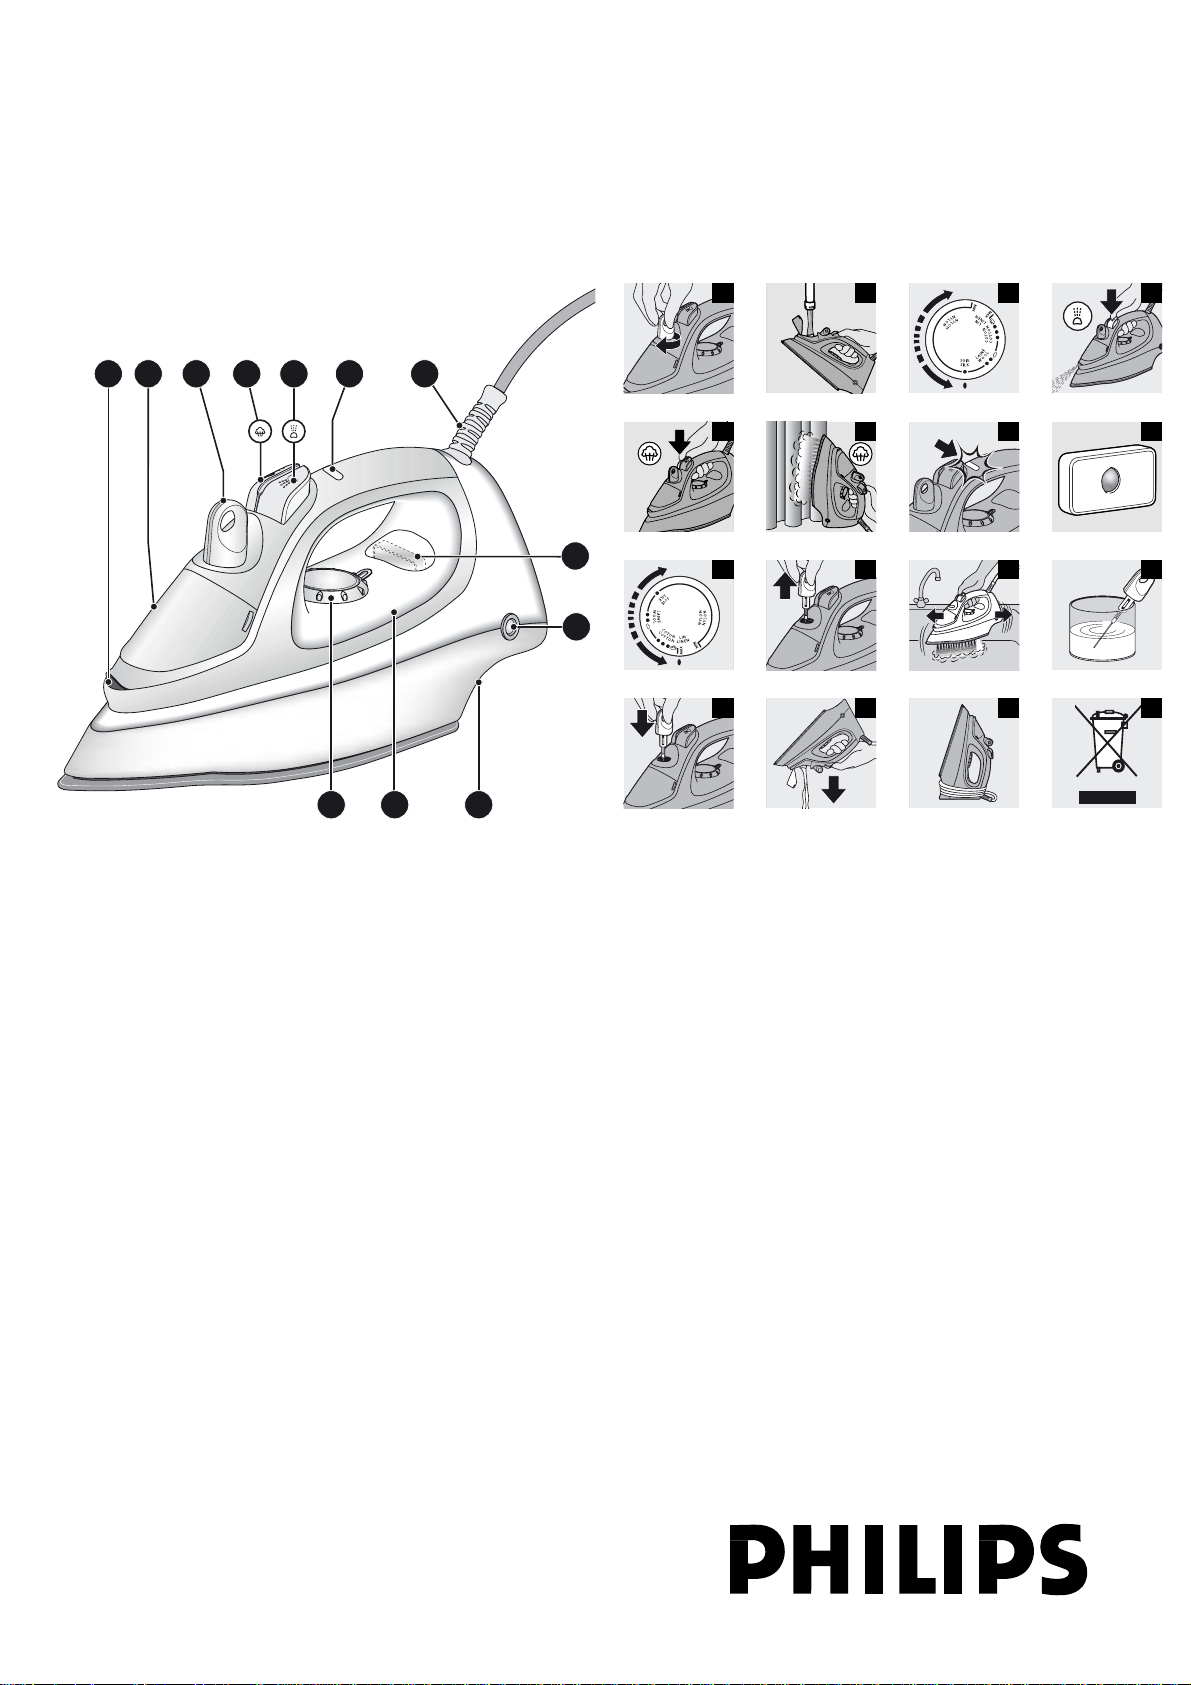
General description (fig. 1)
.
A Spray nozzle
B Cap of filling opening
C Steam control
- O = no steam
- l = minimum steam
- ; = maximum steam
- 1 = Calc-Clean function
D Shot-of-steam button
E Spray button T
F Automatic shut-off light (GC2560 only)
G Mains cord
H Anti-Calc tablet
I Temperature light
J Type plate
K Water tank
L Temperature dial
Important
.
Read these instructions for use carefully before using the appliance and save them for
future reference.
◗ Check if the voltage indicated on the type plate corresponds to the local
mains voltage before you connect the appliance.
◗ Only connect the appliance to an earthed wall socket.
◗ Do not use the appliance if the plug, the cord or the appliance itself shows
visible damage, or if the appliance has been dropped or is leaking.
◗ Check the cord regularly for possible damage.
◗ If the mains cord is damaged, it must be replaced by Philips, a service centre
authorised by Philips or similarly qualified persons in order to avoid a hazard.
◗ Never leave the appliance unattended when it is connected to the mains.
◗ Never immerse the iron and the stand, if provided, in water.
◗ Keep the appliance out of the reach of children.
◗ The soleplate of the iron can become extremely hot and may cause burns if
touched.
◗ Do not allow the cord to come into contact with the soleplate when it is hot.
◗ When you have finished ironing, when you clean the appliance, when you fill
or empty the water tank and also when you leave the iron even for a short
while: set the steam control to position O, put the iron on its heel and
remove the mains plug from the wall socket.
◗ Always place and use the iron and the stand, if provided, on a stable, level and
horizontal surface.
◗ This appliance is intended for household use only.
Preparing for use
.
Filling the water tank
1 Remove the mains plug from the wall socket.
2 Set the steam control to position O (= no steam) (fig. 2).
3 Open the cap of the filling opening.
4 Tilt the iron and fill the water tank up to maximum level (fig. 3).
If the tap water in your area is very hard, we advise you to use distilled water.
Do not use chemically descaled water.
Do not fill the water tank beyond the MAX indication.
Do not put perfume, vinegar, starch, descaling agents, ironing aids or other
chemicals in the water tank.
5 Close the cap of the filling opening ('click').
Setting the temperature
◗ The iron may give off some smoke when you use it for the first time. This will
cease after a short while.
1 Put the iron on its heel and set the temperature dial to the required ironing
temperature by turning it to the appropriate position (fig. 4).
- Check the laundry care label for the required ironing temperature.
- 1 Synthetic fabrics (e.g. acrylic, viscose, polyamide, polyester)
- 1 Silk
- 2 Wool
- 3 Cotton, linen
- If you do not know what kind or kinds of fabric an article is made of, determine
the right ironing temperature by ironing a part that will not be visible when you
wear or use the article.
- Silk, woollen and synthetic materials: iron the reverse side of the fabric to
prevent shiny patches. Avoid using the spray function to prevent stains.
2 Put the mains plug in an earthed wall socket.
3 When the temperature light has gone out, wait a while before you start
ironing.
B
The temperature light will go on from time to time during ironing.
Using the appliance
.
Steam ironing
Make sure that there is enough water in the water tank.
1 Set the temperature dial to the recommended position (see section 'Setting
the temperature').
2 Set the steam control to the appropriate steam position (fig. 2).
- Á for minimum steam (temperature settings 2 and 3).
- È for maximum steam (temperature settings 3 to MAX).
B
The iron will start steaming as soon as the set temperature has been reached.
GC2640/GC2620/GC2530/GC2520/GC2510 only:
Water may leak from the soleplate if the set temperature is too low (MIN to 2).
Ironing without steam
1 Set the steam control to position O (= no steam).
2 Set the temperature dial to the recommended position (see section 'Setting
the temperature').
Features
.
Spray function
You can use the spray function to remove stubborn creases at any temperature
1 Make sure that there is enough water in the water tank.
2 Press the spray button several times to moisten the article to be ironed (fig. 5).
Shot of steam
A powerful shot of steam helps to remove very stubborn creases.
The shot-of-steam function only works at temperature settings between 2 and MAX.
1 Press and release the shot-of-steam button (fig. 6).
Vertical shot of steam (GC2650/2640/2620/2560/2530/2520)
1 The shot-of-steam function can also be used when you are holding
the iron in vertical position. This is useful for removing creases from
hanging clothes, curtains, etc (fig. 7).
Never direct the steam at people.
Drip stop (GC2650/GC2560 only)
This iron is equipped with a drip stop function: the iron automatically stops producing
steam when the temperature is too low to prevent water from dripping out of the
soleplate. When this happens you will hear a click.
Automatic shut-off (GC2560 only)
The electronic shut-off function automatically switches the heating element off if the
iron has not been moved for a while.
◗ The automatic shut-off light starts blinking to indicate that the heating element
has been switched off (fig. 8).
To let the iron heat up again, pick the iron up or move it slightly. The automatic shutoff light goes out.
1 If the temperature light goes on, wait for it to go out before you start ironing.
2 If the temperature light does not go on, the iron is ready for use.
Cleaning and maintenance
.
Double-Active Calc System
◗ The Anti-Calc tablet prevents scale from clogging the steam vents. The tablet
is constantly active and does not need to be replaced (fig. 9).
◗ The Calc-Clean function removes the scale particles.
Calc-Clean function
Use the Calc-Clean function once every two weeks. If the water in your area is very
hard (i.e. when flakes come out of the soleplate during ironing), the Calc-Clean
function should be used more frequently.
1 Set the steam control to position O.
2 Fill the water tank to the maximum level.
Do not pour vinegar or other descaling agents into the water tank..
3 Set the temperature dial to MAX (fig. 10).
4239 000 61482
2/13
4 Put the plug in the wall socket.
5 Unplug the iron when the temperature light has gone out.
6 Hold the iron over the sink and set the steam control to the Calc-Clean
position (1). The steam control will spring up slightly.
7 Pull the steam control upwards and remove it (fig. 11).
8 Hold the iron over the sink and move it to and fro (fig. 12).
B
Steam and boiling water will come out of the soleplate. Impurities and scale (if any)
will be flushed out.
9 Use vinegar to remove scale, if any, from the steam control needle (fig. 13).
Do not bend or damage the steam control needle.
10 Put the steam control back into the iron by inserting the point of the needle
exactly in the centre of the hole and by fitting the small projection on the side
of the needle into the slot. Press down the steam control while turning it to
position O (fig. 14).
11 Repeat the Calc-Clean process if the iron still contains a lot of impurities.
After the Calc-Clean process
1 Put the plug in the wall socket and let the iron heat up to allow the soleplate
to dry.
2 Unplug the iron when the temperature light has gone out.
3 Move the iron gently over a piece of used cloth to remove any water stains
that may have formed on the soleplate.
Storage
.
1 Set the steam control to position O, remove the plug from the wall socket
and let the iron cool down.
2 Clean the appliance and wipe scale and any other deposits off the soleplate
with a damp cloth and a non-abrasive (liquid) cleaner.
Keep the soleplate smooth: avoid hard contact with metal objects.
Never use a scouring pad, vinegar or other chemicals.
3 Regurarly rinse the water tank with water and empty it after cleaning (fig. 15).
4 Wind the mains cord round the cord storage facility (fig. 16).
5 Always store the iron standing on its heel in a safe and dry place.
Environment
.
◗ Do not throw the appliance away with the normal household waste at the end
of its life, but hand it in at an official collection point for recycling. By doing
this you will help to preserve the environment (fig. 17).
Guarantee & service
.
If you need information or if you have a problem, please visit the Philips website at
www.philips.com or contact the Philips Customer Care Centre in your country (you
will find its phone number in the worldwide guarantee leaflet). If there is no
Customer Care Centre in your country, turn to your local Philips dealer or contact
the Service Department of Philips Domestic Appliances and Personal Care BV.
Troubleshooting
This chapter summarises the most common problems you could encounter with
your iron. If you are unable to solve the problem, please contact the Philips
Customer Care Centre in your country.
4239 000 61482
3/13

Solution
Check the mains cord, the
plug and the wall socket.
Set the temperature dial
to the required position.
Fill the water tank (see
chapter 'Preparing for use',
section 'Filling the water
tank').
Set the steam position to
Á or È (see chapter
'Using the appliance',
section 'Steam ironing').
Set the temperature dial
to a position in the steam
area (2 to MAX). Put
the iron on its heel and
wait until the temperature
light has gone out before
you start ironing.
Continue ironing in
horizontal position and
wait a while before using
the shot-of-steam function
again.
Set the temperature dial
to a position in the steam
area (2 to MAX). Put
the iron on its heel and
wait until the temperature
light has gone out before
you start ironing.
Use the Calc-Clean
function a few times (see
chapter 'Cleaning and
maintenance', section
'Calc-Clean function').
Pick the iron up or move it
slightly to deactivate the
automatic shut-off
function. The red light
stops blinking.
Press onto the cap until
you hear a click.
Set the temperature dial
to a position in the steam
area (2 to MAX). Put
the iron on its heel and
wait until the temperature
light has gone out before
you start ironing.
Empty the water tank and
set the steam control to
position O after use. Store
the iron on its heel.
Possible cause
There is a connection
problem.
The temperature dial has
been set to MIN.
There is not enough water
in the water tank.
The steam control has
been set to position O.
The soleplate is not hot
enough and/or the drip
stop function (specific
types only) has been
activated.
The shot-of-steam
function has been used
too often within a very
short period.
The soleplate is not hot
enough.
Hard water forms flakes
inside the soleplate.
The automatic shut-off
function has been
activated (see chapter
'Features', section
'Automatic shut-off').
The cap of the filling
opening has not been
closed properly.
(GC2640/GC2620/
GC2530/GC2520
/GC2510 only).The set
temperature is too low for
steam ironing.
The iron has been put in
horizontal position while
there was still water in the
water tank.
Problem
The iron is plugged in but
the soleplate is cold.
No steam.
No shot of steam or no
vertical shot of steam
(specific types only).
Flakes and impurities come
out of the soleplate during
ironing.
The red light blinks
(GC2560 only).
There are water droplets
on the fabric.
There are water droplets
on the fabric.
Water drips out of the
soleplate after the iron has
cooled down or has been
stored.
4239 000 61482
4/13

FRANÇAIS
Description générale (fig. 1)
.
A Spray
B Bouchon de l'orifice de remplissage
C Commande de vapeur
- O = pas de vapeur
- l = vapeur minimale
- ; = vapeur maximale
- 1 = fonction Calc-Clean (anti-calcaire)
D Bouton jet de vapeur
E Bouton spray T
F Voyant d'arrêt automatique (GC2560 uniquement)
G Cordon d'alimentation
H Tablette anti-calcaire
I Voyant de température
J Plaque signalétique
K Réservoir d'eau
L Thermostat
Important
.
Avant d'utiliser l'appareil, lisez les instructions ci-dessous et conservez ce mode
d'emploi pour un usage ultérieur.
◗ Vérifiez que la tension indiquée sur la plaque signalétique correspond bien à la
tension secteur locale avant de brancher l'appareil.
◗ Branchez l'appareil uniquement sur une prise murale mise à la terre.
◗ N'utilisez pas le fer à repasser si la fiche, le câble, le cordon d'alimentation ou
l'appareil lui-même est endommagé, ou si le fer est tombé et/ou si de l'eau
s'écoule de l'appareil.
◗ Vérifiez régulièrement l'état du cordon d'alimentation.
◗ Si le cordon d'alimentation est endommagé, il doit être remplacé par Philips
ou un Centre Service Agréé afin d'éviter tout accident.
◗ Ne laissez jamais le fer à repasser sans surveillance pendant qu'il est branché.
◗ Ne plongez jamais le fer à repasser ni son support (s'il est fourni) dans l'eau.
◗ Tenez l'appareil hors de portée des enfants.
◗ La semelle du fer à repasser peut devenir très chaude et peut par conséquent
provoquer des brûlures si vous la touchez.
◗ Évitez le contact du cordon d'alimentation avec la semelle lorsqu'elle est
chaude.
◗ Lorsque vous avez fini de repasser, pendant que vous nettoyez l'appareil, que
vous remplissez ou videz le réservoir d'eau, ou même si vous laissez le fer
sans surveillance pendant un bref instant, réglez la commande de vapeur sur la
position O, placez le fer à repasser sur le talon et débranchez-le du secteur.
◗ Placez toujours le fer à repasser et son support, s'il est fourni, sur une surface
stable, plane et nivelée.
◗ Cet appareil est destiné à un usage domestique uniquement.
Avant utilisation
.
Remplissage du réservoir
1 Retirez le cordon d'alimentation de la prise secteur.
2 Réglez la commande de vapeur sur la position O (pas de vapeur) (fig. 2).
3 Ouvrez le bouchon de l'orifice de remplissage.
4 Inclinez le fer en arrière et remplissez le réservoir d'eau jusqu'au niveau
maximal (fig. 3).
Si l'eau du robinet de votre région est très calcaire, il est conseillé d'utiliser de
l'eau
déminéralisée. N'utilisez pas de produits détartrants.
Ne remplissez pas le réservoir au-delà de l'indication MAX.
Ne mettez pas de parfum, de vinaigre, d'amidon, de détartrants ou d'autres agents
chimiques dans le réservoir d'eau.
5 Fermez le bouchon de l'orifice de remplissage (clic).
Réglage de la température
◗ Le fer peut fumer légèrement lors de la première utilisation. Ce phénomène
est normal et cesse après un bref instant.
1 Posez le fer à repasser sur son talon et réglez la température de repassage
recommandée en tournant le thermostat sur la position adéquate (fig. 4).
- Consultez l'étiquette de lavage pour vérifier la température de repassage
recommandée :
- 1 Fibres synthétiques (par ex. acrylique, viscose, polyamide, polyester)
- 1 Soie
- 2 Laine
- 3 Coton, lin
- Si vous ne connaissez pas la composition du tissu, repassez en commençant par
la température la plus basse sur une partie interne de l'article et invisible de
l'extérieur.
- Soie, laine et autres fibres synthétiques : repassez sur l'envers pour éviter de les
lustrer. Évitez d'utiliser la fonction Spray au risque de faire des taches.
2 Branchez le cordon d'alimentation sur une prise secteur.
3 Une fois le voyant de température éteint, patientez un court instant avant de
commencer à repasser.
B
Le voyant de température s'allume de temps en temps pendant le repassage.
Utilisation de l'appareil
.
Repassage à la vapeur
Assurez-vous qu'il y a suffisamment d'eau dans le réservoir.
1 Réglez le thermostat sur la température recommandée (voir la section
Réglage de la température).
2 Réglez la commande de vapeur sur la position adéquate (fig. 2).
- Á pour une vapeur minimale (réglages de température 2 et 3).
- È pour une vapeur maximale (réglages de température 3). à MAX).
B
Le fer commence à dégager de la vapeur dès que la température réglée est atteinte.
GC2640/GC2620/GC2530/GC2520/GC2510 uniquement :
De l'eau peut s'écouler de la semelle si la température sélectionnée est trop basse
(MIN à 2).
Repassage sans vapeur
1 Réglez la commande de vapeur sur la position O (= pas de vapeur).
2 Réglez le thermostat sur la température recommandée (voir la section «
Réglage de la température »).
Caractéristiques
.
Fonction Spray
Vous pouvez utiliser la fonction Spray pour enlever les faux plis difficiles à éliminer.
1 Assurez-vous qu'il y a suffisamment d'eau dans le réservoir.
2 Appuyez à plusieurs reprises sur le bouton du spray afin d'humidifier l'article à
repasser (fig. 5).
Jet de vapeur
Un jet de vapeur puissant est utile pour enlever les faux plis les plus tenaces.
La fonction Jet de vapeur peut être utilisée uniquement à des températures situées
entre 2 et MAX.
1 Appuyez sur le bouton de jet de vapeur, puis relâchez-le (fig. 6).
Jet de vapeur vertical (GC2650/2640/2620/2560/2530/2520)
1 Vous pouvez également utiliser la fonction Jet de vapeur lorsque vous tenez le
fer en position verticale. Cela peut s'avérer utile pour enlever les faux plis des
vêtements rangés sur un cintre, des rideaux, etc (fig. 7).
Ne dirigez en aucun cas le jet de vapeur sur des personnes.
Système anti-goutte (GC2650/GC2560 uniquement)
Ce fer à repasser est doté d'un système anti-goutte : en cas de température trop
basse, la production de vapeur est interrompue afin d'éviter tout écoulement d'eau
de la semelle. Le cas échéant, vous entendez un clic.
Arrêt automatique (GC2560 uniquement)
Cette fonction éteint automatiquement l'élément chauffant si le fer reste immobile
pendant un certain temps.
4239 000 61482
5/13

◗ Le voyant d'arrêt automatique se met à clignoter pour indiquer que l'élément
chauffant est éteint (fig. 8).
Pour que le fer se réchauffe, prenez-le en main ou déplacez-le légèrement. Le voyant
d'arrêt automatique s'éteint.
1 Si le voyant de température s'allume, attendez qu'il s'éteigne avant de
commencer à repasser.
2 S'il reste éteint, vous pouvez commencer le repassage.
Nettoyage et entretien
.
Système anti-calcaire double action
◗ La tablette anti-calcaire empêche l'accumulation de dépôts sur les évents à
vapeur. Elle agit de manière permanente et ne doit pas être remplacée (fig. 9).
◗ La fonction Calc-Clean permet d'éliminer les particules de calcaire.
Fonction Calc-Clean (anti-calcaire)
Utilisez la fonction Calc-Clean toutes les deux semaines. Si l'eau de votre région est
très calcaire (par exemple si des particules de calcaire s'écoulent de la semelle
pendant le repassage), n'hésitez pas à utiliser cette fonction plus souvent.
1 Réglez la commande de vapeur sur la position O.
2 Remplissez le réservoir d'eau jusqu'au niveau maximal.
Ne versez pas de vinaigre ou d'autres détartrants dans le réservoir d'eau.
3 Réglez le thermostat sur la position MAX (fig. 10).
4 Branchez le cordon d'alimentation sur la prise secteur.
5 Lorsque le voyant de température s'éteint, débranchez l'appareil.
6 Tenez le fer au-dessus de l'évier et réglez la commande de vapeur sur la
position Calc-Clean (1). La commande de vapeur se soulève légèrement.
7 Retirez la commande de vapeur en la soulevant (fig. 11).
8 Tenez le fer au-dessus de l'évier et secouez-le (fig. 12).
B
De la vapeur et de l'eau bouillante sortent de la semelle. Les impuretés et dépôts
sont évacués en même temps.
9 Utilisez un peu de vinaigre pour enlever les particules de calcaire de la tige de
la commande de vapeur, si nécessaire (fig. 13).
Veillez à ne pas courber ni endommager la tige de la commande de vapeur.
10 Placez avec précision la pointe de la tige au centre de l'orifice et insérez-la
correctement dans son emplacement. Appuyez sur la commande de vapeur en
la réglant sur la position O (fig. 14).
11 Répétez cette opération aussi souvent que nécessaire.
Après le traitement anti-calcaire
1 Branchez le cordon d'alimentation sur la prise secteur et réchauffez le fer afin
de sécher la semelle.
2 Lorsque le voyant de température s'éteint, débranchez l'appareil.
3 Repassez un morceau de tissu afin d'éliminer les dernières gouttes d'eau qui se
sont formées sur la semelle, le cas échéant.
Rangement
.
1 Réglez la commande de vapeur sur la position O, retirez la fiche de la prise
murale et laissez refroidir le fer à repasser.
2 Nettoyez l'appareil et ôtez les particules de calcaire et autres impuretés de la
semelle à l'aide d'un chiffon humide et d'un détergent (liquide) non abrasif.
Évitez le contact de la semelle avec tout objet métallique afin de ne pas
l'endommager.
N'utilisez jamais de tampons à récurer, vinaigre ou autres produits chimiques.
3 Rincez régulièrement le réservoir d'eau avec de l'eau et videz-le après
nettoyage (fig. 15).
4 Enroulez le cordon d'alimentation sur le talon (fig. 16).
5 Posez toujours le fer sur son talon et placez-le dans un endroit sûr et sec.
Environnement
.
◗ Lorsqu'il ne fonctionnera plus, ne jetez pas l'appareil avec les ordures
ménagères mais déposez-le à un endroit assigné à cet effet, où il pourra être
recyclé. Vous contribuerez ainsi à la protection de l'environnement (fig. 17).
Garantie et service
.
Si vous souhaitez obtenir des informations supplémentaires ou si vous rencontrez un
problème, visitez le site Web de Philips à l'adresse www.philips.com ou contactez le
Service Consommateurs Philips de votre pays (vous trouverez le numéro de
téléphone correspondant sur le dépliant de garantie internationale). S'il n'existe pas
de Service Consommateurs Philips dans votre pays, renseignez-vous auprès de votre
revendeur local ou contactez le Service Department of Philips Domestic Appliances
and Personal Care BV.
Dépannage
Cette rubrique présente les problèmes les plus courants que vous pouvez rencontrer
avec votre fer à repasser. Si vous n'arrivez pas à résoudre le problème, veuillez
contacter le Service Consommateurs Philips de votre pays.
4239 000 61482
6/13

Solution
Vérifiez le cordon
d'alimentation, la fiche et
la prise secteur.
Réglez le thermostat sur la
température requise.
Remplissez le réservoir
d'eau (voir le chapitre
Avant utilisation, section
Remplissage du réservoir
d'eau).
Réglez la commande de
vapeur sur la position Á
ou È (voir le chapitre
Utilisation de l'appareil,
section Repassage à la
vapeur).
Cause possible
Il s'agit d'un problème de
branchement.
Le thermostat a été réglé
sur MIN.
Il n'y a pas assez d'eau
dans le réservoir d'eau.
La commande de vapeur a
été réglée sur la position
O.
Problème
Le fer à repasser est
branché, mais la semelle
est froide.
Pas de vapeur.
Solution
Continuez à utiliser le fer
en position horizontale et
attendez quelque temps
avant d'utiliser de nouveau
la fonction Jet de vapeur.
Sélectionnez une
température de repassage
appropriée pour le
repassage à la vapeur (2
à MAX). Placez le fer sur
son talon et attendez que
le voyant de température
s'éteigne avant de
commencer le repassage.
Utilisez quelques fois la
fonction Calc-Clean (voir
le chapitre Nettoyage et
entretien, section Fonction
Calc-Clean).
Prenez le fer en main et
déplacez-le légèrement
pour désactiver la fonction
d'arrêt automatique. Le
voyant rouge ne clignote
plus.
Appuyez sur le bouchon
jusqu'à ce que vous
entendiez un clic.
Sélectionnez une
température de repassage
appropriée pour le
repassage à la vapeur (2
à MAX). Placez le fer sur
son talon et attendez que
le voyant de température
s'éteigne avant de
commencer le repassage.
Videz le réservoir d'eau et
réglez la commande de
vapeur sur la position O
après utilisation. Rangez le
fer en l'ayant
préalablement posé sur
son talon.
Cause possible
La fonction Jet de vapeur
a été utilisée trop souvent.
La semelle n'est pas
suffisamment chaude.
L'eau trop calcaire favorise
la formation de dépôts
calcaires à l'intérieur de la
semelle.
La fonction d'arrêt
automatique a été activée
(voir le chapitre
Caractéristiques, section
Arrêt automatique).
Le bouchon de l'orifice de
remplissage n'a pas été
correctement fermé.
(GC2640/GC2620/GC25
30/GC2520/GC2510
uniquement). La
température sélectionnée
est trop basse pour le
repassage à la vapeur.
Le fer a été mis en
position horizontale alors
que le réservoir d'eau
n'était pas vide.
Problème
Pas de jet de vapeur ou
pas de jet de vapeur
vertical (certains modèles
uniquement).
Des particules de calcaire
et des impuretés
s'écoulent de la semelle
pendant le repassage.
Le voyant rouge clignote
(GC2560 uniquement).
Des gouttes d'eau
tombent sur le tissu.
Des gouttes d'eau
tombent sur le tissu.
De l'eau s'écoule de la
semelle lorsque le fer a
refroidi ou que vous l'avez
rangé.
4239 000 61482
7/13
 Loading...