

GC2225, GC2220, GC2215,
GC2130, GC2115, GC2110, GC2105

2
3
I
F
E
A
B
C
M
J
G
H
D
1
L
K

4
ENGLISH 6
POLSKI 14
ROMÂNĂ 24
РУССКИЙ 34
ČEŠTINA 44
MAGYAR 53
SLOVAK 61
УКРАЇНСЬКА 71
HRVATSKI 81
EESTI 90
LATVIEŠU 98
LIETUVIŠKAI 107
SLOVENŠČINA 115
БЪЛГАРСКИ 124
SRPSKI 134
143
GC2225, GC2220, GC2215,
GC2130, GC2126, GC2125, GC2120, GC2115, GC2110, GC2105

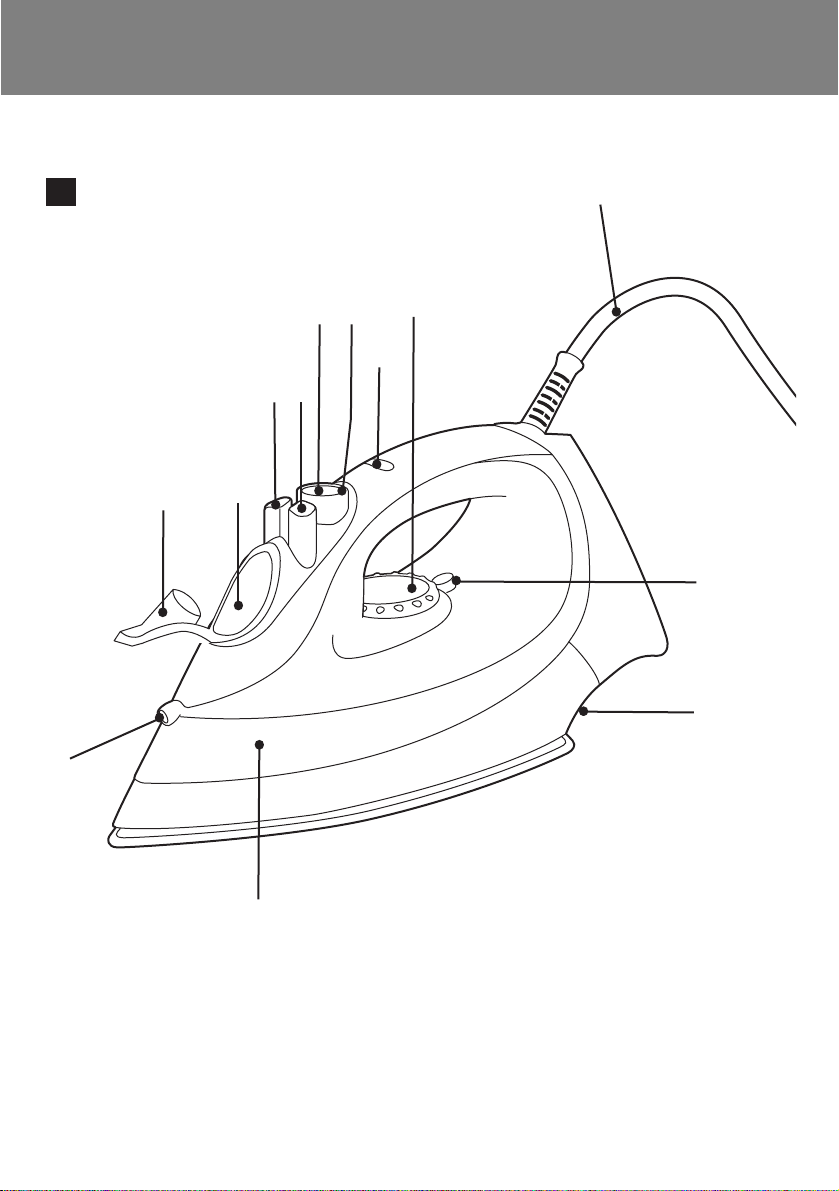
General description (fig. 1)
A Spray nozzle
B Filling cap (GC2225/2220/2215/GC2130/2126/2125/2120 only)
C Filling opening
D Shot-of-steam button 9
(GC2225/2220/2215/GC2130/2126/2125/2120/2115/2110 only)
E Spray button T
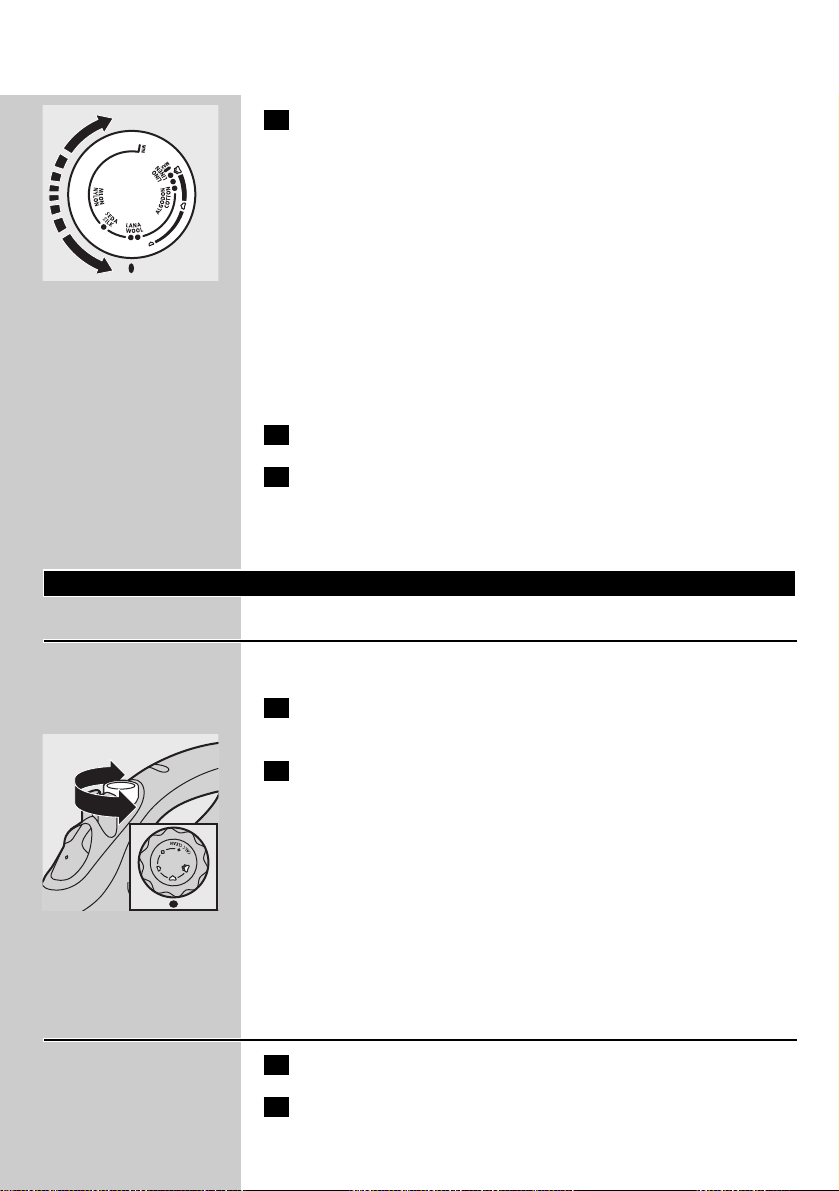
F Steam control
O = no steam
Á = minimum steam
q = moderate steam
(GC2225/2220/2215/GC2130/2126/2125/2120 only)
w = maximum steam
1 = Calc-Clean function
G Extra-steam function (GC2105 only)
H Temperature light (all types) and automatic shut-off light
(GC2225/GC2130 only)
I Temperature dial
J Mains cord
K Temperature indicator
L Type plate
M Water tank
Important
Read these instructions for use carefully before using the appliance and
save them for future reference.
◗ Check if the voltage indicated on the type plate corresponds to
the local mains voltage before you connect the appliance.
◗ Only connect the appliance to an earthed wall socket.
◗ Do not use the appliance if the plug, the cord or the appliance
itself shows visible damage, or if the appliance has been dropped
or is leaking.
◗ Check the cord regularly for possible damage.
◗ If the mains cord is damaged, it must be replaced by Philips, a
service centre authorised by Philips or similarly qualified persons
in order to avoid a hazard.
◗ Never leave the appliance unattended when it is connected to the
mains.
◗ Never immerse the iron and the stand,if provided, in water.
◗ Keep the appliance out of the reach of children.
◗ The soleplate of the iron can become extremely hot and may
cause burns if touched.
◗ Do not allow the cord to come into contact with the soleplate
when it is hot.
◗ When you have finished ironing, when you clean the appliance,
when you fill or empty the water tank and also when you leave the
iron even for a short while:set the steam control to position O,
ENGLISH6
put the iron on its heel and remove the mains plug from the wall
socket.
◗ Always place and use the iron and the stand, if provided, on a
stable, level and horizontal surface.
◗ Do not put perfume, vinegar, starch, descaling agents, ironing aids
or other chemicals in the water tank.
◗ This appliance is intended for household use only.
Before first use
C
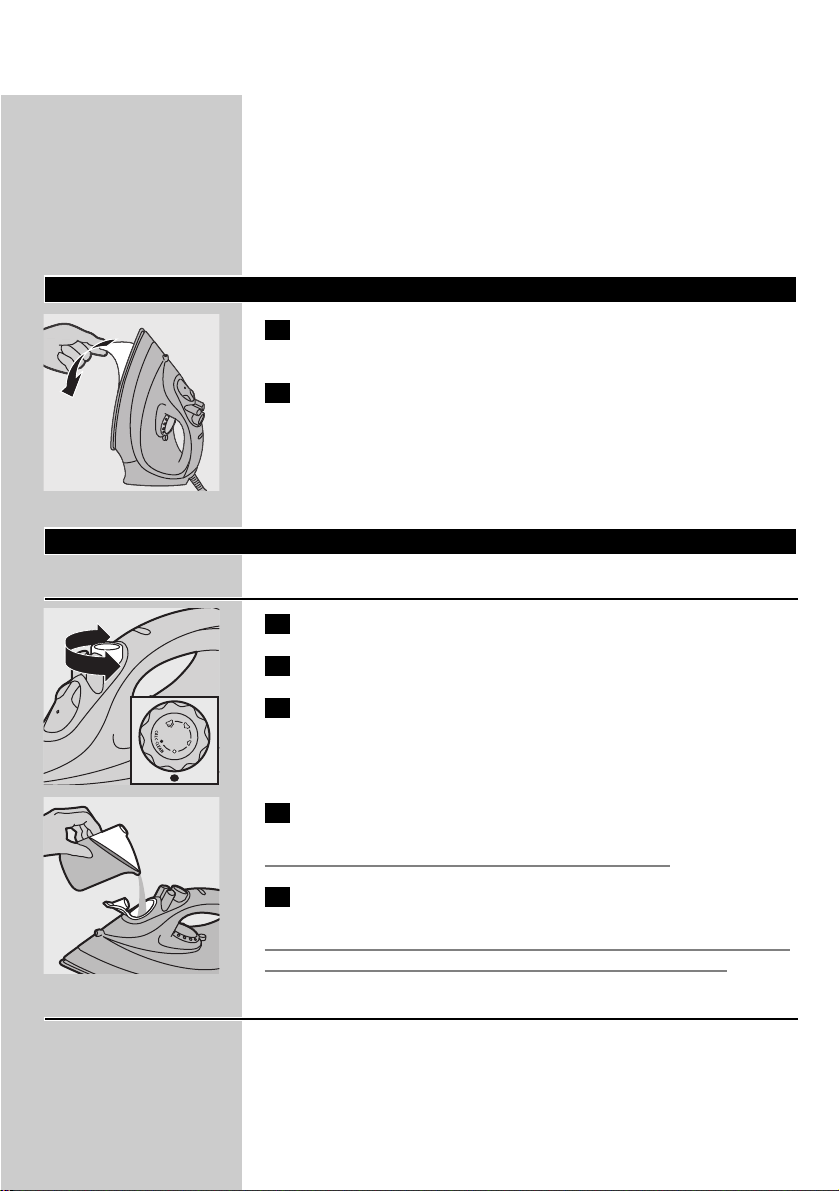
1 Remove any sticker or protective foil from the soleplate.Also
remove the storage cover, if provided.
2 Let the iron heat up to maximum temperature and pass the
iron over a piece of damp cloth for several minutes to remove
any residues from the soleplate.
The iron may give off some smoke when you use it for the first time.
This will cease after a short while.
Preparing for use
Filling the water tank
1 Remove the mains plug from the wall socket.
C
2 Set the steam control to position O (= no steam).
3 Open the filling cap (specific types only).
C
4 Tilt the iron and fill the water tank up to maximum level.
Do not fill the water tank beyond the MAX indication.
5 Close the filling cap (click!) (specific types only).
If the tap water in your area is very hard, we advise you to use distilled
water. Do not use vinegar, starch or chemically descaled water.
Setting the temperature
◗ The iron may give off some smoke when you use it for the first
time.This will cease after a short while.
ENGLISH 7
C
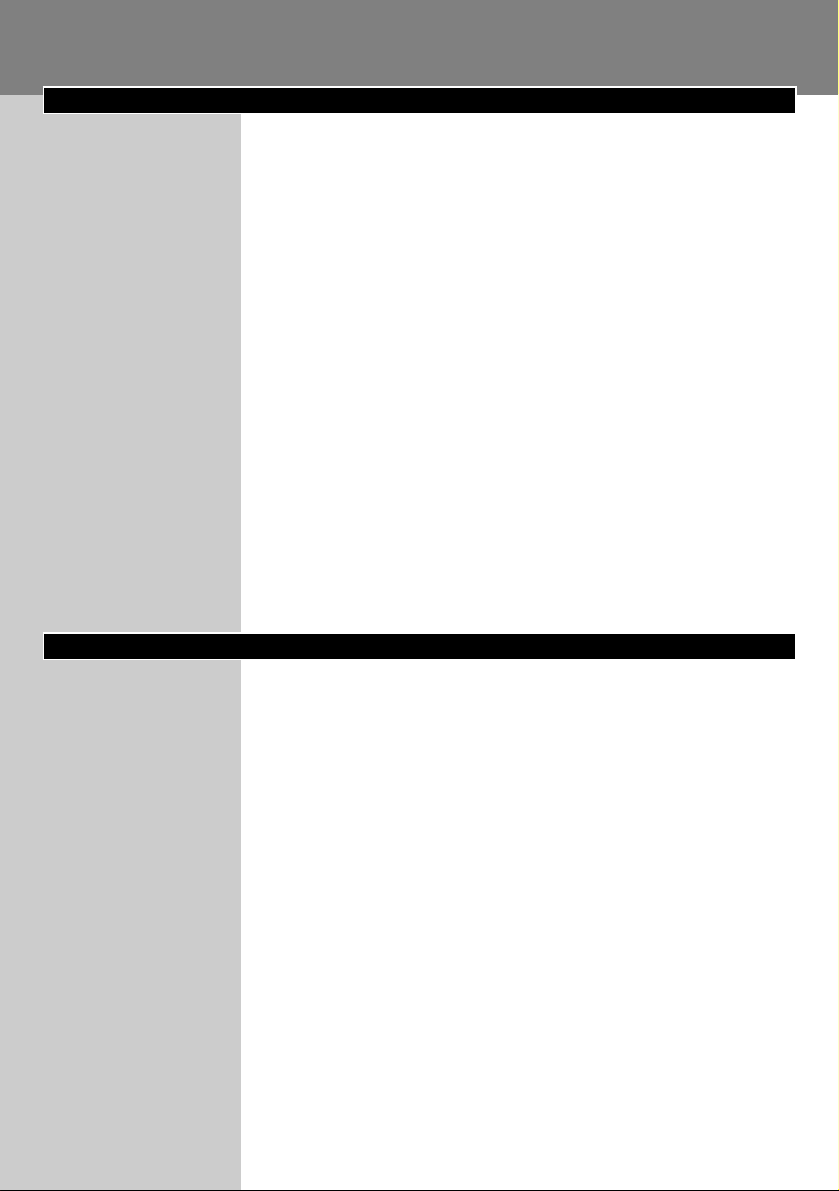
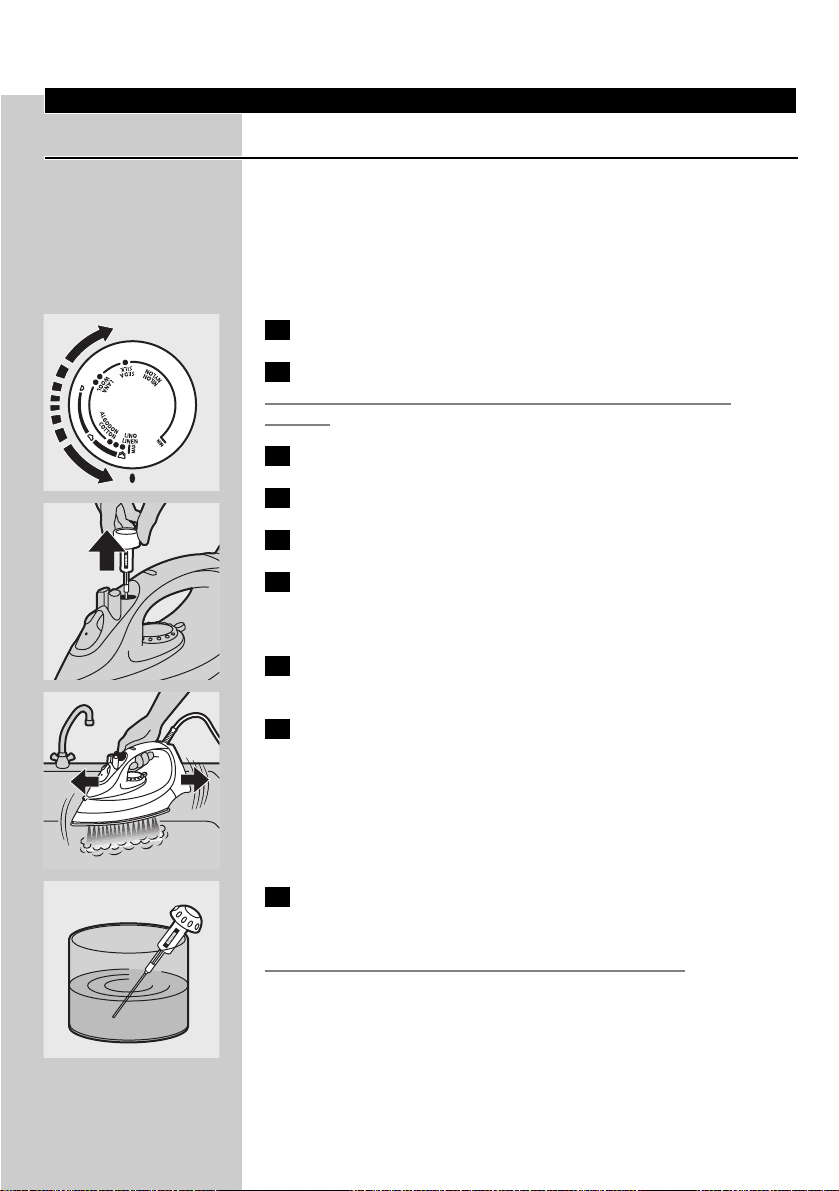
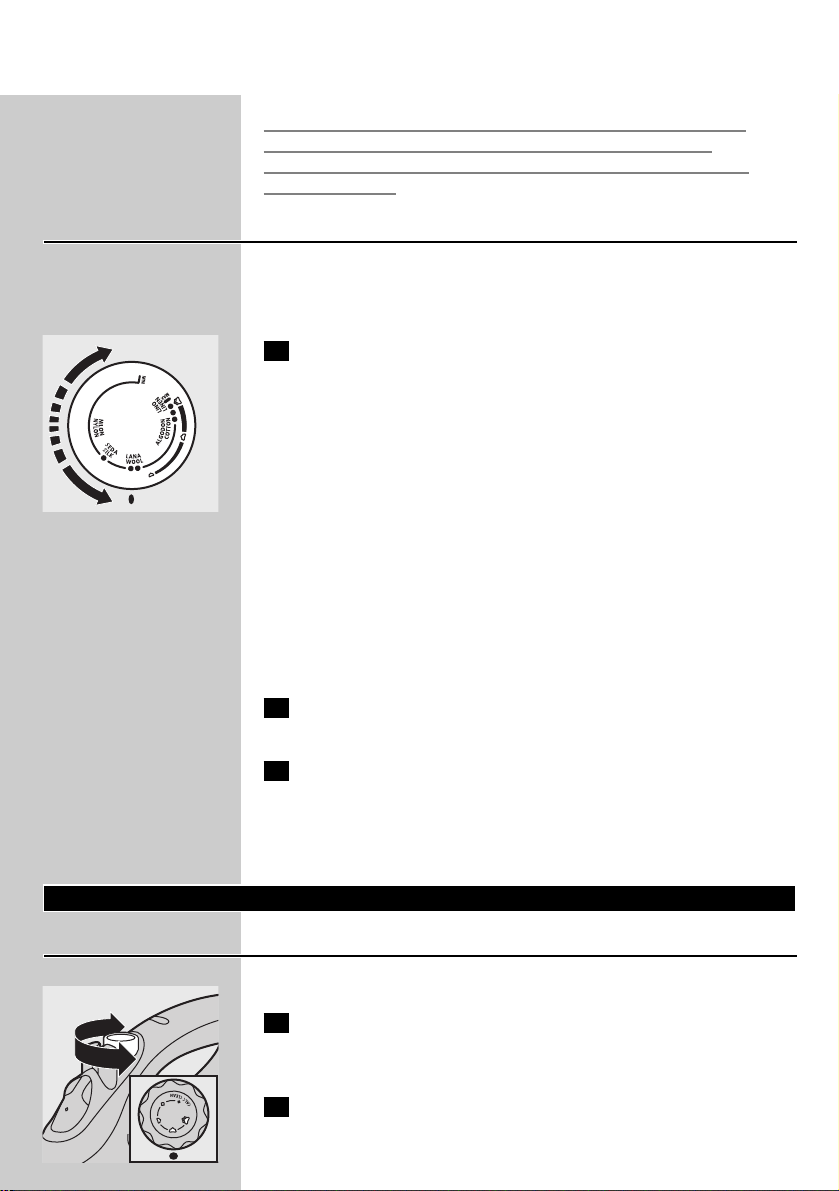
1 Put the iron on its heel and set the temperature dial to the
required ironing temperature by turning it to the appropriate
position.
- Check the garment label for the required ironing temperature.
- 1 Synthetic fabrics (e.g. acrylic, viscose, polyamide, polyester)
- 1 Silk
- 2 Wool
- 3 Cotton, linen
- If you do not know what kind or kinds of fabric an article is made of,
determine the right ironing temperature by ironing a part that will
not be visible when you wear or use the article.
- Silk, woollen and synthetic materials: iron the reverse side of the
fabric to prevent shiny patches. Avoid using the spray function to
prevent stains.
2 Put the mains plug in an earthed wall socket.
3 When the temperature light has gone out, wait a while before
you start ironing.
B
The temperature light will go on from time to time during ironing.
Using the appliance
Steam ironing
Make sure that there is enough water in the water tank.
1 Set the temperature dial to the recommended position.
See 'Setting the temperature'.
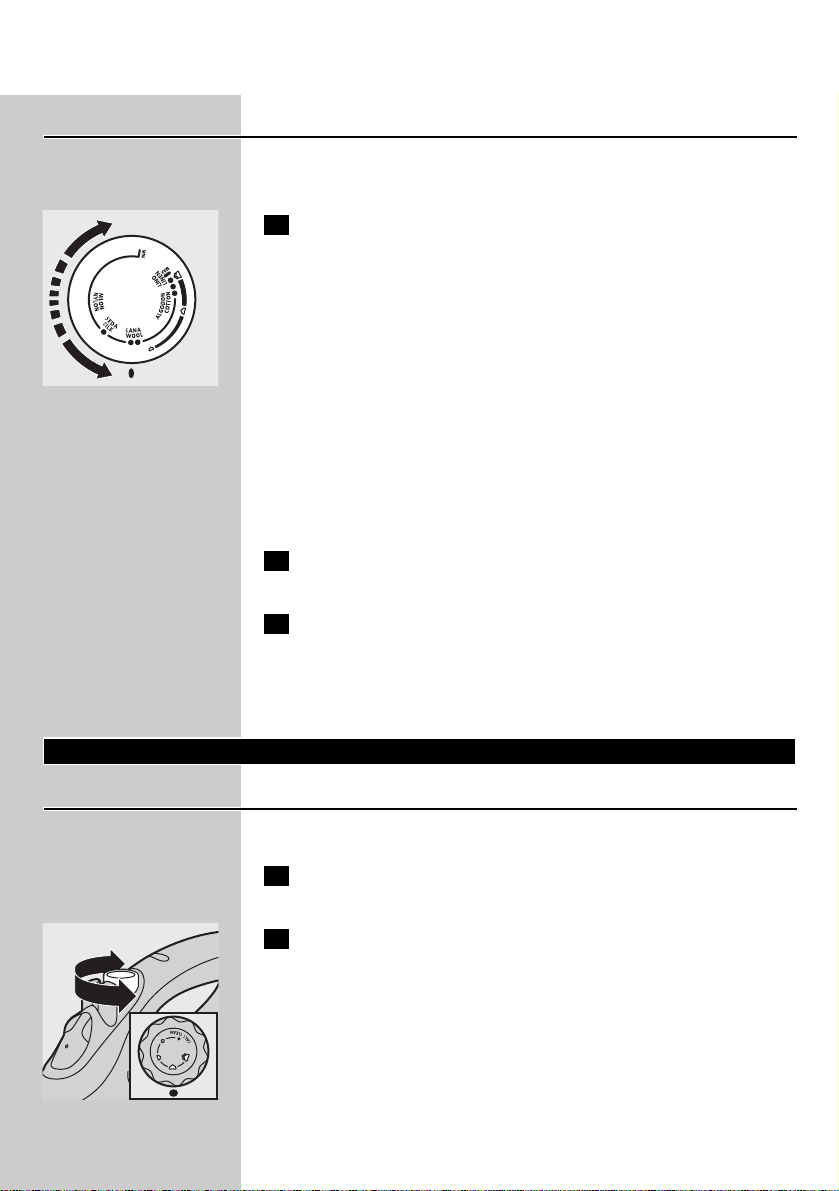
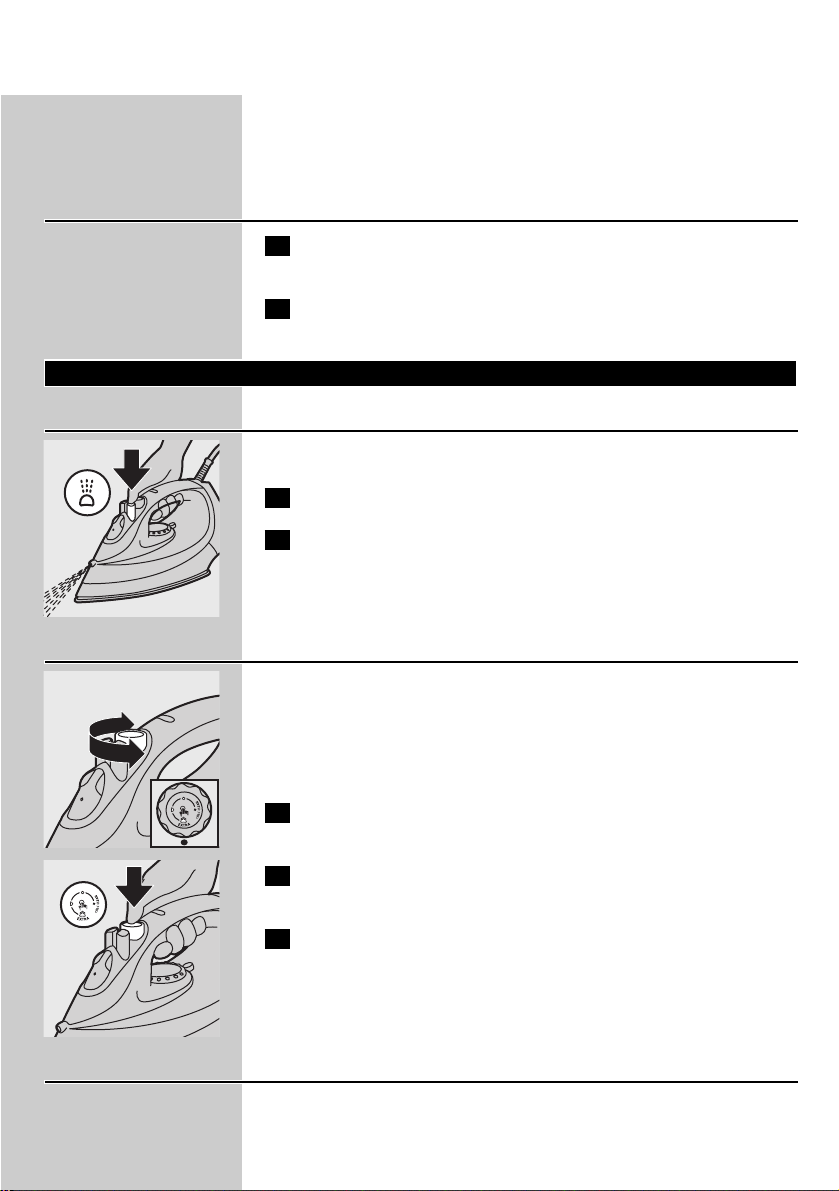
C
2 Set the steam control to the appropriate steam position.
- Á for minimum steam (temperature settings 2 and 3).
- Ë for moderate steam (temperature settings 3 to MAX)
(specific types only).
- È for maximum steam (temperature settings 3 to MAX).
B
Steaming will start as soon as the set temperature has been reached.
GC2215/2120/2115/2110/2105 only:
Water may leak from the soleplate if the set temperature is too low
(MIN to 2).
Ironing without steam
1 Set the steam control to position O (= no steam).
2 Set the temperature dial to the recommended position.
See 'Setting the temperature'.
ENGLISH8

Features
Spraying
To remove stubborn creases at any temperature
1 Make sure that there is enough water in the water tank.
C
2 Press the spray button several times to moisten the garment to
be ironed.
Extra Steam (specific types only)
This function provides extra steam to remove really stubborn creases.
The Extra Steam function only works at temperature settings between
3 and MAX.
C
1 Set the steam control to maximum position È.
C
2 Press and hold the Steam Control button down for max.5
seconds.
3 Wait at least 1 minute before using Extra Steam again to
prevent water from dripping out of the soleplate.
Shot of Steam (specific types only)
A powerful shot of steam helps to remove very stubborn creases.
The Shot-of-Steam function only works at temperature settings
between 2 and MAX.
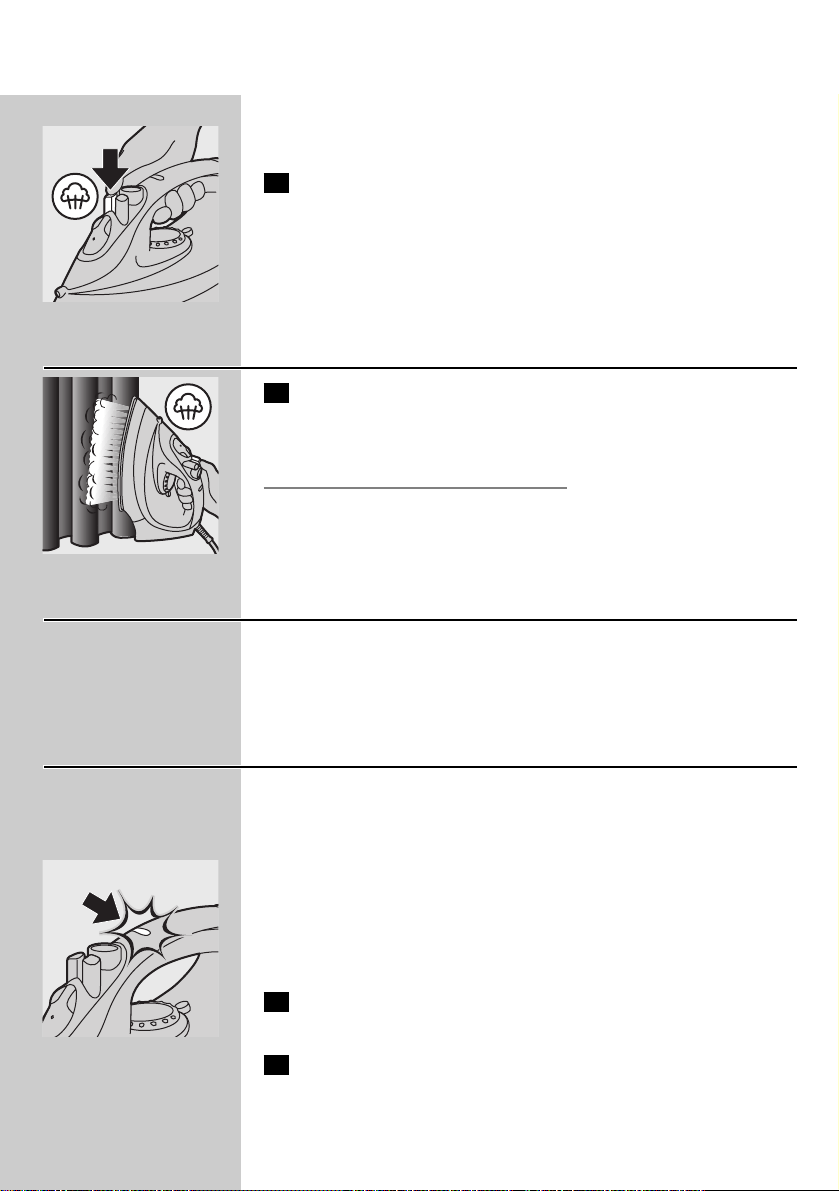
C
1 Press and release the Shot-of-Steam button.
ENGLISH 9
Vertical Shot of Steam
(GC2225/2220/2215/2130/2126/2125/2120/2115 only)
C
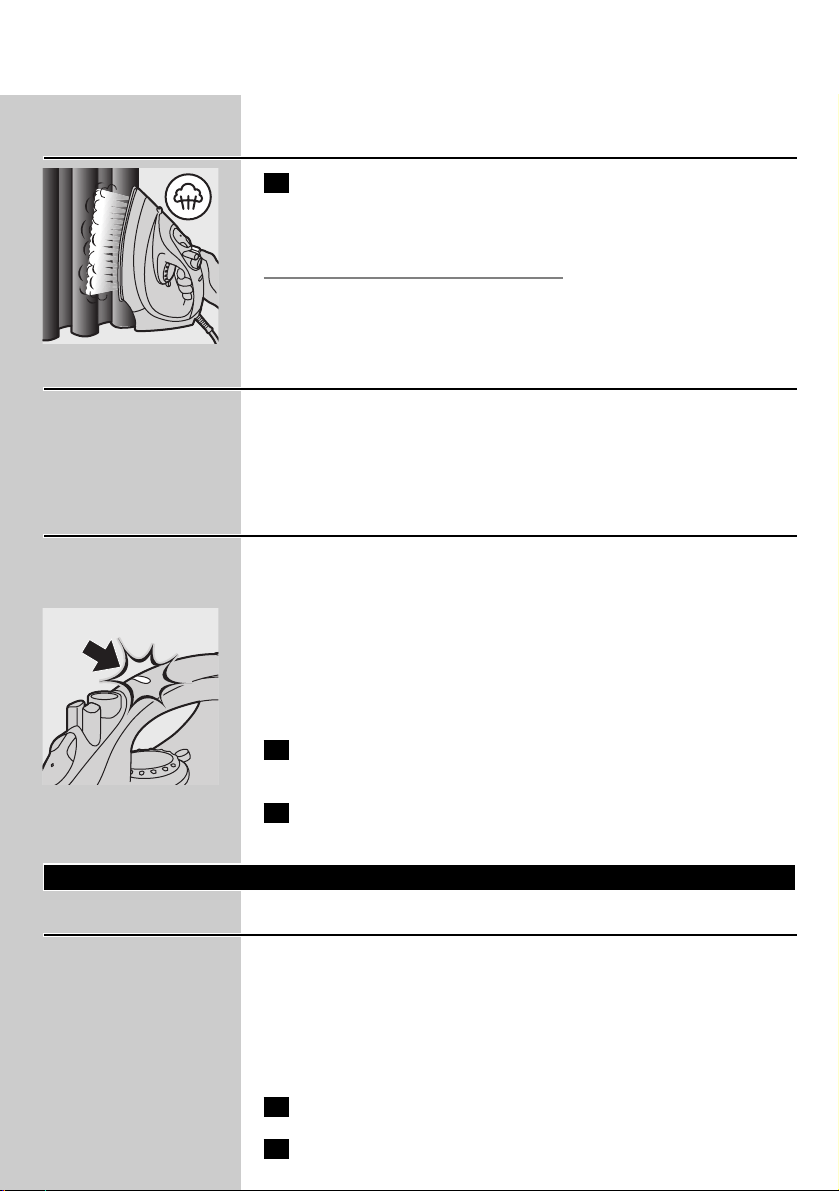
1 The Shot-of-Steam function can also be used when you are
holding the iron in vertical position.This is useful for removing
creases from hanging clothes,curtains, etc.
Never direct the steam towards people.
Drip stop (GC2225/2220/GC2130/2126/2125 only)
This iron is equipped with a drip stop function: the iron automatically
stops steaming when the temperature is too low to prevent water
from dripping out of the soleplate. When this happens you will hear a
click.
Automatic shut-off (specific types only)
An electronic safety device will automatically switch the heating
element off if the iron has not been moved for a while.
C
◗ To indicate that the heating element has been switched off, the
automatic shut-off light will start blinking.
To heat up the iron again: pick it up or move it slightly.The automatic
shut-off light will go out.
1 If the temperature light goes on, wait for it to go out before
you start ironing.
2 If the temperature light does not go on, the iron is ready for
use.
Cleaning and maintenance
Calc-Clean function
◗ The Calc-Clean function removes the scale particles.
Use the Calc-Clean function once every two weeks. If the water in
your area is very hard (i.e. when flakes come out of the soleplate
during ironing), the Calc-Clean function should be used more
frequently.
1 Set the steam control to position O.
2 Fill the water tank to the maximum level.
ENGLISH10

Do not pour vinegar or other descaling agents into the water tank..
C
3 Set the temperature dial to MAX.
4 Put the plug in the wall socket.
5 Unplug the iron when the temperature light has gone out.
6 Hold the iron over the sink and set the steam control to
position 1 (Calc-Clean).The steam control knob will spring up
slightly.
C
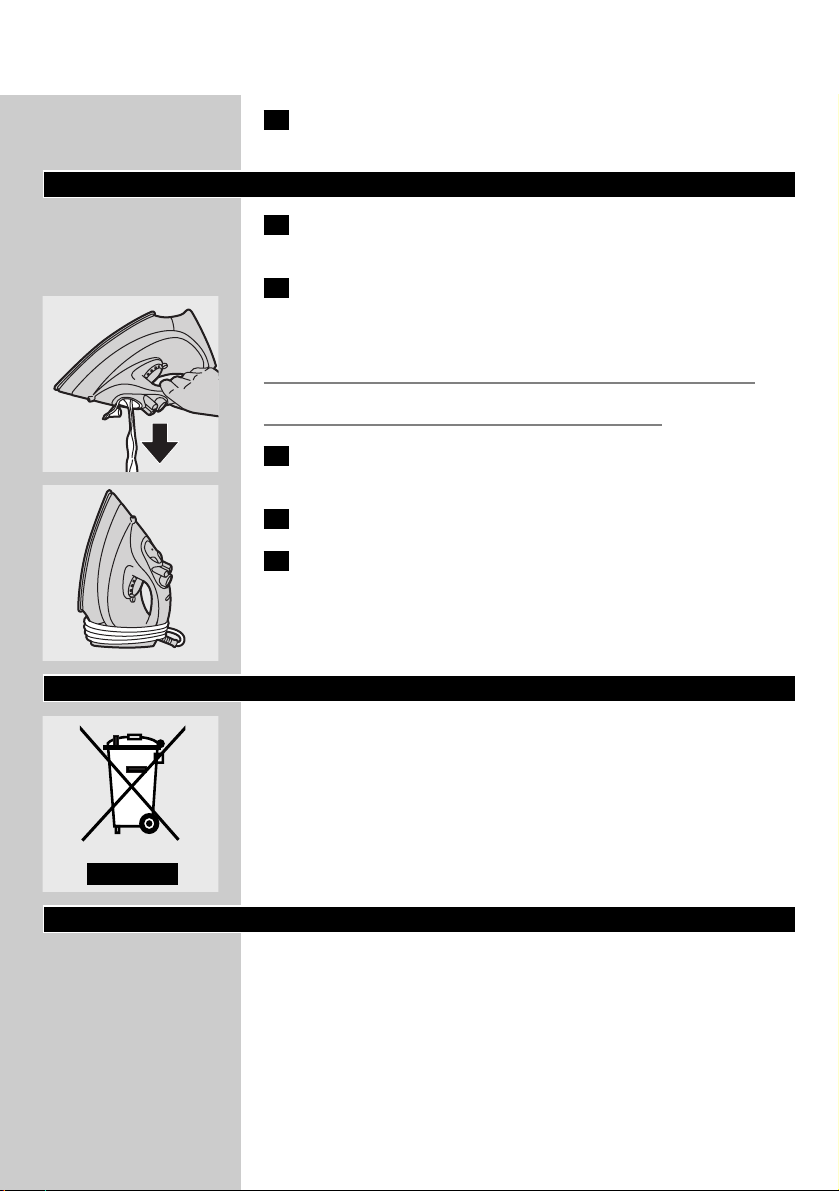
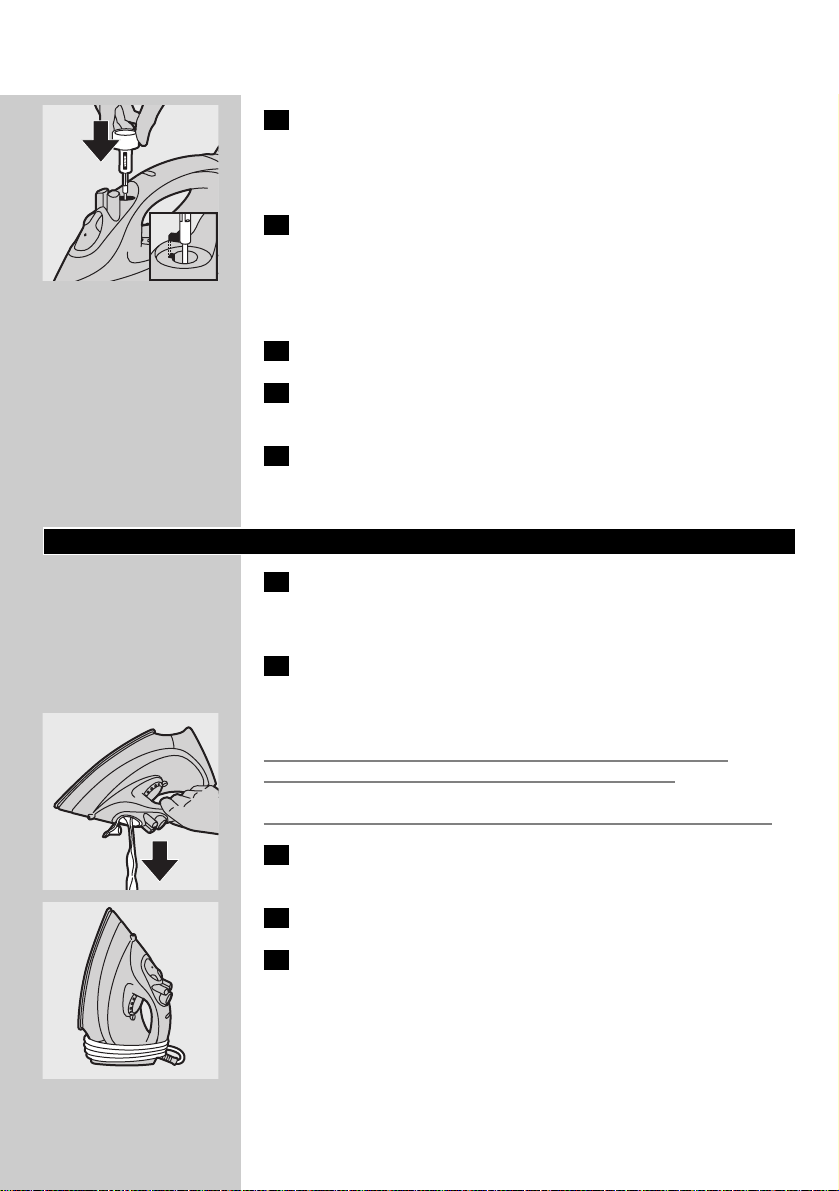
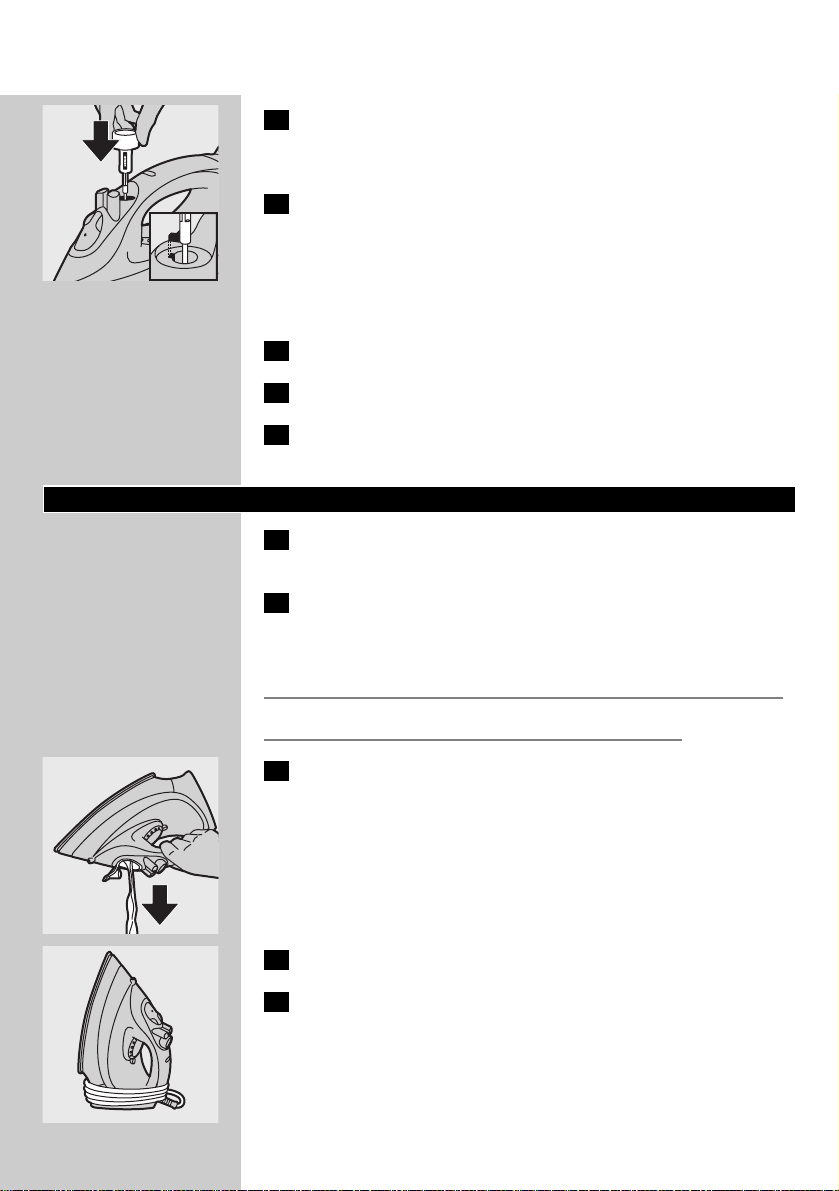
7 Pull the steam control knob upwards to remove the steam
control needle.
C
8 Hold the iron over the sink and move it to and fro.
B
Steam and boiling water will come out of the soleplate. Impurities and
scale (if any) will be flushed out.
C
9 Use vinegar to remove scale, if any,from the needle.
Do not bend or damage the steam control needle.
C
10 Put the steam control needle back by inserting the point of the
needle exactly in the centre of the hole and by fitting the small
projection on the side of the needle into the slot. Set the
steam control knob to position O.
11 Repeat the Calc-Clean process if the iron still contains a lot of
impurities.
After the Calc-Clean process
1 Plug the iron in to let the soleplate dry up.
2 Unplug the iron when the temperature light has gone out.
ENGLISH 11
3 Move the iron gently over a piece of used cloth to remove any
water stains that may have formed on the soleplate.
Storage
1 Remove the mains plug from the wall socket, let the iron cool
down and set the steam control to position O.
2 Clean the appliance and wipe scale and any other deposits off
the soleplate with a damp cloth and a non-abrasive (liquid)
cleaner.
Keep the soleplate smooth: avoid hard contact with metal objects.
Never use a scouring pad, vinegar or other chemicals.
C
3 Regularly rinse the water tank with water and empty it after
cleaning.
C
4 Wind the mains cord round the cord storage facility.
5 Always store the iron standing on its heel in a safe and dry
place.
Environment
C
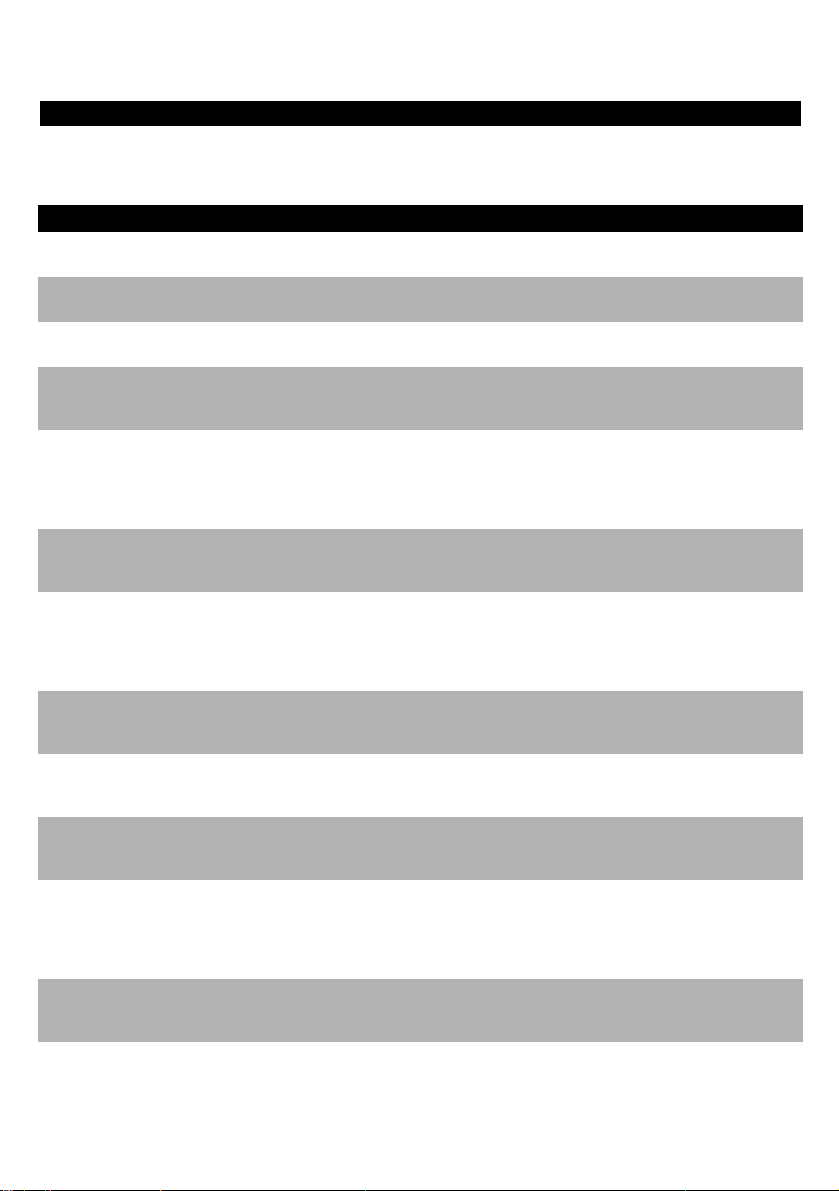
◗ Do not throw the appliance away with the normal household
waste at the end of its life, but hand it in at an official collection
point for recycling. By doing this you will help to preserve the
environment.
Guarantee & service
If you need information or if you have a problem, please visit the Philips
website at www.philips.com or contact the Philips Customer Care
Centre in your country (you will find its phone number in the
worldwide guarantee leaflet). If there is no Customer Care Centre in
your country, turn to your local Philips dealer or contact the Service
Department of Philips Domestic Appliances and Personal Care BV.
ENGLISH12
13
Solution
Check the mains cord, the plug and
the wall socket.
Set the temperature dial to the
required position.
Fill the water tank (see 'Preparing for
use'; section 'Filling the watertank'.)
Set the steam position to Á, Ë or È
(see 'Using the appliance', section
'Steam ironing').
Set the temperature dial to a position
in the steam area (2 to MAX). Put
the iron on its heel and wait until the
temperature light has gone out before
you start ironing.
Put the iron in horizontal position and
wait a while before using the (Vertical)
Shot of Steam function again.
Set the temperature dial to a position
in the steam area (2 to MAX). Put
the iron on its heel and wait until the
temperature light has gone out before
you start ironing.
Use the Calc-Clean function a few
times (see 'Cleaning and maintenance',
section 'Calc-Clean').
Pick the iron up or move it slightly to
deactivate the automatic shut-off
function: the red light will stop blinking.
Press the filling cap until you hear a
click.
Set the temperature dial to a position
in the steam area (2 to MAX). Put
the iron on its heel and wait until the
temperature light has gone out before
you start ironing.
Empty the water tank and set the
steam control to position O after use.
Store the iron on its heel.
Possible cause(s)
Connection problem
Temperature dial set at MIN
Not enough water in the water tank.
The steam control has been set to
position O.
The soleplate is not hot enough
and/or the drip stop function (specific
types only) has been activated.
The (Vertical) Shot of Steam function
has been used too often within a very
short period.
The soleplate is not hot enough.
Hard water forms flakes inside the
soleplate.
The automatic shut-off function has
been activated (see 'Other features',
section 'Automatic shut-off').
The filling cap has not been closed
properly.
The temperature has been set too
low.
The iron has been put in horizontal
position while there was still water in
the water tank.
Problem
The iron is plugged in but the soleplate
is cold.
No steam
No shot of steam or no Vertical Shot
of Steam (specific types only).
Flakes and impurities come out of the
soleplate during ironing.
Red light is blinking (GC2225 and
GC2130 only).
Water droplets on fabric
(GC2225/2220/2215/GC2130/2126/2
125/2120 only)
Water droplets on fabric
(GC2215/2120/2115/2110/2105 only)
Water drips from the soleplate after
the iron has cooled down or has been
stored.
Troubleshooting
This chapter summarises the most common problems you could encounter with your iron. Please
read the different sections for more details. If you are unable to solve the problem, please contact the
Philips Customer Care Centre in your country.
ENGLISH
Opis ogólny (rys. 1)
A Dysza spryskiwacza
B Nasadka otworu wlewowego wody (tylko modele
GC2225/2220/2215/GC2130/2126/2125/2120)
C Otwór wlewowy wody
C Przycisk silnego uderzenia pary 9 (tylko modele
GC2225/2220/2215/GC2130/2126/2125/2120/2115/2110)
E Przycisk spryskiwacza T
F Regulator pary
O = brak pary
Á = minimalna ilość pary
q = umiarkowana ilość pary (tylko
GC2225/2220/2215/GC2130/2126/2125/2120)
w = maksymalna ilość pary
1 = funkcja Calc-Clean
F Funkcja wytwarzania dodatkowego strumienia pary (tylko model
GC2105)
H Wskaźnik temperatury (wszystkie modele) i wskaźnik
automatycznego wyłączenia (tylko modele GC2225/GC2130)
I Pokrętło regulatora temperatury
J Przewód sieciowy
K Wskaźnik temperatury
L Tabliczka znamionowa
M Zbiorniczek wody
Ważne
Przed pierwszym użyciem urządzenia zapoznaj się dokładnie z jego
instrukcją obsługi i zachowaj ją na wypadek konieczności użycia w
przyszłości.
◗ Przed podłączeniem urządzenia upewnij się, czy napięcie podane
na tabliczce znamionowej jest zgodne z napięciem w sieci
elektrycznej.
◗ Podłączaj urządzenie wyłącznie do uziemionego gniazdka
elektrycznego.
◗ Nie korzystaj z urządzenia, jeśli uszkodzona jest wtyczka, przewód
sieciowy lub samo urządzenie, albo jeśli urządzenie zostało
upuszczone bądź przecieka.
◗ Regularnie sprawdzaj, czy przewód sieciowy nie jest uszkodzony.
◗ Ze względów bezpieczeństwa oddaj uszkodzony przewód
sieciowy do wymiany do autoryzowanego centrum serwisowego
firmy Philips lub odpowiednio wykwalifikowanej osobie.
◗ Nigdy nie zostawiaj urządzenia bez nadzoru, gdy jest ono
podłączone do sieci elektrycznej.
◗ Nigdy nie zanurzaj w wodzie żelazka ani podstawki (jeśli jest
dołączona).
◗ Przechowuj urządzenie w miejscu niedostępnym dla dzieci.
◗ Stopa żelazka może być bardzo rozgrzana i dotknięcie jej może
spowodować poparzenia.
POLSKI14

15
◗ Nie dopuszczaj do kontaktu przewodu z rozgrzaną stopą żelazka.
◗ Po zakończeniu prasowania ustaw regulator pary w położeniu „0”,
postaw żelazko w pionie i wyjmij wtyczkę przewodu sieciowego z
gniazdka w przypadku: czyszczenia urządzenia, napełniania lub
opróżniania zbiorniczka wody, odstawienia żelazka nawet na
krótką chwilę.
◗ Zawsze korzystaj z żelazka i podstawki (jeśli jest dołączona) na
stabilnej i równej poziomej powierzchni.
◗ Nie wlewaj do zbiorniczka wody perfum, octu, krochmalu,
środków do usuwania kamienia, ułatwiających prasowanie ani
żadnych innych środków chemicznych.
◗ Urządzenie to jest przeznaczone wyłącznie do użytku domowego.
Przed pierwszym użyciem
C
1 Usuń wszystkie nalepki i folię ochronną ze stopy żelazka oraz
zdejmij z etui do przechowywania, jeśli jest dołączone.
2 Aby usunąć wszystkie zanieczyszczenia ze stopy żelazka,
rozgrzej żelazko do maksymalnej temperatury i prasuj przez
kilka minut wilgotną szmatkę.
Podczas pierwszego użycia z żelazka może wydostawać się dym.
Zjawisko to ustanie po krótkiej chwili.
Przygotowanie do użycia
Napełnianie zbiorniczka na wodę.
1 Wyjmij wtyczkę przewodu sieciowego z gniazdka
elektrycznego.
C
2 Ustaw regulator pary w położeniu 0 (= brak pary).
3 Zdejmij nasadkę z otworu wlewowego wody (tylko wybrane
modele).
C
4 Przechyl żelazko i napełnij zbiorniczek wody do maksymalnego
poziomu.
Nie napełniaj zbiorniczka wody powyżej oznaczenia „MAX”.
5 Załóż nasadkę na otwór wlewowy wody (usłyszysz „kliknięcie”)
(tylko wybrane modele).
Jeśli w twojej okolicy woda z kranu jest bardzo twarda, radzimy używa
wody destylowanej. Nie należy stosować octu, krochmalu, ani wody
odwapnionej chemicznie.
POLSKI
16
Ustawianie temperatury
◗ Podczas pierwszego użycia z żelazka może wydostawać się dym.
Zjawisko to ustanie po krótkiej chwili.
C
1 Ustaw żelazko w pionie i nastaw wymaganą temperaturę
prasowania, obracając pokrętło regulatora temperatury w
odpowiednie położenie.
- Sprawdź zaznaczoną na metce wymaganą temperaturę prasowania.
- 1 Tkaniny sztuczne (np. akryl, wiskoza, poliamid, poliester)
- 1 Jedwab
- 2 Wełna
- 3 Bawełna, len
- Jeśli nie znasz rodzaju tkaniny,z którego wykonany jest prasowany
produkt, właściwą temperaturę prasowania należy ustalić przez
wyprasowanie takiej jego części, która będzie niewidoczna podczas
noszenia czy używania.
- Jedwab, wełna i tkaniny sztuczne:Aby nie dopuścić do powstawania
lśniących plam, prasuj tkaniny na lewej stronie. Nie używaj funkcji
spryskiwacza, aby uniknąć powstawania plam przy prasowaniu.
2 Podłącz wtyczkę przewodu sieciowego do uziemionego
gniazdka elektrycznego.
3 Gdy zgaśnie wskaźnik temperatury,odczekaj chwilę przed
rozpoczęciem prasowania.
B
Podczas prasowania wskaźnik temperatury będzie zapalał się od czasu
do czasu.
Zasady używania
Prasowanie parowe
Sprawdź, czy w zbiorniczku jest wystarczająca ilość wody.
1 Ustaw pokrętło regulatora temperatury w żądanej pozycji.
Patrz „Ustawianie temperatury”.
C
2 Ustaw regulator pary w odpowiednim położeniu.
- Á dla minimalnej ilości pary (ustawienia temperatury od 2 do
3).
- Ë dla umiarkowanej ilości pary (ustawienia temperatury od 3 do
„MAX”) (tylko wybrane modele).
- È dla maksymalnej ilości pary (ustawienia temperatury od 3 do
„MAX”)
B
Z chwilą osiągnięcia wybranej temperatury żelazko zacznie wytwarzać
parę.
POLSKI

17
Tylko modele GC2215/2120/2115/2110/2105:
Jeśli nastawiona temperatura jest zbyt niska (od „MIN” do 2),ze
stopy żelazka może wyciekać woda.
Prasowanie bez pary
1 Ustaw regulator pary w położeniu O (= brak pary).
2 Ustaw pokrętło regulatora temperatury w żądanej pozycji.
Patrz „Ustawianie temperatury”.
Funkcje
Spryskiwacz
Umożliwia usuwanie uporczywych zagnieceń w każdej temperaturze
prasowania.
1 Sprawdź, czy w zbiorniczku jest wystarczająca ilość wody.
C
2 Aby zwilżyć prasowaną tkaninę, kilkakrotnie wciśnij przycisk
spryskiwacza.
Dodatkowy strumień pary (tylko wybrane modele)
Funkcja ta zapewnia dostarczenie dodatkowej pary w celu usunięcia
wyjątkowo uporczywych zgnieceń.
Funkcja wytwarzania dodatkowego strumienia pary działa wyłącznie
przy ustawieniach temperatury od 3 do „MAX”.
C
1 Ustaw regulator pary w maksymalnym położeniu È.
C
2 Wciśnij i przytrzymaj przycisk regulatora pary przez nie dłużej
niż 5 sekund.
3 Odczekaj co najmniej 1 minutę przed ponownym użyciem
funkcji dodatkowego strumienia pary, aby zapobiec kapaniu
wody ze stopy żelazka.
Silne uderzenie pary (tylko wybrane modele)
Silne uderzenie pary pozwala usunąć najbardziej uporczywe
zagniecenia.
POLSKI
18
Funkcja silnego uderzenia pary działa wyłącznie przy ustawieniach
temperatury od 2 do „MAX”.
C
1 Wciśnij i zwolnij przycisk silnego uderzenia pary.
Pionowe uderzenie pary (tylko modele
GC2225/2220/2215/2130/2126/2125/2120/2115)
C
1 Funkcji silnego uderzenia pary można także używać, trzymając
żelazko w pozycji pionowej.Jest ona użyteczna w przypadku
usuwania zagnieceń z wiszących ubrań, zasłon itd.
Nigdy nie kieruj strumienia pary na ludzi.
Blokada kapania (tylko modele
GC2225/2220/GC2130/2126/2125)
Modele te zostały wyposażone w funkcję blokady kapania: żelazko
automatycznie przestaje wytwarzać parę, gdy temperatura jest zbyt
niska, co zapobiega kapaniu wody ze stopy żelazka.Włączenie tej funkcji
jest sygnalizowane kliknięciem.
Automatyczne wyłączenie (tylko wybrane modele)
Elektroniczny wyłącznik bezpieczeństwa powoduje automatyczne
wyłączenie elementu grzejnego żelazka, gdy nie jest ono używane przez
dłuższy czas.
C
◗ Aby zasygnalizować wyłączenie elementu grzejnego,wskaźnik
automatycznego wyłączenia zacznie migać.
Podnieś żelazko lub lekko nim porusz, aby ponownie się rozgrzało.
Wskaźnik automatycznego wyłączenia zgaśnie.
1 Jeśli zaświeci się wskaźnik temperatury, przed rozpoczęciem
prasowania poczekaj, aż zgaśnie.
2 Jeśli wskaźnik temperatury nie zaświeci się, oznacza to, że
żelazko jest gotowe do użycia.
POLSKI

Czyszczenie i konserwacja
Funkcja Calc-Clean
◗ Funkcja Calc-Clean usuwa cząstki kamienia wapiennego.
Tej funkcji należy używać raz na dwa tygodnie. Jeśli woda w danej
okolicy jest bardzo twarda (tzn. gdy podczas prasowania ze stopy
żelazka spadają płytki kamienia), z funkcji należy korzystać częściej.
1 Ustaw regulator pary w położeniu O.
2 Napełnij zbiorniczek wodą do wskaźnika „MAX”.
Nie wlewaj do zbiorniczka wody octu ani innych środków do usuwania
kamienia.
C
3 Ustaw pokrętło regulatora temperatury w położeniu „MAX”.
4 Włóż wtyczkę do gniazdka elektrycznego.
5 Gdy zgaśnie wskaźnik temperatury,wyjmij wtyczkę z gniazdka
elektrycznego.
6 Trzymając żelazko nad zlewem, ustaw pokrętło pary w
położeniu 1 (Calc-Clean). Regulator pary wyskoczy nieco do
góry.
C
7 Pociągnij pokrętło regulatora pary ku górze, aby wyjąć igłę
regulatora pary.
C
8 Trzymaj żelazko nad zlewem i potrząśnij nim.
B
Ze stopy żelazka zacznie wydostawać się para i gorąca woda.
Wypłukany zostanie kamień i wszelkie zanieczyszczenia.
C
9 Użyj octu do usunięcia kamienia z igły regulatora pary.
Nie zginaj igły regulatora pary i uważaj, aby jej nie uszkodzić.
19POLSKI
20
C
10 Włóż igłę regulatora pary z powrotem do urządzenia,
umieszczając ją dokładnie pośrodku otworu i wpasowując mały
występ z boku igły w zagłębienie. Ustaw pokrętło regulatora
pary w położeniu 0.
11 Czynność należy powtórzyć, jeśli w żelazku nadal znajduje się
dużo zanieczyszczeń.
Po czyszczeniu przy użyciu funkcji Calc-Clean
1 Aby wysuszyć stopę żelazka, podłącz je do sieci.
2 Gdy zgaśnie wskaźnik temperatury,wyjmij wtyczkę z gniazdka
elektrycznego.
3 Aby usunąć zacieki wodne, jakie mogły powstać na stopie
żelazka, delikatnie przeciągnij żelazko po kawałku niepotrzebnej
tkaniny.
Przechowywanie
1 Wyjmij wtyczkę przewodu sieciowego z gniazdka
elektrycznego, poczekaj, aż żelazko ostygnie i ustaw regulator
pary w położeniu O.
2 Zetrzyj ze stopy żelazka kamień i inne osady za pomocą
wilgotnej szmatki i (płynnego) środka czyszczącego nie
zawierającego środków ściernych.
Aby powierzchnia stopy pozostała niezarysowana, należy unika
narażania jej na zetknięcie z metalowymi przedmiotami.
Nie wolno używać czyścików,octu ani innych środków chemicznych.
C
3 Regularnie płucz zbiorniczek wodą i opróżniaj go po
czyszczeniu.
C
4 Nawiń przewód zasilający na żelazko.
5 Przechowuj żelazko w pozycji pionowej,w suchym i
bezpiecznym miejscu.
POLSKI
Ochrona środowiska
C
◗ Zużytego urządzenia nie należy wyrzucać wraz z normalnymi
odpadami gospodarstwa domowego — należy oddać je do punktu
zbiórki surowców wtórnych w celu utylizacji.Stosowanie się do
tego zalecenia pomaga w ochronie środowiska.
Gwarancja i serwis
W razie jakichkolwiek pytań lub problemów prosimy odwiedzić naszą
stronę internetową www.philips.com lub skontaktować się z Centrum
Obsługi Klienta firmy Philips (numer telefonu znajduje się w ulotce
gwarancyjnej). Jeśli w kraju zamieszkania nie ma takiego Centrum, o
pomoc należy zwrócić się do sprzedawcy produktów firmy Philips lub
do Działu Obsługi Klienta firmy Philips Domestic Appliances and
Personal Care BV.
21POLSKI

22
Rozwiązanie
Sprawdź połączenie przewodu
sieciowego, wtyczkę oraz gniazdko
elektryczne.
Ustaw pokrętło regulatora
temperatury w żądanej pozycji.
Napełnij zbiorniczek wodą (patrz
rozdział „Przygotowanie do użycia”,
część „Napełnianie zbiorniczka wody”).
Ustaw regulator pary w położeniu Á,
Ë lub È (patrz „Zasady używania”,
część „Prasowanie parowe”).
Ustaw pokrętło regulatora
temperatury w pozycji do prasowania
parowego (od 2 do „MAX”). Ustaw
żelazko na piętce i przed
rozpoczęciem prasowania odczekaj, aż
zgaśnie wskaźnik temperatury.
Ustaw żelazko w pozycji poziomej i
odczekaj chwilę przed ponownym
użyciem funkcji silnego (pionowego)
uderzenia pary.
Ustaw pokrętło regulatora
temperatury w pozycji do prasowania
parowego (od 2 do „MAX”). Ustaw
żelazko na piętce i przed
rozpoczęciem prasowania odczekaj, aż
zgaśnie wskaźnik temperatury.
Kilkakrotnie użyj funkcji Calc-Clean
(patrz „Czyszczenie i konserwacja”,
część „Funkcja Calc-Clean”).
Aby wyłączyć funkcję automatycznego
wyłączenia, podnieś żelazko lub lekko
nim porusz. Czerwony wskaźnik
przestanie migać.
Dociśnij nasadkę otworu wlewowego
wody, aż usłyszysz charakterystyczne
kliknięcie.
Ustaw pokrętło regulatora
temperatury w pozycji do prasowania
parowego (od 2 do „MAX”). Ustaw
żelazko na piętce i przed
rozpoczęciem prasowania odczekaj, aż
zgaśnie wskaźnik temperatury.
Prawdopodobna(e) przyczyna(y)
Problem z połączeniem
Pokrętło regulatora temperatury
ustawione jest w pozycji „MIN”.
W zbiorniczku nie ma wystarczającej
ilości wody.
Regulator pary został ustawiony w
położeniu O.
Stopa żelazka nie jest wystarczająco
rozgrzana i/lub została uruchomiona
funkcja blokady kapania (tylko wybrane
modele).
Funkcja silnego (pionowego) uderzenia
pary była używana zbyt często, w
bardzo krótkich odstępach czasu.
Stopa żelazka nie jest wystarczająco
rozgrzana.
Twarda woda powoduje tworzenie się
osadów wewnątrz stopy żelazka.
Została uruchomiona funkcja
automatycznego wyłączania (patrz
„Funkcje”, część „Automatyczne
wyłączenie”).
Otwór wlewowy wody nie został
prawidłowo zamknięty za pomocą
nasadki.
Nastawiona została zbyt niska
temperatura.
Problem
Żelazko jest zasilane, ale stopa jest
zimna.
Brak wytwarzania pary
Brak silnego lub pionowego uderzenia
pary (tylko wybrane modele)
Podczas prasowania ze stopy żelazka
wydostają się zanieczyszczenia.
Miga czerwony wskaźnik (tylko modele
GC2225 i GC2130).
Krople wody na tkaninie (tylko modele
GC2225/2220/2215/GC2130/2126/21
25/2120)
Krople wody na tkaninie (tylko modele
GC2215/2120/2115/2110/2105)
Rozwiązywanie problemów
Ten rozdział opisuje najczęstsze problemy, z którymi można się zetknąć, korzystając z żelazka.Więcej
szczegółów znajduje się w poszczególnych częściach instrukcji. Jeśli problemu nie można rozwiązać
samodzielnie, należy skontaktować się z Centrum Obsługi Klienta.
POLSKI

23
Rozwiązanie
Po użyciu żelazka opróżnij zbiorniczek
wody i ustaw regulator pary w
położeniu O. Przechowuj żelazko
ustawione na piętce.
Prawdopodobna(e) przyczyna(y)
Żelazko zostało postawione w pozycji
poziomej, gdy w zbiorniczku wciąż
znajdowała się woda.
Problem
Po ochłodzeniu lub przechowywaniu
ze stopy żelazka kapie woda.
POLSKI
Descriere generală (fig. 1)
A Pulverizator
B Capac rezervor
(doar GC2225/2220/2215/GC2130/2126/2125/2120)
C Orificiu de umplere
D Buton jet de abur 9
(numai GC2225/2220/2215/GC2130/2126/2125/2120/2115/2110)
E Buton de pulverizare T
F Buton de reglarea a aburului
O = fără abur
Á = abur minim
q = abur moderat (doar
GC2225/2220/2215/GC2130/2126/2125/2120)
w = volum maxim de abur
1 = funcţie anticalcar
F Funcţie abur suplimentar (numai GC2105)
H Led pentru temperatură (toate tipurile) şi led pentru oprire
automată (numai GC2225/GC2130)
I Termostat
J Cablu de alimentare
K Indicator de temperatură
L Plăcuţă cu date tehnice
M Rezervor de apă
Important
Citiţi aceste instrucţiuni de utilizare cu atenţie înainte de a folosi
aparatul şi păstraţi-le pentru consultare ulterioară.
◗ Verificaţi dacă tensiunea indicată pe plăcuţa de înregistrare
corespunde tensiunii de alimentare locale înainte de a conecta
aparatul.
◗ Conectaţi aparatul numai la o priză de perete cu împământare.
◗ Nu folosiţi aparatul dacă ştecherul, cablul electric sau aparatul
prezintă deteriorări vizibile, dacă aţi scăpat aparatul pe jos sau
dacă acesta prezintă scurgeri.
◗ Verificaţi cablul regulat, pentru a vă asigura că nu este deteriorat.
◗ În cazul în care cablul de alimentare este deteriorat, acesta trebuie
înlocuit de Philips, de un centru de service autorizat de Philips sau
de personal calificat în domeniu pentru a evita orice accident.
◗ Aparatul nu trebuie lăsat nesupravegheat în timp ce este conectat
la priză.
◗ Nu introduceţi fierul sau suportul (dacă este furnizat) în apă.
◗ Nu lăsaţi aparatul la îndemâna copiilor.
◗ Talpa fierului de călcat se încinge foarte tare şi poate cauza arsuri
la atingere.
◗ Feriţi cablul de alimentare de contactul cu talpa încinsă.
◗ După ce aţi terminat de călcat, când curăţaţi aparatul, în timp ce
umpleţi sau goliţi rezervorul de apă sau chiar când faceţi o scurtă
ROMÂNĂ24

25
pauză: setaţi comutatorul pentru abur la poziţia O, puneţi fierul în
poziţie verticală şi scoateţi aparatul din priză.
◗ Aşezaţi şi folosiţi întotdeauna fierul şi suportul (dacă este furnizat)
pe o suprafaţă orizontală, plană şi stabilă.
◗ Nu turnaţi parfum, oţet, amidon,agenţi de detartrare, aditivi de
călcare sau alte substanţe chimice în rezervorul de apă.
◗ Acest aparat este destinat exclusiv uzului casnic.
Înainte de prima utilizare
C
1 Îndepărtaţi orice autocolant sau folie protectoare de pe talpă.
De asemenea, îndepărtaţi şi capacul pentru depozitare,dacă a
fost furnizat.
2 Lăsaţi fierul de călcat să se încălzească până la temperatura
maximă şi treceţi fierul peste o bucată de pânză uscată timp de
câteva minute, pentru a îndepărta eventualele reziduuri de pe
talpă.
Din fierul de călcat poate ieşi fum când este folosit pentru prima dată.
Acest lucru va înceta după puţin timp.
Pregătirea pentru utilizare
Umplerea rezervorului de apă
1 Scoateţi ştecherul din priză.
C
2 Poziţionaţi butonul de reglare a aburului pe poziţia O ( = fără
abur).
3 Deschideţi capacul rezervorului (doar anumite modele).
C
4 Înclinaţi fierul şi umpleţi rezervorul de apă până la nivelul
maxim.
Nu umpleţi rezervorul peste gradaţia MAX.
5 Închideţi capacul rezervorului (clic!) (doar anumite modele).
Dacă apa din zona în care locuiţi este foarte dură, vă sfătuim să folosiţi
apă distilată. Nu folosiţi oţet, amidon sau apă tratată chimic.
ROMÂNĂ

26
Reglarea temperaturii
◗ Din fierul de călcat poate ieşi fum când este folosit pentru prima
dată.Acest lucru va înceta după puţin timp.
C
1 Aşezaţi fierul de călcat în poziţie verticală şi reglaţi termostatul
la temperatura necesară pentru călcat, răsucindu-l în poziţia
corespunzătoare.
- Verificaţi eticheta pentru a regla temperatura necesară de călcare.
- 1 Materiale sintetice (de ex. fibre acrilice, viscoză, poliamidă,
poliester)
- 1 Mătase
- 2 Lână
- 3 Bumbac, in
- Dacă nu cunoaşteţi tipul sau tipurile de material din care este
confecţionat articolul, încercaţi să călcaţi o porţiune de material care
nu se vede când purtaţi articolul vestimentar respectiv, pentru a
determina temperatura corectă de călcare.
- Ţesături sintetice, de mătase şi de lână: călcaţi ţesătura pe dos pentru
a nu lăsa pete strălucitoare. Evitaţi folosirea funcţiei spray pentru a nu
produce pete.
2 Introduceţi ştecherul în priza de perete cu împământare.
3 După ce indicatorul portocaliu pentru temperatură se stinge,
aşteptaţi puţin înainte de a începe să călcaţi.
B
Indicatorul portocaliu pentru temperatură se va aprinde periodic în
timpul călcatului.
Utilizarea aparatului
Călcarea cu abur
Asiguraţi-vă că este suficientă apă în rezervor.
1 Reglaţi termostatul în poziţia recomandată.
Consultaţi secţiunea 'Reglarea temperaturii'.
C
2 Poziţionaţi butonul de reglare a jetului de abur în poziţia
potrivită.
- Á pentru abur minim (reglaje de temperatură 2 şi 3).
- Ë pentru abur moderat (reglaje de temperatură 3 până la MAX)
(doar anumite tipuri).
- È pentru abur maxim (reglaje de temperatură 3 până la MAX)
B
Jetul de abur va porni imediat ce temperatura selectată va fi atinsă.
ROMÂNĂ
27
Doar pentru GC2215/2120/2115/2110/2105:
Apa se poate scurge prin talpa aparatului dacă temperatura selectată
este prea redusă (MIN până la 2).
Călcarea fără abur
1 Poziţionaţi comutatorul pentru abur pe poziţia O ( = fără
abur).
2 Reglaţi termostatul în poziţia recomandată.
Consultaţi secţiunea 'Reglarea temperaturii'.
Caracteristici
Pulverizare
Pentru a netezi cutele persistente la orice temperatură
1 Asiguraţi-vă că este suficientă apă în rezervor.
C
2 Apăsaţi butonul spray de câteva ori pentru a umezi articolul pe
care doriţi să îl călcaţi.
Abur suplimentar (doar anumite modele)
Această funcţie degajă abur suplimentar pentru călcarea cutelor
persistente.
Funcţia Abur suplimentar nu poate fi folosită decât la temperaturi între
3 şi MAX.
C
1 Reglaţi comutatorul pentru abur în poziţia maximă È.
C
2 Apăsaţi şi ţineţi apăsat butonul pentru abur timp de maxim
5 secunde.
3 Aşteptaţi cel puţin 1 minut înainte de a utiliza din nou funcţia
Abur suplimentar pentru a evita scurgerea apei prin talpă.
Jet de abur (doar anumite modele)
Jetul puternic de abur vă ajută să neteziţi cutele foarte persistente.
ROMÂNĂ

28
Funcţia Jet de abur nu poate fi folosită decât la temperaturi între 2 şi
MAX.
C
1 Apăsaţi şi eliberaţi butonul pentru jet de abur.
Jet de abur vertical (doar
GC2225/2220/2215/2130/2126/2125/2120/2115)
C
1 Funcţia Jet de abur poate fi folosită şi când ţineţi fierul de călcat
în poziţie verticală.Astfel,puteţi netezi cutele perdelelor,
hainelor în poziţie verticală etc.
Nu îndreptaţi niciodată aburul spre oameni.
Anti-picurare (doar GC2225/2220/GC2130/2126/2125)
Acest fier de călcat este prevăzut cu o funcţie anti-picurare: fierul de
călcat opreşte automat aburul la temperaturi prea reduse pentru a
preveni scurgerea apei prin talpă. Când se întâmplă acest lucru veţi auzi
un clic.
Oprire automată (doar anumite modele)
Un dispozitiv electronic de siguranţă va opri automat elementul de
încălzire dacă fierul de călcat nu a fost mişcat o perioadă de timp.
C
◗ Pentru a vă indica faptul că elementul de încălzire a fost oprit,
ledul corespunzător opririi automate va începe să lumineze
intermitent.
Pentru repornirea fierului: ridicaţi fierul de călcat sau mişcaţi-l uşor.
Ledul de oprire automată se va stinge.
1 Dacă indicatorul de temperatură se aprinde, aşteptaţi până se
stinge înainte de a continua călcatul.
2 Dacă indicatorul de temperatură nu se aprinde, fierul este gata
de utilizare.
ROMÂNĂ
Curăţare şi întreţinere
Funcţia de detartrare
◗ Funcţia anticalcar îndepărtează depunerile de calcar.
Folosiţi funcţia de detartrare o dată la două săptămâni. Dacă apa din
zona dvs. este foarte dură (caz în care ies mici particule de calcar prin
talpa fierului în timpul călcatului), funcţia de detartrare trebuie folosită
mai des.
1 Reglaţi comutatorul pentru abur pe poziţia O.
2 Umpleţi rezervorul până la nivelul maxim.
Nu turnaţi oţet sau alţi agenţi pentru îndepăr tarea calcarului în
rezervor.
C
3 Poziţionaţi termostatul pe poziţia MAX.
4 Introduceţi ştecherul în priză.
5 Scoateţi ştecherul din priză când ledul de temperatură s-a stins.
6 Ţineţi fierul deasupra chiuvetei şi poziţionaţi comutatorul
pentru abur în poziţia 1 (detartrare).Comutatorul pentru abur
se va desprinde uşor.
C
7 Trageţi comutatorul pentru abur în sus pentru a scoate tija
acestuia.
C
8 Ţineţi fierul de călcat deasupra chiuvetei şi agitaţi-l bine.
B
Aburul şi apa ajunsă la punctul de fierbere se vor scurge prin talpa
fierului de călcat. Impurităţile şi calcarul (dacă există) se vor elimina.
C
9 Îndepărtaţi depunerile de calcar de pe tijă cu puţin oţet, dacă
este cazul.
Nu îndoiţi sau deterioraţi tija comutatorului pentru abur.
29ROMÂNĂ
30
C
10 Reintroduceţi vârful tijei comutatorului pentru abur exact în
centrul orificiului şi fixaţi mica protuberanţă de pe tijă în nişă.
Reglaţi comutatorul pentru abur în poziţia O.
11 Repetaţi procedura de detartrare dacă mai sunt multe
impurităţi în aparatul de călcat.
După procedura de detartrare
1 Introduceţi fierul în priză pentru a lăsa talpa să se usuce.
2 Scoateţi ştecherul din priză când ledul de temperatură s-a stins.
3 Mişcaţi uşor fierul peste o bucată de material uzat pentru a
îndepărta petele de apă care ar fi putut să se formeze pe talpă.
Depozitarea
1 Scoateţi ştecherul din priză, lăsaţi fierul să se răcească şi
poziţionaţi comutatorul pentru abur în poziţia O.
2 Curăţaţi aparatul şi ştergeţi depunerile de calcar sau orice alte
murdării de pe talpă cu o cârpă umedă şi un detergent (lichid)
neabraziv.
Pentru a păstra talpa netedă: evitaţi contactul dur cu obiecte metalice.
Nu folosiţi bureţi abrazivi, oţet sau alte produse chimice.
C
3 Clătiţi regulat rezervorul cu apă şi goliţi-l după curăţare.
C
4 Înfăşuraţi cablul în jurul suportului special.
5 Depozitaţi întotdeauna fierul în poziţie verticală într-un loc
sigur şi uscat.
ROMÂNĂ

Protecţia mediului
C
◗ Nu aruncaţi aparatul împreună cu gunoiul menajer la sfârşitul
duratei de funcţionare, ci duceţi-l la un punct de colectare
autorizat pentru reciclare. În acest fel, veţi ajuta la protejarea
mediului înconjurător.
Garanţie şi service
Pentru informaţii suplimentare sau în cazul apariţiei altor probleme, vă
rugăm să vizitaţi site-ul Philips www.philips.com sau să contactaţi
centrul de asistenţă pentru clienţi Philips din ţara dvs. (veţi găsi numărul
de telefon în broşura de garanţie internaţională). Dacă în ţara dvs. nu
există un astfel de centru, contactaţi furnizorul dvs. Philips sau
Departamentul de Service din cadrul Philips Domestic Appliances and
Personal Care BV.
31ROMÂNĂ

32
Soluţie
Verificaţi cablul electric, ştecherul şi
priza de perete.
Reglaţi termostatul pe poziţia corectă.
Umpleţi rezervorul cu apă (consultaţi
capitolul 'Pregătirea pentru utilizare',
secţiunea 'Umplerea rezervorului de
apă').
Reglaţi aburul în poziţia Á, Ë sau È
(consultaţi capitolul 'Utilizarea
aparatului', secţiunea 'Călcarea cu
abur').
Reglaţi termostatul într-o poziţie
corespunzătoare călcării cu abur (de la
2 până la MAX). Aşezaţi fierul în
poziţie verticală şi aşteptaţi până ce
indicatorul de temperatură se stinge
înainte de a începe călcarea.
Aşezaţi fierul în poziţie orizontală şi
aşteptaţi puţin înainte de a folosi
funcţia Jet de abur (vertical) din nou.
Reglaţi termostatul într-o poziţie
corespunzătoare călcării cu abur (de la
2 până la MAX). Aşezaţi fierul în
poziţie verticală şi aşteptaţi până ce
indicatorul de temperatură se stinge
înainte de a începe călcarea.
Folosiţi funcţia de detartrare de câteva
ori (consultaţi capitolul 'Curăţare şi
întreţinere', secţiunea 'Detartrare').
Ridicaţi fierul şi mişcaţi-l uşor pentru a
dezactiva funcţia de oprire automată:
ledul roşu nu va mai lumina
intermitent.
Apăsaţi capacul până auziţi clic.
Reglaţi termostatul într-o poziţie
corespunzătoare călcării cu abur (de la
2 până la MAX). Aşezaţi fierul în
poziţie verticală şi aşteptaţi până ce
indicatorul de temperatură se stinge
înainte de a începe călcarea.
Cauze posibile
Problemă de conexiune
Termostat reglat la MIN
Nu este suficientă apă în rezervor.
Comutatorul pentru abur a fost setat
pe poziţia O.
Talpa nu este suficient de încinsă şi/sau
funcţia anti-picurare (doar anumite
modele) a fost activată.
Funcţia Jet de abur (vertical) a fost
folosită prea des într-o perioadă foarte
scurtă de timp.
Talpa fierului de călcat nu este suficient
de încinsă.
Apa dură formează depuneri de calcar
în interiorul tălpii.
Funcţia de oprire automată a fost
activată (consultaţi capitolul 'Alte
caracteristici', secţiunea 'Oprire
automată').
Nu aţi închis corect capacul
rezervorului.
Temperatura selectată este prea
redusă.
Problemă
Fierul este conectat la priză, dar talpa
este rece.
Nu se degajă abur.
Nu funcţionează jetul de abur sau jetul
de abur vertical (doar anumite
modele)
În timpul călcării, din talpă ies bucăţi de
calcar şi impurităţii.
Ledul roşu luminează intermitent
(numai GC2225 şi GC2130).
Picături mici de apă pe material (doar
GC2225/2220/2215/GC2130/2126/21
25/2120)
Picături mici de apă pe material (numai
GC2215/2120/2115/2110/2105)
Depanare
Acest capitol include cele mai frecvente probleme care pot apărea la fierul dvs. de călcat. Pentru mai
multe detalii, citiţi aceste secţiuni. Dacă nu reuşiţi să rezolvaţi problema, contactaţi Centrul de
asistenţă pentru clienţi Philips din ţara dvs.
ROMÂNĂ

33
Soluţie
Goliţi rezervorul de apă şi reglaţi
comutatorul pentru abur în poziţia O
după utilizare. Depozitaţi fierul în
poziţie verticală.
Cauze posibile
Aţi pus fierul în poziţie orizontală când
mai era apă în rezervor.
Problemă
Apa continuă să picure din talpă şi
după răcirea sau depozitarea fierului.
ROMÂNĂ

Общее описание (рис. 1)
A Сопло разбрызгивателя
B Крышка наливного отверстия (только у моделей
GC2225/2220/2215/GC2130/2126/2125/2120)
C Наливное отверстие
C Кнопка выброса пара 9 (только для моделей
GC2225/2220/2215/GC2130/2126/2125/2120/2115/2110)
E Кнопка включения разбрызгивания T
F Выбор режима подачи пара
O = глажение без пара
Á = минимальная подача пара
q = умеренная подача пара (только у моделей
GC2225/2220/2215/GC2130/2126/2125/2120)
w = максимальная подача пара
1 = функция очистки от накипи Calc-Clean
F Функция усиленной подачи пара (только для модели GC2305)
H Индикатор нагрева (для всех моделей) и индикатор
автоматического отключения (только для моделей
GC2225/GC2130)
I Дисковый регулятор нагрева
J Сетевой шнур
K Индикатор температуры
L Заводская бирка
M Резервуар для воды
Внимание
До начала эксплуатации прибора внимательно ознакомьтесь с
настоящим руководством и сохраните его для дальнейшего
использования в качестве справочного материала.
◗ Перед подключением прибора убедитесь, что номинальное
напряжение, указанное на заводской бирке,соответствует
напряжению местной электросети.
◗ Подключайте прибор только к заземленной розетке.
◗ Не пользуйтесь прибором, если сетевой шнур, сетевая вилка
или сам прибор имеют видимые повреждения, а также если
прибор роняли, или он протекает.
◗ Регулярно проверяйте, не поврежден ли сетевой шнур.
◗ В случае повреждения сетевого шнура, его необходимо
заменить. Чтобы обеспечить безопасную эксплуатацию
прибора, заменяйте шнур только в торговой организации
Philips, в авторизованном сервисном центре Philips или в
сервисном центре с персоналом аналогичной квалификации.
◗ Не оставляйте включенный в сеть прибор без присмотра.
◗ Запрещается погружать утюг и подставку (при наличии) в
воду.
◗ Храните прибор в недоступном для детей месте.
◗ Прикосновение к сильно нагретой подошве утюга может
привести к ожогам.
34 РУССКИЙ

35
◗ Шнур не должен касаться горячей подошвы.
◗ По окончании глажения, при очистке прибора, во время
заполнения или слива резервуара для воды, а так же оставляя
утюг без присмотра даже на короткое время, устанавливайте
парорегулятор в положение О, ставьте утюг в вертикальное
положение и отключайте его от электросети.
◗ Используйте утюг и подставку (при наличии) на
горизонтальной, ровной и устойчивой поверхности.
◗ Не добавляйте в парогенератор духи, уксус, крахмал,
химические средства для удаления накипи, добавки для
глажения или другие химические средства.
◗ Прибор предназначен только для домашнего использования.
Перед первым использованием
C
1 Удалите все наклейки и защитные пленки с подошвы утюга.
При необходимости удалите упаковку для хранения.
2 Разогрейте утюг до максимальной температуры и несколько
минут проводите им по влажной ткани, чтобы удалить с
подошвы всё лишнее.
При первом включении утюга в сеть возможно нензначительное
выделение дыма, которое вскоре прекратится.
Подготовка прибора к работе
Заполнение резервуара для воды
1 Выньте вилку сетевого шнура из розетки электросети.
C
2 Установите парорегулятор в положение О (= глажение без
пара).
3 Откройте крышку наливного отверстия (только у
определенных моделей).
C
4 Наклоните утюг и заполните резервуар для воды до
максимального уровня.
Не заполняйте резервуар для воды выше отметки МАХ.
5 Закройте крышку наливного отверстия до щелчка (только
для определенных моделей).
РУССКИЙ
36
Если водопроводная вода в вашей местности слишком жестк
рекомендуется использовать дистиллированную воду. Не
добавляйте в воду уксус, крахмал или химические средства дл
удаления накипи.
Установка температуры
◗ При первом включении утюга в сеть возможно
нензначительное выделение дыма, которое вскоре
прекратится.
C
1 Поставьте утюг вертикально и установите необходимую
температуру, повернув дисковый регулятор нагрева в
соответствующее положение.
- Проверьте, какая рекомендуемая температура глажения указана
на ярлыке текстильного изделия (памятке по уходу).
- 1 Синтетические ткани (например, акрил, вискоза, полиамид,
полиэстер)
- 1 Шелк
- 2 Шерсть
- 3 Хлопок, лен
- Если материал изделия неизвестен, попробуйте сначала
прогладить на участке, незаметном при носке.
- Изделия, изготовленные из шелка, шерстяных и синтетических
материалов, следует гладить с изнанки, чтобы не допустить
появления лоснящихся пятен. При использовании функции
разбрызгивания, на изделии возможно появления пятен.
2 Вставьте вилку шнура питания в заземленную розетку
электросети.
3 Начинать глажение следует через некоторое время после
того, как погаснет индикатор нагрева.
B
Во время глажения будет периодически загораться индикатор
нагрева.
Использование прибора
Глажение с паром
Убедитесь, что резервуар для воды заполнен.
1 Установите дисковый регулятор нагрева в рекомендуемое
положение.
См. раздел Установка температуры.
C
2 Установите парорегулятор в соответствующее положение.
- Á для минимальной подачи пара (маркировки дискового
регулятора 2 и 3).
РУССКИЙ

37
- Ë для умеренной подачи пара (при положении терморегулятора
от 3 до MAX) (только у определенных моделей).
- È для максимальной подачи пара (маркировки дискового
регулятора от 3 до MAX).
B
Отпаривание начнется, как только температура подошвы
утюга достигает установленного значения.
Только для моделей GC2215/2120/2115/2110/2105:
Если установлена недостаточно высокая степень нагрева (от MIN
до 2), из подошвы утюга возможна утечка воды.
Сухое глажение
1 Установите парорегулятор в положение O (= глажение без
пара).
2 Установите дисковый регулятор нагрева в рекомендуемое
положение.
См. раздел Установка температуры.
Функциональные особенности
Разбрызгивание.
Для разглаживания стойких складок при любом нагреве.
1 Убедитесь, что резервуар для воды заполнен.
C
2 Для увлажнения изделий при глажении несколько раз
нажмите кнопку включения разбрызгивания.
Усиленная подача пара (только у определенных моделей)
Эта функция обеспечивает дополнительный выброс пара для
разглаживания особенно стойких складок.
Функция усиленной подачи пара может быть использована только
при установке температуры в диапазоне от 3 до МАХ.
C
1 Установите парорегулятор в максимальное положение È.
РУССКИЙ

38
C
2 Нажмите на кнопку парорегулятора и удерживайте ее в
течение максимум 5 секунд.
3 Использовать функцию усиленной подачи пара следует с
перерывами не менее одной минуты, чтобы избежать
появления капель воды на подошве утюга
Паровой удар (только у определенных моделей)
Мощный выброс пара для разглаживания особенно стойких
складок.
Функцию Паровой удар можно использовать только при установке
нагрева в диапазоне от 2 до МАХ.
C
1 Нажмите и отпустите кнопку выброса пара.
Вертикальный паровой удар (только у моделей
GC2225/2220/2215/2130/2126/2125/2120/2115)
C
1 Функцию Паровой удар можно также применять,
удерживая утюг в вертикальном положении. Это особенно
удобно при разглаживании стойких складок на висящей
одежде, занавесках и т.д.
Запрещается направлять струю пара на людей.
Противокапельная система (только у моделей
GC2225/2220/GC2130/2126/2125)
Утюг снабжен противокапельной системой Drip Stop: при слишком
низкой температуре нагрева парообразование автоматически
отключается, что предотвращает утечку воды из отверстий
подошвы. При срабатывании этой системы раздается щелчок.
Автоматическое отключение (только у определенных
моделей)
Электронное защитное устройство автоматического отключения
нагревательного элемента срабатывает, если утюг некоторое время
остается неподвижным.
РУССКИЙ

39
C
◗ При отключении нагревательного элемента индикатор
автоматического отключения начинает мигать.
Чтобы возобновить нагрев утюга, приподнимите утюг или слегка
переместите его. Индикатор автоматического отключения
погаснет.
1 Если включился индикатор нагрева, дождитесь его
отключения, прежде чем начинать гладить.
2 Если индикатор нагрева не включился, утюг готов к
использованию.
Чистка и обслуживание
Функция очистки от накипи Calc-Clean
◗ Функция очистки от накипи Calc-Clean предназначена для
удаления частиц накипи.
Применяйте функцию очистки от накипи Calc-Clean раз в две
недели. Если вода имеет повышенную жесткость (т.е. если во время
глажения вокруг отверстий подошвы утюга образуется накипь),
следует применять функцию очистки от накипи Calc-Clean чаще.
1 Установите парорегулятор в положение O.
2 Заполните резервуар для воды до отметки максимального
уровня.
Не добавляйте в резервуар для воды уксус и другие средства дл
удаления накипи.
C
3 Установите дисковый регулятор нагрева в положение МАХ.
4 Вставьте вилку сетевого шнура в розетку электросети.
5 Когда индикатор нагрева погаснет, отключите утюг от
электросети.
6 Удерживая утюг над раковиной,установите парорегулятор
в положение 1 (функция очистки от накипи Calc-Clean).
Парорегулятор слегка выдвинется.
C
7 Вытяните вверх кнопку парорегулятора, чтобы извлечь
стержень парорегулятора.
РУССКИЙ

40
C
8 Поместите утюг над раковиной и слегка встряхните его.
B
Из подошвы утюга будут выходить пар и кипящая вода, вымывая
грязь и хлопья накипи (при наличии).
C
9 Если стержень покрыт накипью,удалите накипь с помощью
уксуса.
Не сгибайте стержень парорегулятора. Обращайтесь с ним
бережно.
C
10 Поместите стержень парорегулятора на место, вставив его
точно в центр отверстия и установив небольшой выступ
стержня в паз. Установите парорегулятор в положение О.
11 Если утюг по-прежнему загрязнен, повторите очистку.
После очистки от накипи
1 Подключите утюг к электросети, чтобы высушить подошву.
2 Когда индикатор нагрева погаснет, отключите утюг от
электросети.
3 Осторожно проведите утюгом по куску ненужной ткани,
чтобы стереть с подошвы остатки воды.
Хранение
1 Выньте сетевую вилку из розетки электросети, дайте утюгу
остыть и установите парорегулятор в положение O.
2 Очистите утюг и удалите накипь и другие загрязнения с
подошвы утюга с помощью кусочка ткани, смоченного
неабразивным (жидким) чистящим средством.
Следите за тем, чтобы поверхность подошвы утюга оставалас
гладкой: не допускайте её соприкосновения с металлическими
предметами.
РУССКИЙ

41
Запрещается использовать губки с абразивным покрытием, уксус
или другие химические средства.
C
3 Регулярно промывайте резервуар для воды и сливайте воду
после промывки.
C
4 Намотайте шнур питания на приспособление для хранения
шнура.
5 Всегда храните утюг в вертикальном положении, установив
его на задний торец корпуса в сухом и безопасном месте.
Защита окружающей среды
C
◗ После окончания срока службы не выбрасывайте прибор
вместе с бытовыми отходами. Передайте его в
специализированный пункт для дальнейшей утилизации. Этим
вы поможете защитить окружающую среду.
Гарантия и обслуживание
Для получения дополнительной информации или в случае
возникновения проблем зайдите на веб-сайт www.philips.com или
обратитесь в Центр поддержки покупателей в вашей стране
(номер телефона центра указан на гарантийном талоне). Если
подобный центр в вашей стране отсутствует, обратитесь в
местную торговую организацию Philips или в отдел поддержки
покупателей компании Philips Domestic Appliances and Personal
Care BV.
РУССКИЙ

42
Способы решения
Проверьте исправность шнура
питания, вилки и розетки
электросети.
Установите дисковый регулятор
нагрева в рекомендуемое
положение.
Заполните резервуар для воды (см.
раздел Заполнение резервуара для
воды главы Подготовка прибора к
работе).
Установите терморегулятор в
положение Á, Ë или È (см. раздел
Глажение с паром главы
Использование прибора).
Установите дисковый регулятор
нагрева в положение глажения с
паром (от 2 до MAX). Установите
утюг вертикально и дождитесь
выключения индикатора нагрева
перед началом глажения.
Придайте утюгу горизонтальное
положение и подождите некоторое
время перед повторным
использованием функции Паровой
удар (Вертикальный паровой удар).
Установите дисковый регулятор
нагрева в положение глажения с
паром (от 2 до MAX). Установите
утюг вертикально и дождитесь
выключения индикатора нагрева
перед началом глажения.
Воспользуйтесь несколько раз
функцией очистки от накипи (см.
раздел Функция очистки от накипи
Calc-Clean главы Чистка и
обслуживание).
Приподнимите утюг и слегка
сдвиньте его, чтобы отменить
автоматическое отключение.
Красный индикатор перестанет
мигать.
Нажмите на крышку до щелчка.
Возможная(ые) причина(ы)
Неправильное подключение
Дисковый регулятор нагрева
установлен на MIN
Резервуар для воды не заполнен.
Парорегулятор установлен в
положение O.
Подошва утюга недостаточно
нагрета и/или включена
противокапельная система (только
для определенных моделей).
Функция Паровой удар
(Вертикальный паровой удар)
использовалась слишком часто за
короткий промежуток времени.
Утюг недостаточно нагрет.
Из-за использования жесткой воды
внутри подошвы утюга образуется
накипь.
Сработала функция автоматического
отключения утюга (см. раздел
Другие функции главы Другие
функциональные особенности).
Крышка наливного отверстия
закрыта неплотно.
Неисправность
Утюг включен в сеть, но подошва
холодная.
Нет пара
Не производится выброс пара или
вертикальный выброс пара (только у
определенных моделей).
Во время глажения из отверстий
подошвы поступают хлопья накипи
и грязь.
Мигает красный индикатор (только у
GC2225 и GC2130).
Капли воды попадают на ткань
(только для моделей
GC2225/2220/2215/GC2130/2126/21
25/2120)
Поиск и устранение неисправностей
Данный раздел посвящен наиболее общим вопросам использования утюга. Для получения
более подробной информации прочитайте другие разделы руководства. Если самостоятельно
справиться с возникшими проблемами не удается, обратитесь в центр поддержки покупателей
Philips вашей страны.
РУССКИЙ

43
Способы решения
Установите дисковый регулятор
нагрева в положение глажения с
паром (от 2 до MAX). Установите
утюг вертикально и дождитесь
выключения индикатора нагрева
перед началом глажения.
После использования утюга слейте
воду из резервуара для воды и
установите парорегулятор в
положение O. Храните утюг в
вертикальном положении.
Возможная(ые) причина(ы)
Установлена недостаточно высокая
степень нагрева.
Утюг был установлен в
горизонтальное положение, а
резервуар для воды оставался
заполненным.
Неисправность
Капли воды попадают на ткань
(только для моделей
GC2215/2120/2115/2110/2105)
После остывания или во время
хранения утюга из его подошвы
вытекает вода.
РУССКИЙ

Všeobecný popis (obr. 1)
A Rozprašovací tryska
B Víčko plnicího otvoru (pouze typy
GC2225/2220/2215/GC2130/2126/2125/2120)
C Plnicí otvor
D Tlačítko parního impulsu 9 (pouze typy
GC2225/2220/2215/GC2130/2126/2125/2120/2115/2110)
E Tlačítko rozprašovače T
F Regulátor páry
O = bez páry
Á = minimum páry
q = střední množství páry (pouze typy
GC2225/2220/2215/GC2130/2126/2125/2120)
w = maximum páry
1 = funkce Calc-Clean
G Funkce mimořádný parní impuls (pouze typ GC2105)
H Kontrolka teploty (všechny typy) a kontrolka automatického vypnutí
(pouze typy GC2225/GC2130)
I Regulátor teploty
J Síťová šňůra
K Indikátor teploty
L Typový štítek
M Nádržka na vodu
Důležité
Před použitím přístroje si přečtěte pečlivě tento návod a uschovejte ho
pro případné pozdější nahlédnutí.
◗ Než přístroj připojíte k síti, zkontrolujte, zda napětí na typovém
štítku odpovídá napětí elektrické sítě.
◗ Přístroj připojujte výhradně do řádně uzemněných zásuvek.
◗ Přístroj nepoužívejte, pokud je viditelně poškozena zástrčka,
síťová šňůra nebo samotný přístroj, pokud přístroj spadl na zem
nebo z něj odkapává voda.
◗ Pravidelně kontrolujte, zda není poškozena síťová šňůra.
◗ Pokud by byla poškozena síťová šňůra, musí její výměnu provést
společnost Philips, servis autorizovaný společností Philips nebo
obdobně kvalifikovaní pracovníci,abyste předešli možnému
nebezpečí.
◗ Přístroj nikdy nenechávejte bez dozoru,je-li zapojen do elektrické
sítě.
◗ Žehličku nebo stojánek nikdy neponořujte do vody.
◗ Přístroj neponechávejte v dosahu dětí.
◗ Nedotýkejte se žehlicí plochy, je velmi horká a mohli byste se
spálit.
◗ Síťová šňůra se nesmí dostat do kontaktu s horkou žehlicí
plochou.
◗ Po ukončení žehlení,při čištění přístroje, při plnění či
ČEŠTINA44

45
vyprazdňování nádržky na vodu i při krátkém ponechání žehličky
bez dozoru: nastavte regulátor páry do polohy O,postavte
žehličku na zadní stranu a vytáhněte síťovou zástrčku ze zásuvky
ve zdi.
◗ K odkládání žehličky a umístění stojánku i pro vlastní žehlení
používejte stabilní vodorovný podklad.
◗ Do nádržky na vodu nelijte parfém, ocet, škrob, odvápňovací
prostředky, změkčovadla či jiné chemické látky.
◗ Přístroj je určen výhradně pro použití v domácnosti.
Před prvním použitím
C
1 Sejměte případné nálepky či ochranné folie z žehlicí plochy.
Sejměte také úložný obal, je-li dodáván.
2 Zahřejte žehličku na maximální teplotu a přežehlete kousek
vlhké textilie, abyste odstranili všechny zbytky nečistot z žehlicí
plochy.
Při prvním použití může ze žehličky unikat slabý kouř.Tento jev však
brzy zmizí.
Příprava k použití
Naplnění nádržky na vodu
1 Odpojte síťovou zástrčku ze zásuvky ve zdi.
C
2 Nastavte regulátor páry do polohy O (= bez páry).
3 Otevřete víčko plnicího otvoru (pouze u některých typů).
C
4 Nakloňte žehličku a naplňte nádržku na vodu až po značku
maxima.
Neplňte vodní zásobník nad úroveň značky MAX.
5 Uzavřete víčko plnicího otvoru (ozve se zaklapnutí) (pouze u
některých typů).
Pokud je voda ve vaší oblasti nadměrně tvrdá, doporučujeme vám
používat destilovanou vodu. Nepoužívejte ocet, škrob nebo chemicky
upravovanou vodu.
ČEŠTINA

46
Nastavení teploty
◗ Při prvním použití může ze žehličky unikat slabý kouř.Tento jev
však brzy zmizí.
C
1 Položte žehličku na zadní stranu a otočením regulátoru teploty
nastavte požadovanou teplotu pro žehlení.
- Teplotu žehlení si také ověřte na cedulce žehleného prádla.
- 1 Syntetické materiály (akrylát, viskóza, polyamid, polyester)
- 1 Hedvábí
- 2 Vlna
- 3 Bavlna, plátno
- Pokud nevíte, z jakých základních materiálů je oděv vyroben, určete
správnou teplotu žehlení na malé části oděvu, která není při nošení
vidět.
- Hedvábné, vlněné nebo syntetické materiály: žehlete po rubové
straně, aby se nevytvořily lesklé plochy. Nepoužívejte rozprašovač, aby
se nevytvořily skvrny.
2 Zasuňte zástrčku do zásuvky ve zdi.
3 Když kontrolka teploty zhasne, ještě chvíli před začátkem
žehlení počkejte.
B
Kontrolka teploty se během žehlení opakovaně rozsvítí.
Použití přístroje
Žehlení s párou
Zkontrolujte, zda je v nádržce dostatek vody.
1 Nastavte regulátor teploty na doporučenou hodnotu.
Viz kapitola „Nastavení teploty".
C
2 Nastavte regulátor páry do odpovídající polohy.
- Á pro minimum páry (nastavení teploty 2 a 3).
- Ë pro střední množství páry (nastavení teploty 3 až MAX)
(pouze některé typy).
- È pro maximum páry (nastavení teploty 3 až MAX).
B
Pára začne být produkována, jakmile je dosaženo nastavené teploty.
Pouze typy GC2215/2120/2115/2110/2105:
Pokud je nastavena příliš nízká teplota (MIN až 2), z žehlicí plochy
může odkapávat voda.
ČEŠTINA

47
Žehlení bez páry
1 Nastavte regulátor páry do polohy O (= bez páry).
2 Nastavte regulátor teploty na doporučenou hodnotu.
Viz kapitola „Nastavení teploty".
Speciální funkce
Zvlhčení vodou
Pro odstranění nepoddajných záhybů při jakékoli nastavené teplotě.
1 Zkontrolujte, zda je v nádržce dostatek vody.
C
2 Opakovaným stlačením tlačítka rozprašovače navlhčete žehlený
oděv.
Funkce mimořádný parní impuls (pouze u některých typů)
Tato funkce dodá velké množství páry pro vyrovnání nepoddajných
záhybů.
Funkce mimořádný parní impuls funguje pouze při nastavené teplotě
mezi 3 a MAX.
C
1 Nastavte regulátor páry na maximum È.
C
2 Stiskněte a podržte tlačítko regulátoru páry maximálně
5 sekund.
3 Před dalším použitím funkce impulsu počkejte asi 1 minutu,aby
ze žehlicí plochy neodkapávala voda.
Parní impuls (pouze některé typy)
Silný parní impuls usnadňuje vyrovnání nepoddajných záhybů.
Funkce parní impuls funguje pouze při nastavené teplotě mezi 2 a
MAX.
ČEŠTINA

48
C
1 Stiskněte a uvolněte tlačítko parního impulsu.
Vertikální parní impuls (pouze typy
GC2225/2220/2215/2130/2126/2125/2120/2115)
C
1 Funkci parního impulsu je možné použít také při držení
žehličky ve svislé poloze.To je užitečné při odstraňování
přehybů u zavěšených oděvů,záclon atd.
Nikdy nemiřte párou na jiné osoby.
Funkce Drip stop (pouze typy
GC2225/2220/GC2130/2126/2125)
Tato žehlička je vybavena funkcí Drip-stop: žehlička přestane vytvářet
páru, pokud je teplota příliš nízká a voda odkapává z žehlicí plochy. Při
uzavření uslyšíte zřetelné cvaknutí.
Automatické vypnutí (pouze u některých typů)
Elektronické bezpečnostní zařízení automaticky vypne topné těleso,
pokud s žehličkou nějakou dobu nehýbete.
C
◗ Po vypnutí topného tělesa začne blikat kontrolka automatického
vypnutí.
Chcete-li, aby se žehlička znovu ohřála: zdvihněte ji nebo s ní lehce
pohněte. Kontrolka automatického vypnutí zhasne.
1 Pokud se rozsvítí kontrolka teploty, počkejte až zhasne, teprve
pak pokračujte v žehlení.
2 Pokud se kontrolka teploty nerozsvítí, je žehlička připravená k
použití.
ČEŠTINA

Čištění a údržba
Funkce Calc-Clean
◗ Funkce Calc-Clean odstraňuje částečky vodního kamene.
Funkci Calc-Clean používejte každé dva týdny. Pokud je voda ve vaší
oblasti nadměrně tvrdá (ze žehlicí plochy se při žehlení odlupují šupinky
vodního kamene), použijte tuto funkci ještě častěji.
1 Nastavte regulátor páry do polohy O.
2 Nádržku na vodu naplňte až po označení maximální hladiny.
Nenalévejte do nádržky na vodu ocet nebo jiné přípravky k odstranění
vodního kamene.
C
3 Nastavte regulátor teploty na MAX.
4 Zasuňte zástrčku do síťové zásuvky.
5 Po zhasnutí kontrolky teploty odpojte žehličku ze zásuvky.
6 Podržte žehličku nad dřezem a regulátor páry nastavte do
polohy 1 (Calc-Clean).Tlačítko regulátoru páry se mírně
vysune.
C
7 Vysuňte tlačítko regulátoru páry směrem nahoru a vyjměte
jehlu.
C
8 Držte žehličku nad dřezem a pohybujte s ní sem a tam.
B
Z žehlící plochy začne vystupovat pára a horká voda, s níž jsou
vyplaveny případné nečistoty a vodní kámen.
C
9 Pokud jsou na jehle částice vodního kamene, odstraňte je z
jehly octem.
Dbejte na to, abyste jehlu neohnuli nebo jinak nepoškodili.
49ČEŠTINA

50
C
10 Jehlu regulátoru páry vraťte zpět tak, že její hrot opatrně
vložíte do malého otvoru ve středu dutiny a pak ji zvolna do
otvoru zasunete.Tlačítko regulátoru páry nastavte do polohy
O.
11 Pokud žehlička stále obsahuje množství nečistot, postup
opakujte.
Po ukončení procesu Calc-Clean
1 Zapněte žehličku, aby se žehlicí plocha vysušila.
2 Po zhasnutí kontrolky teploty odpojte žehličku ze zásuvky.
3 Lehce přežehlete kousek použité látky, aby se odstranil povlak,
který se mohl utvořit na žehlicí ploše.
Skladování
1 Odpojte síťovou zástrčku ze zásuvky ve zdi,nechejte žehličku
vychladnout a nastavte regulátor páry do polohy O.
2 Pomocí navlhčené utěrky s trochou tekutého čisticího
prostředku otřete žehličku a z žehlicí plochy odstraňte
případné zbytky vodního kamene.
Aby zůstala žehlicí plocha hladká, chraňte ji před přímým kontaktem s
kovovými předměty.
K čištění žehlicí plochy nikdy nepoužívejte drátěnku, ocet ani jiné
chemikálie.
C
3 Pravidelně nádržku na vodu vyplachujte vodou a nakonec ji
vyprázdněte.
C
4 Síťovou šňůru oviňte kolem příslušné části.
5 Žehličku vždy uchovávejte na bezpečném suchém místě,
postavenou ve svislé poloze na zadní stěně.
ČEŠTINA

Ochrana životního prostředí
C
◗ Až přístroj doslouží, nevyhazujte jej do běžného komunálního
odpadu, ale odevzdejte jej do sběrny určené pro recyklaci.
Chráníte tím životní prostředí.
Záruka a servis
Pokud byste měli jakýkoliv problém nebo byste potřebovali nějakou
informaci, navštivte webovou stránku www.philips.com, nebo
kontaktujte Informační středisko firmy Philips.Adresu, telefonní čísla a
další spojení na Informační servis najdete v letáčku s celosvětovou
zárukou. Pokud není Informační středisko ve vaší zemi, můžete
kontaktovat místního dodavatele výrobků Philips nebo oddělení Service
Department of Philips Domestic Appliances and Personal Care BV.
51ČEŠTINA

52
Řešení
Zkontrolujte síťovou šňůru, zástrčku i
zásuvku ve zdi.
Nastavte regulátor na požadovanou
teplotu.
Naplňte nádržku vodou (viz kapitola
„Příprava k použití", odstavec „Plnění
nádržky vodou".)
Nastavte regulátor páry do polohy Á,
Ë nebo È (viz kapitola „Použití
přístroje", odstavec „Žehlení s párou").
Nastavte regulátor teploty do polohy,
která je vhodná pro žehlení s párou (
až MAX). Položte žehličku na zadní
stranu a než začnete žehlit vyčkejte, až
zhasne kontrolka teploty.2
Postavte žehličku do vodorovné
polohy a chvíli počkejte, než použijete
další parní impuls nebo vertikální parní
impuls.
Nastavte regulátor teploty do polohy,
která je vhodná pro žehlení s párou (
až MAX). Položte žehličku na zadní
stranu a než začnete žehlit vyčkejte, až
zhasne kontrolka teploty.2
Několikrát použijte funkci Calc-Clean
(viz kapitola „Čištění a údržba",
odstavec „Funkce Calc-Clean").
Zdvihněte žehličku nebo s ní mírně
pohněte, aby došlo k deaktivaci funkce
automatického vypnutí: červená
kontrolka přestane blikat.
Stlačte víčko, dokud neuslyšíte
zaklapnutí.
Nastavte regulátor teploty do polohy,
která je vhodná pro žehlení s párou (
až MAX). Položte žehličku na zadní
stranu a než začnete žehlit vyčkejte, až
zhasne kontrolka teploty.2
Po použití vodní nádržku vyprázdněte
a regulátor páry nastavte do polohy
O. Žehličku ukládejte ve svislé poloze
na zadní stranu.
Možné příčiny
Problém s připojením
Regulátor teploty je nastaven na MIN
Nedostatek vody v nádržce na vodu
Regulátor páry je nastaven do polohy
O.
Žehlicí plocha není dostatečně horká
nebo je zapnutý systém Drip stop
(pouze u některých typů).
Parní impuls a vertikální parní impuls
byly aktivovány příliš rychle za sebou.
Žehlicí plocha není dostatečně horká.
Šupinky se vytvářejí kvůli nadměrně
tvrdé vodě.
Je zapnutá funkce automatického
vypnutí (viz kapitola „Speciální funkce",
odstavec „Automatické vypnutí").
Víčko nádržky na vodu nebylo řádně
uzavřeno.
Nastavená teplota je příliš nízká.
Žehlička byla postavena do vodorovné
polohy, když v nádržce byla voda.
Problém
Žehlička je zapojená do zásuvky, ale
žehlicí plocha je studená.
Nevytváří se pára
Nevytváří se parní impuls ani vertikální
parní impuls (pouze u některých typů).
Ze žehlicí plochy se při žehlení odlupují
šupinky a jiné nečistoty.
Červená kontrolka bliká (pouze typy
GC2225 a GC2130).
Kapičky vody na látce (pouze typy
GC2225/2220/2215/GC2130/2126/21
25/2120)
Kapičky vody na látce (pouze typy
GC2215/2120/2115/2110/2105)
Z žehlicí plochy, po jejím vychladnutí a
uložení, odkapává voda.
Řešení problémů
Tato kapitola obsahuje informace o nejčastějších problémech, které se mohou při používání žehličky
vyskytnout.Více informací naleznete v dalších kapitolách. Pokud se vám daný problém nepodaří
vyřešit, obraťte se na Informační středisko společnosti Philips ve vaší zemi.
ČEŠTINA

Általános leírás (1. ábra)
A Vízpermetező orr
B Vízbetöltő nyílás fedele (csak a
GC2225/2220/2215/GC2130/2126/2125/2120 típusoknál)
C Vízbetöltő nyílás
D Gőzlövet gomb 9 (csak a
GC2225/2220/2215/GC2130/2126/2125/2120/2115/2110
típusoknál)
E Vízpermetező gomb T
F Gőzvezérlés gomb
O = nincs gőz
Á = minimális gőz
q = mérsékelt gőz (a
GC2225/2220/2215/GC2130/2126/2125/2120 típusoknál)
w = maximális gőz
1 = Vízkőmentesítő funkció
G Extra gőz funkció (csak a GC2105 típusnál)
H Hőmérsékletjelző-fény (minden típusnál) és automatikus
kikapcsolást jelző lámpa (csak a GC2225/GC2130 típusnál)
I Hőfokszabályozó
J Hálózati kábel
K Hőmérsékletjelző
L Típusazonosító tábla
M Víztartály
Fontos!
A készülék első használata előtt figyelmesen olvassa el a használati
útmutatót. Őrizze meg az útmutatót későbbi használatra.
◗ A készülék csatlakoztatása előtt ellenőrizze, hogy a rajta
feltüntetett feszültség egyezik-e a helyi hálózati feszültséggel.
◗ Kizárólag földelt fali konnektorhoz csatlakoztassa a készüléket.
◗ Ne használja a készüléket, ha a csatlakozó dugón, a hálózati
kábelen, vagy a készüléken látható sérülés van,vagy ha a készülék
leesett vagy szivárog.
◗ Ellenőrizze rendszeresen,hogy nem sérült-e meg a hálózati kábel.
◗ Ha a hálózati kábel meghibásodott, a kockázatok elkerülése
érdekében Philips szakszervizben, vagy hivatalos szakszervizben ki
kell cserélni.
◗ Ne hagyja a készüléket felügyelet nélkül, ha a hálózathoz
csatlakoztatta.
◗ Ne merítse a vasalót és az állványt (ha van ilyen) víz alá.
◗ Tartsa a készüléket biztonságos távolságban gyermekektől.
◗ A vasalótalp hőmérséklete igen magas lehet, égési sérülést
okozhat.
◗ Ne engedje, hogy a hálózati kábel a forró vasalótalphoz érjen.
◗ A vasalás végeztével, a készülék tisztításakor, a víztartály
feltöltésekor vagy leeresztésekor, illetve, ha rövid időre
megszakítja a vasalást; mindig állítsa a gőzszabályzót O fokozatra,
MAGYAR 53

54
állítsa fel a vasalót függőleges helyzetbe és húzza ki a hálózati
dugót a fali konnektorból.
◗ A vasalót, illetve az állványt mindig stabil, vízszintes és egyenletes
felületen használja és tárolja.
◗ Ne töltsön parfümöt, ecetet, keményítőt, vízkőmentesítő szert,
vasalási segédanyagokat vagy egyéb vegyszert a víztartályba.
◗ A készüléket kizárólag háztartási használatra tervezték.
Teendők az első használat előtt
C
1 Távolítson el minden címkét és védőfóliát a vasalótalpról,
valamint a tárolásnál használt vasalótalpborítást is, ha van ilyen.
2 Melegítse fel a vasalót maximális hőmérsékletre, és néhány
percen át nedves szövetdarabot vasalva tisztítsa meg a
vasalótalpat a lerakódásoktól.
Elképzelhető, hogy a vasaló első használatakor rövid ideig kissé füstöl.
Előkészítés
A víztartály feltöltése
1 Húzza ki a hálózati dugót a fali konnektorból.
C
2 Állítsa a gőzvezérlő gombot O (= nincs gőz) pozícióba.
3 Nyissa fel a vízbetöltő nyílás fedelét (a meghatározott
típusoknál).
C
4 Döntse meg a vasalót, és töltse fel a víztartályt a maximális
szintjelzésig.
Ne töltse a víztartályt a MAX jelzés fölé.
5 Zárja be a vízbetöltő nyílást kattanásig (a meghatározott
típusoknál).
Amennyiben lakóhelyén a csapvíz nagyon kemény, desztillált víz
használatát javasoljuk. Ne használjon ecetet, keményítőt vagy vegyileg
mésztelenített vizet.
A hőmérséklet beállítása
◗ Elképzelhető, hogy a vasaló első használatakor rövid ideig kissé
füstöl.
MAGYAR
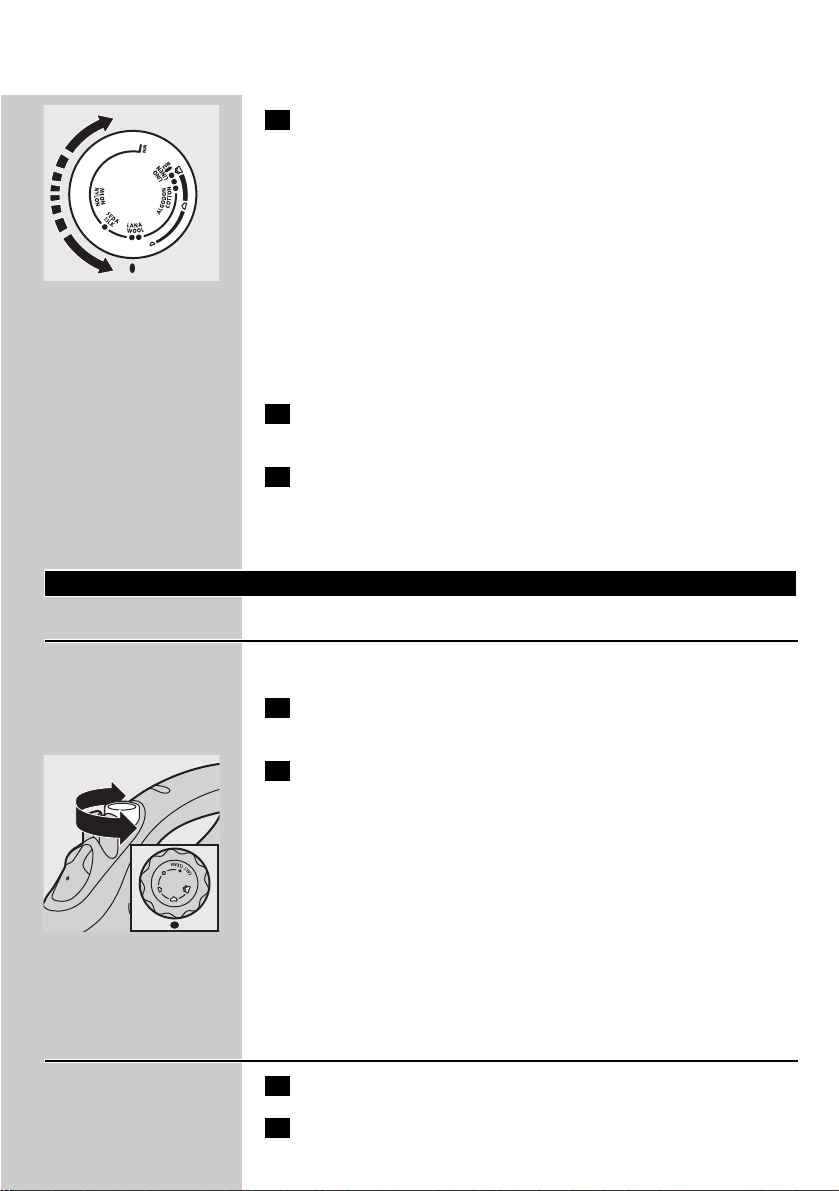
55
C
1 Állítsa a vasalót függőleges helyzetbe, és állítsa a hőfokot a
kívánt vasalási hőértékre.
- Ellenőrizze a ruhacímkén az előírt vasalási hőmérsékletet.
- 1 Szintetikus anyagok (pl. akril, viszkóz, poliamid, poliészter)
- 1 Selyem
- 2 Gyapjú
- 3 Pamut, vászon
- Ha nem tudja, milyen anyagból vagy anyagokból készült a ruhanemű,
végezzen próbavasalást olyan részen, ami viseléskor vagy használatkor
nem látszik.
- Selyem, gyapjú és műszálas anyagok: visszájáról vasalja az anyagot,
hogy ne keletkezzenek rajta fényes csíkok. Ne használja a
vízpermetezési funkciót, így elkerülheti a foltok képződését.
2 Csatlakoztassa a vasaló hálózati dugóját földelt fali
konnektorba.
3 A hőfokjelző-lámpa kialvása után várjon egy kicsit, mielőtt
hozzáfogna a vasaláshoz.
B
Vasalás közben a jelzőlámpa időnként bekapcsol.
A készülék használata
Gőzölős vasalás
Győződjön meg róla, hogy a víztartályban elegendő víz legyen.
1 Állítsa a hőmérsékletszabályozót a megfelelő fokozatba.
Lásd a „A hőmérséklet beállítása” c. részt.
C
2 Állítsa a gőzvezérlő gombot a megfelelő gőzpozícióba.
- Á minimális gőz (2 és 3 közötti hőfok mellett)
- Ë mérsékelt gőz (3 és MAX közötti hőfok mellett)
(a meghatározott típusoknál).
- È maximális gőz (3 és MAX közötti hőfok mellett)
B
Amint a készülék eléri a beállított hőmérsékletet, elkezdheti a gőzölős
vasalást.
csak a GC2215/2120/2115/2110/2105 típusoknál:
Ha a beállított hőfok túl alacsony (MIN és 2 között), víz szivároghat a
vasalótalpból.
Vasalás gőz nélkül
1 Állítsa be a gőzvezérlő gombot O fokozatba (= nincs gőz).
2 Állítsa a hőmérsékletszabályozót a megfelelő fokozatba.
Lásd a „A hőmérséklet beállítása” c. részt.
MAGYAR

Tulajdonságok
Vízpermet
Makacs ráncok eltávolítása bármilyen hőmérsékleten
1 Győződjön meg róla, hogy a víztartályban elegendő víz legyen.
C
2 A vízpermetező gombot néhányszor megnyomva nedvesítse be
a vasalandó ruhát.
Extra gőz (a meghatározott típusoknál)
Ez a funkció extra gőzt ad a legmakacsabb gyűrődések kisimításához.
Az Extra gőz funkció csak 3 és MAX közötti hőmérséklet
beállításoknál működik.
C
1 Fordítsa a gőzszabályozót maximális (È) állásba.
C
2 Nyomja le a gőzszabályozó gombot legfeljebb 5 másodpercre.
3 Az Extra gőz funkció ismételt használata előtt várjon legalább 1
percet, ezzel megakadályozza a vízcseppek kicseppenését a
vasalótalpból.
Gőzlövet (a meghatározott típusoknál)
Az erőteljes gőzlövet segít a nagyon makacs gyűrődések eltávolításában.
A gőzlövet funkció kizárólag a 2 és a MAX közötti hőfokbeállításnál
működik.
C
1 Nyomja le, majd engedje fel a gőzlövet gombot.
56 MAGYAR

57
Függőleges gőzlövet (csak a
GC2225/2220/2215/2130/2126/2125/2120/2115 típusoknál)
C
1 A gőzlövet funkció függőleges helyzetű vasalóval is használható.
Így a felfüggesztett textíliák, függönyök stb. gyűrődéseinek
kilsimítására is alkalmas.
Soha ne irányítsa a gőzt emberek felé.
Cseppzáró rendszer (csak a
GC2225/2220/GC2130/2126/2125 típusoknál)
Ez a vasaló cseppzáró funkcióval van ellátva: a vasaló automatikusan
leállítja a gőzölést, ha a hőmérséklet túl alacsony, hogy elkerülje a
vízcsepegést a vasalótalpból. Ilyenkor kattanó hang hallható.
Automatikus kikapcsolás (a meghatározott típusoknál)
Egy elektronikus biztonsági szerkezet automatikusan kikapcsolja a
fűtőszálat, ha a vasalót egy ideig mozdulatlan marad.
C
◗ Annak jelzésére, hogy a fűtőszál kikapcsolt,a piros automatikus
kikapcsolást jelző lámpa elkezd villogni.
A vasaló újbóli felmelegítéséhez: emelje fel vagy mozdítsa meg a vasalót.
Ekkor az automatikus kikapcsolást jelző lámpa kialszik.
1 Ha a hőmérsékletjelző fény világít, várjon míg elalszik és csak
utána kezdjen el vasalni.
2 Ha a hőmérsékletjelző fény nem világít, a vasaló készen áll a
használatra.
Tisztítás és karbantartás
Vízkőmentesítő funkció
◗ A vízkőmentesítő funkció eltávolítja a vízkőlerakódásokat.
A vízkőmentesítő funkciót kéthetenként egyszer alkalmazza. Ha
körzetében a víz nagyon kemény (vízkőlerakódások jönnek ki a
vasalótalpból vasalás közben), a vízkőmentesítő funkciót gyakrabban kell
alkalmaznia.
1 Állítsa a gőzvezérlőt O állásba.
2 Töltse fel a víztartályt a maximális szintig.
MAGYAR

58
Ne töltsön a víztartályba ecetet vagy egyéb vízkőmentesítő szert.
C
3 Állítsa a hőmérsékletet MAX-ra.
4 Csatlakoztassa a hálózati dugót a fali konnektorba.
5 Amikor a hőmérsékletjelző LED elalszik, húzza ki a hálózati
dugót a fali konnektorból.
6 Tartsa a vasalót a mosogató fölé, s fordítsa a gőzszabályozót 1
állásba (vízkőmentesítés).A gőzszabályozó gomb kissé
megemelkedik.
C
7 Húzza fel a gőzszabályozó gombot,majd távolítsa el a
gőzszabályozó tűt.
C
8 Tartsa a vasalót a mosogató fölé, és óvatosan rázogassa a
készüléket.
B
A vasalótalpból gőz és forró víz áramlik ki, kimosva a készülékben lévő
szennyeződéseket és vízkőlerakódásokat.
C
9 Ecet segítségével távolítsa el a tűről az esetleges
vízkőlerakódást.
Ne hajlítsa meg, és ne sértse meg a gőzvezérlő tűt.
C
10 Tegye vissza a gőzszabályzó tűt úgy,hogy a tű hegyét pontosan
a lyuk közepébe dugja, és illessze a tű oldalán lévő kis kiálló
részt a résbe. Állítsa a gőzszabályzót gombot O pozícióba.
11 Amennyiben ezek után is sok szennyeződés marad a vasalóban,
ismételje meg az eljárást.
A vízkőmentesítést követő teendők
1 Dugja a hálózati csatlakozó dugót a fali konnektorba,és hagyja
megszáradni a vasalótalpat.
MAGYAR

59
2 Amikor a hőmérsékletjelző fény elalszik,húzza ki a hálózati
dugót a fali konnektorból.
3 Mozgassa könnyedén a vasalót egy használt ruhadarabon, hogy
a vasalótalpon lévő vízfoltokat eltávolítsa.
Tárolás
1 Húzza ki a hálózati dugót a fali konnektorból, hagyja a vasalót
lehűlni, és állítsa a gőzszabályzó gombot O pozícióra.
2 Törölje le a vasalótalpról a vízkődarabkákat és az egyéb
lerakódásokat nedves ruhával és nem karcoló (folyékony)
tisztítószerrel.
A vasalótalp épségének megóvása érdekében kerülje fémtárggyal való
érintkezését.
Ne használjon súrolószivacsot, ecetet vagy egyéb vegyszereket.
C
3 Rendszeresen öblítse ki a víztartályt, majd tisztítás után ürítse ki.
C
4 Csévélje a hálózati kábelt a kábeltárolóra.
5 A vasalót mindig függőleges helyzetbe állítva tárolja, biztonságos
és száraz helyen.
Környezetvédelem
C
◗ A leselejtezett készülék szelektív lakossági hulladékként
kezelendő. Kérjük, hivatalos újrahasznosító gyűjtőhelyen adja le,
így hozzájárul a környezet védelméhez.
Jótállás és szerviz
Ha információra van szüksége, vagy ha valamilyen probléma merült fel,
látogasson el a Philips honlapjára (www.philips.com), vagy forduljon az
adott ország Philips vevőszolgálatához (a telefonszámot megtalálja a
világszerte érvényes garancialevélen). Ha országában nem működik
vevőszolgálat, forduljon a Philips helyi szaküzletéhez vagy a Philips
háztartási kisgépek és szépségápolási termékek üzletágának
vevőszolgálatához.
MAGYAR

Megoldás
Ellenőrizze a kábelt, a dugót és a fali
konnektort.
Állítsa a hőfokszabályozót a megfelelő
fokozatba.
Töltse fel a víztartályt (lásd az
„Előkészítés” fejezet „A víztartály
feltöltése” című részét).
Állítsa a gőzszabályozót Á, Ë vagy È
állásba (lásd „A készülék használata”
fejezet „Gőzölős vasalás” című részét).
Fordítsa a hőfokszabályozó tárcsát
gőzölős vasalás állásba (2 és MAX
közé). Állítsa a vasalót függőleges
helyzetbe, majd várja meg,hogy a
hőfokjelző LED elaludjon. Most
elkezdheti a vasalást.
Állítsa a vasalót vízszintes helyzetbe, s a
(függőleges) gőzlövet újbóli
alkalmazása előtt várjon egy kis ideig.
Fordítsa a hőfokszabályozó tárcsát
gőzölős vasalás állásba (2 és MAX
közé). Állítsa a vasalót függőleges
helyzetbe, majd várja meg,hogy a
hőfokjelző fény elaludjon. Most
elkezdheti a vasalást.
Vízkőmentesítse a készüléket
néhányszor egymás után (lásd a
„Tisztítás és karbantartás” fejezet
„Vízkőmentesítés” című részét).
Az automatikus kikapcsolás funkció
deaktiválásához emelje fel, vagy enyhén
mozgassa meg a készüléket. Ekkor a
vörös lámpa elalszik.
Nyomja lefelé a vízbetöltő nyílás
fedelét, amíg kattanást nem hall.
Fordítsa a hőfokszabályozó tárcsát
gőzölős vasalás állásba (2 és MAX
közé). Állítsa a vasalót függőleges
helyzetbe, majd várja meg,hogy a
hőfokjelző fény elaludjon. Most
elkezdheti a vasalást.
Használat után ürítse ki a víztartályt és
állítsa a gőzvezérlőt O helyzetbe. A
vasalót függőleges helyzetben tárolja.
Lehetséges ok(ok)
Csatlakoztatási hiba
A hőfokszabályozó tárcsa MIN állásban
van.
Nincs elég víz a víztartályban.
Állítsa a gőzvezérlőt a O pozícióba.
Nem elég forró a vasalótalp, és/vagy
aktiválódott a cseppzáró funkció (a
meghatározott típusoknál).
A (függőleges) gőzlövetet túl gyorsan
használta rövid időn belül.
A vasalótalp nem elég forró.
A kemény víz vízkőlerakódásokat
képez a vasalótalp belsejében.
Az automatikus kikapcsolás funkció
aktiválódott (lásd a „Egyéb funkciók”
fejezet „Automatikus kikapcsolás” c.
részét).
A vízbetöltő nyílás fedele nincs
rendesen lezárva.
A hőmérsékletet túl alacsonyra
állította.
A vasaló vízszintes helyzetben van, és
víz van a víztartályban.
Probléma
A vasaló hálózati dugóját a fali
konnektorba csatlakoztatta, a vasalótalp
mégis hideg.
Nincs gőz
Nincs gőzlövet vagy nincs függőleges
gőzlövet (a meghatározott típusoknál).
Vasalás közben vízkőlerakódások és
szennyeződések jönnek ki a
vasalótalpból.
A vörös lámpa világít (csak a GC2225
és a GC2130 típusnál).
Vízcseppek az anyagon (csak a
GC2225/2220/2215/GC2130/2126/21
25/2120 típusoknál)
Vízcseppek az anyagon (csak a
GC2215/2120/2115/2110/2105
típusoknál)
A vasaló lehűlése után vagy tárolás
közben víz csepeg a vasalótalpból.
Hibaelhárítás
Ez a fejezet részletesen foglalkozik a vasalóval kapcsolatban leggyakrabban felmerülő problémákkal. Ha
nem sikerül megoldania a problémát, forduljon az országában működő Philips vevőszolgálathoz.
MAGYAR60

Opis zariadenia (obr. 1)
A Hubica na kropenie
B Plniaci uzáver (Iba modely
GC2225/2220/2215/GC2130/2126/2125/2120)
C Plniaci otvor
D Tlačidlo Impulz pary 9 (Iba modely
GC2225/2220/2215/GC2130/2126/2125/2120/2115/2110)
E Tlačidlo kropenia T
F Ovládanie naparovania
O = bez pary
Á = minimálne množstvo pary
q = mierne množstvo pary (Iba modely
GC2225/2220/2215/GC2130/2126/2125/2120)
w = maximálne množstvo pary
1 = funkcia Calc-Clean
G Funkcia prídavného prúdu pary (len model GC2105)
H Kontrolné svetlo nastavenia teploty (všetky modely) a kontrolné
svetlo automatického vypnutia (len model GC2225/GC2130)
I Koliesko na nastavenie teploty
J Sieťový kábel
K Indikátor teploty
L Štítok s označením modelu
M Zásobník na vodu
Dôležité
Pred použitím zariadenia si pozorne prečítajte tieto pokyny na použitie
a uschovajte ich pre referenciu do budúcnosti.
◗ Skôr, ako zariadenie pripojíte do siete, skontrolujte,či napätie
uvedené na štítku s označením modelu súhlasí s napätím v sieti.
◗ Zariadenie pripojte jedine do uzemnenej zásuvky.
◗ Zariadenie nepoužívajte vtedy, ak zástrčka, kábel alebo samotné
zariadenie sú viditeľne poškodené, alebo ak zariadenie padlo,
prípadne z neho tečie.
◗ Pravidelne kontrolujte, či kábel nie je poškodený.
◗ Ak je poškodený sieťový kábel,smie ho vymeniť jedine personál
spoločnosti Philips, servisného centra autorizovaného
spoločnosťou Philips, alebo iná kvalifikovaná osoba, aby sa predišlo
nebezpečným situáciám.
◗ Pokiaľ je zariadenie pripojené do siete, nesmiete ho nikdy nechať
bez dozoru.
◗ Žehličku a stojan (ak bol dodaný) nikdy nesmiete ponoriť do
vody.
◗ Zariadenie odkladajte mimo dosahu detí.
◗ Žehliaca platňa žehličky môže byť veľmi horúca a pri dotyku
môže spôsobiť popáleniny.
◗ Kým je žehliaca platňa horúca, kábel sa jej nesmie dotýkať.
◗ Keď skončíte žehlenie, keď čistíte zariadenie, keď plníte alebo
SLOVAK 61

vyprázdňujete zásobník na vodu a tiež, keď necháte žehličku čo
len na krátku chvíľu bez používania: ovládač naparovania nastavte
do polohy 0, postavte žehličku do stojana a odpojte ju zo siete.
◗ Vždy umiestnite a používajte žehličku a stojan (ak je dodaný) na
pevný, hladký a vodorovný povrch.
◗ Do zásobníka na vodu nepridávajte parfum, ocot, škrob,
prostriedky na odstránenie vodného kameňa,prostriedky na
uľahčenie žehlenia ani žiadne iné chemikálie.
◗ Toto zariadenie je určené len na domáce použitie.
Pred prvým použitím
C
1 Zo žehliacej platne odlepte všetky nálepky a ochrannú fóliu.
Taktiež zložte úložný kryt (ak je nasadený).
2 Žehličku nechajte zohriať na najvyššiu teplotu a prechádzajte
ňou niekoľko minút po navlhčenej tkanine, aby ste odstránili
všetky nečistoty z povrchu žehliacej platne.
Pri prvom použití žehličky sa môže objaviť aj trochu dymu. Dym sa však
čoskoro stratí.
Príprava na použitie
Plnenie zásobníka na vodu
1 Vytiahnite sieťovú zástrčku zo zásuvky.
C
2 Ovládač naparovania nastavte na pozíciu O (= bez pary).
3 Otvorte plniaci uzáver (len určité modely).
C
4 Nakloňte žehličku a naplňte zásobník na vodu po značku
maximálnej úrovne.
Zásobník vody naplňte najviac po úroveň MAX.
5 Zatvorte plniaci uzáver, budete počuť kliknutie (len určité
modely).
Ak je voda z vodovodu príliš tvrdá,odporúčame vám používať
destilovanú vodu. Nepoužívajte ocot, škrob ani chemicky zmäkčenú
vodu.
SLOVAK62

Nastavenie teploty
◗ Pri prvom použití žehličky sa môže objaviť aj trochu dymu.Dym
sa však čoskoro stratí.
C
1 Žehličku postavte na pätu a otočením kolieska na nastavenie
teploty do príslušnej polohy nastavte požadovanú teplotu pri
žehlení.
- Skontrolujte teplotu na štítku ošetrovania odevu.
- 1 Syntetické vlákna (napr. akryl, viskóza, polyamid, polyester)
- 1 Hodváb
- 2 Vlna
- 3 Bavlna, ľan
- Ak neviete z akého materiálu je výrobok zhotovený, správnu teplotu
žehlenia určíte tak, že ožehlíte niektorú časť výrobku, ktorú pri nosení
nebude vidieť.
- Hodvábne, vlnené a syntetické materiály: žehlite opačnú stranu
oblečenia, aby na ňom nevznikli lesklé plochy. Pri žehlení takéhoto
oblečenia nepoužívajte kropenie, aby na oblečení nevznikli škvrny.
2 Zariadenie pripojte do siete.
3 Keď zhasne kontrolné svetlo nastavenia teploty, chvíľu počkajte
a potom začnite so žehlením.
B
Kontrolné svetlo nastavenia teploty sa počas žehlenia občas rozsvieti.
Použitie zariadenia
Naparovanie
Uistite sa, že v zásobníku je dostatok vody.
1 Koliesko na nastavenie teploty otočte do odporúčanej pozície.
Pozrite "Nastavenie teploty".
C
2 Ovládač naparovania nastavte na príslušnú pozíciu naparovania.
- Á minimálnym prúdom pary (nastavenie teploty 2 a 3).
- Ë miernym prúdom pary (nastavenie teploty 3 až MAX) (len
určité modely).
- È maximálnym prúdom pary (nastavenie teploty 3 až MAX)
B
Naparovanie začne ihneď po dosiahnutí nastavenej teploty.
SLOVAK 63

Iba modely GC2215/2120/2115/2110/2105:
Ak nastavíte príliš nízku teplotu (MIN až 2), z otvorov v žehliacej
platni môže unikať voda.
Žehlenie bez naparovania
1 Ovládač naparovania nastavte do polohy O (= bez pary).
2 Koliesko na nastavenie teploty otočte do odporúčanej pozície.
Pozrite "Nastavenie teploty".
Funkcie
Kropenie
Vyhladenie pokrčených miest pri ľubovoľnej teplote.
1 Uistite sa, že v zásobníku je dostatok vody.
C
2 Opakovane stlačte tlačidlo kropenia,aby ste navlhčili žehlenú
látku.
Prídavný prúd pary (Iba určité modely)
Prídavný prúd pary sa používa na vyhladenie veľmi pokrčenej látky.
Prídavný prúd pary môžete použiť len pri nastavení teploty medzi
3 a MAX.
C
1 Ovládač naparovania nastavte do maximálnej polohy È.
C
2 Stlačte a maximálne 5 sekúnd, podržte stlačené tlačidlo
ovládača naparovania.
3 Počkajte najmenej 1 minútu pred opätovným použitím
prídavného prúdu pary, aby ste zabránili vytekaniu vody zo
žehliacej platne.
SLOVAK64

Impulz pary (len určité modely)
Silný prúd pary sa používa na vyhladenie veľmi pokrčenej látky.
Funkciu Impulz pary môžete použiť len pri nastavení teploty medzi 2
a MAX.
C
1 Stlačte a uvoľnite tlačidlo impulzu pary.
Impulz pary vo zvislej polohe (Iba modely
GC2225/2220/2215/2130/2126/2125/2120/2115)
C
1 Impulz pary môžete použiť aj vtedy,keď držíte žehličku vo
zvislej polohe.Toto je užitočné na vyhladenie pokrčených miest
zaveseného oblečenia,záclon atď.
Žehliacu plochu nikdy neotáčajte smerom k ľuďom.
Funkcia Drip stop (len modely
GC2225/2220/GC2130/2126/2125)
Žehlička umožňuje použiť funkciu Drip stop: žehlička automaticky
zablokuje naparovanie, ak je teplota príliš nízka na úplné odparenie
vody pretekajúcej cez otvory v žehliacej platni. Ak sa tak stane, budete
počuť kliknutie.
Automatické vypnutie (len určité modely)
Ak ste žehličkou určitý čas nepohli, elektronické bezpečnostné
zariadenie automaticky vypne ohrevné teleso.
C
◗ Automatické vypnutie ohrevného telesa naznačuje blikajúce
kontrolné svetlo.
Opätovné zohriatie žehličky: zodvihnite žehličku, alebo ňou jemne
pohýbte. Kontrolné svetlo automatického vypnutia zhasne.
1 Ak sa rozsvieti kontrolné svetlo nastavenia teploty, počkajte
kým nezhasne, a až potom začnite so žehlením.
2 Ak sa kontrolné svetlo nastavenia teploty nerozsvieti, žehlička
je pripravená na použitie.
SLOVAK 65

Čistenie a údržba
Funkcia Calc-Clean na odstránenie vodného kameňa
◗ Funkcia Calc-Clean odstráni usadený vodný kameň.
Funkciu Calc-Clean na odstránenie vodného kameňa používajte každé
dva týždne. Ak je voda, ktorú používate príliš tvrdá (napr. ak z otvorov v
žehliacej platni vychádzajú počas žehlenia šupiny usadenín), funkciu
Calc-Clean musíte používať častejšie.
1 Ovládanie naparovania nastavte do polohy O.
2 Zásobník vody naplňte na maximálnu úroveň.
Do zásobníka nepridávajte ocot, ani iný prostriedok na odstránenie
vodného kameňa.
C
3 Koliesko nastavenia teploty otočte do polohy MAX.
4 Koncovku kábla pripojte do sieťovej zástrčky.
5 Keď zhasne kontrolné svetlo nastavenia teploty, žehličku
odpojte zo siete.
6 Žehličku podržte nad umývadlom a ovládanie naparovania
nastavte do polohy na odstraňovanie vodného kameňa 1 (CalcClean). Gombík ovládania naparovania sa trochu vysunie.
C
7 Vytiahnite gombík ovládania naparovania,aby ste vybrali ihlu
ovládania naparovania.
C
8 Žehličku podržte nad umývadlom a pohybujte ňou dopredu a
dozadu.
B
Z otvorov v žehliacej platni vytečie para a vriaca voda. Spolu s ňou sa
vyplavia nečistoty a vodný kameň (ak už vznikol).
C
9 Ak je na ihle usadený vodný kameň, rozpustite ho v octe.
Neohnite, ani inak nepoškoďte ihlu na ovládanie naparovania.
SLOVAK66

C
10 Ihlu na ovládanie naparovania vráťte späť tak,že jej špičku
zasuniete presne do stredu otvoru a výstupok na ihle do
drážky. Gombík ovládania naparovania nastavte do polohy O.
11 Ak je v žehličke naďalej veľa nečistôt,postup odstraňovania
vodného kameňa zopakujte.
Po odstránení vodného kameňa
1 Žehličku zapojte do siete a nechajte vysušiť žehliacu plochu.
2 Keď zhasne kontrolné svetlo nastavenia teploty, žehličku
odpojte zo siete.
3 Jemne prejdite žehličkou po kúsku použitej tkaniny, aby ste
odstránili škvrny, ktoré sa pri odparovaní vody mohli vytvoriť
na povrchu žehliacej platne.
Odkladanie
1 Odpojte zariadenie zo siete, nechajte žehličku ochladnúť a
ovládanie naparovania nastavte do polohy O.
2 Očistite žehličku a tkaninou navlhčenou jemným (tekutým)
čistiacim prostriedkom zotrite vodný kameň a ostatné
usadeniny z povrchu žehliacej platne.
Udržujte žehliacu platňu hladkú: vyvarujte sa kontaktu s kovovými
predmetmi.
Na jej čistenie nepoužívajte drsné prostriedky, ocot ani iné chemikálie.
C
3 Zásobník na vodu pravidelne vyplachujte vodou a po čistení
vyprázdnite.
C
4 Kábel naviňte okolo výstupku na jeho odkladanie.
5 Žehličku odkladajte vždy v stojacej polohe na päte na
bezpečnom a suchom mieste.
SLOVAK 67

Životné prostredie
C
◗ Zariadenie na konci životnosti neodhadzujte spolu s bežným
komunálnym odpadom,ale kvôli recyklácii ho odovzdajte na
mieste oficiálneho zberu. Pomôžete tak chrániť životné
prostredie.
Záruka a servis
Ak potrebujete informácie, alebo máte problém,prosíme vás, aby ste
navštívili webovú stránku spoločnosti Philips - www.philips.com, alebo
sa obrátili na Centrum služieb zákazníkom spoločnosti Philips vo vašej
krajine (telefónne číslo Centra nájdete v priloženom celosvetovo
platnom záručnom liste). Ak sa vo vašej krajine toto Centrum
nenachádza, obráťte sa na miestneho predajcu výrobkov Philips, alebo
kontaktujte Oddelenie služieb Philips - divízia domáce spotrebiče a
osobná starostlivosť.
SLOVAK68

Riešenie
Skontrolujte sieťový kábel, zástrčku a
sieťovú zásuvku.
Koliesko na nastavenie teploty otočte
do požadovanej polohy.
Zásobník naplňte vodou (viď "Príprava
na použitie", časť "Plnenie zásobníka na
vodu").
Ovládanie naparovania nastavte do
polohy Á, Ë alebo È (viď "Použitie
zariadenia", časť "Naparovanie").
Koliesko nastavenia teploty otočte do
polohy vhodnej na naparovanie (2
až MAX). Žehličku postavte na pätu a
počkajte kým zhasne kontrolné svetlo
nastavenia teploty. Potom môžete
začať žehliť.
Žehličku postavte do vodorovnej
polohy a pred ďalším použitím
(vertikálneho) impulzu pary chvíľu
počkajte.
Koliesko nastavenia teploty otočte do
polohy vhodnej na naparovanie (2
až MAX). Žehličku postavte na pätu a
počkajte kým zhasne kontrolné svetlo
nastavenia teploty. Potom môžete
začať žehliť.
Opakovane použite funkciu Calc-Clean
na odstránenie vodného kameňa (viď
"Čistenie a údržba" časť "Funkcia CalcClean").
Zodvihnite, alebo jemne pohnite
žehličkou, aby ste deaktivovali funkciu
automatického vypnutia: červené
kontrolné svetlo prestane blikať.
Zatlačte plniaci uzáver, aby ste začuli
kliknutie.
Koliesko nastavenia teploty otočte do
polohy vhodnej na naparovanie (2
až MAX). Žehličku postavte na pätu a
počkajte kým zhasne kontrolné svetlo
nastavenia teploty. Potom môžete
začať žehliť.
Možná(é) príčina(y)
Pravdepodobne je prerušený kontakt
Koliesko nastavenia teploty je v polohe
MIN
V zásobníku nie je dostatok vody.
Ovládanie naparovania je v polohe O.
Žehliaca platňa nie je dostatočne teplá
a/alebo bola aktivovaná funkcia Drip
stop (len určité modely).
Funkcia (vertikálneho) impulzu pary sa
použila príliš veľakrát alebo vo veľmi
krátkom čase.
Žehliaca platňa nie je dostatočne
zohriata.
Tvrdosť používanej vody spôsobuje
vznik usadenín.
Aktivovala sa funkcia automatického
vypnutia (viď kapitolu "*alšie vlastnosti",
časť "Automatické vypnutie").
Plniaci uzáver nie je riadne uzavretý.
Nastavili ste príliš nízku teplotu.
Problém
Žehlička je pripojená do siete, ale
žehliaca platňa je studená.
Žehlička nevytvára paru
Nefunguje funkcia impulz pary alebo
impulz pary vo zvislej polohe (len
určité modely).
Počas žehlenia z otvorov v žehliacej
platni vychádzajú usadeniny a nečistoty.
Bliká červené kontrolné svetlo (len
modely GC2225 a GC2130).
Kvapky vody na oblečení (len modely
GC2225/2220/2215/GC2130/2126/21
25/2120)
Kvapky vody na oblečení (len modely
GC2215/2120/2115/2110/2105)
Riešenie problémov
V tejto kapitole sú uvedené najbežnejšie problémy, s ktorými sa môžete stretnúť pri žehlení. *alšie
informácie získate v jednotlivých častiach návodu.V prípade, že nedokážete odstrániť vzniknutý
problém, kontaktujte Centrum starostlivosti o zákazníka spoločnosti Philips vo vašej krajine.
SLOVAK 69

Riešenie
Po použití vyprázdnite zásobník na
vodu a ovládanie naparovania nastavte
do polohy O. Žehličku odkladajte vo
vzpriamenej polohe.
Možná(é) príčina(y)
Žehličku ste odložili vo vodorovnej
polohy, pričom v zásobníku ešte bola
voda.
Problém
Zo žehliacej platne po schladení, alebo
odložení žehličky kvapká voda.
SLOVAK70

Загальний опис (мал. 1)
A Носик розпилювача
B Ковпачок отвору для води (лише моделі
GC2225/2220/2215/GC2130/2126/2125/2120)
C Отвір для води
D Кнопка викиду пари 9 (лише моделі
GC2225/2220/2215/GC2130/2126/2125/2120/2115/2110)
E Кнопка розпилювача T
F Регулятор пари
O = без пари
Á = мінімум пари
q = помірна обробка парою (лише моделі
GC2225/2220/2215/GC2130/2126/2125/2120)
w = максимум пари
1 = функція Calc-Clean
G Функція есктра-відпарювання (лише модель GC2105)
H Індикатор температури (усі моделі) та індикатор автоматичного
вимкнення (лише моделі GC2225/GC2130)
I Регулятор температури
J Шнур живлення
K Індикатор температури
L Табличка з даними
M Резервуар для води
Важлива інформація
Уважно прочитайте ці інструкції перед тим, як використовувати
пристрій, та зберігайте їх для подальшого використання.
◗ Перед тим, як приєднувати пристрій до мережі,перевірте, чи
збігається напруга, вказана на таблиці з даними, із напругою у
мережі.
◗ Підключайте пристрій лише до заземленої розетки.
◗ Не використовуйте пристрій,якщо на штекері, шнурі або
самому пристрої помітні пошкодження, або якщо пристрій
упав або протікає.
◗ Регулярно перевіряйте, чи не пошкоджений шнур.
◗ Якщо шнур пошкоджений, його можна замінити у сервісному
центрі Philips або кваліфікованими особами для запобігання
небезпеки.
◗ Ніколи не залишайте пристрій без нагляду, коли він
приєднаний до мережі.
◗ Ніколи не занурюйте праску і підставку, якщо така входить в
комплект, у воду.
◗ Зберігайте пристрій подалі від дітей.
◗ Температура підошви праски може бути дуже високою і
спричинити опіки.
◗ Не допускайте, щоб шнур живлення торкався гарячої підошви.
◗ Після прасування, під час чищення пристрою, наповнення або
УКРАЇНСЬКА 71

спорожнення резервуару для води,а також якщо Ви навіть
ненадовго залишаєте праску: встановлюйте регулятор пари у
положення O, кладіть праску на п'яту та витягайте штепсель з
розетки.
◗ Завжди ставте і використовуйте праску і підставку, якщо така
входить у комплект, на стійкій, рівній горизонтальній поверхні.
◗ Не заливайте у резервуар для води парфуми, оцет, крохмаль,
засоби проти накипу, засоби для прасування чи інші хімікати.
◗ Цей пристрій призначений виключно для побутового
використання.
Перед першим використанням
C
1 Зніміть з підошви усі етикетки чи захисну плівку. Зніміть
також ковпак для зберігання, якщо такий додається.
2 Нагрійте праску до максимальної температури і протягом
декількох хвилин водіть нею по шматку вологої тканини,
щоб видалити з підошви будь-які залишки.
Під час першого використання з праски може виходити дим. Це
незабаром припиниться.
Підготовка до використання
Наповнення резервуару для води
1 Витягніть штепсель із розетки.
C
2 Налаштуйте регулятор пари в положення O (= без пари).
3 Відкрийте ковпачок (лише певні моделі).
C
4 Нахиліть праску і заповніть резервуар водою до
максимальної позначки.
Не наповнюйте резервуар для води вище позначки MAX.
5 Закрийте кришку до клацання (лише певні моделі).
Якщо вода дуже жорстка, радимо використовувати фільтровану
воду. Не використовуйте оцет, крохмаль, воду після хімічного
видалення накипу.
УКРАЇНСЬКА72

Налаштування температури
◗ Під час першого використання з праски може виходити дим.
Це незабаром припиниться.
C
1 Покладіть праску на п'яту і встановіть регулятором
температури необхідне значення температури прасування,
повертаючи регулятор до відповідної позиції.
- Перевірте значення допустимої температури прасування одежі
на етикетці:
- 1 Синтетичні тканини (наприклад, акрил, віскоза, поліамід,
поліестер).
- 1 Шовк
- 2 Вовна
- 3 Бавовна, льон
- Якщо невідомо, до якого типу або типів відноситься тканина
виробу, визначте відповідну температуру, попрасувавши шматок
тканини, якого не видно під час носіння одягу.
- Шовк, вовна та синтетика: для запобігання появи лиску на
тканині, прасуйте зі зворотньої сторони тканини. Не
використовуйте функцію розпилення, щоб запобігти виникненню
плям.
2 Підключіть вилку до заземленої розетки.
3 Коли згасне індикатор температури, зачекайте трохи перед
тим, як починати прасувати.
B
Під час прасування індикатор температури час від часу
засвічуватиметься.
Застосування пристрою
Прасування з відпарюванням
Перевірте, чи у резервуарі достатньо води.
1 Налаштуйте регулятор температури до рекомендованого
положення.
Див. розділ "Налаштування температури".
C
2 Налаштуйте регулятор пари у відповідне положення.
- Á для мінімальної пари (налаштування температури 2 та 3).
- Ë для помірної обробки парою (налаштування температури від
3 до MAX) (лише певні моделі).
- È для максимальної пари (налаштування температури від 3
до MAX).
B
Пара почне утворюватися відразу ж після того, як буде досягнута
задана температура.
УКРАЇНСЬКА 73

Лише моделі GC2215/2120/2115/2110/2105:
Вода може виливатися з підошви, якщо встановлено надто низьку
температуру (від MIN до 2).
Прасування без пари
1 Налаштуйте регулятор пари у положення O (= без пари).
2 Налаштуйте регулятор температури до рекомендованого
положення.
Див. розділ "Налаштування температури".
Характеристики
Розпилення
Для видалення складних складок за будь-якої температури.
1 Перевірте, чи у резервуарі достатньо води.
C
2 Натисніть кнопку розпилення декілька разів, щоб
зволожити тканину.
Екстра-відпарювання (лише певні моделі)
Ця функція забезпечує викид додаткової пари для прасування
важких складок.
Функція екстра-відпарювання працює лише з налаштуваннями
температури від 3 до MAX.
C
1 Налаштуйте регулятор пари у максимальне положення È.
C
2 Натисніть та тримайте кнопку регулятора пари максимум
5 секунд.
3 Щоб краплі води не капали з підошви праски, почекайте
принаймні 1 хвилину перед тим, як знову натиснути на
кнопку екстра-відпарювання .
Викид пари (лише певні моделі)
Потужний струмінь пари допоможе прасувати дуже складні
складки.
УКРАЇНСЬКА74

Функція викиду пари працює лише з налаштуваннями температури
від 2 до MAX.
C
1 Натисніть і відпустіть кнопку викиду пари.
Вертикальний викид пари (лише моделі
GC2225/2220/2215/2130/2126/2125/2120/2115)
C
1 Функцію викиду пари можна використовувати також,
тримаючи праску у вертикальному положенні. Це згодиться
для прасування складок на підвішеному одязі, занавісках
тощо.
Ніколи не спрямовуйте пару на людей.
Система запобігання протіканню води (лише моделі
GC2225/2220/GC2130/2126/2125)
Праска має функцію запобігання протіканню води: щоб запобігти
протіканню води з підошви, праска автоматично припиняє подачу
пари, коли температура стає надто низькою. Коли це відбувається,
чути клацання.
Автоматичне вимикання (лише певні моделі)
Електронний запобіжник автоматично вимкне нагрівальний
елемент, якщо праску деякий час не рухали з місця.
C
◗ Під час автоматичного відключення нагрівального елементу
почне блимати індикатор автоматичного вимкнення.
Щоб праска знову нагрілася: підніміть її або ледь порухайте.
Індикатор автоматичного вимкнення згасне.
1 Якщо засвічується індикатор температури, перед тим, як
починати прасувати,зачекайте, поки він не згасне.
2 Якщо індикатор температури не засвічується, праска готова
до використання.
УКРАЇНСЬКА 75

Чищення та догляд
Функція Calc-Clean
◗ Функція Calc-Clean видаляє частинки накипу
Використовуйте функцію видалення накипу Calc-Clean двічі на
місяць. Якщо вода дуже жорстка (тобто коли під час прасування з
підошви виходять частки накипу), цю функцію необхідно
використовувати частіше.
1 Налаштуйте регулятор пари у положення O.
2 Заповніть резервуар для води до максимальної позначки.
Не заливайте в резервуар для води оцет та інші речовини дл
видалення накипу.
C
3 Встановіть регулятор температури у положення MAX.
4 Вставте штепсель у розетку на стіні.
5 Витягніть штепсель із розетки, коли індикатор температури
згасне.
6 Тримайте праску над раковиною і виставте регулятор пари в
положення 1 (Calc-Clean). Ручка регулятора пари трохи
висунеться.
C
7 Витягніть ручку регулятора пари догори та зніміть стержень
регулятора пари.
C
8 Тримайте праску над раковиною і рухайте нею вперед-
назад.
B
Пара і гаряча вода витечуть з підошви. Домішки та накип (якщо
є) будуть вимиватися.
C
9 За допомогою оцту видаліть накип, якщо такий є, зі
стержня.
Не згинайте і не зламайте стержень регулятора пари.
УКРАЇНСЬКА76

C
10 Встановіть стержень регулятор пари на місце, вставивши
кінець стержня регулятора точно в центр отвору, а малим
виступом збоку стержня потрапивши в паз. Налаштуйте
регулятор пари в положення О.
11 Якщо в прасці все ще залишилися домішки, повторіть
процедуру видалення накипу.
Після використання функції видалення накипу
Calc-Clean
1 Увімкніть праску, щоб нагрівальний елемент висох.
2 Витягніть штепсель із розетки, коли індикатор температури
згасне.
3 Повільно ведіть праскою по шматку ганчірки, щоб видалити
плями, які можуть утворитися на підошві.
Зберігання
1 Витягніть штепсель із розетки., дайте прасці охолонути і
встановіть регулятор пари у положення O.
2 Почистіть пристрій від накипу та інших відкладень вологою
тканиною з неабразивним (рідким) засобом для чищення.
Захищайте підошву від подряпин: уникайте контактів з металевими
предметами.
Ніколи не використовуйте шліфувальні подушечки, оцет чи ін
хімічні речовини.
C
3 Регулярно ополіскуйте резервуар для води та спорожняйте
після чищення.
C
4 Намотайте шнур живлення навколо пристрою для
зберігання шнура.
5 Завжди зберігайте праску на п'яті у безпечному та сухому
місці.
УКРАЇНСЬКА 77

Навколишнє середовище
C
◗ Не викидайте пристрій разом із звичайними побутовими
відходами, а здавайте його в офіційний пункт прийому для
повторної переробки. Таким чином Ви допоможете захистити
довкілля.
Гарантія та обслуговування
Якщо Вам необхідна інформація або у Вас виникла проблема,
відвідайте веб-сторінку компанії Philips www.philips.com, або
зверніться до Центру обслуговування клієнтів компанії Philips у
Вашій країні (телефон можна знайти на гарантійному талоні). Якщо
у Вашій країні немає Центру обслуговування клієнтів, зверніться до
місцевого дилера або у відділ технічного обслуговування компанії
Philips Domestic Appliаnces аnd Personаl Cаre BV.
УКРАЇНСЬКА78

Вирішення
Перевірте шнур живлення, штепсель
і розетку.
Налаштуйте регулятор температури
у потрібне положення.
Наповніть резервуар для води (див.
розділ "Підготовка до
використання", підрозділ
"Наповнення резервуару для води").
Встановіть регулятор пари в
положення Á, Ë або È (див. розділ
"Використання пристрою", підрозділ
"Прасування з відпарюванням").
Налаштуйте регулятор температури
в положення в області пари (від 2
до MAX). Перед тим, як починати
прасування, поставте праску на п'яту
і почекайте, поки індикатор
температури не згасне.
Поставте праску горизонтально та
зачекайте трохи перед тим, як знову
використовувати функцію
(вертикального) викиду пари.
Налаштуйте регулятор температури
в положення в області пари (від 2
до MAX). Перед тим, як починати
прасування, поставте праску на п'яту
і почекайте, поки індикатор
температури не згасне.
Кілька разів використайте функцію
Calc-Clean (див. розділ "Чищення та
догляд", підрозділ "Функція CalcClean").
Підніміть праску і легенько
порухайте нею, щоб деактивувати
функцію автоматичного вимкнення:
червоний індикатор перестане
блимати.
Потисніть ковпачок, доки не почуєте
клацання.
Можлива причина (причини)
Проблема з підключенням
Регулятор температури встановлено
на MIN
У резервуарі недостатньо води.
Регулятор пари було встановлено у
положення O.
Підошва недостатньо гаряча та/або
активовано функцію запобігання
протіканню води (лише певні
моделі).
Функція (вертикального) викиду
пари перед цим використовувалася
надто часто.
Підошва недостатньо гаряча.
Жорстка вода створює накип у
підошві.
Було активовано функцію
автоматичного вимкнення (див.
розділ "Інші характеристики",
підрозділ "Автоматичне вимкнення").
Ковпачок заливного отвору закрито
не щільно.
Проблема
Праска підключена до розетки, але
підошва холодна.
Немає пари
Немає викиду пари або
вертикального викиду (лише певні
моделі).
Частки накипу та інші забруднення
виходять із підошви під час
прасування.
Блимає червоний індикатор (лише
моделі GC2225 та GC2130).
На тканину потрапляють краплі води
(лише моделі
GC2225/2220/2215/GC2130/2126/21
25/2120)
Усунення несправностей
У цьому розділі зведено основні проблеми, які можуть виникнути під час використання праски.
Детальнішу інформацію можна знайти в окремих розділах. Якщо Вам не вдається вирішити
проблему, будь-ласка, зверніться до Центру обслуговування клієнтів Philips у Вашій країні.
УКРАЇНСЬКА 79

Вирішення
Налаштуйте регулятор температури
в положення в області пари (від 2
до MAX). Перед тим, як починати
прасування, поставте праску на п'яту
і почекайте, поки індикатор
температури не згасне.
Після використання спорожніть
резервуар для води і налаштуйте
регулятор пари в положення O.
Зберігайте праску на п'яті.
Можлива причина (причини)
Виставлено занадто низьку
температуру.
Праску поставили у горизонтальне
положення, а в резервуарі ще була
вода.
Проблема
На тканині є краплі води (лише
моделі
GC2215/2120/2115/2110/2105)
Вода капає з підошви після того, як
праска охолола або не
використовувалася.
УКРАЇНСЬКА80

Opći opis (slika 1)
A Mlaznica za raspršivanje
B Poklopac otvora za punjenje (samo
GC2225/2220/2215/GC2130/2126/2125/2120)
C Otvor za punjenje
D Gumb za mlaz pare 9 (samo
GC2225/2220/2215/GC2130/2126/2125/2120/2115/2110)
E Gumb raspršivača T
F Kontrola pare
O = bez pare
Á = najmanje pare
q = umjerena količina pare (samo
GC2225/2220/2215/GC2130/2126/2125/2120)
w = najviše pare
1 = funkcija Calc-Clean
G Funkcija za dodatnu količinu pare (samo GC2105)
H Lampica za temperaturu (svi tipovi) i indikator automatskog
isključivanja (samo GC2225/GC2130)
I Regulator temperature
J Kabel za napajanje
K Indikator temperature
L Pločica s oznakom
M Spremište za vodu
Važno
Prije korištenja aparata pažljivo pročitajte ove upute za uporabu i
spremite ih za buduće potrebe.
◗ Prije priključivanja aparata provjerite odgovara li mrežni napon
naveden na naljepnici s podacima naponu lokalne mreže.
◗ Priključite aparat samo u uzemljenu zidnu utičnicu.
◗ Nemojte koristiti aparat ako su na utikaču,kabelu ili samom
aparatu vidljiva oštećenja, ako je aparat pao na pod ili ako iz njega
curi voda.
◗ Redovito provjeravajte je li kabel oštećen.
◗ Ako se kabel za napajanje ošteti,mora ga zamijeniti tvrtka Philips,
ovlašteni Philips servisni centar ili kvalificirana osoba kako bi se
izbjegle potencijalno opasne situacije.
◗ Nikada ne ostavljajte aparat bez nadzora kada je spojen na
mrežno napajanje.
◗ Nikada ne uranjajte u vodu glačalo i postolje, ako je isporučeno.
◗ Aparat držite izvan dohvata djece.
◗ Površina za glačanje se može jako zagrijati i uzrokovati opekotine
ako se dodiruje.
◗ Pazite da kabel ne dođe u dodir s površinom za glačanje kada je
površina vruća.
◗ Nakon glačanja, tijekom čišćenja aparata, punjenja ili pražnjenja
spremišta za vodu i kad nakratko ostavljate glačalo bez nadzora:
HRVATSKI 81

postavite kontrolu pare na poloÏaj O, postavite glaãalo u uspravni
poloÏaj i izvucite kabel za napajanje iz zidne utiãnice.
◗ Uvijek koristite i stavljajte glačalo i postolje,ako je isporučeno,na
stabilnu, ravnu i vodoravnu površinu.
◗ Nemojte stavljati parfem,ocat, izbjeljivač, sredstva protiv kamenca,
sredstva za olakšavanje glačanja ili neka druga kemijska sredstva u
spremište za vodu.
◗ Ovaj aparat je namijenjen isključivo uporabi u kućanstvu.
Prije prve uporabe
C
1 Uklonite sve naljepnice i zaštitne folije s površine za glačanje.
Skinite i zaštitni pokrov, ako postoji.
2 Ostavite glačalo da se zagrije do najviše temperature i nekoliko
minuta prelazite njime preko vlažne tkanine kako biste uklonili
ostatke s površine za glačanje.
Prilikom prve uporabe glačala možda ćete primijetiti malo dima, ali on
će nestati nakon kratkog vremena.
Priprema za uporabu
Punjenje spremišta za vodu
1 Izvucite kabel za napajanje iz zidne utičnice.
C
2 Postavite kontrolu pare na položaj O (= bez pare).
3 Otvorite poklopac otvora za punjenje (samo neki modeli).
C
4 Nagnite glačalo i potpuno napunite spremište za vodu.
Nemojte puniti spremište za vodu iznad oznake MAX.
5 Zatvorite poklopac otvora za punjenje (klik!) (samo neki
modeli).
Ako je voda u vašem području vrlo tvrda, preporučujemo da koristite
destiliranu vodu. Nemojte koristiti ocat, izbjeljivač ili vodu koja je
kemijski očišćena od kamenca.
Postavljanje temperature
◗ Prilikom prve uporabe glačala možda ćete primijetiti malo dima, ali
on će nestati nakon kratkog vremena.
HRVATSKI82
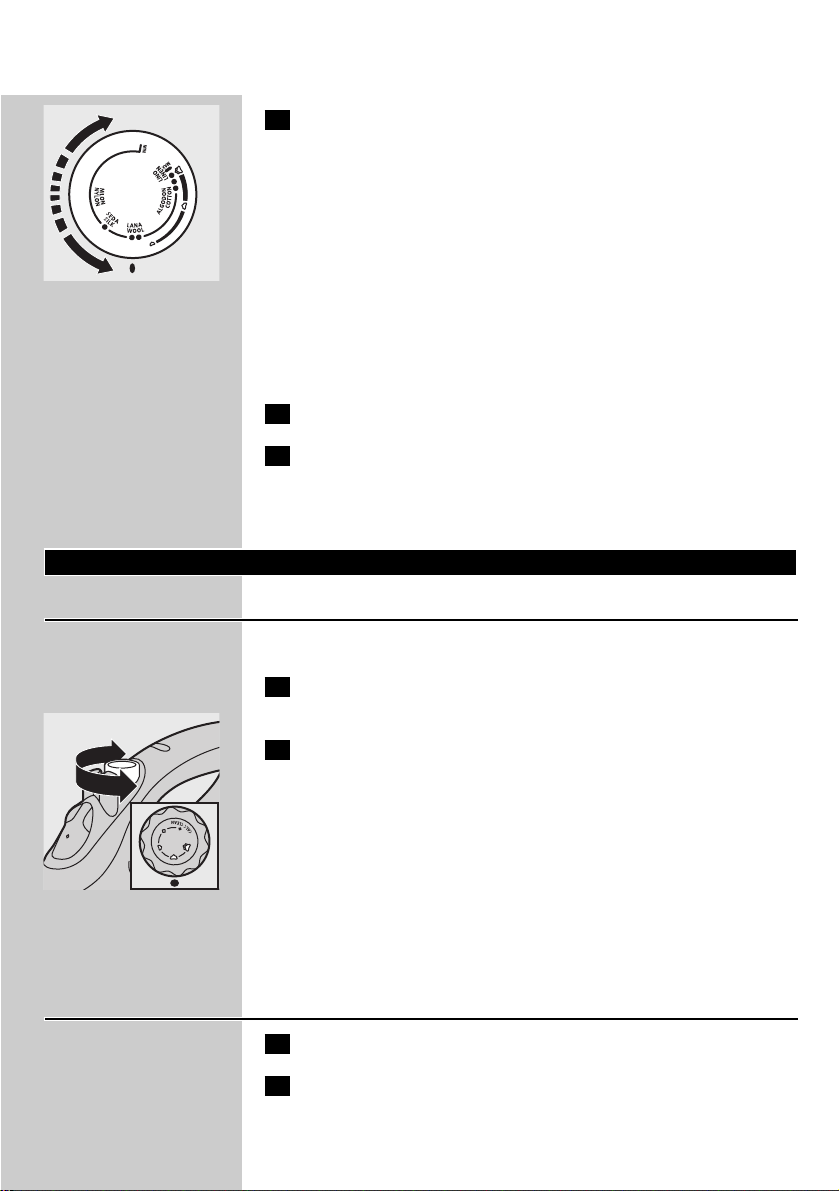
C
1 Postavite glačalo u uspravni položaj i okretanjem regulatora
temperature postavite odgovarajuću temperaturu.
- Dozvoljenu temperaturu glačanja pronađite na ušivenoj markici.
- 1 Sintetika (akril, viskoza,poliamid, poliester)
- 1 Svila
- 2 Vuna
- 3 Pamuk, lan
- Ako ne znate od kojeg materijala je odjevni predmet koji glačate,
isprobajte temperaturu glačanja na komadiću tkanine koji se ne vidi
prilikom nošenja.
- Svila, vuneni i sintetički materijali: glačajte s naličja tkanine kako biste
izbjegli sjajne mrlje. Izbjegavajte funkciju raspršivanja kako se ne bi
stvarale mrlje na tkanini.
2 Priključite utikač u uzemljenu zidnu utičnicu.
3 Kad se indikator temperature ugasi, pričekajte neko vrijeme
prije nego što počnete glačati.
B
Indikator temperature će se tijekom glačanja povremeno paliti i gasiti.
Korištenje aparata
Glačanje s parom
Provjerite ima li u spremištu dovoljno vode.
1 Postavite regulator temperature na preporučeni položaj.
Pogledajte odjeljak "Postavljanje temperature".
C
2 Postavite kontrolu pare u odgovarajući položaj.
- Á za najmanje pare (postavke temperature 2 i 3).
- Ë za umjerenu količinu pare (postavke temperature 3 do MAX)
(samo neki modeli).
- È za najviše pare (postavke temperature 3 do MAX).
B
Para počinje izlaziti u trenutku kad se postigne postavljena temperatura.
samo GC2215/2120/2115/2110/2105:
Ako je postavljena temperatura preniska (MIN do 2), voda može
curiti iz površine za glačanje.
Glačanje bez pare
1 Postavite kontrolu pare na položaj O (= bez pare).
2 Postavite regulator temperature na preporučeni položaj.
Pogledajte odjeljak "Postavljanje temperature".
HRVATSKI 83

Značajke
Raspršivanje
Za uklanjanje nabora pri bilo kojoj temperaturi.
1 Provjerite ima li u spremištu dovoljno vode.
C
2 Pritisnite gumb za raspršivanje nekoliko puta kako biste navlažili
tkaninu koju glačate.
Dodatna količina pare (samo neki modeli)
Ova funkcija daje dodatnu količinu pare za uklanjanje upornih nabora.
Funkcija za dodatnu količinu pare radi samo pri temperaturama između
3 i MAX.
C
1 Postavite kontrolu pare u maksimalni položaj È.
C
2 Pritisnite i držite gumb za kontrolu pare najviše 5 sekundi.
3 Prije ponovnog korištenja funkcije za dodatnu količinu pare
pričekajte najmanje 1 minutu kako biste spriječili kapanje vode
iz površine za glačanje.
Mlaz pare (samo neki modeli)
Snažan mlaz pare pomaže u glačanju nabora koji se teško glačaju.
Mlaz pare radi samo pri temperaturama između 2 i MAX.
C
1 Pritisnite i otpustite gumb za mlaz pare.
HRVATSKI84

Okomiti mlaz pare (samo
GC2225/2220/2215/2130/2126/2125/2120/2115)
C
1 Mlaz pare se može koristiti i kad je glačalo u okomitom
položaju.To je korisno za uklanjanje nabora na izvješenoj
odjeći, zavjesama itd.
Mlaz nikada nemojte usmjeravati prema ljudima.
Zaustavljanje kapanja (samo
GC2225/2220/GC2130/2126/2125)
Ovo glačalo je opremljeno funkcijom zaustavljanja kapanja: glačalo
automatski prestaje s proizvodnjom pare kada je temperatura preniska
kako bi se spriječilo kapanje vode kroz površinu za glačanje. Kad se to
dogodi, čuje se 'klik'.
Automatsko isključivanje (samo neki modeli)
Elektronički sigurnosni uređaj automatski isključuje grijaći element ako
neko vrijeme niste pomaknuli glačalo.
C
◗ Indikator automatskog isključivanja počinje treperiti,što označava
da je grijaći element isključen.
Kako bi se glačalo ponovno zagrijalo: podignite ga ili ga lagano
pomaknite. Indikator automatskog isključivanja će se ugasiti.
1 Ako se indikator temperature upali,pričekajte neko vrijeme
prije nego počnete glačati.
2 Ako se indikator temperature ne upali,glačalo je spremno za
rad.
Čišćenje i održavanje
Funkcija Calc Clean
◗ Funkcija Calc-Clean uklanja komadiće kamenca.
Koristite je jednom u dva tjedna. Ako je voda u vašem području vrlo
tvrda (odnosno, ako tijekom glačanja iz površine za glačanje izlaze djelići
kamenca), ovu je funkciju potrebno koristiti češće.
1 Postavite kontrolu pare u položaj O.
2 Potpuno napunite spremište za vodu.
HRVATSKI 85

U spremište za vodu ne ulijevajte kvasinu ili druga sredstva za uklanjanje
kamenca.
C
3 Postavite regulator temperature na MAX.
4 Uključite utikač u zidnu utičnicu.
5 Kad se indikator temperature ugasi, izvucite utikač iz utičnice.
6 Držite glačalo iznad sudopera i postavite kontrolu pare na
položaj 1 (Calc-Clean). Polugica za kontrolu pare će se malo
podići.
C
7 Povucite polugicu za kontrolu pare prema gore i izvadite iglu za
kontrolu pare.
C
8 Držite glačalo iznad sudopera i lagano ga okrećite.
B
Iz površine za glačanje izlaze para i kipuća voda. Nečistoća i kamenac
(ako ih ima) se ispiru.
C
9 Ako na igli ima kamenca, očistite ga octom.
Nemojte saviti ili oštetiti iglu kontrole pare.
C
10 Vratite iglu kontrole pare tako da njen vrh umetnete točno u
središte otvora,a malu izbočinu s bočne strane igle u utor.
Postavite polugicu kontrole pare na položaj O.
11 Ako u glačalu još ima nečistoće, ponovite postupak Calc-Clean.
Nakon postupka Calc-Clean
1 Priključite glačalo u napajanje kako bi se površina za glačanje
osušila.
2 Kad se indikator temperature ugasi, izvucite utikač iz utičnice.
HRVATSKI86

3 Lagano glačajte komad tkanine kako bi ste s površine za
glačanje uklonili moguće mrlje.
Spremanje
1 Isključite utikač iz zidne utičnice, ostavite glačalo da se ohladi i
postavite kontrolu pare u položaj O.
2 Očistite glačalo i obrišite kamenac ili bilo koju drugu nečistoću
s površine za glačanje vlažnom tkaninom i neabrazivnim
(tekućim) sredstvom za čišćenje.
Površina za glačanje uvijek treba biti glatka i zato izbjegavajte kontakt
površine za glačanje s metalnim predmetima.
Nikada nemojte koristiti spužvicu za ribanje, ocat ili druge kemikalije.
C
3 Redovito ispirite spremište za vodu i ispraznite ga nakon
čišćenja.
C
4 Omotajte kabel za napajanje oko pretinca za spremanje kabela.
5 Glačalo uvijek spremajte u uspravnom položaju na sigurno i
suho mjesto.
Zaštita okoliša
C
◗ Aparat koji se više ne može koristiti nemojte odlagati s
uobičajenim otpadom iz kućanstva nego ga odnesite u predviđeno
odlagalište na recikliranje.Time ćete pridonijeti očuvanju okoliša.
Jamstvo i servis
Ako vam je potrebna informacija ili imate problem s nekim od uređaja,
posjetite web-stranicu www.philips.com ili kontaktirajte Philips centar
za korisnike u svojoj državi (broj se nalazi u jamstvenom listu).Ako u
vašoj državi ne postoji centar za korisnike, obratite se lokalnom
prodavaču Philips proizvoda ili servisnom odjelu Philips Domestic
Appliances and Personal Care BV.
HRVATSKI 87

Rješenje
Provjerite kabel, utikač i zidnu utičnicu.
Postavite regulator temperature u
odgovarajući položaj.
Napunite spremište za vodu
(pogledajte "Priprema za uporabu",
odjeljak "Punjenje spremišta za vodu").
Postavite kontrolu pare u položaj Á, Ë
ili È (pogledajte "Uporaba aparata",
odjeljak "Glačanje s parom").
Postavite regulator temperature na
bilo koju temperaturu za glačanje s
parom (2 do MAX). Postavite
glačalo u uspravan položaj i pričekajte
da se indikator temperature ugasi prije
početka glačanja.
Stavite glačalo u vodoravan položaj i
malo pričekajte prije ponovnog
korištenja funkcije (okomitog) mlaza
pare.
Postavite regulator temperature na
bilo koju temperaturu za glačanje s
parom (2 do MAX). Postavite
glačalo u uspravan položaj i pričekajte
da se indikator temperature ugasi prije
početka glačanja.
Nekoliko puta uporabite funkciju CalcClean (pogledajte "Čišćenje i
održavanje", odjeljak "Čišćenje od
kamenca").
Za deaktiviranje automatskog
isključivanja podignite glačalo ili ga
lagano pomaknite. Crveno svjetlo će
prestati treperiti.
Pritišćite poklopac otvora za punjenje
dok ne začujete 'klik'.
Postavite regulator temperature na
bilo koju temperaturu za glačanje s
parom (2 do MAX). Postavite
glačalo u uspravan položaj i pričekajte
da se indikator temperature ugasi prije
početka glačanja.
Mogući uzrok (uzroci)
Problem u napajanju
Regulator temperature je postavljen na
MIN
Nema dovoljno vode u spremištu za
vodu.
Kontrola pare je postavljena na O.
Površina za glačanje nije dovoljno vruća
ili je uključena funkcija zaustavljanja
kapanja (samo neki modeli).
Funkcija (okomitog) mlaza pare je
prečesto korištena u vrlo kratkom
razdoblju.
Površina za glačanje nije dovoljno
vruća.
Tvrda voda stvara kamenac unutar
površine za glačanje.
Uključena je funkcija automatskog
isključivanja (pogledajte "Ostale
značajke", odjeljak "Automatsko
isključivanje").
Poklopac otvora za punjenje nije
dobro zatvoren.
Temperatura je preniska.
Problem
Glačalo je uključeno, ali je površina za
glačanje hladna.
Nema pare
Funkcija mlaza pare ili okomitog mlaza
pare ne radi (samo neki modeli).
Tijekom glačanja iz površine za glačanje
izlaze komadići nečistoće i kamenca.
Crveno svjetlo treperi (samo GC2225
i GC2130).
Kapi vode ostaju na tkanini (samo
GC2225/2220/2215/GC2130/2126/21
25/2120)
Kapi vode ostaju na tkanini (samo
GC2215/2120/2115/2110/2105)
Rješavanje problema
U ovom poglavlju su opisani najčešći problemi s kojima biste se mogli susresti prilikom uporabe
glačala. Pročitajte i ostale odjeljke za više pojedinosti.Ako ne možete riješiti problem, obratite se
Philips centru za korisničku podršku u svojoj državi.
HRVATSKI88

Rješenje
Ispraznite spremište za vodu i nakon
uporabe postavite kontrolu pare na O.
Glačalo spremite u uspravnom
položaju.
Mogući uzrok (uzroci)
Glačalo je postavljeno u vodoravni
položaj dok je u spremištu još bilo
vode.
Problem
Nakon što se glačalo ohladilo ili nakon
što ste ga spremili iz površine za
glačanje kapa voda.
HRVATSKI 89

Seadme osad (joon 1)
A Piserdusotsik
B Täiteava kaas (ainult mudelid
GC2225/2220/2215/GC2130/2126/2125/2120)
C Täiteava
D Aurujoa dosaatori nupp 9 (ainult mudelid
GC2225/2220/2215/GC2130/2126/2125/2120/2115/2110)
E Piserdusnupp T
F Aururegulaator
O = kuivtriikimine
Á = minimaalne aurujuga
q = mõõdukas aurujuga (ainult mudelid
GC2225/2220/2215/GC2130/2126/2125/21)
w = maksimaalne aurujuga
1 = katlakivi eemaldamisfunktsioon
G Täiendava aurujoa andmise funktsioon (ainult mudel GC2105)
H Temperatuuri märgutuli (kõikidel mudelitel) ja automaatse
väljalülitumise märgutuli (ainult mudel GC2225/GC2130)
I Temperatuuri ketasregulaator
J Toitejuhe
K Temperatuuri märgutuli
L Nimiandmete silt
M Veepaak
Tähelepanu!
Enne seadme kasutamist lugege kasutusjuhend hoolikalt läbi ja hoidke
alles edaspidiseks.
◗ Enne seadme sisselülitamist kontrollige, kas seadme andmesildile
märgitud pinge vastab kohalikule toitepingele.
◗ Ühendage seade ainult maandatud pistikupessa.
◗ Ärge kasutage seadet, kui pistikul, toitejuhtmel või seadmel endal
on nähtavaid kahjustusi või kui seade on maha pillatud või lekib.
◗ Kontrollige juhet korrapäraselt,et leida võimalikke vigastusi.
◗ Kui toitejuhe on vigastatud,tuleb see uue vastu vahetada Philipsi,
Philipsi volitatud hooldekeskuses või lihtsalt vastavalt
kvalifitseeritud isiku poolt, et vältida ohtlikke olukordi.
◗ Ärge jätke elektrivõrku ühendatud seadet järelvalveta.
◗ Ärge kastke triikrauda või laadimisalust, kui see on varustuses
olemas, vette.
◗ Hoidke seade laste käeulatusest eemal.
◗ Triikraua tald võib minna väga kuumaks ja puudutamisel tekitada
põletusi.
◗ Ärge laske juhtmel minna vastu tulist triikrauatalda.
◗ Kui olete lõpetanud triikimise või puhastate seadet,kui täidate või
tühjendate veenõu või peate triikraua juurest korraks ära minema,
siis keerake aururegulaator asendisse "O", pange triikraud kannale
seisma ja eemaldage pistik pistikupesast.
EESTI90

◗ Alati asetage ja kasutage triikrauda ning alust, kui on
standardvarustuses, kindlal, tasasel ja horisontaalsel pinnal.
◗ Ärge täitke veepaaki lõhnaõli,äädika, tärgeldamise,
katlakivieemaldamise ega mingite teiste keemiliste vahenditega.
◗ Seade on mõeldud kasutamiseks ainult koduses majapidamises.
Enne esmakasutust
C
1 Eemaldage tallalt kõik kleebised või kaitsekile. Hoiustuskatte
kasutamisel eemaldage ka see.
2 Laske triikraual kuumeneda maksimaalse temperatuurini ja
triikige paar minutit niisket lappi,et eemaldada tallalt suvalised
jäägid.
Esmakasutusel võib triikraud veidi suitseda. See nähtus kaob kiiresti.
Ettevalmistus kasutamiseks
Veepaagi täitmine
1 Võtke võrgupistik seinakontaktist välja.
C
2 Seadke aururegulaator asendisse O (= kuivtriikimine).
3 Avage täiteava kaas (ainult teatud mudelitel).
C
4 Kallutades triikrauda, kallake veepaak maksimaalse tasemeni
täis.
Ärge kunagi täitke veepaaki üle MAX-tähise.
5 Vajutades klikkiva helini,sulgege täiteava kaas (ainult teatud
mudelitel).
Kui piirkonnas, kus te elate, on väga kare vesi, soovitame kasutada ainult
destilleeritud vett. Ärge kasutage äädikat, tärklist ega katlakivist
keemilisel teel puhastatud vett.
Temperatuuri reguleerimine
◗ Esmakasutusel võib triikraud veidi suitseda. See nähtus kaob
kiiresti.
EESTI 91

C
1 Pange triikraud kannale ja pöörates ketasregulaatorit vastavasse
asendisse, seadistage triikimistemperatuur.
- Kontrollige pesusildilt esemete soovitatavaid triikimistemperatuure.
- 1 Tehiskiud (nt akrüül, viskoos,polüamiid, polüester)
- 1 Siid
- 2 Vill
- 3 Puuvill, lina
- Kui te ei tea, millisest või millistest materjalidest on ese valmistatud,
triikige õige triikimistemperatuuri määramiseks kohta, mida eseme
kandmisel või kasutamisel pole näha.
- Siid, villane ja sünteetilised materjalid - triikige riiet pahemalt poolt, et
vältida läikivate kohtade tekkimist. Plekkide ärahoidmiseks ärge
rakendage piserdusfunktsiooni.
2 Sisestage pistik maandatud pistikupessa.
3 Pärast temperatuuri märgutule kustumist oodake natuke,enne
kui alustate triikimisega.
B
Triikimise ajal süttib märgutuli aeg-ajalt.
Seadme kasutamine
Auruga triikimine
Kontrollige, kas veepaagis on küllaldaselt vett.
1 Seadke temperatuuri ketasregulaator soovitatud asendisse.
Vt "Temperatuuri reguleerimine".
C
2 Seadke aururegulaator vajaliku aurutaseme asendisse.
- Á minimaalne aurujuga (temperatuuri regulaator asendis 2 ja
3).
- Ë mõõdukas aurujuga (temperatuuri regulaator asendis 3 kuni
MAX, ainult teatud mudelitel).
- È maksimaalne aurujuga (temperatuuriasend 3 kuni MAX).
B
Triikrauast hakkab auru niipea väljuma, kui vajalik temperatuur on
saavutatud.
Ainult mudelid GC2215/2120/2115/2110/2105:
Kui temperatuur on liiga madalaks (MIN kuni 2) keeratud, siis võib
triikraua tallast vett tilkuda.
Kuivtriikimine
1 Seadke aururegulaator asendisse O (kuivtriikimine).
2 Seadke temperatuuri ketasregulaator soovitatud asendisse.
Vt "Temperatuuri reguleerimine".
EESTI92

Omadused
Vee piserdamine
Raskesti eemaldatavate kortsude kõrvaldamiseks igal temperatuuril
1 Kontrollige, kas veepaagis on küllaldaselt vett.
C
2 Triigitava toote niisutamiseks vajutage mitmel korral
piserdusnupule.
Lisaaur (ainult teatud mudelitel)
See funktsioon annab täiendavat auru eriti raskelt eemaldatavate
kortsude triikimiseks.
Lisaauru on võimalik anda ainult temperatuurivahemikus 3 kuni
MAX.
C
1 Pange aururegulaator maksimaalsele aurutasemele È.
C
2 Vajutage ja hoidke aururegulaatorit all maksimaalselt kuni 5
sekundit.
3 Et vältida vee väljatilkumist triikraua tallast, oodake vähemalt
üks minut, enne kui lisaauru funktsiooni uuesti rakendate.
Aurutamine (ainult teatud mudelitel)
Tugev aurujuga aitab kõrvaldada väga tugevad kortsud.
Aurujoa funktsioon toimib ainult 2 ja MAX temperatuuride vahel.
C
1 Vajutage ja samas vabastage aurujoa nupp.
EESTI 93

Vertikaalse aurujoa dosaator (ainult
GC2225/2220/2215/2130/2126/2125/2120/2115)
C
1 Aurujoa funktsiooni saate rakendada ka püstiasendis
triikrauaga. Nii on võimalik triikida riidepuul olevate rõivaste
volte, kardinaid jms.
Ärge kunagi suunake aurujuga inimeste poole.
Tilgalukustus (ainult mudelid
GC2225/2220/GC2130/2126/2125)
Sellel triikraual on tilgalukustus, mis automaatselt lõpetab aurutamise ja
hoiab ära vee tilkumise triikraua tallalt liigmadalal temperatuuril.
Lukustuse rakendumisel kuulete klõpsatust.
Automaatne väljalülitumine (ainult teatud mudelitel)
Kui teatava aja jooksul pole triikrauda liigutatud, siis elektrooniline
ohutussüsteem lülitab automaatselt soojuselemendi välja.
C
◗ Küttekeha väljalülitamisel hakkab punane automaatse
väljalülitamise märgutuli vilkuma.
Küttekeha uuesti sisselülitamiseks tõstke triikrauda üles või liigutage
seda kergelt. Automaatne väljalülitamise märgutuli kustub.
1 Kui temperatuuri märgutuli on süttinud,oodake, kuni see
kustub, enne kui jätkate triikimist.
2 Kui temperatuuri märgutuli ei põle, on triikraud kasutamiseks
valmis.
Puhastamine ja hooldus
Katlakivi eemaldamisfunktsioon
◗ Katlakivi eemaldamisfunktsioon kõrvaldab katlakivi osakesed.
Kasutage katlakivi eemaldamisfunktsiooni kord kahe nädala jooksul. Kui
vesi on väga kare (nt kui triikraua tallast väljuvad triikimise ajal helbed),
eemaldage katlakivi sagedamini.
1 Seadke aururegulaator asendisse O.
2 Valage veepaak vett täis (kuni MAX-tähiseni).
EESTI94

Ärge valage veepaaki kunagi äädikat ega teisi katlakivi eemaldamise
vahendeid.
C
3 Seadke temperatuuri ketasregulaator MAX asendisse.
4 Sisestage pistik pistikupessa.
5 Kui temperatuuri märgutuli kustub,eemaldage pistik
pistikupesast.
6 Hoidke triikrauda valamu kohal ja seadke aururegulaator
katlakivi eemaldamise asendisse 1 (katlakivi eemaldamine).
Aururegulaatori nupp tõuseb aeglaselt üles.
C
7 Tõmmake aururegulaatori nuppu üles,et eemaldada
aururegulaatori nõel.
C
8 Hoidke triikrauda kraanikausi kohal ja liigutage seda edasi-
tagasi.
B
Aur ja keev vesi väljuvad triikraua tallast. Lisandid ja katlakivi (kui on)
loputatakse välja.
C
9 Kasutage nõelalt katlakivi eemaldamiseks äädikat, kui seal seda
on.
Ärge painutage ega kahjustage aururegulaatori nõela.
C
10 Pange aururegulaatori nõel tagasi nii, et nõela terav ots oleks
täpselt augu keskel,sobitades nõela küljel oleva väikese nuki
vastavasse pilusse. Seadke aururegulaatori nupp asendisse O.
11 Kui triikrauas on veel hulgaliselt lisandeid, siis korrake katlakivi
eemaldamise toimingut.
Pärast katlakivi eemaldamist
1 Lülitage triikraua talla kuivatamiseks toide sisse.
EESTI 95
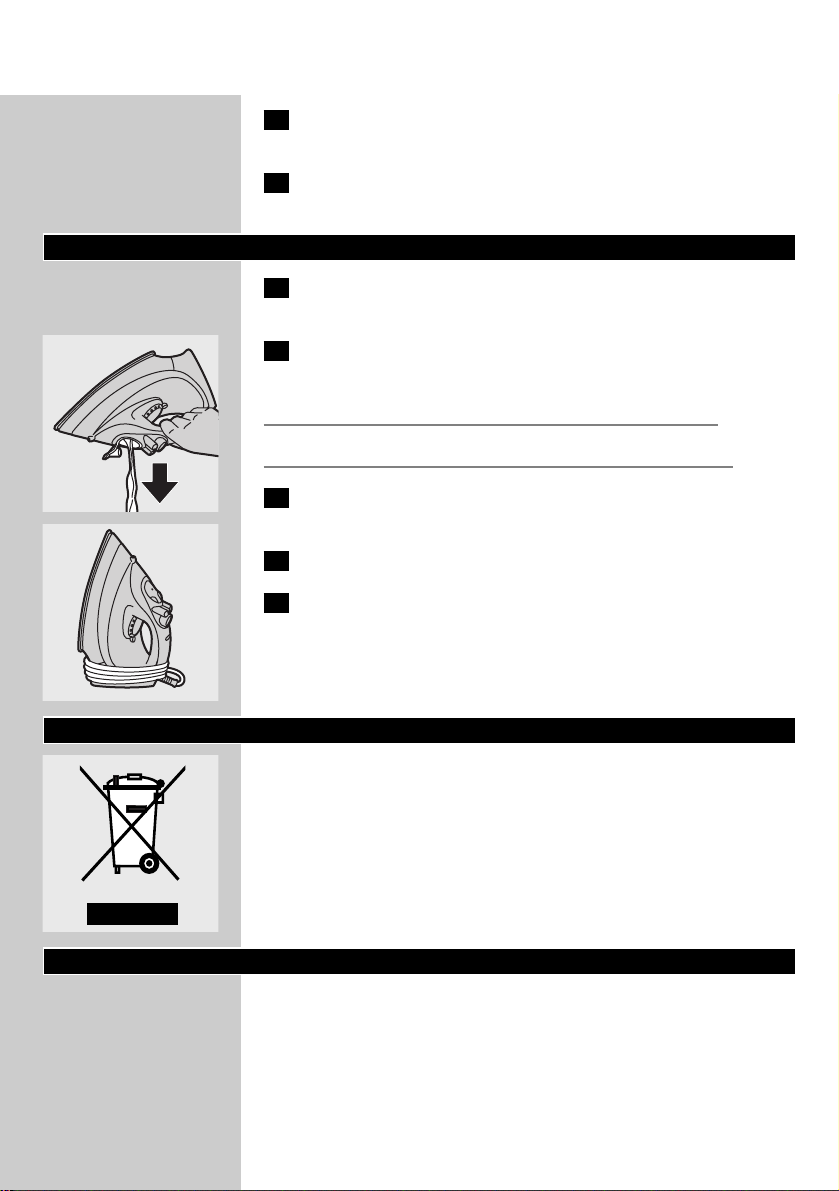
2 Kui temperatuuri märgutuli kustub,eemaldage pistik
pistikupesast.
3 Triikige tallale jäänud veejääkide eemaldamiseks õrnalt mõnda
kasutatud riideeset.
Hoidmine
1 Eemaldage toitejuhe seinapistikust, laske triikraual maha jahtuda
ja seadke aururegulaator asendisse O.
2 Puhastage seade ja pühkige katlakivi ja muud jäägid tallalt niiske
lapi ja mitteabrasiivse (vedela) puhastusvahendiga ära.
Hoidke talda siledana: ärge puudutage talda metallesemetega!
Ärge kunagi kasutage küürimiskäsna, äädikat ega teisi kemikaale.
C
3 Loputage veepaaki korrapäraselt veega ja tühjendage see pärast
puhastamist.
C
4 Kerige toitejuhe ümber juhtme hoidiku.
5 Hoiustamiseks pange triikraud ohutus ja kuivas kohtas alati
kannale seisma.
Keskkonnakaitse
C
◗ Kasutuskõlbmatut seadet ei tohi olmeprügi hulka visata. Seade
tuleb ametlikku kogumispunkti viia. See on vajalik keskkonna
säästmiseks.
Garantii ja hooldus
Infopäringud ja küsimused on võimalik esitada Philipsi veebisaidi
www.philips.com kaudu või kohalikku Philipsi hoolduskeskusse
pöördudes (telefoninumbri leiate garantiilehelt). Kui teie riigis ei ole
hoolduskeskust, pöörduge Philips toodete kohaliku müüja poole või
võtke ühendus Philips kodumasinate teeninduskeskusega.
EESTI96

Kõrvaldamine
Kontrollige toitejuhet, pistikut ja
pistikupesa.
Seadke temperatuuri regulaator
nõutud asendisse.
Täitke veepaak (vt "Ettevalmistus
kasutamiseks", lõik "Veepaagi täitmine").
Seadke aururegulaator asendisse Á, Ë
või È (vt pt "Seadme kasutamine" lõik
"Auruga triikimine").
Pange temperatuuri ketasregulaator
aurutamise asendisse (2 kuni MAX).
Asetage triikraud kannale seisma ja
enne triikima hakkamist oodake, kuni
temperatuuri märgutuli kustub.
Pange triikraud horisontaalasendisse ja
oodake natuke aega, enne kui kasutate
vertikaalset aurujuga uuesti.
Pange temperatuuri ketasregulaator
aurutamise asendisse (2 kuni MAX).
Asetage triikraud kannale seisma ja
enne triikima hakkamist oodake, kuni
temperatuuri märgutuli kustub.
Rakendage mõned korrad katlakivi
eemaldamise funktsiooni (vt
"Puhastamine ja hooldus", lõik "Katlakivi
eemaldamine").
Automaatse väljalülitamise funktsiooni
deaktiveerimiseks tõstke triikrauda
korraks või liigutage seda natuke.
Punane märgutuli lõpetab vilkumise.
Vajutage kaant, kuni kostab klõpsatus.
Pange temperatuuri ketasregulaator
aurutamise asendisse (2 kuni MAX).
Asetage triikraud kannale seisma ja
enne triikima hakkamist oodake, kuni
temperatuuri märgutuli kustub.
Tühjendage veepaak ja seadke
aururegulaator pärast seadme
kasutamist asendisse O. Pange triikraud
tallale seisma.
Võimalik(ud) põhjus(ed)
Ühenduse viga.
Temperatuuri ketasregulaator on MIN
asendis.
Paagis ei ole piisavalt vett.
Aururegulaator on asendis O.
Triikraua tald ei ole piisavalt kuum
ja/või tilgalukusti funktsioon (ainult
mudelid GC2225 ja GC2220) on
aktiveeritud.
Püstiasendi aurujuga on lühikese aja
jooksul liiga tihti kasutatud.
Triikraua tald ei ole piisavalt tuline
Kare vesi tekitab triikraua tallas katlakivi
helbeid.
Aktiveeriti automaatne väljalülitamise
funktsioon (vt pt "Teised omadused"
osa "Automaatne väljalülitamine").
Täiteava kaas ei ole korralikult suletud.
Temperatuur on liiga madalale seatud.
Olete triikraua pannud
horisontaalasendisse, samal ajal kui
veepaagis on veel vett.
Häire
Triikraud on elektrivõrku ühendatud,
aga tald on külm.
Auru ei tule
Triikrauast ei tule auru või ver tikaalses
asendis (ainult teatud mudelid) ei tule
auru.
Katlakivi helbed ja mustus väljuvad
triikimise ajal tallast.
Punane märgutuli vilgub (ainult mudel
GC2225 ja GC2130).
Kangal on veetilgad (ainult mudel
GC2225/2220/2215/2126/2125/2120)
Kangal on veetilgad (ainult mudelid
GC2215/2120/2115/2110/2105)
Pärast triikraua mahajahtumist või
hoiustamist tilgub tallast vett.
Veaotsing
Selles peatükis on tehtud kokkuvõte triikraual tihedamini esinevatest riketest. Põhjalikuma teabe
saamiseks lugege palun erinevaid lõike. Kui teil ei õnnestu riket omal jõul kõrvaldada, siis pöörduge
oma riigi Philipsi klienditeenindusesse.
EESTI 97

Vispārējs apraksts (1. zīm.)
A Smidzināšanas sprausla
B Uzpildes vāciņš (tikai
GC2225/2220/2215/GC2130/2126/2125/2120)
C Uzpildes atvere
D Tvaika padeves poga 9 (tikai
GC2225/2220/2215/GC2130/2126/2125/2120/2115/2110)
E Smidzināšanas poga T
F Tvaika vadība
O = bez tvaika
- Á = minimālais tvaiks
q = vidējs tvaiks (tikai
GC2225/2220/2215/GC2130/2126/2125/2120)
- w = maksimālais tvaiks
1 = "Calc-Clean" funkcija
G Palielināta tvaika funkcija (tikai GC2105)
H Temperatūras lampiņa (visiem modeļiem) un automātiskā
izslēgšanās lampiņa (tikai GC2225/GC2130)
I Temperatūras regulators
J Elektrības vads
K Temperatūras indikators
L Modeļa plāksne
M Ūdens tvertne
Svarīgi
Pirms ierīces lietošanas uzmanīgi izlasiet šo lietošanas pamācību un
saglabājiet to, lai vajadzības gadījumā varētu ieskatīties tajā arī turpmāk.
◗ Pirms pieslēgšanas elektrotīklam pārbaudiet, vai uz ierīces modeļa
plāksnītes norādītais spriegums atbilst jūsu vietējā elektrotīkla
spriegumam.
◗ Pievienojiet ierīci tikai iezemētai elektrotīkla sienas
kontaktrozetei.
◗ Nelietojiet ierīci, ja tās elektrības vadam, kontaktdakšai vai pašai
ierīcei ir redzami bojājumi, kā arī, ja ierīce ir kritusi zemē vai tai ir
sūce.
◗ Regulāri pārbaudiet, vai elektrības vadam nav kādi bojājumi.
◗ Ja elektrības vads ir bojāts, tas jānomaina autorizētā Philips servisa
centrā, lai izvairītos no bīstamām situācijām.
◗ Nekad neatstājiet ierīci bez uzraudzības, kad tā ir pieslēgta
elektrotīklam.
◗ Gludekli un paliktni, ja tāds ir gludekļa komplektā, nekad nelieciet
ūdenī.
◗ Glabājiet ierīci bērniem nepieejamā vietā.
◗ Gludekļa darba virsma var kļūt ārkārtīgi karsta, un pieskaršanās tai
var izsaukt apdegumus.
◗ Raugieties, lai elektrības vads nesaskaras ar gludekļa darba virsmu,
kamēr tā ir karsta.
LATVIEŠU98

◗ Pēc gludināšanas, tīrot ierīci, piepildot vai iztukšojot ūdens tvertni
un arī kaut uz pavisam īsu brīdi atstājot gludekli bez uzraudzības:
iestatiet tvaika padevi stāvoklī O, novietojiet gludekli vertikāli un
izvelciet elektrības vada spraudni no sienas kontaktligzdas.
◗ Gludekli un paliktni, ja tāds ir gludekļa komplektā, vienmēr
novietojiet un lietojiet uz stabilas, līdzenas un horizontālas virsmas.
◗ Nelejiet ūdens tvertnē smaržas, etiķi, cieti,katlakmens attīrīšanas
līdzekļus, gludināšanas šķidrumus vai citas ķīmiskas vielas.
◗ Ierīce ir paredzēta tikai mājas lietošanai.
Pirms pirmās lietošanas
C
1 Noņemiet ikvienu uzlīmi vai aizsargplēvi no gludināšanas
virsmas. Noņemiet arī glabāšanas apvalku, ja apgādāts.
2 Ļaujiet gludeklim uzkarst līdz maksimālajai temperatūrai un
vairākas minūtes pagludiniet mitru drānu, lai notīrītu no
gludināšanas virsmas iesaiņojuma pārpalikumus.
Pirmajā lietošanas reizē gludeklis var nedaudz kūpēt. Pēc neilga laika
dūmi izzudīs.
Sagatavošana lietošanai
Ūdens tvertnes piepildīšana
1 Atvienojiet gludekli no elektrotīkla.
C
2 Noregulējiet tvaika vadības slēdzi stāvoklī O (= bez tvaika).
3 Atveriet uzpildes vāciņu (tikai atsevišķiem modeļiem).
C
4 Sagrieziet gludekli un uzpildiet ūdens tvertni līdz maksimālajam
līmenim.
Nepārsniedziet maksimālā līmeņa iezīmi MAX.
5 Aizveriet uzpildes vāciņu (atskan klikšķis!) (tikai atsevišķiem
modeļiem).
Ja vietā, kur dzīvojat, ūdens ir ļoti ciets, iesakām izmantot destilētu ūdeni
Neizmantojiet etiķi, cieti vai ķīmiski attīrītu ūdeni.
LATVIEŠU 99

Temperatūras noregulēšana
◗ Pirmajā lietošanas reizē gludeklis var nedaudz kūpēt. Pēc neilga
laika dūmi izzudīs.
C
1 Novietojiet gludekli uz tā pēdas un uzstādiet temperatūras
regulatoru uz nepieciešamo gludināšanas temperatūru, griežot
to uz atbilstošo pozīciju.
- Pārbaudiet apģērba kopšanas etiķeti, lai izvēletos atbilstošo
gludināšanas temperatūru.
- 1 Sintētiskie audumi (piemēram, akrils, viskoze, poliamīds,
poliesteris)
- 1 Zīds
- 2 Vilna
- 3 Kokvilna, lins
- Ja nezināt, no kāda auduma apģērbs izgatavots, noskaidrojiet pareizo
gludināšanas temperatūru, pagludinot apģērbu vietā, kas valkājot nav
redzama.
- Zīda, vilnas un sintētisko materiālu apģērbiem gludiniet otru pusi, lai
novērstu spīdīgu plankumu rašanos. Neizmantojiet smidzināšanas
funkciju, lai nerastos traipi.
2 Iespraudiet elektrības kontaktdakšu iezemētā elektrotīkla
sienas kontaktligzdā.
3 Kad temperatūras lampiņa izdziest, pagaidiet brīdi, pirms sākat
gludināšanu.
B
Gludināšanas laikā temperatūras lampiņa periodiski iedegas.
Ierīces lietošana
Gludināšana ar tvaiku
Pārliecinieties, vai tvertnē ir pietiekami daudz ūdens.
1 Uzstādiet temperatūras regulatoru rekomdējamā pozīcijā.
Skatiet 'Temperatūras regulēšana'.
C
2 Noregulējiet tvaika vadības slēdzi nepieciešamajā stāvoklī.
- Á minimālam tvaikam (temperatūras uzstādījumi 2 un 3).
- Ë vidējam tvaikam (temperatūras uzstādījumi no 3 līdz MAX)
(tikai atsevišķiem modeļiem).
- È maksimālam tvaikam (temperatūras uzstādījumi no 3 līdz
MAX).
B
Tvaika padeve būs iespējama tad, kad tiks sasniegta noregulētā
temperatūra.
LATVIEŠU100
 Loading...