


Model No.
TY-WK32LX20W
Wall hanging bracket for LCD TV
Installation Manual
Thank you very much for purchasing the wall hanging bracket for the Panasonic LCD TV.
•Please perform installation work correctly after carefully reading this installation manual and the operation manual for the LCD TV.
•After installation work is complete, please give this installation manual to the customer so they can read it and keep for future reference. (It may be needed for maintenance or when moving.)
•Retain all removed parts. They may become necessary when returning to the original installation condition.
Wandhalterung zum Anbringen des LCD-Fernsehers
Installationsanleitung
Vielen Dank für den Kauf der Wandhalterung zum Anbringen des LCDFernsehers von Panasonic.
•Lesen Sie bitte vor der Installation diese Anleitung und die Bedienungsanleitung für den LCD-Fernseher sorgfältig durch, damit die Anbringung richtig ausgeführt wird.
•Geben Sie bitte diese Installationsanleitung nach Beendigung der Installation dem Kunden, damit der sie als zukünftige Referenz aufbewahren kann. (Die Anleitung kann für Wartungszwecke oder bei einem Umzug benötigt werden.)
•Heben Sie alle entfernten Bauteile auf. Sie können notwendig werden, wenn die ursprüngliche Installation wieder ausgeführt werden soll.
Applique de fixation au mur du téléviseur à cristaux liquides
Manuel d’installation
Nous vous remercions d’avoir acquis l’applique de suspension au mur pour les téléviseur à écran à cristaux liquides Panasonic.
•Veuillez effectuer l’installation avec soin après avoir soigneusement lu le manuel et le mode d’emploi du téléviseur à cristaux liquides.
•Lorsque l’installation est terminée, veuillez remettre ce manuel au client pour qu’il puisse en prendre connaissance et qu’il le conserve pour référence.
(Ce manuel peut être nécessaire pour effectuer une réparation, ou encore pour déplacer l’appareil.)
•Conservez toutes les pièces que vous avez retirées. Ces pièces peuvent être requises pour remettre l’appareil en son état original.
Supporto per il montaggio a parete del televisore a cristalli liquidi
Manuale di installazione
Grazie per aver acquistato il supporto per il montaggio a parete del televisore a cristalli liquidi Panasonic.
•Prima di effettuare le operazioni di installazione, leggere questo manuale e il manuale del televisore a cristalli liquidi.
•Al termine dell’installazione, fornire questo manuale al cliente il quale lo conserverà per riferimenti futuri (potrebbe essere necessario per effettuare operazioni di manutenzione o spostare eventualmente il supporto).
•Conservare tutte le parti rimovibili in quanto potrebbero essere necessarie per ripristinare le condizioni di installazione originali.
Soporte para colgar en pared un televisor LCD
Manual de instalación
Muchas gracias por haber adquirido el soporte para colgar en una pared el televisor LCD de Panasonic.
•Haga correctamente el trabajo de instalación después de leer cuidadosamente este manual de instalación y el manual de instrucciones del televisor LCD.
•Después de finalizar el trabajo de instalación, entregue este manual de instalación al cliente para que lo lea y luego lo guarde por si necesita consultarlo en el futuro. (Este manual puede resultar necesario para realizar trabajos de mantenimiento o para cuando se cambie el lugar de instalación.)
•Guarde todas las piezas que quite. Éstas pueden ser necesarias para volver a la condición de instalación original.
English
Deutsch
Français
Italiano
Español
TQZH519-2

English
Deutsch
Français
Italiano
Español
Caution:
This bracket intended for use only Panasonic LCD TV Model TX-32LX500 / TC-32LX500 / TX-26LX500 / TC-26LX500 / TX-32LX50 / TC-32LX50 / TX-26LX50 / TC-26LX50 / TC-32LX300 / TX-32LX1 / TX32LXD1 / TC-32LX20 / TC-32LX1 / TX-26LX1 / TX-26LXD1 / TC-26LX20 / TC-26LX1 Series and TX32LXD500 / TX-26LX500 / TX-32LXD50 / TX-32LXD40 / TX-32LXD55F / TX-26LD50.
Use with other apparatus is capable of resulting in instability causing possible injury.
Vorsicht:
Diese Halterung ist nur für die Verwendung mit LCD-Fernsehern der Modellserie TX-32LX500 / TC32LX500 / TX-26LX500 / TC-26LX500 / TX-32LX50 / TC-32LX50 / TX-26LX50 / TC-26LX50 / TC32LX300 / TX-32LX1 / TX-32LXD1 / TC-32LX20 / TC-32LX1 / TX-26LX1 / TX-26LXD1 / TC-26LX20 / TC26LX1 und TX-32LXD500 / TX-26LX500 / TX-32LXD50 / TX-32LXD40 / TX-32LXD55F / TX-26LD50. von Panasonic vorgesehen. Die Verwendung mit anderen Geräten kann zu Instabilität führen und Verletzungen zur Folge haben.
Attention:
L’applique a été conçue spécifiquement pour les téléviseur à écran à cristaux liquides de la séries TX32LX500 / TC-32LX500 / TX-26LX500 / TC-26LX500 / TX-32LX50 / TC-32LX50 / TX-26LX50 / TC26LX50 / TC-32LX300 / TX-32LX1 / TX-32LXD1 / TC-32LX20 / TC-32LX1 / TX-26LX1 / TX-26LXD1 / TC26LX20 / TC-26LX1 et la séries TX-32LXD500 / TX-26LX500 / TX-32LXD50 / TX-32LXD40 / TX-32LXD55F / TX-26LD50.
Utilisée avec un autre appareil, elle peut se révéler tout à fait inappropriée et être la cause indirecte de blessures.
Attenzione:
Questo supporto è progettato per essere utilizzato esclusivamente con il modello di televisore a cristalli liquidi Panasonic della serie TX-32LX500 / TC-32LX500 / TX-26LX500 / TC-26LX500 / TX-32LX50 / TC32LX50 / TX-26LX50 / TC-26LX50 / TC-32LX300 / TX-32LX1 / TX-32LXD1 / TC-32LX20 / TC-32LX1 / TX-26LX1 / TX-26LXD1 / TC-26LX20 / TC-26LX1 e della serie TX-32LXD500 / TX-26LX500 / TX-32LXD50 / TX-32LXD40 / TX-32LXD55F / TX-26LD50. L’uso con altri apparecchi potrebbe provocare instabilità ed eventuali lesioni personali.
Aviso:
Este soporte ha sido pensado para ser utilizado solamente con los modelos de televisor LCD Panasonic de las series siguientes: TX-32LX500 / TC-32LX500 / TX-26LX500 / TC-26LX500 / TX-32LX50 / TC32LX50 / TX-26LX50 / TC-26LX50 / TC-32LX300 / TX-32LX1 / TX-32LXD1 / TC-32LX20 / TC-32LX1 / TX-26LX1 / TX-26LXD1 / TC-26LX20 / TC-26LX1 y TX-32LXD500 / TX-26LX500 / TX-32LXD50 / TX32LXD40 / TX-32LXD55F / TX-26LD50. Si se utiliza con otros aparatos, la instalación no será estable y algunas personas podrían sufrir heridas.
2

Wall-hanging bracket (Adjustable angle type) |
External dimensions drawing |
Wandhalterung (Typ mit einstellbarem Winkel) |
Abbildung mit externen Abmessungen |
Applique de fixation au mur (type à angle réglable) |
Plan des dimensions extérieure |
Staffa di montaggio a parete (con angolazione regolabile) |
Schema delle dimensioni esterne |
Soporte para montaje en pared (Tipo de águlo ajustable) |
Dibujo de dimensiones externas |
|
|
|
A |
|
|
|
|
|
480 |
|
|
|
|
|
440 |
|
|
|
176 |
|
|
163 |
|
|
|
89.5 |
|
120 |
|
325 |
280 |
118 |
216 |
B |
|
|
|
|
|
121 |
|
C |
23 |
|
|
23 |
|
Model No. |
A |
|
B |
|
C |
|
mm (inches) |
mm (inches) |
mm (inches) |
||||
|
||||||
|
|
|
|
|
|
|
TX-32LX500 Series |
857 (33 47/64) |
563 (22 11/64) |
164 ( 6 29/64) |
|||
TX-32LXD500 |
||||||
TC-32LX500 Series |
|
|
|
|
|
|
|
|
|
|
|
|
|
TX-32LX50 Series |
|
|
|
|
|
|
TX-32LXD50 |
|
|
|
|
|
|
TX-32LXD55F |
795 (31 19/64) |
573 (22 |
9/16) |
164 ( 6 29/64) |
||
TX-32LXD40 |
|
|
|
|
|
|
TC-32LX50 Series |
|
|
|
|
|
|
|
|
|
|
|
|
|
TC-32LX300 |
897 (35 |
5/16) |
578 (22 |
3/ 4) |
164 (35 29/64) |
|
|
|
|
|
|
|
|
TX-32LX1 |
|
|
|
|
|
|
TX-32LXD1 |
1000 (33 |
15/64) |
558 (21 |
31/32) |
135 ( 5 5/16) |
|
TC-32LX20 |
||||||
|
|
|
|
|
||
TC-32LX1 |
|
|
|
|
|
|
|
|
|
|
|
|
|
TX-26LX500 Series |
725 (28 35/64) |
487 (19 11/64) |
164 ( 6 29/64) |
|||
TX-26LXD500 |
||||||
TC-26LX500 Series |
|
|
|
|
|
|
|
|
|
|
|
|
|
TX-26LX50 Series |
663 (24 59/64) |
495 (19 31/64) |
164 ( 6 29/64) |
|||
TX-26LXD50 |
||||||
TC-26LX50 Series |
|
|
|
|
|
|
|
|
|
|
|
|
|
TX-26LX1 |
|
|
|
|
|
|
TX-26LXD1 |
844 (33 15/64) |
478 (18 13/16) |
135 ( 5 5/16) |
|||
TC-26LX20 |
|
|
|
|
|
|
TC-26LX1 |
|
|
|
|
|
|
|
|
|
|
|
|
|
3

English
Safety precautions Always follow these precautions
To prevent injury to the user and others and to prevent damage to property, directions that must be followed are explained as shown below.
 The following displays categorize the degree of danger when mishandled.
WARNING |
Possibility of serious injury and even death when mishandled. |
|
|
CAUTION |
Possibility of injury or damage to surrounding property. |
|
|
 Directions that must be followed are explained using the following symbols.
(Examples of graphical symbols are shown below.)
This symbol indicates that the direction must be followed with caution.
This symbol indicates that the direction is prohibited.
This symbol indicates that the direction must always be followed.

 WARNING
|
Installation to be performed by certified |
|
Be aware of safety factors concerning the |
|
|
||
|
|
||
|
personnel only. |
|
mounting strength. |
|
Inadequate installation may cause the LCD |
|
Insufficient strength may cause the LCD TV |
|
TV to fall, resulting in bodily injury. |
|
to fall, resulting in bodily injury. |
|
Prohibited |
|
|
Do not install where tolerance is weak.
If the tolerance of the mounting location is weak, the LCD TV may fall resulting in bodily
Prohibited injury.
When expanding connection equipment, be sure to prevent lock release.
This may cause injury.
Do not hang from the LCD TV, place stepsladder, etc.
The LCD TV may become damaged or it may fall, causing bodily injury.
Prohibited

 CAUTION
Do not install in humid or dusty areas, or where the LCD TV may be exposed to lampblack, steam or heat.
This may affect the LCD TV, and may cause fire or electric shock.
Prohibited
At least two persons should perform installation and removal of the LCD TV unit.
Dropping the LCD TV may result in injury.
Always remove the wall hanging bracket when removing the LCD TV.
Injury may result when accidentally hitting the projected parts.
• Take caution when removing for repairs, etc.
Do not install with the LCD TV facing downward, on its side, or upside down.
Heat may build up within the LCD TV, causing fire as a result.
Prohibited
Ensure there is a space of at least 5 cm between the LCD TV body and other objects at the top, bottom and sides, and at least 4 cm at the back.
Vent holes are located on the rear of the LCD TV. Blocking these holes may result in fire.
Make sure there is sufficient air circulation so that the ambient temperature does not exceed 35 °C.
Heat may build up within the LCD TV, causing fire as a result.
4
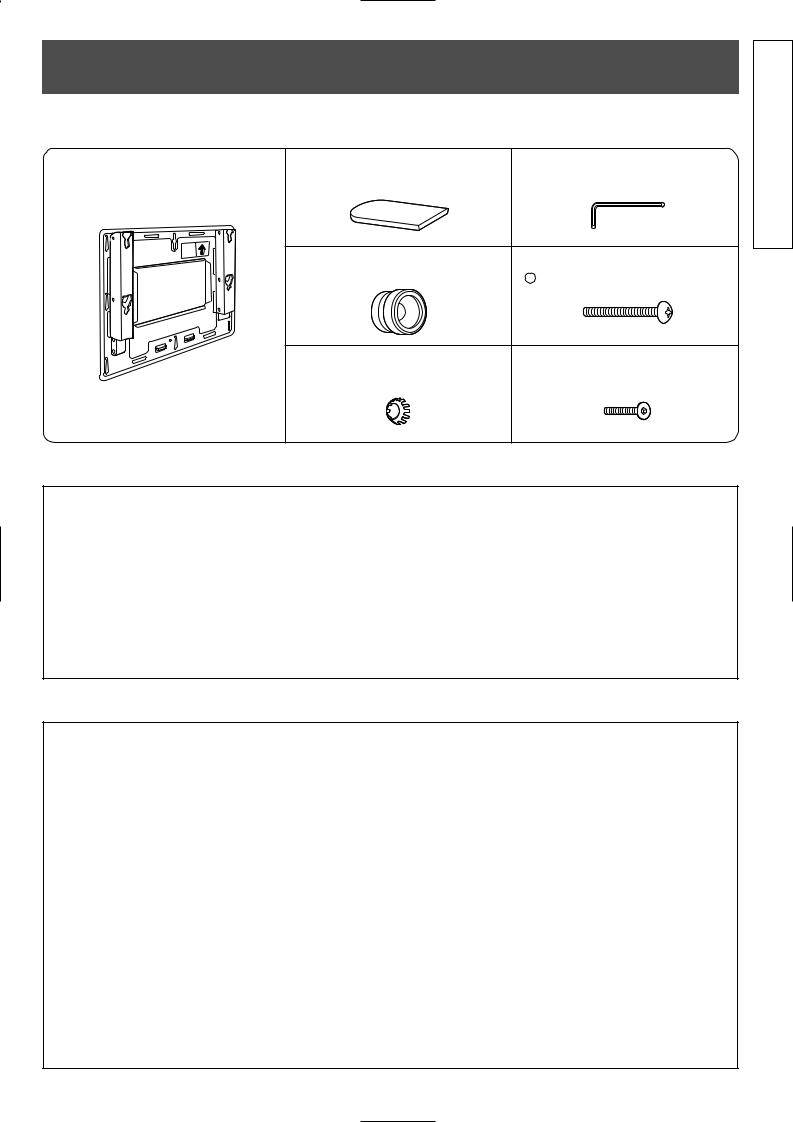
Components
TY-WK32LX20W |
Wall hanging bracket (Vertical mounting type) |
|
|
Wall hanging bracket ..................... |
× 1 Cover stickers ........................... |
× 2 Allen wrench (included tool) ...... |
× 1 |
Insulation spacers ..................... |
× 4 Unit fastening screws |
× 2 |
|
( + M5-35) ................................. |
Dished toothed washers ............ |
× 4 Allen head countersunk screws |
× 4 |
|
(M4-18) ...................................... |
English
Requests regarding handling
1)Exercise care when selecting the location for the TV because it may discolor or deform due to light or heat if it is placed where it is exposed to direct sunlight, or near a heater.
2)Upkeep
Wipe with a dry cloth. If the unit is extremely soiled, first wipe off soiling with a neutral detergent diluted in water, and then wipe with a dry cloth. Do not use cleaners such as benzene, thinner or furniture wax because they may cause paint peeling. (If using a chemical wiping cloth, follow any precautions included.)
3)Do not affix adhesive tape or stickers. Doing so may dirty the surface of the wall mounting bracket.
Precautions for wall hanging bracket fitting
 The wall hanging bracket is for use in attaching a LCD TV unit to a vertical wall for viewing. Do not fit to any surface other than a vertical wall.
 There is a lock mechanism on the left side of the unit, so keep a space of at least 300 mm (11 13/16 inches) between the LCD TV and the nearest wall.
 To ensure correct LCD TV performance and prevent trouble, do not fit at any of the following locations.
•Near sprinklers or fire/smoke detectors
•Where there is a risk of exposure to vibration or impact
•Near high-voltage wires or dynamic power supplies
•Locations exposed to air blown from heating equipment
 Fit using techniques suited to the structure and materials of the fitting location.
 Use commercially available M6 screws suited to the wall surface material (wood, steel frame, concrete etc.) for fitting the bracket to the wall.
 Fit so there is no contact between the attachment screws or power cord and any metal inside the wall.
 For the TV power supply plug, use a power supply outlet that can be reached easily.
 Ensure good air flow so that the equipment ambient temperature does not exceed 40˚C. Failure to do this may cause heat to build up inside the LCD TV, resulting in malfunction.
5

English
Fitting procedure |
|
|
|
|
|
|
|
|
1. Confirm the strength of the proposed fitting location |
|
A |
|
|
||||
The weight of the wall hanging bracket is approximately 3 kg |
|
|
|
|
|
|
|
|
|
|
|
480 (18 57/64) |
|
|
|||
(6.6 lb.). When fitted to the LCD TV, the total weight is |
|
|
|
440 (17 21/64) |
|
|
||
|
|
|
|
|
|
|
|
|
approximately 23 kg (50.7 lb.) (32”) or approximately 18 kg |
|
|
176 (6 59/64) |
163 (6 27/64) |
|
|
||
(39.7 lb.) (26”). |
|
|
|
|
|
|
|
|
Check the wall strength at the 6 attachment locations by |
51/64)(12325 |
1/64)(11280 |
|
11889.5 |
(341/64)(417/32) |
120121 |
47/64)(449/64) |
B |
referring to the dimension drawing of the wall hanging bracket |
|
|||||||
|
|
|
|
|
|
|
|
|
(given at right), and provide adequate reinforcement if strength |
|
|
LCD TV |
|
|
|
|
|
is not sufficient. |
|
|
external |
|
|
216 (8 1/2) |
|
|
|
|
|
profile |
|
|
|
|
|
Note |
|
|
|
|
|
|
(4 |
|
There are 12 holes in the wall hanging bracket. |
|
|
|
|
|
|
|
|
C |
(29/32)23 |
|
|
|
23 |
(29/32) |
|
|
If the wall material is wood, and adequate attachment strength |
|
|
|
|
||||
|
|
|
|
|
|
|
|
|
cannot be ensured by fastening at the 6 points at right, use as |
|
|
|
|
|
|
|
|
many spare holes as necessary. However, exercise care |
|
|
Wall hanging bracket |
|
Wall attachment holes (at 6 points) |
|||
because some wall materials may crack if screws are located |
|
|
|
|||||
Unit: mm (inches) |
|
|
|
|
|
|||
too close together. The following dimensions are important. |
|
|
|
|
|
|||
|
Be sure to fit screws and tighten securely. |
|
||||||
Do not fit at any location where these dimensions cannot be |
|
|
||||||
secured. |
|
Provide spacing for the LCD TV of at least 100 mm (3 15/16 |
||||||
* For detailed dimensions for attaching the plasma TV, refer |
|
|
inches) to the top and right side, at least 300 mm (11 13/16 |
|||||
|
|
inches) to the left side, at least 100 mm (3 15/16 inches) to |
||||||
to the separate External Dimension Drawing (page3). |
|
|
||||||
|
|
the bottom and at least 42 mm (1 21/32 inches) to the rear. |
||||||
|
|
|
||||||
2. Fit wall hanging bracket to wall
•Fit so that the arrow marks on the wall hanging bracket point upward.
•If the wall consists of a material such as concrete and bolts or nuts must be embedded beforehand, determine the hole positions by aligning using the actual wall hanging bracket, or calculate hole positions based on the dimension drawing, and then embed
“M6” bolts or nuts. When embedding bolts, locate so that the bolts protrude from the wall by 10 to 15 mm (25/64 to 19/32 inches).
(1)Fasten the screw at the top center hole first.
(2)Using a level, correct any bracket inclination, and then fasten screws at the remaining 5 locations.
Note Use commercially available M6 screws suited to the wall surface material (wood, steel frame, concrete etc.) for fitting the bracket to the wall.
3. Prepare the LCD TV
Remove the TV stand from the LCD TV. Carefully store the removed TV stand.
Fit the insulation spacers to the LCD TV.
Place the LCD TV unit face down on a blanket or other soft cloth that is clean and free of debris, and follow the procedure below.
(1)Remove the terminal cover at the lower center of the TV’s backside.
Refit the removed terminal cover after wiring.
(2)Affix the included cover stickers (1 each for left and right) to the stand pole holes on the bottom of the TV. (Peel off the backing paper and affix the cover stickers to cover the holes.)
(3)Fix the included Allen head countersunk screws, the dished toothed washers and insulation spacers (4 sets) into the insulation spacer fastening screw holes using the included Allen wrench as shown at right.
Insulation spacer fastening screw hole
Remove the TV stand.
Remove the screws (4 pcs).
Stand pole hole
Terminal cover
Cover sticker
Fit into the lower hole.
1Allen head countersunk screw
2Dished toothed washer
3 Insulation spacer
4 Allen wrench
6

4. Fit and fasten the LCD TV unit to the wall hanging bracket
(1)Hook the upper insulation spacers on the LCD TV on the top notch of the wall hanging bracket.
(2)While lowering the TV, insert the lower insulation spacers into the holes at the lower part of the wall hanging bracket, and allow the TV to settle down.
(3)Attach securely using the included unit fastening screws (1 each for left and right).
(1)
Wall hanging bracket 
Note |
Red screw for |
Wall |
|
open/close |
|||
|
fastening
Be sure to securely tighten the fastening screws to keep the LCD TV from becoming loose.
Top insulation spacer
LCD TV
Upper notch
Fitting hole for LCD
TV fastening screw
(3) LCD TV |
fastening |
screw |
|

 Wall
Wall
Lower insulation spacer
Lower hole
(2)
5. Preparation for wiring to equipment
(1)Remove the red screws for open/close fastening (1 each on the left and right)  .
.
(2)Raise the LCD TV towards yourself, as shown in the diagram at right, push up the lock bracket in the arrow direction (upward), check that the bracket has locked, and tentatively fasten.
Securely fasten the red screw for open/close
fastening (1 screw on left side)  to the lock bracket fastening hole
  .
.
(3)After the above preparation, wire to equipment.
(4)Refit the terminal cover removed during “Prepare the LCD TV.”
Wall hanging bracket
 Red screw for open/close fastening
LCD TV
Lock bracket
Wall |
Wall |
(2)
 Red screw for
open/close fastening
Lock bracket fastening hole
6. Fastening of wall hanging bracket
(1)After wiring, remove the red screw for open/close fastening  on the left side from the lock bracket fastening hole
  , lift the LCD TV slightly towards yourself, and then slowly let it swing down again. The lock will be released.
(2)Securely fasten the red screws for open/close fastening (1 each on the left and right)  to the fitting holes on the side of the unit.
Note
Be sure to always fit the red screws for open/close fastening  in order to fasten the LCD TV.
7. Removal of LCD TV unit
Wall hanging bracket
 Wall
Wall
Fitting hole for red screw for open/close fastening
 Red screw for
  open/close fastening
(1) Remove the screws for unit fastening (1 each on |
Wall hanging |
|
the left and right) that are fitted to the wall hanging |
||
bracket sides. |
bracket |
|
|
||
(2) While lifting the bottom of the LCD TV unit, pull it |
Wall |
|
towards yourself. |
||
|
||
(3) When the lower insulation spacers are freed, keep |
|
|
lifting upward. |
|
|
|
(1) LCD TV fastening |
|
|
screw |
Wall
(2)
(3)
Insulation spacer
English
7

Deutsch
Sicherheitsmaßnahmen |
Folgen Sie immer diesen |
Vorsichtsmaßnahmen. |
Die folgenden Hinweise müssen befolgt werden, um Gefahren für den Benutzer oder andere Personen sowie Sachbeschädigungen zu vermeiden.
 Die folgenden Zeichen weisen auf den Gefahrengrad hin, der eintreten kann, wenn eine Warnung oder Vorsichtsmaßnahme nicht beachtet wird.
Warnung |
Dieses Zeichen weist auf die Gefahr schwerer Verletzungen oder Todesfolge hin. |
|
|
Vorsicht |
Dieses Zeichen weist auf die Gefahr von Verletzungen oder Sachbeschädigungen hin. |
|
|
 Auf das mit einem Hinweis verbundene Vorgehen wird durch die folgenden Zeichen hingewiesen.
(Beispiele von Zeichen werden nachfolgend gezeigt.)
Dieses Zeichen bedeutet, dass der Vorgang mit Vorsicht ausgeführt werden muß.
Dieses Zeichen bedeutet, dass der Vorgang nicht ausgeführt werden darf.
Dieses Zeichen bedeutet, dass der Vorgang immer ausgeführt werden muß.

 Warnung
Die Installation sollte nur von einem qualifizierten Techniker ausgeführt werden.
|
Eine unzureichende Installation kann zum |
|
Herunterfallen des LCD-Fernsehers führen und |
Verboten |
Verletzungen verursachen. |
|
Den LCD-Fernseher nicht an einem Ort anbringen, der das Gewicht des Gerätes nicht tragen kann.
|
Wenn der Anbringungsort keine ausreichende |
|
Festigkeit aufweist, kann der LCD-Fernseher |
Verboten |
herunterfallen und Verletzungen verursachen. |
|
Beim Anschluß anderer Geräte ist sicherzustellen, dass ein Ausrasten verhindert wird.
Dies kann zu Verletzungen führen.
Stellen Sie sicher, dass der Anbringungsort eine ausreichende Festigkeit aufweist.
Wenn keine ausreichende Festigkeit gegeben ist, kann der LCD-Fernseher herunterfallen und Verletzungen verursachen.
Hängen Sie keine Gegenstände an den LCDFernseher und lehnen Sie keine Leitern an das Gerät.
Der LCD-Fernseher kann beschädigt werden oder er kann herunterfallen und Verletzungen
Verboten verursachen.

 Vorsicht
Das Gerät nicht an feuchten oder staubigen Orten installieren, an denen Lampenruß, Dampf oder Feuchtigkeit vorhanden ist.
|
Dies kann einen schädlichen Einfluß auf den LCD- |
|
Fernseher haben und Feuer oder elektrischen |
Verboten |
Schlag verursachen. |
|
Das Anbringen oder Abnehmen des LCD-Fernsehers sollte immer von mindestens zwei Personen ausgeführt werden.
Das Herunterfallen des LCD-Fernsehers kann Verletzungen verursachen.
Immer die Wandhalterung entfernen, wenn der LCDFernseher abgenommen wird.
D i e v o r s t e h e n d e n B a u t e i l e k ö n n e n z u Verletzungen führen.
•Vorsichtig vorgehen, wenn der Fernseher für Reperaturen abgenommen wird.
Der LCD-Fernseher sollte nicht nach unten weisend, seitlich oder umgekehrt installiert werden.
Im LCD-Fernseher kann es zu einem Wärmestau kommen und dadurch Feuer verursacht werden.
Verboten
Stellen Sie sicher, dass um den LCD-Fernseher mindestens ein Abstand von 5 cm zu anderen Gegenständen nach oben, unten, auf beiden Seiten und mindestens 4 cm auf der Rückseite vorhanden ist.
Der LCD-Fernseher ist mit Luftaustrittsöffnungen auf der Rückseite ausgestattet. Das Abdecken dieser Öffnungen kann Feuer verursachen.
Stellen Sie sicher, dass ausreichend Luftzirkulation vorhanden ist und die Umgebungstemperatur 35 °C nicht überschreitet.
Im LCD-Fernseher kann es zum Wärmestau kommen, der Feuer zur Folge haben kann.
8
 Loading...