


 Loading...
Maintenance Manual for maintenance engineer
CX31/41
Thank you for purchasing the Olympus microscope CX31/41.
In order to fully utilize its performance and secure optimum condition, please read this manual before maintenance work.
Please also keep it at hand during maintenance as well as for future reference.
All rights reserved, Reproduction in whole or in part without written permission is prohibited.

CX31/41 MAINTENANCE MANUAL
INTRODUCTION
The purpose of this manual is to satisfy any requirements for maintenance material that maybe considered as necessary to professionals in the maintenance field, such as Maintenance engineer in Hospitals.
It is intended to be used as a tool for performing basic maintenance procedures if needed or when required as per the recommended maintenance schedule.
The sections from this manual only cover procedure pertaining maintenance ’s that are considered to be easily performed. For more involved maintenance’s or repairs, it is recommended that you contact a qualified service engineer from your local Authorized Olympus dealer.
Maintenance parts, grease, and other items specified in the manual can be ordered from your Authorized Olympus dealer, and subject to change without notice.
The recommended maintenance schedule is shown below as reference. ( * Necessary item)
|
Portion |
Cleaning |
Optical/mechanical check |
Maintenance schedule |
|
|
|
|
|
|
|
Optical components |
|
|
|
|
|
1) |
Outer surface |
* |
|
|
Once in a year |
|
Eyepiece, objective, |
|
|
|
(If dirt is conspicuous or oil |
|
condenser lens, filter, |
|
|
|
immersion objective is used, |
|
photo eyepiece |
|
|
|
cleaning should be made after |
|
|
|
|
|
every use.) |
2) |
Inner part Prism, |
* |
|
|
Once in a year |
|
internal lenses |
|
|
|
|
Appearance |
* |
|
|
Once in a year |
|
Microscope frame, |
|
|
|
(If dirt is conspicuous, cleaning |
|
mechanical part |
|
|
|
should be made after every |
|
|
|
|
|
|
use.) |
Observation tube |
|
|
* |
Once in a year |
|
|
|
|
Optical adjustment: |
|
|
|
|
|
1) |
Optical axis (standard) |
|
|
|
|
2) |
Left/right optical axis |
|
|
|
|
3) |
Revolving axis |
|
|
|
|
4) |
Parfocality |
|
Mechanical part |
|
|
* |
Once in two to three years |
|
Focusing unit, stage, |
|
Mechanical movement: |
|
||
revolving nosepiece, |
|
|
Grease replacement |
|
|
aperture/field iris |
|
|
Mechanical adjustment |
|
|
diaphragm |
|
|
|
|
|
|
|
|
|
|
|

CX31/41 MAINTENANCE MANUAL
CONTENTS
CHAPTER 1 |
MAINTENANCE PROCEDURE ........................................................................ |
1 |
|
1. |
Maintenance of Microscope............................................................................................ |
1 |
|
2. |
Guide to Maintenance .................................................................................................... |
2 |
|
|
2-1 |
Overview of maintenance....................................................................................... |
2 |
|
2-2 |
Cleaning method for the optical components.......................................................... |
3 |
3. |
Preparing for Inspection ................................................................................................. |
6 |
|
4. |
CX31/41 Inspection Sheet.............................................................................................. |
7 |
|
CHAPTER 2 |
INSPECTION PROCEDURE............................................................................. |
8 |
|
1. |
Checking Performance of Microscope............................................................................ |
8 |
|
2. |
Checking Dirty Portion.................................................................................................... |
8 |
|
|
2-1 |
Image influence caused by dirt on each component ............................................... |
8 |
|
2-2 |
How to find dirty portion through observation.......................................................... |
9 |
|
2-3 |
How to check cleaning condition .......................................................................... |
10 |
CHAPTER 3 |
REPAIR PROCEDURE..................................................................................... |
11 |
|
1. |
Optical Adjustment ........................................................................................................ |
11 |
|
2. |
Mechanical Adjustment................................................................................................. |
14 |
|
|
2-1 Preparation for the tension adjustment of Y-wire................................................... |
14 |
|
|
2-2 Adjustment method for the tension of Y-wire......................................................... |
15 |
|
|
2-3 Confirmation of the Y-wire tension ........................................................................ |
15 |
|
|
2-4 |
Final adjustment................................................................................................... |
16 |
3. |
Replacing Grease for Fine Focus Adjustment Knob Ass’y............................................. |
17 |
|
4. |
Electrical Adjustment .................................................................................................... |
18 |
|
|
4-1 |
CX31/41 wiring diagram....................................................................................... |
18 |
|
4-2 Replacing circuit board / rheostat ass’y ................................................................ |
18 |
|
|
4-3 |
Preparation .......................................................................................................... |
19 |
|
4-4 |
Voltage adjustments............................................................................................. |
19 |
CHAPTER 4 |
JIGS AND TOOLS / GREASES AND ADHESIVES ....................................... |
20 |
|
1. |
List of Jigs and Tools.................................................................................................... |
20 |
|
2. |
List of Greases............................................................................................................. |
20 |
|
3. |
List of Adhesives .......................................................................................................... |
20 |
|
CHAPTER 5 |
MAINTENANCE PARTS ................................................................................. |
21 |
|
1. List of Maintenance Parts............................................................................................. |
21 |

CX31/41 MAINTENANCE MANUAL |
MAINTENANCE PROCEDURE |
|
|
CHAPTER 1
MAINTENANCE PROCEDURE
1.Maintenance of Microscope
1)Fundamental handling
a.Read the instruction manual thoroughly, handle the microscope correctly.
b.Be sure to make a usual cleaning, especially after every use of microscope.
c.When handling the microscope, do not expose it to shock, moisture, heat and dust.
d.If the problem occurs, do not treat it in self-judgement.
2)Using and storing conditions
a.The microscope should be used under no vibration.
If it is placed in such environment as vibration, this causes disturbance and fatigue in observation and affects the photomicrography.
b.It should not be stored in high humidity.
Such condition causes fungus, corrosion on lens and rust on metal part. Therefore, special caution is exercised if stored in a long period of time.
c.Intense temperature change should be avoided.
Be careful not to place the microscope near window exposed to direct sunlight and air conditioner. When bringing it into warm room from cold storage location in winter, condensation occurs on lens and metal part, it causes fungus and rust.
d.It should be kept clean.
The microscope is required to keep away from dust that causes contamination, fungus on lens and failure of sliding part in the frame.
Be careful not to place it in the environment where the corrodent chemicals such as hydrogen sulfide, hydrogen fluoride and acid are handled.
<Reference> fungus: occurrence conditions
|
|
|
|
|
|
Temperature |
|
|
|
|
Dry blue aspergillus |
Degree(C) |
|
|
|
|
|
|
|
40 |
|
|
|
|
|
|
30 |
|
|
|
|
|
|
20 |
|
|
|
|
|
Aspergillus |
10 |
|
|
|
|
|
|
|
Humidity |
% |
60 |
70 |
80 |
90 |
100 |
|
|
|
|
|
||
- 1 -

CX31/41 MAINTENANCE MANUAL |
MAINTENANCE PROCEDURE |
|
|
2. Guide to Maintenance
2-1 Overview of maintenance
1) |
|
|
|
|
|
|
|
|
|
|
2) |
|
|
|
|
|
|
|
|
|
|
|
|
|
|
|
|
3) |
||||||||||||||||||||||||||||||||||||||||||||||||||||
|
|
|
|
|
|
|
|
|
|
|
|
|
|
|
|
|
|
|
|
|
|
|
|
|
|
|
|
|
|
|
|
|
|
|
|
|
|
|
|
|
|
|
|
|
|
|
|
|
|
|
|
|
|
|
|
|
|
|
|
|
|
|
|
|
|
|
|
|
|
|
|
|
|
|
|
|
|
|
|
|
|
|
|
|
|
|
|
|
|
|
|
|
|
|
|
|
|
|
|
|
|
|
|
|
|
|
|
|
|
|
|
|
|
|
|
|
|
|
|
|
|
|
|
|
|
|
|
|
|
|
|
|
|
|
|
|
|
|
|
|
|
|
|
|
|
|
|
|
|
|
|
|
|
|
|
|
|
|
|
|
|
|
|
|
|
|
|
|
|
|
|
|
|
|
|
|
|
|
|
|
|
|
|
|
|
|
|
|
|
|
|
|
|
|
|
|
|
|
|
|
|
|
|
|
|
|
|
|
|
|
|
|
|
|
|
|
|
|
|
|
|
|
|
|
|
|
|
|
|
|
|
|
|
|
|
|
|
|
|
|
|
|
|
|
|
3 |
4 |
|
3 |
4 |
|
|
3 |
4 |
|
|
5 |
2 |
5 |
5 |
2 |
|
|
2 |
||
|
6 |
|
1 |
6 |
6 |
1 |
|
|
1 |
||
|
|
|
|
*removed |
|
|
|
|
|
if necessary |
|
|
|
|
|
*Attachment |
|
|
|
|
|
lens |
|
Set your correct interpupillary distance. |
Sweep off dust on the outer surfaces |
Remove the optical components and |
||
Note any areas suggesting a need for |
with the soft brush. If there are stains on |
the specimen holder. (The attachment |
||
mechanical and/or optical maintenance |
the microscope frame, clean them with |
lens is removed from the condenser |
||
by operating it or observing a specimen. |
neutral detergent. |
with the condenser turned upside |
||
|
|
|
|
down.) |
4) |
|
|
5) |
6) |
Plastic part |
3 |
4 |
|
|
2 |
5 |
|
|
|
|
1 |
6 |
|
|
plastic part |
|
|
|
|
Wipe off any dirt spots on the surface of |
Clean all exposed optics such as lenses |
Mount the removed components to the |
||
lenses, filter, glass and stage. The |
of eyepieces and objectives. |
microscope frame. |
||
plastic parts should be cleaned with |
|
|
|
|
neutral detergent. |
|
|
|
|
7)
3  4
4
2 |
5 |
1  6
6
Polish all plastic components and the frame with silicon cloth.
8)
3 |
4 |
5
2
6
1
Return the interpupillary distance to original condition and prepare for the inspection. (see page 6)
9)
Do a final check following the inspection sheet in this manual. (See page 7)
Tool required:
Lens tissue |
Neutral detergent |
Cleaning solution |
Cotton swab |
Blower |
Silicon cloth |
|
(For plastic part or |
(For lens or filter |
or tweezers |
|
(For finishing) |
|
frame) |
etc.) |
etc. |
|
|
- 2 -
CX31/41 MAINTENANCE MANUAL |
MAINTENANCE PROCEDURE |
|
|
2-2 Cleaning method for the optical components
Required tools:
1)Lens tissue
2)Cotton swab or tweezers etc.
3)Blower
4)Magnifier (Eyepiece is possible to be used by turning it upside down. Refer to page 10.)
5)Cleaning solution: e.g. Alcohol
Before cleaning: Lightly brush the lens surface or blow with the blower before wiping with tissue. This removes particles that may scratch the lens surface. (to protect the lens coating)
HOW TO CLEAN THE OBJECTIVE LENS
1 |
|
2 |
|
|
3 |
|
|
|
4 |
|
|
|
|
|
|
|
|
|
|
||||||||||||||||
|
|
|
|
|
|
|
|
|
|
|
|
|
|
|
|
|
|
|
|
|
|
|
|
|
|
|
|
|
|
|
|
|
|
|
|
|
|
|
|
|
|
|
|
|
|
|
|
|
|
|
|
|
|
|
|
|
|
|
|
|
|
|
|
|
|
|
|
|
|
|
|
|
|
|
|
|
|
|
|
|
|
|
|
|
|
|
|
|
|
|
|
|
|
|
|
|
|
|
|
|
|
|
|
|
|
|
|
|
|
|
|
|
|
|
|
|
|
|
|
|
|
|
|
|
|
|
|
|
|
|
|
|
|
|
|
|
|
|
|
|
|
|
|
|
|
|
|
|
|
|
|
|
|
|
|
|
|
|
|
|
|
|
|
|
|
|
|
|
|
|
|
|
|
|
|
|
|
|
|
|
|
|
|
|
|
|
|
|
|
|
|
|
|
|
|
|
|
|
|
|
|
|
|
|
|
|
|
|
|
|
|
|
|
|
|
|
|
|
|
|
|
|
|
|
|
|
|
|
|
|
|
|
|
|
|
|
|
|
|
|
|
|
|
|
|
|
|
|
|
|
|
|
|
|
|
|
|
|
|
|
|
|
|
|
|
|
|
|
|
|
|
|
|
|
|
|
|
|
|
|
|
|
|
|
|
|
|
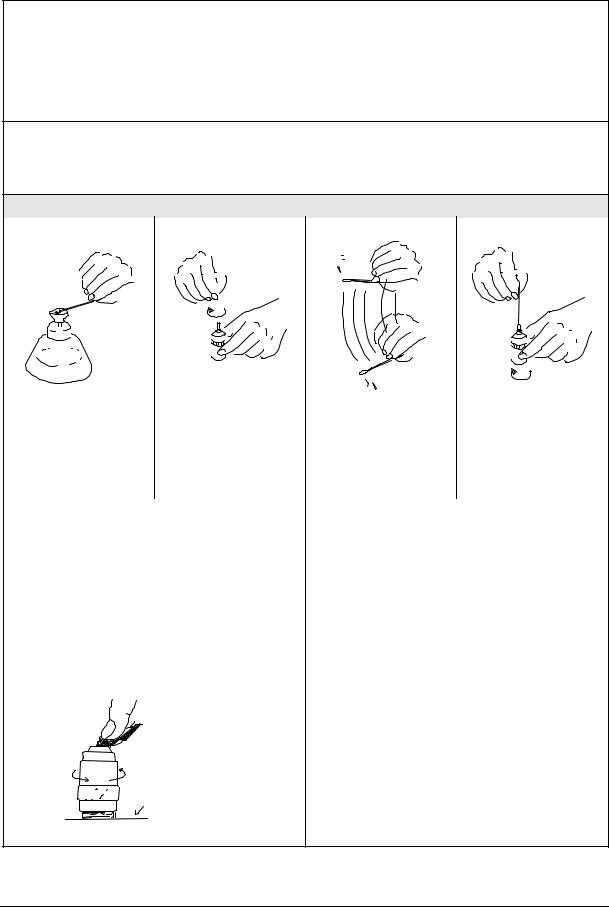
Moisten the tip of |
With a circular motion, |
Dip a new cotton swab |
Wipe the objective lens |
||
cotton swab with |
wipe the top lens |
in the cleaning solution |
from the center |
||
cleaning solution. |
surface with the cotton |
and shake vigorously |
towards the periphery, |
||
|
|
|
swab, to thoroughly |
to remove any excess |
while rotating the lens. |
|
|
|
remove any oil or dirt |
cleaning solution. |
|
|
|
|
from the lens. |
|
|
|
|
||||
When the lens size is large and difference in level |
Cleaning the immersion objective: |
||||
between the lens and the lens frame is small: |
|
|
|||
Fold the lens tissue several times and moisten it |
Wipe off the immersion oil while absorbing it with |
||||
with cleaning solution. |
|
lens tissue that is not moistened. After that, clean |
|||
After that, apply the folded line edge to the center |
the lens as the same manner mentioned on the |
||||
of lens, push it with index finger and turn the |
left. When the top surface of lens frame is higher |
||||
objective by the other hand to clean the lens |
than that of lens and remained dirty potion on the |
||||
while moving it from the center towards the |
periphery of lens can not be wiped off, clean the |
||||
periphery. |
|
lens referring the above figures, 1 to 4. |
|||
|
|
|
|
|
|
Put it on the desk
- 3 -
CX31/41 MAINTENANCE MANUAL |
MAINTENANCE PROCEDURE |
|
|
HOW TO CLEAN THE FILTER
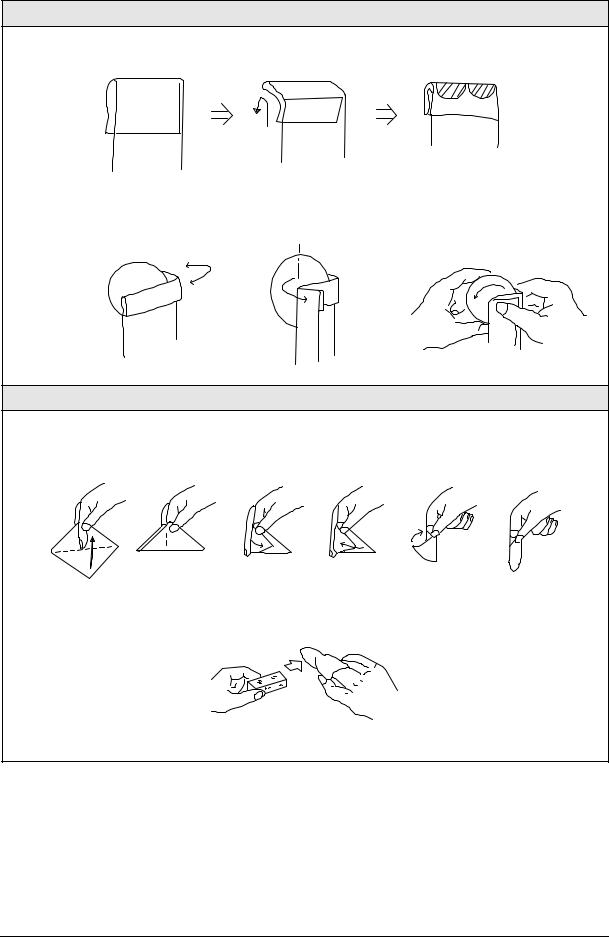
Fold the lens tissue into two or three layers and moisten its shaded part with cleaning solution.
Hold the filter at its edge and fold the lens paper from the lens center to outside as illustrated. Move the lens tissue gradually to outside while turning the filter by left hand.
HOW TO CLEAN THE PRISM
Hold a sheet of lens tissue between your middle and index fingers, then fold and wrap it around your index finger. Hold the tissue down with your thumb and moisten it with sufficient cleaning solution.
1) |
2) |
3) |
4) |
5) |
6) |
Wipe the prism surfaces from front to backward at a stroke, applying even pressure.
- 4 -

CX31/41 MAINTENANCE MANUAL |
MAINTENANCE PROCEDURE |
|
|
HOW TO CLEAN THE EYEPIECE
1
Wrap a sheet of lens tissue around a cotton swab as illustrated. If the area to be cleaned is large, wrap the lens tissue looser and thicker. Otherwise, make a thin, tight wrap.
2
Dip the wrapped lens tissue in the cleaning solution, and wipe the eyepiece from the center towards the periphery in a circular motion.
Important notes:
1)Never rub the lens surface strongly.
2)Do not use the same lens tissue to clean more than one lens .
3)Do not moisten the lens tissue with an excessive amount of cleaning solution.
4)When cleaning with tweezers, be careful not to protrude its tip from the lens tissue.
- 5 -
Loading...