


MICROLINE 320/390FB
User Manual (English)
MICROLINE 320/390FB |
User Manual (English) |

English
Table of Contents
Note to Customers ................................... |
E-2 |
Important Safety Instructions .................. |
E-3 |
Important Wiring Instructions ................. |
E-4 |
Installing Your Printer ............................. |
E-5 |
Preliminaries ............................................ |
E-6 |
Connecting to the Computer .................... |
E-9 |
Installing the Ribbon Cartridge ............... |
E-10 |
Loading Paper .......................................... |
E-12 |
Loading Continuous Paper ...................... |
E-12 |
Loading Cut Sheet paper ......................... |
E-18 |
Setting the Top of Form .......................... |
E-20 |
Positioning of the Printer ......................... |
E-21 |
Running a Self Test ................................. |
E-22 |
Printing Demo Patterns ........................... |
E-23 |
Changing Menu Settings ......................... |
E-24 |
Specifications ........................................... |
E-26 |
E – 1
Note to Customers
Every effort has been made to ensure that the information in this manual is complete, accurate and up-to-date. Oki assumes no responsibility for errors beyond its control. Oki also can not guarantee that changes in software and equipment made by other manufacturers and referred to in this book will not affect the applicability of the information in this manual.
Copyright 1994 by Oki. All rights reserved.
Microline is a registered trademark of Oki Electric Industry Company Limited.
Epson is registered trademark of Seiko Epson Corporation.
IBM, PC, Proprintere XL and Graphics Printer are registered trademarks of International Business Machines Corporation.
MS-DOS is a trademark of Microsoft Corporation.
E – 2
Important Safety Instructions
Your printer has been carefully designed to perform safely and reliably. However, as with all electrical equipment certain precautions should be allowed:
Read all documentation supplied with and on the printer before commencing.
Always disconnect the printer from the mains source before cleaning.
Be certain that your power source matches the rating listed on the back of the printer. If you are using an extension cord, ensure that the total rating does not exceed 15 amperes.
Your printer has an earthed 3-pin plug, DO NOT use this plug with a socket that is not earthed.
DO NOT make any adjustments, other than those outlined in this manual, it could damage the printer.
If you have persistent problems with your printer, switch off, disconnect from the mains source and contact your dealer for assistance.
E – 3

Important Wiring Instructions
The wires in the mains lead are coloured in accordance with the following code:
Green and Yellow |
Earth |
Blue |
Neutral |
Brown |
Live |
If the colours of the wires in the mains lead of this printer do not correspond with the markings of the terminals of your plug, proceed as follows:
Green and Yellow must be connected to the terminal marked with the letter E (or the safety earth symbol) or the terminal coloured Green or Green and Yellow. Brown must be connected to the terminal marked with the letter L or coloured Red. Blue must be connected to the terminal marked with the letter N or coloured Blue or Black.
Warning: This printer must be earthed.
If you are in any doubt regarding the wiring, please contact a qualified electrician.
E – 4

Installing Your Printer
Prior to unpacking the printer, find a flat, sturdy surface to place it on, for example, a desk, printer stand, etc. Gently remove the printer from its carton. Make sure you have everything shown below:
MICROLINE 320/390 FLATBED printer
Sheet stacker
Power cord
Ribbon cartridge
Printer Handbook
!Note: Save the box and all packing material. Repack the printer when planning to transport it long distances, in order to protect it from rough handling
and damage.
!Note: You can purchase an interface cable and paper for the MICROLINE 320/390 FLATBED from your dealer.
Sheet stacker
Printer |
Ribbon cartridge |
|
Printer handbook
Power cable
ln the unlikely event that anything is missing or damaged, contact your dealer immediately.
E – 5

Preliminaries
Before plugging in the printer, follow these steps to install your printer.
1.Hold both sides of the access cover and lift up.
There is a shipping retainer to protect the printhead from jamming. Remove this shipping retainer and keep it with the other packing materials. (To transport the printer long distances, make sure to re-install the shipping retainer). Close the access cover.
Access cover
Shipping retainer
E – 6

2.Next install the sheet stacker.
Put the stud of one of the stacker’s legs into the hole at the end of the rear vent. Gently press the other leg until it slips into the other hole.
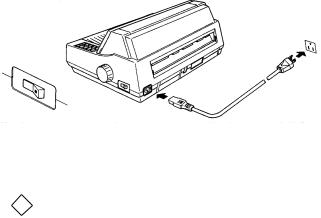
3.Make sure the power switch is OFF. Plug the power cord into the back of the printer. Plug the other end into an earthed socket.
4.Turn the power switch on, and check that the POWER lamp and the ALARM lamp are illuminated. If paper is loaded, the POWER lamp and the SEL lamp will be illuminated.
E – 7
5. Turn the power switch off.
!Important: Make sure the socket is earthed. Do not use an adapter because it will defeat the earthing.
E – 8
 Loading...