


 Loading...
1.Do not drop, puncture or disassemble the camera; otherwise the warranty will be voided.
2.Avoid all contact with water and dry hands before using.
3.Do not expose the camera to high temperature or leave it in direct sunlight. Doing so may damage the camera.
4.Use the camera with care. Avoid pressing hard on the camera body.
5.For your own safety, avoid using the camera when there is a storm or lightning.
6.Avoid using batteries of different brands or types at the same time. There is potential of explosion from using incorrect batteries.
7.Remove batteries during long periods between usage, as deteriorated batteries may affect the functionality of the camera.
8.Remove batteries if they show signs of leaking or distortion.
9.We suggest using only the accessories supplied by the manufacturer.
1 |
7 |
2
8
3 |
9 |
4
5
6

Contents
Getting Started |
4 |
|
|
1. Your camera parts |
4 |
|
|
2. |
Loading the battery |
5 |
|
3. |
Inserting and removing the SD/MMC card |
6 |
|
|
Inserting the card |
6 |
|
|
Removing the card |
6 |
|
4. Attaching the strap |
7 |
|
|
5. |
Using the tripod |
8 |
|
Basic Operation |
9 |
|
|
|
|
|
|
1. |
Switching on and off |
9 |
|
2. |
Setting the Mode switch |
10 |
|
3. |
Taking still pictures |
11 |
|
|
The LCD display information |
11 |
|
|
Snapshot |
12 |
|
4. |
Recording movies |
13 |
|
|
The LCD display information |
13 |
|
|
Making a movie |
14 |
|
5. |
Playing your pictures and movies |
15 |
|
|
The LCD display information |
15 |
|
|
Viewing pictures |
16 |
|
|
Viewing movies |
17 |
|
|
Deleting pictures and movies |
18 |
|
1

6. |
Recording an audio clip |
19 |
Advanced Settings |
20 |
|
|
|
|
1. Menu access |
20 |
|
|
Setting the language |
21 |
|
Setting the date and time |
22 |
|
Using the flash strobe |
23 |
|
Setting the resolution |
24 |
|
Setting the date stamp |
25 |
|
Setting the flicker |
26 |
|
Delete all and format |
27 |
2. |
Using the self-timer |
28 |
3. |
Using the Smart key |
29 |
Enjoying your Images and Audio Clips |
30 |
|
on the Computer |
|
|
|
|
|
1. |
Installing MD 41084 Manager |
30 |
2. |
Connecting your camera to your computer |
33 |
3. |
Copying images and audio clips to your computer |
34 |
4. |
Playing on your computer |
36 |
Using MD 41084 Manager |
37 |
|
|
|
|
1. |
Installing MD 41084 Manager |
37 |
2. |
Connecting your camera to your computer |
38 |
3. Starting MD 41084 Manager |
40 |
|
4. Managing images via MD 41084 Manager |
41 |
|
|
Album mode panel |
41 |
2

|
Picture enhancement |
42 |
|
Viewing your images |
43 |
|
Copying your images to "My Album" |
44 |
|
Designating the album path |
45 |
|
Creating an AVI file |
46 |
5. Using PC Camera via MD 41084 Manager |
47 |
|
|
Live mode panel |
47 |
|
Capturing immediate images to your computer |
48 |
|
Advanced settings |
49 |
Troubleshooting |
51 |
|
|
|
|
Other Information |
53 |
|
|
|
|
1. |
Battery life |
53 |
2. |
LED indicator events |
53 |
3. |
Storage capacity |
54 |
4. |
More on flicker |
54 |
5. |
Specifications |
55 |
3

 Getting Started
1. Your camera parts
Knowing your camera parts well before using it will help you
operate it more easily.
|
1 |
|
|
|
2 |
|
|
3 |
7 |
|
|
|
|
||
4 |
8 |
|
|
5 |
9 |
|
|
6 |
|
|
|
11 |
|
10 |
|
|
|
||
12 |
16 |
|
|
17 |
|
||
13 |
|
||
18 |
19 |
||
14 |
|||
|
|||
15 |
|
20 |
|
|
|
21 |
1Shutter/OK button
2Mode switch
3Lens cover
4Lens
5Microphone
6Self-timer lamp
7Flash strobe
8USB port
9Focus switch
10Tripod port
11LED indicator
12LCD display
13 PLAYBACK button (Control
  button)
14Smart key (Control button)
15MENU/  button
16Strap hook
17Control - button (Zoom out)
18Control + button (Zoom in)
19Battery/card cover
20Card slot
21 Battery section
4
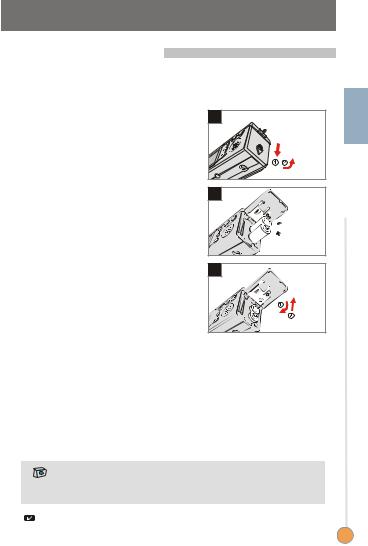
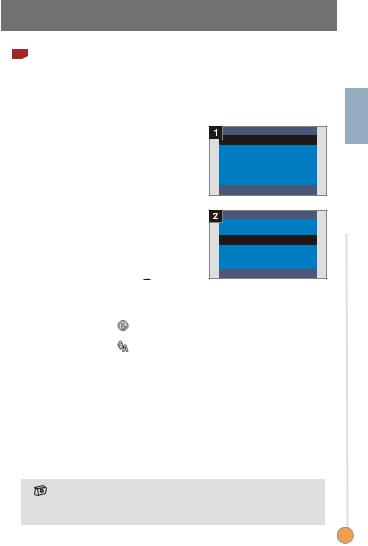
2. Loading the battery
Please use two AAA batteries.
Slide the battery/card cover in the |
1 |
1direction of the indication to open it. |
|
Follow the indication to load |
2 |
2 batteries into the battery section |
|
with the correct + and - ends. |
|
Close inward and slide upward the |
3 |
3 battery/card cover to lock it. |
|
Started Getting
1. We recommend you to use rechargeable 1.2 V Ni-MH batteries as this will increase time of usage.
2. You can also use 1.5 V alkaline batteries.
For details of the battery life, please see the "Battery life" section on page 53.
5
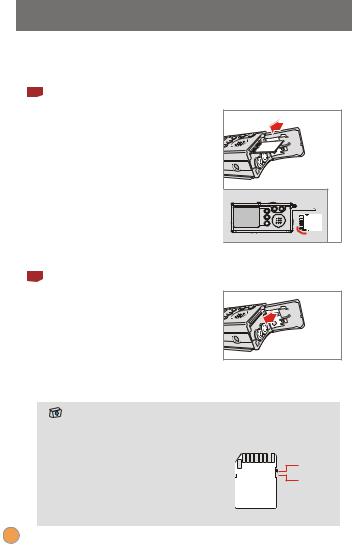
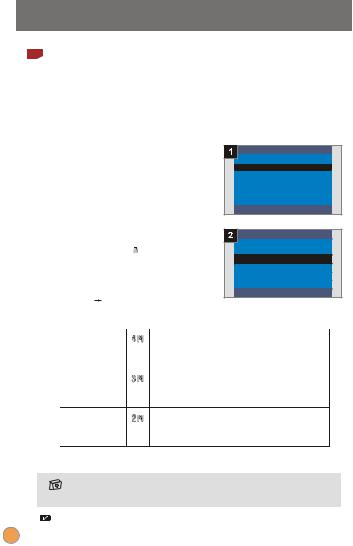
3. Inserting and removing the SD/MMC card 
1 Inserting the card
1Open the battery/card cover.
Insert the card in the direction of
2 the indication and push it in till the end of the card plot.
3 Close the battery/card cover.
2 Removing the card
Push in and release the card to remove it.
1. The camera comes with 16MB flash memory built inside for storage. If you do not insert a SD/MMC card, the data will be saved in the built-in flash memory automatically.
2. The SD card comes with a write-protect
switch. When the write-protect switch is
Unlock
set to the lock position, the card will
become non-writable. To ensure that the
Lock
camera can operate normally, please set the write-protect unlock position before inserting the card.
6
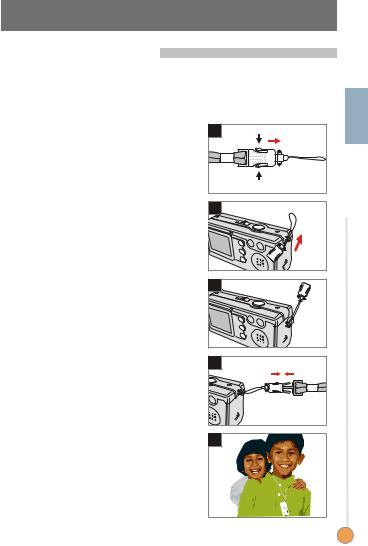
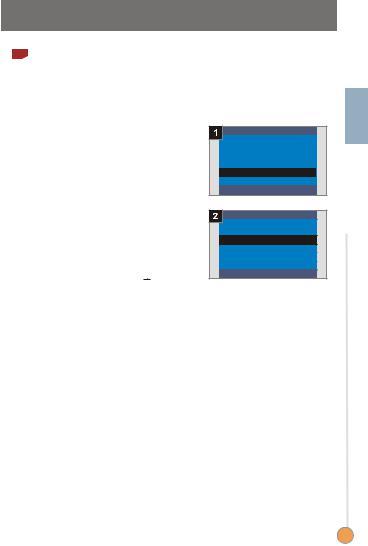
4. Attaching the strap
For convenience and safety, you may wish to attach the
carrying strap.
Press the buttons as indicated to
1separate the strap into two parts.
Thread the strap loop through the
2 hook in the direction indicated.
3 Fasten the strap loop as indicated.
4 Combine the strap as indicated.
5 Wear the strap around your neck.
1 |
|
2 |
Started Getting |
3 |
4 |
5
7
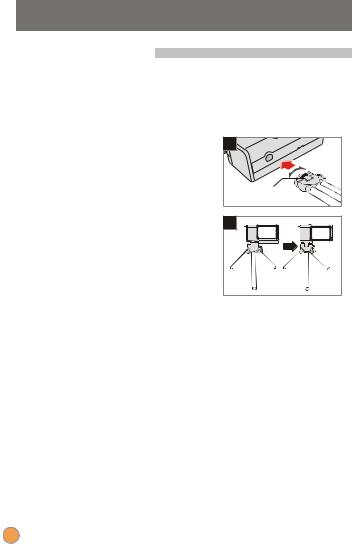
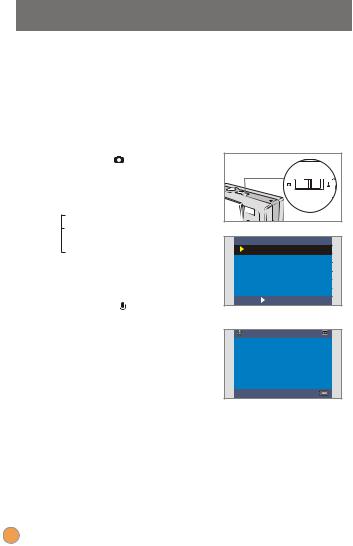
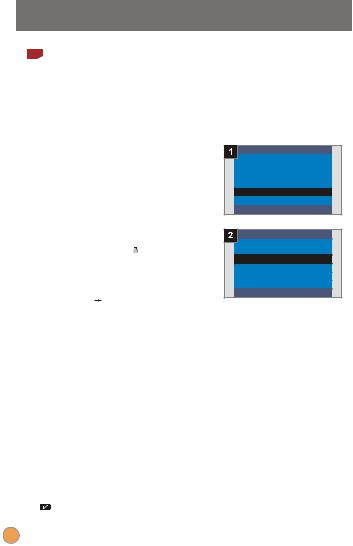
5. Using the tripod
Use the tripod to minimize camera movement and ensure optimal image quality, particularly while taking self-portraits, longer movies, video conferencing or in the macro mode.
Attach the tripod to the port on the
1bottom of the camera and rotate the serrated wheel to lock it.
Unfold the legs to set up. Then
2 adjust the alignment to the desired position.
1 |
Serrated wheel |
2 |
8
 Basic Operation
1. Switching on and off 
Slide the Lens cover in the direction of the arrow to switch the
camera on or off.
|
Basic |
ON |
Operation |
|
|
|
OFF |
If the camera is idle for over 60 seconds, the LCD display will be turned off to conserve battery power, press any key to wake up the camera. If you do not operate this camera for over 3 minutes, the camera will shut down automatically.
9
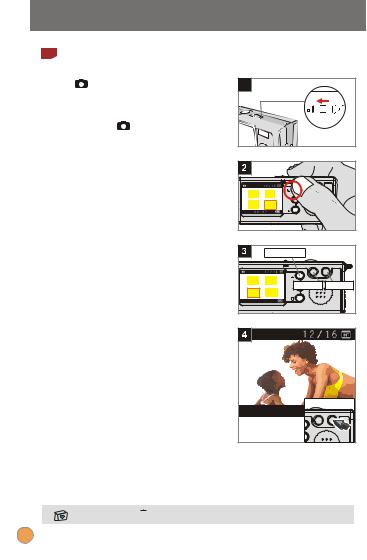
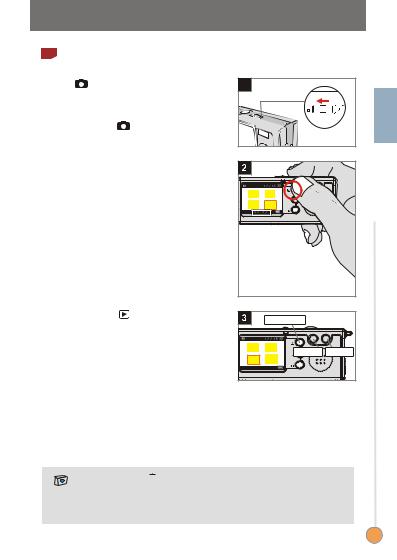
2. Setting the Mode switch 
This camera provides two modes of use - DSC (Digital Still
Camera) and Audio modes. Push the Mode switch to select the mode that you wish to use.
1 |
DSC mode: |
1 |
|
Taking still pictures, recording |
Mode switch |
|
|
|
|
||
|
movies and setting the camera. |
|
|
|
AVI: recording a movie. |
|
|
|
SELFTIMER: taking a |
|
|
|
self-portrait picture. |
DSC |
|
|
SETTING: fine tuning the camera |
AVI |
|
|
SELFTIMER |
||
|
settings. |
||
|
SETTING |
||
|
Audio mode: |
OK |
SHUTTER |
|
DSC mode |
|
|
2 Recording audio clips. |
|
||
|
|
||
Audio mode
10
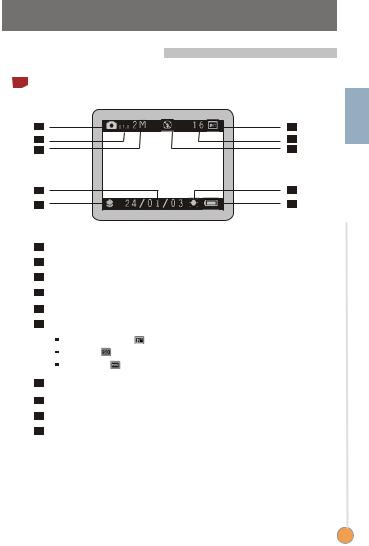
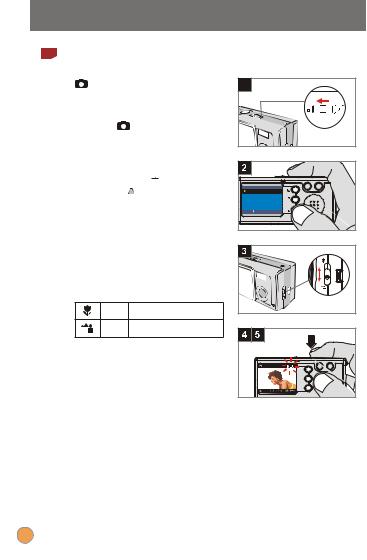
3. Taking still pictures
1 The LCD display information
1 |
6 |
2 |
7 |
3 |
8 |
4 |
9 |
5 |
10 |
1 |
Still picture mode |
2 |
Zoom ratio |
3 |
Resolution |
4 |
Date stamp |
5 |
Focus mode |
6 |
Storage media |
|
Internal memory: |
|
SD card: |
|
MMC card: |
7 |
Remaining number of pictures |
8 |
Flash status |
9 |
White balance or effect status |
10 |
Battery life |
Operation Basic
11
2 |
Snapshot |
|
|
|
|
mode |
|
1 |
|
|
1Slide the Lens cover to switch the |
|
||
|
camera on. Then set the Mode |
|
||
|
switch to |
. |
|
|
|
2 FocusPush the Focus switch to set the |
|
||
|
mode best for your picture. |
|
||
|
Macro |
12"~16" (30cm~40cm) |
|
|
|
Micro |
16"~ |
(40cm~ ) |
|
|
|
|
Zoom out |
Zoom in |
|
Zoom in or zoom out |
|
||
|
3 Press the Control + button to |
|
||
|
zoom in or the Control - button to |
|
||
|
zoom out. |
|
|
|
Take a still
4 Press the Shutter button to take a
shot.
12
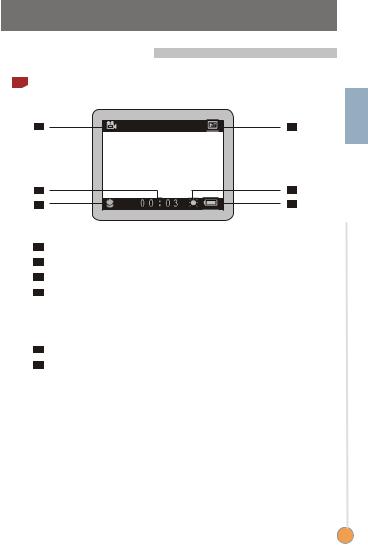
4. Recording movies
1 The LCD display information
1 |
4 |
2 |
5 |
3 |
6 |
1Movie mode
2Recording time
3Focus mode
4Storage media
 Internal memory:
 SD card:
 MMC card:
5White balance or effect status
6Battery life
Operation Basic
13
2 |
Making a movie |
|
|
mode |
1 |
|
1Slide the Lens cover to switch the |
|
|
camera on. Then set the Mode |
|
|
switch to . |
|
Select the AVI item
2 Press the MENU/  button. Use the Control
  buttons to highlight the AVI item, then press the
Shutter button to confirm.
DSC |
|
AVI |
|
SELFTIMER |
|
SETTING |
|
OK |
SHUTTER |
3 FocusPush the Focus switch to set the
focus as appropriate.
Macro 12"~16" (30cm~40cm)
Micro 16"~  (40cm~
 )
)
4
5
Start recording
Press the Shutter button to start
recording.
Stop recording
Press the Shutter button again to
stop recording.
14
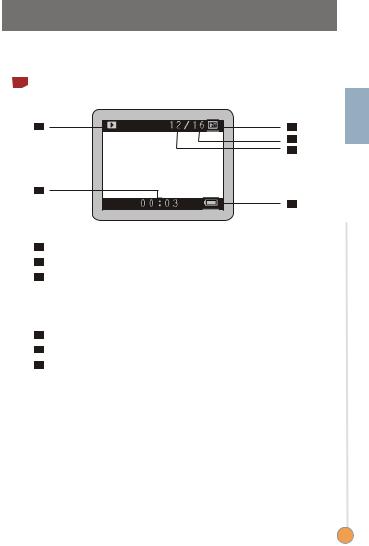
5. Playing your pictures and movies 
1 The LCD display information
1 |
3 |
4
5
2
6
1Playback mode
2Playing time of a recording
3Storage media
 Internal memory:
 SD card:
 MMC card:
4Number of pictures and movies taken
5Picture or movie number
6Battery life
Operation Basic
15
2 |
Viewing pictures |
|
|
mode |
1 |
|
1Slide the Lens cover to switch the |
|
|
camera on. Then set the Mode |
|
|
switch to . |
|
Playback mode
2 Press the  PLAYBACK button to enter a thumbnail view. The last
image taken will be highlighted.
3
4
Select images
Press the Control - button to select the previous image or the
Control + button to select the next one. Once you select the target file, press the  PLAYBACK button to view the file.
Zoom in for a close-up look
If you want to take a closer look,
press the Control + button to
zoom in.
View the file |
|
- |
+ |
Previous |
Next |
effect |
|
menu |
|
- |
+ |
Zoom in |
|
Press the MENU/  button to exit.
16
3 |
Viewing movies |
|
|
mode |
1 |
|
1Slide the Lens cover to switch the |
|
|
camera on. Then set the Mode |
|
|
switch to . |
|
Playback mode
2 Press the  PLAYBACK button to enter a thumbnail view. The last
image taken will be highlighted.
|
|
If the |
|
|
Select images |
highlighted file |
|
||
3 Press the Control - button to |
is a movie, a |
|
||
count indicator will |
|
|||
select the previous image or the |
appear at the bottom |
|
||
of the LCD display. |
|
|||
Control + button to select the next |
|
|
||
one. Once you select the target file, |
|
|
||
press the |
PLAYBACK button |
View the file |
|
|
to view the file. |
|
|||
- |
+ |
|||
|
|
|||
Stop playing the movie |
Previous |
Next |
||
effect |
|
|||
menu |
|
|||
4 While playing a recording, press |
|
|||
|
|
|||
the Shutter button to stop playing |
|
|
||
the movie. |
|
|
|
|
1. Press the MENU/  button to exit.
2.While playing a movie on the camera, sound playback is not available. Please copy the movie to your computer (for details, see page 30) to view it with sound playback.
Operation Basic
17
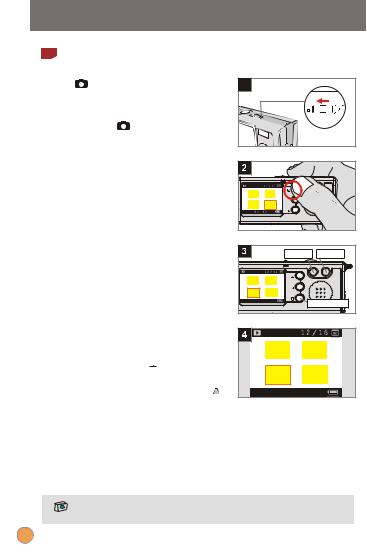
4 Deleting pictures and movies |
|
mode |
1 |
1Slide the Lens cover to switch the |
|
camera on. Then set the Mode |
|
switch to . |
|
Playback mode
2 Press the  PLAYBACK button to enter a thumbnail view. The last
image taken will be highlighted.
Select images |
Previous |
Next |
|
3 Press the Control - button to |
|||
- |
+ |
||
select the previous image or the |
|
|
|
Control + button to select the next |
menu |
|
|
|
effect |
|
|
one. |
|
Delete the file |
Delete the image
4 Once you select the target file,
press the MENU/  button to bring up a confirmation screen of deletion. Then press the Control
  buttons to select the Yes item. Press the Shutter button to complete the action of deletion.
DELETE ONE?
 NO YES
As the step. 4 above, select the No item and then press the Shutter button
to exit if you do not wish to delete the image.
18
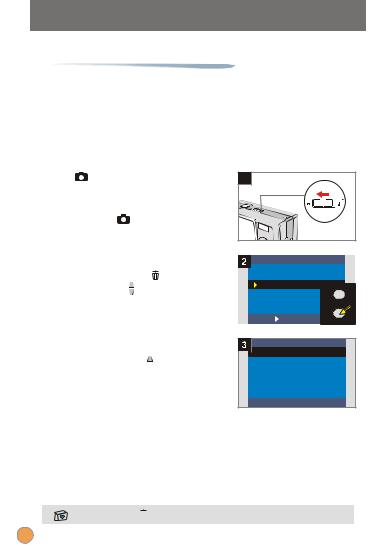
6. Recording an audio clip |
|
mode |
1 |
1Slide the Lens cover to switch the |
|
camera on. Then set the Mode |
|
switch to . |
|
Start recording
2 Press the Shutter button to start
recording an audio clip. While
starting to record, the count
0 0 : 0 0
indicator at the bottom of the LCD
display will run.
Stop recording
3 Press the Shutter button again to
stop recording.
Operation Basic
To play your audio clip, please copy the file to your computer first. For
details on playing an audio clip, please see page 30.
19
 Advanced Settings
1. Menu access 
The SETTING Menu provides more advanced features for you
to fine-tune the camera. The following describes how to access
the Menu.
mode |
|
|
1 |
|
|
1Slide the Lens cover to switch the |
|
|
|||
camera on. Then set the Mode |
|
|
|||
switch to |
. |
|
|
|
|
Select the SETTING item |
DSC |
|
|||
2 Press the MENU/ |
button. Use |
AVI |
|
||
SELFTIMER |
|||||
the Control |
buttons to highlight |
SETTING |
|||
|
|
||||
the SETTING item, then press the |
|
effect |
|||
|
|
||||
Shutter button to confirm. |
|
menu |
|||
OK |
SHUTTER |
||||
|
|
|
|||
Adjust the settings
3 Use the Control  buttons to highlight the desired item, then fine tune the setting of your camera.
SETTING

 STROBE
QUALITY
DELETE ALL
DATE
DATESTAMP
LANGUAGE
OK  SHUTTER
Press the MENU/  button to exit.
20
1Setting the language
When you switch the camera on for the first time, the LCD display may not be shown in your local language. You can set the LCD display language by using the method below.
Select the LANGUAGE item
1 Under the SETTING Menu, use the
Control buttons to highlight the
LANGUAGE item, then press the
Shutter button to confirm.
Select a language
2 Use the Control buttons to highlight the desired language, then press the Shutter button to confirm. Press the MENU/
button to exit.
SETTING
STROBE
QUALITY
DELETE ALL
DATE
DATESTAMP
 LANGUAGE
OK  SHUTTER
LANGUAGE

 ENGLISH
DEUTSCH
FRAN AIS
ITALIANO
ESPA OL
PORTUGU S
S
OK  SHUTTER
Settings Advanced
21
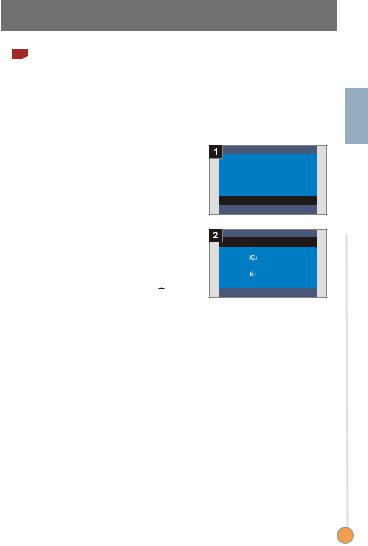
2Setting the date and time
When you switch the camera on for the first time, please set up the date and time.
Select the DATE item
1 Under the SETTING Menu, use the
Control  buttons to highlight the
DATE item, then press the Shutter button to confirm.
Set date and time
2 Use the Control +/- buttons to adjust the value, then press the
Shutter button to shift between items. Press the Smart key to confirm or the MENU/  button to exit.
SETTING
STROBE
QUALITY
DELETE ALL
 DATE
DATE
DATESTAMP
LANGUAGE
OK  SHUTTER
DATE
08:00
2003/01/01
ADJUST  - / +
- / +
NEXT  SHUTTER
SET  SMART
SMART
22
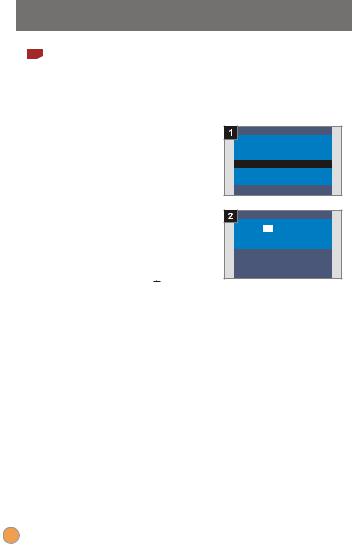
3Using the flash strobe
When the lighting is not sufficient for your shooting environment, the flash can provide the extra light you need.
Select the STROBE item
1 Under the SETTING Menu, use the
Control buttons to highlight the
STROBE item, then press the
Shutter button to confirm.
Select the AUTO item
2 Use the Control buttons to highlight the AUTO item and press
the Shutter button to confirm.
Then press the MENU/  button to exit.
SETTING

 STROBE
QUALITY
DELETE ALL
DATE
DATESTAMP
LANGUAGE
OK  SHUTTER
STROBE
OFF
 AUTO
AUTO
OK  SHUTTER
OFF |
|
The strobe does not fire. |
|
|
|
AUTO |
|
The strobe will automatically fire as more light is |
|
|
needed. |
|
|
|
Charging the flash strobe requires more battery power. When the battery power is low, the flash strobe Auto cannot be set. Please change the batteries.
Settings Advanced
23
4Setting the resolution
Changing the resolution affects the number of pictures that can be taken. The higher the resolution is, the more memorydemanding the images will be.
Select the QUALITY item
1 Under the SETTING Menu, use the
Control  buttons to highlight the
QUALITY item, then press the
Shutter button to confirm.
Select a desired item
2 Use the Control  buttons to highlight the resolution you want to choose, and press the Shutter button to confirm. Then press the
MENU/  button to exit.
SETTING
STROBE
 QUALITY
DELETE ALL
DATE
DATESTAMP
LANGUAGE
OK  SHUTTER
QUALITY
4M 2304x1728
 3M 2048x1536
2M 1600x1200
OK  SHUTTER
2304X1728 |
The most memory-demanding option. Select |
|
the 2304x1728 type when you want to develop |
|
6*8 photos or smaller. |
2048X1536 |
The default setting. Select the 2048x1536 |
|
type when you want to develop 5*7 photos or |
|
smaller. |
1600X1200 |
The most memory-saving option. Select the |
|
1600x1200 type when you want to develop 3*5 |
|
photos or smaller. |
We recommend you to use 2048X1536 to optimize image quality and memory use.
For details, please see the "Storage capacity" section on page 54.
24
5Setting the date stamp
Enabling the date stamp will print the date of shooting on the picture.
Select the DATESTAMP item
1 Under the SETTING Menu, use the
Control buttons to highlight the
DATESTAMP item, then press the
Shutter button to confirm.
Select the YES item
2 Use the Control buttons to highlight the YES item and press
the Shutter button to confirm.
Then press the MENU/  button to exit.
SETTING
STROBE
QUALITY
DELETE ALL
DATE
 DATESTAMP
LANGUAGE
OK  SHUTTER
DATE STAMP
NO
 YES
YES
OK  SHUTTER
Settings Advanced
25
6Setting the flicker
If you travel to another country, the flicker setting may not suit the country you are staying. To prevent nosie on the LCD display, please set the flicker matching the place you are staying.
Select the FLICKER item
1 Under the SETTING Menu, use the
Control  buttons to highlight the
FLICKER item, then press the
Shutter button to confirm.
Select a desired item
2 Use the Control  buttons to highlight the flicker you want to choose, and press the Shutter button to confirm. Then press the
MENU/  button to exit.
SETTING
DELETE ALL
DATE
DATESTAMP
LANGUAGE
 FLICKER
FORMAT
OK  SHUTTER
FLICKER
50 Hz
 60 Hz
60 Hz
OK  SHUTTER
For more details on flicker settings, please refer to "More on flicker" on
page 54.
26

7Delete all and format
You can use "delete all" or "format" function to quick erase obsolete files. "Delete all" will only delete files, while "format" will format the storage and thus erase all files.
Select the DELETE ALL or 1 FORMAT item
Under the SETTING Menu, use the
Control  buttons to highlight the
DELETE ALL or FORMAT item, then press the Shutter button to
confirm.
Select the YES item |
|||
2 Use the Control |
|
buttons to |
|
select the YES item, and press the |
|||
Shutter button to confirm. Then |
|||
press the MENU/ |
|
|
button to exit. |
Note that the deleted files can not be restored.
SETTING 
 DELETE ALL
DATE
DATESTAMP
LANGUAGE
FLICKER
FORMAT
OK  SHUTTER
DELETE ALL
NO
 YES
YES
OK  SHUTTER
! All images and other files will not be recovered if you select the Format item.
Settings Advanced
27

2. Using the self-timer 
The self-timer allows a delay of ten seconds before the shutter
fires when taking a self-portrait picture.
mode |
|
|
1 |
|
|
1Slide the Lens cover to switch the |
|
|
|||
camera on. Then set the Mode |
|
|
|||
switch to |
. |
|
|
|
|
Select the SELFTIMER item |
DSC |
|
|||
2 Press the MENU/ |
button. Use |
AVI |
|
||
SELFTIMER |
|||||
the Control |
buttons to highlight |
SETTING |
|||
|
|
||||
the SELFTIMER item, then press |
|
|
|||
the Shutter button to confirm. You |
OK |
SHUTTER |
|||
will see a |
icon on the top left |
||||
|
|
||||
section of the LCD display. |
|
Ten beeps |
|||
|
|
|
|
||
Use the self-timer |
|
|
|
||
3 When the Shutter button is |
|
|
|||
pressed, the camera will have ten |
|
|
|||
seconds delay with the Self-timer |
|
|
|||
lamp flashing and ten beeps |
|
|
|||
emitting before taking a picture. |
|
|
|||
After the shutter fires, the self-timer |
|
|
|||
will be automatically disabled. |
|
|
|||
28
Loading...