


 Loading...
Univ-FB_MD 81302_UK.fm Seite 3 Montag, 7. August 2006 11:08 11
Contents |
|
Safety instructions . . . . . . . . . . . . . . . . . . . . . . . . . |
5 |
General information . . . . . . . . . . . . . . . . . . . . . . . . . |
5 |
Battery instruction . . . . . . . . . . . . . . . . . . . . . . . . . . |
5 |
Cleaning . . . . . . . . . . . . . . . . . . . . . . . . . . . . . . . . . |
5 |
Product description . . . . . . . . . . . . . . . . . . . . . . . . 6 Operation . . . . . . . . . . . . . . . . . . . . . . . . . . . . . . . . 6
Inserting batteries . . . . . . . . . . . . . . . . . . . . . . . . . . |
6 |
Settings after battery replacement . . . . . . . . . . . . . |
6 |
Protection against unexpected battery discharging |
6 |
The display . . . . . . . . . . . . . . . . . . . . . . . . . . . . . . . |
7 |
Overview . . . . . . . . . . . . . . . . . . . . . . . . . . . . . . . . . |
7 |
Default readouts in the display . . . . . . . . . . . . . . . . |
7 |
Navigating the menus . . . . . . . . . . . . . . . . . . . . . . |
8 |
Cancel function . . . . . . . . . . . . . . . . . . . . . . . . . . . . |
8 |
Setting time and date . . . . . . . . . . . . . . . . . . . . . . . 9
Setting clock time . . . . . . . . . . . . . . . . . . . . . . . . . . 9 Setting the date . . . . . . . . . . . . . . . . . . . . . . . . . . . 10
Backlight . . . . . . . . . . . . . . . . . . . . . . . . . . . . . . . . 11 RESET – factory settings . . . . . . . . . . . . . . . . . . . 12
Programming device codes . . . . . . . . . . . . . . . . 13
Device types and code groups . . . . . . . . . . . . . . . 13 Programming options . . . . . . . . . . . . . . . . . . . . . . 14 Opens programming mode . . . . . . . . . . . . . . . . . 14 Select device code in the display . . . . . . . . . . . . . 14 Entering the device code according
to the code list . . . . . . . . . . . . . . . . . . . . . . . . . . . . 15 Manual code search. . . . . . . . . . . . . . . . . . . . . . . . 16 Code searching by brand name. . . . . . . . . . . . . . . 17 Code identification . . . . . . . . . . . . . . . . . . . . . . . . 18
Normal operation . . . . . . . . . . . . . . . . . . . . . . . . . |
19 |
Operating individual devices . . . . . . . . . . . . . . . . . 19 SHIFT function . . . . . . . . . . . . . . . . . . . . . . . . . . . . 19 Recordings . . . . . . . . . . . . . . . . . . . . . . . . . . . . . . 19 EPG – Electronic Programme Guide . . . . . . . . . . . 19 Operating combined devices . . . . . . . . . . . . . . . . 20 ALL OFF function . . . . . . . . . . . . . . . . . . . . . . . . . 20
Set timer . . . . . . . . . . . . . . . . . . . . . . . . . . . . . . . . |
21 |
TV sleep-timer . . . . . . . . . . . . . . . . . . . . . . . . . . . . |
21 |
Command timer . . . . . . . . . . . . . . . . . . . . . . . . . . |
22 |
Learn function . . . . . . . . . . . . . . . . . . . . . . . . . . . 24
Notes on learn function . . . . . . . . . . . . . . . . . . . . . 24 Program commands . . . . . . . . . . . . . . . . . . . . . . . 25 Delete commands . . . . . . . . . . . . . . . . . . . . . . . . . 26
3
Univ-FB_MD 81302_UK.fm Seite 4 Montag, 7. August 2006 11:08 11
Macros . . . . . . . . . . . . . . . . . . . . . . . . . . . . . . . . . |
27 |
Programming macros . . . . . . . . . . . . . . . . . . . . . . . |
27 |
Executing macros . . . . . . . . . . . . . . . . . . . . . . . . . |
28 |
Deleting macros . . . . . . . . . . . . . . . . . . . . . . . . . . . |
29 |
Universal functions (“Punch Through”) . . . . . . . 30
Playback functions . . . . . . . . . . . . . . . . . . . . . . . . 30 Volume/mute . . . . . . . . . . . . . . . . . . . . . . . . . . . . . 30
Error recovery . . . . . . . . . . . . . . . . . . . . . . . . . . . 33
Disposal . . . . . . . . . . . . . . . . . . . . . . . . . . . . . . . . 33
Packaging. . . . . . . . . . . . . . . . . . . . . . . . . . . . . . . . 33 Device . . . . . . . . . . . . . . . . . . . . . . . . . . . . . . . . . . 33 Batteries . . . . . . . . . . . . . . . . . . . . . . . . . . . . . . . . 33
Technical data . . . . . . . . . . . . . . . . . . . . . . . . . . . 33
4

Univ-FB_MD 81302_UK.fm Seite 5 Montag, 7. August 2006 11:08 11
Safety instructions
Please read these instructions carefully before operating the remote control. Keep the instructions in a safe place for future reference or in case you need to pass them on to someone else.
General information
Do not attempt to repair the remote control yourself.
The universal remote control contains an infrared laser class 1 diode. The device has a safety system that prevents the emission of dangerous laser rays escaping from the device during normal use. In order to avoid injury to the eyes, never interfere with or damage the unit's security system.
Do not subject your remote control to dust, strong sunlight, moisture, high temperatures or strong vibrations.
Battery instructions
Keep children away from the batteries. Seek medical attention immediately in the event of a battery being swallowed.
Before inserting the batteries, check whether the contacts in the device and batteries are clean and, if necessary, clean them.
Only use new batteries. Never use old and new batteries together.
Do not use a combination of battery types.
Please note the polarity (+/-) when inserting the batteries.
WARNING! There is a risk of explosion if batteries are incorrectly replaced. Replace the batteries only with the same or equivalent type.
Never try to recharge non-rechargeable batteries. There is a risk of an explosion!
Store batteries in a cool, dry location. Direct strong heat can damage the batteries. For that reason do not expose the device to any sources of strong heat.
Never short-circuit the batteries.
Never throw batteries into a fire.
If the appliance is not going to be used for long periods, remove the batteries.
Immediately remove leaking batteries from the device. Clean the contacts before inserting new batteries. There is a risk of corrosion due to battery acid!
Also remove dead batteries from the device.
Cleaning
Clean the device with a dry or lightly dampened, lint free cloth. Do not use any corrosive or aggressive cleaning products.
5
Univ-FB_MD 81302_UK.fm Seite 6 Montag, 7. August 2006 11:08 11
Product Description
This universal remote control has eight mode keys and therefore can replace up to eight normal remote controls ("8 in 1 function“). These may be remote controls for practically every type of remote-controlled consumer electronics (see the supplied code list).
The labels "TV" "VCR" "DVD" "CD" "ASAT" "CBL" "AUX" "DSAT" on the mode keys are for overview purposes. With the exception of the TV key, you can assign any key to any device (“Flex Mode”). To program in codes see “Programming device codes” on page 13.
Operation
Inserting batteries
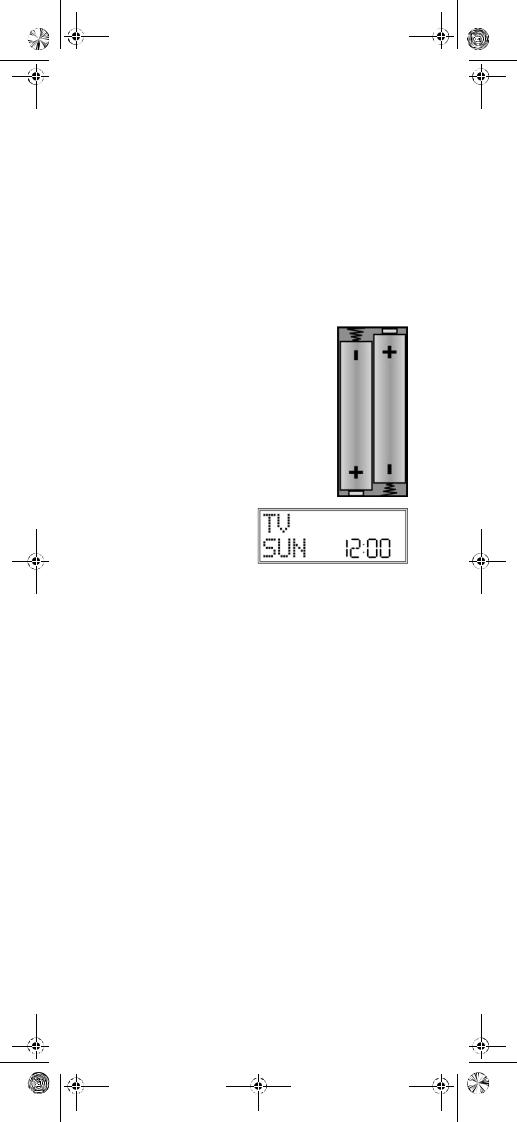
2 LR03 AAA micro batteries are supplied.
`Remove the battery compartment cover by pushing it downwards.
`Insert both batteries into the compartment while observing the +/- polarity.
`Replace the cover.
Settings after battery replacement
If the batteries have been inserted correctly, the factory setting is displayed. It shows the active mode ("TV"), the day of the week and the time.
`Please read “Setting time and date” on page 9 for more information on setting the time and date.
After new batteries have been inserted, the mode, time, date and backlight time are reset to the factory settings.
However, codes that have already been programmed in as well as programmed learn functions and macros are retained when batteries are changed.
Protection against unexpected battery discharging
If a key remains pressed down by accident (because something is lying on the remote control for example), the remote control sends 255 infrared signals (for approximately 30 seconds) and this ends the transmission. This prevents the batteries from discharging accidentally.
6
Univ-FB_MD 81302_UK.fm Seite 7 Montag, 7. August 2006 11:08 11
The display
Overview
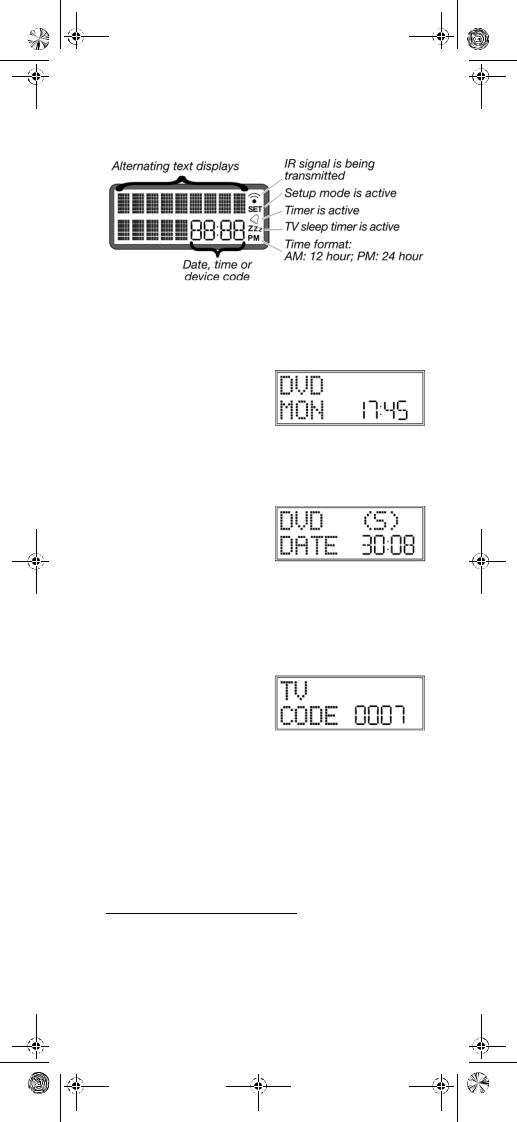
Default readouts in the display
Standard display – time
In the standard display
the active mode appears in the first column (device type).
the day of the week and time appears in the second column.
Date
Press the S (Setup) 1 key briefly to show:
the symbol for the activated SHIFT function2
(S) in the first column;
the date in the second column.
Please read “Setting time and date” on page 9 for more information on setting the time and date.
Select mode or device
Use a mode key to select the mode or the device that was programmed to this mode key. In the display:
the name of the mode key appears in the first column;
this device's programmed code appears in the second column.
Please refer to “Programming device codes” on page 13 for more information on programming the device code.
1.Press and hold the S (Setup) key to open the SETUP menu with the first menu CODE SETUP (cf. next chapter).
2.Most keys can be assigned two functions (cf. Page 19). You can access the second function by first activating the SHIFT function.
7

Univ-FB_MD 81302_UK.fm Seite 8 Montag, 7. August 2006 11:08 11
Navigating the menus
`To open the Setup menu, press and hold the S (Setup) key until CODE SETUP appears along with the "SET" symbol in the display.
`If the display shows CODE SETUP continue to press the S (Setup) key to access the other menus:
CODE SETUP > SYSTEM SETUP > TIMER SETUP > LEARN SETUP > MACRO SETUP > EXIT SETUP.
`Press OK to open a menu.
`Press the arrows to switch between sub-menus  .
.
`To exit the Setup menu, press the EXIT key and confirm the EXIT SETUP display with OK.
Cancel function
If you wish to cancel a process, wait approx. 30 seconds. The Setup menu closes automatically and the TIMEOUT message appears.
8
Univ-FB_MD 81302_UK.fm Seite 9 Montag, 7. August 2006 11:08 11
Setting time and date
In the standard display, the day and time appear in the lower column.
Press the S (Setup) key briefly to show the date in the lower column for approx. 30 seconds.
Setting clock time
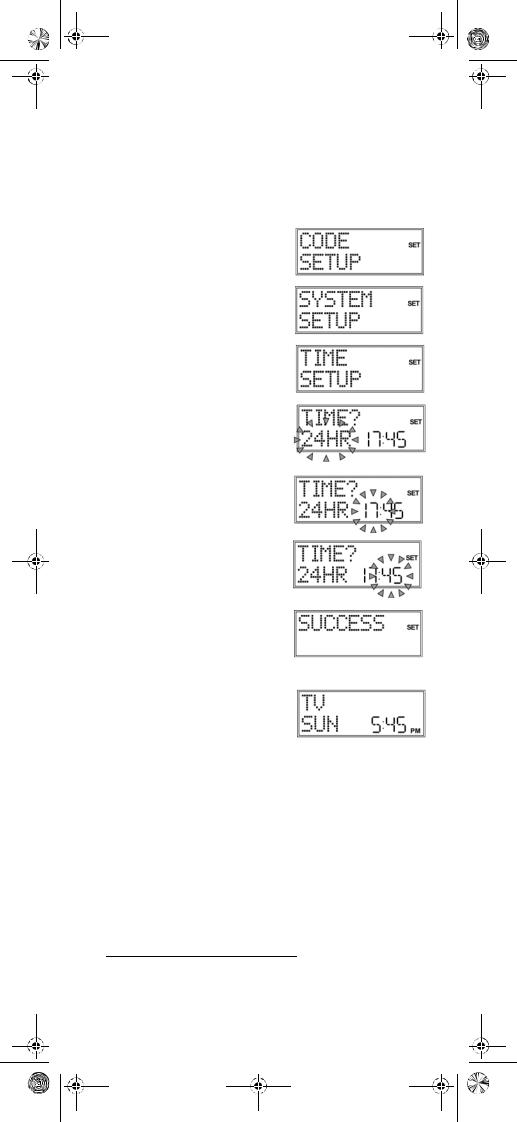
1.Keep the S (Setup) key pressed down for approx. 3 seconds, until CODE SETUP appears.
2.Press S again briefly to open the SYSTEM SETUP.
3.Confirm with OK. The VOL/ MUTE SETUP 1is displayed.
4.Use the arrows  to select the TIME SETUP and confirm with
OK.
5.The current time format flashes. Use the arrows to select  the 12 or 24 HR time format ) and confirm with OK (see the end of the section).
6.The hour display flashes. Use the arrows to select  the hour and confirm by pressing
OK.
7.The minute display flashes. Use the arrows to select  the number of minutes and confirm by pressing OK.
8.The message SUCCESS appears and the display returns to CODE SETUP.
If you choose 12 HR format, the time is displayed with the AM or PM symbols.
1.The VOL/MUTE SETUP is explained on page 30, Universal Functions („Punch Through“)
9
Univ-FB_MD 81302_UK.fm Seite 10 Montag, 7. August 2006 11:08 11
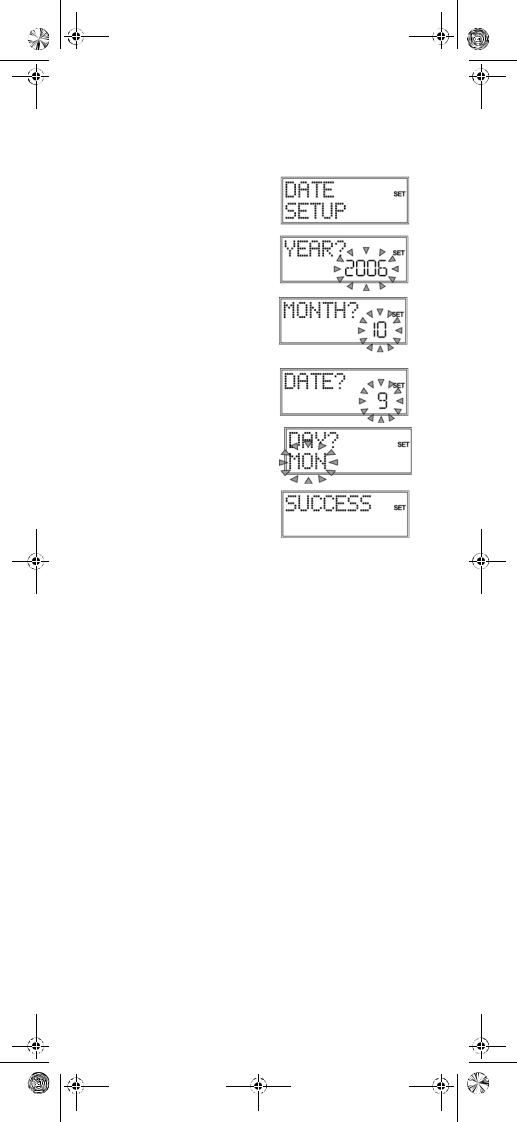
Setting the date
1.Open SYSTEM SETUP as described in "Setting clock time".
2.Confirm with OK. The VOL/MUTE SETUP is displayed.
3.Use the arrows to select  the DATE SETUP (press twice) and confirm with OK.
4.The year flashes. Use the arrows to select  the year and confirm by pressing
OK.
5.The month flashes. Use the arrows to select  the month and confirm by pressing
OK.
6.The day ("DATE") flashes. Use the arrows to select  the day and confirm by pressing
OK.
7.The day ("DAY") flashes. Use the arrows to select  the day of the week and confirm by pressing OK.
8.The message
SUCCESS appears and the display returns to CODE SETUP.
10

Univ-FB_MD 81302_UK.fm Seite 11 Montag, 7. August 2006 11:08 11
Backlight
The display's backlight comes on each time the button is pressed. The backlight's factory setting is for 10 seconds. You can switch off the backlight or extend it to 60 seconds.
Please note that the backlight uses up additional battery life.
1.Keep the S (Setup) key pressed down for approx. 3 seconds, until CODE SETUP appears.
2.Press S again briefly to open
SYSTEM SETUP.
3.Confirm with OK. The VOL/ MUTE SETUP is displayed.
4.Use the arrows (press three
times) to select  the
the
BACKLIGHT SETUP and confirm with OK.
5.The current set time flashes (factory setting is for 10 seconds). Use the arrows to select  the required time span in five second intervals. - In order to switch the backlight off, select “00“ seconds. Confirm with OK.
6.The confirmation message SUCCESS appears and the display returns to CODE SETUP.
11

Univ-FB_MD 81302_UK.fm Seite 12 Montag, 7. August 2006 11:08 11
RESET – factory settings
Use Reset to restore all device settings to the factory settings. Codes that have been programmed in, learn functions and macros are therefore deleted.
1.Keep the S (Setup) key pressed down for approx. 3 seconds, until CODE SETUP appears.
2.Press S again briefly to open
SYSTEM SETUP.
3.Confirm with OK. The VOL/ MUTE SETUP is displayed.
4.Use the arrows  (press four times) to select SYSTEM RESET and confirm with OK.
5.The message CONFIRM RESET is displayed. Confirm with OK to reset the settings.
6.While the factory settings are being restored, PLEASE WAIT appears in the display.
12
Loading...