


MD 4302 BDA/UK 19.09.2002 13:54 Uhr Seite 1
®
|
|
Medion Electronics Ltd. |
|
|
|
130 Faraday Park |
|
5261 |
|
Faraday Road |
|
|
Dorcan |
||
|
|
||
5000MSN |
01/03 |
Swindon SN3 5JF |
|
GB-Wiltshire |
|||
|
|
||
|
|
Tel. 0870 72 70 370 |
Fax 01793 71 57 16
E-Mail: hotline@medion.co.uk
C M Y CM MY CY CMY K
HEART RATE MONITOR
MD 4302
OPERATING MANUAL
®
!SAFETY INSTRUCTIONS
•The heart rate monitor is not a medical instrument. It is a training instrument that has been designed to monitor and indicate your heart rate, calorie consumption and fat burn.
•Before you begin your training program visit your doctor and consult him as to your individual upper and lower heart rate limit (training range), exercise frequency and duration.
With these parameters of your current fitness level you will be able to achieve optimum results.
•Do not wear your heart rate monitor for sports where injuries are likely to occur.
•Read the operating manual through carefully and keep it for future reference as long as you have the heart rate monitor.
•People who have heart and circulatory problems or wearers of heart pacemakers should consult their doctor before using this heart rate monitor.
CARE
Wipe the heart rate monitor and the transmitter down with a damp cloth after training.
Make sure the transmitting unit is stored in a dry place to prevent the batteries discharging.
Lift the flap!
MD 4302 BDA/UK 19.09.2002 13:54 Uhr Seite 2
FLOW DIAGRAM
LAP STOPWATCH MODE |
DATE MODE |
|
|||
|
|
|
|
A =Mode button |
|
C |
C |
C |
C |
C =Option button |
|
COUNTDOWN MODE |
ALARM MODE |
||||
|
|||||
C |
|
C |
|
|
|
TRAINING STOPWATCH MODE |
TIME MODE |
|
TRAINING ZONE MODE |
||
A |
A |
|
A |
A |
|
|
A |
|
|||
KILOGRAM/CALORIE COUNTER |
AVERAGE HEART RATE |
||||
|
|||||
C |
C |
|
C |
C |
|
FAT BURNER MONITOR |
|
MAXIMUM HEART RATE |
|||
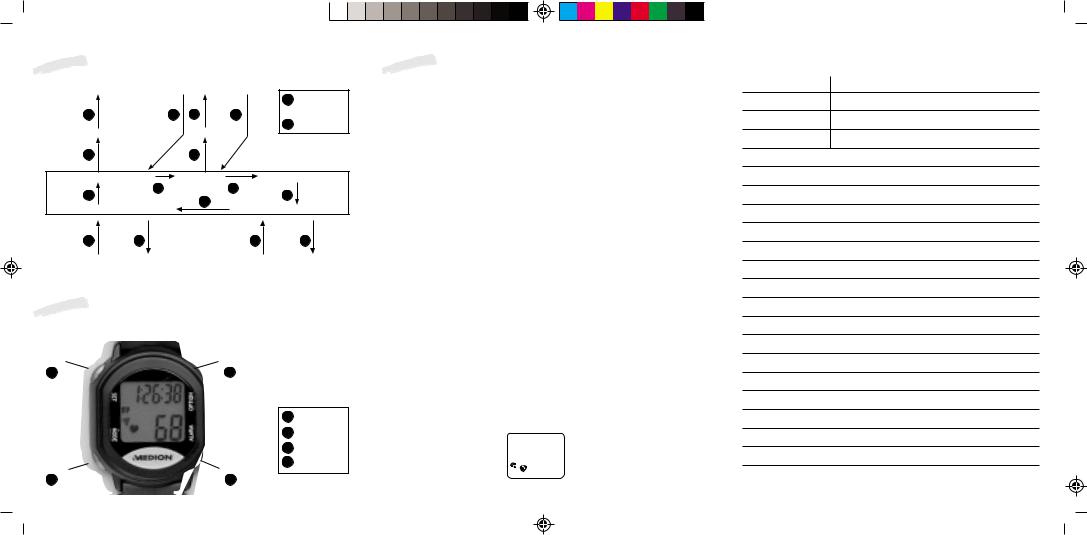
BUTTON FUNCTIONS
Your heart rate monitor has four functional buttons.
Set |
Option |
B |
C |
A =Mode button
B =Set button
C =Option button
D =Alarm button
Mode |
Alarm |
A |
D |
C M Y CM MY CY CMY K
BUTTON FUNCTIONS
Never activate the function buttons under water, as moisture can then penetrate the housing.
The A mode button is used to switch between the different operating modes. Press the mode button briefly to move from the time mode into the training zone mode, the heart rate mode, kilocalorie mode, training stopwatch mode and back to the time mode.
The B set button is used to set the upper and lower heart rate, normal time, date, alarm time, countdown timer and calorie consumption parameters. In addition, the set button is used for starting the countdown function, training stopwatch function and lap stopwatch function.
The C option button is used to switch between the individual options in the respective operating modes as follows.
You can move from the normal time mode to the alarm mode, the date mode and back to the normal time mode.
From the heart rate mode you can move from the average heart rate to the max. heart rate and back to the average heart rate. From the training stopwatch mode you can move into the countdown mode, the lap stopwatch mode and back to the training stopwatch mode.
The D alarm button is used to activate a beeper when the button is touched or when you are no longer within the training range. Touch the alarm button to activate/deactivate the beep. A sound symbol appears in the display when the beeper is activated.
Set |
13:24 |
Option |
Mode |
|
Alarm |
- 1 -
Name:
Normal pulse:
Lower pulse limit:
Upper pulse limit:

MD 4302 BDA/UK 19.09.2002 13:54 Uhr Seite 3
C M Y CM MY CY CMY K
SETTING THE TIME
The monitor must be in the time mode for the time to be set, i.e. the time is shown in the top right-hand corner and the current heart rate in the bottom righthand corner of the display. If this is not the case, press the option button until you are in the correct operating mode. Then press the mode button to reach the time mode.
Once in the time mode, keep the set button pressed for approx. 2 seconds until the word "Hold" disappears from the display. Now press the set button to select between 12-hour and 24-hour display.
When 12-hour display is selected, the American calendar format month/date will be displayed automatically. When the 24-hour display is selected the European calendar format date/month is displayed. When setting the 12-hour clock make sure the display for AM (before noon) and PM (after noon) is correct.
Confirm your selection using the mode button, the clock will then appear with the hour figure flashing. Set the current hour using the set button.
Or for 12-hour setting:
Press the mode button. The minute figure will begin to flash. Use the set button to set the minutes correctly.
Return to the time mode by pressing the mode button.
SETTING THE ALARM TIME
The monitor must be in alarm time mode for the alarm time to be set, i.e. the alarm time, the current heart rate and the letters "AL" can be seen on the display. If this is not the case, enter the time mode and press the option button to move into the alarm time mode.
Once in the time mode, keep the set button pressed for approx. 2 seconds until the word "Hold" disappears from the display. Now press the set button to switch the alarm on (the word "on" and a bell symbol appear in the display) or off (the word "off" appears in the display).
 The bell symbol remains visible in all operating modes if the alarm has been switched on.
Confirm your selection using the mode button, the alarm clock will then appear with the hour figure flashing. Set the hour required by pressing the set button.
Press the mode button. The minute figure will begin to flash. Now use the set button to set the minutes.
Return to the alarm time mode by pressing the mode button.
- 2 - |
- 3- |
 Loading...