


RF1101
GB
For Model RP1100/RP1101, RF1100/RF1101
Plunge Router Base Instruction Manual
F
Base de toupie plongeante Manuel d’instructions
E
Base para router Manual de instrucciones
1
3
7
4
5
6
19
11
10
8
9
10
11
13
2
1
12
14
15
17
16
15
16
18
1
2
3
5
7
4
6
8
2

ENGLISH
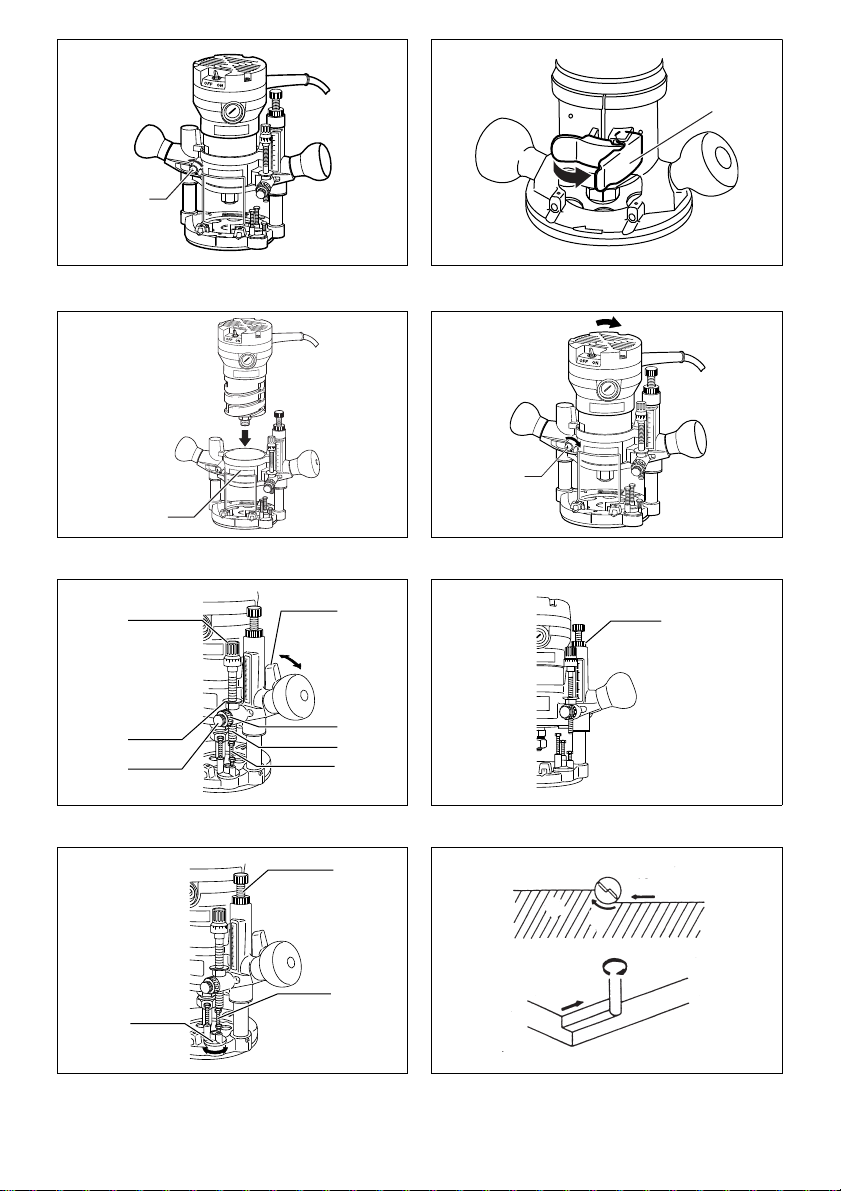
Explanation of general view
1 Lock screw
2 Lock lever
3 Label
4 Adjusting knob
5 Depth pointer
6 Fast-feed button
7 Lock lever
8 Tighten
9 Loosen
10 Stopper pole
11 Adjusting hex bolt
12 Nylon nut
13 Stopper block
14 Workpiece
Replacing the base
CAUTION:
• Always be sure that the tool is switched off and
unplugged before removing or installing the base.
Removing the existing base
For Model RP1100/RP1101 (Fig. 1)
Loosen the lock screw. Turn the motor unit counterclockwise while holding the base. Turn it until the pin
in the base is disengaged from the groove in the
motor unit. Lift the motor unit free from the base.
For Model RF1100/RF1101 (Fig. 2)
Open the lock lever. Turn the motor unit counterclockwise while holding the base. Turn it until the pin in the
base is disengaged from the groove in the motor unit.
Lift the motor unit free from the base.
Installing plunge router base
Place the plunge router base keeping the label front.
Insert the motor unit into the base keeping the cord
left side. (Fig. 3)
Rotate the motor unit clockwise until it stops. Tighten
the lock screw securely. (Fig. 4)
HOW TO USE
Adjusting depth of cut (Fig. 5)
CAUTION:
• Always be sure that the tool is switched off and
unplugged before adjusting the depth of cut.
Place the tool on a flat surface. Press the lock lever
down and lower the tool body until the bit just touches
the flat surface. Release the lock lever to hold the tool
body down. Turn the stopper pole setting nut counterclockwise to loosen. While pressing the fast-feed button, lower the stopper pole until it makes contact with
the adjusting hex bolt. Align the depth pointer with the
"0" graduation. The depth of cut is indicated on the
scale by the depth pointer. While pressing the fastfeed button, raise the stopper pole until the desired
depth of cut is obtained. Minute depth adjustments
can be obtained by turning the adjusting knob
(1.6 mm per turn). After adjusting the depth of cut,
turn the stopper pole setting nut clockwise to fasten
the stopper pole firmly.
Now, your predetermined depth of cut can be
obtained by pressing the lock lever and then lowering
the tool body until the stopper pole makes contact
with the adjusting hex bolt of the stopper block.
15 Bit revolving direction
16 Feed direction
17 View from the top of the tool
18 Correct bit feed direction
19 Stopper pole setting nut
Nylon nut (Fig. 6)
CAUTION:
• Do not lower the nylon nut too low or the bit will protrude dangerously.
By turning the nylon nut, the upper limit of the tool
body can be adjusted. When the tip of the bit is
retracted more than required in relation to the base
plate surface, turn the nylon nut to lower the upper
limit.
CAUTION:
• Since excessive cutting may cause overload of the
motor or difficulty in controlling the tool, the depth of
cut should not be more than 15 mm at a pass when
cutting grooves with an 8 mm diameter bit.
• When cutting grooves with a 20 mm diameter bit,
the depth of cut should not be more than 5 mm at a
pass.
• For extra-deep grooving operation, make two or
three passes with progressively deeper bit settings.
Stopper block (Fig. 7)
The stopper block has three adjusting hex bolts
which raise or lower 0.8 mm per turn. You can easily
obtain three different depths of cut using these
adjusting hex bolts without readjusting the stopper
pole.
Adjust the lowest hex bolt to obtain the deepest depth
of cut. Adjust the two remaining hex bolts to obtain
shallower depths of cut. The differences in height of
these hex bolts are equal to the differences in depths
of cut.
To adjust the hex bolt height, turn the hex bolts with a
screw driver or wrench.
The stopper block is also convenient for making three
passes with progressively deeper bit settings when
cutting deep grooves.
3
 Loading...