


English / French / German
Italian / Dutch / Spanish
Pole Hedge Trimmer
Taille haie à Rallonge
Hock-Heckenschere
Tagliasiepi Prolungato a Scoppio
Stok Heggenschaar
Cortasetos Articulado de Altura PTR2500
Instruction Manual |
Manuale di istruzioni |
Manuel d’instructions |
Handleiding |
Betriebsanleitung |
Manual de instrucciones |
|
|
|
|
Important:
Read this instruction manual thoroughly before using the Pole Hedge Trimmer and follow the safety regulations carefully. Be sure to keep this instruction manual for future reference.
Important:
Lire entièrement ce manuel d’instructions avant d’utiliser la taille haie à rallonge et respecter toutes les consignes de sécurité.
S’assurer de conserver ce manuel d’instructions pour toute référence ultérieure.
Wichtig:
Lesen Sie vor Inbetriebnahme des Hock-Heckenscheres diese Betriebsanleitung sorgfältig durch, und befolgen Sie unbedingt alle Sicherheitsvorschriften für den Gebrauch des Gerätes.
Bewahren Sie diese Betriebsanleitung für späteres Nachschlagen unbedingt auf.
Importante:
Leggere questo manuale di istruzioni sino in fondo prima di usare il tagliasiepi prolungato a scoppio e seguire sempre attentamente le norme di sicurezza.
Conservare poi questo manuale per poterne fare di nuovo uso in futuro.
Belangrijk:
Lees deze handleiding zorgvuldig door voor u de stok heggenschaar gaat gebruik en volg de veiligheidsinstructies nauwgezet op.
Bewaar deze handleiding zodat u er later nog iets in op kunt zoeken.
Importante:
Lea completamente este manual de instrucciones antes de utilizar el Cortasetos Articulado de Altura y respete cuidadosamente las instrucciones para su seguridad.
Guarde este manual de instrucciones en un lugar a mano para su referencia en cualquier momento.

English
Thank you very much for choosing the MAKITA Pole Hedge Trimmer. We are pleased to offer you a product that is the result of an extensive development program and many years of knowledge and experience.
To safely obtain the best possible results from your MAKITA Pole Hedge Trimmer, please read this manual thoroughly before using the machine, and follow all instructions given herein to assure proper operation of the MAKITA Pole Hedge Trimmer.
Table of Contents |
Page |
Symbols |
2 |
Safety instructions |
3~6 |
Specifications |
7 |
Parts Breakdown |
8 |
Connecting the trimmer unit to the pole |
9 |
Attaching the handle |
9 |
Using the shoulder strap |
9 |
Fuel/refueling |
10 |
Precautions before starting the engine |
11 |
Starting the engine |
11 |
Stopping the engine |
12 |
Checking and adjusting the idling speed |
12 |
Operating the Pole Hedge Trimmer |
13~14 |
Maintenance |
14~16 |
Storage |
17 |
Maintenance schedule |
17 |
Troubleshooting |
17 |
SYMBOLS
Please note the following symbols when reading this instruction manual
WARNING/DANGER
Before usage, carefully read and fully understand the instructions in this manual
PROHIBITION
Nosmoking
No naked flame
Wear protective shoes
Wear protective gloves
Keep working area clear of persons and pets
Wear a protective helmet and eye and ear protection
Beware of pinching
Beware of electrical lines, risk of electrical shock
Gasoline/oil mixture
Engine manual-start
Emergency stop
First aid
Recyclable
ON/START
OFF/STOP
CE-mark
2

SAFETY INSTRUCTIONS
General Instructions
-Before usage, carefully read this manual and thoroughly familiarize yourself with how to correctly handle the pole hedge trimmer. THIS EQUIPMENT CAN CAUSE SERIOUS INJURY IF USED IMPROPERLY!
-Always provide detailed instructions on how to correctly use the pole hedge trimmer when lending the equipment to another person. Make sure that the instruction manual is handed over together with the pole hedge trimmer.
-First-time users should ask their dealer for basic instructions on the correct handling of the pole hedge trimmer.
-Store this manual in a location where it is easily accessible for quick reference.
-Do not allow persons under the age of 18 to operate the pole hedge trimmer. Individuals over 16 years old, however, may use the pole hedge trimmer for training purposes if under the constant supervision of an adult familiar with the operation of the pole hedge trimmer.
-Always use the pole hedge trimmer with the utmost care and attention.
-Serious injury may result if the pole hedge trimmer is used in the following circumstances. Do not use the pole hedge trimmer:
•When feeling tired or ill.
•After consumption of alcohol and/or medication.
•At night or in poor lighting conditions.
•During pregnancy.
Intended use
-This pole hedge trimmer has been designed for the sole purpose of trimming hedges and bushes with a maximum branch diameter of 6 mm. Do not use the trimmer for any other purposes.
(1)
(2)
(3)
Personal protective equipment
-Clothes worn should be functional and tight-fitting without restricting movement. Do not wear clothing or jewelry that could get entangled in underbrush or in the machine.
-For adequate protection against injuries to head, eyes, feet, hands, as well as
hearing impairment, the following protective equipment and clothing must be |
(4) |
used when working with the pole hedge trimmer. |
|
-To prevent injury to the head or the eyes, always wear a protective helmet (1) with goggles or a visor (2).
-To avoid hearing impairment, wear adequate ear defenders (3) at all times.
-Use of a well-fitting work overalls (4) is strongly recommended.
- Always wear rugged, leather working gloves (5) when operating the pole |
(5) |
(6) |
hedgetrimmer. |
|
|
-When using the pole hedge trimmer, always wear sturdy shoes (6) with a nonslip sole. Special work shoes ensure good footing and protect against injury.
3

Starting the Pole Hedge Trimmer
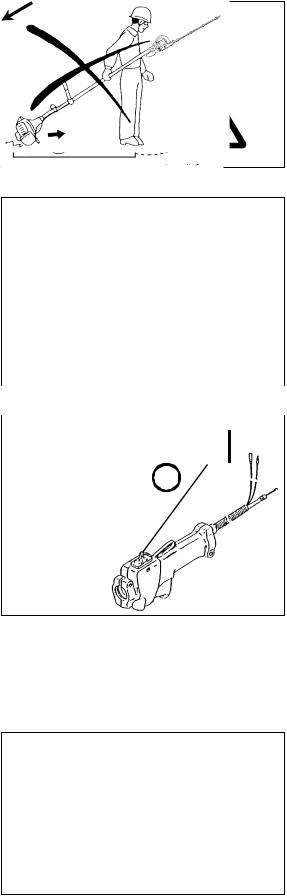
-At all times allow a 15-meter diameter safety zone around the working area. Make sure that all persons (in particular children) and/or animals remain outside this zone. In general, avoid using the hedge trimmer whenever people (in particular children) are nearby.
-Before starting the Pole Hedge Trimmer, always make sure that the machine is in safe operational condition.
-Check the operation of the throttle lever safety mechanism. The lock-off lever should have a smooth and easy action. Make sure that the lock-off lever functions properly. Check that the handles are clean and dry and test the STOP switch to ensure that it is functioning properly.
Always start the pole hedge trimmer in accordance with the directions provided in this instruction manual.
Follow the instructions below to start the pole hedge trimmer
-Start the pole hedge trimmer only after the machine has been completely assembled and all accessory parts have been attached.
-Before starting the engine, make sure that cutter blades are not obstructed by any foreign objects such as stones, branches, etc.
-Stop the engine immediately if engine problems occur.
-When operating the pole hedge trimmer, always maintain a firm grip on both handles. Wrap your fingers tightly around each handle, cradling the handle between thumb and forefinger. To keep the pole hedge trimmer under control at all times, avoid changing your grip during operation. Make sure that the control handles are in good condition and free of moisture, mud, oil or grease.
Always ensure secure and well-balanced footing
-Only use the pole hedge trimmer outdoors.
-Always stop the engine immediately and discontinue operation if engine trouble occurs or if the machine starts making unusual noise.
-Exhaust fumes are poisonous. Never operate the machine in an enclosed room or tunnel without ventilation (risk of suffocation and gas poisoning). Note that carbon monoxide is an odorless gas. Always make sure that areas where the engine is operated are adequately ventilated.
-Stop the engine when resting, or when the pole hedge trimmer is left unattended. Place the machine in a safe location and make sure that no combustible material is nearby.
-Never place a hot hedge trimmer onto dry grass or combustible material.
-To reduce the risk of fire, keep the engine and muffler free of debris, leaves or excessive lubricant.
-Never operate the engine if the muffler is malfunctioning.
-Turn off the engine before transportation.
-Always stop the engine in the following circumstances. When:
•Resting
•Transporting the machine
•Cleaning the machine
•Refueling the machine
•Performing maintenance on the machine
•Fixing a problem with the machine
-When transporting the machine in a vehicle, always securely attach the pole hedge trimmer to avoid leakage of residual fuel.
-Always empty the fuel tank before transporting the pole hedge trimmer in a vehicle.
-When unloading the machine from a vehicle, take extra care not to drop the pole hedge trimmer to the ground, as this may seriously damage the fuel tank.
-Except in an emergency, never drop the pole hedge trimmer as this may seriously damage the machine.
-When transporting the pole hedge trimmer, always lift the machine completely off of the ground. Never drag the engine across the ground as this may damage the fuel tank and possibly cause a fire.
-Always use the cutter cover provided to protect and secure the cutting section of the pole hedge trimmer during transportation and storage.
•Resting
•Transporting the machine
•Cleaning the machine
•Refueling the machine
•Performing maintenance on the machine
•Fixing a problem with the machine
4

Refueling
-Before refueling, stop the engine.
-Never refuel near naked flames
-Do not smoke when refueling.
-Always allow sufficient time for the engine to cool down before refueling.
-Take care not to let your skin come into contact with petroleum products. Do not inhale gasoline fumes and always wear protective gloves when refueling. Change and clean protective wear at regular intervals.
-Take extra care to avoid spilling gasoline and oil in order to avoid contamination of the ground (environmental protection). If gasoline or oil has been spilled onto the hedge trimmer, immediately wipe the surface of the hedge trimmer with a rag. To avoid spontaneous combustion, allow wet rags to dry sufficiently before discarding them into an appropriate, covered container.
-Make sure that no fuel comes in contact with your clothing. Change fuelcontaminated clothing immediately (fire hazard).
-Close the fuel tank and tighten the fuel tank cap securely. To restart the engine, transfer the pole hedge trimmer to a location at least 3 meters away from the place of refueling.
-Check the fuel tank cap at regular intervals to make sure that the cap is securely fastened.
-Never refuel the machine in an enclosed room. Fuel vapors accumulate at ground level (risk of explosion).
-Store fuel in appropriate containers only, and make sure that stored fuel is out of
the reach of children. |
3 meters |
-To prevent damage to fuel lines and engine parts, avoid using gasoline that contains ethanol or methanol (types of alcohol) when mixing gasoline with twostroke engine oil.
Operation
-During operation, hold the pole hedge trimmer with both hands at all times.
-Only use the pole hedge trimmer in good light and visibility conditions. Beware of slippery and wet areas (ice and snow) during the cold season (danger of slipping), and always ensure secure footing.
-Never use the pole hedge trimmer while standing on an unstable surface or a steep slope.
-Never use the pole hedge trimmer while standing on a ladder.
-Never climb a tree to use the pole hedge trimmer from the tree.
-To avoid stumbling or falling over objects, never walk backwards when working with the pole hedge trimmer.
-Always stop the engine before cleaning or servicing the machine. Also, refrain from replacing parts before the engine has been stopped.
-Do not operate the pole hedge trimmer if the cutting unit is damaged or worn.
Maintenance instructions
-Always do your utmost to keep pollution and noise emissions as low as possible when operating the pole hedge trimmer. Pay special attention to correct adjustment of the carburetor.
-Clean the hedge trimmer at regular intervals and periodically check whether all nuts and bolts are securely tightened.
-Never service or store the pole hedge trimmer in the vicinity of naked flames, sparks, etc.
-Empty the fuel tank before storage, and always store the pole hedge trimmer in a well-ventilated locked room. Make sure the pole hedge trimmer is out of children's reach at all times.
-To prevent further damage and/or personal injury, refrain from repairing a malfunctioning pole hedge trimmer if not qualified to do so. For repairs always contact your dealer or an authorized service agent.
Do not attempt to modify or remodel the pole hedge trimmer as this may affect operation safety.
5

Maintenance work that can be performed by the user is limited to the activities described in this instruction manual. Any other procedures are to be executed by an authorized service agent.
Use only genuine spare parts and accessories supplied by MAKITA via authorized service centers.
Use of unauthorized accessories and tools may increase the risk of accident and injury. MAKITA accepts no liability whatsoever for accidents or damage resulting from the use of unauthorized accessories and parts.
First aid
As a precaution for the occurrence of an accident, make sure that a fully stocked first aid kit is ready at hand.
Replace any items taken from the first aid kit as soon as possible.
When asking for help in the case of an emergency, give the following information:
•Place of accident
•What happened
•Number of injured people
•Extent of injuries
•Your name
Packaging
The pole hedge trimmer is delivered in a protective cardboard box to prevent damage during shipping. Cardboard is a basic raw material that can be reused and recycled (waste paper recycling).
EC-DECLARATION OF CONFORMITY
Model; PTR2500
We declare under our sole responsibility that this product is in compliance with the following standards of standardized documents, ISO11806, EN774, ISO11680, EN55012 in accordance with Council Directives, 89/392/EEC, amended 98/37/EEC, 93/68/EEC,89/336/EEC,amended92/31/EEC.
Measured Sound Power: 106 dB
Guarantee Sound Power: 108 dB
These sound power levels wear measured in accordance with Council Directive, 2000/14/EC.
Conformity assessment procedure: Annex V.
CE2007
Tomoyasu Kato
Director
Responsible Manufacturer:
Makita Corporation.
3-11-8,Sumiyoshi-cho, Anjo, Aichi, JAPAN Authorized Representative in Europe:
Makita International Europe Ltd.
Michigan Drive, Tongwell, Milton kyenes, Bucks MK15 8JD, ENGLAND
6

TECHNICAL DATA : PTR2500
Model |
|
|
|
|
PTR2500 |
|
|
|
|
|
|
|
|
|
|
|
|
|
|
|
|
|
Loop handle and Grip handle |
|
|
|
|
|
|
Dimensions (L x W x H) |
|
mm |
2400 x 350 x 220 |
||
|
|
|
|
|
|
Mass |
|
|
|
kg |
6.1 |
|
|
|
|
|
|
Volume (fuel tank) |
|
L |
0.65 |
||
|
|
|
|
|
|
Cutting length |
|
|
mm |
535 |
|
|
|
|
|
|
|
Engine displacement |
|
cm³ |
24.5 |
||
|
|
|
|
|
|
Maximum engine performance |
|
|
0.75 kW at 7000 min-1 |
||
|
|
|
|
|
|
Engine speed |
|
|
min-1 |
10,000 |
|
At recommended max, spindle speed |
|
||||
|
|
||||
Fuel consumption |
|
kg/h |
0.54 |
||
|
|
|
|
|
|
Specific fuel consumption |
|
g/kWh |
735 |
||
|
|
|
|
|
|
Idling speed |
|
|
min-1 |
3000 |
|
|
|
|
|
|
|
Clutch engagement speed |
|
min-1 |
4100 |
||
|
|
|
|
|
|
Carburetor |
|
|
|
type |
WALBRO WYJ |
(Diaphragm carburetor) |
|
|
|||
|
|
|
|||
Ignition system |
|
|
type |
Solid state ignition |
|
|
|
|
|
|
|
Spark plug |
|
|
|
type |
NGK BMR7A |
|
|
|
|
|
|
Electrode gap |
|
|
mm |
0.6-0.7 |
|
|
|
|
|
|
|
|
|
Right handle |
Idling |
m/s² |
3.63 |
|
|
|
|
|
|
|
|
(rear grip) |
Racing |
m/s² |
8.01 |
|
|
|
|||
|
|
|
|
|
|
Vibration |
per |
Left handle |
Idling |
m/s² |
7.24 |
|
|
|
|||
ISO7916 |
|
(handle) |
Racing |
m/s² |
12.00 |
|
|
|
|||
|
|
|
|
|
|
|
|
Left handle |
Idling |
m/s² |
4.74 |
|
|
|
|
|
|
|
|
(front grip) |
Racing |
m/s² |
8.44 |
|
|
|
|||
|
|
|
|
|
|
|
|
Right handle |
Idling |
m/s² |
4.41 |
|
|
|
|
|
|
|
|
(rear grip) |
Racing |
m/s² |
7.81 |
|
|
|
|||
|
|
|
|
|
|
Vibration |
per |
Left handle |
Idling |
m/s² |
11.76 |
|
|
|
|||
ISO11680 |
|
(handle) |
Racing |
m/s² |
13.65 |
|
|
|
|||
|
|
|
|
|
|
|
|
Left handle |
Idling |
m/s² |
4.36 |
|
|
|
|
|
|
|
|
(front grip) |
Racing |
m/s² |
8.23 |
|
|
|
|||
|
|
|
|
|
|
Sound pressure level average |
ISO7917 |
dB (A) |
90.0 |
||
|
|
|
|
||
Sound power level average |
ISO10884 |
dB (A) |
102.8 |
||
|
|
|
|
|
|
Mixture ratio (Fuel: MAKITA 2-stroke oil) |
|
50:1 |
|||
|
|
|
|
|
|
Gear ratio |
|
|
|
|
1/4 |
|
|
|
|
|
|
7

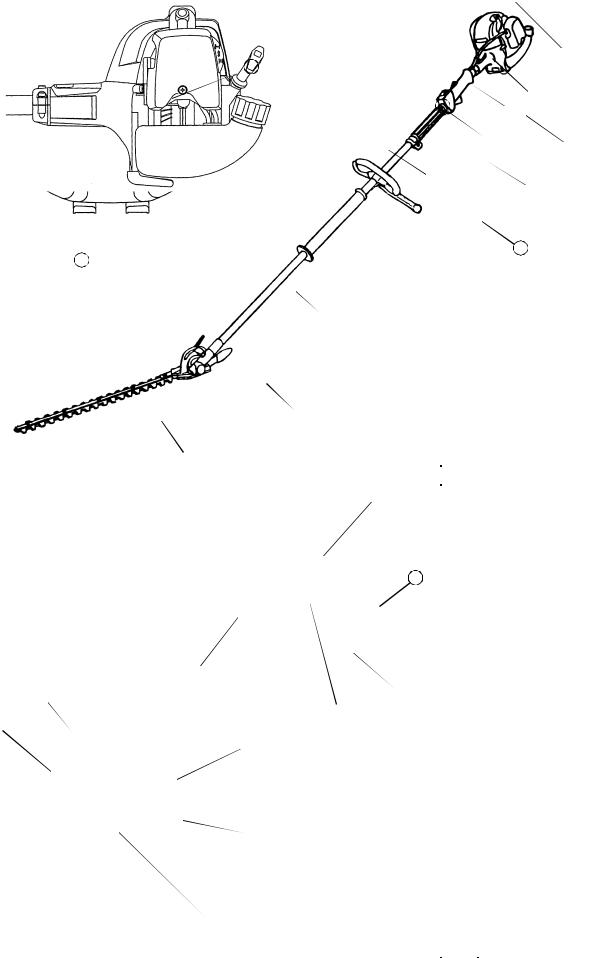
DESIGNATION OF PARTS
25
22
23
24
|
|
|
|
|
|
Designation of parts |
|
|
|
|
|
|
|
|
|
|
|
1 |
Fuel tank |
|
2 |
Recoil starter |
|
|
|
||
|
|
3 |
Air cleaner |
|
|
4 |
I-O switch (ON/OFF) |
|
|
5 |
Spark plug |
|
21 |
6 |
Muffler |
|
|
7 |
Clutch case |
|
|
8 |
Rear grip |
|
|
9 |
Hanger |
|
|
10 |
Handle |
|
11 |
Throttle lever |
|
|
|
12 |
Throttle cable |
|
|
13 |
Shaft |
|
14 |
Cutter blades |
|
|
|
||
|
15 |
Front grip |
|
|
|
16 |
Starter knob |
|
|
17 |
Primer pump |
|
|
18 |
Gear box |
|
|
19 |
Exhaust pipe |
|
20 |
Clamp lever |
|
|
|
||
|
|
21 |
Fuel tank cap |
|
|
22 |
Distance collar |
|
|
23 |
Barrier |
|
|
24 |
Blade cover |
|
|
25 |
Shoulder strap |
|
|
|
|
8
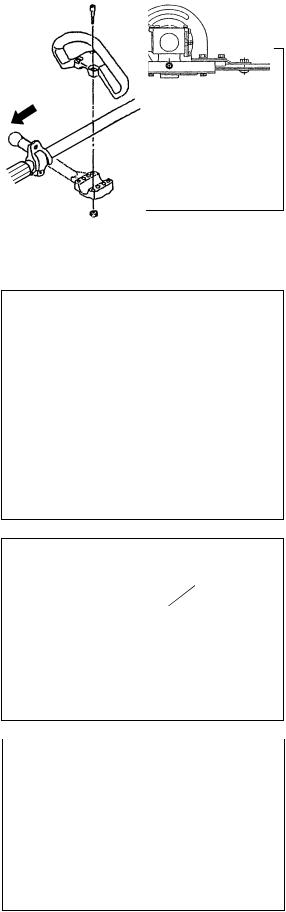
CONNECTING THE TRIMMER UNIT TO THE POLE
Important:
Make sure that the engine is turned off, and remove the spark plug cap before assembling the pole hedge trimmer.
Wear protective gloves!
Secure blades with the blade cover provided when connecting the trimmer unit to the pole.
-Loosen the M5x10 screw and M5x25 bolt.
-Insert shaft into gear case
NOTE: Make sure that the shaft is completely inserted into the gear case (approx. 40mm/1.57").
If you are having trouble inserting the shaft, manually rotate the drive axle a little and try again.
-Confirm that the shaft is properly inserted and then tighten the M5x10 screw and the M5x25 bolt.
Drive axle |
M5x10 screw |
40mm
Shaft |
M5x25 bolt |
|
ATTACHING THE HANDLE
-Attach the protective barrier together with the handle so that the barrier juts out to the left as viewed from the operating position.
-Make sure not to set the handle too close to the control grip (use the distance collar provided for this purpose).
to engine
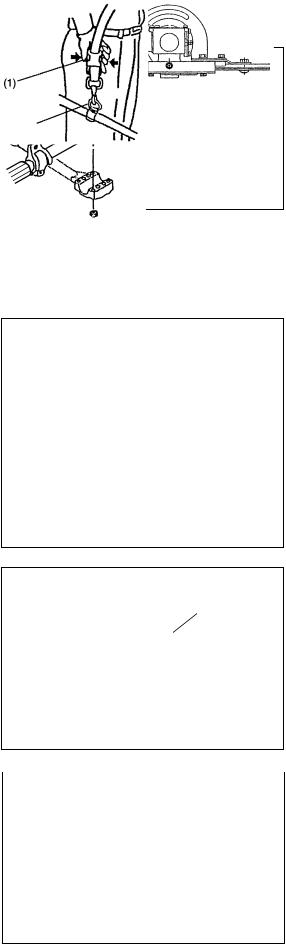
USING THE SHOULDER STRAP
How to wear the shoulder strap
-Wear the shoulder strap over the left shoulder.
-Keep the pole hedge trimmer unit on the right hand side of the body.
-Attach the strap to the fitting provided on the pole hedge trimmer and adjust the length of the strap to attain a comfortable working position.
Detachment
-In an emergency, push the notches (1) at both sides, and you can detach the machine from you.
Be extremely careful to maintain control of the machine at this time. Do not allow the machine to be deflected toward you or anyone in the work vicinity.
WARNING: Failure to maintain complete control of the machine at all could result in serious bodily injury or DEATH.
Hanger
Shoulder strap
Wear over left shoulder
9

FUEL/REFUELING
Gasoline/oil mixture
-The engine of the pole hedge trimmer is a highly efficient two-stroke engine that runs on a mixture of gasoline and two-stroke engine oil. The engine is designed to use regular unleaded gasoline with a min. octane value of 91 ROZ. If such gasoline is not obtainable, instead use gasoline with the highest octane value available. This will not cause any damage to the engine, but may result in poor engine performance. Similar results are to be expected when leaded gasoline is used. To obtain optimal engine performance, and for the sake of human health and the environment, where possible use unleaded fuel.
-Two-stroke engine oil (quality grade: TSC-3) must be added to the gasoline in order to lubricate the engine. The engine has been designed to use environmentfriendly MAKITA 2-stroke oil, which is to be mixed at a ratio of 50:1. This specially developed oil ensures prolonged engine service life and reliable engine performance with an absolute minimum of exhaust gas emissions. It is imperative to strictly observe the 50:1 mixture (Gasoline/MAKITA 2-stroke oil), as reliable performance of the pole hedge trimmer cannot be guaranteed otherwise.
-Correct gasoline/oil mixture:
Mix 50 parts gasoline with 1 part MAKITA 2-stroke engine oil (see also table on the right).
NOTE: When preparing the gasoline/oil mixture, first mix all of the amount of oil required with half the amount of gasoline required. Add the remaining gasoline and shake the mixture well before replenishing the tank.
Do not add more oil then prescribed. If too much oil is added this will produce additional combustion residue, thus polluting the environment and clogging the muffler and the cylinder exhaust channel. In addition, overall fuel consumption will also increase and poorer engine performance is to be expected.
Handling of petroleum products
Always handle fuel with the utmost care and attention. Since fuel contains substances similar to solvents, refueling must be done outdoors or in wellventilated areas. Do not inhale gasoline fumes and avoid any skin contact with gasoline or oil. Human skin will dry out if in contact with petroleum over an extended period of time. This may result in various skin diseases and allergic reactions.
Gasoline or oil coming into contact with the eyes can cause severe eye irritation. Should gasoline or oil come into contact with your eyes, immediately rinse your eyes with large amounts of clean water. Do not hesitate to see a doctor if irritation persists.
Refueling
The engine must be switched off.
-Thoroughly clean the area around the fuel filler cap (2), to prevent dirt from getting into the fuel tank (1).
-Unscrew the fuel filler cap (2) and fill the tank with fuel.
-Tightly screw on the fuel filler cap (2).
-Clean screw fuel filler cap (2) and tank after refueling.
Fuel storage
-Fuel deteriorates if stored over an extended period of time.
-Purchase only the amount of fuel to be used over a 4-week period.
-Use only approved petroleum-storage containers.
Observe the Safety Instructions on page 5
|
|
|
|
|
|
|
|
Gasoline |
|
Oil |
|
|
|
|
|
|
|
|
|
|
|
|
|
|
50 |
|
|
|
|
|
|
|
|
|
|
|
|
|
|
|
||
|
|
|
|
|
|
|
|
|
|
1000mL |
(1L) |
|
|
20mL |
|||
|
5000mL |
(5L) |
|
|
100mL |
|||
|
10000mL (10L) |
|
|
200mL |
||||
|
|
|
|
|
|
|
|
|
|
|
|
|
|
|
|
|
|
|
|
|
|
|
|
|
|
|
|
|
|
|
|
|
|
|
|
|
|
|
|
|
|
|
|
|
10
PRECAUTIONS BEFORE STARTING THE ENGINE
-At all times allow a 15-meter diameter safety zone around the working area. Make sure that all persons (in particular children) and/or animals remain outside this zone.
-Before using the pole hedge trimmer, make sure that the machine is in safe operational condition. Make sure that the cutter blades are not damaged, and check the throttle lever for easy action. Confirm that the cutter blades are not in motion when the engine is idling. If the machine is not operating normally, contact your dealer to have the machine adjusted. Make sure that the handles are clean and dry, and test whether the I-O switch is functioning properly. Start the engine only in accordance with the instructions given in this manual. Do not use any other methods to start the pole hedge trimmer (see , "Starting the Engine").
-Start the engine of the pole hedge trimmer only after having read and fully understood the instructions. Never attempt to start a pole hedge trimmer that has not been fully assembled. Serious injury may result otherwise.
-Before starting the engine, always make sure that the cutter blades are not obstructed by stones, branches or any other solid objects.
-Check the working area for wires, cord, glass or other foreign objects that could get caught in the cutter blades.
-Electrical shock: Be aware of all electrical lines in the vicinity. Check the entire work area for the presence of power lines and electrical fences before starting to work.
STARTING THE ENGINE
If the machine has just been refueled, move at least 3 meters away from the location where the pole hedge trimmer was refueled. Place the pole hedge trimmer on a reasonably clean spot on level ground, and make sure that the cutter blades are not in contact with the ground or any other solid objects.
Cold start (cold engine / engine was stopped for more than 5 minutes / after refueling)
1.Move the I-O switch to the "I" position (1).
2.Push the primer pump (2) repeatedly (7 to 10 times) until fuel enters the bulb of pump.
3.Move the choke lever (3) into the " " (vertical) position.
4.With one hand hold the engine firmly on the ground (4).
5.Pull the starter cord for approx. 10~15 cm until resistance can be felt.
6.Pull firmly (repeatedly if necessary) on the cord until the engine starts.
7.Return choke lever to position " " after the engine has started. Note that the choke lever returns automatically when the throttle lever is operated. Squeeze the throttle lever together with the lock-off lever.
8.Warm up the engine at a moderate speed for approx. 1~2 minutes.
9.After the engine is warm the engine runs evenly and transition from low speed to high speed is smooth and without interruption.
Note: Pulling the starter rope repeatedly with the choke in " " position results in excessive fuel intake, which can make it difficult for the engine to start. In the case of excessive fuel intake, remove the spark plug and pull the starter rope slowly to remove excess fuel. Dry the spark plug electrode and replace the spark plug.
Warm start (immediate restart after engine-stop)
Do not operate the choke (3) when restarting the engine immediately after stoppage. If the engine does not start, execute steps 1~8 as described above (cold start).
Note: Do not release the starter knob immediately after pulling the starter rope, but guide the knob back to its original position.
(4)
(1)
I-O switch
 Lock-off lever
 Throttle lever
 (3)
(3)
 (2)
(2)
11
STOPPING THE ENGINE
1.Release the throttle lever.
2.Push the I-O switch to the "O" position (5) to stop the engine.
(5)
CHECKING AND ADJUSTING THE IDLING SPEED
The cutter blades of the pole hedge trimmer should not move when the throttle lever is released.
- The correct idling speed is 3000 min-1. If necessary, adjust the idling speed using the idling adjustment screw (reduce revs until the cutter blades do not move anymore).
• Turn screw clockwise: |
Idling speed increases |
• Turn screw counter-clockwise: |
Idling speed decreases. |
Allow an adequate difference between the idling rate and the rate at which the clutch engages (reduce idling speed further if necessary). Should the cutter blades still move in spite of accurate idling speed settings, consult your nearest authorized service agent.
•The clutch should engage at a minimum rate of 4000 min-1.
•Check that the STOP switch, the lock-off lever and the throttle lever are all functioning properly.
Idling adjustment screw
slow High
12

OPERATING THE POLE HEDGE TRIMMER
-When working with the pole hedge trimmer, firmly grasp the handles with both hands.
-Do not touch the cutter blade portion of the pole hedge trimmer during operation, or when the engine is running.
-Take extra care not to inhale exhaust gases when working with the pole hedge trimmer. Never operate the pole hedge trimmer in an enclosed room or an area with insufficient ventilation (risk of suffocation and gas poisoning). Note that carbon monoxide is an odorless gas that is, it cannot be detected by the sense of smell.
-Always wear adequate protective wear before starting to work with the pole hedgetrimmer.
-Stop the engine immediately if the muffler is not functioning properly.
-Only use the pole hedge trimmer in good light and visibility conditions.
-Do not operate the pole hedge trimmer in darkness or fog. Beware of slippery and wet areas (ice and snow) during the cold season (danger of slipping), and always ensure secure footing.
-Never use the pole hedge trimmer while standing on an unstable surface or a steep slope.
-Never use the pole hedge trimmer while standing on a ladder.
-Never climb a tree to use the pole hedge trimmer from the tree.
-Continuously check the working area for wires, cord, glass or other foreign objects that could get caught in the cutter blades.
-Confirm that the cutter blades are in rapid motion before starting to cut.
-Always grip the pole hedge trimmer with both hands and maintain a firm grip when working with the machine.
-To assure optimal control over the pole hedge trimmer, always completely wrap your hands around the handles (use your thumb for counter pressure) and apply a firm grip on the handles.
-Note that the cutter blades will remain in motion for up to two seconds after the throttle lever has been released.
-Do not cut with the pole hedge trimmer at low engine speed.
-The speed of the cutter blades cannot be adjusted properly with the throttle lever when the engine is running at low speed.
-To trim the top surface of a hedge, first align the cutting tool at an angle of 15°~30° in the cutting direction and keep the pole hedge trimmer in a horizontal position. Then start trimming the hedge using a swinging movement, much like drawing circle segments with the hedge trimmer shaft.
-To trim the sides of a hedge, align the blades parallel to the surface to be cut and start trimming with semi-circular upward (down-up) movements.
-Pay attention when trimming a hedge that has grown along a fence. Be especially careful not to allow the cutter blades from coming into contact with solid matter such as a metal fence. Cutting into solid matter such as metal, stone, concrete or thick wood may damage the blades and/or cause overall breakdown of the machine.
-Do not use the pole hedge trimmer over an extended period of time. As a general rule, for every 50 minutes of operation take a 10-20 minutes rest.
-If the cutter blades come into contact with stones or other solid objects, stop the engine immediately and check the blades for damage. Replace the blades if damaged.
-If the pole hedge cutter develops a problem during operation (strange noises, vibration, etc.), immediately stop the engine. Do not use the machine again until the problem has been recognized and solved.
-Always do your utmost to keep pollution and noise emissions as low as possible when operating the pole hedge trimmer. Pay special attention to correct carburetor adjustment and accurate gasoline/oil mixture.
-If thick branches get jammed in the cutter blades, immediately stop the engine, lay the equipment on the ground and remove the obstruction. Check the blades for damage before using the machine again.
15meters
(50feet)
15m
(50ft)
15m
(50ft)
13
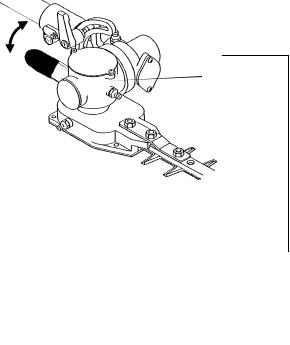
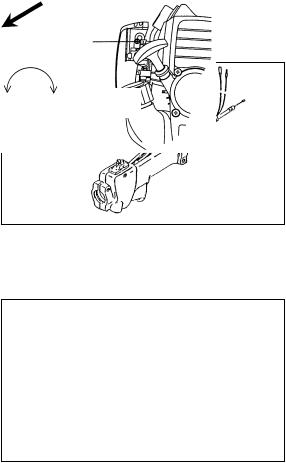
Adjustment of cutting angle
1.Stop the pole hedge trimmer engine and lay the machine on the ground.
2.To adjust the angle of the cutter unit, loosen the clamp lever located at the top of the cutter unit by turning it counter-clockwise.
3.Adjust the angle of the cutter unit and turn the clamp lever clockwise to secure.
•The cutter unit can be adjusted anywhere between 45° and 90°.
Note:
-Do not adjust the cutter unit while the pole hedge trimmer is in an upright position.
-Move the I-O switch to the "O" position and lay the pole hedge trimmer flat on the ground to adjust the cutting angle.
-Always secure the blades with the blade cover provided before adjusting cutting angle.
Clamp lever
Tighten
Loosen
MAINTENANCE
-Before performing any maintenance work on the pole hedge cutter (blade cleaning, etc.), always stop the engine and wait until the engine has cooled down. As an additional safety precaution, also remove the spark plug cap.
-Do not try to straighten or weld a bent or broken cutting blade. Always replace damaged blades.
-Stop the engine at regular intervals to check the cutter blades for possible damage (perform a tapping-resonance test to detect hard-to-see hairline cracks). Always make sure that the teeth of the blades are sharp.
-Clean the pole hedge trimmer at regular intervals. During cleaning also check that all screws, nuts and bolts are well tightened.
-To reduce the risk of fire, never service or store the pole hedge trimmer in the vicinity of open fires.
-Always wear rugged protective gloves when handling the cutter blades.
-Contact your dealer for replacement cutter blades.
Sharpening the blade
If the cutting blades have become blunt and cutting performance is poor, have the blades sharpened by an authorized service agent.
14

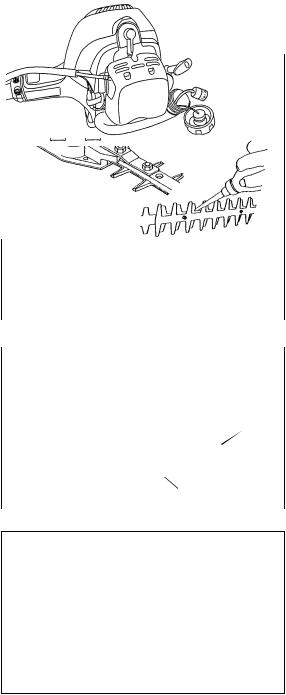
Blade adjustments
Extended use of the pole hedge trimmer will gradually wear down the blades. Readjust the blades if cutting performance deteriorates noticeably. For adjustment of the blades follow the instructions below.
1.Release nut .
2.Tighten screw lightly until resistance is felt. Then turn the screw in the opposite direction for a quarter or half turn.
3.Hold screw in place with a screwdriver and tighten nut .
4.After adjustment lubricate the blades with a thin film of light oil.
5.Start the engine and pull the throttle lever several times to set the blades in motion. Continue for approx. one minute.
6.Stop the engine and wait until the blades come to a standstill. Cautiously touch the blades with your bare hand. Adjustment is correct if the blades are warm, but not too hot to touch. If the blades are too hot to be touched, release screwfor another quarter to half a turn and repeat steps 5~6 to confirm proper adjustment.
NOTE: Always stop the engine and remove the spark plug cap before adjusting the blades!
The blades have grooves around the truss screws . Always keep these grooves clean so that they can be inspected for possible damage.
|
|
|
|
|
Hexagonal U-nut |
|
|
|
|
|
|
|
|
|
Truss screw |
|
|
|
|
Flat washer |
|
|
|
|
Blunt extension |
|
|
|
|
|
|
|
||
Blade guide |
|
|
||
|
|
Upper bladeLower blade
Cleaning the air cleaner - Every 8 hours (daily)
-Remove the air cleaner cover.
-Remove the sponge element. Wash the sponge element in lukewarm water and allow to dry completely.
-Replace the cleaned and dried sponge element and then replace the air cleaner cover.
Note: Clean the air cleaner on a daily basis. A clogged air cleaner may make it difficult or impossible to start and/or accelerate the engine.
Screw
Checking the spark plug - Every 8 hours (daily)
-Only use the universal wrench provided to remove and replace the spark plug.
-The spark plug gap should be 0.6~0.7 mm. Adjust the spark plug gap if it is too wide or too narrow. Clean or replace the spark plug if contaminated and/or clogged with carbon residue. Always replace with the same type of spark plug.
Element
Air cleaner cover
15
Adding grease and lubricant
-The gearbox of the pole hedge trimmer should be greased every 20 working hours. Add approx. 10cc of lubricant (Shell Alvania No. 3 or equivalent) to the gearbox via the grease nipples. (Some grease will emerge from the head of the gearbox (located at the base of the blade) when the pole hedge trimmer is set in motion the first time after greasing. Use this as a rough indicator for the amount of grease to supply.)
Note: Observe greasing intervals and the amount of grease to be supplied. Mechanical parts of the pole hedge trimmer may be damaged if grease is not supplied at the prescribed intervals or if an insufficient amount of grease is added.
Fuel tank filter
-The inside of the fuel tank is equipped with a filter (1) that cleans the fuel before it enters the carburetor.
-Visually check the filter at regular intervals. To do so, use a piece of wire formed into a hook and draw the filter out of the tank (2). Replace the filter if it is hardened, clogged up, or excessively contaminated.
-Inadequate fuel supply as a result of a deteriorated fuel filter may result in poor engine performance. In order to ensure that the required amount of fuel enters the carburetor, replace the fuel filter whenever in doubt of its condition.
Cleaning the muffler outlet
-Check the condition of the muffler outlet (3) at regular intervals.
-Use a suitable tool to remove excessive carbon residue that accumulates around the muffler outlet. Take special care to prevent removed carbon residue from entering engine parts.
Cleaning the spark arrester
-The spark arrester should be cleaned every 50 working hours.
-Have the spark arrester cleaned at your dealership or by an authorized service agent.
For all maintenance work not mentioned in this instruction manual, please contact your dealership or an authorized service agent.
Daily inspection and maintenance
To ensure a long service life of your pole hedge trimmer, perform the following inspections and maintenance on a daily basis.
-Always check for loose or missing parts before starting operation. Pay special attention to the cutting unit and make sure that the cutter blade lock screws are well tightened.
-Check for clogging of the cooling air passages and the cooling fins of the cylinder before starting operation. Clean if necessary.
-Each day after using the pole hedge trimmer perform the following.
•Clean the outside of the pole hedge trimmer; check for damage and loose parts.
•Clean the air filter. Clean the filter several times a day if working in extremely dusty conditions.
•Check the cutter blades for damage. Make sure that the blades are securely mounted.
Grease nipple
(1)
(2)
(3)
16

STORAGE
If the pole hedge trimmer is to be stored for an extended period of time, proceed as follows:
-Drain all fuel from the tank and carburetor.
-Remove the spark plug and add a few drops of two-stroke oil through the spark plug hole. Gently pull out the starter rope to ensure that the oil is evenly distributed inside the engine. Replace and tighten the spark plug.
-Clean the entire pole hedge trimmer and apply a thin layer of oil to the metallic surfaces of the machine. Secure and protect the blades with the blade cover provided. Store the pole hedge trimmer in location that is free of humidity.
MAINTENANCE SCHEDULE
General |
Engine |
Check general condition and safety |
|
Screws, nuts, bolts |
Visually check for damage |
|
|
Confirm that screws, nuts and bolts are secure |
|
|
|
After refueling |
Throttle lever |
Check functioning |
|
Lock-off lever |
Check functioning |
|
STOP switch |
Check functioning |
|
|
|
Daily |
Air filter |
Clean |
|
Cooling air duct |
Clean |
|
Cutting tool |
Check for damage, confirm sharp |
|
Idling |
Confirm that the cutter blades are not in motion |
|
|
|
Every 20 hours |
Gearbox |
Add grease |
|
|
|
Weekly |
Spark plug |
Check, replace if necessary |
|
Muffler |
Check, clean outlet if necessary |
|
|
|
Quarter annually |
Fuel filter |
Clean or replace, if necessary |
|
Fuel tank |
Clean inside |
|
|
|
Before extended storage |
Fuel tank |
Drain tank |
|
Carburetor |
Keep engine running until fuel runs out |
|
|
|
TROUBLESHOOTING
Problem |
System |
Observation |
Cause |
|
|
|
|
Engine does not start or |
Ignition |
Ignition spark is present |
Problem with fuel supply or compression system, |
difficulty starting |
|
|
mechanical defect |
|
|
No ignition spark |
STOP switch in OFF-position, broken wire, defective |
|
|
|
spark plug or connector, defective ignition module |
|
Fuel supply |
Fuel available |
Wrong choke setting, defective carburetor, fuel filter |
|
|
|
contaminated, broken or bent fuel hose |
|
Compression |
Inside engine |
Defective cylinder gasket, damaged crankshaft |
|
|
|
seals, defective piston and/or cylinder rings |
|
|
Outside engine |
Loose spark plug |
|
Mechanical |
Starter not functional |
Defective starter spring, mechanical defect inside |
|
|
|
engine |
Warm start problems |
|
Fuel available |
Carburetor contaminated (have carburetor cleaned) |
|
|
Ignition functioning |
|
Engine starts but stalls |
Fuel supply |
Fuel available |
Incorrect idling adjustment, carburetor or fuel filter |
immediately |
|
|
contaminated |
|
|
|
Defective fuel tank vent, broken fuel hose, defective |
|
|
|
STOP switch (loose contact, etc.) |
Poor performance |
Several systems may |
Engine idling |
Contaminated air filter, carburetor contaminated, |
|
be affected |
|
clogged muffler, clogged cylinder exhaust duct |
|
simultaneously |
|
|
|
|
|
|
17
French
Nous vous remercions pour l’achat de la Taille haie à Rallonge MAKITA. Nous sommes heureux de pouvoir vous offrir un produit qui est le fruit d’un programme de développement intensif et de plusieurs années de savoir et d’expérience. Prière de lire entièrement ce manuel avant d’utiliser l’appareil et de suivre les instructions données afin d’obtenir le meilleur résultat et le bon fonctionnement de la Taille haie à Rallonge MAKITA.
Table des matières |
Page |
Symboles |
18 |
Consignes de sécurité |
19~22 |
Spécifications |
23 |
Nomenclature |
24 |
Raccordement de la taille haie à la rallonge |
25 |
Montage de la poignée |
25 |
Utilisation de la bandoulière |
25 |
Alimentation en carburant |
26 |
Précautions avant démarrage du moteur |
27 |
Démarrage du moteur |
27 |
Arrêt du moteur |
28 |
Vérification et réglage de la vitesse de marche à vide 28
Fonctionnement de la taille haie à rallonge |
29~30 |
Entretien |
30~32 |
Remisage |
33 |
Programmed’entretien |
33 |
Dépannage |
33 |
SYMBOLES
Prière de noter les symboles suivants en lisant le manuel d’instructions.
AVERTISSEMENT/DANGER
Avant toute utilisation, lire attentivement et comprendre les instructions dans ce manuel.
INTERDICTION
Interdit de fumer
Pas de flamme nue
Port de chaussures de protection
Port de gants de protection
Maintenir toute personne et tout animal à l’écart de la zone de travail
Porter un casque de protection et des protections visuelles et auditives
Faire attention à ne pas se faire pincer
Faire attention aux lignes électriques, risque d’électrocution
Essence/ mélange de carburant
Démarrage manuel du moteur
Arrêt d’urgence
Premiers secours
Recyclage
On/Démarrage
Off/Arrêt
LogoCE
18

CONSIGNES DE SÉCURITÉ
Instructions générales
-Avant d’utiliser la machine, I’utilisateur doit lire ce manuel d’instructions afin de se familiariser avec la manipulation de la taille haie à rallonge. CET APPAREIL PEUT CAUSER DES BLESSURES GRAVES S’IL N’EST PAS CORRECTEMENT UTILISE!
-Il faut toujours donner des instructions détaillées sur l’utilisation de la taille haie à rallonge avant de la prêter à une autre personne. S’assurer de leur remettre le manuel d’instructions avec la machine.
-Les utilisateurs novices doivent demander au revendeur de leur expliquer les instructions de base pour la manipulation de la taille haie à rallonge.
-Ranger le manuel dans un endroit facilement accessible en cas de besoin.
-Les jeunes gens de moins de 18 ans ne doivent pas être autorisés à utiliser la taille haie à rallonge. Cependant, les jeunes de plus de 16 ans peuvent apprendre à utiliser la machine sous la surveillance d’un adulte expérimenté dans l’utilisation de la taille haie à rallonge.
-Utiliser la taille haie à rallonge avec le plus de soin et d’attention possibles.
-Il y a un risque de blessures graves si la taille haie à rallonge est utilisée dans les circonstances suivantes. Ne pas utiliser la taille haie à rallonge :
•En cas de maladie ou de fatigue.
•Après absorption d’alcool et/ou de médicaments.
•La nuit ou dans de mauvaises conditions d’éclairage.
•En cas de grossesse.
Application
-La taille haie à rallonge est destinée uniquement à couper les haies et les buissons avec des branches d’un diamètre maximum de 6 mm. La machine ne doit jamais être utilisée pour autre chose.
(1)
(2)
(3)
Equipement personnel de protection
-Les vêtements doivent être fonctionnels et adaptés, ils doivent par exemple être serrés sans toutefois entraver les mouvements. Ne pas porter de bijoux ou de vêtements qui risquent de s’accrocher dans les buissons ou la machine.
-Porter l’équipement et les vêtements de protection suivants lors de l’utilisation de la taille haie à rallonge pour éviter tout risque de blessures à la tête, aux yeux, aux mains ou aux pieds et pour protéger son ouïe.
-Pour se protéger la tête et les yeux, porter toujours un casque de protection (1) avec des lunettes ou une visière (2).
-Porter toujours un équipement de protection contre le bruit approprié pour éviter une détérioration de l’ouïe (3).
-Il est vivement conseillé de porter une combinaison de travail (4).
-Porter toujours des gants de travail (5) en cuir épais lors de l’utilisation de la taille haie.
-Lors de l’utilisation de la taille haie, il faut toujours porter des chaussures solides munies d’une semelle antidérapante. Les chaussures spécial travail permettent d’éviter tout risque de blessure et de déséquilibre.
(4)
(5)(6)
19
Démarrage de la taille haie à rallonge
-Il faut toujours aménager une zone de sécurité de 15 mètres autour de la zone de travail. S’assurer qu’aucune autre personne (en particulier les enfants) et/ou qu’aucun animal ne se trouve dans la zone de travail. Eviter, en général, d’utiliser la taille haie si des personnes (et en particulier des enfants) se trouvent à proximité.
-Vérifier toujours que la taille haie peut fonctionner en toute sécurité avant de la démarrer.
-Vérifier le fonctionnement du mécanisme de sécurité du levier des gaz. Le levier de déverrouillage doit pouvoir être actionné facilement. Le vérifier. Vérifier que les poignées sont propres et sèches et essayer le bouton d’arrêt STOP pour voir s’il fonctionne correctement.
Mettre la taille haie en marche en appliquant strictement les instructions données dans ce manuel.
Suivre les instructions ci-dessous pour démarrer la taille haie à rallonge
-Ne démarrer la taille haie qu’une fois entièrement montée et tous les accessoires fixés.
-Avant de démarrer le moteur, s’assurer que l’outil de coupe n’est pas en contact avec des objets durs tels que des branches ou des pierres.
-Arrêter immédiatement le moteur en cas de problèmes.
-Tenir toujours la taille haie des deux mains lors du fonctionnement. Mettre les doigts bien autour de chaque poignée et serrant le pouce et l’index. Pour garder le contrôle de la taille haie, éviter de changer la poignée de main pendant l’utilisation. Vérifier que les poignées sont en bonne condition sans humidité, ni terre, huile ou graisse.
Assurer toujours une position équilibrée des pieds
-Utiliser la taille haie uniquement à l’extérieur.
-Arrêter toujours le moteur immédiatement et ne plus utiliser la machine en cas de problème ou si elle émet un bruit étrange.
-Les gaz d’échappement sont toxiques. Ne jamais utiliser la machine dans un endroit clos ou dans un tunnel sans ventilation (risque d’asphyxie et d’intoxication). Noter que le gaz carbonique est sans odeur. Vérifier que les endroits où la machine est utilisée est bien ventilé.
-Arrêter le moteur pour se reposer ou lorsque la taille haie est sans surveillance. Placer l’appareil dans un endroit sûr loin de tout produit combustible.
-Ne jamais placer la taille haie chaude sur du gazon sec ou un produit combustible.
-Pour réduire le risque d’incendie, garder le moteur et le pot d’échappement libre de tout débris ou feuilles et sans excès de lubrifiant.
-Ne jamais utiliser le moteur si le pot d’échappement ne fonctionne pas.
-Arrêter le moteur avant le transport.
-Arrêter toujours le moteur dans les conditions suivantes :
•Repos
•Transport de la machine
•Nettoyage de la machine
•Plein de carburant
•Réparation de la machine
•Dépannage de la machine
-Lors du transport de la taille haie dans un véhicule, bien l’attacher pour éviter toute fuite de carburant résiduel.
-Vider toujours le réservoir de carburant avant de transporter la taille haie dans un véhicule.
-En déchargeant la machine d’un véhicule, faire attention à ne pas la faire tomber sur le sol ce qui risque d’endommager sérieusement le réservoir de carburant.
-Sauf en cas d’urgence, ne jamais laisser tomber la taille haie au risque de l’endommager.
-Pour transporter la taille haie, la soulever complètement du sol. Ne jamais tirer le moteur sur le sol au risque d’endommager le réservoir de carburant et de provoquer un incendie.
-Utiliser toujours le couvercle de la lame de coupe fourni pour protéger et fixer la section de coupe de la taille haie lors du transport ou du rangement.
•Repos
•Transport de la machine
•Nettoyage de la machine
•Plein de carburant
•Réparation de la machine
•Dépannage de la machine
20
Ravitaillement
-Arrêter le moteur avant le ravitaillement en carburant.
-Pendant le ravitaillement, se tenir à l’écart des flammes nues.
-Ne pas fumer pendant le ravitaillement.
-Laisser le moteur refroidir avant d’effectuer le ravitaillement.
-Faire attention à ne pas laisser la peau en contact avec les produits pétroliers. Ne pas inhaler les vapeurs de carburant et porter toujours des gants de protection lors du ravitaillement. Changer et nettoyer régulièrement les vêtements de protection.
-Faire très attention à ne pas renverser le carburant et l’huile sur le sol pour ne pas le contaminer (protection de l’environnement). Si le carburant ou l’huile vient à se renverser dans la taille haie, essuyer immédiatement la surface avec un chiffon. Pour éviter une combustion spontanée, laisser sécher suffisamment les chiffons avant de les jeter dans un récipient approprié et couvert.
-Faire attention à ne pas salir les vêtements avec le carburant. Changer immédiatement de vêtements s’ils sont contaminés par le carburant (risque d’incendie).
-Fermer le réservoir de carburant et serrer le bouchon. Pour redémarrer le moteur, déplacer la taille haie à 3 mètres de l’endroit de ravitaillement.
-Vérifier le bouchon du réservoir de carburant à intervalles réguliers pour s’assurer qu’il est bien fermé.
-Ne jamais ravitailler la machine dans un endroit clos. Les vapeurs de carburant s’accumulent au niveau du sol (risque d’explosion).
- Ranger le carburant dans des récipients adéquats uniquement et s’assurer qu’ils |
3 mètres |
|
sont hors de portée des enfants. |
||
|
||
- Pour éviter d’endommager les lignes de carburant et les pièces du moteur, éviter |
|
|
d’utiliser du carburant contenant de l’éthanol ou du méthanol (types d’alcool) lors |
|
|
du mélange de carburant avec de l’huile à moteur à deux cycles. |
|
Fonctionnement
-Pendant le fonctionnement, tenir toujours la taille haie avec les deux mains.
-Utiliser la taille haie seulement dans des conditions de bonne visibilité et de lumière adéquate. Faire attention aux endroits glissants et mouillés (verglas et neige) pendant la saison froide (danger de glissade) et assurer toujours une bonne stabilité sur les pieds.
-Ne jamais utiliser la taille haie en se tenant sur une surface instable ou une pente.
-Ne jamais utiliser la taille haie en se tenant sur une échelle.
-Ne jamais grimper sur un arbre pour utiliser la taille haie.
-Pour éviter de basculer ou de tomber sur des objets, ne jamais marcher à reculant en travaillant avec la taille haie.
-Arrêter toujours le moteur avant le nettoyage et la réparation de la machine. Eviter de remplacer des pièces alors que le moteur est encore en marche.
-Ne pas utiliser la taille haie si la lame de coupe est endommagée ou cassée.
Instructions d’entretien
-Faire très attention à maintenir la pollution et les émissions de bruit aussi bas que possible lors de l’utilisation de la taille haie. Faire attention à régler en particulier le carburateur.
-Régler périodiquement la taille haie à rallonge et vérifier régulièrement si tous les boulons et les vis sont fermement serrés.
-Ne jamais réparer ou ranger la taille haie à proximité de flammes nues, bougies ou autres.
-Vider le réservoir de carburant avant de ranger la machine dans un endroit bien ventilé et fermant à clé. -Faire attention à toujours garder la taille haie hors de portée des enfants.
-Pour éviter tout dommage et/ou accident, ne pas faire réparer la machine par une personne non qualifiée. Pour la réparation, s’adresser toujours au revendeur ou à un réparateur agréé.
Ne pas tenter de modifier ou de remodeler la taille haie au risque de rendre son utilisation dangereuse.
21

Le travail d’entretien pouvant être effectué par l’utilisateur est limité aux activités décrites dans le manuel d’instructions. Toute autre procédure doit être effectuée par un réparateur agréé.
Utiliser uniquement les pièces de rechange et les accessoires d’origine fournis par MAKITA via des centres après-vente agréés.
L’utilisation d’accessoires et d’outils non autorisés augmente le risque d’accident et de blessure.
MAKITA n’assume aucune responsabilité en cas d’accident ou de dommage suite à l’utilisation de pièces et d’accessoires non autorisés.
Premier secours
Vérifier qu’une boîte de premier secours est toujours disponible à proximité du lieu de travail par précaution.
Remplacer immédiatement tout article prélevé dans la boîte de premier secours.
En demandant du secours en cas d’urgence, indiquer les informations suivantes :
•Le lieu de l’accident
•Description de l’accident
•Le nombre de personnes blessées
•Le type de blessures
•Votre nom
Emballage
La Taille haie à Rallonge est livrée dans un carton de protection afin d’éviter tout dommage au cours du transport.
Le carton est une matière première réutilisable ou recyclable (recyclage des vieux papiers).
DECLARATION DE CONFORMITE CE
Modèle : PTR2500
Nous prenons la responsabilité pour déclarer que le présent produit est conforme aux normes suivantes énoncées aux documents ISO11806, EN774, ISO11680, EN55012 conformément aux Drectives du Conseil, 89/ 392/CEE,98/37/CEE,93/68/CEE,89/336/CEEmodifiéeset92/31/CEEmodifiée.
Niveau sonore mesuré : 106 dB
Niveau sonore garanti : 108 dB
Niveaux sonores mesurés conformément à la Directive du Conseil, 2000/14/CE.
Procédure d’évaluation de conformité FAnnexe V
CE2007
Tomoyasu Kato
Directeur
Producteur responsable:
Makita Corporation.
3-11-8, Sumiyoshi-cho, Anjo,Aichi, JAPAN Représentant autorisé en Europe:
Makita International Europe Ltd.
Michigan Drive, Tongwell, Milton Keynes, Bucks MK15 8JD, ENGLAND
22

SPÉCIFICATIONS : PTR2500
Modèle |
|
|
|
PTR2500 |
|
|
|
|
|
|
|
|
|
|
|
|
|
|
|
|
|
|
Poignée et manche |
|
|
|
|
|
|
Dimensions (L x P x H) |
|
mm |
2400 x 350 x 220 |
||
|
|
|
|
|
|
Poids |
|
|
kg |
6.1 |
|
|
|
|
|
|
|
Volume (réservoir de carburant) |
|
L |
0.65 |
||
|
|
|
|
|
|
Longueur de coupe |
|
|
mm |
535 |
|
|
|
|
|
|
|
Cylindrée du moteur |
|
|
cm³ |
24.5 |
|
|
|
|
|
|
|
Puissance maximale du moteur |
|
|
0.75 kW à 7000 min-1 |
||
|
|
|
|
|
|
Vitesse du moteur |
|
|
min-1 |
10,000 |
|
A vitesse max. recommandée |
|
|
|||
|
|
|
|||
Consommation de carburant |
|
kg/h |
0.54 |
||
|
|
|
|
|
|
Consommation de carburant spécifique |
|
g/kWh |
735 |
||
|
|
|
|
|
|
Vitesse de marche à vide |
|
min-1 |
3000 |
||
|
|
|
|
|
|
Vitesse d’embrayage |
|
min-1 |
4100 |
||
|
|
|
|
|
|
Carburateur |
|
|
type |
WALBRO WYJ |
|
(Carburateur diaphragme) |
|
|
|||
|
|
|
|||
Système d’allumage |
|
|
type |
Allumage monolithique |
|
|
|
|
|
|
|
Bougie d’allumage |
|
|
type |
NGK BMR7A |
|
|
|
|
|
|
|
Ecartement des électrodes |
|
mm |
0.6-0.7 |
||
|
|
|
|
|
|
|
|
Poignée de droite |
Ralenti |
m/s² |
3.63 |
|
|
|
|
|
|
|
|
(manche arrière) |
Emballement |
m/s² |
8.01 |
|
|
|
|||
|
|
|
|
|
|
Vibration par |
|
Poignée de gauche |
Ralenti |
m/s² |
7.24 |
|
|
|
|
||
ISO7916 |
|
(poignée) |
Emballement |
m/s² |
12.00 |
|
|
|
|||
|
|
|
|
|
|
|
|
Poignée de gauche |
Ralenti |
m/s² |
4.74 |
|
|
|
|
|
|
|
|
(manche avant) |
Emballement |
m/s² |
8.44 |
|
|
|
|||
|
|
|
|
|
|
|
|
Poignée de droite |
Ralenti |
m/s² |
4.41 |
|
|
|
|
|
|
|
|
(manche arrière) |
Emballement |
m/s² |
7.81 |
|
|
|
|||
|
|
|
|
|
|
Vibration par |
|
Poignée de gauche |
Ralenti |
m/s² |
11.76 |
|
|
|
|
||
ISO11680 |
|
(poignée) |
Emballement |
m/s² |
13.65 |
|
|
|
|||
|
|
|
|
|
|
|
|
Poignée de gauche |
Ralenti |
m/s² |
4.36 |
|
|
|
|
|
|
|
|
(manche avant) |
Emballement |
m/s² |
8.23 |
|
|
|
|||
|
|
|
|
|
|
Moyenne de niveau de pression de son |
ISO7917 |
dB (A) |
90.0 |
||
|
|
|
|
||
Moyenne de niveau de puissance de son |
ISO10884 |
dB (A) |
102.8 |
||
|
|
|
|
|
|
Mélange (carburant:huile 2 temps MAKITA) |
|
|
50:1 |
||
|
|
|
|
||
Rapport d’engrenage |
|
|
1/4 |
||
|
|
|
|
|
|
23
NOMENCLATURE
25
22
23
24
|
|
|
|
Nomenclature |
|
|
|
|
|
|
|
1 |
Réservoir de carburant |
|
|
|
|
2 |
Démarreur de retour |
|
|
|
3 |
Epurateur d’air |
|
|
|
4 |
Interrupteur I-O (ON/OFF) |
|
|
21 |
5 |
Bougie d’allumage |
|
|
6 |
Silencieux |
|
|
|
|
||
|
|
|
7 |
Carter d’embrayage |
|
|
|
8 |
Manche arrière |
|
|
|
9 |
Anneau d’accrochage |
|
|
|
10 |
Poignée |
|
|
11 |
Levier d’étrangleur |
|
|
|
|
||
|
12 |
Câble d’étrangleur |
||
|
|
|
13 |
Axe |
|
|
|||
|
|
14 |
Lames de coupe |
|
|
|
|
||
|
|
15 |
Manche avant |
|
|
|
|
||
|
|
|
16 |
Bouton du démarreur |
|
|
|
17 |
Pompe de démarrage |
|
|
|
18 |
Boîte de vitesses |
|
|
|
19 |
Pot d’échappement |
|
|
|
20 |
Levier de serrage |
|
|
|
21 |
Bouchon du réservoir de carburant |
|
|
|
22 |
Collier d’espacement |
|
|
|
23 |
Barrière |
|
|
24 |
Cache lame |
|
|
|
|
||
|
|
|
25 |
Bandoulière |
|
|
|
|
|
24
RACCORDEMENT DE LA TAILLE-HAIE À LA RALLONGE
Important:
S’assurer que le moteur est arrêté et retirer le cache de la bougie d’allumage avant d’assembler la taille haie à rallonge.
Porter des gants de protection!
Couvrir les lames avec le cache lors du raccordement de la taille haie à la rallonge.
-Desserrer la vis M5x10 et le boulon M5x25.
-Insérer l’axe dans la boîte à vitesses.
Remarque: S’assurer que l’axe est complètement inséré dans la boîte à vitesses (environ 40 mm/1.57’’).
En cas de problème pour insérer l’axe, tourner manuellement l’essieu de commande et essayer de nouveau.
-Confirmer que l’axe est correctement inséré, puis serrer la vis M5x10 et le boulon M5x25.
Essieu Vis M5x10
40mm
Axe |
Boulon M5x25 |
|
FIXATION DE LA POIGNÉE
-Fixer la barrière de protection avec la poignée de façon à ce qu’elle dépasse vers la gauche tel qu’observé de la position d’utilisation.
-S’assurer de ne pas régler la poignée trop près du manche de commande (utiliser le collier d’espacement fourni pour cet effet).
Au moteur
UTILISATION DE LA BANDOULIÈRE
Comment porter la bandoulière
-Porter la bandoulière sur l’épaule gauche.
-Tenir la taille haie à rallonge du côté droit du corps.
-Fixer la bandoulière à l’attache sur la taille haie, puis régler la longueur de la bandoulière afin d’avoir une position de travail confortable.
Retrait
-En cas d'urgence, poussez les entailles (1) sur les deux côtés, et vous pouvez détacher la machine de vous.
Etre extrêmement prudent pour garder le contrôle de la machine lors de cette opération. Ne pas laisser la machine dévier dans votre direction ou vers toute autre personne se trouvant à proximité de la zone de travail.
AVERTISSEMENT: La non-observation de cette précaution peut se traduire par de blessures corporelles graves ou la MORT.
Attache du harnais
Bandoulière
Porter sur l’épaule gauche.
25
ALIMENTATION EN CARBURANT
Mélange carburant /huile
-Le moteur de la taille haie à rallonge est un moteur à deux temps très puissant qui fonctionne avec un mélange de carburant et d’huile moteur à deux temps. Le moteur est conçu pour marcher avec du carburant ordinaire sans plomb avec une valeur minimale d’octane de 91ROZ. Si ce genre de carburant n’est pas disponible, utiliser le carburant avec la valeur d’octane la plus élevée disponible. Ceci n’endommagera pas le moteur, mais ses performances seront réduites. Il en est de même pour le carburant avec plomb. Pour obtenir les performances optimales et pour la protection de la santé publique et de l’environnement, utiliser tant que possible du carburant sans plomb.
-De l’huile moteur à deux temps (niveau de qualité : TSC-3) doit être ajoutée au carburant pour lubrifier le moteur. Le moteur est conçu pour utiliser l’huile à deux temps MAKITA écologique, à mélanger à un pourcentage de 50 :1. Cette huile spécialement développée assure une longue durée de vie et les meilleures performances pour le moteur avec le minimum d’échappement de gaz. Il est impératif de respecter le mélange 50 :1 (Carburant / huile à deux temps MAKITA) afin d’obtenir une bonne performance de la taille haie.
-Mélange carburant/huile correct:
Mélanger 50 parts de carburant à une part d’huile moteur à deux temps MAKITA (voir aussi le tableau à droite).
Remarque: Lors de la préparation du mélange carburant/huile, mélanger d’abord toute la quantité nécessaire d’huile avec la moitié de carburant. Ajouter l’autre moitié de carburant et mélanger avant de remplir le réservoir.
Ne pas ajouter plus d’huile que décrit. S’il y a trop d’huile, plus de résidu de combustion est produit, ce qui pollue l’environnement et bouche les conduits du silencieux et du cylindre. De plus, la consommation de carburant augmente et les performances de la machinediminuent.
Manipulation des produits pétroliers
Manipuler le carburant le plus de précaution possible. Le carburant contient des substances similaires au solvants, par conséquent le ravitaillement doit se faire à l’extérieur ou dans un endroit bien ventilé. Ne pas inhaler les vapeurs de carburant et éviter tout contact du carburant ou de l’huile avec la peau. La peau devient sèche si elle est contact prolongé avec des produits pétroliers. Ceci peut provoquer des maladies de peau et des réactions allergiques.
Le carburant ou l’huile risquent de provoquer des irritations graves en contact avec les yeux. Si le cas se produit, rincer immédiatement les yeux avec une grande quantité d’eau fraîche. Ne pas hésiter à contacter un médecin si l’irritation persiste.
Ravitaillement
Le moteur doit être coupé!
-Nettoyer soigneusement la zone entourant le bouchon de remplissage de carburant (2) afin d’empęcher que la saleté ne s’introduise dans le réservoir de carburant (1).
-Dévisser le bouchon de remplissage de carburant (2) et remplir le réservoir de carburant.
-Revisser fermement le bouchon de remplissage de carburant (2).
-Nettoyer le bouchon de remplissage de carburant fileté (2) et le réservoir aprčs leravitaillement!
Stockage du carburant
-Le carburant se détériore s’il est stocké pendant longtemps.
-Acheter la quantité de carburant nécessaire pour une période de 4 semaines.
-Utiliser les récipients de carburant appropriés.
Observer les instructions de sécurité à la page 21
|
|
|
|
|
|
|
|
Carburant |
|
Huile |
|
|
|
|
|
|
|
|
|
|
|
|
|
|
50 |
|
|
|
|
|
|
|
|
|
|
|
|
|
|
|
||
|
|
|
|
|
|
|
|
|
|
1000mL |
(1L) |
|
|
20mL |
|||
|
5000mL |
(5L) |
|
|
100mL |
|||
|
10000mL (10L) |
|
|
200mL |
||||
|
|
|
|
|
|
|
|
|
|
|
|
|
|
|
|
|
|
|
|
|
|
|
|
|
|
|
|
|
|
|
|
|
|
|
|
|
|
|
|
|
|
|
|
|
26
PRÉCAUTIONS AVANT LE DÉMARRAGE DU MOTEUR
-Laisser toujours une zone de sécurité de 15 mètres autour de la zone de travail. S’assurer que toutes les personnes (en particulier les enfants) et/ou les animaux se trouvent en dehors de cette zone.
-Avant d’utiliser la taille haie à rallonge, s’assurer qu’elle est en bonne condition de travail. Vérifier que les lames de coupe ne sont pas endommagées et que le levier d’étrangleur peut être actionné facilement. Vérifier que les lames de coupe ne sont pas en mouvement lorsque le moteur est en marche à vide. Si la machine ne fonctionne pas correctement, contacter le revendeur pour la régler. Vérifier que les poignées sont propres et sèches et que l’interrupteur I-O fonctionne correctement. Démarrer le moteur selon les instructions données dans le manuel. Ne pas utiliser d’autre méthode pour démarrer la taille haie (voir «Démarrage du moteur»).
-Ne démarrer le moteur de la taille haie à rallonge qu’après avoir lu et compris les instructions. Ne jamais tenter de démarrer une taille-haies qui n’est pas entièrement montée. Il y a un grand risque de blessures.
-Avant de démarrer le moteur, s’assurer que les lames de coupe ne sont pas bouchées par des cailloux, branches ou tout autre objet solide.
-Vérifier la zone de travail pour tout fil, cordon, morceau de verre ou objet étranger qui risquent de s’attraper dans les lames de coupe.
-Electrocution : Faire attention aux lignes électriques aux alentours. Vérifier toute la zone de travail pour la présence de lignes électriques ou de clôture électrique avant de commencer le travail.
DÉMARRAGE DU MOTEUR
Si la machine vient d’être alimentée en carburant, se déplacer d’environ 3 mètres de l’endroit de ravitaillement. Placer la taille haie à rallonge sur le sol dans un endroit raisonnablement propre et s’assurer que les lames de coupe ne touchent pas le sol ou tout autre objet solide.
Démarrage à froid (moteur froid / arrêt du moteur pendant plus de 5 minutes / Après ravitaillement)
1.Déplacer l’interrupteur I-O sur la position "I" (1).
2.Pousser répétitivement (7 à 10 fois) la pompe d’amorçage (2) jusqu’à ce que le carburant entre dans la pompe.
3.Déplacer le levier de starter (3) dans la position "  " (verticale).
4.Tenir fermement le moteur avec une seule main au sol (4).
5.Tirer la corde du starter d’environ 10~15 cm jusqu’à sentir une résistance.
6.Tirer fermement (répétitivement si nécessaire) sur la corde jusqu’à ce que le moteur démarre.
7.Remettre le levier de starter sur la position "  " après le démarrage du moteur. Noter que le levier de starter revient automatiquement lorsque le levier d’étrangleur est actionné. Presser le levier d’étrangleur avec le levier de déverrouillage.
8.Chauffer le moteur à une vitesse modérée pendant environ 1 à 2 minutes.
9.Une fois le moteur chaud, il tourne normalement et la transition de la vitesse faible à la vitesse élevée est douce sans interruption.
Remarque: Si la corde du starter est tirée répétitivement avec le starter sur la position "  ", il y a une prise excessive de carburant ce qui rendra le démarrage du moteur difficile.
S’il y a trop de carburant, retirer la bougie d’allumage et tirer doucement la corde du starter pour dégager l’excès de carburant. Sécher l’électrode de la bougie d’allumage et remettre la bougie.
Démarrage à chaud (démarrage immédiat après arrêt du moteur)
Ne pas utiliser le starter (3) pour redémarrer immédiatement le moteur. Si le moteur ne s’arrête pas, exécuter les étapes 1 à 8 décrites ci-dessus (Démarrage à froid).
Remarque : Ne pas lâcher immédiatement le bouton du starter après avoir tiré sur la corde du starter mais le guider vers sa position d’origine.
(1)
Interrupteur I-O
 Levier de déverrouillage
 Levier d’étrangleur
 (3)
(3)
 (2)
(2)
(4)
27

ARRÊT DU MOTEUR
1.Relâcher le levier d’étrangleur.
2.Pousser l’interrupteur I-O sur la position “O” pour arrêter le moteur.
(5)
VÉRIFICATION ET RÉGLAGE DE LA VITESSE DE MARCHE À VIDE
Les lames de coupe de la taille haie ne doivent pas tourner lorsque le levier d’étrangleur est relâché.
- La vitesse de marche à vide correcte est de 3000 min-1 . Régler, si nécessaire, la vitesse de marche à vide à l’aide de la vis de réglage (réduire la révolution jusqu’à ce que les lames s’arrêtent de tourner).
• Tourner la vis dans le sens des aiguilles d’une montre :
La vitesse de marche à vide augmente.
• Tourner la vis dans le sens contraire des aiguilles d’une montre : La vitesse de marche à vide diminue.
Laisser une certaine différence entre la vitesse de marche à vide et celle d’embrayage (réduire plus la vitesse de marche à vide si nécessaire). Si les lames de coupe continuent de tourner même après un réglage adéquat de la vitesse de marche à vide, consulter le réparateur autorisé le plus proche.
•L’embrayage s’enclenche à une vitesse minimale de 4000 min-1.
•Vérifier que l’interrupteur d’arrêt STOP, le levier de déverrouillage et le levier d’étrangleur fonctionnent correctement.
Vis de réglage de marche à vide
A petite |
A grande |
vitesse |
vitesse |
28

FONCTIONNEMENT DE LA TAILLE-HAIES À RALLONGE
-En travaillant avec la taille haie, tenir fermement la poignée avec les deux mains.
-Ne pas toucher la lame de coupe de la taille haie pendant l’utilisation ou lorsque le moteur est en marche.
-Faire attention à ne pas inhaler les gaz d’échappement en travaillant avec la taille haie. Ne jamais utiliser la taille haie dans un endroit clos ou sans ventilation suffisante (risque d’asphyxie et d’intoxication). Noter que le gaz carbonique est un gaz inodore ne pouvant être détecté ni par l’odorat.
-Porter toujours des vêtements de travail adéquats avant de commencer le travail avec la taille haie.
-Arrêter immédiatement le moteur si le silencieux ne fonctionne pas correctement.
-N’utiliser la taille haie que dans de bonnes conditions de lumière et de visibilité.
-Ne pas utiliser la taille haie dans l’obscurité ou le brouillard. Faire attention aux endroits mouillés et glissants (neige et verglas) pendant la saison froide (danger de glissade) et assurer toujours un bon équilibre sur les jambes.
-Ne jamais utiliser la taille haie en se tenant sur une surface instable ou une pente.
-Ne jamais utiliser la taille haie en se tenant sur une échelle.
-Ne jamais grimper sur un arbre pour utiliser la taille haie.
-Vérifier toujours la zone de travail et retirer tout fil, corde, verre ou objet étranger qui risque d’être pris les lames.
-Vérifier que les lames de coupe tournent vite avant de commencer à couper.
-Tenir toujours la taille haie des deux mains et maintenir une bonne prise en travaillant avec la machine.
-Pour assurer un contrôle optimal de la taille haie, mettre les mains bien autour des poignées (utiliser le pouce pour la contre pression) et les serrer.
-Noter que les lames de coupe restent en mouvement jusqu’à 2 secondes après avoir relâché le levier d’étrangleur.
-Ne pas couper avec la taille haie à faible vitesse.
-La vitesse des lames de coupe ne peut pas être correctement réglée avec le levier d’étrangleur lorsque le moteur tourne a bas régime.
-Pour couper le haut d’une haie, aligner tout d’abord l’outil de coupe à un angle de 15°~30° dans la direction de coupe et garder la taille haie en position horizontale.
Commencer à couper la haie en un mouvement basculant comme en dessinant |
15mètres |
des cercles avec l’axe de la taille haie. |
(50feet) |
-Pour couper les bords de la haie, aligner les lames parallèlement avec la surface à couper et commencer à couper avec des mouvements semi-circulaires (de bas en haut).
-Faire attention en coupant une haie qui a poussé le long d’une clôture. Faire attention à ne pas mettre en contact les lames de coupe et clôture métallique. Le fait de couper dans du métal, pierre, ciment ou bois épais risque de casser les lames et/ou d’endommager toute la machine.
-Ne pas utiliser la taille haie pendant une longue durée. En général, pour chaque 50 minutes de travail, arrêter la machine pendant environ 10 à 20 minutes.
-Si les lames de coupe viennent à toucher des pierres ou un objet solide, arrêter immédiatement le moteur et vérifier les lames. Remplacer les lames cassées.
-S’il y a un problème en cours d’utilisation de la taille haie (bruit étrange, vibrations, etc.), arrêter immédiatement le moteur. Ne pas utiliser de nouveau la machine jusqu’à trouver la cause du problème et la réparer.
-Faire son possible pour garder au minimum la pollution et les émissions de gaz en utilisant la taille haie. Faire attention particulièrement au réglage du carburateur et au mélange carburant/huile.
-Si des branches épaisses sont coincées entre les lames, arrêter immédiatement le moteur, allonger la taille haie sur le sol et retirer l’obstacle. Vérifier que les lames n’ont pas été endommagées avant de reprendre le travail.
15m
(50ft)
15m
(50ft)
29

Réglage de l’angle de coupe
1.Arrêter le moteur de la taille haie et allonger la machine sur le sol.
2.Pour régler l’angle de l’élément de coupe, desserrer le levier de crochet situé audessus de l’élément de coupe en le tournant dans le sens contraire des aiguilles
d’une montre. |
Serrer |
3.Régler l’angle de l’élément de coupe et tourner le levier de crochet dans le sens des aiguilles d’une montre pour les serrer.
• L’élément de coupe peut être réglé entre 45° et 90°. |
Desserrer |
Remarque :
-Ne pas régler l’élément de coupe alors que la taille haie est en position verticale.
-Déplacer l’interrupteur I-O sur la position "O" et allonger la taille haie sur le sol pour régler l’angle de l’élément de coupe.
-Couvrir toujours les lames avec le cache fourni avant de régler l’angle de coupe.
ENTRETIEN
-Avant d’effectuer tout travail d’entretien de l’élément de coupe de la taille haie (nettoyage de lame, etc.), arrêter toujours le moteur et attendre qu’il refroidisse. Par précaution, retirer également la bougie d’allumage.
-Ne pas essayer de consolider ou de redresser une lame de coupe cassée. Remplacer toujours les lames endommagées.
-Arrêter le moteur à des intervalles réguliers pour vérifier si les lames de coupe ne sont pas endommagées (effectuer un léger test de résonance pour détecter d’éventuelles fissures invisibles). Vérifier toujours que les dents des lames sont aiguisées.
-Nettoyer la taille haie à intervalles réguliers. Vérifier également pendant le nettoyage que toutes les vis, écrous et boulons sont bien vissés.
-Pour réduire le risque de feu, ne jamais réparer ou ranger la taille haie à proximité de flammes nues.
-Porter toujours des gants épais de protection en manipulant les lames.
-Contacter le revendeur pour remplacer les lames.
Aiguiser les lames
Si les lames de coupes ne sont plus tranchantes et que la performance de coupe n’est pas bonne, faire aiguiser les lames par un réparateur autorisé.
Levier de crochet
30
 Loading...