


RBC411
GB Brush Cutter
BZ Cortador de mato
LS Desbrozadora
F Débroussailleuse
Instruction manual
Manual de instruções
Manual de instrucciones
Manuel d’instructions
Important:
Read this instruction manual carefully before putting the Brush Cutter into operation and strictly observe the safety regulations! Preserve instruction manual carefully!
Importante:
Leia com atenção este manual de instruções antes de colocar o cortador de mato em funcionamento e cumpra estritamente com os regulamentos de segurança!
Guarde o manual de instruções com cuidado!
Importante:
Lea esta manual de instrucciones con atención antes de utilizar la desbrozadora y ¡observe estrictamente las regulaciones de seguridad! ¡Conserve cuidadosamente su manual de instrucciones!
Important :
Veuillez lire attentivement ce manuel d’instructions avant d’utiliser la débroussailleuse, et observez strictement les consignes de sécurité ! Veillez à conservez ce manuel d’instructions !

Thank you very much for selecting the MAKITA Brush Cutter. We are pleased to be able to offer you the MAKITA Brush Cutter which is the result of a long development programme and many years of knowledge and experience. Please read, understand and follow this booklet which refers in detail to the various points that will demonstrate its outstanding performance. This will assist you to obtain the best possible result from your MAKITA Brush Cutter.
|
English |
Table of Contents |
Page |
Symbols ........................................................................ |
2 |
Safety instructions...................................................... |
3-6 |
Technical data............................................................... |
7 |
Designation of parts ...................................................... |
8 |
Assembly of engine and shaft....................................... |
9 |
Mounting of handle ....................................................... |
9 |
Mounting of protector .................................................. |
10 |
Mounting of cutter blade.............................................. |
11 |
Fuels/refueling............................................................. |
12 |
Correct handling of machine ....................................... |
13 |
Putting into operation .................................................. |
14 |
Resharpening the cutting tool ..................................... |
15 |
Maintenance schedule ................................................ |
16 |
Storage ....................................................................... |
17 |
Symbols
You will note the following symbols when reading the instruction manual.
Read instruction manual
Take particular care and attention
Forbidden
Keep distance
Flying object hazard
No smoking
No open flame
Protective gloves must be worn
Wear sturdy boots with non-slip soles. Steel toed safety boots are recommended.
Keep the area of operation clear of all persons and pets
Wear protective helmet, eye and ear protection
Top permissible tool speed
Fuel and oil mixture
Engine-Manual start
Emergency stop
First Aid
Recycling
ON/START
Kickback |
OFF/STOP |
2

Safety instructions
General Instructions
–To ensure correct and safe operation, the user must read, understand and follow this instruction manual to assure familiar with the handling of the brush cutter. Users insufficiently informed will risk danger to themselves as well as others due to improper handling.
–It is recommended only to loan the brush cutter to people who have proven to be experienced with brush cutters.
Always hand over the instruction manual.
–First-time users should ask the dealer for basic instructions to familiarize oneself with the handling of an engine powered cutter.
–Children and young persons aged under 18 years must not be allowed to operate the brush cutter. Persons over the age of 16 years may however use the tool for the purpose of being trained only while under the direct supervision of a qualified trainer.
–Use brush cutters with the utmost care and attention.
–Operate the brush cutter only if you are in good physical condition. Perform all work conscientiously and carefully. The user has to accept responsibility for others.
–Never use the brush cutter while under the influence of alcohol or drugs.
–Do not use the unit when you are tired.
–Save these instructions for future referral.
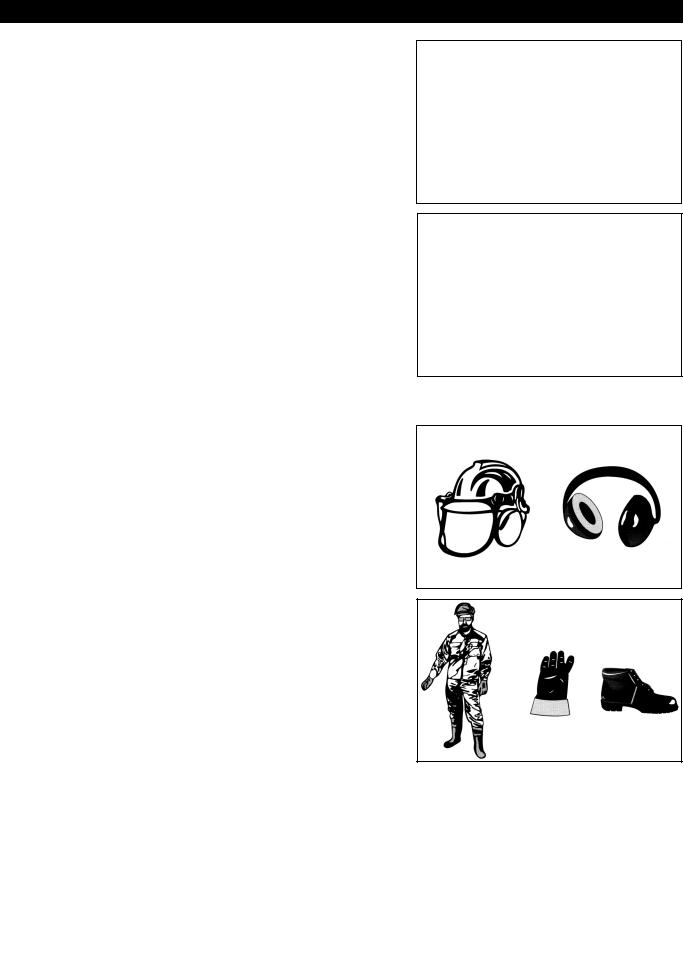
Personal protective equipment
–The clothing worn should be functional and appropriate, i.e. it should be tightfitting but not cause a hindrance. Do not wear jewelry, clothing or long hair which could become entangled with bushes or shrubs.
–In order to avoid head-, eye-, handor foot injuries as well as to protect your hearing the following protective equipment and protective clothing must be used during operation of the brush cutter.
–Always wear a helmet when working in the forest. The protective helmet (1) is to be checked at regular intervals for damage and is to be replaced at the least every 5 years. Use only approved protective helmets.
–The visor (2) of the helmet (or approved goggles) protects the face from flying sticks, stones or other objects. During operation of the brush cutter always wear goggles, or a visor to prevent eye injuries.
–Wear adequate noise protection equipment to avoid hearing impairment (ear muffs (3), ear plugs etc.), especially during extended work periods.
–The work overalls (4) protect against flying stones and splinters. We strongly recommend that the user wears work overalls.
–Special gloves (5) made of thick leather are part of the prescribed equipment and must always be worn during operation of the brush cutter.
–When using the brush cutter, always wear safety shoes (6) with a non-slip sole. This protects against injuries and ensures good footing.
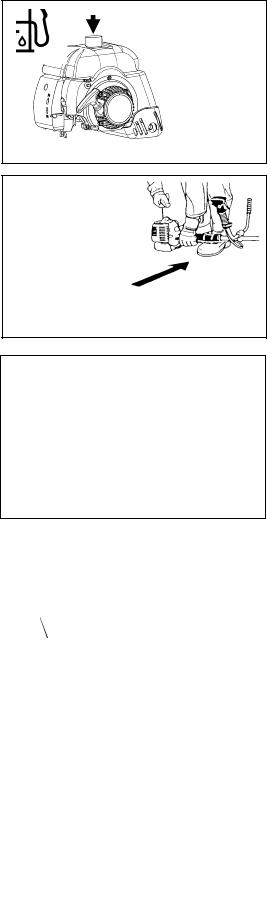
Starting up the brush cutter
–Please make sure that there are no children or other people within a working range of 15 meters, also pay attention to any animals in the working vicinity.
–Before operating, always check that the brush cutter is safe for operation: Check the security of the cutter blade. Be sure the blade mounting nut is firmly secured. The throttle lever should be checked for smooth and easy action. Check for proper functioning of the throttle lever lock. The cutter blade must not rotate during idling.
Consult idle adjustment instructions on page 15. Check for clean and dry handles and test function of the ON-OFF switch.
Keep handles free of oil and fuel.
(1)
(2)
(3)
(4)
(5) |
(6) |
|
|
|
|
|
|
|
|
|
|
|
|
|
3

–Start the brush cutter only in accordance with the instructions. Do not use any other methods for starting the engine!
–Use the brush cutter and the tools only for such applications as specified.
–Only start the brush cutter engine, after the entire assembly is done. Operation of the device is only permitted after all the appropriate accessories are attached!
–Before starting make sure that the cutting tool has no contact with hard objects such as branches, stones etc. as the cutting tool will revolve when starting.
–The engine is to be switched off immediately in case of any engine problems.
–Should the cutting tool hit stones or other hard objects, immediately switch off the engine and inspect the cutting tool.
–Inspect the cutting tool at short regular intervals for damage (detection of hairline cracks by means of tapping-noise test).
–Operate the brush cutter only with the shoulder strap attached which is to be suitably adjusted before putting the brush cutter into operation. It is essential to adjust the shoulder strap according to the user's size to prevent fatigue occurring during use. Never hold the cutter with one hand during use.
–During operation always hold the brush cutter with both hands. Always ensure a safe footing.
–Operate the brush cutter in such a manner as to avoid inhalation of the exhaust gases. Never run the engine in enclosed rooms (risk of gas poisoning). Carbon monoxide is an odorless gas.
–Switch off the engine when resting and when leaving the brush cutter unattended, and place it in a safe location to prevent danger to others or damage to the machine.
–Never put the hot brush cutter onto dry grass or onto any combustible materials.
–The cutting tool has to be equipped with it's appropriate guard. Never run the cutter without this guard!
–All protective installations and guards supplied with the machine must be used during operation.
–Never operate the engine with faulty exhaust muffler.
–Shut off the engine during transport.
–During transport over long distances the tool protection included with the equipment must always be used.
–Ensure safe position of the brush cutter during car transportation to avoid fuel leakage.
–When dispatching the brush cutter, ensure that the fuel tank is completely empty.
–When unloading the Brush Cutter from the truck, never drop the Engine to the ground or this may severely damage the fuel tank.
–Except in case of emergency, never drop or cast the Brush Cutter to the ground or this may severely damage the Brush Cutter.
–Remember to lift the entire equipment from the ground when moving the equipment. Dragging the fuel tank is highly dangerous and will cause damage and leakage of fuel, possibly causing fire.
•Resting
•Transport
•Refuelling
•Maintenance
•Tool Replacement
4
Refuelling
–Shut off the engine during refuelling, keep away from naked flames and do not smoke.
–Avoid skin contact with mineral oil products. Do not inhale fuel vapor. Always wear protective gloves during refuelling. Change and clean protective clothing at regular intervals.
–Take care not to spill either fuel or oil in order to prevent soil contamination (environmental protection). Clean the brush cutter immediately after fuel has been spilt. Avoid any fuel contact with your clothing. Change your clothing instantly if fuel has been spilt on it (to prevent clothing catching fire).
–Inspect the fuel cap at regular intervals making sure that it can be securely fastened.
–Carefully tighten and does not leak the fuel tank cap. Change location to start the engine (at least 3 meters (10ft) away from the place of refuelling).
–Never refuel in closed rooms. Fuel vapors accumulate at ground level (risk of explosion).
–Only transport and store fuel in approved containers. Make sure the fuel stored is not accessible to children.
Method of operation
3 meters (10ft)
–Only use the brush cutter in good lighting and visibility. During the winter season beware of slippery or wet areas, ice and snow (risk of slipping). Always ensure a safe looting.
–Never cut above shoulder height.
–Never stand on a ladder and run the brush cutter.
–Never climb up into trees to perform cutting operation with the brush cutter.
–Never work on unstable surfaces.
–Remove sand, stones, nails etc. found within the working range.
Foreign particles may damage the cutting tool and can cause dangerous kickbacks.
–Before commencing cutting, the cutting tool must have reached full working speed.
Kickback |
|
|
|
|
12 |
|
Caution: |
||
– When operating the brush cutter, uncontrolled kickback may occur. |
|
|||
2 |
Kickback |
|||
– This is particularly the case when attempting to cut within a blade segment |
|
|||
|
|
|||
between 12 and 2 o'clock. |
|
|
|
|
– Never apply the brush cutter within a segment between 12 and 2 o'clock. |
|
|
|
|
– Never apply this segment of the brush cutter blade to solids, such as bushes |
|
|
|
|
and trees, etc., having a diameter in excess of 3 cm or the brush cutter will be |
|
|
|
|
deflected at great force with the risk of injuries. |
|
|
|
|
|
|
|
Diagrammatic |
|
|
|
|
figure |
|
Kickback prevention |
|
|
|
|
|
|
|
||
|
|
|
||
To avoid kickbacks, observe the following: |
|
|
|
|
– Operation within a blade segment between 12 and 2 o'clock presents positive |
|
|
|
|
hazards, especially when using metal cutting tools. |
|
|
|
|
– Cutting operations within a blade segment between 11 and 12 o'clock, and |
|
|
|
|
between 2 and 5 o'clock, must only be performed by trained and experienced |
|
|
|
|
operators, and then only at their own risk. |
|
|
|
|
Easy cutting with almost no kickback is possible within a blade segment |
|
|
|
|
between 8 and 11 o'clock. |
|
|
Diagrammatic |
|
|
|
|
||
|
|
|
figure |
|
|
|
|
|
5

Cutting Tools
Employ only the correct cutting tool for the job in hand.
Nylon cutting head:
Exclusively designed for cutting along walls, fences, grass edges, trees, posts etc. (supplementing the grass mower). Perform this cutting work by swinging the grass trimmer evenly in half-circles from left to right.
Cutter blade (Star Blade (4 teeth), Eddy Blade (8 teeth)):
For cutting thick materials, such as weed, high grass, bushes, shrubs, underwood, thicket etc. (max. 2 cm dia. thickness). Perform this cutting work by swinging the brush cutter evenly in half-circles from right to left (similar to using a scythe).
Saw blade:
Please use saw blade in case bamboo leaves, small tree, pampas etc. are mixed in weed.
Maintenance instructions
–The condition of the cutter, in particular of the cutting tool of the protective devices and also of the shoulder strap must be checked before commencing work. Particular attention is to be paid to the cutting blades which must be correctly sharpened.
–Turn off the engine and remove the spark plug connector when replacing or sharpening cutting tools, and also when cleaning the cutter or cutting tool.
Never straighten or weld damaged cutting tools.
–Operate the brush cutter with as little noise and contamination as possible. In particular check the correct setting of the carburetor.
–Clean the brush cutter at regular intervals and check that all screws and nuts are well tightened.
–Never service or store the brush cutter in the vicinity of naked flames.
–Always store the brush cutter in locked rooms and with an emptied fuel tank.
Observe the relevant accident prevention instructions issued by the relevant trade associations and by the insurance companies.
Do not perform any modifications on the brush cutter as this will endanger your safety.
The performance of maintenance or repair work by the user is limited to those activities as described in the instruction manual. All other work is to be done by an Authorized Service Agent.
Use only genuine spare parts and accessories supplied MAKITA.
Use of non-approved accessories and tools means increased risk of accidents and injuries.
MAKITA will not accept any liability for accidents or damage caused by the use of any non-approved cutting tools attachments accessories.
6

Technical data
Model |
|
RBC411 |
|
|
|
|
U handle |
|
|
|
|
|
|
|
Dimensions: length x width x height (without cutting blade) |
mm |
1,705 x 620 x 435 (67" x 24" x 17") |
|
|
|
Mass (without plastic guard and cutting blade) |
kg |
7.3 (16.1 lb) |
|
|
|
Volume (fuel tank) |
L |
1.1 |
|
|
|
Engine displacement |
cc |
40.2 |
|
|
|
Maximum engine performance |
HP |
1.97 at 7,000 /min |
|
|
|
Engine speed at recommended max. spindle speed |
/min |
8,500 |
|
|
|
Maximum spindle speed (corresponding) |
/min |
6,800 |
|
|
|
Fuel consumption |
kg/h |
0.98 (32.8 oz/h) |
|
|
|
Specific fuel consumption |
g/HPh |
846 (29.9 oz/kwh) |
|
|
|
Idling speed |
/min |
2,600 |
|
|
|
Clutch engagement speed |
/min |
3,600 |
|
|
|
Carburetor (Float - carburetor) |
type |
MIKUNI VM |
|
|
|
Ignition system |
type |
Solid state ignition |
|
|
|
Spark plug |
type |
NGK BPM7A |
|
|
|
Electrode gap |
mm |
0.6 - 0.7 |
|
|
|
Mixture ratio (Fuel: MAKITA 2-stroke oil) |
|
25 : 1 |
|
|
|
Gear ratio |
|
13/19 |
|
|
|
1) The data takes equally into account the idling and racing or wide open throttle speed operating modes.
7

Designation of parts
GB |
Designation of parts |
|
|
1 |
Fuel Tank |
|
|
2 |
Rewind Starter |
|
|
3 |
Air Cleaner |
|
|
4 |
I-O Switch (on/off) |
|
|
5 |
Spark Plug |
|
|
6 |
Exhaust Muffler |
|
|
7 |
Clutch Case |
|
|
8 |
Hanger |
|
|
9 |
Handle |
|
|
10 |
Throttle Lever |
|
|
11 |
Throttle wire |
|
|
12 |
Shaft |
|
|
13 |
Protector |
|
|
14 |
Gear Case |
|
|
15 |
Handle Holder |
|
|
16 |
Cutter Blade |
|
|
17 |
Waist Pad |
|
|
18 |
Fuel Filler Cap |
|
|
19 |
Starter Knob |
|
|
20 |
Choke Lever |
|
|
21 |
Exhaust Pipe |
|
|
8

Assembly of engine and shaft
CAUTION: Before doing any work on the brush cutter, always switch off the motor and pull the spark plug connector off the spark plug. Always wear protective gloves.
CAUTION: Start the brush cutter only after having assembled it completely.
–After checking the parts, fasten the drive shaft to the engine with four bolts M6 x 22(1). At this time, fasten also the earth terminal (2) of the stop cord to the engine.
Mounting of handle
–Place the handle with the throttle lever on the handle holder on the right side (to be held by the right hand) and the other on the left side.
–Fit the handle edge to the handle holder groove, and provisionally fix the upper side (3) of the handle holder by four bolts M5 x 25 (4).
–Adjust the handle to an angle easy to manipulate, and tighten the bolt (4) uniformly on the right and left sides.
 (4)
(4)
(3)
– Mount the waist pad (5). When the waist pad is mounted, be sure to confirm |
|
|
|
|
|
that the wires do not move horizontally. |
Hanger |
|
– Avoid any tendency of the throttle wire to loop at the handle bar. |
|
|
|
|
|
The purpose of the detent lock is to prevent the engine from rotating relative to |
|
|
the drive shaft while operating the starter or transporting the equipment from |
|
|
place to place. The detent should be unlocked while the unit is being used. |
|
|
|
Detent lock |
Throttle wire |
|
|
|
9

Mounting of protector
To meet the applicable safety provisions, only the tool/protector combinations as indicated in the table must be used.
Be sure to use genuine MAKITA cutter blade or nylon cutting head.
–The cutter blade must be well polished, free of cracks or breakage.
–If the cutter blade hits against a stone during operation, stop the engine and check the blade immediately.
–Polish or replace the cutter blade every three hours of operation.
–The outside diameter of the cutter blade must be 255 mm (10-1/32”). Never use any blades surpassing 255 mm (10-1/32”) in outside diameter.
Star Blade |
Eddy Blade |
Saw Blade |
Protector for metal blade |
PART NO. 6418501400 |
PART NO. 6418501900 |
PART NO. 6418501600 |
PART NO. 6418026000 |
|
|
|
|
CAUTION: The appropriate protector must always be installed, for your own safety and in order to comply with accident-prevention regulations. Operation of the equipment without the guard being in place is not permitted.
– Fix the protector (1) to the clamp (3) with two bolts M6 x 30 (2).
NOTE: Tighten the right and left bolts evenly so that the gap between the clamp
(3) and the protector (1) will be constant.
Otherwise, the protector sometimes may not function as specified.
10
Mounting of cutter blade
–Insert the hex wrench through the hole in the gear case and rotate the receiver washer (4) until it is locked with the hex wrench.
–Loosen the nut (1) (left-hand thread) with the socket wrench and remove the nut (1), cup (2), and clamp washer (3).
Mounting of cutter blade
With the hex wrench still in place.
–Mount the cutter blade onto the shaft so that the guide of the receiver washer
(4)fits in the arbor hole in the cutter blade. Install the clamp washer (3), cup (2), and secure the cutter blade with the nut (1).
[Tightening torque: 13 - 23 N•m]
NOTE: Always wear gloves when handling the cutter blade.
NOTE: The cutter blade-fastening nut (with coned disc spring) is a consumable part.
If there appears any wear or deformation on the coned disc spring washer, replace the nut.
Make sure that the blade is the left way up.
Tighten
Loosen
Hex Wrench
11

Fuels/refueling
Handling petroleum products
Utmost care is required when handling fuel. Fuel may contain substances similar to solvents. Refuel either in a well ventilated area or outdoors. Do not inhale fuel vapors, avoid any contact of fuel or oil with your skin.
Mineral oil products degrease your skin. If your skin comes in contact with these substances repeatedly and for an extended period of time, various skin diseases may result. In addition, allergic reactions are known to occur. Eyes can be irritated by contact with oil, fuel etc.
If oil comes into your eyes, immediately wash them with clear water. If your eyes are still irritated, see a doctor immediately.
Fuel and oil mixture
The engine of the brush cutter is a high-efficiency two-stroke engine.
It is run with a mixture of fuel and two-stroke engine oil. The engine is designed to use unleaded regular fuel with a min. Octane value of 91 RON. If no such fuel is available, you can use fuel with a higher octane value. This will not affect the engine, but may cause poor operating behavior.
A similar situation will arise from the use of leaded fuel. To obtain optimum engine performance and to protect your health and the environment, only unleaded fuel should be used!
For engine lubrication use a two-stroke engine oil (quality grade: TC-3), which is added to the fuel. The engine has been designed to use MAKITA two-stroke engine oil at mixture ratio of 25:1 to protect the environment. In addition, a long service life and reliable operation with a minimum emission of exhaust gasses is assured. It is absolutely essential to observe a mixture ratio of 25:1 MAKITA 2- stroke engine oil. Otherwise reliable function of the brush cutter cannot be guaranteed.
The correct mixture ratio:
Mix 25 parts gasoline with 1 part MAKITA 2-stroke engine oil (see table on right).
NOTE: For preparing the fuel-oil mixture first mix the entire oil quantity with half of the fuel required in an approved can which meets or exceeds all local code standards, then add the remaining fuel.
Throughly shake the mixture before filling it into the brush cutter tank. It is not wise to add more engine oil than specified to ensure safe operation. This will only result in a higher production of combustion residues which will pollute the environment and clog the exhaust channel in the cylinder, the spark plugs as well as the muffler. In addition, fuel consumption will rise and the performance will be decreased.
Refuelling
Never perform refuelling operations in a closed, unventilated area.
The engine must be switched off!
–Thoroughly clean the area around the gas cap, to prevent dirt from getting into the fuel tank.
–Unscrew the gas cap and fill the tank with fuel.
–Never fill the fuel tank to the very top.
–Securely screw on the gas cap.
–Wipe the screw plug and tank with an absorbent after refuelling! Allow cloths to dry and discard in a proper container.
Storage of Fuel
Fuel cannot be stored for an unlimited period of time.
Purchase only the quantity required for a 4 week operating period. Only use approved fuel storage containers.
Observe the Safety Instructions on page 4!
Gasoline |
25:1 |
(premium unleaded)
+
|
|
|
|
|
1,000 cc (1L) |
40 cc |
|
|
5,000 cc (5L) |
200 cc |
|
|
10,000 cc (10L) |
400 cc |
|
|
|
|
|
|
|
|
|
|
|
|
|
|
|
|
|
|
|
|
|
12

Correct handling of machine
Attachment of shoulder strap
–Adjust the strap length so that the cutter blade will be kept parallel with the ground.
Hanger
Detachment
–In case of emergency, remove the emergency detachment lever (1) by pulling strongly with a finger. The machine sill detach from body.
Be extremely careful to maintain control of the machine at this time. Do not allow the machine to be deflected toward you or anyone in the work vicinity.
WARNING: Failure to maintain complete control of the machine at all could result in serious bodily injury or DEATH.
Hanger
13
Putting into operation
Observe the applicable accident prevention regulations!
Starting
Move at least 3m (10ft) away from the place of refuelling. Place the brush cutter on a clean piece of ground taking care that the cutting tool does not come into contact with the ground or any other objects.
Cold start |
|
||
(4) |
|||
– Push the I-O switch (1) in the direction shown by the arrow. |
|||
|
|||
– |
Grasp the handle (hand pressure activates the safety lock-off lever (2)). |
|
|
– |
Press the throttle lever (3) and hold it down. |
(3) |
|
– Press the lock button (4) and release the control lever, and then release the |
|||
|
|||
|
lock button (the lock button holds the throttle lever in the start-up position). |
(1) |
|
|
|
||
|
|
(2) |
|
|
|
|
|
–First place the machine on the ground.
–Open the fuel valve. The valve opens when the lever (5) is at right angles to the ground (6). The valve closes when the lever is parallel with the ground (7).
–Move the choke lever (8) to the top position (  ).
).
–Firmly hold the clutch case by your left hand, as illustrated.
–Slowly pull the starter grip until resistance is felt and continue with a smart pull.
–Do not pull out the starter rope to its full extent and do not allow the starter handle to be retracted without control, but ensure that it is retracted slowly.
–Repeat the starting operation until initial ignitions are heard.
– Depress the choke lever ( |
) and pull the starter rope again until the engine |
starts. |
|
–As soon as the engine starts, immediately tap and release the throttle, thus releasing the half-throttle lock so that the engine can run in idle.
–Run the engine for approximately one minute at a moderate speed before applying full throttle.
Caution during operation:
If the throttle lever is opened fully in a no-load operation, the engine rotation is increased to 10,000 /min or more. Never operate the engine at a higher speed than required and at an approximate speed of 6,000 - 8,000 /min.
Starting the warm engine
–As described above, except without moving the choke lever (choke lever remains in the down position).
Stopping
–Release the control lever (3) fully, and when the engine speed has lowered, push the I-O switch (1) to “O” position the engine will now stop.
(3)(1)
14

IDLE ADJUSTMENT
The cutter blade or the nylon cutting head should not run when the control lever is fully released. If necessary, adjust the idle rpm using the idle adjusting screw.
Checking the Idling speed
–Idle speed should be set to 2,600 /min.
If necessary correct it by means of the idle screw (the blade or the nylon cutting head must not turn when the engine is at idle).
Screwing in the screw (1) will cause an increase in the engine speed, whereas backing off the screw will reduce the engine speed.
Resharpening the cutting tool
CAUTION: The cutting tools mentioned below must only be resharpened by an authorized facility. Manual resharpening will result in imbalances of the cutting tool causing vibrations and damage to the equipment.
– cutter blade (star blade (4 teeth), eddy blade (8 teeth), saw blade)
An expert resharpening and balancing service is provided by Authorized Service Agents.
NOTE: To increase the service life of the cutter blade (star blade, eddy blade, saw blade) it may be turned over once, until both cutting edges have become blunt.
15

Maintenance schedule
1.Before operation, pay particular attention to the tightness of Cutter Blade or nylon cutting head.
Check bolts and nuts and retighten if necessary.: Every 8 hour (Daily)
2.Check clogging of the cooling air passage and the cylinder fins. Clean them if necessary.: Every 8 hours (Daily)
3.Cleaning of air cleaner.: Every 8 hours (Daily)
1)Remove the air cleaner cover (1) and clean the sponge element (2). If there is excessive dust or dirt adhering to cleaner, clean it.
A clogged air cleaner may make it difficult or impossible to start the engine or increase the engine rotational speed.
2)Install the sponge element around the ribs of the air cleaner case.
4.Checkup of spark plug.: Every 8 hours (Daily)
The gap between the two electrodes of the spark plug should be 0.6 to 0.7 mm (0.024" to 0.028").
If the gap is too wide or too narrow, adjust it.
If the spark plug is clogged with carbon or fouled, clean it thoroughly or replace it.
5.Supply of grease to gear case.
Apply grease (SHELL ALVANIA No.3 or equivalent) to the gear case through the grease hole (3) every 30 hours.
(Genuine MAKITA grease may be purchased from your MAKITA dealer.)
6.Cleaning of muffler exhaust port: Every 50 hours (Monthly)
If the exhaust port (4) is clogged with carbon, remove it by scraping and tapping gently with a screwdriver or the like.
7.Check of fuel filter. If clogged, clean the filter.
8.Replace fuel lines.: Every 200 hours (Yearly)
9.Overhaul engine.: Every 200 hours (Yearly)
10.Replace packings and gaskets with new ones.: Every time engine is reassembled.
0. 6mm-0.7 mm (0.024”-0.028”)
Grease case
(3)
(4)
General |
Engine assembly, screws and nuts |
Visual inspection for damage and tightness |
|
Check for general condition and security |
|
|
|
|
|
|
|
After each refuelling |
Throttle lever |
Functional check |
|
Safety lock key |
Functional check |
|
ON-OFF switch |
Functional check |
|
|
|
Daily |
Sponge element (air filter) |
To be cleaned |
|
Cooling air duct |
To be cleaned |
|
Cutting blade |
Check for damage and sharpness |
|
Idling speed |
Inspection (cutting tool must not move) |
|
|
|
Weekly |
Spark plug |
Inspection, replace if necessary |
|
Muffler |
Check and if necessary clean the opening |
|
|
|
Quarterly |
Suction head (gas line filter) |
To be replaced |
|
Fuel tank |
To be cleaned |
|
|
|
Shutting down procedure |
Fuel tank |
Empty fuel tank |
|
Carburetor |
Operate until engine runs out of fuel |
|
|
|
16

Storage
–When the machine is in storage for a long time, drain fuel from the fuel tank and carburetor, as follows: Drain all fuel from the fuel tank. Dispose of properly and in accordance with all local laws.
–Remove the spark plug and a few drops of oil into the spark plug hole. Then, pull the starter gently, so that oil covers the engine inside and tighten the spark plug.
– Clear dirt or dust from the cutter blade and outside of engine, wipe them with a |
|
|
|
|
Drain fuel |
||||
|
Humidity |
|||
oil-immersed cloth and keep the machine in a place as dry as possible. |
|
|
|
|
|
|
|
Fault location
Fault |
System |
Observation |
Cause |
|
|
|
|
Engine not starting or with |
Ignition system |
Ignition spark O.K. |
Fault in fuel supply or compression system, mechanical |
difficulty |
|
|
defect |
|
|
|
|
|
|
No ignition spark |
I-O switch operated, wiring fault or short circuit, spark |
|
|
|
plug or connector defective, ignition module faulty |
|
|
|
|
|
Fuel supply |
Fuel tank filled |
Incorrect choke position, carburetor defective, fuel |
|
|
|
supply line bent or blocked, fuel dirty. |
|
|
|
|
|
Compression |
No compression when |
Cylinder bottom gasket defective, crankshaft seals |
|
|
pulled over |
damaged, cylinder or piston rings defective or improper |
|
|
|
sealing of spark plug |
|
|
|
|
|
Mechanical fault |
Starter not engaging |
Broken starter spring, broken parts inside of the engine |
|
|
|
|
Warm start problems |
|
Tank filled ignition spark |
Carburetor contaminated, must be cleaned |
|
|
existing |
|
|
|
|
|
Engine starts but dies |
Fuel supply |
Tank filled |
Incorrect idling adjustment, carburetor contaminated |
immediately |
|
|
Fuel tank vent defective, fuel supply line interrupted, |
|
|
|
|
|
|
|
cable or I-O switch faulty |
|
|
|
|
Insufficient performance |
Several systems |
Engine idling poor |
Air filter contaminated, carburetor contaminated, muffler |
|
may simultaneously |
|
clogged, exhaust duct in the cylinder clogged |
|
be affected |
|
|
|
|
|
|
17

Obrigado por selecionar o Cortador de mato da MAKITA. É com satisfação que podemos oferecer o cortador de mato da MAKITA como resultado de um longo programa de desenvolvimento e muitos anos de conhecimento e experiência.
Leia, compreenda e siga este livreto, o qual se refere em detalhes aos vários pontos que demonstrarão seu excelente desempenho. Isto irá lhe ajudar a obter o melhor resultado possível de seu Cortador de mato da MAKITA.
|
Português |
Índice |
Página |
Símbolos ..................................................................... |
18 |
Instruções de segurança........................................ |
19-22 |
Dados técnicos............................................................ |
23 |
Designação de peças.................................................. |
24 |
Montagem do motor e eixo ......................................... |
25 |
Montagem do punho ................................................... |
25 |
Montagem do protetor................................................. |
26 |
Montagem do disco do cortador.................................. |
27 |
Combustíveis/abastecimento...................................... |
28 |
Correto manuseio da máquina.................................... |
29 |
Colocação em funcionamento..................................... |
30 |
Afiação da ferramenta de corte................................... |
31 |
Programação de manutenção..................................... |
32 |
Armazenamento.......................................................... |
33 |
Símbolos
Os seguintes símbolos serão notados ao ler o manual de instruções.
Leia o manual de instruções
Tenha muito cuidado e preste atenção
Proibido
Mantenha distância
Perigo de objeto solto no ar
Proibido fumar
Proibida chama aberta
Luvas de proteção devem ser usadas
Usar botas resistentes com solas antiderrapantes. Botas de segurança com bicos de aço são recomendadas
Mantenha a área de operação livre de pessoas e animais de estimação
Use um capacete e proteção ocular e de ouvidos
Velocidade máxima permitida da ferramenta
Mistura de combustível e óleo
Início manual do motor
Parada de emergência
Primeiros socorros
Reciclagem
ON/START
Rebote |
OFF/STOP |
18
Instruções de segurança
Instruções gerais
–Para assegurar a operação correta e segura, o usuário deve ler, compreender e seguir este manual de instruções para assegurar sua familiaridade com o manuseio do cortador de mato. Os usuários insuficientemente informados correrão riscos, assim como outras pessoas devido ao manuseio inapropriado.
–Recomenda-se somente emprestar o cortador de mato a pessoas que tenham experiência comprovada com cortadores de mato.
Sempre entregue o manual de instruções.
–Os usuários que estejam utilizando pela primeira vez devem pedir ao vendedor instruções básicas para se familiarizarem com o manuseio de um cortador motorizado.
–Crianças e jovens com menos de 18 anos não devem ser permitidos a operar o cortador de mato. Pessoas acima de 16 anos podem, porém, utilizar a ferramenta para o propósito de treinamento apenas, enquanto estiverem sob supervisão direta de um instrutor qualificado.
–Utilize cortadores de mato com o maior cuidado e atenção.
–Opere o cortador de mato somente se estiver em boas condições físicas. Execute todo o trabalho com consciência e cuidado. O usuário tem que aceitar responsabilidade sobre os outros.
–Nunca utilize o cortador de mato enquanto estiver sob influência de drogas ou álcool.
–Não use a unidade quando estiver cansado.
–Guarde estas instruções para consultas futuras.
Equipamentos de proteção pessoal
–As roupas usadas devem ser funcionais e apropriadas, ou seja, devem justas, mas não devem causar qualquer impedimento. Não use jóias, roupas ou cabelos compridos que possam enroscar com mato ou arbustos.
–Para evitar ferimentos à cabeça, olhos, mãos ou pés, assim como para proteger sua audição, os seguintes equipamentos e vestimentas de proteção devem ser usados durante o uso do cortador de mato.
–Use sempre um capacete quando trabalhar na floresta. O capacete protetor
(1) deve ser verificado em intervalos regulares e ser substituído pelo menos a cada cinco anos. Use somente capacetes protetores aprovados.
–O visor (2) do capacete (ou óculos de proteção aprovados) protegem o rosto de galhos finos, pedras ou outros objetos que se soltam no ar. Durante a operação do cortador de mato, use sempre óculos de proteção ou um visor para evitar ferimentos aos olhos.
–Use equipamento de proteção anti-ruído adequado para evitar danos à audição (protetores auriculares(s), tampões de ouvido, etc.), especialmente durante longos períodos de trabalho.
–Os macacões de trabalho (4) protegem contra pedras e farpas que se soltam. Recomendamos com veemência que o usuário vista macacões de trabalho.
–Luvas especiais (5) fabricadas com couro grosso fazem parte do equipamento prescrito e devem ser sempre usadas durante a operação do cortador de mato.
–Quando utilizar o cortador de mato, use sempre sapatos (6) de segurança com sola antiderrapante. Isto protege contra ferimentos e assegura firmeza dos pés.
Colocação do cortador de mato em funcionamento
–Certifique-se de que não haja crianças ou outras pessoas dentro de uma área de trabalho de 15 metros, prestando atenção também para animais nas proximidades do trabalho.
–Antes de colocar em funcionamento, verifique se o cortador de mato está seguro para operação:
Verifique a segurança do disco do cortador. Certifique-se de que a porca de montagem do disco está firmemente segura. O acelerador deve ser verificado para ver se está com movimento fácil e sem problemas. Verifique se a trava do acelerador está funcionando corretamente. O disco do cortador não deve girar enquanto estiver ocioso.
Consulte as instruções de ajuste de marcha lenta na página 31. Verifique se os punhos estão limpos e secos e teste o funcionamento do botão ON-OFF (liga/desliga).
Mantenha os punhos limpos de óleo e combustível.
(1)
(2)
(3)
(4)
(5) |
(6) |
|
|
|
|
|
|
|
|
|
|
|
|
|
19

–Dê início ao cortador de mato somente de acordo com as instruções. Não use qualquer outro método de partida do motor!
–Utilize o cortador de mato e as ferramentas somente para as aplicações conforme especificadas.
–Dê partida ao cortador de mato somente depois que o conjunto inteiro estiver pronto. A operação do aparelho é permitida somente depois que todos os acessórios apropriados estiverem colocados!
–Antes de dar início, certifique-se de que a ferramenta de corte não está em contato com objetos duros, tais como galhos de árvore, pedras, etc. enquanto a ferramenta de corte gira na inicialização.
–O motor deve ser desligado imediatamente no caso de qualquer problema com o mesmo.
–Se a ferramenta de corte bater em pedras ou outros objetos duros, desligue imediatamente o motor e inspecione a ferramenta de corte.
–Inspecione a ferramenta de corte em intervalos regulares quanto a danos (detecção de rachaduras finas através do teste de ruído ao dar batidas).
–Opere o cortador de mato somente com a alça de ombro colocada, a qual deve estar ajustada adequadamente antes de colocar o cortador de mato em funcionamento. É fundamental ajustar a alça de ombro de acordo com o tamanho do usuário para evitar cansaço durante o uso. Nunca segure o cortador com uma mão durante o uso.
–Durante a operação, segure sempre o cortador de mato com ambas as mãos. Assegure sempre um posicionamento firme dos pés.
–Opere o cortador de mato de modo que seja evitada a inalação de gases de escape. Nunca coloque o motor em funcionamento em ambientes fechados (risco de envenenamento por gás). Monóxido de carbono é um gás sem odor.
–Desligue o motor enquanto estiver descansando e quando deixar o cortador de mato desacompanhado, e coloque-o em um lugar seguro para evitar perigos para outros ou danos à máquina.
–Nunca coloque o cortador de mato quente sobre a grama seca ou sobre materiais inflamáveis.
–A ferramenta de corte tem que ser equipada com seu protetor apropriado. Nunca coloque o cortador em funcionamento sem este protetor!
–Todas as instalações de proteção e protetores fornecidos com o aparelho devem ser usados durante o funcionamento.
–Nunca opere o motor com um silenciador de escape defeituoso.
–Desligue o motor durante o transporte.
–Durante o transporte por longas distâncias, deve-se usar sempre a proteção da ferramenta incluída com o equipamento.
–Assegure a posição segura do cortador de mato durante o transporte por carro para evitar vazamento de combustível.
–Quando despachar o cortador de mato, certifique-se de que o tanque de combustível está completamente vazio.
–Quando descarregar o cortador de mato do caminhão, nunca deixe o motor cair no chão ou isto pode danificar seriamente o tanque de combustível.
–Exceto no caso de uma emergência, nunca deixe cair ou jogue o cortador de mato no chão ou isto pode danificar seriamente o cortador de mato.
–Lembre-se de levantar todo o equipamento do chão ao carregá-lo. Arrastar o tanque de combustível é altamente perigoso e poderá causar danos e vazamento de combustível, possivelmente causando incêndio.
•Repouso
•Transporte
•Reabastecimento
•Manutenção
•Substituição da ferramenta
20
Reabastecimento
–Desligue o motor durante o reabastecimento, mantendo o equipamento longe de chamas e não fume.
–Evite o contato da pele com produtos de óleo mineral. Não inale vapor de combustível. Vista sempre luvas protetoras durante o reabastecimento. Mude e limpe roupas protetoras em intervalos regulares.
–Cuidado para não derramar combustível ou óleo para evitar contaminação do solo (proteção ambiental). Limpe o cortador de mato imediatamente depois de derramar combustível. Evite qualquer contato do combustível com sua roupa. Mude de roupa imediatamente se derramar combustível n ela (para evitar que a roupa pegue fogo).
–Inspecione a tampa do combustível em intervalos regulares, certificando-se de que foi apertada com segurança.
–Aperte cuidadosamente e não deixe vazar na tampa do tanque de combustível. Mude de local para dar partida ao motor (pelo menos 3 metros ou 10 pés de distância do local de reabastecimento).
–Nunca reabasteça em ambientes fechados. Os vapores de combustível se acumulam ao nível do chão (risco de explosão).
–Somente transporte e armazene combustível em recipientes aprovados. Certifique-se de que o combustível armazenado não é acessível por crianças.
Método de operação
3 metros (10 pés)
–Utilize somente o cortador de mato em boas condições de luminosidade e visibilidade. Durante a estação de inverto, cuidado com áreas escorregadias ou molhadas, gelo e neve (risco de escorregão). Assegure sempre um posicionamento firme dos pés.
–Nunca faça cortes acima da altura dos seus ombros.
–Nunca suba em uma escada e coloque o cortador de mato em funcionamento.
–Nunca suba em árvores para executar a operação de corte com o cortador de mato.
–Nunca trabalhe em superfícies instáveis.
–Remova areia, pedras, pregos, etc. encontrados na área se trabalho. Partículas estranhas podem danificar a ferramenta de corte e causar rebotes perigosos.
–Antes de começar o corte, a ferramenta de corte deve chegar à velocidade de trabalho máxima.
Rebote |
|
|
|
|
12 |
|
Precaução: |
||
– Quando operar o cortador de mato, pode ocorrer rebote. |
|
|||
2 |
Rebote |
|||
– Este é particularmente o caso quando a tentativa de cortar dentro de um |
|
|||
|
|
|||
segmento do disco entre 12 e 2 horas. |
|
|
|
–Nunca aplique o cortador de mato dentro de um segmento entre 12 e 2 horas.
–Nunca aplique este segmento do disco do cortador de mato a sólidos, tais como galhos e árvores, etc., tendo um diâmetro maior de 3 cm ou o cortador de mato será desviado com grande força causando o risco de ferimentos.
Diagrama
Prevenção de rebote
Para evitar rebotes, observe o seguinte:
–A operação dentro de um segmento do disco entre 12 e 2 horas apresenta perigos reais, especialmente quando utilizar ferramentas de corte de metal.
–As operações de corte dentro de um segmento do disco entre 11 e 2 horas e entre 2 e 5 horas devem ser realizadas somente por operadores treinados e experientes e somente aos seus próprios riscos.
O corte com quase nenhum rebote é possível dentro de um segmento de lâmina entre 8 e 11 horas.
Diagrama
21
 Loading...