

Page 1

REGLETA BAJO MUEBLE
CON LEDES
Instrucciones de montaje y de advertencias
de seguridad
LAMPADA SOTTOPENSILE
Istruzioni di sicurezza e montaggio
LÂMPADA DE
SUBESTRUTURA LED
Indicações de montagem e segurança
LED UNDER-CABINET LIGHT
Assembly and safety advice
LED-UNTERBAULEUCHTE
Montage- und Sicherheitshinweise
5
Z31237A
Z31237B
Page 2
ES Instrucciones de montaje
IT / MT Istruzioni di sicurezza
PT Indicações de
GB / MT Assembly and
DE / AT / CH Montage- und
y de advertencias
de seguridad Página 5
e montaggio Pagina 19
montagem
e segurança Página 32
safety advice Page 45
Sicherheitshinweise Seite 57
Page 3
Z31237B
Z31237A
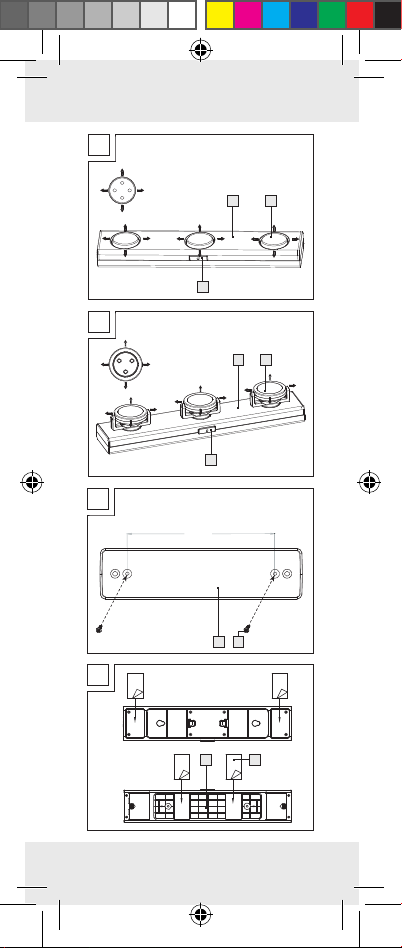
A
2
1
3
B
21
3
C
ca.14,6 cm
7
6
D
Z31237A
7 8
Z31237B
3
Page 4
7
E
F
Z31237A
3
7
Z31237B
3
4
Z31237A
Z31237B
5
4
Page 5
Introducción
Uso adecuado ..... Página 6
Descripción de
las piezas .............Página 7
Características
técnicas ................Página 7
Volumen de
suministro .............Página 8
Indicaciones
generales de
seguridad.............Página 8
Indicaciones de
seguridad sobre
las pilas .................Página 10
Utilización
Montaje ...............Página 12
Antes de la
puesta en servicio
...Página 13
Puesta en
funcionamiento ....Página 13
Encendido /
apagado de
zonas móviles ......Página 14
Cambiar las pilas ...Página 15
Limpieza y
conservación ......Página 15
Eliminación ..........Página 16
5 ES
Page 6

Regleta bajo
mueble con ledes
Introducción
Antes de usar el
producto familiarí-
cese con todas las
indicaciones de manejo y de
seguridad. Adjunte igualmente
toda la documentación en caso
de entregar el producto a terceros.
Uso adecuado
El producto no ha sido concebido para un uso comercial. El
fabricante no se hace responsable de los daños que puedan
derivarse de un uso indebido.
Este producto sólo es apto para
iluminación en espacios interiores no húmedos y para uso
privado.
6 ES
Page 7
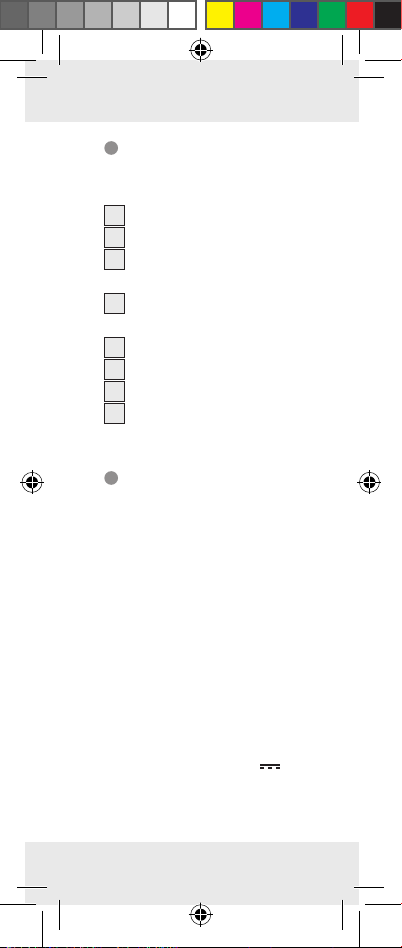
Descripción de
las piezas
1
Lámpara LED
2
Zona móvil
3
Tecla de encendido /
apagado
4
Tapa del compartimento
de la pila
5
Pila, 1,5 V, AAA
6
Tornillo (ø 3 x 10 mm)
7
Placa de montaje
8
Disco adhesivo
Características
técnicas
Lámpara: 3 zonas con
4 LED cada una
(para modelo
Z31237A) y con
3 LED cada una
(para modelo
Z31237B), cada
uno 0,06 W máx.
(Las lámparas no
son sustituibles.)
Pilas: 6 x 1,5 V
tipo AAA
,
7 ES
Page 8
Volumen de
suministro
1 Lámpara
1 Placa de montaje
6 Pilas
2 Tornillos (ø 3 x 10 mm)
2 Discos adhesivos
1 Manual de instrucciones
Indicaciones
generales de
seguridad
¡LEA LAS INSTRUCCIONES
DE USO ANTES DE UTILIZAR
EL PRODUCTO! ¡CONSERVE
CUIDADOSAMENTE LAS
INSTRUCCIONES DE USO!
Compruebe que el producto
se encuentra en perfectas
condiciones antes de ponerlo en funcionamiento.
Si el aparato está averiado
no lo utilice en ningún caso.
Aquellas personas (inclui-
dos niños) con limitaciones
físicas, sensoriales o psíquicas o sin la experiencia
8 ES
Page 9

y / o los conocimientos
suficientes sólo podrán
utilizar el aparato bajo la
supervisión de una persona
responsable de su seguridad o habiendo recibido
de esta persona las indicaciones necesarias sobre
cómo utilizar el producto.
Los niños deben ser vigilados para asegurarse de
que no jueguen con el
aparato.
Nunca utilice la lámpara
si ha detectado algún tipo
de daño.
El LED no se puede reem-
plazar.
La lámpara sólo
es apta para el
uso en interiores,
en habitaciones no húmedas y cerradas.
9 ES
Page 10
Indicaciones de
seguridad sobre
las pilas
¡ADVERTEN-
CIA! ¡PELIGRO
DE MUERTE!
No deje las pilas al alcance
de los niños. No deje las
pilas en cualquier lugar.
Los niños o animales podrían ingerirlas. En caso
de ingestión acuda inmediatamente a un médico.
¡PELIGRO DE
EXPLOSIÓN!
Nunca recargue
pilas no recargables, no
las ponga en cortocircuito
ni las abra.
¡PELIGRO DE
EXPLOSIÓN!
No arroje nunca
pilas al fuego o al agua.
Las pilas podrían explotar.
Mantenga las baterías
fuera del alcance de los
niños. No las arroje al
fuego, no las ponga en
cortocircuito ni las desmonte.
10 ES
Page 11
Evite el contacto con la
piel, ojos y mucosas. En
caso de entrar en contacto
con el ácido de las pilas
lave inmediatamente la
zona afectada con abundante agua y busque
atención médica.
Cuando fuera necesario,
limpie los contactos de las
pilas y del aparato antes
de introducirlas.
¡Cuando coloque la pila
observe la polaridad correcta! Esta está indicada
en el compartimento de
las pilas.
Utilice únicamente pilas
del mismo tipo.
Retire las pilas del aparato
si no piensa utilizarlo
durante un período de
tiempo prolongado.
Retire enseguida las pilas
gastadas del aparato.
¡Existe un alto riesgo de
sulfatación!
Evite condiciones y tempe-
raturas extremas que puedan influir sobre las pilas,
por ejemplo acercarlas a
11 ES
Page 12
un radiador. En caso contrario existe un elevado
riesgo de sulfatación de
la pila.
De no observarse estas
indicaciones de seguridad,
las baterías podrían descargarse más allá de su
tensión final. En este caso
existe riesgo de sulfatación.
¡Si se derrama el líquido
de las pilas dentro del
aparato, sáquelas inmediatamente para evitar
daños en el aparato!
¡Las pilas no deben
desecharse junto con la
basura doméstica!
Todo usuario está obligado
a desechar las pilas adecuadamente.
Utilización
Montaje
Fije la placa de montaje
7
con ayuda de los
tornillos
6
o los discos
adhesivos facilitados
12 ES
8
Page 13
sobre un tablero liso. Para
ello siga las ilustraciones
C o D respectivamente.
Ponga los corchetes en la
parte inferior de la lámpara LED
de montaje y desplace
hacia un lado la lámpara
LED hasta el tope como se
muestra en la ilustración E.
1
sobre la placa
Antes de la
puesta en servicio
Las pilas 5 vienen montadas
de fábrica.
Saque las tiras aislantes
que sobresalen de ambos
compartimentos para las
baterías.
Puesta en
funcionamiento
Tanto para el modelo Z31237A
como para el modelo Z31237B
las zonas móviles pueden
colocarse en una inclinación
2
13 ES
Page 14
aproximada de 45° (ver ilustración A o B).
Encendido /
apagado de
zonas móviles
Puede manejar la lámpara LED
1
mediante la tecla de
encendido / apagado
interruptor tiene tres funciones:
Pulse la tecla encendido /
apagado una vez: La
lámpara se ilumina con mayor
intensidad.
Pulse la tecla encendido /
apagado otra vez: La
lámpara se ilumina con menor
intensidad.
Pulse la tecla encendido /
apagado otra vez: La
lámpara se apaga.
3
. El
14 ES
Page 15
Cambiar las pilas
Desplace la placa de
montaje
soporte. En el centro de la
parte trasera de la lámpara
LED se encuentran dos
compartimentos de pilas
(ver ilustración F).
Presione suavemente el
tirador del compartimento
de la pila hacia el mismo
compartimento y levante
la tapa
Coloque las pilas en el
compartimento según las
marcas.
Cierre el compartimento
colocando de nuevo la
tapa.
Ejerza una ligera presión
hasta que el tirador encaje.
7
y sáquela del
4
para abrirlo.
Limpieza y
conservación
Para la limpieza y cuidado
utilice un paño seco, suave
y sin pelusas. En caso de
suciedad persistente, utilice
15 ES
Page 16
un paño sin pelusas ligeramente humedecido y un
detergente suave.
Eliminación
El embalaje se compone de materiales
que respetan el medio ambiente. Deséchelos en
los contenedores de reciclaje
locales.
Para obtener información
sobre las posibles formas de
deshacerse del producto cuando
ya no sirva, acuda a la administración de su comunidad o
ciudad.
En beneficio del
medio ambiente,
cuando el producto
ya no le sea útil, no lo arroje a
la basura doméstica y deséchelo
correctamente.
Diríjase a la administración
competente para obtener información sobre los puestos
16 ES
Page 17
de recogida de residuos y sus
horarios.
Las pilas defectuosas o usadas
deben ser recicladas según lo
indicado en la directiva
2006 / 66 / EC. Para ello
evuelva las pilas y / o el aparato en los puntos de recogida
indicados.
¡Daños
medioambien-
Pb
tales debidos a
un reciclaje
incorrecto de
las pilas!
Las pilas no deben desecharse
junto con los residuos domésticos. Estos pueden contener
metales pesados tóxicos que
deben tratarse conforme a la
normativa aplicable a los residuos especiales. Los símbolos
químicos de los metales pesados son: Cd = cadmio, Hg =
mercurio, Pb = plomo. Las
pilas deben reciclarse en un
punto de recolección específico
para ello.
17 ES
Page 18
EMC
18 ES
Page 19
Introduzione
Utilizzo secondo
la destinazione
d’uso ................... Pagina 20
Descrizione dei
componenti ......... Pagina 21
Dati tecnici .......... Pagina 21
Fornitura .............. Pagina 22
Avvertenze
generali di
sicurezza ............. Pagina 22
Avvertenze di
sicurezza per
le batterie ........... Pagina 23
Utilizzo
Montaggio.......... Pagina 26
Prima della
messa in funzione
Messa in funzione
... Pagina 27
... Pagina 27
Accensione /
Spegnimento
lampadine spot ... Pagina 28
Sostituzione
delle batterie ...... Pagina 28
Pulizia e
manutenzione ... Pagina 29
Smaltimento ...... Pagina 30
19 IT/MT
Page 20
Lampada sottopensile
Introduzione
Leggere attentamente tutte le indi-
cazioni importanti
per la sicurezza, lo smaltimento
e l‘uso del prodotto. In caso di
cessione del prodotto a terzi,
consegnare anche l‘intera
documentazione del prodotto.
Utilizzo secondo
la destinazione
d’uso
Il prodotto non è destinato
all‘uso professionale. Il costruttore non si assume alcuna
responsabilità per eventuali
danni causati da un impiego
non conforme alla destinazione
d‘uso. Questo prodotto è
destinato esclusivamente all’illuminazione in ambienti interni
privati asciutti.
20 IT/MT
Page 21
Descrizione dei
componenti
1
Lampada LED
2
Lampadina spot mobile
3
Tasto On / Off
4
Coperchio del vano porta-
batteria
5
Batteria, 1,5 V, AAA
6
Vite (ø 3 x 10 mm)
7
Piastra di montaggio
8
Tampone adesivo
Dati tecnici
Lampadine: 3 Spots, ognuna
dotata di 4 LED
(per il modello
Z31237A) e
ognuna con 3 LED
(per il modello
Z31237B) di max.
0,06 W (le lampadine non sono
sostituibili.)
Batterie: 6 x 1,5 V
tipo AAA
,
21 IT/MT
Page 22
Fornitura
1 Lampada
1 Piastra di montaggio
6 Batterie
2 Viti (ø 3 x 10 mm)
2 Tamponi adesivi
1 Manuali d‘istruzioni d’uso
Avvertenze
generali di
sicurezza
LEGGERE LE ISTRUZIONI
PRIMA DELL‘USO! CONSERVARE CON CURA LE ISTRUZIONI D‘USO!
Prima dell‘uso, controllare
che il prodotto non sia
danneggiato. Non mettete
in nessun caso in funzione
un apparecchio danneggiato.
L‘utilizzo di questo articolo
non è indicato a persone
(ivi inclusi bambini) con
capacità fisiche, sensoriali
o mentali limitate. Il prodotto non può inoltre essere
22 IT/MT
Page 23

utilizzato da persone che
non conoscono il suo
funzionamento. In questo
caso, una persona responsabile per la sicurezza deve
supervisionare o dare indicazioni su come il prodotto
debba essere utilizzato. I
bambini devono essere
sorvegliati per impedire che
giochino con l’apparecchio.
Non utilizzare mai la lam-
pada se si rilevano eventuali danni.
I LED non possono essere
sostituiti.
La lampada è
destinata esclu-
sivamente all‘utilizzo in locali interni e in
ambienti asciutti e chiusi.
Avvertenze di
sicurezza per
le batterie
AVVISO! AT-
TENZIONE!
PERICOLO DI
MORTE! Le batterie vanno
23 IT/MT
Page 24

tenute fuori dalla portata
dei bambini. Non lasciare
batterie in giro. Sussiste il
pericolo che bambini o
animali domestici le ingoino
In tal caso, consultare
subito un medico.
PERICOLO DI
ESPLOSIONE
Non ricaricare
mai batterie non ricaricabili, non cortocircuitarle
e / o aprirle.
PERICOLO DI
ESPLOSIONE
Non gettare mai
le batterie nel fuoco o in
acqua. Le batterie potrebbero esplodere.
Tenere le batterie lontano
dalla portata dei bambini,
non gettarle nel fuoco, non
cortocircuitarle e non smontarle.
Evitare il contatto con pelle,
occhi e mucose. In caso di
contatto con gli acidi della
batteria sciacquare
abbondantemente le aree
coinvolte con acqua limpida
.
!
!
24 IT/MT
Page 25

e contattare immediatamente un medico.
Se necessario, pulire i
contatti della batteria e
dell’apparecchio prima di
inserire le batterie.
Prestare attenzione alla
polarità corretta quando
vengono inserite le batterie!
Questa viene indicata sullo
scompartimento batteria.
Utilizzare solamente batterie
dello
stesso tipo.
Rimuovere dall’apparecchio
le batterie non utilizzate
per parecchio tempo.
Rimuovere immediatamente
dall‘apparecchio le batterie
usate. Persiste un elevato
pericolo di perdite!
Evitare condizioni e tem-
perature estreme che potrebbero avere influenza
sulle batterie, quali ad
esempio caloriferi. In caso
contrario sussiste il pericolo
di perdite.
In caso di inosservanza
delle avvertenze di sicurezza, le batterie potrebbero scaricarsi oltre la
25 IT/MT
Page 26

tensione finale. Persiste il
pericolo di perdite.
Se le batterie del vostro
apparecchio dovessero
aver subito perdite, estrarle
immediatamente al fine di
evitare danni all‘apparecchio!
Non smaltire le batteria
con i rifiuti domestici!
Ogni consumatore per
legge ha l’obbligo di smaltire in maniera corretta le
batterie.
Utilizzo
Montaggio
Fissare la piastra di mon-
7
taggio
delle viti in dotazione
o dei tamponi adesivi
su una piastra di legno
piana. A tale scopo, procedere come illustrato
nelle figure C o D.
Inserire gli occhielli della
parte inferiore della lampada a LED
con l‘impiego
1
snela
6
8
26 IT/MT
Page 27

piastra di montaggio e far
scorrere la lampada lateralmente fino al bloccaggio
come rappresentato nella
figura E.
Prima della
messa in funzione
Le batterie 5 sono già state
inserite in fabbrica.
Rimuovere la striscia iso-
lante da entrambi i vani
batteria.
Messa in funzione
Sia per il modello Z31237A
sia per Z31237B è possibile
spostare le lampadine spot
2
mobili
di ca. 45° (vedi fig. A o B).
con un‘inclinazione
27 IT/MT
Page 28

Accensione/
Spegnimento
lampadine spot
Utilizzare la lampada a LED 1
tramite il tasto di accensione /
spegnimento 3. Il tasto dispone
di tre funzioni:
Premere una volta il
tasto ON / OFF: La lampada
emana un‘intensità di luce più
elevata.
Premere di nuovo il tasto
ON / OFF: La lampada emana
un‘intensità di luce più bassa.
Premere di nuovo il tasto
ON/OFF: La lampada si
spegne.
Sostituzione
delle batterie
Far scorrere la piastra di
montaggio
dal supporto. Al centro
della parte posteriore della
lampada a LED sono posi-
7
e toglierla
28 IT/MT
Page 29

zionati due vani portabatteria (vedi fig. F).
Premere con cautela la
levetta del vano portabatteria verso il comparto
batteria e sollevare il
coperchio
vano portabatteria.
Inserire le batterie come
illustrato nel vano batterie.
Chiudere il vano batteria
ponendo nuovamente il
coperchio del vano portabatterie sul vano batterie.
Esercitare una leggera
pressione fino allo scatto
della levetta.
4
per aprire il
Pulizia e
manutenzione
Per la pulizia e la manu-
tenzione utilizzare un
panno asciutto, morbido e
senza pelucchi. In caso di
notevole sporcizia, utilizzare un panno leggermente
inumidito e del detergente
delicato.
29 IT/MT
Page 30

Smaltimento
L’imballaggio consta
esclusivamente di
materiali ecologici.
Gettare questi rifiuti nei contenitori locali di riciclaggio.
Potete informarvi sulle possibilità di smaltimento del prodotto
utilizzato presso l‘amministrazione comunale o cittadina.
Non gettare il pro-
dotto usurato tra i
rifiuti domestici ma,
per motivi di tutela dell‘ambiente,
provvedere al suo corretto
smaltimento.
Per conoscere gli orari di
accesso e i centri di raccolta
rivolgersi all‘amministrazione
locale competente in materia.
Le batterie difettose o esauste
devono essere riciclate ai sensi
della Direttiva 2006 / 66 / EC.
Smaltire le batterie e / o l’apparecchio presso i punti di
raccolta indicati.
30 IT/MT
Page 31

Danni all’am-
biente a causa
Pb.
di uno smaltimento erroneo
delle batterie!
Le batterie non devono essere
smaltite nei rifiuti domestici. Esse
possono contenere una varietà
di metalli pesanti tossici da
smaltire come rifiuti tossici. I
simboli chimici dei metalli
pesanti sono i seguenti: Cd =
Cadmio, Hg = mercurio, Pb =
piombo. Consegnare quindi le
batterie usate presso un punto
di raccolta comunale.
EMC
31 IT/MT
Page 32

Introdução
Utilização
adequada ........... Página 33
Descrição das
peças .................. Página 34
Dados técnicos ... Página 34
Material
fornecido ............ Página 35
Indicações gerais
de segurança ..... Página 35
Indicações de
segurança
para as pilhas ... Página 36
Utilização
Montagem .......... Página 39
Antes da
colocação em
funcionamento .... Página 40
Colocação em
funcionamento .... Página 40
Ligar / desligar
os focos móveis ... Página 40
Substituir as
pilhas................... Página 41
Limpeza e
conservação ...... Página 42
Eliminação .......... Página 43
32 PT
Page 33

Lâmpada de
subestrutura LED
Introdução
Familiarize-se com
todas as indicações
de utilização e de
segurança do artigo. Se transmitir o produto a terceiros, entregue também os respectivos
documentos.
Utilização
adequada
Este produto não se destina à
utilização comercial. O fabricante não assume qualquer
responsabilidade por danos
resultantes de uma utilização
incorrecta. Este produto destina-
-se exclusivamente à iluminação
de espaços interiores secos e
ao uso privado.
33 PT
Page 34

Descrição
das peças
1
Lâmpada LED
2
Focos móveis
3
Botão para Ligar / Desligar
4
Tampa do compartimento
das pilhas
5
Pilhas, 1,5 V, AAA
6
Parafuso (ø 3 x 10 mm)
7
Placa de montagem
8
Disco adesivo
Dados técnicos
Lâmpada: 3 focos com
respetivamente
4 LED (para modelo Z31237A)
e com respetivamente 3 LED (para
modelo Z31237B
a, no máximo,
0,06 W (As
lâmpadas não
podem ser substituídas.)
Pilhas: 6 x 1,5 V
Tipo AAA
)
,
34 PT
Page 35

Material
fornecido
1 lâmpada
1 placa de montagem
6 pilhas
2 parafusos (ø 3 x 10 mm)
2 discos adesivos
1 manual de instruções
Indicações
gerais de
segurança
ANTES DE UTILIZAR, LEIA O
MANUAL DE INSTRUÇÕES!
CONSERVE CUIDADOSAMENTE O MANUAL DE INSTRUÇÕES!
Antes da colocação em
funcionamento
produto quanto a danos.
Nunca coloque um produto
danificado em funcionamento.
Este aparelho não deve
ser utilizado por pessoas
(incluindo crianças) com
capacidades físicas,
, verifique o
35 PT
Page 36

sensoriais ou mentais
limitadas ou pessoas sem
experiência e/ou conhecimento, a não ser que estas
sejam supervicionadas por
alguém responsável pela
segurança ou deste recebam instruções acerca do
funcionamento do aparelho.
As crianças têm que ser
vigiadas para evitar que
brinquem com o aparelho.
Nunca utilize a sua lâm-
pada quando detectar
danos.
A LED não pode ser subs-
tituída.
A lâmpada
destina-se ex-
clusivamente à
utilização no interior e em
espaços secos e fechados.
Indicações de
segurança para
as pilhas
AVISO!
PERIGO DE
MORTE! As
36 PT
Page 37

pilhas não devem ser
manuseadas por crianças.
Não deixe as pilhas espalhadas. Existe o perigo de
serem engolidas por crianças ou animais de estimação. Se isso acontecer,
consulte imediatamente
um médico.
PERIGO DE
EXPLOSÃO!
Nunca recarregue pilhas não recarregáveis, não provoque curtocircuito nem as abra.
PERIGO DE
EXPLOSÃO!
Nunca atire as
pilhas para o fogo ou para
a água. As pilhas podem
explodir.
Mantenha as pilhas afas-
tadas de crianças, não as
atire para o fogo, não as
curto-circuite nem as desmonte.
Evite o contacto com a
pele, olhos e mucosas. Em
caso de contacto com o
ácido da pilha, lave imediatamente a zona afectada
37 PT
Page 38

com ág
ua limpa abundante
e consulte um médico.
Se necessário, limpe os
contactos das pilhas e do
aparelho antes da sua
colocação.
Ao colocar as pilhas,
tenha em atenção a polaridade correta! Esta é indicada no compartimento
das pilhas.
Utilize apenas pilhas do
mesmo tipo.
Retire as pilhas do apare-
lho, se este não for utilizado
durante muito tempo.
Remova de imediato as
pilhas usadas do aparelho.
Existe um elevado risco de
derrame!
Evite condições e tempe-
raturas extremas que possam ter efeito sobre as
pilhas, por ex. em
elementos térmicos. Caso contrário,
existe elevado risco de
derrame.
No caso de desrespeito
das indicações de segurança, as pilhas podem
ficar descarregadas para
38 PT
Page 39

além da sua tensão final.
Neste caso, existe perigo
de derrame.
Caso as pilhas do seu
aparelho comecem a derramar dentro deste, retire-as
imediatamente, de forma a
evitar danos no aparelho!
As pilhas não devem ser
depositadas no lixo doméstico!
Cada consumidor é legal-
mente obrigado a eliminar
corretamente as pilhas!
Utilização
Montagem
Fixe a placa de montagem
7
mediante os parafusos
fornecidos
adesivos fornecidos
cima de um painel plano.
Para tal, siga as figuras C
ou D.
Encaixe os olhais na parte
inferior da lâmpada LED
1
e desloque a lâmpada
6
ou os discos
8
em
na placa de montagem
39 PT
Page 40

LED lateralmente para engatar como apresentado
na figura E.
Antes da colocação
em funcionamento
As pilhas 5 já foram colocadas na fábrica.
Retire as riscas de isola-
mento que saiam dos dois
compartimentos das pilhas.
Colocação em
funcionamento
Tanto para o modelo Z31237A
como também para o modelo
Z31237B, os focos móveis
podem ser inclinados em
aprox. 45° (ver Fig. A ou B).
2
Ligar / desligar
os focos móveis
Pode operar a lâmpada LED
1
através do botão para
40 PT
Page 41

ligar / desligar 3. A tecla
possui três funções:
Prima a tecla para ligar/
desligar uma vez: A lâm-
pada ilumina com forte intensidade luminosa.
Voltar a premir a tecla
para ligar / desligar: A
lâmpada ilumina com baixa
intensidade luminosa.
Voltar a premir a tecla
para ligar / desligar:
Desliga a lâmpada.
Substituir as
pilhas
Empurre a placa de mon-
7
tagem
do suporte. No meio da
parte traseira da lâmpada
LED encontram-se dois
compartimentos das pilhas
(ver Fig. F).
Prima ligeiramente o res-
petivo punho do compartimento das pilhas em
e retire-a depois
41 PT
Page 42

direção do compartimento
das pilhas e levante a
tampa do compartimento
das pilhas
Coloque as pilhas de
acordo com a sinalização
no compartimento das
pilhas.
Feche o compartimento
das pilhas colocando
novamente a tampa neste
mesmo.
Exerça uma pressão ligeira
até que o punho volta a
engatar.
4
para abri-lo.
Limpeza e
conservação
Para limpar e conservar,
utilize um pano seco, macio e que não desfie. Em
caso de maior sujidade,
utilize um pano ligeiramente humedecido e um
produto de limpeza suave.
42 PT
Page 43

Eliminação
A embalagem é
constituída por materiais recicláveis.
Elimine-a nos ecopontos locais.
Pode obter informações relativas à eliminação do produto
usado através dos responsáveis legais pela reciclagem.
Não deposite o
produto utilizado no
lixo doméstico, a
favor da proteção
Elimine
-o de forma responsável.
Pode informar-se no seu
município sobre os locais de
recolha adequados e o seu
período de funcionamento.
As pilhas avariadas ou gastas
têm de ser recicladas de acordo
com a diretiva 2006 / 66 / EC.
Entregue as pilhas e / ou o
aparelho nos locais específicos destinados à sua recolha.
do ambiente.
43 PT
Page 44

Danos ambien-
tais devido à
Pb
eliminação
incorreta das
pilhas!
As pilhas não podem ser eliminadas no lixo doméstico. Podem
conter metais pesados nocivos
e estão sujeitas à regulação
de lixos tóxicos. Os símbolos
químicos dos metais pesados
são os seguintes: Cd = cádmio,
Hg = mercúrio, Pb = chumbo.
Como tal, deposite as pilhas
utilizadas num ponto de recolha
adequado do seu município.
EMC
44 PT
Page 45

Introduction
Intended use ..........Page 46
Parts description ....Page 46
Technical data .......Page 47
Contents .................Page 47
General Safety
Information ...........Page 48
Battery safety
information ...........Page 49
Use
Installation .............Page 51
Before use ..............Page 52
Start-up ...................Page 52
Switching swivel
spots on / off ..........Page 53
Replacing
batteries .................Page 53
Cleaning and
Care ..........................Page 54
Disposal ..................Page 54
45 GB/MT
Page 46

LED Under-cabinet
light
Introduction
Before using the
product, please
familiarise yourself
with all of the safety information and instructions for use.
When passing this product on
to others, please also include
all the documents.
Intended use
The product is not intended for
commercial use. The manufacturer is not liable for damage
caused by improper use. This
product is only suitable for
private use to illuminate dry
indoor rooms.
Parts description
1
LED light
2
Swivel spotlight
46 GB/MT
Page 47

3
On / Off switch
4
Battery compartment cover
5
Battery, 1.5 V, AAA
6
Screw (ø 3 x 10 mm)
7
Mounting plate
8
Self-adhesive pad
Technical data
Light bulb: 3 spots, each with
4 LED (for model
Z31237A) and
each with 3 LED
(for model
Z31237B), max.
0.06 W each (LEDs
not replaceable)
Batteries: 6 x 1.5 V
,
type AAA
Contents
1 Lamp
1 Mounting plate
6 Batteries
2 Screws (ø 3 x 10 mm)
2 Self-adhesive pads
1 Instructions for use
47 GB/MT
Page 48

General
Safety
Information
PLEASE READ THE INSTRUCTIONS PRIOR TO USE!
PLEASE KEEP THE INSTRUCTIONS FOR USE IN A SAFE
PLACE!
Check the product for
damage before use. Never
use a damaged product.
This product is not intended
for use by individuals
(including children) with
limited physical sensory or
mental capacity, or lacking
experience and / or skills
unless supervised by an
individual responsible for
their safety, or after being
instructed on product use.
Supervise children to ensure they do not play with
the product.
Never use the light if any
defects have been identified.
LED cannot be replaced.
48 GB/MT
Page 49

indoor spaces.
This light is solely
suitable for use
in dry, closed
Battery safety
information
WARNING!
RISK OF
FATAL INJU-
RIES! Batteries are not
intended for children. Do
not leave batteries lying
around. They may otherwise be swallowed by children or pets. If accidentally
swallowed seek immediate
medical attention.
EXPLOSION
HAZARD!
Never recharge
non-rechargeable batteries,
short-circuit and / or open
batteries.
EXPLOSION
HAZARD!
Never throw
batteries into fire or water.
49 GB/MT
Page 50

The batteries may otherwise explode.
Keep batteries away from
children; do not throw into
fire, short-circuit or take them
apart.
Avoid contact with the skin,
eyes and mucous membranes. In the event of
contact with battery acid,
thoroughly flush the affected
area with clean water and
seek immediate medical
attention.
If necessary, clean the bat-
teries and device contacts
before inserting batteries.
When inserting the battery
ensure the correct polarity!
This is indicated in the
battery compartment.
Only use the same type of
batteries.
Remove batteries from the
device after extended
periods of non-use.
Promptly remove drained
batteries from the product.
There is an increased risk
of leaks!
50 GB/MT
Page 51

Avoid extreme conditions
and temperatures which
may impact batteries, e.g
on radiators. Otherwise
there is an increased risk
of leaking.
Failure to follow safety
instructions may drain
batteries beyond their end
voltage. This will then pose
a risk of leaking.
If the batteries have leaked
inside the product, please
remove them immediately
to prevent product damage!
Batteries do not belong in
household refuse!
The law requires every
consumer to properly
dispose of batteries.
Use
Installation
Secure the mounting plate
7
to a level wooden sur-
8
included.
6
or
face using the screws
adhesive pads
51 GB/MT
Page 52

Refer to figures C or D,
respectively.
Place the eyes on the bot-
tom part of the LED light
onto the mounting plate
and latch in the LED light,
sliding it sideways as illustrated in Figure E.
Before use
The batteries 5 are factory
installed.
Pull the two insulating strips
out of the two battery
compartments to activate.
Start-up
For both model Z31237A and
Z31237B, the swivel spotlights
2
can be tilted approx. 45°
in any direction (see Fig. A or B).
1
52 GB/MT
Page 53

Switching swivel
spots on / off
The LED light 1 is controlled
using the On / Off switch
This button has three settings:
Press on / off switch
once: high light output.
Press on / off switch
again: low light output.
Press the on / off switch
again: turns the light off.
3
Replacing
batteries
Slide the mounting plate
7
and remove from the
bracket. There are two
battery compartments at
the rear centre of the LED
light (see Fig. F).
Press the handle on the
battery compartment slightly
toward the compartment
and lift the battery
.
53 GB/MT
Page 54

compartment cover 4 to
open the battery compartment.
Insert batteries in the com-
partment as indicated.
Replace the battery cover
to close the battery compartment.
Apply light pressure until
the handle locks in again.
Cleaning and Care
Use a dry, soft and lint-free
cloth for cleaning and care.
Use a slightly dampened
cloth and a mild detergent
to remove stubborn dirt.
Disposal
The packaging is
made from ecofriendly materials.
Dispose of packaging through
municipal recycling containers.
54 GB/MT
Page 55

Contact your municipality for
information on how to dispose
of the worn-out product.
To protect the environment, please do
not dispose of the
Worn-out product in your
household waste, but dispose
of properly.
Contact your municipality for
information regarding collection
facilities and their opening
hours.
Defective or used batteries must
be recycled in accordance
with Directive 2006 / 66 / CE.
Return batteries and / or the
device to the recycling facilities
offered.
Environmental
damage due to
Pb
improper bat-
tery disposal!
Never dispose of batteries in
your household waste. They
may contain toxic heavy metals
55 GB/MT
Page 56

and are subject to hazardous
waste regulations. The chemical
symbols of the heavy metals
are: Cd = cadmium, Hg =
mercury, Pb = lead. Therefore
dispose of used batteries through
your municipal collection site.
EMC
56 GB/MT
Page 57

Einleitung
Bestimmungsgemäße
Verwendung ...........Seite 58
Teilebeschreibung ...Seite 59
Technische Daten ...Seite 59
Lieferumfang ...........Seite 60
Allgemeine
Sicherheits-
hinweise ..............Seite 60
Sicherheitshinweise für
Batterien .............Seite 62
Gebrauch
Montage .................Seite 65
Vor der Inbetrieb-
nahme .....................Seite 65
Inbetriebnahme ......Seite 66
Bewegliche Spots
ein- / ausschalten ....Seite 66
Batterien wechseln ...Seite 67
Reinigung und
Pflege.....................Seite 68
Entsorgung ........Seite 68
57 DE/AT/CH
Page 58

LEDUnterbauleuchte
Einleitung
Machen Sie sich
vor der ersten Be-
nutzung des Produkts
mit allen Bedien- und Sicherheitshinweisen vertraut. Händigen Sie alle Unterlagen bei
Weitergabe des Produkts an
Dritte ebenfalls mit aus.
Bestimmungs-
gemäße
Verwendung
Das Produkt ist nicht für den
gewerblichen Einsatz bestimmt.
Für aus bestimmungswidriger
Verwendung entstandene
Schäden übernimmt der Hersteller keine Haftung. Dieses
Produkt ist ausschließlich zur
Beleuchtung in trockenen Innenräumen für den privaten
Einsatz geeignet.
58 DE/AT/CH
Page 59

Teile-
beschreibung
1
LED-Leuchte
2
beweglicher Spot
3
Ein- / Aus-Taste
4
Batteriefachdeckel
5
Batterie, 1,5 V, AAA
6
Schraube (ø 3 x 10 mm)
7
Montageplatte
8
Klebepad
Technische Daten
Leuchtmittel: 3 Spots, mit je
4 LED (für Modell
Z31237A) und
mit je 3 LED (für
Modell Z31237B)
à max. 0,06 W
(Die Leuchtmittel
sind nicht austauschbar.)
Batterien: 6 x 1,5 V
Typ AAA
,
59 DE/AT/CH
Page 60

Lieferumfang
1 Leuchte
1 Montageplatte
6 Batterien
2 Schrauben (ø 3 x 10 mm)
2 Klebepads
1 Bedienungsanleitung
Allgemeine
Sicherheits-
hinweise
VOR GEBRAUCH BITTE DIE
BEDIENUNGSANLEITUNG
LESEN! BEDIENUNGSANLEITUNG BITTE SORGFÄLTIG
AUFBEWAHREN!
Kontrollieren Sie das Produkt
vor der Inbetriebnahme
auf Beschädigungen.
Nehmen Sie ein beschädigtes Produkt nicht in
Betrieb.
Dieses Gerät ist nicht da-
für bestimmt, durch Personen (einschließlich Kinder)
mit eingeschränkten physischen, sensorischen oder
60 DE/AT/CH
Page 61

geistigen Fähigkeiten oder
mangels Erfahrung und /
oder mangels Wissen benutzt zu werden, es sei
denn, sie werden durch
eine für ihre Sicherheit
zuständige Person beaufsichtigt oder erhielten von
ihr Anweisungen, wie das
Gerät zu benutzen ist. Kinder sollten beaufsichtigt
werden, um sicherzustellen, dass sie nicht mit dem
Gerät spielen.
Benutzen Sie Ihre Leuchte
niemals, wenn Sie irgendwelche Beschädigungen
feststellen.
LED kann nicht ersetzt
werden.
Die Leuchte ist
ausschließlich
für den Betrieb
im Innenbereich, in trockenen und geschlossenen
Räumen geeignet.
61 DE/AT/CH
Page 62

Sicherheits-
hinweise für
Batterien
WARNUNG!
LEBENSGEFAHR! Batte-
rien gehören nicht in
Kinderhände. Lassen Sie
Batterien nicht herumliegen.
Es besteht die Gefahr, dass
diese von Kindern oder
Haustieren verschluckt
werden. Suchen Sie im
Falle eines Verschluckens
sofort einen Arzt auf.
EXPLOSI-
ONSGEFAHR! Laden
Sie nicht aufladbare Batterien niemals wieder auf,
schließen Sie sie nicht
kurz und / oder öffnen Sie
sie nicht.
EXPLOSI-
ONSGEFAHR! Werfen
Sie Batterien niemals in
Feuer oder Wasser. Die
Batterien können explodieren.
62 DE/AT/CH
Page 63

Halten Sie Batterien von
Kindern fern, werfen Sie
Batterien nicht ins Feuer,
schließen Sie Batterien
nicht kurz und nehmen Sie
sie nicht auseinander.
Vermeiden Sie den Kon-
takt mit Haut, Augen und
Schleimhäuten. Spülen Sie
bei Kontakt mit Batteriesäure die betroffenen Stellen sofort mit reichlich
klarem Wasser und suchen Sie umgehend einen
Arzt auf.
Reinigen Sie Batterie- und
Gerätekontakt vor dem
Einlegen falls erforderlich.
Achten Sie beim Einlegen
auf die richtige Polarität!
Diese wird im Batteriefach
angezeigt.
Verwenden Sie nur Batte-
rien des gleichen Typs.
Entfernen Sie die Batte-
rien, wenn sie längere Zeit
nicht verwendet worden
sind, aus dem Gerät.
Entfernen Sie verbrauchte
Batterien umgehend aus
63 DE/AT/CH
Page 64

dem Gerät. Es besteht
erhöhte Auslaufgefahr!
Vermeiden Sie extreme
Bedingungen und Temperaturen, die auf Batterien
einwirken können z. B. auf
Heizkörpern. Andernfalls
besteht erhöhte Auslaufgefahr.
Bei Nichtbeachtung der
Sicherheitshinweise können die Batterien über ihre
Endspannung hinaus entladen werden. Es besteht
dann die Gefahr des Auslaufens.
Falls die Batterien in Ihrem
Gerät ausgelaufen sein
sollten, entnehmen Sie
diese sofort, um Schäden
am Gerät vorzubeugen!
Batterien gehören nicht in
den Hausmüll!
Jeder Verbraucher ist ge-
setzlich verpflichtet, Batterien ordnungsgemäß zu
entsorgen.
64 DE/AT/CH
Page 65

Gebrauch
Montage
Befestigen Sie die Monta-
geplatte
beiliegenden Schrauben
oder der beiliegenden
Klebepads
ebenen Holzplatte. Folgen
Sie hierzu den Abbildungen C bzw. D.
Stecken Sie die Ösen im
Unterteil der LED-Leuchte
und schieben Sie die LEDLeuchte zur Arretierung
seitwärts wie in Abbildung
E dargestellt.
7
mittels der
8
auf einer
1
auf die Montageplatte
Vor der
Inbetriebnahme
Die Batterien 5 sind bereits
werksseitig eingelegt.
Ziehen Sie die Isolations-
streifen heraus, die aus
beiden Batteriefächern
ragen.
6
65 DE/AT/CH
Page 66

Inbetriebnahme
Sowohl für Modell Z31237A
als auch für Modell Z31237B
können die beweglichen Spots
2
um ca. 45° in der Neigung
verstellt werden (siehe Abb. A
oder B).
Bewegliche Spots
ein- / ausschalten
Sie können die LED-Leuchte 1
über die Ein- / Aus-Taste
bedienen. Die Taste verfügt
über drei Funktionen:
Drücken Sie die
Ein- / Aus-Taste einmal:
Die Leuchte strahlt mit hoher
Leuchtkraft.
Drücken Sie die
Ein- / Aus-Taste erneut:
Die Leuchte strahlt mit niedriger Leuchtkraft.
3
Drücken Sie die
Ein- / Aus-Taste erneut:
Sie schalten die Leuchte aus.
66 DE/AT/CH
Page 67

Batterien
wechseln
Schieben Sie die Montage-
7
platte
sie dann aus der Halterung.
In der Mitte der Rückseite
der LED-Leuchte befinden
sich zwei Batteriefächer
(s. Abb. F).
Drücken Sie jeweils den
Griff des Batteriefachs
leicht in Richtung des Batteriefachs und heben Sie
den Batteriefachdeckel
an, um das Batteriefach
zu öffnen.
Legen Sie die Batterien
gemäß der Kennzeichnung
in das Batteriefach ein.
Schließen Sie das Batterie-
fach, indem Sie den Batteriefachdeckel wieder auf
das Batteriefach setzen.
Üben Sie leichten Druck
aus, bis der Griff wieder
einrastet.
und nehmen Sie
4
67 DE/AT/CH
Page 68

Reinigung und
Pflege
Verwenden Sie zur Reini-
gung und Pflege ein trockenes, weiches,
fusselfreies Tuch. Verwenden Sie bei stärkerer Verschmutzung ein leicht
angefeuchtetes Tuch und
mildes Spülmittel.
Entsorgung
Die Verpackung
besteht aus umwelt-
freundlichen Materialien. Entsorgen Sie diese in
den örtlichen Recyclingbehältern.
Möglichkeiten zur Entsorgung
des ausgedienten Produktes
erfahren Sie bei Ihrer Gemeinde- oder Stadtverwaltung.
68 DE/AT/CH
Werfen Sie Ihr
Produkt, wenn es
ausgedient hat, im
Page 69

Interesse des Umweltschutzes
nicht in den Hausmüll, sondern
führen Sie es einer fachgerechten Entsorgung zu.
Über Sammelstellen und deren
Öffnungszeiten können Sie
sich bei Ihrer zuständigen
Verwaltung informieren.
Defekte oder verbrauchte Batterien müssen gemäß Richtlinie
2006 / 66 / EC recycelt werden. Geben Sie Batterien
und / oder das Gerät über die
angebotenen Sammeleinrichtungen zurück.
Umweltschäden
durch falsche
Pb
Entsorgung der
Batterien!
Batterien dürfen nicht über den
Hausmüll entsorgt werden. Sie
können giftige Schwermetalle
enthalten und unterliegen der
Sondermüllbehandlung. Die
chemischen Symbole der
Schwermetalle sind wie folgt:
Cd = Cadmium, Hg =
69 DE/AT/CH
Page 70

Quecksilber, Pb = Blei. Geben
Sie deshalb verbrauchte Batterien bei einer kommunalen
Sammelstelle ab.
EMC
70 DE/AT/CH
Page 71

IAN 75470
Z31237A
Z31237B
LED-UNTERBAULEUCHTE
Montage- und Sicherheitshinweise
REGLETA BAJO MUEBLE
CON LEDES
Instrucciones de montaje y de advertencias
de seguridad
LAMPADA SOTTOPENSILE
Istruzioni di sicurezza e montaggio
LED UNDER-CABINET LIGHT
Assembly and safety advice
LÂMPADA DE
SUBESTRUTURA LED
Indicações de montagem e segurança
5
Milomex Ltd.
c/o Milomex Services
Hilltop Cottage
Barton Road
Pulloxhill
Bedfordshire
MK45 5HP
UK
Model-No.: Z31237A / Z31237B
Version: 10 / 2012
© by ORFGEN Marketing
Estado de las informaciones
Versione delle informazioni
Estado das informações
Last Information Update
Stand der Informationen: 08/ 2012
Ident.-No.: Z31237A/B082012-5
5
 Loading...