

Page 1
Lámpara de techo de bajo consumo
LÁMPARA DE TECHO
DE BAJO CONSUMO
Instrucciones de montaje y de advertencias de seguridad
ENERGIESPAR-DECKENLEUCHTE
Montage- und Sicherheitshinweise
IAN 73850
ENERGY-SAVING CEILING LIGHT
Assembly and safety advice
Page 2
Antes de empezar a leer abra la página que contiene las imágenes y, en seguida, familiarícese con todas
las funciones del dispositivo.
Before reading, unfold the page containing the illustrations and familiarise yourself with all functions of the
device.
Klappen Sie vor dem Lesen die Seite mit den Abbildungen aus und machen Sie sich anschließend mit allen
Funktionen des Gerätes vertraut.
ES Instrucciones de montaje y de advertencias de seguridad Página 5
GB Assembly and safety advice Page 11
DE / AT / CH Montage- und Sicherheitshinweise Seite 17
Page 3
A
L
N
L
N
B
1
5
6
23b
3a
4
7
54 cm
9,8 cm
54 cm
7
7
9,8 cm
7
Page 4

Page 5

Índice
Introducción
Uso adecuado ................................................................................................................................ Página 6
Descripción de las piezas .............................................................................................................. Página 6
Características técnicas .................................................................................................................. Página 6
Volumen de suministro .................................................................................................................... Página 6
Seguridad
Indicaciones de seguridad ............................................................................................................. Página 6
Preparativos
Herramientas y materiales necesarios ........................................................................................... Página 7
Antes de la instalación ..................................................................................................... Página 8
Puesta en funcionamiento
Cómo montar la lámpara ............................................................................................................... Página 8
Sustitución de bombilla ................................................................................................................... Página 9
Mantenimiento y limpieza............................................................................................ Página 9
Eliminación del producto ................................................................................................ Página 9
Garantía y asistencia técnica
Declaración de garantía ................................................................................................................ Página 9
Dirección del servicio técnico ......................................................................................................... Página 10
Declaración de conformidad ......................................................................................................... Página 10
Fabricante ........................................................................................................................................ Página 10
5 ES
Page 6
Introducción / Seguridad
Lámpara de techo de bajo
consumo
Introducción
Enhorabuena por la adquisición de
su nuevo aparato. Ha optado por un
producto de alta calidad. Lea atenta y
completamente las siguientes instrucciones de uso.
Despliegue la página con las ilustraciones. Estas
instrucciones pertenecen a este producto y contienen
indicaciones importantes sobre la puesta en marcha
y el manejo. Observe siempre todas las indicaciones
de seguridad. Antes de la puesta en marcha, compruebe si dispone de la tensión correcta y si todas
las piezas están bien montadas. Si tiene dudas o
no sabe cómo manejar el aparato, póngase en
contacto con el comercial o el punto de asistencia.
Conserve estas indicaciones en lugar seguro y, en
caso necesario, entréguelas a terceros.
Uso adecuado
Esta lámpara sólo es apta para el uso en interiores,
en habitaciones secas y cerradas. Se puede montar
sobre todas las superficies inflamables normales. Este
aparato sólo está pensado para el uso doméstico.
Descripción de las piezas
1
Tapa
2
Bombilla
3a
Tapa final
3b
Tapa final
4
Abertura para cable de red
5
Cable de conexión a red (externo)
6
Regleta
7
Abertura de montaje
Características técnicas
N.° artículo: 6401–186L
Dimensiones: aprox. 73,5 x 16 x
5,5 cm (L x A x A)
Tensión de funcionamiento: 230–240 V ∼, 50 Hz
Bombilla: 220–240 V, 18 W, T8
Potencia nominal máx.: 2 x 18 W
Clase de protección: I /
Grado de protección: IP20 (apropiado exclu-
sivamente para su uso
en interiores)
Volumen de suministro
1 Lámpara para techo, modelo 6401–186L
2 Bombilla 18 W, T8
4 Tacos
4 Tornillos
1 Manual de instrucciones
Seguridad
Indicaciones de seguridad
En caso de producirse daños por el incumplimiento de
este manual de instrucciones se anulará la garantía
del producto. ¡No se asumirá responsabilidad alguna
por los daños resultantes! En caso de que el manejo
inadecuado del producto o el incumplimiento de
las indicaciones de seguridad provoquen daños
materiales o personales, no se asumirá responsabilidad.
Prevención de descargas
eléctricas (peligro de muerte)
Encargue la instalación eléctrica a un electricista
o a una persona especialmente cualificada
para ello.
6 ES
Page 7
Seguridad / Preparativos
Cada vez que se realice una conexión a la red,
compruebe que la lámpara y el cable estén en
perfecto estado. No utilice la lámpara si aprecia
algún tipo de daño.
¡PRECAUCIÓN! Un cable deteriorado puede
suponer peligro de muerte por descarga eléctrica. En caso de daños, reparaciones u otros
problemas en el farol, diríjase al centro de
asistencia o a un técnico electricista.
Antes del montaje, retire el fusible o desconecte
el interruptor automáticouptor de la caja de
fusibles (posición 0).
Asegúrese antes de cada montaje, de que la
corriente nominal disponible coincida con la
tensión de funcionamiento necesaria de la
lámpara (230–240 V ∼).
Evite el contacto de la lámpara con agua u
otros líquidos.
Nunca abra el equipo eléctrico ni introduzca
objetos en el mismo. Esto pondría su vida en
peligro por una posible descarga eléctrica.
¡No instalar la lámpara sobre una superficie
húmeda o conductora!
Cómo prevenir incendios
y lesiones
¡RIESGO DE LESIONES! Compruebe el
estado de cada bombilla nada más desempaquetar el embalaje. No monte la lámpara con
bombillas defectuosas. En dicho caso, póngase
en contacto con el servicio de mantenimiento
para la sustitución de las mismas.
¡PELIGRO DE QUEMADURAS! Asegúrese
de que la lámpara esté apagada y fría antes de
tocarla para evitar quemaduras. Las bombillas
generan mucho calor.
objetos iluminados. Si se genera demasiado
calor, podría provocarse un incendio.
Sustituya inmediatamente las bombillas defec-
tuosas. Antes de cambiar la bombilla, retire el
fusible o desconecteyuntor el interruptor automático de la corriente.
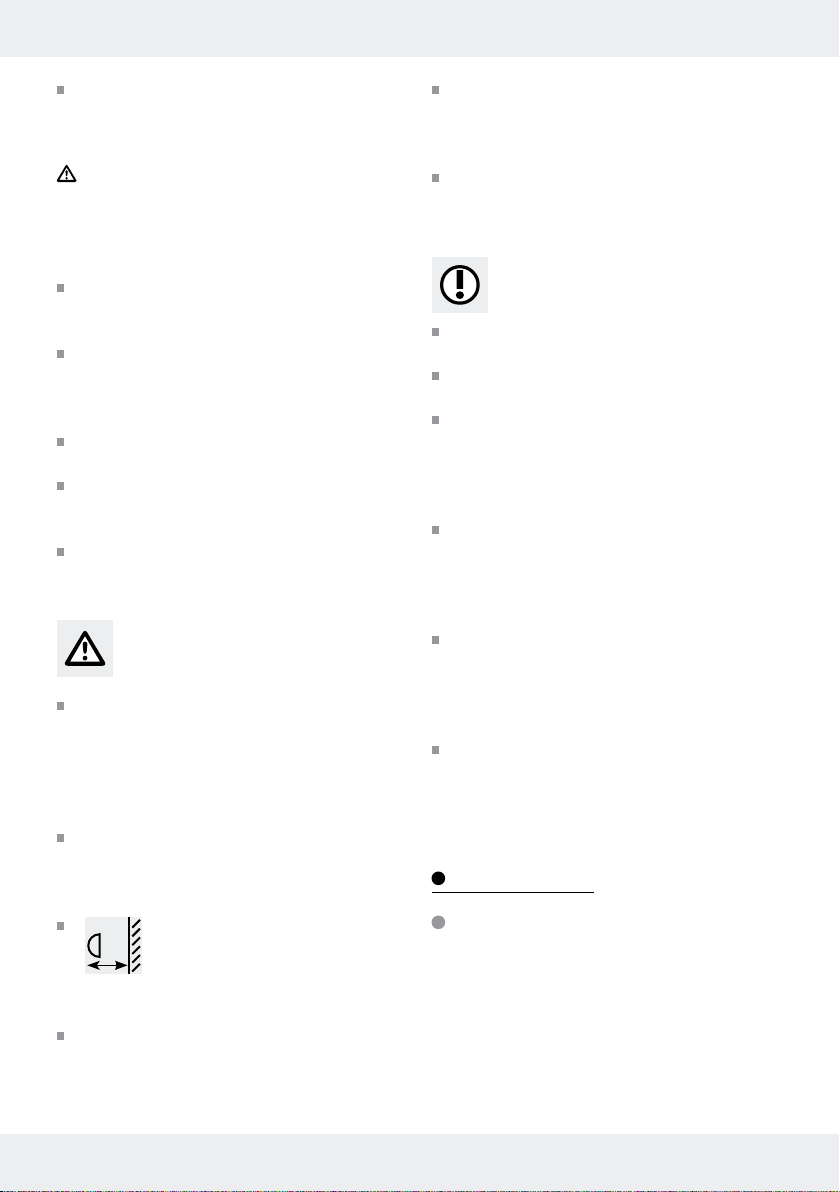
¡RIESGO DE INCENDIO! Monte
0,5 m
la lámpara a una distancia de al
menos 0,5 m con respecto a los
No deje la lámpara ni el embalaje sin supervisión.
Las láminas y bolsas de plástico, las piezas de
plástico, etc. pueden convertirse en juguetes
peligrosos para los niños.
No emplee esta lámpara con atenuadores de
luminosidad o interruptores eléctricos. La lámpara
no es compatible con dichos dispositivos.
Cómo proceder de forma segura
Utilice únicamente bombillas de 220–240 V ∼
con una potencia máxima de 18 vatios.
Monte la lámpara de modo que esté protegida
de la humedad, el viento y la suciedad.
Prepare cuidadosamente el montaje y dedíquele
el tiempo suficiente. Antes de comenzar, ordene
todas las piezas y asegúrese de que las tiene
a mano junto con el resto de herramientas o
material que se necesite.
Monte la lámpara solo en superficies estables
(por ejemplo en mampostería) Compruebe antes
del montaje que la pared o el techo elegido sea
apropiado para soportar la lámpara. Infórmese
eventualmente en tiendas especializadas.
Antes del montaje en el techo, infórmese sobre el
material que necesitará para realizar el montaje
en el mismo. Para el montaje en techo hemos
incluido materiales apropiados para mampostería
corriente, resistente.
Proceda con sumo cuidado. Preste mucha aten-
ción a los trabajos y actúe siempre con sentido
común. Bajo ningún concepto monte la lámpara
si está distraído o no se encuentra bien.
Preparativos
Herramientas y materiales
necesarios
Las herramientas y los materiales mencionados a
continuación no están incluidos en el volumen de
suministro. Los valores y datos indicados a continuación son aproximados y meramente orientativos.
El conjunto de materiales necesarios dependerá de
las circunstancias particulares de cada situación.
7 ES
Page 8
Preparativos / Antes de la instalación / Puesta en funcionamiento
– Lápiz / herramienta de marcación
– Comprobador de tensión
– Destornillador de estrella
– Taladro
– Broca
– Alicates
– Escalera
Antes de la instalación
Importante: Encargue la instalación eléctrica a
un electricista cualificado o a una persona formada
especialmente en instalaciones eléctricas. Esta
persona deberá conocer las características de la
lámpara y la normas de conexión.
Antes de la instalación, familiarícese con la
lámpara y con las indicaciones e ilustraciones
de este manual.
Antes de la instalación, asegúrese de que la
línea a la que se conectará la lámpara esté sin
tensión. Para ello retire el fusible o apague el
interruptor automático en la caja de fusibles
(posición 0).
Compruebe la ausencia de tensión con un
detector de tensión.
Puesta en funcionamiento
Cómo montar la lámpara
Nota: Para el montaje necesitará un taladro.
¡PRECAUCIÓN! ¡PELIGRO DE LESIONES!
Consulte el manual de instrucciones de su taladro.
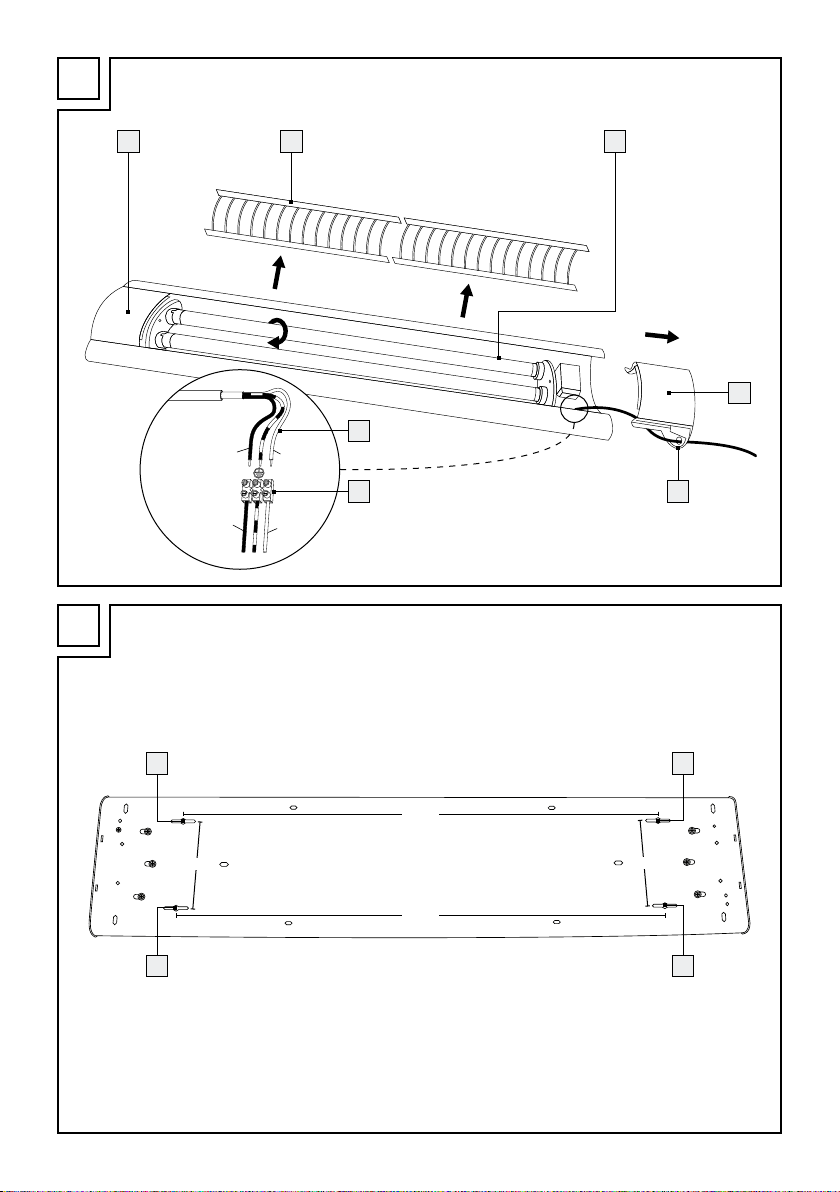
Retire la tapa final 3a, soltándola del anclaje
presionándola ligeramente y desplazándola
lateralmente. La tapa final, bajo la cual se encuentra la regleta requerida
(ver adhesivo “Output wire”).
Retire las cubiertas 1, desplazándolas lateral-
mente.
6
, está marcada
Retire las dos bombillas 2. Para ello, gire
cada bombilla
2
¼ de vuelta y extráigala
del casquillo. Utilice para ello un paño limpio
y sin pelusas.
Retire el reflector interior de color cromo para
acceder a las aberturas de montaje
7
. Para
ello gire las tapas de plástico ¼ de vuelta hacia la izquierda y extráigalas.
Extraiga a continuación el reflector.
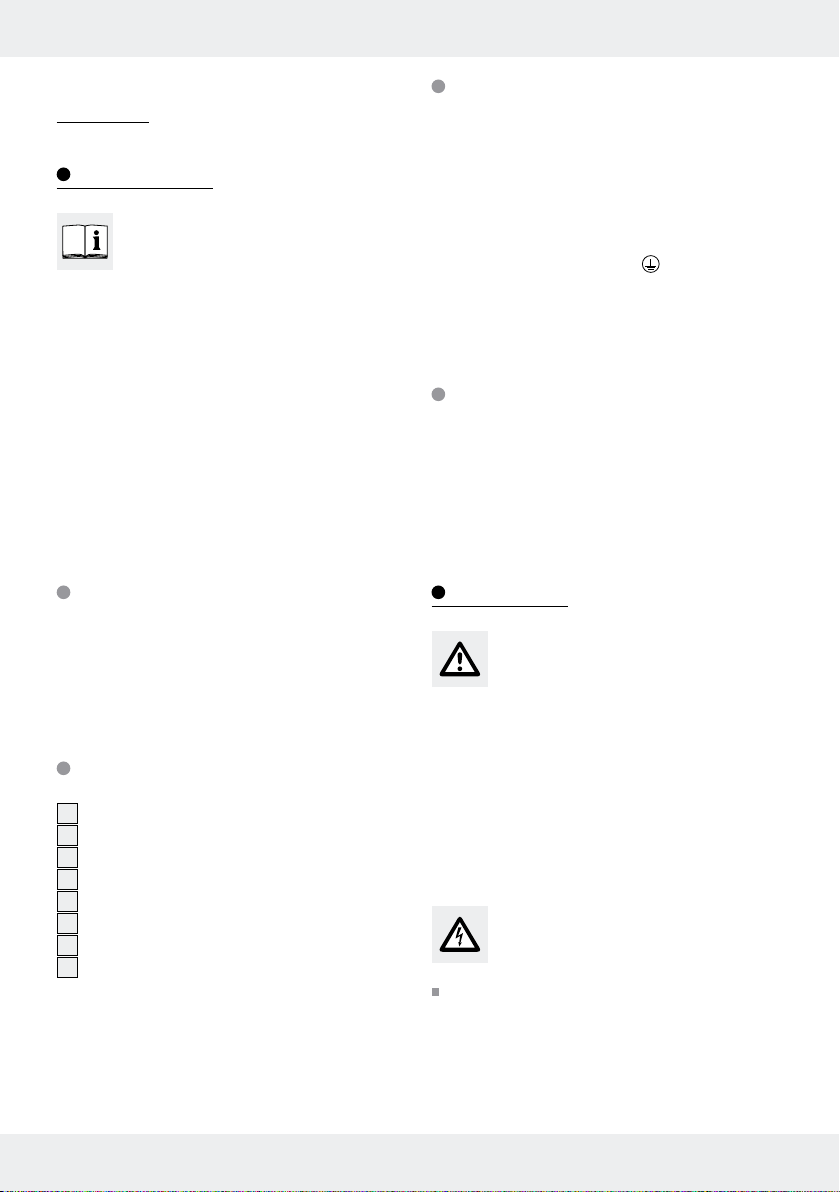
Fije la lámpara al techo en la posición deseada.
Marque los orificios de montaje 7 a taladrar
(véase fig. B).
Taladre los agujeros (ø aprox. 6 mm, profundidad
aprox. 40 mm). Asegúrese de no dañar la línea
de alimentación.
Introduzca los tacos en los agujeros. En caso
necesario, ayúdese de un martillo.
Introduzca los tornillos en los tacos y deje que
sobresalgan aproximadamente 2,0 mm del techo
o de la superficie de montaje.
Introduzca los tornillos en las aberturas previs-
7
tas
de la lámpara y oriente la lámpara,
desplazándola lateralmente a izquierda o
derecha. Apriete a continuación los tornillos.
Coloque a continuación nuevamente el reflec-
tor y fíjelo con las tapas blancas de plástico retiradas previamente, colocándolas en las
aberturas previstas y girándolas ¼ de vuelta
hacia la derecha.
Compruebe el asiento correcto.
Introduzca el cable de conexión (externo) 5
3a
4
.
de la tapa
a través de la abertura prevista
final retirada previamente
Nota: Para poder guiar el cable de conexión
a red (externo)
prevista
forada de la abertura
5
a través de la abertura
4
, retire con cuidado la placa preper-
4
.
Conecte a continuación el cable de conexión
de la lámpara con la regleta
cable de conexión de red (externo)
6
adjunta al
5
.
Nota: Asegúrese de que cada uno de los
conductores de la conexión de alimentación
(externo) están correctamente conectados:
conductor de corriente, negro o marrón =
símbolo L; conductor neutro, azul = símbolo N;
conductor de protección, verde-amarillo =
símbolo
.
8 ES
Page 9

… / Mantenimiento … / Eliminación del producto / Garantía y asistencia técnica
Coloque a continuación de nuevo las dos
bombillas
billa
el casquillo. Compruebe el asiento correcto.
Coloque de nuevo las cubiertas 1 y coloque
la tapa final
lámpara. Compruebe el asiento correcto.
La lámpara ya está lista para usarse.
2
. Para ello introduzca cada bom-
2
y gírela ¼ de vuelta para montarla en
3a
de nuevo en la carcasa de la
Sustitución de bombilla
¡PRECAUCIÓN! ¡PELIGRO DE DESCARGA
ELÉCTRICA! Para sustituir las bombillas desconecte
primero la lámpara de la red eléctrica. Para ello,
retire el fusible o desconecte el interruptor automático
en la caja de fusibles (posición 0).
¡PRECAUCIÓN! ¡RIESGO DE QUEMADU-
RAS! Deje que la lámpara se enfríe completamente.
Sustituya la bombilla 2 únicamente una vez
se haya enfriado por completo. Al cambiar la
bombilla, utilice un paño limpio y sin pelusas.
Retire la tapa final 3b, soltándola del anclaje
presionándola ligeramente y desplazándola
lateralmente.
Retire las cubiertas 1, desplazándolas lateral-
mente.
Gire la bombilla 2 ¼ de vuelta y extráigala
del casquillo.
Introduzca la nueva bombilla 2 en el casquillo
y gírela ¼ de vuelta para montarla. Compruebe
el asiento correcto.
Nota: Utilice únicamente bombillas 220–
240 V ∼ con una potencia máxima de 18 vatios.
Inserte de nuevo las cubiertas 1 y coloque la
tapa final
3b
.
Mantenimiento y limpieza
¡PRECAUCIÓN! ¡PELIGRO DE DESCARGA
ELÉCTRICA! Desenchufe la lámpara de la red
eléctrica para la limpieza. Para ello retire el fusible
o apague el interruptor automático en la caja de
fusibles (posición 0).
¡PRECAUCIÓN! ¡RIESGO DE QUEMADU-
RAS! Deje que la lámpara se enfríe completamente.
¡PRECAUCIÓN! ¡PELIGRO DE DESCARGA
ELÉCTRICA! Por razones de seguridad eléctrica, no
limpie nunca la lámpara con agua u otros líquidos
ni la sumerja en agua. Limpie la lámpara únicamente
con un paño seco sin pelusas.
No utilice disolventes, gasolina ni similares.
La lámpara resultaría dañada.
Eliminación del producto
El embalaje y sus componentes están constituidos
exclusivamente por materiales que no dañan el medio
ambiente. Éstos pueden desecharse en cualquier
depósito de reciclaje local.
El símbolo de un cubo de la basura
sobre ruedas tachado significa que el
producto dentro de la Unión Europea
debe desecharse en un punto de recogida selectiva
de desechos. Esto es vigente para este producto y
para todos los accesorios marcados con este símbolo. Este tipo de productos no puede desecharse
junto con la basura doméstica, sino que deben
entregarse en un punto de recogida para el reciclaje
de aparatos eléctricos y electrónicos. El reciclaje
ayuda a reducir el uso de materias primas y a aliviar
el medio ambiente.
Garantía y asistencia técnica
Declaración de garantía
El aparato incluye una garantía de 3 años aplicable
al primer comprador, es decir, no es transferible.
Presente el ticket de compra como comprobante.
La garantía cubre defectos de fabricación o de
material, pero no el desgaste de las piezas o los
daños que puedan producirse por un uso incorrecto
del aparato. La garantía será anulada en caso de
que el aparato sea manipulado por terceros. Esta
garantía no reduce en forma alguna sus derechos
legales. En caso de querer hacer uso de su garantía
9 ES
Page 10

Garantía y asistencia técnica
póngase en contacto con el servicio de mantenimiento
telefónicamente. Sólo de este modo le podemos
garantizar el envío gratuito del aparato.
Dirección del servicio técnico
Briloner Leuchten GmbH
Im Kissen 2, 59929 Brilon, Alemania
Tel.: 0 29 61 / 97 12–0
Fax: 0 29 61 / 97 12–199
E-mail: Info@briloner.de
IAN 73850
Tenga a mano el comprobante de caja para todas las
consultas y el número de artículo (p. ej. IAN 12345)
como prueba de compra.
Declaración de conformidad
Este producto cumple las exigencias de las directivas europeas y nacionales vigentes (compatibilidad electromagnética 2004 / 108 / EC, directiva
de baja tensión 2006 / 95 / EC). Se ha comprobado la conformidad. El fabricante dispone de las
declaraciones y documentos correspondientes.
Fabricante
Briloner Leuchten GmbH
Im Kissen 2
59929 Brilon
Alemania
10 ES
Page 11

Table of Contents
Introduction
Proper use ............................................................................................................................................ Page 12
Description of parts ............................................................................................................................. Page 12
Technical data ..................................................................................................................................... Page 12
Scope of delivery ................................................................................................................................ Page 12
Safety
Safety notes ......................................................................................................................................... Page 12
Preparation
Required tools and materials .............................................................................................................. Page 13
Before installation ................................................................................................................... Page 14
Preparing for use
Mounting the light ............................................................................................................................... Page 14
Replacing a bulb ................................................................................................................................. Page 14
Maintenance and cleaning ............................................................................................... Page 15
Disposal ............................................................................................................................................ Page 15
Warranty and Service
Warranty Declaration ......................................................................................................................... Page 15
Service address ................................................................................................................................... Page 15
Declaration of conformity ................................................................................................................... Page 16
Manufacturer ....................................................................................................................................... Page 16
11 GB
Page 12

Introduction / Safety
Energy-Saving Ceiling Light
Introduction
We congratulate you on the purchase
of your new device. You have chosen
a high quality product. Please read
carefully and completely through these operating
instructions. Fold out the page with the illustrations.
These instructions are part of the product and
contain important information about bringing the
product into use and its handling. Always observe
all the safety advice. Check that the correct mains
voltage is available and that all the parts have been
properly assembled before bringing into use. Should
you have any questions or be uncertain as to how
to operate the device, please get in touch with your
dealer or service point. Please keep these instructions
in a safe place and hand them on to a third party if
necessary.
Proper use
This light is suitable only for interior use, in dry and
enclosed spaces. The lamp can be attached to all
normally flammable surfaces. This device is intended
for use only in a domestic, private household environment.
Description of parts
Technical data
Article No.: 6401–186L
Dimensions: approx. 73.5 x 16 x 5.5 cm
(L x W x H)
Operating voltage: 230–240 V ∼, 50 Hz
Bulbs: 220–240 V, 18 W, T8
Max. nominal output: 2 x 18 W
Protection class: I /
Protection class: IP20 (only suitable for
indoor use)
Scope of delivery
1 Ceiling light, model 6401–186L
2 Bulbs 18 W, T8
4 Dowels
4 Screws
1 Operating instructions
Safety
Safety notes
Damages due to failure to follow these instructions
for use will void the product warranty! We assume
no liability for secondary failures! We assume no
liability for property or personal damages due to
improper handling or failure to observe safety
instructions!
1
Cover
2
Bulb
3a
End cap
3b
End cap
4
Opening for mains connection cable
5
Mains connection cable (external)
6
Terminal block
7
Mounting opening
12 GB
Avoid danger to life from
electric shock
Ensure that a qualified electrician or a person
trained to carry out electrical installations
performs the electrical installation.
Check the lamp and the mains lead for damage
each time before connecting them. Never use
your lamp if you discover that it is damaged in
any way.
Page 13

CAUTION! A damaged mains lead presents
a serious danger to life from electric shock. In
the event of damage, repairs or other problems
with the lamp, please contact the Service Centre
or an electrician.
Before installation, remove the fuse for this circuit
or switch off the circuit breaker (0 setting) in the
fuse box.
Before assembly, ensure that the available mains
voltage corresponds to the operating voltage
necessary for the light (230–240 V ∼).
Never let the lamp come into contact with water
or other liquids.
Never open or insert anything into electrical
fittings or equipment. This may result in the
danger of death from electric shock.
Do not attach the light to damp or conductive
substrates!
Avoid fire hazards and
risk of injury
RISK OF INJURY! Check every bulb for
damage immediately upon unpacking. Do not
install the light if the bulbs are defective. If they
are, contact the service point for a replacement.
RISK OF INJURY FROM BURNS! Ensure
the lamp has been switched off and allowed to
cool before you touch it. Light bulbs develop a
great deal of heat.
from the development of too much heat.
Replace any faulty bulbs with new ones immedi-
ately. Before replacing the bulb, always remove
the fuse or switch the automatic cutout off.
Do not allow the lamp or the packaging materials
to lie around unattended. Plastic film or bags,
Styrofoam etc. can turn into dangerous toys for
children.
Do not use this light for dimmers or electronic
switches. It is not suitable for this mode of
operation.
FIRE HAZARD! Fit the light so that
0.5 m
it is at least 0.5 m away from the
material illuminated. Fire can result
Safety / Preparation
Working safely
Only use 220–240 V ∼ bulbs with a maximum
output of 18Watt.
Install the lamp so that it is protected from
moisture, wind and dirt.
Make careful preparations for the assembly and
take sufficient time. Clearly lay out all components
and any additional tools or materials that might
be required so that they are readily to hand.
Install the lamp on stable surfaces only (e.g.
masonry). Check before mounting the light to
the ceiling whether the ceiling is suitable for
supporting the light. If necessary seek advice
from your local DIY supplier or a construction
specialist.
Examine the ceiling before installation and
choose suitable installation fixings. For ceiling
installation we have supplied fixings suitable for
ordinary solid concrete or masonry construction.
Remain alert at all times and always watch what
you are doing! Always pay attention to what you
are doing and act with common sense. Always
proceed with caution and do not assemble the
lamp if you cannot concentrate or feel unwell.
Preparation
Required tools and materials
The tools and materials referred to are not included
in delivery. The details and values given are nonbinding and for guidance only. The condition of
the material is determined by the individual local
conditions.
– Pencil / marking tool
– Voltage tester
– Crosstip screwdriver
– Electric drill
– Drill
– Edge cutter
– Ladder
13 GB
Page 14

Before installation / Preparing for use
Before installation
Important: The electrical connection must be
carried out by a qualified electrician or someone
trained to perform electrical installations. This person
must be familiar with the properties of the light and
all connection regulations.
Familiarise yourself with all instructions and
diagrams in this manual as well as with the
light before installation.
Before installation, ensure that the cable that
the light is to be attached to is not live. To do
this, remove the fuse or switch off the circuit
breaker in the fuse box (0 position).
Use the voltage tester to check that there is
no voltage.
Preparing for use
Mounting the light
Note: you will need a drill for installation.
CAUTION! RISK OF INJURY! Refer to your
drill’s operating instructions.
Remove the end cap 3a by pressing it lightly
out of the fastening and moving it away to the
side. The end cap, beneath which is the terminal
6
block
(see label “Output wire”).
Remove the cover 1 by moving it away to the
side.
Remove both bulbs 2. Remove the respective
light bulb
it out of the socket. Use a clean, lint-free cloth
when you are replacing a bulb.
To uncover the mounting openings 7, remove
the chromed reflector inside the ceiling lamp.
To do so, rotate the two white plastic caps ¼
turn to the left and pull them out.
Then remove the reflector.
Hold the light on the required position on the
ceiling.
Mark the drill holes for the installation openings 7
(see fig. B).
needed for connection, is marked
2
by turning it a ¼ turn and pulling
Drill the holes (ø approx. 6 mm, depth approx.
40 mm). Make sure that no electrical wiring is
damaged during this operation.
Insert the dowels in the drilled holes. Use a
hammer if necessary.
Insert the supplied screws into the dowels and
let them project a distance of about 2.0 mm
from the ceiling or mounting surface.
Insert the screws into the mounting openings
provided for them
7
of the light and align
the light by pushing it to the left or to the right.
Finally tighten the screws.
Now re-insert the chromed reflector and fasten
it with the previously removed plastic caps by
inserting them into the openings provided for
them and rotating them ¼ turn to the right.
Check for correct fitting.
Route the mains connection cable (external) 5
through the opening provided for it
end cap that was previously removed
4
in the
3a
.
Note: Carefully remove the pre-punched
connection plate from the opening
mains connection cable (external)
can guide the cable through the opening
4
for the
5
so you
4
Now connect the connection cable of the light
to the mains connection cable (external)
means of the terminal block
6
provided.
5
by
Note: Ensure that each wire of the mains
connection cable (external) is properly connected in the correct place: live wire, black or
brown = symbol L, neutral wire, blue = symbol N,
protective earth wire, green-yellow = symbol
Insert the two bulbs 2 once again. Insert each
2
bulb
into the socket and tighten it with a
¼ turn. Check for correct fitting.
Reinsert the cover 1 and put the end cap 3a
back on the light housing. Ensure that the end
cap is correctly seated.
Your light is now ready for operation.
Replacing a bulb
CAUTION! RISK OF ELECTRIC SHOCK!
To replace the bulb , first of all disconnect the light
from the mains circuit. To do this, remove the fuse
.
.
14 GB
Page 15

Preparing for use / Maintenance and cleaning / Disposal / Warranty and Service
or switch off the circuit breaker in the fuse box
(0 position).
CAUTION! RISK OF BURNS! Allow the
lamp to cool down completely.
Replace the bulb 2 only after it has fully
cooled. Use a clean, lint-free cloth when you
are replacing a bulb.
Remove the end cap 3b by pressing it lightly out
of the fastening and moving it away to the side.
Remove the cover 1 by moving it away to the
side.
Remove the bulb 2 by turning it a ¼ turn and
pulling it out of the socket.
insert the new bulb 2 into the socket and
tighten it with a ¼ turn. Check for correct fitting.
Note: Only use 220–240 V ∼ bulbs with a
maximum output of 18Watt.
Reinsert the cover 1 and put the end cap 3b
back on the light housing.
Maintenance and cleaning
CAUTION! RISK OF ELECTRIC SHOCK!
To clean the light , first of all disconnect it from the
mains circuit. To do this, remove the fuse or switch
off the circuit breaker in the fuse box (0 position).
CAUTION! RISK OF BURNS! Allow the
lamp to cool down completely.
CAUTION! RISK OF ELECTRIC SHOCK!
For electrical safety reasons, never clean the light
with water or other fluids nor immerse it in water.
Only use a dry, lint-free cloth for cleaning.
Do not use solvents, petrol etc. Otherwise the
light will be damaged.
The symbol of the wheelie bin with the line
through it means that, in the European
Union, the product has to be disposed of
in a separate refuse collection. This applies to the
product and to all components bearing this symbol.
Products marked in this way may not be disposed
of along with normal domestic waste but have to be
handed in at a recycling collection point for electrical
and electronic appliances. Recycling helps the reduce
the consumption of raw materials and protects the
environment.
Warranty and Service
Warranty Declaration
This product has a 3-year warranty from the date of
purchase; the warranty is only valid for the original
purchaser and is not transferable. Please keep your
receipt as proof of purchase. The warranty applies
to material or manufacturing defects only. It does not
cover wear parts or damage caused by improper
use. The guarantee lapses in cases of unauthorized
tampering. Your statutory rights are not restricted in
any way by this warranty. Please contact the service
centre by telephone. In the event of any claims under
the warranty. This is the only way to ensure that your
instrument can be returned free of charge.
Service address
Briloner Leuchten GmbH
Im Kissen 2, 59929 Brilon, Germany
Phone: +49 (0) 29 61 / 97 12–0
Fax: +49 (0) 29 61 / 97 12–199
Email: Info@briloner.de
Disposal
The packaging and ancillary packing consist entirely
of environmentally friendly materials. They can be
disposed of at your local recycling facility.
IAN 73850
Please have your receipt and the product number
(e.g. IAN 12345) available for all queries as proof
of purchase.
15 GB
Page 16

Warranty and Service
Declaration of conformity
This product fulfils the requirements of the applicable
European and national directives (Electromagnetic
Compatibility 2004 / 108 / EC, Low Voltage Directive
2006 / 95 / EC). Conformity has been demonstrated.
The relevant declarations and documents are held
by the manufacturer.
Manufacturer
Briloner Leuchten GmbH
Im Kissen 2
59929 Brilon
Germany
16 GB
Page 17

Inhaltsverzeichnis
Einleitung
Bestimmungsgemäße Verwendung .................................................................................................... Seite 18
Teilebeschreibung ............................................................................................................................... Seite 18
Technische Daten ................................................................................................................................ Seite 18
Lieferumfang ........................................................................................................................................ Seite 18
Sicherheit
Sicherheitshinweise ............................................................................................................................. Seite 18
Vorbereitung
Benötigtes Werkzeug und Material ................................................................................................... Seite 19
Vor der Installation ................................................................................................................. Seite 20
Inbetriebnahme
Leuchte montieren ...............................................................................................................................Seite 20
Leuchtmittel auswechseln .................................................................................................................... Seite 21
Wartung und Reinigung ..................................................................................................... Seite 21
Entsorgung ..................................................................................................................................... Seite 21
Garantie und Service
Garantieerklärung ............................................................................................................................... Seite 21
Serviceadresse ....................................................................................................................................Seite 22
Konformitätserklärung ......................................................................................................................... Seite 22
Hersteller .............................................................................................................................................. Seite 22
17 DE/AT/CH
Page 18

Einleitung / Sicherheit
Energiespar-Deckenleuchte
Einleitung
Wir beglückwünschen Sie zum Kauf Ihres
neuen Gerätes. Sie haben sich damit für
ein hochwertiges Gerät entschieden.
Bitte lesen Sie diese Bedienungsanleitung vollständig
und sorgfältig durch. Klappen Sie die Seite mit den
Abbildungen aus. Diese Anleitung gehört zu diesem
Gerät und enthält wichtige Hinweise zur Inbetriebnahme und Handhabung. Beachten Sie immer alle
Sicherheitshinweise. Prüfen Sie vor der Inbetriebnahme,
ob die korrekte Spannung vorhanden ist und ob alle
Teile richtig montiert sind. Sollten Sie Fragen haben
oder unsicher in Bezug auf die Handhabung des
Gerätes sein, setzen Sie sich bitte mit Ihrem Händler
oder der Servicestelle in Verbindung. Bewahren Sie
diese Anleitung bitte sorgfältig auf und geben Sie
sie ggf. an Dritte weiter.
Bestimmungsgemäße
Verwendung
Diese Leuchte ist ausschließlich für den Betrieb im
Innenbereich, in trockenen und geschlossenen Räumen
geeignet. Die Leuchte kann auf allen normal entflammbaren Oberflächen befestigt werden. Dieses Gerät ist
nur für den Einsatz in privaten Haushalten vorgesehen.
Teilebeschreibung
Technische Daten
Artikel-Nr.: 6401-186L
Maße: ca. 73,5 x 16 x 5,5 cm
(L x B x H)
Betriebsspannung: 230–240 V ∼, 50 Hz
Leuchtmittel: 220–240 V, 18 W, T8
Max. Nennleistung: 2 x 18 W
Schutzklasse: I /
Schutzart: IP20 (Nur für den Innen-
bereich geeignet)
Lieferumfang
1 Deckenleuchte, Modell 6401-186L
2 Leuchtmittel 18 W, T8
4 Dübel
4 Schrauben
1 Bedienungsanleitung
Sicherheit
Sicherheitshinweise
Bei Schäden, die durch Nichtbeachtung dieser
Bedienungsanleitung verursacht werden, erlischt
der Garantieanspruch! Für Folgeschäden wird keine
Haftung übernommen! Bei Sach- oder Personenschäden, die durch unsachgemäße Handhabung oder
Nichtbeachtung der Sicherheitshinweise verursacht
werden, wird keine Haftung übernommen!
1
Abdeckung
2
Leuchtmittel
3a
Endkappe
3b
Endkappe
4
Öffnung für Netzanschlusskabel
5
Netzanschlusskabel (extern)
6
Lüsterklemme
7
Montageöffnung
18 DE/AT/CH
Vermeiden Sie Lebensgefahr
durch elektrischen Schlag
Lassen Sie die Elektroinstallation durch einen
ausgebildeten Elektriker oder eine für Elektroinstallationen eingewiesene Person durchführen.
Überprüfen Sie vor jedem Netzanschluss die
Leuchte und das Netzanschlusskabel auf etwaige
Beschädigungen. Benutzen Sie Ihre Leuchte
niemals, wenn Sie irgendwelche Beschädigungen
feststellen.
Page 19

Sicherheit / Vorbereitung
VORSICHT! Beschädigte Netzkabel bedeuten
Lebensgefahr durch elektrischen Schlag. Wenden
Sie sich bei Beschädigungen, Reparaturen oder
anderen Problemen an der Leuchte an die Servicestelle oder eine Elektrofachkraft.
Entfernen Sie vor der Montage die Sicherung
oder schalten Sie den Leitungsschutzschalter im
Sicherungskasten aus (0-Stellung).
Vergewissern Sie sich vor der Montage, dass die
vorhandene Netzspannung mit der benötigten
Betriebsspannung der Leuchte übereinstimmt
(230–240 V ∼).
Vermeiden Sie unbedingt die Berührung der
Leuchte mit Wasser oder anderen Flüssigkeiten.
Öffnen Sie niemals eines der elektrischen Betriebs-
mittel oder stecken irgendwelche Gegenstände
in dieselben. Derartige Eingriffe bedeuten Lebensgefahr durch elektrischen Schlag.
Leuchte nicht auf feuchtem oder leitendem
Untergrund installieren!
Vermeiden Sie Brand- und
Verletzungsgefahr
VERLETZUNGSGEFAHR! Überprüfen Sie
unmittelbar nach dem Auspacken jedes Leuchtmittel auf Beschädigungen. Montieren Sie die
Leuchte nicht mit defekten Leuchtmitteln. Setzen
Sie sich in diesem Fall für Ersatz mit der Servicestelle in Verbindung.
VERBRENNUNGSGEFAHR! Stellen Sie
sicher, dass die Leuchte ausgeschaltet und
abgekühlt ist, bevor Sie diese berühren, um
Verbrennungen zu vermeiden. Leuchtmittel
entwickeln eine starke Hitze.
Materialien. Eine übermäßige Wärmeentwicklung
kann zu Brandentwicklung führen.
Ersetzen Sie defekte Leuchtmittel sofort durch
neue. Entfernen Sie vor dem Leuchtmittelwechsel
immer zuerst die Sicherung oder schalten Sie
den Leitungsschutzschalter aus.
BRANDGEFAHR! Montieren Sie
0,5 m
die Leuchte mit einer Entfernung von
mindestens 0,5 m zu angestrahlten
Lassen Sie die Leuchte oder Verpackungsmaterial
nicht achtlos liegen. Plastikfolien / -tüten, Kunststoffteile, etc. könnten für Kinder zu einem
gefährlichen Spielzeug werden.
Verwenden Sie diese Leuchte nicht für Dimmer
und elektrische Schalter. Sie ist nicht dafür
geeignet.
So verhalten Sie sich richtig
Verwenden Sie nur 220–240 V ∼ Leuchtmittel
mit einer Höchstleistung von 18 Watt.
Montieren Sie die Leuchte so, dass sie vor
Feuchtigkeit und Verschmutzung geschützt ist.
Bereiten Sie die Montage sorgfältig vor und
nehmen Sie sich ausreichend Zeit. Legen Sie alle
Einzelteile und zusätzlich benötigtes Werkzeug
oder Material vorher übersichtlich und griffbereit
zurecht.
Montieren Sie die Leuchte nur an stabilen
Oberflächen (z. B. Mauerwerk). Überprüfen Sie
vor der Deckenmontage, ob die gewählte Decke
zum Tragen der Leuchte geeignet ist. Erkundigen
Sie sich gegebenenfalls im Fachhandel.
Informieren Sie sich vor der Deckenmontage
über das geeignete Montagematerial für Ihre
Decke. Für die Deckenmontage haben wir
Montagematerial beigelegt, das für übliches,
festes, Mauerwerk geeignet ist.
Seien Sie stets aufmerksam! Achten Sie immer
darauf was Sie tun und gehen Sie stets mit
Vernunft vor. Montieren Sie die Leuchte in keinem
Fall, wenn Sie unkonzentriert sind oder sich
unwohl fühlen.
Vorbereitung
Benötigtes Werkzeug
und Material
Die genannten Werkzeuge und Materialien sind nicht
im Lieferumfang enthalten. Es handelt sich hierbei um
unverbindliche Angaben und Werte zur Orientierung.
Die Beschaffenheit des Materials richtet sich nach
den individuellen Gegebenheiten vor Ort.
19 DE/AT/CH
Page 20

Vorbereitung / Vor der Installation / Inbetriebnahme
– Bleistift / Markierwerkzeug
– Spannungsprüfer
– Kreuzschraubendreher
– Bohrmaschine
– Bohrer
– Seitenschneider
– Leiter
Vor der Installation
Wichtig: Der elektrische Anschluss muss durch
einen ausgebildeten Elektriker oder eine für Elektroinstallationen eingewiesene Person erfolgen. Diese
muss Kenntnis über die Eigenschaften der Leuchte
und Anschlussbestimmungen haben.
Machen Sie sich vor der Installation mit allen
Anweisungen und Abbildungen in dieser Anleitung
sowie mit der Leuchte selbst vertraut.
Stellen Sie vor der Installation sicher, dass an
der Leitung, an der die Leuchte angeschlossen
werden soll, keine Spannung vorliegt. Entfernen
Sie hierfür die Sicherung oder schalten Sie den
Leitungsschutzschalter im Sicherungskasten aus
(0-Stellung).
Überprüfen Sie die Spannungsfreiheit mittels
Spannungsprüfer.
Inbetriebnahme
Leuchte montieren
Hinweis: Für die Montage benötigen Sie eine
Bohrmaschine.
VORSICHT! VERLETZUNGSGEFAHR!
Ziehen Sie die Bedienungsanleitung Ihrer Bohrmaschine hinzu.
Entfernen Sie die Endkappe 3a, indem Sie diese
durch leichtes Drücken aus der Verankerung
lösen und seitlich wegschieben. Die Endkappe,
unter der die zum Anschluss notwendige
Lüsterklemme
(siehe Aufkleber „Output wire“).
6
liegt, ist gekennzeichnet
Entfernen Sie die Abdeckungen 1, indem Sie
diese seitlich herausschieben.
Entfernen Sie beide Leuchtmittel 2. Drehen Sie
dazu das jeweilige Leuchtmittel
2
mit einer
¼ Umdrehung und ziehen Sie es aus der Fassung
heraus. Benutzen Sie dazu ein sauberes, fusselfreies Tuch.
Entfernen Sie den innenliegenden chromfarbenen
Reflektor, um die Montageöffnungen
7
freizulegen. Drehen Sie dazu die beiden weißen
Kunststoffkappen mit einer ¼-Drehung nach
links und ziehen Sie diese heraus.
Entnehmen Sie anschließend den Reflektor.
Halten Sie die Leuchte an der gewünschten
Position an die Decke.
Markieren Sie anschließend die Bohrlöcher für
die Montageöffnungen
7
(siehe Abb. B).
Bohren Sie nun die Löcher (ø ca. 6 mm, Tiefe
ca. 40 mm). Stellen Sie sicher, dass Sie die
Zuleitung nicht beschädigen.
Stecken Sie die Dübel in die Bohrlöcher. Nehmen
Sie, falls nötig, einen Hammer zur Hilfe.
Führen Sie anschließend die Schrauben in die
Dübel ein und lassen diese ca. 2,0 mm von der
Decke bzw. Montagefläche abstehen.
Führen Sie die Schrauben durch die dafür vor-
gesehenen Montageöffnungen
7
der Leuchte
und richten Sie die Leuchte aus, indem Sie diese
seitlich nach links oder rechts schieben. Ziehen
Sie im Anschluss die Schrauben fest.
Setzen Sie nun den chromfarbenen Reflektor
wieder ein und befestigen Sie ihn mit den zuvor
entfernten weißen Kunststoffkappen, indem Sie
diese in die dafür vorgesehenen Öffnungen
führen und mit einer ¼-Drehung nach rechts
drehen.
Überprüfen Sie den richtigen Sitz.
Führen Sie das Netzanschlusskabel (extern) 5
durch die dafür vorgesehen Öffnung
zuvor entfernten Endkappe
3a
4
der
.
Hinweis: Um das Netzanschlusskabel (extern)
5
durch die dafür vorgesehene Öffnung 4
führen zu können, entfernen Sie bitte vorsichtig die
vorgestanzte Abschlussplatte aus der Öffnung
4
Verbinden Sie nun das Anschlusskabel der
Leuchte mittels beigefügter Lüsterklemme
mit dem Netzanschlusskabel (extern)
6
5
.
.
20 DE/AT/CH
Page 21

Inbetriebnahme / Wartung und Reinigung / Entsorgung / Garantie und Service
Hinweis: Achten Sie darauf, dass Sie die ein-
zelnen Leiter des Netzanschlusskabels (extern)
jeweils richtig anschließen: stromführender Leiter,
schwarz oder braun = Symbol L, Neutralleiter,
blau = Symbol N, Schutzleiter, grün-gelb =
Symbol
Setzen Sie nun beide Leuchtmittel 2 wieder ein.
Stecken Sie dazu das jeweilige Leuchtmittel
in die Fassung und montieren Sie es mit einer
¼ Umdrehung. Überprüfen Sie den richtigen Sitz.
Setzen Sie die Abdeckungen 1 wieder ein und
setzen Sie die Endkappe
Leuchtengehäuse. Achten Sie auf den richtigen
Sitz.
Ihre Leuchte ist nun betriebsbereit.
.
2
3a
wieder auf das
Leuchtmittel auswechseln
VORSICHT! STROMSCHLAGGEFAHR!
Trennen Sie zum Auswechseln von Leuchtmitteln die
Leuchte zuerst vom Stromnetz. Entfernen Sie hierfür
die Sicherung oder schalten Sie den Leitungsschutzschalter im Sicherungskasten aus (0-Stellung).
VORSICHT! VERBRENNUNGSGEFAHR!
Lassen Sie die Leuchte vollständig abkühlen.
Wechseln Sie das Leuchtmittel 2 nur dann aus,
wenn es vollständig abgekühlt ist. Benutzen Sie
zum Auswechseln ein sauberes, fusselfreies Tuch.
Entfernen Sie die Endkappe 3b, indem Sie diese
durch leichtes Drücken aus der Verankerung
lösen und seitlich wegschieben.
Entfernen Sie die Abdeckungen 1, indem Sie
diese seitlich herausschieben.
Drehen Sie das Leuchtmittel 2 mit einer ¼ Um-
drehung und ziehen Sie es aus der Fassung
heraus.
Stecken Sie nun das neue Leuchtmittel 2 in
die Fassung und montieren Sie es mit einer
¼ Umdrehung. Überprüfen Sie den richtigen Sitz.
Hinweis: Verwenden Sie nur 220–240 V ∼
Leuchtmittel mit höchstens 18 Watt.
Setzen Sie die Abdeckungen 1 wieder ein
und die Endkappe
3b
auf.
Wartung und Reinigung
VORSICHT! STROMSCHLAGGEFAHR!
Trennen Sie zur Reinigung die Leuchte zuerst vom
Stromnetz. Entfernen Sie hierfür die Sicherung oder
schalten Sie den Leitungsschutzschalter im Sicherungskasten aus (0-Stellung).
VORSICHT! VERBRENNUNGSGEFAHR!
Lassen Sie die Leuchte vollständig abkühlen.
VORSICHT! STROMSCHLAGGEFAHR!
Aus Gründen der elektrischen Sicherheit darf die
Leuchte niemals mit Wasser oder anderen Flüssigkeiten gereinigt oder gar in Wasser getaucht werden.
Verwenden Sie zur Reinigung nur ein trockenes,
fusselfreies Tuch.
Benutzen Sie keine Lösungsmittel, Benzin o. ä.
Die Leuchte würde hierbei Schaden nehmen.
Entsorgung
Die Verpackung und das Verpackungsmaterial
bestehen ausschließlich aus umweltfreundlichen
Materialien. Sie können in den örtlichen Recyclingbehältern entsorgt werden.
Das Symbol der durchgestrichenen
Abfalltonne auf Rädern bedeutet, dass
das Gerät in der Europäischen Union
einer getrennten Müllsammlung zugeführt werden
muss. Dies gilt für das Gerät und alle mit diesem
Symbol gekennzeichneten Zubehörteile. Gekennzeichnete Geräte dürfen nicht über den normalen
Hausmüll entsorgt werden, sondern müssen an einer
Annahmestelle für das Recycling von elektrischen und
elektronischen Geräten abgegeben werden. Recycling
hilft, den Verbrauch von Rohstoffen zu reduzieren
und die Umwelt zu entlasten.
Garantie und Service
Garantieerklärung
3 Jahre Garantie ab Kaufdatum auf dieses Gerät, gilt
nur gegenüber dem Ersteinkäufer, nicht übertragbar.
21 DE/AT/CH
Page 22

Garantie und Service
Bitte Kassenbon als Nachweis aufbewahren. Die
Garantieleistung gilt nur für Material- oder Fabrikationsfehler, nicht aber für Verschleißteile oder für
Beschädigungen durch unsachgemäßen Gebrauch.
Die Garantie erlischt bei Fremdeingriff. Ihre gesetzlichen Rechte werden durch diese Garantie nicht
eingeschränkt. Im Garantiefall mit der Servicestelle
telefonisch in Verbindung setzen. Nur so kann eine
kostenlose Einsendung Ihres Geräts gewährleistet
werden.
Serviceadresse
Briloner Leuchten GmbH
Im Kissen 2, 59929 Brilon, Deutschland
Tel.: 0 29 61 / 97 12 - 0
Fax: 0 29 61 / 97 12 - 199
E-mail: Info@briloner.de
IAN 73850
Bitte halten Sie für alle Anfragen den Kassenbon
und die Artikelnummer (z. B. IAN 12345) als
Nachweis für den Kauf bereit.
Konformitätserklärung
Dieses Gerät erfüllt die Anforderungen der geltenden
europäischen und nationalen Richtlinien (Elektromagnetische Verträglichkeit 2004 / 108 / EC ,
Niederspannungsrichtlinie 2006 / 95 / EC). Die
Konformität wurde nachgewiesen. Entsprechende
Erklärungen und Unterlagen sind beim Hersteller
hinterlegt.
Hersteller
Briloner Leuchten GmbH
Im Kissen 2
59929 Brilon
Deutschland
22 DE/AT/CH
Page 23

23
Page 24

24
Page 25

Briloner Leuchten GmbH
Im Kissen 2
D-59929 Brilon
© by ORFGEN Marketing
Estado de las informaciones · Last Information Update
Stand der Informationen: 03 / 2012
Ident.-No.: 6401-186L032012-5
IAN 73850
 Loading...