

hAloGen cliP liGht
hAloGen cliP liGht
Operation and Safety Notes
hAloGÉn olV ASÓlÁmPA
Kezelési és biztonsági utalások
hAloGÉnoVÉ SVietiDlo So ŠtiPcom
Pokyny pre obsluhu a bezpečnostné pokyny
IAN 103126
hAloGenoWA lAmPA ZAciSKoWA
Wskazówki dotyczące obsługi i bezpieczeństwa
lAmPiČKA Se SVorKou
Pokyny pro obsluhu a bezpečnostní pokyny
hAloGen-Klemmleuchte
Bedienungs- und Sicherheitshinweise
Before reading, unfold the page containing the illustrations and familiarise yourself with all functions of the
device.
Przed przeczytaniem proszę rozłożyć stronę z ilustracjami, a następnie proszę zapoznać się z wszystkimi
funkcjami urządzenia.
Olvasás előtt kattintson az ábrát tartalmazó oldalra és végezetül ismerje meg a készülék mindegyik
funkcióját.
Před čtením si otevřete stranu s obrázky a potom se seznamte se všemi funkcemi přístroje.
Pred čítaním si odklopte stranu s obrázkami a potom sa oboznámte so všetkými funkciami prístroja.
Klappen Sie vor dem Lesen die Seite mit den Abbildungen aus und machen Sie sich anschließend mit allen
Funktionen des Gerätes vertraut.
GB Operation and Safety Notes Page 5
PL Wskazówki dotyczące obsługi i bezpieczeństwa Strona 11
HU Kezelési és biztonsági utalások Oldal 17
CZ Pokyny pro obsluhu a bezpečnostní pokyny Strana 23
SK Pokyny pre obsluhu a bezpečnostné pokyny Strana 29
DE / AT / CH Bedienungs- und Sicherheitshinweise Seite 35
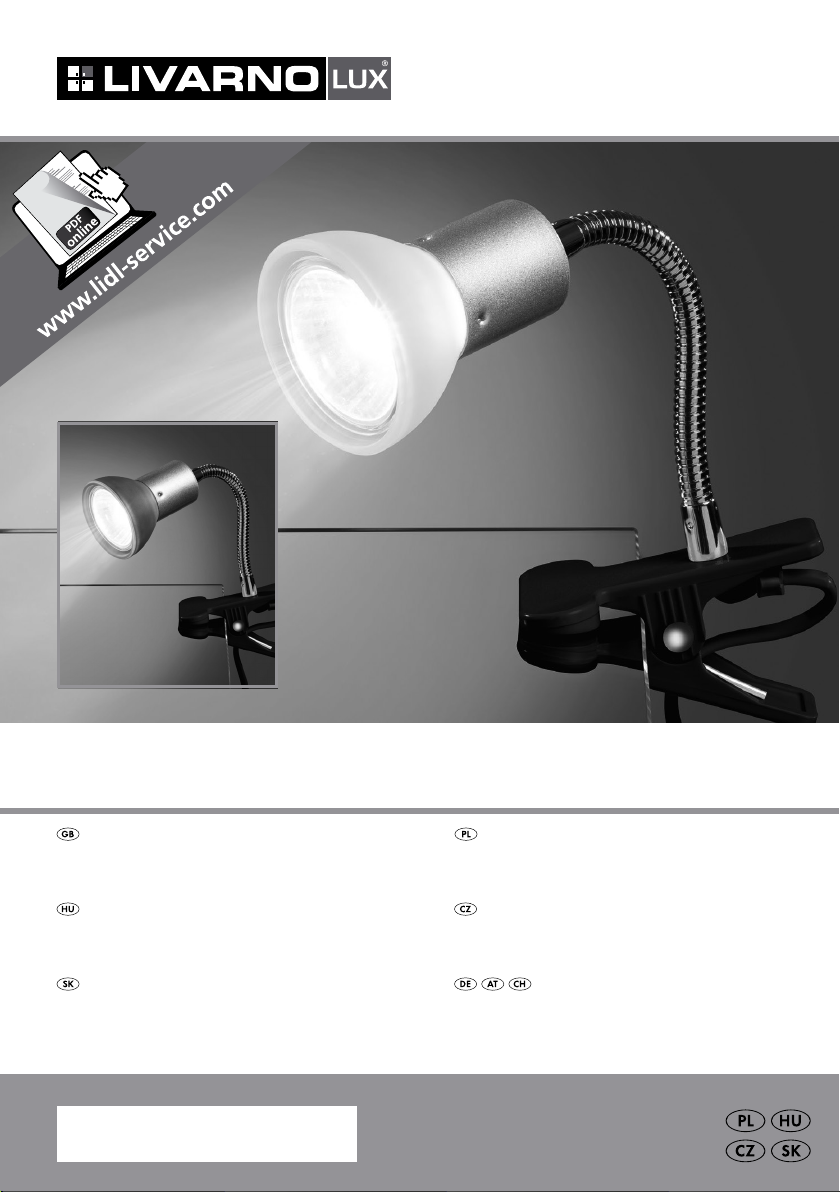
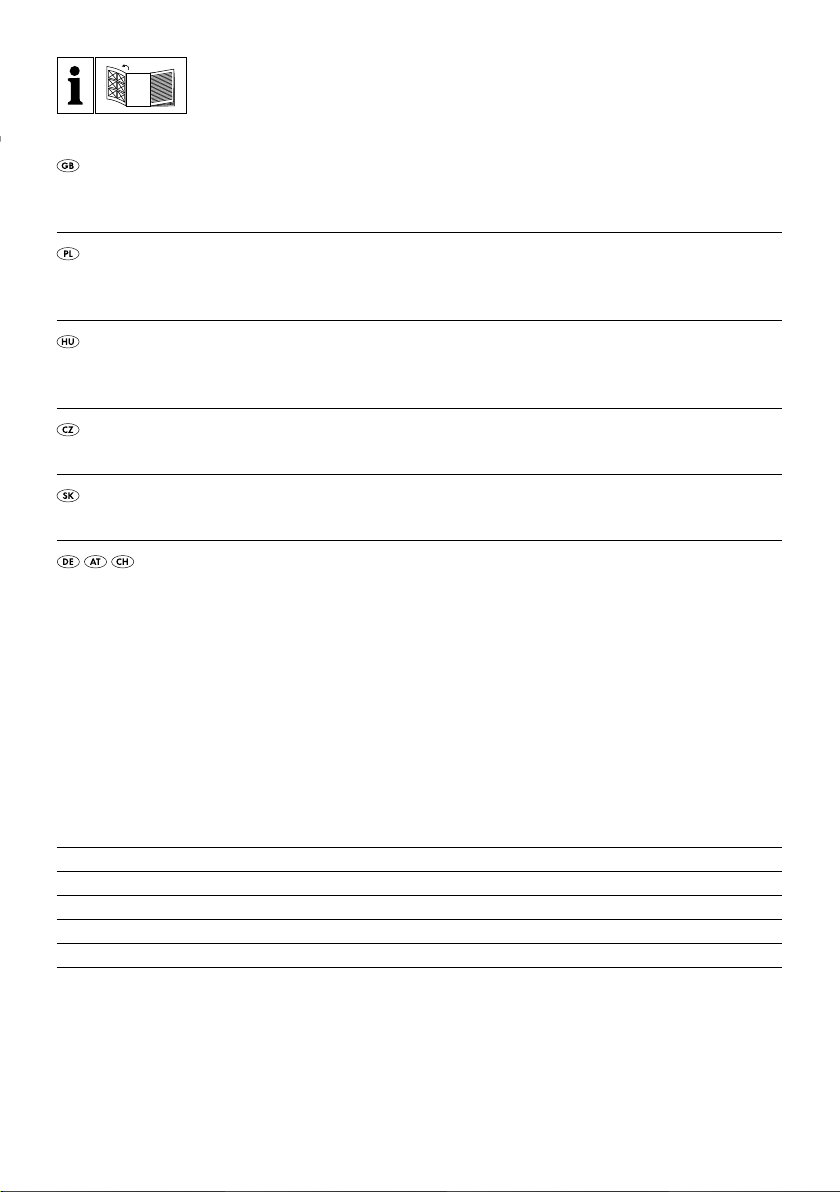
A
2973-010L
2973-016L
1
2
3
4
5
B
2
3
1
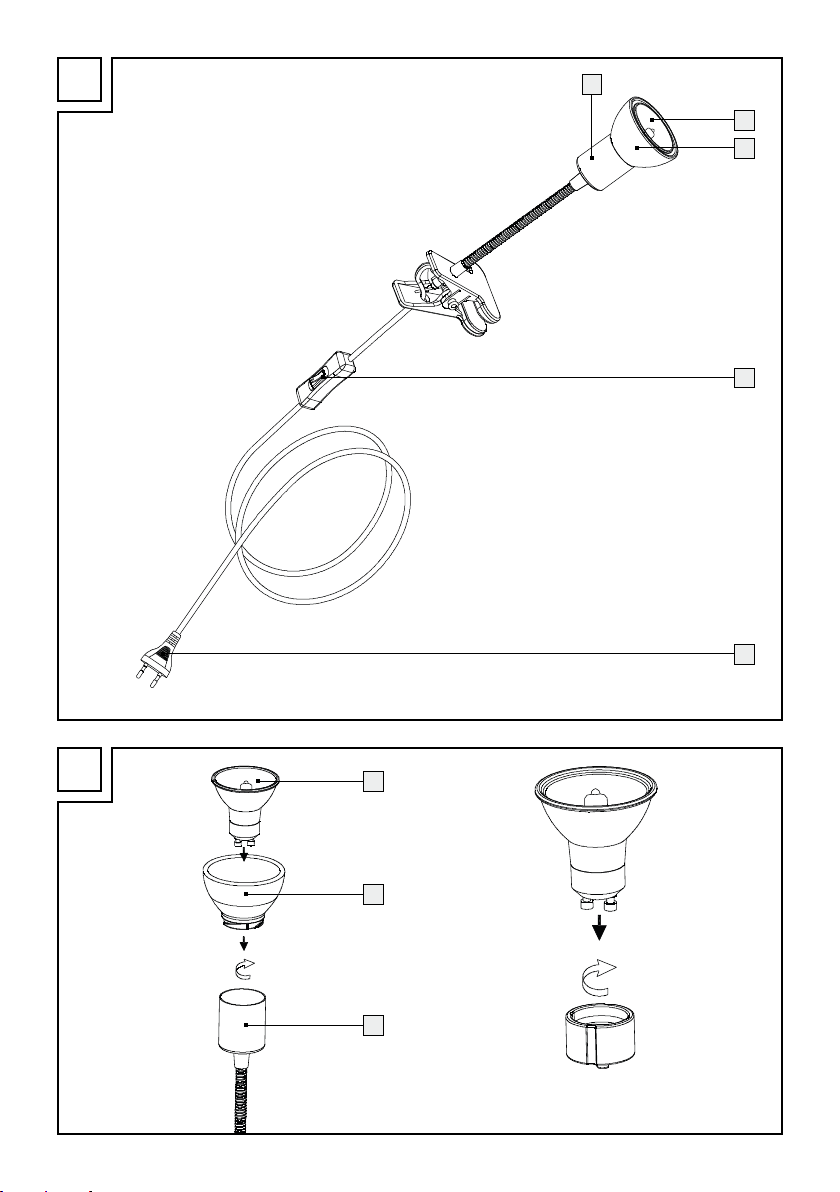
A
2972-014L
2972-016L
1
2
6
4
5
B
6
2
1
Table of Contents
Introduction
Proper use ........................................................................................................................................... Page 6
Included items ..................................................................................................................................... Page 6
Description of parts ............................................................................................................................ Page 6
Technical information ......................................................................................................................... Page 6
Safety
Safety advice ...................................................................................................................................... Page 6
Assembly
Fitting the light ..................................................................................................................................... Page 7
Operation
On / Off sw itch ................................................................................................................................... Page 7
Directing the spotlight......................................................................................................................... Page 8
Changing the bulbs ............................................................................................................................ Page 8
Maintenance and Cleaning ............................................................................................. Page 8
Disposal ............................................................................................................................................ Page 8
Warranty and Service
Guarantee ........................................................................................................................................... Page 8
Service address .................................................................................................................................. Page 9
Declaration of Conformity ................................................................................................................. Page 9
Manufacturer ...................................................................................................................................... Page 9
5 GB

Introduction / Safety
Halogen Clip Light
Q
Introduction
We congratulate you on the purchase of
your new device. You have chosen a high
quality product. Please read carefully
and completely through these operating instructions.
Fold out the page with the illustrations. These instructions form part of the product and contain important
information about bringing the product into use and
its handling. Always observe all the safety advice.
Check that the correct mains voltage is available
and that all the parts have been properly assembled
before bringing into use. Should you have any
questions or be uncertain as to how to operate the
device, please get in touch with your dealer or service point. Please keep these instructions in a safe
place and hand them on to a third party if necessary.
Q
Proper use
This light is designed only for use indoors, in dry
and enclosed rooms. The light can be attached to
any surface classified as normally inflammable,
except pipes. Any use other than that described
above or modification to the lamp is not permitted
and may lead to damage to people or property.
Moreover, there is the risk of injury or loss of life and
that the lamp may develop technical faults such as
short circuit or fire or give an electric shock.
This lamp is intended for use only in a domestic
environment.
Q
Description of parts
1
Spotlight
2
Bulb
3
Glass shade (model 2973)
4
ON / OFF in-line switch
5
Mains lead with plug
6
Chrome ring (model 2972)
Q
Technical information
Operational voltage: 2 30–240 V~, 50 - 60 Hz
Bulb: 35 W
Maximum nominal
output: 1 x 35 W
Protection category: II /
Model: 2973-010L (Spot head blue)
2973-016L (Spot head white)
2972-014L (Spot head titanium)
2972-016L (Spot head white)
Q
Safety
Safety advice
The right to claim under the guarantee shall be
rendered invalid in respect of damage caused by
the non-observance of these operating instructions!
No liability is accepted for consequent damage!
No liability is accepted for damage to property
or persons caused by improper handling or nonobservance of the safety advice!
Q
Included items
Check that all the items and accessories are present and that the lamp is in perfect condition
immediately after unpacking.
1 Halogen Clip Lamp (1-light spotlight)
1 Bulb GU 10, 35 W
1 Glass shade
1 Operating instructions
6 GB
To avoid danger to life
from electric shock
Every time before connecting the lamp the mains,
check it and the mains lead for damage. Never
use your light if you find it is damaged in any way.
CAUTION! A damaged mains lead presents
a serious danger to life from electric shock.
In the event of damage, repairs or other problems
with the lamp please contact the service centre
or an electrician.
Never let the lamp come into contact with
water or other liquids.
Never open any electrical fittings such as in-line
switches, transformers etc. or allow any object
to be inserted into them. This sort of interference
can lead to a serious danger to life from
electric shock.
To avoid danger of fire and injury
RISK OF INJURY! Check every bulb and
lampshade for damage immediately upon unpacking. Do not fit the light if the bulbs and / or
lampshades are faulty. If they are, contact the
service point for a replacement.
RISK OF INJURY FROM BURNS! Ensure
the lamp has been switched off and allowed to
cool before you touch it. In this way you will
avoid the danger of burns. Bulbs give off a lot
of heat around the top of the lamp.
Allow the lamp to cool for at least 15 minutes
before replacing a defective bulb.
Replace defective bulbs immediately. Before
replacing the bulb always remove the plug
from the mains socket.
DANGER OF FIRE! Install the
0.3 m
spotlight so that it is at least 0.3 m
from any illuminated materials.
Never leave the spotlight operating unattended.
Fire can result from the development of too
much heat.
This light is not suitable for use as a night light.
Do not allow the lamp or the packaging materials
to lie around unattended. Plastic film or bags,
Styrofoam etc. can turn into dangerous toys for
children.
Do not attach the lamp to damp or conductive
substrates.
Only use halogen illuminants with a
covering pane or in low-pressure
technology.
With this symbol, no “cool beam”
illuminant must be used.
Safety / Assembly / Operation
Working safely
Only use 230–240 V bulbs with a GU 10
base and a maximum output of 35 Watts.
Fit the light in such a way to ensure it is
protected from damp and dirt.
Do not attach this spotlight to pipes.
Q
Assembly
Q
Fitting the light
Use a clean, fluff-free cloth when you are fitting
the bulb.
Modell 2973:
Fit the bulb 2 and the glass shade 3 on to
the spotlight together (see Fig. B). Use a dry, flufffree cloth for this. First put the bulb
glass shade
3
. Insert the bulb 2 carefully
into the fitting and attach it along with the glass
3
shade
press the glass shade
by turning it a ¼ turn clockwise. Now
3
into the spotlight 1
and lock it in place by turning it a ¼ turn clockwise. Check that everything is correctly seated.
Model 2972:
Insert the light bulb 2 into the socket and
install with a ¼ turn to the right.
Place the chrome ring 6 onto the light bulb
2
and secure with a little pressure. Check for
correct seating.
Clamp the spotlight on to a suitable object.
Note: make sure that the anti-slip rubbers and
the bracket are secure.
Insert the mains plug 5 (attached to the mains
lead) into the mains socket.
Your spotlight is now ready for operation.
Q
Operation
Q
On / Off switch
Flip the ON / OFF in-line switch 4 to turn the
spotlight on or off.
2
into the
7 GB
Operation / Maintenance and Cleaning / Disposal / Warranty and Service
Q
Directing the spotlight
Only change the direction of the spotlight 1
after the light has been switched off.
Allow the lamp to cool down completely.
Turn the spotlight 1 in the desired direction. The
spotlight
Q
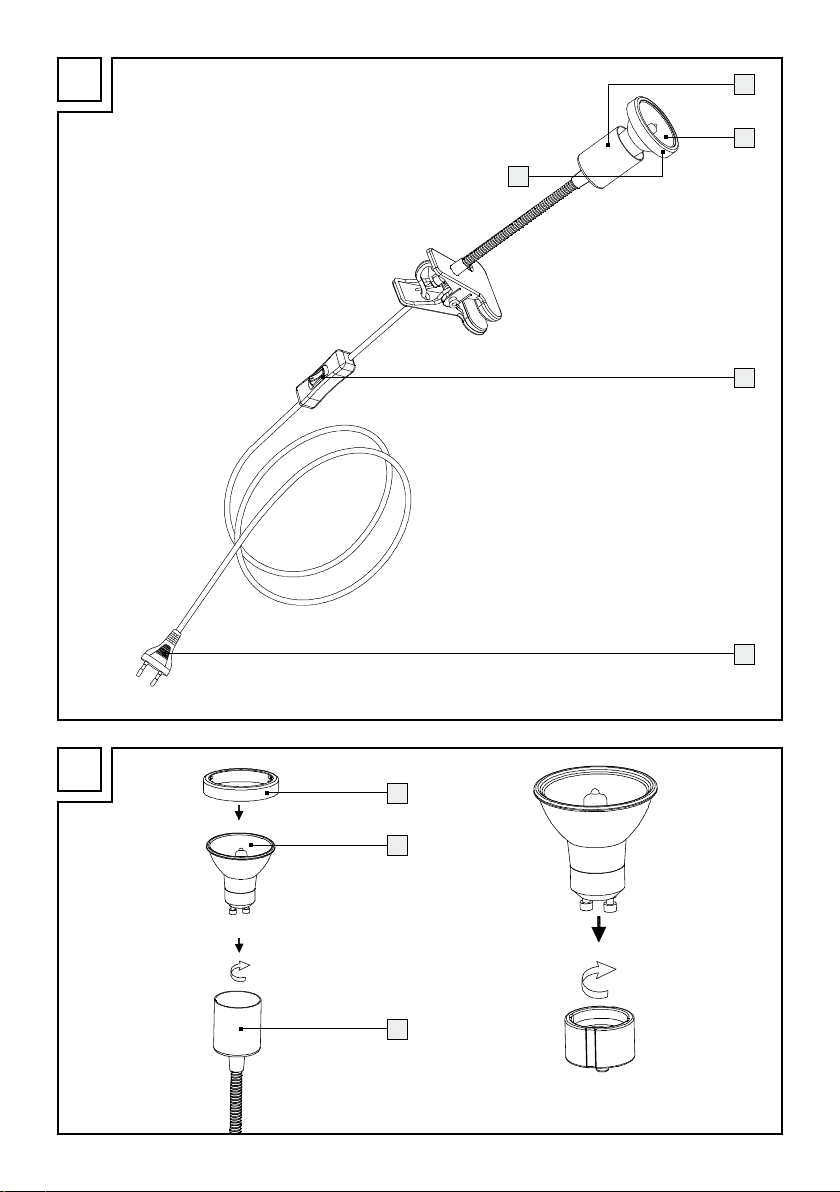
Changing the bulbs
1
can be turned to face any direction.
CAUTION! DANGER OF ELECTRIC
SHOCK! First pull the plug
5
attached to the
mains lead out of the mains socket.
Allow the lamp to cool down completely.
Only change the bulb
2
when it has completely
cooled down. Use a clean, lint-free cloth when
changing light bulbs.
Model 2973:
Release the defective light bulb 2 from the
socket with a ¼ turn to the left.
ATTENTION: When you loosen the bulb
you also loosen the glass shade
3
2
.
Make sure you hold on to it.
Only use 230–240 volt light bulbs 2 with a
maximum of 35 Watts and a GU 10 base.
Now fit the new bulb 2 and the glass shade 3
on to the spotlight together (see Fig. B). First
put the bulb
the bulb
it along with the glass shade
2
into the glass shade 3. Insert
2
carefully into the fitting and attach
3
by turning it a
¼ turn clockwise. Now press the glass shade
into the spotlight
1
and lock it in place by
turning it a ¼ turn clockwise.
Check that everything is correctly seated.
Model 2972:
Remove the chrome ring 6 from the light
2
bulb
.
Release the defective light bulb 2 from the
socket with a ¼ turn to the left.
Install the new light bulb 2 with a ¼ turn to
the right.
Place the chrome ring 6 onto the light bulb 2
and secure with a little pressure. Check for
correct seating.
Q
Maintenance and Cleaning
CAUTION! DANGER OF ELECTRIC
SHOCK! First pull the plug
5
attached to the
mains lead out of the mains socket.
Do not use any solvents, petrol or similar. This
would cause damage to the light.
Allow the lamp to cool down completely.
CAUTION! DANGER OF ELECTRIC
SHOCK! For reasons of electrical safety, the
light must never be cleaned with water or other
fluids or be immersed in water. When cleaning,
only use a dry, lint-free cloth.
Q
Disposal
The packaging and ancillary packing
consist entirely of environmentally-friendly materials. They can be disposed of at
your local recycling facility.
The symbol of the wheelie bin with the line
through it means that, in the European
Union, the product has to be disposed
of in a separate refuse collection. This applies to
the product and to all components bearing this
symbol. Products marked in this way may not be
disposed of along with normal domestic waste but
have to be handed in at a recycling collection point
for electrical and electronic appliances. Recycling
3
helps to reduce the consumption of raw materials
and to ease the burden on the environment.
Q
Warranty and Service
Q
Guarantee
You receive a 36 month warranty on this product,
valid from the date of purchase.
The device has been carefully produced under
strict quality control.
Within the warranty period we shall rectify without
charge all material and manufacturing defects. In
the event of a defect arising during the warranty
period, please send the device to the listed Service
8 GB
Centre address, making reference to the following
article number: 2973-010L / 2973-016L /
2972-014L / 2972-016L.
Wear parts (such as bulbs) and damage caused
by improper handling, non-observance of the operating instructions or unauthorised interference are
excluded from the warranty.
The performance of services under the warranty
does not extend or renew the warranty period.
Q
Service address
Briloner Leuchten GmbH
Im Kissen 2, 59929 Brilon, Germany
Tel.: +49(0) 29 61 / 9712–0
Fax: +49(0) 29 61 / 97 12–199
E-Mail: Info@briloner.de
www.briloner.de
IAN 103126
Please have your receipt and the product number
(e.g. IAN 12345) available for all queries as proof
of purchase.
Warranty and Service
Q
Declaration of Conformity
This product fulfils the requirements of the applicable
European and national directives (Electromagnetic
Compatibility 2004 / 108 / EC, Low Voltage
Directive 2006 / 95 / EC, Ecodesign Directive
2009/125/EC, RoHS Directive 2011/65/EU).
Conformity has been demonstrated. The relevant
declarations and documents are held by the
manufacturer.
Manufacturer
Briloner Leuchten GmbH
Im Kissen 2
59929 Brilon
Germany
9 GB
10

Spis zawartości
Wstęp
Użytkowanie urządzenia zgodne z przeznaczeniem ................................................................. Strona 12
Zakres dostawy ...............................................................................................................................Strona 12
Opis części .......................................................................................................................................Strona 12
Dane techniczne .............................................................................................................................. Strona 12
Bezpieczeństwo
Wskazówki dotyczące bezpieczeństwa ....................................................................................... Strona 12
Montaż
Montaż oprawy oświetleniowej.....................................................................................................Strona 13
Obsługa
Włącza nie / wyłąc zanie .................................................................................................................Strona 14
Ustawianie spota ............................................................................................................................. Strona 14
Wymiana źródła światła ................................................................................................................ Strona 14
Konserwacja i czyszczenie ...........................................................................................Strona 14
Usuwanie odpadów ...........................................................................................................Strona 15
Gwarancja i serwis
Gwarancja ....................................................................................................................................... Strona 15
Adres serwisu ...................................................................................................................................Strona 15
Deklaracja zgodności ..................................................................................................................... Strona 15
Producent .........................................................................................................................................Strona 15
11 PL
Wstęp / Bezpieczeństwo
Halogenowa lampa zaciskowa
Q
Wstęp
Gratulujemy zakupu nowego urządzenia.
Tym samym zdecydowali się Państwo na
zakup produktu wysokiej jakości. Proszę
dokładnie przeczytać całą niniejszą instrukcję obsługi. Proszę wypiąć stronę z rysunkami. Iniejsza instrukcja obsługi należy do produktu. Zawiera ona
ważne wskazówki dotyczące uruchamiania i posługiwania się produktem. Zawsze należy przestrzegać wszystkich wskazówek dotyczących bezpieczeństwa. Przed uruchomieniem proszę sprawdzić,
czy występuje prawidłowe napięcie, i czy wszystkie
części są prawidłowo zamontowane. Jeżeli mielibyście Państwo pytania lub bylibyście niepewni co
do obchodzenia się z urządzeniem, to proszę
skontaktować się ze sprzedawcą lub punktem serwisowym. Proszę starannie przechowywać niniejszą
instrukcję obsługi, a w razie oddania urządzenia
osobom trzecimprzekazać ją wraz z nim.
Q
Użytkowanie urządzenia
zgodne z przeznaczeniem
Oprawa oświetleniowa nadaje się wyłącznie do
pracy we wnętrzach, w pomieszczeniach suchych
i zamkniętych. Oprawa może być mocowana na
wszystkich zwyczajnie palnych powierzchniach, z
wyjątkiem rur. Inne zastosowanie niż opisane powyżej lub dokonanie zmiany w urządzeniu jest
niedozwolone i prowadzi do jego uszkodzenia.
Skutkiem mogą być ponadto dalsze zagrożenia
niebezpieczne dla życia i obrażenia ciała oraz
nieprawidłowe funkcjonowanie techniczne
(na przykład zwarcie, pożar, porażenie prądem
elektrycznym).
Niniejsze urządzenie jest przewidziane do stosowania
wyłącznie w prywatnych gospodarstwach domowych.
Q
Zakres dostawy
Bezpośrednio po wypakowaniu należy zawsze
skontrolować dostawę pod względem kompletności
oraz nienagannego stanu urządzenia.
1 Halogenowa lampka z klipsem
(1-płomieniowa oprawa typu spot)
1 Źródło światła GU 10, 35 W
1 Szklany klosz
1 Instrukcja obsługi
Q
Opis części
1
Oprawa typu spot
2
Źródło światła
3
Szklany klosz (model 2973)
4
Wyłącznik sznurowy
5
Kabel sieciowy z wtyczką
6
Pierścień chromowany (model 2972)
Q
Dane techniczne
Napięcie robocze: 230–240 V ~, 50–60 Hz
Źródło światła: 35 W
Moc znamionowa
maksymalna: 1 x 35 W
Klasa ochrony: II /
Model:
2973-016L (głowica biała)
Q
Bezpieczeństwo
2973-010L (głowica niebieska)
2972-014L (głowica tytan)
2972-016L (głowica biała)
Wskazówki dotyczące
bezpieczeństwa
W przypadku szkód, które powstały wskutek nieprzestrzegania niniejszej instrukcji obsługi wygasa
roszczenie gwarancyjne! Za szkody pośrednie nie
ponosimy żadnej odpowiedzialności!
W przypadku szkód materialnych lub osobowych,
które powstały wskutek niewłaściwego obchodzenia
12 PL
Bezpieczeństwo / Montaż
się z urządzeniem lub nieprzestrzegania wskazówek
dotyczących bezpieczeństwa nie ponosimy żadnej
odpowiedzialności!
Unikać zagrożenia życia
wskutek porażenia prądem
elektrycznym
J Przed każdym podłączeniem do sieci należy
skontrolować lampę i kabel przyłączeniowy
pod względem ewentualnych uszkodzeń.
Nigdy nie należy używać oprawy oświetleniowej,
jeżeli zostaną stwierdzone jakiekolwiek uszkodzenia.
m OSTROŻNIE! Uszkodzone kable sieciowe
oznaczają zagrożenie życia wskutek porażenia
prądem elektrycznym. W przypadku uszkodzeń,
napraw lub innych problemów z oprawą
oświetleniową należy zwrócić się do punktu
serwisowego lub fachowca-elektryka.
J Należy bezwzględnie unikać kontaktu oprawy
oświetleniowej z wodą lub innymi cieczami.
J Nigdy nie otwierać komponentów elektrycznych
(np. wyłącznika sznurowego, transformatora itp.)
i nie wkładać do nich żadnych przedmiotów.
Tego rodzaju działania stanowią zagrożenie
dla życia w wyniku ewentualnego porażenia
elektrycznego.
Unikać zagrożenia pożarowego
i zagrożenia obrażeniami ciała
J ZAGROŻENIE OBRAŻENIAMI CIAŁA!
Bezpośrednio po wypakowaniu należy skontrolować każde źródło światła i klosz pod
względem uszkodzeń. Proszę nie montować
oprawy oś wietleniowej z uszkodzonymi źródłami światła i/lub kloszami. W takim przypadku
w celu otrzymania części zamiennej należy
skontaktować się z punktem serwisowym.
J ZAGROŻENIE OPARZENIEM! Aby uniknąć
oparzenia należy upewnić się przed dotknięciem
lampy, że jest ona wyłączona i ochłodzona.
Źródła światła wytwarzają w obrębie głowicy
lampy silne gorąco.
J Przed wymianą uszkodzonego źródła światła
pozwól, żeby lampa ochłodziła się przez co
najmniej 15 minut.
J Wymieniać od razu uszkodzone źródła światła
na nowe. Przed wymianą źródła światła wyjąć
wtyczkę z gniazdka wtykowego.
J
NIEBEZPIECZEŃSTWO POŻA-
0,3 m
RU! Montować oprawę oświetlenio-
wą co najmniej 0,3 m od materiałów,
na które pada strumień światła.
J Nie pozostawiać włączonej oprawy oświetle-
niowej bez nadzoru. Nadmierna emisja ciepła
może prowadzić do powstania pożaru.
J Lampa ta nie nadaje się na lampkę nocną.
J Nie pozostawiać lampy lub materiału opako-
waniowego w nieładzie. Folie / woreczki
plastykowe, części plastykowe itp. mogą stać
się niebezpieczną zabawką dla dzieci.
J Lampy nie należy mocować na wilgotnym lub
przewodzącym podłożu.
J
Należy używać jedynie świetlówki
halogenowe z oprawką lub świetlówki wykonane w technice niskoci-
śnieniowej.
J
Przy tym znaku nie można używać
świetlówek „cool beam”.
Sposób prawidłowego
postępowania
J Należy stosować wyłącznie źródła światła
230–240 V z cokołem GU 10 i o maksymalnej
mocy 35 W.
J Oprawę oświetleniową należy zamontować
w taki sposób, żeby była chroniona przed
wilgocią i zanieczyszczeniem.
J Nie montować oprawy oświetleniowej
na rurach.
Q
Montaż
Q
Montaż oprawy oświetleniowej
j Do montażu żarόwki należy używać czystej,
nie strzępiącej się ścierki.
13 PL

Montaż / Obsługa / Konserwacja i czyszczenie
Model 2973:
j Montować źródło światła
kloszem
3
(patrz rys. B). Użyć do tego celu
2
razem ze szklanym
suchej szmatki nie pozostawiającej fuzli. Umieścić
najpierw źródło światła
3
. Następnie włożyć źródło światła 2 ostroż-
2
w szklanym kloszu
nie w oprawę i zamontować razem ze szklanym
kloszem
Wcisnąć szklany klosz
3
, obracając o ¼ obrotu w prawo.
3
w oprawę 1 i zablokować obracając o ¼ obrotu w prawo. Sprawdzić, czy klosz jest prawidłowo zamocowany.
Model 2972:
Następnie włożyć żarówkę 2 do oprawy
izamocować, przekręcając o¼ obrotu w
prawo.
Nałożyć pierścień chromowany 6 na
żarówkę
2
i zamocować lekko dociskając.
Sprawdzić, czy jest dobrze zamocowany.
j Zamocować oprawę oświetleniową przy
pomocy uchwytu zaciskowego w odpowiednim
miejscu.
Wskazówka: Uważać, aby guma antypoślizgowa i klamra były śliśle nałożone.
j Włożyć wtyczkę kabla sieciowego
5
do
gniazdka wtykowego. Oprawa oświetleniowa
jest gotowa do pracy.
Q
Obsługa
Q
Włączanie / wyłączanie
j Pociągnąć za wyłącznik sznurowy 4, żeby
włączyć względnie wyłączyć lampę.
Q
Ustawianie spota
Q
Wymiana źródła światła
m OSTROŻNIE! NIEBEZPIECZEŃSTWO
PORAŻENIA PRĄDOWEGO! Wyjąć naj-
pierw z gniazdka wtykowego wtyczkę
5
kabla sieciowego.
j Lampa musi się zupełnie ochłodzić.
j Również źródło światła
2
należy wymienić
dopiero wtedy, gdy całkowicie ochłodziło się.
Do wymiany należy użyć czystej, niepozostawiającej nitek szmatki.
Model 2973:
Wyjąć uszkodzoną żarówkę 2 do oprawy
przekręcając o¼ obrotu w lewo.
UWAGA: Podczas odkręcania źródła światła
2
odkręca się również szklany klosz 3.
Należy go przytrzymać.
j Stosować jedynie żarówki 230–240 Volt
2
o
maksymalnej mocy 35 wat i oprawce GU 10.
j Montować nowe źródło światła
szklanym kloszem
3
(patrz rys. B). Umieścić
najpierw źródło światła
3
. Następnie włożyć źródło światła 2
2
razem ze
2
w szklanym kloszu
ostrożnie w oprawę i zamontować razem ze
szklanym kloszem
prawo. Wcisnąć szklany klosz
3
, obracając o ¼ obrotu w
3
w oprawę 1
i zablokować obracając o ¼ obrotu w prawo.
Sprawdzić, czy klosz jest prawidłowo zamocowany.
Model 2972:
Zdjąć pierścień chromowany 6 z żarówki 2.
Wyjąć uszkodzoną żarówkę 2 do oprawy
przekręcając o¼ obrotu w lewo.
Zamontować nową żarówkę 2 do oprawy
przekręcając o¼ obrotu w prawo.
Nałożyć pierścień chromowany 6 na
żarówkę
2
i zamocować lekko dociskając.
Sprawdzić, czy jest dobrze zamocowany.
j Ustawienie spota 1 należy zmieniać wyłącz-
nie wtedy, kiedy oświetlenie jest wyłączone.
Lampa musi się zupełnie ochłodzić.
j Obrócić oprawę
kierunku. Oprawa
14 PL
1
za głowicę w pożądanym
1
daje się dowolnie obracać.
Q
Konserwacja i czyszczenie
c OSTROŻNIE! NIEBEZPIECZEŃSTWO
PORAŻENIA PRĄDOWEGO! Wyjąć
najpierw z gniazdka wtykowego wtyczkę
kabla sieciowego.
J Nie używać żadnych rozpuszczalników,
5

Konserwacja i czyszczenie / Usuwanie odpadów / Gwarancja i serwis
benzyny itp. Oprawa oświetleniowa mogłaby
zostać przy tym uszkodzona.
j Lampa musi się zupełnie ochłodzić.
c OSTROŻNIE! NIEBEZPIECZEŃSTWO
PORAŻENIA PRĄDOWEGO! Ze wzglę-
du na bezpieczeństwo elektryczne nigdy nie
wolno czyścić oprawy oświetleniowej wodą
lub innymi cieczami, ani tym bardziej zanurzać
jej w wodzie. Do czyszczenia należy używać
tylko niepozostawiającej nitek suchej szmatki.
Q
Usuwanie odpadów
Opakowanie i materiał opakowania
składają się wyłącznie z materiałów nie-
szkodliwych dla środowiska. Mogą one
być wyrzucane do miejscowych pojemników na
odpady do recyklingu.
Symbol przekreślonego pojemnika na
odpady oznacza, iż w Unii Europejskiej
produkt winien być usuwany osobno.
Dotyczy to produktu i wszystkich części wyposażenia oznaczonych tym symbolem. Oznaczonych w
ten sposób produktów nie można wyrzucać do odpadów komunalnych, lecz muszą być oddane do
punktu zbiórki zużytych urządzeń elektrycznych i
elektronicznych do recyklingu. Recykling przyczynia
się do zmniejszenia zużycia surowców i zanieczyszczenia środowiska.
Q
Gwarancja i serwis
Q
Gwarancja
W momencie zakupu otrzymują Państwo na to
urządzenie 36 miesiące gwarancji.
Urządzenie zostało wyprodukowane starannie i
poddane dokładnej kontroli jakościowej. Jeśli mimo
wszystko w okresie gwarancji ujawnione zostaną
wady, proszę przesłać urządzenie na podany adres serwisowy z uwzględnieniem następującego
numeru artykułu: 2973-010L / 2973-016L /
2972-014L / 2972-016L.
W czasie trwania okresu gwarancji usuniemy bez-
płatnie wszystkie wady materiałowe i produkcyjne.
Gwarancji nie podlegają uszkodzenia spowodowane przez nieprawidłowe użytkowanie,
nieprzestrzeganie instrukcji obsługi lub ingerencję
nieautoryzowanych osób, a także części
szybkozużywające się (jak np. źródła światła).
Usługa gwarancyjna nie przedłuża ani nie
odnawia okresu gwarancji.
Adres serwisu
Briloner Leuchten GmbH
Im Kissen 2, 59929 Brilon, Niemcy
Tel.: +49 (0) 29 61 / 97 12–0
Faks: +49 (0) 29 61 / 97 12–199
Adres E-Mail: Info@briloner.de
www.briloner.de
IAN 103126
Przed skontaktowaniem się z działem serwisowym
należy przygotować paragon i numer artykułu
(np. IAN 12345) jako dowód zakupu.
Q
Deklaracja zgodności
Niniejszy produkt spełnia wymagania obowiązujących dyrektyw europejskich i krajowych (Odpowiedniość elektromagnetyczna 2004 / 108 / EC,
Dyrektywa dla niskich napięć 2006 / 95 / EC,
Dyrektywa w sprawie ekoprojektu
2009 / 125 / WE, dyrektywa RoHS 2011 / 65 / UE).
Zgodność została wykazana. Odpowiednie
objaśnienia i podkładki dokumentacyjne są zdeponowane u producenta.
Producent
Briloner Leuchten GmbH
Im Kissen 2
59929 Brilon
Niemcy
15 PL

16

Tartalomjegyzék
Bevezetés
Rendeltetésszerű használat ...........................................................................................................Oldal 18
Csomagolás tartalma .....................................................................................................................Oldal 18
A részek megnevezése...................................................................................................................Oldal 18
Műszaki adatok ..............................................................................................................................Oldal 18
Biztonság
Biztonsági tudnivalók .....................................................................................................................Oldal 18
Szerelés
A lámpa felszerelése ......................................................................................................................Oldal 19
Kezelés
Be- / k ikapcsolás .............................................................................................................................Oldal 20
A spot beállítása .............................................................................................................................Oldal 20
A világító eszköz cseréje ...............................................................................................................Oldal 20
Karbantartás és tisztítás ............................................................................................... Oldal 20
Megsemmisítés ...................................................................................................................... Oldal 20
Garancia és szerviz
Garancia .........................................................................................................................................Oldal 21
Szerviz címe ....................................................................................................................................Oldal 21
Megfelelőségi nyilatkozat .............................................................................................................Old al 21
Gyártó ............................................................................................................................................. Oldal 21
17 HU

Bevezetés / Biztonság
Halogén olvasólámpa
Q
Bevezetés
Gratulálunk új készülékének vásárlásához.
Ezzel egy kiváló minőségű termék
mellett döntött. Kérjük, olvassa el
gondosan és végig ezt a kezelési útmutatót. Nyissa
fel az ábrákat tartalmazó oldalt. Ez az útmutató
ehhez a termékhez tartozik és fontos tudnivalókat
tartalmaz az üzembevétellel és a kezeléssel
kapcsolatban. Mindig tartsa szem előtt a biztonsági
utasításokat. Az üzembevétel előtt vizsgálja meg,
hogy a megfelelő feszültség rendelkezésre áll-e és
hogy mindegyik rész helyesen van-e összeszerelve.
Amennyiben a készülék kezelésével kapcsolatban
kérdései lennének, vegye fel a kapcsolatot a
kereskedőjével vagy a szervizzel. Őrizze meg jól
ezt az utasítást és adott esetben adja tovább a
harmadik félnek.
Q
A részek megnevezése
1
Spot
2
Világító eszköz
3
Lámpaüveg (modell 2973)
4
BE- / Ki-kapcsoló a zsinóron
5
Hálózati kábel hálózati dugóval
6
Króm-gyűrű (modell 2972)
Q
Műszaki adatok
Üzemi feszültség: 230 – 240 V ~, 50-60 Hz
Izzó: 35 W
Maximális névleges
teljesítmény: 1 x 35 W
Védelmi osztály: II /
Modell: 2973-010L (kék spotfej)
2973-016L (fehér spotfej)
2972-014L (titán spotfej)
2972-016L (fehér spotfej)
Q
Rendeltetésszerű használat
Ez a lámpa kizárólag beltéri, száraz és zárt
helyiségekben történő üzemelésre alkalmas. A
lámpát a csöveket kivéve minden normál gyúlékony
felületre fel szabad erősíteni. Az előbb leírtaktól eltérő
alkalmazás, vagy a készülék megváltoztatása nem
megengedett és károsodásokhoz vezet. Ezenkívül
a következmények további életveszélyes helyzetek
és sérülések, valamint műszaki hibák (pld.
rövidzárlat, tűz, áramütés) lehetnek. Ez a készülék
csak háztartásokban való használatra készült.
Q
Csomagolás tartalma
A kicsomagolás után közvetlenül ellenőrizze a
szállítási terjedelem teljességét, valamint a készülék
kifogástalan állapotát.
1 halogén csíptetős lámpa, (1-égős spotlámpa)
1 izzó GU 10, 35 W
1 lámpaüveg
1 használati útmutató
18 HU
Q
Biztonság
Biztonsági tudnivalók
Olyan károk esetén, amelyek ennek a kezelési
útmutatónak a figyelmen kívül hagyásából erednek,
a garancia érvényét veszti! A következményekből
eredő károkért a gyártó nem vállal felelősséget!
Azokért a tárgyi-, vagy személyi sérülésekért,
amelyek a szakszerűtlen kezelésből, vagy a
biztonsági tudnivalók figyelmen kívül hagyásából
erednek, a gyártó nem vállal felelősséget!
Kerülje az áramütés általi
életveszélyt
Minden egyes a hálózatra való csatlakoztatás
előtt vizsgálja meg a készüléket és a hálózati
csatlakozó kábelt, azok esetleges sérülései
tekintetében. Soha ne használja a lámpáját,
valamiféle károsodásokat állapit meg rajta.

Biztonság / Szerelés
VIGYÁ ZAT! Sérült hálózati kábelek áramütés
általi életveszélyt rejtenek. A lámpa
meghibásodása, javítások szükségessége vagy
más problémák előállása esetén forduljon a
szervizhez vagy egy villanyszerelőhöz.
Feltétlenül kerülje el a lámpának vízzel, vagy
más folyadékkal való érintkezését.
Soha ne nyisson fel elektromos üzemű eszközt
(pl. zsinór-kapcsolót, transzformátort, vagy
mást), illetve ne dugdosson bele tárgyakat. Az
ilyenszerű beavatkozások áramütés általi
életveszélyt jelentenek.
Kerülje a tűz és
sérülésveszélyeket
SÉRÜLÉSVESZÉLY! Közvetlenül a
kicsomagolás után vizsgálja meg mindegyik
izzót károsodások szempontjából. Ne szerelje
fel a lámpát hibás izzóval és / vagy hibás
üveggel. Ebben az esetben a csere ügyében
vegye fel a kapcsolatot a szervizzel.
ÉGÉSVESZÉLY! Égési sérülések elkerülése
érdekében győződjön meg arról, hogy mielőtt
a lámpát megérinti az ki legyen kapcsolva és
le legyen hűlve. Az izzó a lámpafej környékén
erős hőt fejleszt.
A hibás világító eszköz cseréje előtt hagyja a
lámpát legalább 15 percig lehűlni.
A hibás izzókat azonnal cserélje újakra.
Izzócsere előtt először mindig a hálózati dugót
távolítsa el a dugaljból.
TŰVESZÉLY! A lámpát minimum
0,3 m
0,3 m távolságra szerelje az általa
megvilágított tárgyaktól.
Ne hagyja a lámpát üzemelés közben
felügyelet nélkül. A túlzott hőfejlődés tűz
kitöréséhez vezethet.
Ez a lámpa nem alkalmas éjszakai fényforrásként.
Ne hagyja a lámpát, vagy a csomagolóanyagot
szerteszét felügyelet nélkül. A műanyag-fólia / zacskó, a hungarocell-darabok, stb. a gyerekek
számára veszélyes játékszerek lehetnek.
Ne erősítse a lámpát nedves vagy az áramot
vezető alapra.
Csak alacsony nyomású vagy
fedőüveggel rendelkező halogén
égőket használjunk.
Ilyen jelzésű lámpatestekben tilos a
“cool beam“ égők használata.
Így jár el helyesen
Csak 230–240 V ~ -os, GU10 foglalatú és
maximálisan 35 Watt teljesítményű izzót
használjon.
Szerelje úgy fel a lámpát, hogy az
nedvességtől, széltől és szennyeződésektől
védve legyen.
Ne szerelje ezt a lámpát csövekre.
Q
Szerelés
Q
A lámpa felszerelése
Az izzó behelyezéséhez használjon egy tiszta
és szöszmentes kendőt.
Modell 2973:
Szerelje egybe az izzót 2 a lámpaüveggel 3
(lásd B-ábra). Ehhez tegye az izzót
lámpaüvegbe
3
. Óvatosan dugja az izzót
2
a
a foglalatba és ¼-es jobbra történő
elforgatással szerelje össze a lámpaüveggel
Ezután nyomja a lámpaüveget
3
a spotba
és rögzítse egy ¼-es jobbra történő
eltekeréssel. Vizsgálja meg a helyes fekvését.
Modell 2972:
Dugja az izzót 2 a foglalatba és ¼-es jobbra
történő elforgatással szerelje össze.
Helyezze a krómgyűrűt 6 az izzóra 2 és
rögzítse azt egy enyhe nyomással. Vizsgálja
meg a helyes fekvését.
Egy arra alkalmas helyre csíptesse a lámpát.
Tudnivaló: Ügyeljen a csúszásgátló gumik
biztos fekvésére.
Dugja a hálózati csatlakozót 5 a konnektorba.
A lámpa ezután üzemkész.
2
3
.
1
19 HU

Kezelés / Karbantartás és tisztítás / Megsemmisítés
Q
Kezelés
Q
Be- / kikapcsolás
A lámpa be- vagy kikapcsolásához működtesse
a BE- / KI-kapcsolót
4
.
¼-es balra történő forgatással.
Szerelje be az izzót 2 egy ¼-es jobbra
történő elforgatással.
Helyezze a krómgyűrűt 6 az izzóra 2 és
rögzítse azt egy enyhe nyomással. Vizsgálja
meg a helyes fekvését.
Q
A spot beállítása
A spot 1 beállítását csak akkor változtassa
meg, ha a lámpa ki van kapcsolva.
Hagyja teljesen lehűlni a lámpát.
Forgassa a spotot 1 a kívánt irányba. A
1
spot
tetszőlegesen forgatható.
Q
A világító eszköz cseréje
VIGYÁZAT! ÁRAMÜTÉS VESZÉLYE!
Először húzza ki a hálózati kábelt a dugóval
5
a konnektorból.
Hagyja teljesen lehűlni a lámpát.
Csak akkor cserélje ki az izzót
2
, ha az teljesen
lehűlt.
Az izzó cseréjéhez használjon egy tiszta,
szöszmentes kendőt.
Modell 2973:
Csavarja ki a hibás izzót 2 a foglalatból egy
¼-es balra történő forgatással.
FIGYELEM: Az izzó kitekerésekor
lámpaüveg
3
is lejön. Ezt is tartsa szorosan.
2
a
Tudnivaló: Csak 230–240 V ~ -os, GU10-es
foglalatú és legfeljebb 35 Wattos izzót
2
használjon.
Szerelje egybe az új izzót 2 a lámpaüveggel
3
(lásd a B-ábrát is). Tegye az izzót 2 a
lámpaüvegbe
3
. Óvatosan dugja az izzót 2
a foglalatba és ¼-es jobbra történő
elforgatással szerelje össze a lámpaüveggel
Ezután nyomja a lámpaüveget
3
a spotba
és rögzítse egy ¼-es jobbra történő
eltekeréssel.
Vizsgálja meg a helyes fekvést.
Modell 2972:
Húzza le a krómgyűrűt 6 az izzóról 2.
Csavarja ki a hibás izzót 2 a foglalatból egy
Q
Karbantartás és tisztítás
VIGYÁZAT! ÁRAMÜTÉS VESZÉLYE!
Először húzza ki a hálózati kábelt a dugóval
5
a konnektorból.
A tisztításhoz ne használjon oldószereket,
benzint vagy hasonlókat. Ezek károsíthatják a
lámpát.
Hagyja teljesen lehűlni a lámpát.
VIGYÁZAT! ÁRAMÜTÉS VESZÉLYE!
Elektromos biztonsági okok miatt a lámpát soha
nem szabad vízzel vagy más folyadékokkal
tisztítani vagy akár a vízbe meríteni. A
tisztításhoz mindössze egy száraz és
szöszmentes kendőt használjon.
Q
Megsemmisítés
A csomagolás és a csomagolóanyagok
kizárólag környezetbarát anyagokból
állnak. Ezeket a helyi
újrahasznosítókban semmisítheti meg.
Az áthúzott kerekes szemétkuka azt
jelenti, hogy a termék az Európai
közösségben a terméket szelektív
hulladékgyűjtőbe kell eljuttatni. Ez a termékre és az
összes, ezzel a szimbólummal megjelölt tartozékrészre
egyaránt vonatkozik. A megjelölt termékeket nem
szabad a normál háztartási szemétben
3
megsemmisíteni, hanem egy elektromos és
.
1
elektronikus készülékek újrahasznosítását szolgáló
gyűjtőhelyek egyikén kell azokat leadni. Az
újrahasznosítás hozzájárul a nyersanyagok
felhasználásának a csökkentéséhez és a környezet
tehermentesítéséhez.
20 HU

Garancia és szerviz
Q
Garancia és szerviz
Q
Garancia
Erre a készülékre a vásárlás időpontjától számított
36 havi garanciában részesül.
A készüléket gondosan gyártották és pontos minőségi
vizsgálatnak vetették alá.
A garanciaidő alatt minden anyag és gyártási hibát
díjmentesen elhárítunk. Ha a garanciaidő alatt mégis
hiányosságokat fedez fel, kérjük küldje a készüléket
a megadott szerviz címre a következő cikk szám
feltüntetésével: 2973-010L / 2973-016L /
2972-014L / 2972-016L.
A garanciából kizártak azok a károsodások,
amelyeket szakszerűtlen kezelés, a Kezelési utasítás
figyelmen kívül hagyása, vagy nem feljogosított
személyek beavatkozása okozott, valamint a
kopási részek (mint pld. az izzók).
A garanciateljesítmény a garanciaidőt nem
hosszabbítja meg és nem újítja fel.
Q
Szerviz címe
Briloner Leuchten GmbH
Im Kissen 2, D-59929 Brilon, Németország
Tel.: 02961/ 97 12–0
Fax: 02961 / 97 12–199
E-Mail: Info@briloner.de
www.briloner.de
ter vezésé re vo natkozó irányelv 2011 / 65 / EK). A
megfelelőség bizonyított. Az ezzel kapcsolatos
nyilatkozatok és iratok letétben, a gyártónál
találhatók.
Gyártó
Briloner Leuchten GmbH
Im Kissen 2
59929 Brilon
Németország
IAN 103126
Kérjük, kérdések esetére készítse elő a pénztárblokkot
és a cikkszámot (pl. IAN 12345) a vásárlás
tényének az igazolására.
Q
Megfelelőségi nyilatkozat
Ez a termék kielégíti az érvényes európai és nemzeti
irányelvek követelményeit (Elektromágneses
összeférhetőségre vonatkozó irányelv
2004 / 108 / EK, RoHS-irányelv 2006/95/EU,
Alacsonyfeszültségi irányelv 2009 / 125 / EK,
Energiával kapcsolatos termékek környezetbarát
21 HU

22

Seznam obsahu
Úvod
Použití ke stanovenému účelu ......................................................................................................... Strana 24
Rozsah dodávky .............................................................................................................................. Strana 24
Popis dílů .......................................................................................................................................... Strana 24
Technické údaje ............................................................................................................................... Strana 24
Bezpečnost
Bezpečnostní pokyny ...................................................................................................................... Strana 24
Montáž
Namontování svítidla ...................................................................................................................... Strana 25
Obsluha
Zapínání / vypínání .......................................................................................................................... Strana 26
Seřízení bodového světla ...............................................................................................................Strana 26
Výměna svíticího prostředku ........................................................................................................... Strana 26
Údržba a čistění ..................................................................................................................... Strana 26
Zlikvidování ..............................................................................................................................Strana 26
Záruka a servis
Záruka ..............................................................................................................................................Strana 27
Adresa servisu ..................................................................................................................................Strana 27
Evropské prohlášení o shodě ..........................................................................................................Strana 27
Výrobce ............................................................................................................................................ Strana 27
23 CZ

Úvod / Bezpečnost
Lampička se svorkou
Q
Úvod
Blahopřejeme vám ke koupi nového výrobku. Rozhodli jste se
produkt.
Přečtěte si laskavě kompletně a
pečlivě tento návod k obsluze. Rozevřete stránku s
obrázky. Tento návod patří k tomuto výrobku a obsahuje důležitá upozornění k uvedení zařízení do
provozu a k zacházení s ním. Řiďte se vždy bezpečnostními pokyny. Před uvedením do provozu přezkoušejte, je-li k dispozici správné napětí a jsou-li
všechny díly namontované. V případě, že máte
dotazy nebo si nejste jisti se zacházením se zařízením, spojte se laskavě se svým prodejcem nebo
místem servisu. Návod pečlivě uschovejte a předejte
jej případně třetímu.
Q
Použití ke stanovenému účelu
Toto svítidlo je výhradně určeno pro provoz ve
vnitřní oblasti, vsuchých a uzavřených místnostech.
Svítidlo lze upevnit na všech normálních nehořlavých povrchových plochách kromě trubek. Jiné než
předtím popsané použití nebo změna výrobku
nejsou povoleny a vedou k poškození. Kromě toho
mohou být následkem další nebezpečí a poranění,
jakož i technické chybné funkce (např. zkrat nebo
požár, úraz elektrickým proudem).
Tento přístroj se hodí jen pro použití v soukromých
domácnostech.
Q
Rozsah dodávky
Bezprostředně po vybavení vždy zkontrolujte úplnost rozsahu dodávky a bezvadný stav přístroje.
1 Halogenová lampa se svěrkou
(1 plamenné bodové svítidlo)
1 Svítící prostředek GU 10, 35 W
1 Sklo lampy
1 Návod k obsluze
pro kvalitní
Q
Popis dílů
1
Bodové svítidlo
2
Svítící prostředek
3
Sklo lampy (model 2973)
4
Šňůrový vypínač ZAP / VYP
5
Síťový kabel se zástrčkou
6
Pochromovaný kroužek (model 2972)
Q
Technické údaje
Provozní napětí: 230–240 V ~, 50–60 Hz
Svíticí prostředek: 35 W
Jmenovité napětí,
maximálně: 1 x 35 W
Ochranná třída: II /
Model: 2973-010L (Hlava bodového
svítidla modrá)
2973-016L (Hlava bodového
svítidla bílá)
2972-014L (Hlava bodového
svítidla titan)
2972-016L (Hlava bodového
svítidla bílá)
Q
Bezpečnost
Bezpečnostní pokyny
U škod způsobených nedodržováním tohoto návodu
k obsluze zaniká nárok na záruku. Za následovné
škody se nepřevezme záruka!
U věcných škod nebo poškození osob, které byly
způsobeny neodborným zacházením nebo nedbáním
bezpečnostních pokynů, se nepřevezme záruka!
Zabraňte ohrožení života v důsle-
dku úrazu elektrickým proudem
J Před každým připojením k síti přezkoušejte
svítidlo a připojovací síťový kabel vzhledem k
případným poškozením. Nikdy nepoužívejte
svítidlo, zjistíte-li nějaká poškození.
24 CZ

Bezpečnost / Montáž
m POZOR! Poškozené síťové kabely znamenají
ohrožení života v důsledku úrazu elektrickým
proudem. Obraťte se při poškozeních, opravách
nebo jiných problémech na svítidle na servisní
středisko nebo elektrotechnického odborníka.
J Bezpodmínečně se vyhněte dotyku svítidla
s vodou nebo jinými kapalinami.
J Nikdy neotvírejte některý z elektrických pro-
vozních prostředků (např. šňůrový vypínač,
transformátor aj.), nebo do nich nestrkejte nějaké
předměty. Takové zásahy znamenají ohrožení
života v důsledku úrazu elektrickým proudem.
Vyhněte se nebezpečí
požáru a poranění
J NEBEZPEČÍ PORANĚNÍ! Okamžitě po
vybalení přezkoušejte každý svíticí prostředek
a sklo lampy vzhledem k poškozením. Svítidlo
nemontujte se závadnými skly lampy nebo svíticími prostředky. V tomto případě se pro nasazení
spojte s místem servisu.
J NEBEZPEČÍ POPÁLENÍ! Abyste se vyhnuli
popálením, ujistěte se, že je svítidlo vypnuté a
ochlazené, předtím než se jej dotknete. Svíticí
prostředky vyvinou v oblasti hlavy svítidla silné
vedro.
J Před nahrazením defektního svíticího prostředku
nechejte svítidlo aspoň po dobu 15 minut
ochladit.
J Vadné svíticí prostředky okamžitě nahraďte
novými. Před výměnou svítícího prostředku odstraňte zástrčku ze zásuvky.
J
NEBEZPEČÍ POŽÁRU! Svítidlo
0,3 m
namontujte v odstupu aspoň 0,3 m k
ozařovaným materiálům.
J Stolní lampu nenechejte v provozu bez dozoru.
Nadměrné vyvinutí tepla může vést k vyvinutí
požáru.
J Toto světlo není vhodné k použití jako noční
světlo.
J Svítidlo a obalový materiál nenechejte jen tak
se povalovat. Plastové fólie /pytlíky, umělohmotné díly atd. by mohly být pro děti nebezpečnou hračkou.
J Svítidlo neupevněte na vlhkém nebo vodivém
podkladu.
J Používejte pouze halogenová svíti-
dla s krytem nebo v nízkotlakém
provedení.
J
U tohoto symbolu nesmíte používat
svítidla typu “cool beam“.
Tak se budete bezpečně chovat
J Použijte jen svíticí prostředky 230–240 V s
paticí GU 10 a maximálním napětí 35 wattů.
J Svítidlo namontujte tak, aby bylo chráněné
před vlhkostí a znečištěním.
J Toto svítidlo nemontujte na trubkách.
Q
Montáž
Q
Namontování svítidla
j K montáži svíticího prostředku použijte čistou
tkaninu bez nitek.
Model 2973:
j Nyní namontujte svíticí prostředek
se sklem lampy
3
(viz obr. B). K čistění použí-
2
společně
vejte jen suchou tkaninu bez nitek. Nejprve vložte
svíticí prostředek
zastrčte svíticí prostředek
tujte jej se sklem lampy
doprava. Vtlačte sklo lampy
1
svítidla
2
do skla lampy 3. Opatrně
2
do objímky a smon-
3
otočením o ¼ otáčky
3
do bodového
a zablokujte je otočením o ¼ otáčky
doprava. Zkontrolujte správné usazení.
Model 2972:
Nasaďte osvětlovací prostředek 2 do objím-
ky a zafixujte ho pootočením o ¼ otáčky
směrem doprava.
Nasaďte pochromovaný kroužek 6 na osvět-
lovací prostředek
2
a zajistěte ho mírným
přitlačením. Přezkoušejte správné usazení.
j Svítidlo uchyťte na vhodné místo.
Upozornění: Dávejte pozor na pevné držení
neklouzavé gumy a svěrky.
j Zastrčte síťový kabel
5
do síťové zásuvky.
Vaše svítidlo je nyní připraveno k provozu.
25 CZ

Obsluha / Údržba a čistění / Zlikvidování
Q
Obsluha
Q
Zapínání / vypínání
j Abyste svítidlo zapnuli nebo vypnuli, stiskněte
šňůrový vypínač ZAP / VYP
Seřízení bodového světla
j Změňte seřízení bodového světla 1 jen tehdy,
je-li svítidlo vypnuté. Stolní lampu nechejte úplně
vychladnout.
j Otočte bodovým svítidlem
žádoucího směru. Bodovým svítidlem
libovolně otáčet.
Výměna svíticího prostředku
m POZOR! NEBEZPEČÍ ÚRAZU ELEKTRIC-
KÝM PROUDEM! Nejprve vytáhněte síťový
kabel zástrčkou
j Stolní lampu nechejte úplně vychladnout.
j Svíticí prostředek
úplně chladný.
K výměně použijte čistou tkaninu bez nitek.
Model 2973:
Vyšroubujte vadný osvětlovací prostředek 2 z
objímky pootočením o ¼ otáčky doleva.
POZOR: Při uvolnění svítícího prostředku
se uvolní i sklo lampy
j Používejte jen osvětlovací prostředek
230–240 Volt v objímce GU 10 a s příkonem
nejvýše 35 W.
j Nyní namontujte nový svíticí prostředek
společně se sklem lampy
svíticí prostředek
zastrčte svíticí prostředek
tujte jej se sklem lampy
doprava. Vtlačte sklo lampy
1
svítidla
doprava. Zkontrolujte správné usazení.
Model 2972:
Sejměte pochromovaný kroužek 6 z
osvětlovacího prostředku
Vyšroubujte vadný osvětlovací prostředek 2 z
5
ze zásuvky.
2
2
do skla lampy 3. Opatrně
a zablokujte je otočením o ¼ otáčky
4
.
1
na hlavě do
1
vyměňte jen tehdy, je-li
3
. Držte je pevně.
2
na
3
(viz i obr. B). Vložte
2
do objímky a smon-
3
otočením o ¼ otáčky
3
do bodového
2
.
lze
2
2
objímky pootočením o ¼ otáčky doleva.
Nasaďte nový osvětlovací prostředek 2 do
objímky a zafixujte ho pootočením o ¼ otáčky
směrem doprava.
Nasaďte pochromovaný kroužek 6 na osvět-
lovací prostředek
2
a zajistěte ho mírným
přitlačením. Přezkoušejte správné usazení.
Q
Údržba a čistění
c POZOR! NEBEZPEČÍ ÚRAZU ELEKTRIC-
KÝM PROUDEM! Nejprve vytáhněte síťový
kabel se zástrčkou
5
ze zásuvky.
J Nepoužívejte ředidel, benzínu apod.
Svítidlo by se tím poškodilo.
j Stolní lampu nechejte úplně vychladnout.
c POZOR! NEBEZPEČÍ ÚRAZU ELEKTRIC-
KÝM PROUDEM! Z důvodů elektrické bez-
pečnosti se svítidlo nikdy nesmí čistit vodou nebo
jinými kapalinami nebo dokonce ponořit do vody.
K čistění použijte jen suché tkaniny bez nitek.
Q
Zlikvidování
Obal a obalový materiál se skládají
výhradně z ekologicky vhodných
materiálů. Lze je zlikvidovat i v místních
recyklačních nádobách.
Symbol přeškrtnuté nádoby na odpad
na kolečkách znamená, že výrobek musí
být v Evropské Unii přiveden do sběrny
odděleného odpadu. Toto platí pro výrobek a pro
všechny s tímto symbolem označené díly příslušenství.
Označené výrobky se nesmí zlikvidovat v běžném
domácím odpadu, nýbrž se musí odevzdat na místě
sběru pro recyklaci elektrických a elektronických
zařízení. Recyklace pomůže zredukovat spotřebu
surovin a odlehčit životní prostředí.
26 CZ

Záruka a servis
Q
Záruka a servis
Q
Záruka
K okamžiku koupě obdržíte na toto zařízení záruku
po dobu 36 měsíců.
Zařízení bylo svědomitě vyrobeno a podrobeno přesné kontrole jakosti. Během záruční doby odstraníme
bezplatně všechny chyby materiálu a výrobce. V
případě, že se však během záruční doby vyskytnou
nedostatky, zašlete laskavě zařízení na uvedenou
adresu servisu při udání následujícího čísla sort.
položky: 2973-010L / 2973-016L / 2972-014L /
2972-016L.
Ze záruky vyloučeny škody vzhledem k neodbornému zacházení, nedbání na návod k obsluze nebo
zásahu neautorizovanou osobou, jakož i poškození
rychleopotřebitelných dílů (např. svíticí prostředky).
Záručním výkonem se záruční doba ani neprodlouží ani neobnoví.
Adresa servisu
Briloner Leuchten GmbH
Im Kissen 2, 59929 Brilon, Německo
Tel.: +49 (0) 29 61 / 97 12–0
Fax: +49 (0) 29 61 / 97 12–199
E-Mail: Info@briloner.de
www.briloner.de
Shoda byla dokázána. Příslušné vysvětlivky a podklady jsou deponovány u výrobce.
Výrobce
Briloner Leuchten GmbH
Im Kissen 2
59929 Brilon
Německo
IAN 103126
Pro všechny požadavky si připravte pokladní blok
a číslo výrobku (např. IAN 12345) jako doklad o
nákupu.
Q
Evropské prohlášení o shodě
Tento výrobek splňuje požadavky platných evropských a národních směrnic (Elektromagnetická
kompatibilita 2004 / 108 / EC a směrnice o
bezpečnosti elektrického zařízení nízkého napětí
2006 / 95 / EC, Směrnice ekologického designu
2009 / 125 / EG, směrnice RoHS 2011 / 65 / EU).
27 CZ

28

Zoznam obsahu
Úvod
Použitie k určenému účelu ...............................................................................................................Strana 30
Rozsah dodávky .............................................................................................................................. Strana 30
Popis dielov ...................................................................................................................................... Strana 30
Technické údaje ............................................................................................................................... Strana 30
Bezpečnosť
Bezpečnostné pokyny .....................................................................................................................Strana 30
Montáž
Montáž svietidla .............................................................................................................................. Strana 31
Obsluha
Zapnutie / vypnutie .......................................................................................................................... Strana 32
Centrovanie bodového svetla ......................................................................................................... Strana 32
Výmena žiarovky ............................................................................................................................. Strana 32
Údržba a čistenie .................................................................................................................. Strana 32
Likvidácia ....................................................................................................................................Strana 32
Záruka a servis
Záruka ..............................................................................................................................................Strana 33
Servisná adresa ............................................................................................................................... Strana 33
Prehlásenie o zhode ........................................................................................................................ Strana 33
Výrobca ............................................................................................................................................ Strana 33
29 SK

Úvod / Bezpečnosť
Halogénové svietidlo so štipcom
Q
Úvod
Blahoželáme vám ku kúpe nového výrobku. Rozhodli ste sa pre veľmi kvalitný
výrobok. Prosím prečítajte si dôkladne a
pozorne tento návod na obsluhu. Otvorte si prosím
stranu z obrázkami. Tento návod patrí k
tomuto výrobku a obsahuje dôležité pokyny pre
uvedenie do prevádzky a manipuláciu. Dodržiavajte
vždy všetky bezpečnostné pokyny. Pred uvedením
do prevádzky prekontrolujte, či je k dispozícii správne napätie a či sú všetky diely správne namontované. Ak by ste mali otázky, alebo ste si neboli istý,
čo sa týka manipulácie s prístrojom, spojte sa prosím so svojím obchodníkom alebo servisným strediskom svojej krajiny. Tento návod starostlivo uschovajte
a prípadne ho postúpte tretej osobe.
Q
Použitie k určenému účelu
Toto svietidlo je určené výhradne na prevádzku
v interiéri, v suchých a uzatvorených priestoroch.
Svietidlo môže byť upevnené na všetky normálne
horľavé povrchy, okrem rúr. Iné použitie ako bolo
predtým popísané, alebo zmena prístroja nie je
prípustná a vedie k poškodeniu. To môže mať za
následok ďalšie život ohrozujúce nebezpečenstvá a
zranenia ako aj technicky chybné funkcie (napr. skrat,
požiar, úder elektrickým prúdom).
Tento prístroj je určený len na použitie v súkromných
domácnostiach.
Q
Rozsah dodávky
Bezprostredne po vybalení skontrolujte, či je
dodávka úplná ako aj, či je kompletný prístroj.
1 Halogénová upínacia lampa
(1-ramenné bodové svietidlo)
1 Žiarovka GU 10, 35 W
1 Lampové svetlo
1 Návod na obsluhu
Q
Popis dielov
1
Bodové svetlo
2
Žiarovka
3
Lampové svetlo (Model 2973)
4
Šnúrový zapínač / vypínač
5
Sieťový kábel so zástrčkou
6
Chrómový krúžok (Model 2972)
Q
Technické údaje
Prevádzkové napätie: 230–240 V ~, 50–60 Hz
Žiarovka: 35 W
Menovitý výkon
maximálny: 1 x 35 W
Trieda ochrany: II /
Model: 2973-010L (hlava bodového
svietidla modrá)
2973-016L (hlava bodového
svietidla biela)
2972-014L (hlava bodového
svietidla titán)
2972-016L (hlava bodového
svietidla biela)
Q
Bezpečnosť
Bezpečnostné pokyny
Pri škodách, ktoré budú zapríčinené nedodržiavaním
tohto návodu na obsluhu, zaniká nárok na záruku!
Pri následných škodách nepreberáme záruku!
Pri vecných škodách alebo zraneniach osôb, ktoré
boli zapríčinené neodbornou manipuláciou alebo
nedodržiavaním bezpečnostných pokynov, nepreberáme žiadnu záruku!
Vyhnite sa ohrozeniu života
úderom elektrického prúdu
J Pred každým pripojením na sieť prekontrolujte
možné poškodenia svietidla a sieťového kábla.
30 SK

Bezpečnosť / Montáž
Svietidlo už nepoužívajte, ak ste zistili nejaké
poškodenia.
m POZOR! Poškodené sieťové káble znamenajú
ohrozenie života úderom elektrického prúdu. Pri
poškodeniach, opravách alebo iných problémoch
na svietidle sa obráťte na servisné stredisko
alebo elektroodborníka.
J Bezpodmienečne zabráňte kontaktu svietidla s
vodou alebo inými tekutinami.
J Nikdy neotvárajte žiadny zelektrických prevádz-
kových prostriedkov (napr. šnúrový vypínač,
transformátor a pod.), alebo do neho nestrkajte nejaké predmety. Takéto zásahy znamenajú
ohrozenie života elektrickým úderom.
Vyhnite sa nebezpečenstvu
požiaru a poranení
J NEBEZPEČENSTVO PORANENIA! Bez-
prostredne po vybalení prekontrolujte poškodenia
každej žiarovky a lampového skla. Svietidlo
nikdy nemontujte s chybnými žiarovkami
a / alebo lampovým sklom. Spojte sa v tomto
prípade kvôli výmene so servisným strediskom.
J NEBEZPEČENSTVO POPÁLENIA! Zabez-
pečte, aby bolo svietidlo vypnuté a vychladené,
predtým ako sa ho dotknete, aby ste zabránili
popáleniam. Žiarovky vytvárajú v oblasti hlavy
lampy silné teplo.
J Pred výmenou chybného svetelného zdroja ne-
chajte lampu vychladnúť minimálne 15 minút.
J Chybné žiarovky ihneď vymeňte za nové. Pred
výmenou žiarovky vždy najskôr vytiahnite
zástrčku zo zásuvky.
J
NEBEZPEČENSTVO POŽIARU!
0,3 m
Svietidlo namontujte vo vzdialenosti
najmenej 0,3 m od osvetľovaných
materiálov.
J Svietidlo vprevádzke nenechávajte bez dozoru.
Nadmerný vznik tepla môže viesť k vzniku
požiaru.
J Toto svietidlo nie je vhodné ako nočná lampa.
J Nikdy nenechajte ležať svietidlo alebo obalový
materiál bez dozoru. Plastové fólie / vrecká,
plastové diely, atď. by pre deti mohli byť
nebezpečnou hračkou.
J Svietidlo neupevňujte na vlhkom a vodivom
podklade.
J
Používajte výlučne halogenové svietidla s krytom alebo v nízkotlakom
vyhotovení.
J
Pri tejto značke nesmiete používať
svietidlá „cool beam“.
Tak postupujte správne
J Používajte len žiarovky 230–240 V s päticou
GU 10 a maximálnym výkonom 35 Wattov.
J Svietidlo namontujte tak, aby bolo chránené
pred vlhkom a znečistením.
J Toto svietidlo nemontujte na rúry.
Q
Montáž
Q
Montáž svietidla
j Pri montáži osvetľovacieho prostriedku používajte
čistú a hladkú handričku.
Model 2973:
j Namontujte žiarovku
3
sklom
(pozri Obr. B). Na tento účel použite
2
spolu slampovým
suchú handričku bez chlpov. Najskôr nasaďte do
lampového skla
3
žiarovku 2. Žiarovku 2
opatrne zasuňte do objímky a namontuje ju s
lampovým svetlom
Teraz zatlačte lampové svetlo
svietidla
1
3
s ¼ otočením vpravo.
3
do bodového
a zablokujte ho s ¼ otočením
vpravo. Prekontrolujte správne osadenie.
Model 2972:
Teraz opatrne zasuňte osvetľovací prostriedok
2
do objímky a namontujte ho ¼ otočením
doprava.
Nasaďte chrómový krúžok 6 na osvetľovací
prostriedok
2
a upevnite ho jemným zatlače-
ním. Skontrolujte správnosť osadenia.
j Upnite svietidlo na vhodné miesto.
Upozornenie: Dbajte na prevné priliehanie
protišmykovej gumičky a svorky.
31 SK

Montáž / Obsluha / Údržba a čistenie / Likvidácia
j Zastrčte sieťový kábel so zástrčkou 5 do
zásuvky.
Vaše svietidlo je teraz pripravené na prevádzku.
Q
Obsluha
Q
Zapnutie / vypnutie
j Stlačte šnúrový zapínač / vypínač 4, aby ste
svietidlo zapli alebo vypli.
Q
Centrovanie bodového svetla
j Centrovanie bodového svetla 1 meňte iba
vtedy, keď je svetlo vypnuté. Nechajte svietidlo
úplne ochladnúť.
j Bodové svietidlo
želaného smeru. Bodové svietidlo
1
otočte na hlave do
1
sa dá
ľubovoľne otáčať.
Q
Výmena žiarovky
m P
OZOR! NEBEZPEČENSTVO ZASIAHNU-
TIA
ELEKTRICKÝM PRÚDOM! Najskôr
vytiahnite sieťový kábel so zástrčkou
5
zo
zásuvky.
j Nechajte svietidlo úplne ochladnúť.
j Aj žiarovku
2
vymieňajte len potom, keď je
úplne vychladnutá. Na výmenu použite čistú
handru, ktorá nepúšťa vlákna.
Model 2973:
Uvoľnite defektný osvetľovací prostriedok 2 z
objímky ¼-otočením doľava.
POZOR: Pri uvoľnení žiarovky
aj lampové svetlo
3
. Pevne ho držte.
2
sa uvoľní
j Používajte iba 230–240 V osvetľovacie pros-
2
triedky
s maximálne 35 Watt a päticou
GU 10.
j Teraz namontujte novú žiarovku
vým sklom
lampového skla
3
(pozri Obr. B). Nasaďte do
3
žiarovku 2. Žiarovku 2
2
slampo-
opatrne zasuňte do objímky a namontuje ju s
lampovým svetlom
Teraz zatlačte lampové svetlo
3
s ¼ otočením vpravo.
3
do bodového
svietidla 1 a zablokujte ho s ¼ otočením
vpravo.
Prekontrolujte správne osadenie.
Model 2972:
Vytiahnite chrómový krúžok 6 z osvetľovacie-
ho prostriedku
2
.
Uvoľnite defektný osvetľovací prostriedok 2 z
objímky ¼-otočením doľava.
Namontujte nový osvetľovací prostriedok 2
do objímky ¼ otočením doprava.
Nasaďte chrómový krúžok 6 na osvetľovací
prostriedok
2
a upevnite ho jemným zatlače-
ním. Skontrolujte správnosť osadenia.
Q
Údržba a čistenie
c P
OZOR! NEBEZPEČENSTVO ZASIAHNU-
TIA
ELEKTRICKÝM PRÚDOM! Najskôr
vytiahnite sieťový kábel so zástrčkou
5
zo
zásuvky.
J Nepoužívajte žiadne rozpúšťadlá, benzín a
pod. Svietidlo by sa pri tom mohlo poškodiť.
j Nechajte svietidlo úplne ochladnúť.
c P
OZOR! NEBEZPEČENSTVO ZASIAHNU-
TIA
ELEKTRICKÝM PRÚDOM! Z dôvodov
elektrickej bezpečnosti sa svietidlo nikdy nesmie
čistiť vodou alebo inými tekutinami alebo sa
dokonca ponárať do vody. Na čistenie používajte výhradne suchú handru, ktorá nepúšťa
vlákna.
Q
Likvidácia
Obal a obalový materiál pozostávajú
výlučne z ekologických materiálov.
Môžu byť likvidované v miestnych recyk-
lačných kontajneroch.
Symbol prečiarknutej odpadovej nádoby
na kolieskach znamená, že v Európskej
únii tento výrobok podlieha separovanému
zberu odpadu. Platí to pre výrobok a pre všetky
súčasti príslušenstva označené týmto symbolom.
Označené výrobky sa nesmú likvidovať spoločne s
domovým odpadom, ale musia byť odovzdané na
32 SK

Likvidácia / Záruka a servis
miestach, kde sa recyklujú elektrické a elektronické
prístroje. Recyklácia pomáha znížiť spotrebu surovín,
a tým chrániť životné prostredie.
Q
Záruka a servis
Q
Záruka
Na tento prístroj dostanete záruku 36 mesiacov od
dátumu kúpy.
Prístroj bol starostlivo vyrobený a podrobený
dôkladnej kontrole kvality. V rámci záručnej doby
bezplatne opravíme všetky chyby materiálu a výroby. Ak by sa počas záručnej doby vyskytli ďalšie
nedostatky, pošlite prístroj na uvedenú adresu
servisu a uveďte nasledujúce číslo výrobku:
2973-010L / 2973-016L / 2972-014L / 2972-016L.
Zo záruky sú vylúčené škody spôsobené neodbornou manipuláciou, nedodržaním návodu na obsluhu alebo zásahom neautorizovanej osoby, ako aj
diely podliehajúce opotrebeniu (napr. žiarovky).
Poskytnutím záruky sa záručná doba nepredlžuje
ani neobnovuje.
Servisná adresa
týkajúca sa el. zariadení určených na používanie
vrámci určitých limitov napätia 2006/95/EC,
Smernica o ekodizajne 2009 / 125 / ES, Smernica
RoHS 2011 / 65 / EU). Zhoda bola preukázaná.
Príslušné vysvetlenia a podklady sú uložené u
výrobcu.
Výrobca
Briloner Leuchten GmbH
Im Kissen 2
59929 Brilon
Nemecko
Briloner Leuchten GmbH
Im Kissen 2, 59929 Brilon, Nemecko
Tel.: +49 (0) 29 61 / 97 12–0
Fax: +49 (0) 29 61 / 97 12–199
E-mail: Info@briloner.de
www.briloner.de
IAN 103126
Pre všetky otázky majte pripravený pokladničný
doklad a číslo výrobku (napr. IAN 12345) ako
dôkaz o kúpe.
Q
Prehlásenie o zhode
Tento výrobok spĺňa požiadavky platných
európskych a národných smerníc (smernica o elektromagnetickej kompatibilite 2004/108/EC, smernica
33 SK

34

Inhaltsverzeichnis
Einleitung
Bestimmungsgemäße Verwendung ...................................................................................................Seite 36
Lieferumfang .......................................................................................................................................Seite 36
Teilebeschreibung ............................................................................................................................... Seite 36
Technische Daten ................................................................................................................................Seite 36
Sicherheit
Sicherheitshinweise.............................................................................................................................Seite 36
Montage
Leuchte montieren ............................................................................................................................... Seite 37
Bedienung
Ein- / Aussc halten ................................................................................................................................ Seite 38
Spot ausrichten ................................................................................................................................... Seite 38
Leuchtmittel auswechseln ...................................................................................................................Seite 38
Wartung und Reinigung .....................................................................................................Seite 38
Entsorgung.....................................................................................................................................Seite 38
Garantie und Service
Garantie .............................................................................................................................................. Seite 39
Serviceadresse ...................................................................................................................................Seite 39
Konformitätserklärung ........................................................................................................................Seite 39
Hersteller .............................................................................................................................................Seite 39
35 DE/AT/CH

Einleitung / Sicherheit
Halogen-Klemmleuchte
Q
Einleitung
Wir beglückwünschen Sie zum Kauf Ihres
neuen Gerätes. Sie haben sich damit für
ein hochwertiges Produkt entschieden.
Bitte lesen Sie diese Bedienungsanleitung vollständig
und sorgfältig durch.
Abbildungen
Klappen Sie die Seite mit den
aus. Diese Anleitung gehört zu diesem
Produkt und enthält wichtige Hinweise zur Inbetriebnahme und Handhabung. Beachten Sie immer alle
Sicherheitshinweise. Prüfen Sie vor der Inbetriebnahme, ob die korrekte Spannung vorhanden ist und
ob alle Teile richtig montiert sind. Sollten Sie Fragen
haben oder unsicher in Bezug auf die Handhabung
des Gerätes sein, setzen Sie sich bitte mit Ihrem
Händler oder der Servicestelle in Verbindung. Bewahren Sie diese Anleitung bitte sorgfältig auf und
geben Sie sie ggf. an Dritte weiter.
Q
Bestimmungsgemäße
Verwendung
Diese Leuchte ist ausschließlich für den Betrieb im
Innenbereich, in trockenen und geschlossenen
Räumen geeignet. Die Leuchte kann auf allen normal
entflammbaren Oberflächen, ausgenommen Rohren,
befestigt werden. Eine andere Verwendung als zuvor beschrieben oder eine Veränderung des Gerätes
i
st nicht zulässig und führt zur Beschädigung. Darüb
hinaus können weitere lebensgefährliche Gefahren
und Verletzungen sowie technische Fehlfunktionen
(z. B. Kurzschluss, Brand, elektrischer Schlag) die
Folge sein.
Dieses Gerät ist nur für den Einsatz in privaten
Haushalten vorgesehen.
Q
Lieferumfang
Kontrollieren Sie unmittelbar nach dem Auspacken
immer den Lieferumfang auf Vollständigkeit sowie
den einwandfreien Zustand des Gerätes.
er
1 Halogen-Klemmleuchte, (1-flammige Spotleuchte)
1 Leuchtmittel GU 10, 35 W
1 Lampenglas
1 Bedienungsanleitung
Q
Teilebeschreibung
1
Spot
2
Leuchtmittel
3
Lampenglas (Modell 2973)
4
EIN- / AUS-Schnurschalter
5
Netzkabel mit Netzstecker
6
Chromring (Modell 2972)
Q
Technische Daten
Betriebsspannung: 230–240 V~, 50 - 60 Hz
Leuchtmittel: 35 W
Nennleistung maximal: 1 x 35 W
Schutzklasse: II /
Modell:
2973-010L (Spotkopf blau)
2973-016L (Spotkopf weiß
2972-014L (Spotkopf titan)
2972-016L (Spotkopf weiß)
Q
Sicherheit
Sicherheitshinweise
Bei Schäden, die durch Nichtbeachtung dieser
Bedienungsanleitung verursacht werden, erlischt
der Garantieanspruch! Für Folgeschäden wird
keine Haftung übernommen!
Bei Sach- oder Personenschäden, die durch unsachgemäße Handhabung oder Nichtbeachtung
der Sicherheitshinweise verursacht werden, wird
keine Haftung übernommen!
Vermeiden Sie Lebensgefahr
durch elektrischen Schlag
Überprüfen Sie vor jedem Netzanschluss die
Leuchte und das Netzanschlusskabel auf etwaige
)
36 DE/AT/CH

Sicherheit / Montage
Beschädigungen. Benutzen Sie Ihre Leuchte
niemals, wenn Sie irgendwelche Beschädigungen feststellen.
VORSICHT! Beschädigte Netzkabel bedeuten
Lebensgefahr durch elektrischen Schlag. Wenden Sie sich bei Beschädigungen, Reparaturen
oder anderen Problemen an der Leuchte an die
Servicestelle oder eine Elektrofachkraft.
Vermeiden Sie unbedingt die Berührung der
Leuchte mit Wasser oder anderen Flüssigkeiten.
Öffnen Sie niemals eines der elektrischen
Betriebsmittel (z.B. Schnurschalter, Transformator
o.ä.), oder stecken irgendwelche Gegenstände
in dieselben. Derartige Eingriffe bedeuten
Lebensgefahr durch elektrischen Schlag.
Vermeiden Sie Brand- und
Verletzungsgefahr
VERLETZUNGSGEFAHR! Überprüfen Sie
unmittelbar nach dem Auspacken jedes Leuchtmittel und Lampenglas auf Beschädigungen.
Montieren Sie die Leuchte nicht mit defekten
Leuchtmitteln und / oder Lampenglas. Setzen Sie
sich in diesem Fall für Ersatz mit der Servicestelle
in Verbindung.
VERBRENNUNGSGEFAHR! Stellen Sie
sicher, dass die Leuchte ausgeschaltet und abgekühlt ist, bevor Sie diese berühren, um Verbrennungen zu vermeiden. Leuchtmittel entwickeln
im Bereich des Lampenkopfes eine starke Hitze.
Lassen Sie die Leuchte vor dem Ersetzen eines
defekten Leuchtmittels mindestens 15 Minuten
auskühlen.
Ersetzen Sie defekte Leuchtmittel sofort durch
neue. Entfernen Sie vor dem Leuchtmittelwechsel
immer zuerst den Stecker aus der Steckdose.
BRANDGEFAHR! Montieren Sie
0,3 m
die Leuchte mit einer Entfernung von
mindestens 0,3 m zu angestrahlten
Materialien.
Lassen Sie die Leuchte im Betrieb nicht unbe-
aufsichtigt. Eine übermäßige Wärmeentwicklung kann zur Brandentwicklung führen.
Diese Leuchte ist nicht als Nachtlicht geeignet.
Lassen Sie die Leuchte oder das Verpackungs-
material nicht achtlos liegen. Plastikfolien / -tüten,
Styroporteile, etc. könnten für Kinder zu einem
gefährlichen Spielzeug werden.
Befestigen Sie die Leuchte nicht auf feuchtem
oder leitendem Untergrund.
Nur Halogenleuchtmittel mit Ab-
deckscheibe oder in Niederdrucktechnik verwenden.
Bei diesem Zeichen dürfen keine
“cool beam“ – Leuchtmittel
eingesetzt werden.
So verhalten Sie sich richtig
Verwenden Sie nur 230–240 Volt Leuchtmittel
mit einem GU 10 Sockel und einer
Höchstleistung von 35 Watt.
Montieren Sie die Leuchte so, dass sie vor
Feuchtigkeit und Verschmutzung geschützt ist.
Montieren Sie diese Leuchte nicht an Rohren.
Q
Montage
Q
Leuchte montieren
Benutzen Sie zur Montage des Leuchtmittels
ein sauberes, fusselfreies Tuch.
Modell 2973:
Montieren Sie das Leuchtmittel 2 zusammen mit
dem Lampenglas
zunächst das Leuchtmittel
3
. Stecken Sie das Leuchtmittel
3
(siehe Abb. B). Setzen Sie
2
in das Lampenglas
2
vorsichtig in
die Fassung und montieren Sie es mit dem Lampenglas
Drücken Sie nun das Lampenglas
3
mit einer ¼ Umdrehung nach rechts.
1
und verriegeln es mit einer ¼ Umdrehung
3
in den Spot
nach rechts. Überprüfen Sie den richtigen Sitz.
Modell 2972:
Stecken Sie das Leuchtmittel 2 in die Fassung
und montieren Sie es mit einer ¼ Umdrehung
nach rechts.
Setzen Sie den Chromring 6 auf das Leucht-
2
mittel
und befestigen Sie ihn mit leichtem
Druck. Überprüfen Sie den richtigen Sitz.
37 DE/AT/CH

Montage / Bedienung / Wartung und Reinigung / Entsorgung
Klemmen Sie die Leuchte an eine geeignete Stelle.
Hinweis: Achten Sie auf einen festen Sitz der
Antirutschgummis und der Klammer.
Stecken Sie das Netzkabel mit Netzstecker 5
in die Steckdose.
Ihre Leuchte ist nun betriebsbereit.
Q
Bedienung
Q
Ein- / Ausschalten
Betätigen Sie den EIN- / AUS-Schnurschalter 4,
um die Leuchte ein- oder auszuschalten.
Q
Spot ausrichten
Verändern Sie die Ausrichtung des Spots 1
nur, wenn die Leuchte ausgeschaltet ist.
Lassen Sie die Leuchte vollständig abkühlen.
Drehen Sie den Spot
Richtung. Der Spot
1
in die gewünschte
1
lässt sich beliebig
drehen.
Q
Leuchtmittel auswechseln
VORSICHT! STROMSCHLAGGEFAHR!
Ziehen Sie zuerst das Netzkabel mit Netzstecker
5
aus der Steckdose.
Lassen Sie die Leuchte vollständig abkühlen.
Wechseln Sie das Leuchtmittel 2 nur dann
aus, wenn es vollständig abgekühlt ist.
Benutzen Sie zum Auswechseln ein sauberes
fusselfreies Tuch.
Modell 2973:
Lösen Sie das defekte Leuchtmittel 2 mit einer
¼ Umdrehung nach links aus der Fassung.
ACHTUNG: Beim Lösen des Leuchtmittels
löst sich auch das Lampenglas
3
.
Halten Sie dieses mit fest.
Verwenden Sie nur 230–240 Volt Leuchtmittel
2
mit höchstens 35 Watt und GU 10 Sockel.
Montieren Sie nun das neue Leuchtmittel 2
mit dem Lampenglas
Setzen Sie das Leuchtmittel
3
(siehe auch Abb. B).
2
in das Lampen-
glas 3. Stecken Sie das Leuchtmittel 2 vorsichtig in die Fassung und montieren Sie es mit
dem Lampenglas
3
mit einer ¼ Umdrehung
nach rechts. Drücken Sie nun das Lampenglas
3
in den Spot 1 und verriegeln es mit einer
¼ Umdrehung nach rechts.
Überprüfen Sie den richtigen Sitz.
Modell 2972:
Ziehen Sie den Chromring 6 von dem
Leuchtmittel
2
ab.
Lösen Sie das defekte Leuchtmittel 2 mit einer
¼ Umdrehung nach links aus der Fassung.
Montieren Sie das neue Leuchtmittel 2 mit
einer ¼ Umdrehung nach rechts.
Setzen Sie den Chromring 6 auf das Leucht-
2
mittel
und befestigen Sie ihn mit leichtem
Druck. Überprüfen Sie den richtigen Sitz.
Q
Wartung und Reinigung
VORSICHT! STROMSCHLAGGEFAHR!
Ziehen Sie zuerst das Netzkabel mit Stecker
aus der Steckdose.
Benutzen Sie keine Lösungsmittel, Benzin o.ä.
Die Leuchte würde hierbei Schaden nehmen.
Lassen Sie die Leuchte vollständig abkühlen.
VORSICHT! STROMSCHLAGGEFAHR!
Aus Gründen der elektrischen Sicherheit darf
die Leuchte niemals mit Wasser oder anderen
Flüssigkeiten gereinigt oder gar in Wasser getaucht werden. Verwenden Sie zur Reinigung
nur ein trockenes fusselfreies Tuch.
Q
Entsorgung
Die Verpackung und das Verpackungsmaterial bestehen ausschließlich aus
2
umweltfreundlichen Materialien. Sie
können in den örtlichen Recyclingbehältern
entsorgt werden.
Das Symbol der durchgestrichenen Ab-
falltonne auf Rädern bedeutet, dass das
Produkt in der Europäischen Union einer
getrennten Müllsammlung zugeführt werden muss.
5
38 DE/AT/CH

Entsorgung / Garantie und Service
Dies gilt für das Produkt und alle mit diesem Symbol
gekennzeichneten Zubehörteile. Gekennzeichnete
Produkte dürfen nicht über den normalen Hausmüll
entsorgt werden, sondern müssen an einer Annahmestelle für das Recycling von elektrischen und elektronischen Geräten abgegeben werden. Recycling hilft,
den Verbrauch von Rohstoffen zu reduzieren und
die Umwelt zu entlasten.
Q
Garantie und Service
Q
Garantie
Sie erhalten zum Zeitpunkt des Kaufs auf dieses
Gerät 36 Monate Garantie.
Das Gerät wurde sorgfältig produziert und einer
genauen Qualitätskontrolle unterzogen.
Innerhalb der Garantiezeit beheben wir kostenlos
alle Material- oder Herstellerfehler. Sollten sich
dennoch während der Garantiezeit Mängel herausstellen, senden Sie das Gerät bitte an die aufgeführte Service-Adresse unter Angabe folgender
Artikel-Nummer: 2973-010L / 2973-016L /
2972-014L / 2972-016L.
Von der Garantie ausgeschlossen sind Schäden
durch nicht sachgemäße Handhabung, Nichtbeachtung der Bedienungsanleitung oder Eingriff
durch nicht autorisierte Personen sowie Verschleißteile (wie z.B. Leuchtmittel).
Durch die Garantieleistung wird die Garantiezeit
weder verlängert noch erneuert.
Bitte halten Sie für alle Anfragen den Kassenbon
und die Artikelnummer (z. B. IAN 12345) als
Nachweis für den Kauf bereit.
Q
Konformitätserklärung
Dieses Produkt erfüllt die Anforderungen der
geltenden europäischen und nationalen Richtlinien
(Elektromagnetische Verträglichkeit 2004 / 108 / EC,
Niederspannungsrichtlinie 2006 / 95 / EC, Ökodesign Richtlinie 2009 / 125 / EG, RoHS-Richtlinie
2011 / 65 / EU). Die Konformität wurde nachgewiesen. Entsprechende Erklärungen und Unterlagen
sind beim Hersteller hinterlegt.
Hersteller
Briloner Leuchten GmbH
Im Kissen 2
59929 Brilon
Deutschland
Q
Serviceadresse
Briloner Leuchten GmbH
Im Kissen 2, D-59929 Brilon, Deutschland
Tel.: 02961/ 97 12–0
Fax: 02961 / 97 12–199
E-Mail: Info@briloner.de
www.briloner.de
IAN 103126
39 DE/AT/CH

40

Briloner leuchten GmBh
Im Kissen 2
D-59929 Brilon
Last Information Update · Stan informacji · Információk
állása · Stav informací · Stav informácií · Stand der
Informationen: 10 / 2014 · Ident.-No.: 2973-010L /
2973-016L / 2972-014L / 2972-016L102014-PL/HU/CZ/SK
IAN 103126
 Loading...