


Not For Resale – Free Download at http://homepage.ntlworld.com/joechan/manuals
Not For Resale – Free Download at http://homepage.ntlworld.com/joechan/manuals
We hope that your new LEICA® will give you a great deal of pleasure and wish you many years of successful photography with it.
To enable you to fully enjoy and take advantage of the wide range of possibilities offered by this high-quality, precision camera, we recommend that you first read this manual carefully.
This instruction booklet was printed on paper bleached without chlorine - an expensive process that preserves the environment, especially natural water resources.
The Leica Akademie: Apart from developing and manufacturing high-quality products for its chain of highest optical performance ranging from photography through photo-graphic reproduction to observation. The Leica Camera Group offers a special service through the Leica Academy. For many years, this internationally famous facility has been teaching photographic know-how in application-oriented seminars and training courses. It meets the needs of keen photographers, both beginners and advanced students, for special training in demanding areas of 35mm photography, projection, and enlargement.
Up-to-date, well-equipped classrooms at our Solms headquarters are available for these courses, which are held by experienced instructors, with syllabuses ranging from general photography to specialized fields of interest. They provide a wealth of practical suggestions, help and advice.
Further information and details of seminars are available from:
Leica Camera GmbH, Leica Akademie, Oskar-Barnack-Strasse 11,
D-35606 Solms, Germany Telephone +49(6442)208-421.
II
Not For Resale – Free Download at http://homepage.ntlworld.com/joechan/manuals Brief description
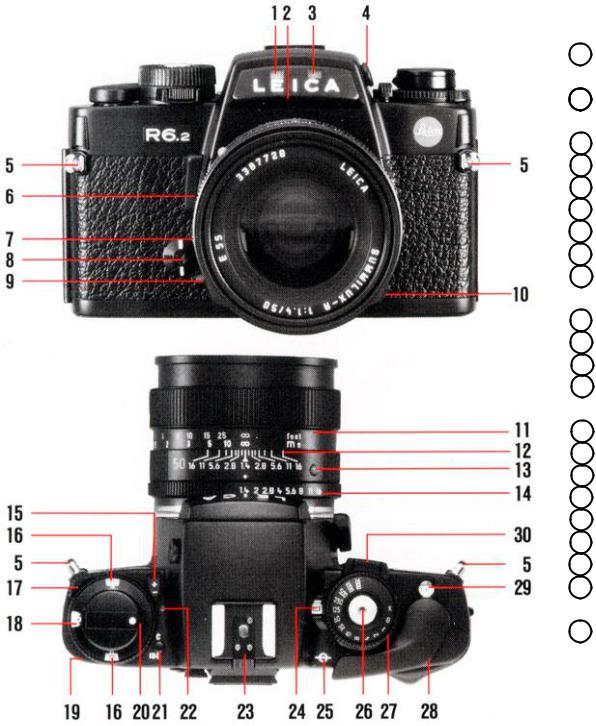
1 Illuminating window for shutter-speed indicator
2 Illuminating window for aperture indicator
3 Self-timer LED
4 Coaxial flash-cable contact
5 Eyelet for carrying strap
6 Depth of field lever
7 Bayonet lock
8 Electronic self-timer
9 Cable socket for independent mirror release
10 Supplementary viewfinder light
11 Focusing ring
12 Depth of field scale
13 Red dot for alignment of interchangeable lenses
14 Aperture setting ring
15 Override lock
16 ISO film speed control window
17 Override setting lever
18 Override scale
19 Film speed setting ring
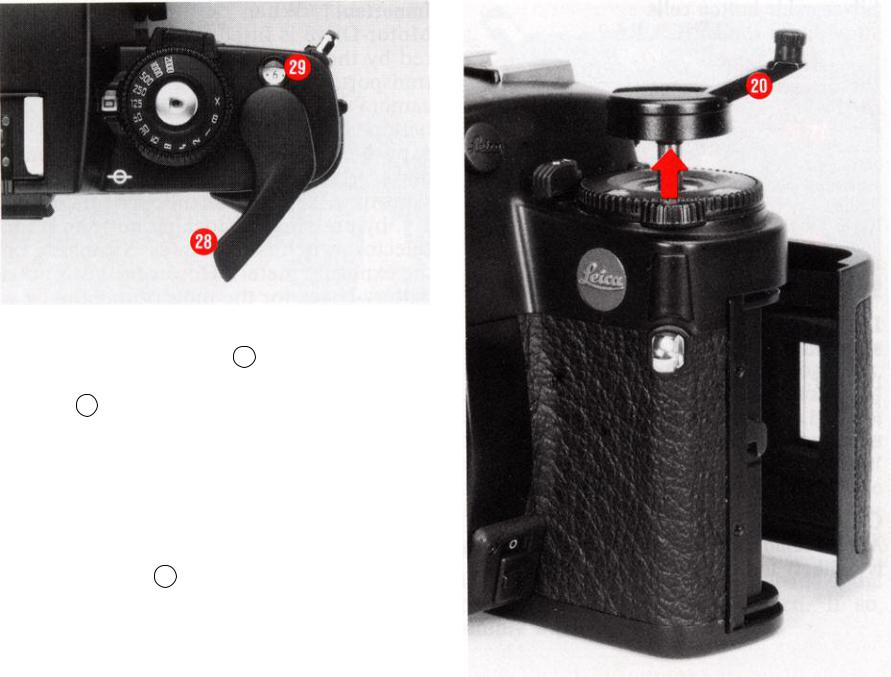
20 Hinged rewind crank
21 Locking button for setting (ISO) film speed and battery check (C)
22 LED for battery check
III
Not For Resale – Free Download at http://homepage.ntlworld.com/joechan/manuals
Contents |
Page |
Brief description |
III, VI |
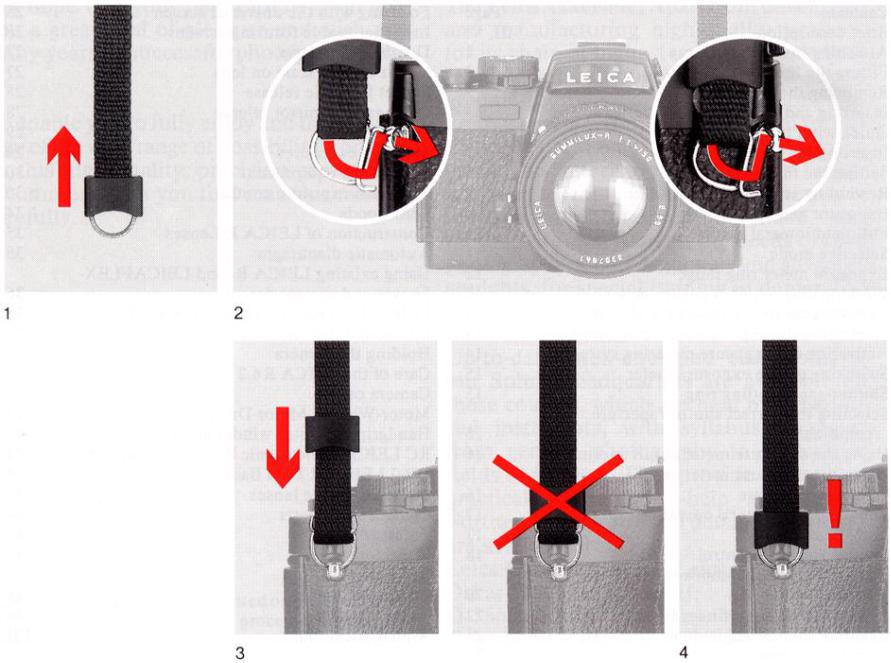
Attaching the carrying strap |
2 |
Pitting the lens |
3 |
Removing the lens |
3 |
Inserting and checking the batteries |
4 |
Quick-wind lever |
6 |
Inserting the film |
7 |
Setting the film-speed |
9 |
Rewinding and removing the film |
9 |
Exposure metering modes |
10 |
Full-field integral mode |
11 |
Selective mode |
11 |
Exposure meter ring range |
12 |
Working diagram of exposure meter |
12 |
Switching on the exposure meter and |
|
selecting the exposure metering mode |
14 |
Activating the exposure metering system |
14 |
Switching off the exposure meter |
15 |
Shutter-speed setting ring |
15 |
Selecting the correct shutter/aperture |
|
combination |
16 |
Using the exposure meter at full aperture |
16 |
Using the exposure meter at |
|
working aperture |
16 |
The exposure meter's operating range |
17 |
Low-light warning |
17 |
Manual override control |
18 |
The viewfinder as composition and |
|
control center |
20 |
Supplementary viewfinder light |
22 |
Eyepiece diopter adjustment |
23 |
Correction lenses |
23 |
Eyecup |
24 |
Eyepiece shutter |
24 |
Focusing with the universal screen |
25 |
Interchangeable focusing screens |
26 |
Depth of field lever |
27 |
Depth of field scale on lens |
27 |
Socket for cable release |
28 |
Independent mirror release |
28 |
Self-timer |
29 |
Multiple exposures |
29 |
Using flash equipment |
30 |
TTL flash-exposure control |
30 |
Lens hoods |
34 |
Construction of LEICA R-Lenses |
35 |
Automatic diaphragm |
35 |
Using existing LEICA R- and LEICAFLEX- |
|
Lenses and accessories |
36 |
LEICA M-Lenses on the LEICA R6.2 |
36 |
Filters and their use |
37 |
Holding the camera |
39 |
Care of the LEICA R6.2 |
40 |
Camera cases |
41 |
Motor-Winder, Motor-Drive |
42 |
Handgrip for motor winder and motor drive |
43 |
RC LEICA R electronic Remove Control unit |
43 |
DB-2 LEICA R Data Back |
44 |
Interchangeable lenses |
44 |
Camera spare parts |
44 |
Enlarger |
45 |
Projectors |
45 |
Binoculars |
45 |
Customer Service |
45 |
Technical data |
46 |
Alphabetical index |
VII |
1
Not For Resale – Free Download at http://homepage.ntlworld.com/joechan/manuals
2
Not For Resale – Free Download at http://homepage.ntlworld.com/joechan/manuals
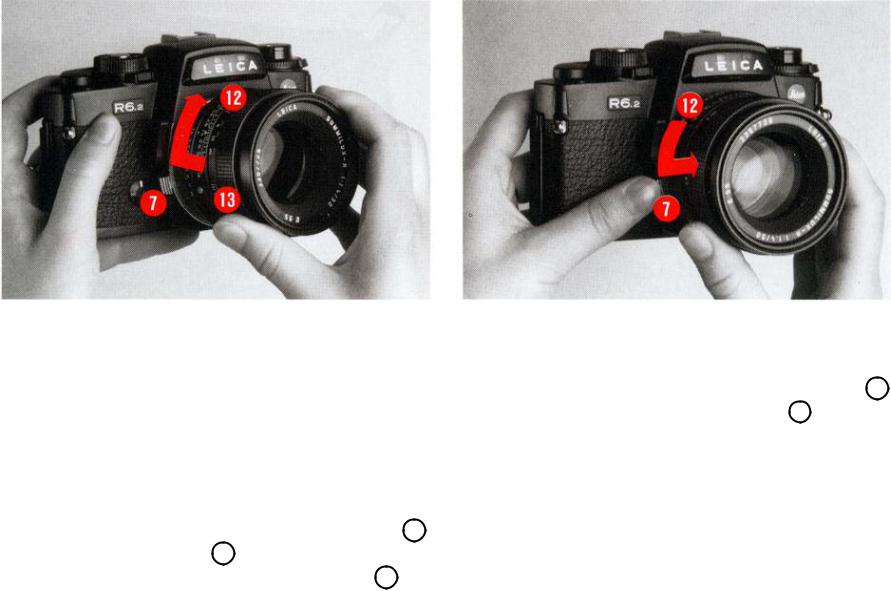
Fitting the lens
Only lenses equipped with a control cam for LEICA R-Cameras (see page 36) may be used on the LEICA R6.2 to avoid damage to the camera. To insert a LEICA R-Lens regardless of the focus and aperture settings, proceed as follows:
Hold the lens firmly by its fixed ring 12. Position the red dot 13 on the lens mount opposite the dot on the bayonet lock 7 on the camera body. Insert the lens in this position. A slight clockwise turn seats the lens securely in position with an audible click.
Removing the lens
Hold the lens Firmly by its fixed ring 12. Press down the bayonet lock 7 on the 3camera body. Turn the lens anticlockwise and remove. Always change lenses in the shade or in your body's shadow.
3
Not For Resale – Free Download at http://homepage.ntlworld.com/joechan/manuals
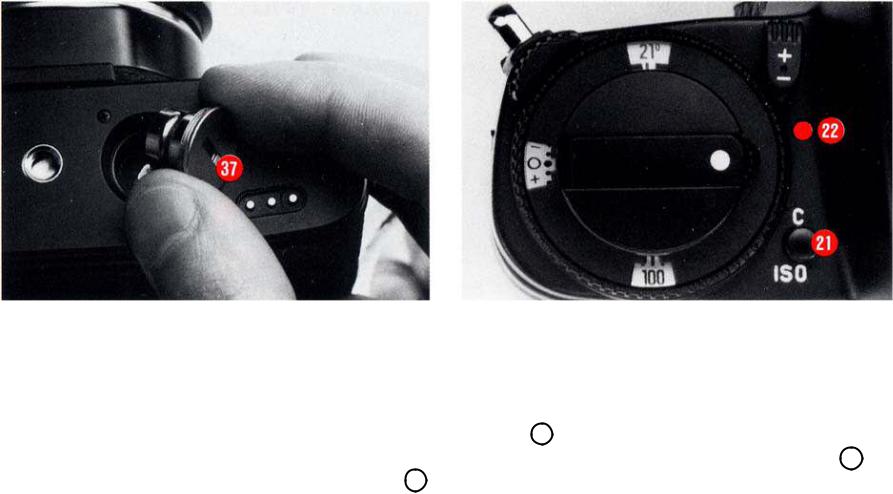
Inserting and checking the batteries
The LEICA R6.2's exposure meter, electronic self-timer, LED display and supplementary viewfinder light are powered by two silver oxide button cells or a lithium cell; see page 9 for a list of suitable battery cells. Insert a coin in the slot of the battery cap 37 to unscrew. Use a clean cloth to wipe off any oxidization on the surface of the battery cells and insert them in the battery cap; position them as marked in the battery cap. Screw the cap with the battery cells back into the baseplate of the camera.
Always check the state of the batteries before attempting to take any photographs, especially when the camera has not been used for some time. To do so, press the test button 21 for about 5 s. If the battery cells are in working order, the red LED 22 in front of the test button lights. If, in these five seconds, the LED dims noticeably, the battery cells are nearly flat and should be replaced as soon as possible.
If the LED does not light, the outside of the battery cells may have oxidized. If so, simply wipe them clean.
4

Not For Resale – Free Download at http://homepage.ntlworld.com/joechan/manuals
Silver oxide button cells suitable for the LEICA R6.2
Duracell |
D 357 |
Duracell |
10 L 14 |
Ever Ready |
EPX 76 |
Kodak |
KS 76 |
Maxell |
SR 44 |
National |
SR 44 |
Panasonic |
SR 44 |
Philips |
357 |
Ray-o-vac |
Panas 357 |
Sony |
SR 44 |
Ucar |
EPX 76 |
Varta |
V 76 PX |
Lithium battery cells suitable for the LEICA R6.2
Duracell |
DL 1/3 N |
Kodak |
K 58 L |
Philips |
CR '/3 N |
Ucar |
2 L 76 |
Varta |
CR 1/3 N |
Caution!
Always remove the battery cells if the camera is unlikely to be used for some time.
Important! When a Motor-Winder or Motor-Drive is fitted, the camera is powered by the batteries of the motorized film transport, i.e. you cannot check the camera's batteries. To check that the motor batteries are in fact supplying power to the exposure meter and the viewfinder displays, press the battery-test button 21, at the same time switching on the exposure meter, e.g. by pressing the locking button on the selector switch (see chapter: Switching on the exposure meter). However, this is not a battery-check for the motor functions.
Notes on battery care and use:
Store battery cells in a cool, dry place. Never use old and new battery cells together.
Do not mix battery cells of different makes. These battery cells are not rechargeable. Batteries contain toxic and environmentally dangerous substances. Do not discard used battery cells in normal household trash, but return them to your camera dealer for recycling.
5
Not For Resale – Free Download at http://homepage.ntlworld.com/joechan/manuals
Quick-wind lever
The quick-wind lever 28 winds the film, cocks the shutter, and turns the frame counter 29.
When you hinge out the lever in the standby position, there is room to slide your thumb behind it and firmly support the camera. For use with a Motor Winder or Motor Drive, see the user manual supplied with the motor unit.
The  symbol 25 marks the film plane.
6
Not For Resale – Free Download at http://homepage.ntlworld.com/joechan/manuals
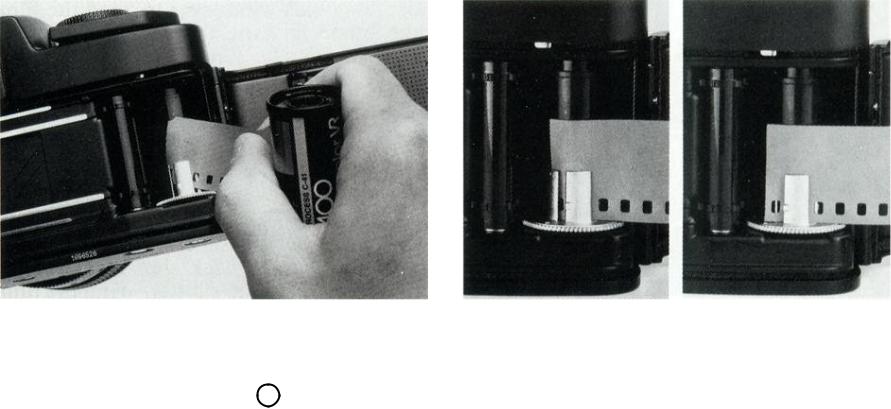
Inserting the film
Pull up the rewind crank 20 and knob past he spring resistance to release and open the camera back*. This also resets the frame counter to S (start).
Correct |
Incorrect |
Pick up the film cartridge as shown above, with the emulsion side facing up. Slide the end of the film obliquely from above into one of the slots of the take-up spool, making sure that the film is gripped by at least one of the retaining clips and projects under the next clip.
* = The procedure is identical when a Data Back is fitted.
7
Not For Resale – Free Download at http://homepage.ntlworld.com/joechan/manuals
Pull up the rewind crank as far as it will go and insert the film cartridge in the empty cartridge chamber, then push in the rewind crank. The edge of the film must be parallel with the film guide. As you move the quickwind lever, the sprockets of the transport drum must engage in the edge perforations of the film.
Use the quick-wind lever to wind the film one frame forward, to ensure that it lies tensioned in the film guide and that the mouth of the cartridge does not project too far.
You may occasionally wish to take out a partly exposed film and later insert it again. To ensure that the film is always inserted under the same conditions, use the quickwind lever to cock the shutter, then release the shutter before you insert the film.
Snap the camera back shut to close the camera. Release the shutter. Wind the film one frame forward, release the shutter again, hen wind on one more frame. The camera is now ready for use. The frame counter 29 stands at 1. It counts up to "36". To indicate the various lengths of film available, the figures "20", "24", and "36" are marked in red.
Important!
Bright light may enter through the mouth of the cartridge and damage your film. Never insert a Him in bright light.
8

Not For Resale – Free Download at http://homepage.ntlworld.com/joechan/manuals
Setting the film speed
To set the film speed in ISO units, press the locking button 21 and turn the setting ring 19 at the same time until the window 16 displays the required Film speed. The display of all ISO values is split, e.g. for ISO 100/210, 100 appears in the lower window and 21 in the upper. The setting range covers all values from ISO 12/12° to 3200/36° inclusive.
Rewinding and removing the exposed film
Exposure of the last frame blocks the action of the quick-wind lever. Rewind the film into its cartridge before removing it from the camera. Press the rewind release button 39 in the camera's baseplate, hinge out the rewind crank 20 and turn it clockwise in the direction indicated by the arrow until you feel a slight resistance as the film is pulled out of the take-up spool. Pull up rewind crank and knob to open the camera back, and remove the cartridge with the exposed film.
To use a MOTOR WINDER R or MOTOR DRIVE R, see the manual supplied with the winder or drive.
9
Not For Resale – Free Download at http://homepage.ntlworld.com/joechan/manuals
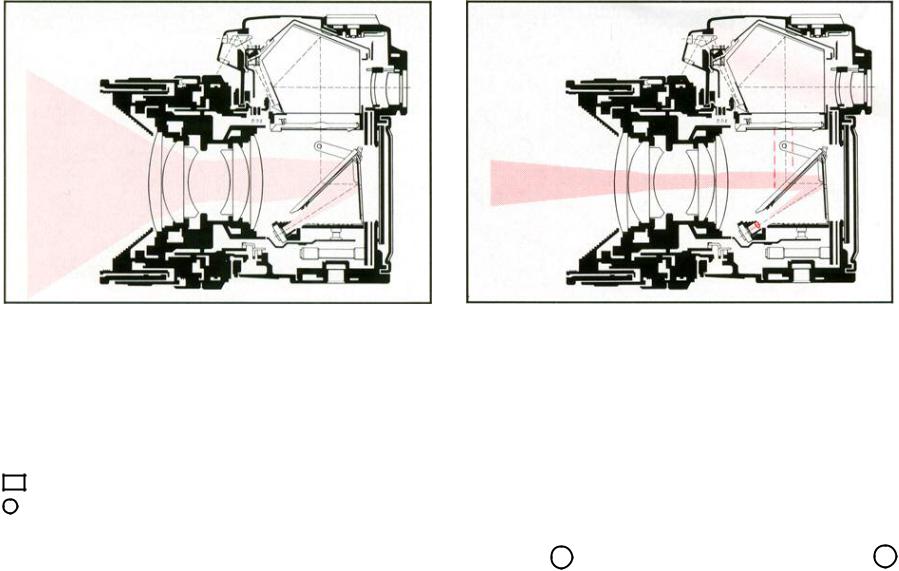
Full-field integral metering
The two exposure metering modes:
The LEICA R6.2 has an exposure metering system that provides two alternative modes:
Full-field integral mode
Selective mode
Selective mode
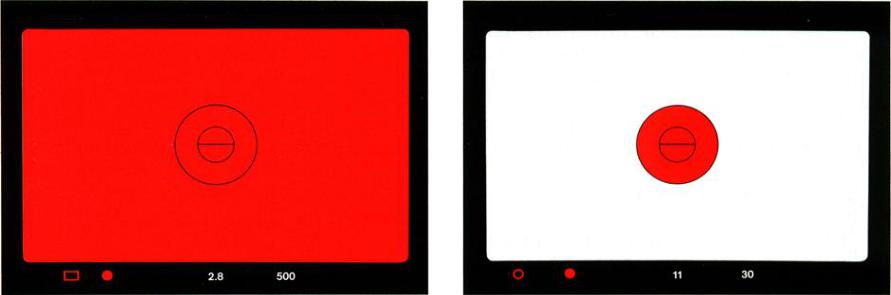
Exposure is measured through the lens. The exposure meter uses a silicon photodiode, placed in the base of the camera to protect it from stray light. When you use any LEICA R-Lens with an automatic spring-back diaphragm, the exposure meter works at full aperture. The symbol displayed in the window 24 next to the program selector 30 and at the lower left of the viewfinder indicates the mode selected.
10
Not For Resale – Free Download at http://homepage.ntlworld.com/joechan/manuals
Full-Held integral mode
Most photographic subjects contain details of varied brightness. The light reflected by this type of subject has a mean grey value of 18%, i.e. it is the same as that of a standard grey area that reflects 18% of the light it receives (average grey value). This is the calibration value for all exposure meters. The full-field integral mode is suitable for all subjects in normal light, with no extremes of light or color, and where the light and dark areas are fairly evenly distributed over the entire visual field. For this type of subject, choose full-field integral mode.
Selective mode
This is the method of choice when the subject has a very wide brightness range and the correct exposure of a certain detail is particularly important.
The large central circle in the viewfinder indicates the field covered in this mode, in which the exposure meter measures only the light reflected by the exact area of the subject that you want to determine the exposure. The field is the same size on all focusing screens and for all lenses, whatever their focal length, and is clearly marked in the viewfinder.
11

Not For Resale – Free Download at http://homepage.ntlworld.com/joechan/manuals
Range of exposure meter
In integral mode the exposure meter has a range from 0.063 cd/m2 at f/stop 1.4 to 125000 cd/m2 (candela per square meter) at f/stop 22.
For ISO 100/21° film this is equal to the standard exposure values Ev -1 to +20, i.e.
from 4s at f/1.4 to 1/2000 s at f/22.
In selective mode, its range is from 0.25 cd/m2 at f/1.4 to 125000 cd/m2. For ISO 100/21° film, this is equal to the standard exposure values Ev +1 to +20 at f/1.4, or 1s
to '/2000 s at f/22. The diagram on page 16 gives all necessary data for the exposure-
metering system of the LEICA R6.2, such as sensitivity and range.
Working diagram of the exposure meter
The diagram shows the relationship between film speed Sv and brightness Bv on the one hand, and between shutter-speed TV and aperture Av on the other, together with the resulting exposure value Ev. The diagram is in two parts connected by diagonal lines that represent the exposure value Ev. On the right, you will find the brightness value Bv determined by the exposure meter. The adjacent grey wedges
indicate the working range of the exposure meter in selective ( ) and large-field integral ( ) modes. The film speeds Sv are marked across the top.
The left side of the diagram shows the camera's working range. In the column of shutter speeds TV, the long-time exposure range from 1 s to 60 s is overprinted on a grey screen. The aperture range (Av) is marked in the footnote along the base.
A typical example marked in red, shows how these values correlate. Assuming a film speed of ISO 400/27°, follow the vertical line to the point where it intersects with the horizontal line for brightness, in the case 0.5 cd/m2, typical for night-time photography. The diagonal which passes through this point of intersection leads to the relevant exposure value, in this case Ev 5. Various combinations of aperture and shutter speed can produce this value. For correct exposure, the points of intersection of the vertical Av and the horizontal TV lines must always lie exactly on a diagonal Ev line. In the example, three such combinations are shown: A = stop 1,4 at 1/15 s; B = stop 2,8 at 1/4 s; and C = stop 16 at 8s.
12

Not For Resale – Free Download at http://homepage.ntlworld.com/joechan/manuals
13
Not For Resale – Free Download at http://homepage.ntlworld.com/joechan/manuals
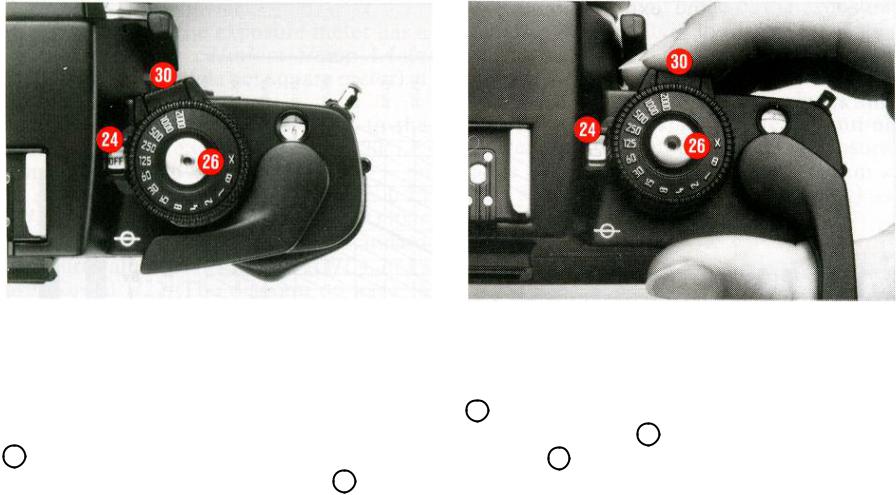
Switching on the exposure metering system
and selecting the exposure metering mode
The exposure metering system is switched on by pressing the locking button while simultaneously shifting the selector switch 30, following through from the "OFF"- setting - displayed in the window 24 - via its selective exposure metering position to the large-field integral metering setting. The exposure metering mode set is displayed in the window. By selecting an exposure metering mode, the camera's exposure metering system is activated (see: "Activating the exposure metering system").
Activating the exposure metering system
After selecting the exposure metering mode, light pressure on the exposure release button 26, pressing the locking button on the selector switch 30 or the battery check button 21 activates the LEICA R6.2's exposure metering system. The LEDsymbol in the viewfinder lights up.
If the shutter is cocked when you release the button you have used to activate the system, the LED's continue to light for about 12 s. If the shutter is not cocked, they go out at once if pressure on one of the activator buttons is not maintained.
14
 Loading...