


LEICA SOFORT
INSTRUCTIONS

EN
|
|
6 |
7 |
1 |
2 |
1a |
8 |
|
|
5 |
5 |
9
10
11
12
13
3 |
|
|
|
|
4a |
22 |
|
|
|
|
21 |
|
|
|
|
|
19 |
|
|
4 |
20a |
18 |
|
|
|
|
17 |
|
|
4b |
20 |
16 |
|
|
|
|
|
|
|
2 |
|
15 |
14 |
14a |
|
EN |
|
15 |
g |
a |
|
b |
f |
|
|
c |
e |
|
d |
|
23 |
|
25
24
3

EN |
FOREWORD |
SCOPE OF DELIVERY |
Dear Customer,
We wish you a great deal of pleasure and success using your new Leica Sofort.
With its fully automatic program control, the Leica Sofort offers photography fun at its best. Furthermore, scene modes and manual settings enable you to make adjustments to various subjects and situations at any time.
Important Notes:
•Please read these instructions in their entirety so that you can make the most of your Leica Sofort.
•Before using the camera for the first time, please also read the ‘Safety and Approval Notes and Information’ on the relevant leaflet enclosed in the camera packaging. You must always observe and follow this information to ensure safe operation of the camera!
Please check the scope of included items for completeness before using your Leica Sofort for the first time.
a.Leica BP-DC17 battery
b.BC-DC17 battery charger with interchangeable plugs
c.Carrying strap
d.Quick Start Guide leaflet
e.‘Safety and Approval Notes and Information’ leaflet
4
EN
5

EN |
CONTENTS |
|
|
FOREWORD............................................................................................... |
4 |
|
PACKAGE CONTENTS............................................................................... |
4 |
|
DESIGNATION OF PARTS......................................................................... |
7 |
|
ATTACHING THE CARRYING STRAP........................................................ |
8 |
|
CHARGING THE BATTERY........................................................................ |
9 |
|
PREPARING THE CHARGER.................................................................. |
9 |
|
CHARGING............................................................................................. |
9 |
|
STATUS DISPLAYS............................................................................... |
9 |
|
INSERTING THE BATTERY...................................................................... |
10 |
|
CHECKING THE BATTERY CAPACITY.................................................. |
10 |
|
TURNING ON THE CAMERA................................................................... |
10 |
|
INSERTING/REMOVING A FILM PACK.................................................. |
11 |
|
DISTANCE SETTING................................................................................ |
13 |
|
TAKING PHOTOGRAPHS........................................................................ |
14 |
|
ADJUSTING PICTURE BRIGHTNESS...................................................... |
15 |
|
FLASH MODES........................................................................................ |
16 |
|
SELF-TIMER............................................................................................. |
17 |
|
SCENE MODES AND SPECIAL FUNCTIONS.......................................... |
18 |
APPENDIX............................................................................................... |
20 |
TROUBLESHOOTING........................................................................... |
20 |
IMPORTANT NOTES............................................................................. |
21 |
CAMERA........................................................................................... |
21 |
BATTERY........................................................................................... |
22 |
FILM PACK/PICTURES...................................................................... |
23 |
CARE INSTRUCTIONS.......................................................................... |
24 |
CAMERA........................................................................................... |
24 |
BATTERY........................................................................................... |
24 |
STORAGE.............................................................................................. |
25 |
LEICA PRODUCT SUPPORT................................................................. |
26 |
LEICA CUSTOMER CARE..................................................................... |
26 |
6

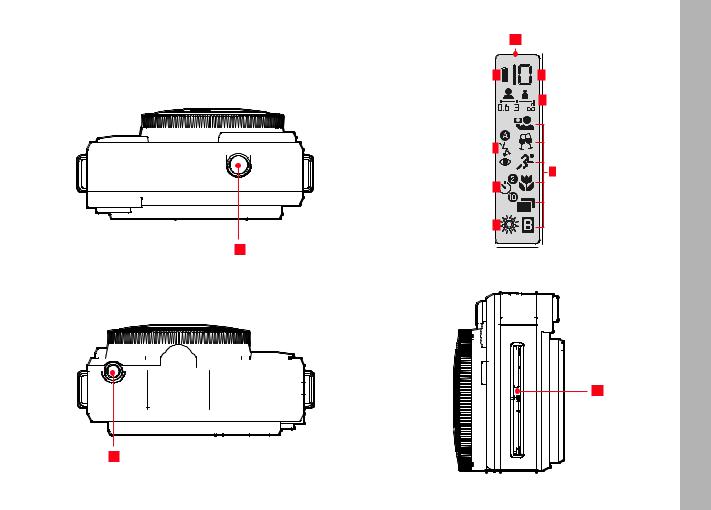
PART DESIGNATIONS
Charger
1Battery tray a Contacts
2Charging pilot light
3Socket for interchangeable plug/mains cable
4Interchangeable plug a Charger contacts b Mains contacts
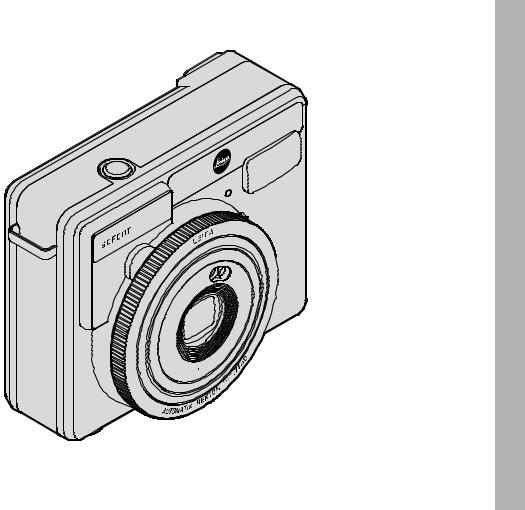
Camera Front
5Carrying strap attachment
6Selfie mirror
7Self-timer LED
8Viewfinder
9Flash
10Exposure measuring cell
11Flash exposure measuring cell
12Setting ring for dirtance ranges
13Lens
Camera Back
14Battery compartment cover a Release tab
15Display
a Counter b Range
|
|
Display (cont.) |
|
|
EN |
||||||||
15 |
|
|
|||||||||||
|
|
|
|
|
|
|
|
|
|
modes/special functions |
|
||
|
|
c |
|
||||||||||
|
|
|
|
|
|
|
|||||||
|
|
|
|
|
|
|
|
|
|
= Selfie |
Party |
Sport |
= Macro / |
|
|
|
|
|
|
|
|
|
|
= Double exposure |
= Long exposure |
||
|
|
|
|
|
|
|
Brightness stage: |
|
|
||||
|
|
d |
|
|
|||||||||
|
|
|
|
|
|
|
|
|
|
= slightly brighter |
= slightly darker |
||
|
|
|
|
|
|
|
|
|
-Timer: |
|
|
|
|
|
|
e |
|
|
|
||||||||
|
|
|
|
|
|
|
|
|
|
2s delay time |
10s delay time |
|
|
|
|
|
|
Flash mode: |
|
|
|
||||||
|
|
f |
|
|
|
||||||||
= Automatic fill-in flash control (standard setting) /
=always flash / = with preflash (against red-eye effect) /
=off
g Battery capacity
16Button for brightness setting
17Self-timer button
18Button for flash modes
19Button for scene modes
20Back cover
a Unlocking slider
21Main switch
22Viewfinder eyepiece
Camera Top
23 Shutter release button
Camera Bottom
24 Tripod thread 1⁄4"
Camera Left
25 Eject slot
7
EN |
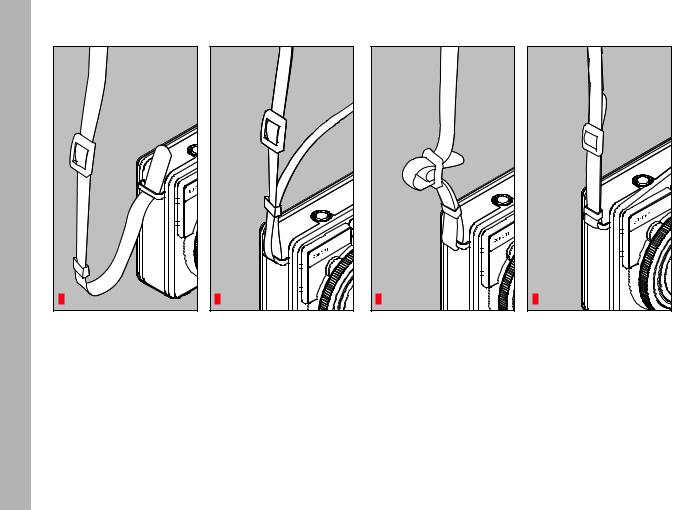
ATTACHING THE CARRYING STRAP |
1 |
2 |
3 |
4 |
8
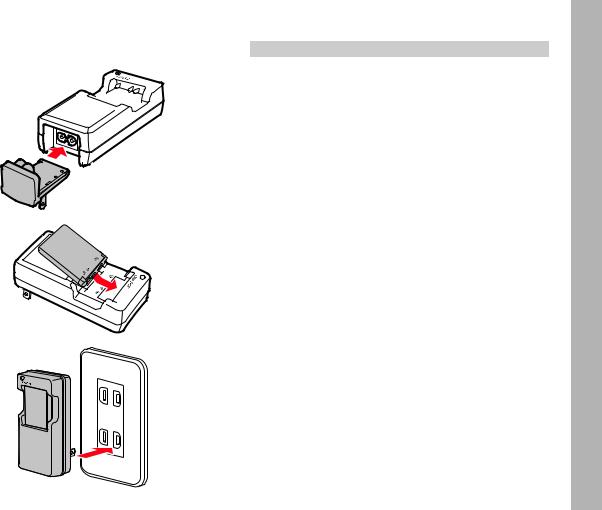
CHARGING THE BATTERY
PREPARING THE CHARGER
CHARGING
STATUS DISPLAYS |
|
|
EN |
|
|
|
|
Charging pilot light |
Battery status |
Notes |
|
Off |
|
|
|
Lights up orange |
Battery charging |
|
|
Lights up green |
Battery charged |
Remove the battery |
|
|
|
from the charger |
|
Flashes orange |
Battery faulty |
Remove the battery |
|
|
|
from the charger, |
|
|
|
disconnect the |
|
|
|
charger from the |
|
|
|
mains |
|
Note:
Please see the ‘Troubleshooting’ section on p. 20.
9
 Loading...