


Leica M „Edition 60”
Instructions

EN
Foreword
FOREWORD
Dear Customer,
Leica would like to thank you for purchasing the Leica M "Leica 60" edition and congratulate you on your choice. With this unique digital view and rangefinder camera, you have made an excellent choice.
We wish you a great deal of pleasure and success using your new camera. In order to make best use of all the opportunities o ered by this high performance camera, we recommend that you first read these instructions.
66

FCC Note: (U.S. only)
This equipment has been tested and found to comply with the limits for a Class B digital device, pursuant to Part 15 of the FCC Rules. These limits are designed to provide reasonable protection against harmful interference in a residential installation. This equipment generates, uses, and can radiate radio frequency energy and, if not installed and used in
accordance with the instructions, may cause harmful interference to radio communications. However, there is no guarantee that interference will not occur in a particular installation. If this equipment does cause harmful interference to radio or television reception, which can be determined by turning the equipment off and on, the user is encouraged to try to correct the interference by one or more of the following measures:
•Reorient or relocate the receiving antenna.
•Increase the separation between the equipment and receiver.
•Connect the equipment into an outlet on a circuit different from that to which the receiver is connected.
•Consult the dealer or an experienced radio/TV technician for help.
FCC Caution:
To assure continued compliance, follow the attached installation instructions and use only shielded interface cables with ferrite core when connecting to computer or peripheral devices.
Any changes or modifications not expressly approved by the party responsible for compliance could void the user’s authority to operate this equipment.
Trade Name: |
Leica |
EN |
Model No.: |
LEICA M EDITION 60 (Typ 240) |
|
Responsible party/ |
|
|
Support contact: |
Leica Camera Inc. |
|
|
1 Pearl Count, Unit A |
|
|
Allendale, New Jersey 07401 |
|
|
Tel.: |
+1 201 995 0051 |
|
Fax: |
+1 201 995 1684 |
technicalinfo@leicacamerausa.com
This device complies with Part 15 of the FCC Rules. Operation is subject to the following two conditions:
(1) This device may not cause harmful interference, and (2) this device must accept any interference received, including interference that may cause undesired operation.
LEICA M EDITION 60 (Typ 240)
Tested To Comply
With FCC Standards
FOR HOME OR OFFICE USE
FOR CANADA ONLY:
CAN ICES-3 (B)/NMB-3(B)
67

EN
Contents
CONTENTS |
|
Foreword ......................................................................................... |
66 |
Warning messages ........................................................................... |
70 |
Legal information ............................................................................. |
70 |
Disposal of electrical and electronic equipment................................ |
71 |
Designation of parts......................................................................... |
72 |
Preparations |
|
Using the protector ....................................................................... |
74 |
Charging the battery...................................................................... |
74 |
Changing the battery and memory card ......................................... |
76 |
Leica M lenses ............................................................................. |
81 |
Attaching ................................................................................... |
83 |
Removing .................................................................................. |
83 |
Controls |
|
Main switch................................................................................... |
84 |
Shutter release ............................................................................. |
85 |
Shutter speed setting dial ............................................................. |
86 |
Basic settings |
|
Setting the date and time .............................................................. |
88 |
Setting the ISO sensitivity.............................................................. |
89 |
Fixed camera settings ...................................................................... |
89 |
Brightline view and rangefinder ........................................................ |
90 |
Distance metering ........................................................................... |
91 |
Exposure metering ........................................................................... |
92 |
Turning the exposure meter on/o ............................................... |
92 |
Exposure modes ........................................................................... |
93 |
Aperture priority ........................................................................ |
93 |
Exposure lock .................................................................................. |
94 |
Manual exposure setting ................................................................. |
94 |
The B setting .................................................................................. |
95 |
Values above and below the metering range ................................. |
95 |
Flash photography............................................................................ |
96 |
68

Miscellaneous |
|
Review ........................................................................................ |
100 |
Transferring data to a computer .................................................. |
100 |
Working with DNG raw data ........................................................ |
100 |
Adobe® Photoshop® Lightroom® ................................................. |
100 |
Installing firmware updates ......................................................... |
101 |
System accessories ...................................................................... |
102 |
Replacements ............................................................................... |
103 |
Leica Summilux-M 35mm f/1.4 ASPH............................................ |
104 |
Precautions and care instructions |
|
General precautions ...................................................................... |
106 |
Care instructions ........................................................................... |
107 |
Cleaning the sensor ....................................................................... |
110 |
Storage ......................................................................................... |
111 |
Malfunctions and their resolution ................................................... |
112 |
Appendix |
|
Viewfinder displays...................................................................... |
114 |
MTF diagrams ............................................................................. |
116 |
Distortion diagrams ..................................................................... |
117 |
Vignetting diagrams..................................................................... |
117 |
Index ............................................................................................. |
118 |
Technical data ............................................................................... |
120 |
Leica Service addresses ................................................................ |
126 |
EN
Contents
69

EN
Warnings / Legal notices
The CE identification of our products documents compliance with the fundamental requirements of the valid EU directives.
WARNING MESSAGES
•Modern electronic components react sensitively to electrostatic discharge. As people can easily pick up charges of tens of thousands of volts, by walking on synthetic carpets for example, a discharge can occur when you touch your camera, particularly if it is placed on a conductive surface. If only the camera housing is a ected, this discharge is harmless to the electronics. However, despite built-in safety circuits, the outer contacts, such as the battery or rear panel contacts, should not be touched if at all possible for safety reasons.
•For any cleaning of the contacts, do not use an optical micro-fiber cloth (synthetic); use a cotton or linen cloth instead. Before touching the contacts, you can make sure you discharge any electrostatic charge by deliberately touching a heating or water pipe (conductive, earthed material). You can also avoid soiling and oxidization of the contacts by storing your camera in a dry place with the lens or bayonet cover fitted.
•You should use exclusively the recommended accessories to prevent faults, short circuits or electric shock.
•Do not attempt to remove parts of the housing (covers); specialist repairs can be carried out only at authorized service centers.
LEGAL INFORMATION
•Please ensure that you observe copyright laws. The recording and publication of pre-recorded media such as tapes, CDs, or other published or broadcast material may contravene copyright laws.
•This also applies to all of the software supplied.
•The SD and HDMI logos are registered trademarks.
•Other names, company or product names referred to in this manual are trademarks or registered trademarks of the relevant companies.
70

DISPOSAL OF ELECTRICAL AND
ELECTRONIC EQUIPMENT
(Applies within the EU, and for other European countries with segregated waste collection systems)
This device contains electrical and/or electronic components and should therefore not be disposed of in general household waste. Instead it should be disposed of at a recycling collection point provided by the local authority. This costs you nothing. If the device itself contains replaceable (rechargeable) batteries, these must be removed first and, if necessary, also be disposed of in line with the relevant regulations.
Further information on this issue is available from your local administration, your local waste collection company, or in the store where you purchased this device.
You can find your camera’s production date on the stickers in the Guarantee |
EN |
Card and on the packaging. The digits stand for YYYY/MM/DD |
|
|
equipment electronic and electrical of Disposal |
71

EN
Designation of parts
DESIGNATION OF PARTS
Illustrations in the front and rear cover pages
Front view
1.Lens release button
2.Distance meter viewing window
3.Brightness sensor1
4.Viewfinder viewing window
Top view
5.Fixed ring with
a.Index for focusing
b.Depth of field scale
c.Red index button for changing lenses
6.Aperture setting ring
7.External thread
8.Thread protection ring
9.Index point for aperture setting
10.Lens hood
11.Focusing ring with
a.Finger grip
12.Main switch with three detent positions for
–  (Camera turned o )
– (Camera turned on)
– (Date/time setting, or sensor cleaning)
13.Function key
14.Shutter release
15.Time setting dial with detent positions for
– A for automatic shutter speed control
– Shutter speeds 1/4000 - 8s (inc. intermediate values)
– B (long-time exposure)
– 

 Flash sync speed (1/180s)
16.Accessory shoe
1Leica M lenses with a viewfinder attachment cover the brightness sensor. Information about functions with these and other lenses can be found under "Displays in the viewfinder" on p.
72 |
114 and "Leica M lenses" on p. 81. |

Rear view
17.Viewfinder
18.LED for indicating picture mode / recording data
19.ISO setting unit with
a.Scale
b.Adjusting dial
c.Index point
Bottom view
(with bottom cover fitted)
20.Locking toggle for bottom cover
21.Tripod thread A ¼, DIN 4503 (¼")
22.Bottom cover
(with bottom cover removed)
23.Memory card slot
24.Battery compartment
25.Battery locking slider
26.Bottom cover locking point
EN
parts of Designation
73
EN
Preparations
PREPARATIONS
USING THE PROTECTOR
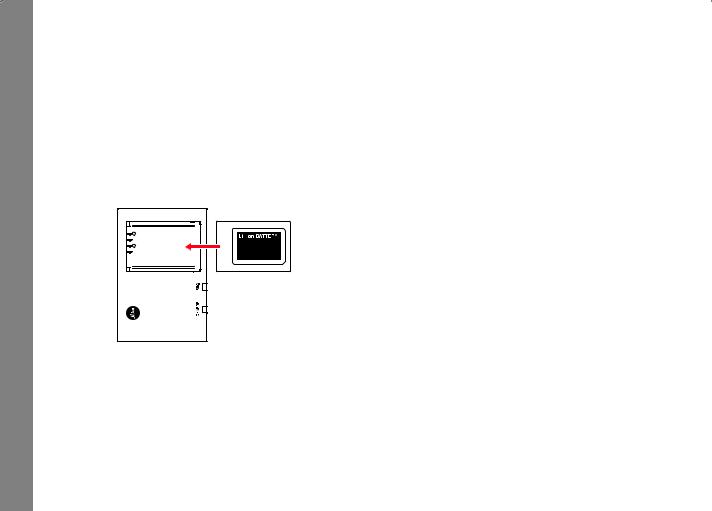
If you want to use the camera with a carrying strap, place it in the protector supplied, which is equipped with a permanently attached carrying strap. The protector is attached to the camera using the tripod screw. It has a tripod thread in its metal base.
CHARGING THE BATTERY
The camera is powered by a lithium ion battery.
•The green LED marked CHARGE starts flashing to confirm that charging
is in progress. As soon as the battery has charged to at least 4/5 of its capacity, the yellow LED marked 80% also lights up. When the battery is fully charged, the green LED also changes from flashing to continuously lit.
Note:
The 80% LED lights up after around 2 hours due to the charging characteristics.
The charger should be disconnected from the mains when charging is complete. There is therefore no risk of overcharging.
Caution:
•Only the battery type specified and described in this manual (order no. 14 499), or battery types specified and described by Leica Camera AG, may be used in this camera.
•These batteries may only be used in the units for which they are designed and may only be charged exactly as described below.
•Using this battery contrary to the instructions and using non-specified battery types can result in an explosion under certain circumstances.
•The batteries may not be exposed to heat, sunlight, humidity or moisture for long periods. Likewise, the batteries may not be placed in a microwave oven or a high pressure container as this results in a risk of fire or explosion.
•A safety valve in the battery guarantees that any excess pressure caused by improper handling is discharged safely.
•Only the charger specified and described in this manual (order no. 14 494) is to be used. The use of other chargers not approved by Leica Camera AG can cause damage to the batteries and, in extreme cases, can cause serious or life-threatening injuries.
•The charger supplied should be used exclusively for charging this battery type. Do not attempt to use it for other purposes.
•The car charging cable supplied may never be connected while the charger is connected to the mains.
•Ensure that the mains outlet used for charging is freely accessible.
•The battery and charger may not be opened. Repairs may only be carried out by authorized workshops.
74
Notes:
•The battery should be charged before the camera is used for the first time.
•The battery must have a temperature of 10°-30°C / 50°-86°F to be charged (otherwise the charger will not turn on, or will turn o again).
•Lithium ion batteries can be charged at any time, regardless of their current charge level. If a battery is only partly discharged when charging starts, it is charged to full capacity faster.
•The batteries warm up during the charging process. This is normal and not a malfunction.
•If the two LEDs on the charger flash rapidly (> 2Hz) after starting charging, this indicates a charging error (e.g. maximum charging time exceeded, voltages or temperatures outside the permitted ranges, or short circuit). In this case, disconnect the charger from the mains and remove the battery. Ensure that the above temperature conditions are met and then restart the charging process. If the problem persists, please contact your dealer, the Leica o ce in your country or Leica Camera AG.
•A new battery only reaches its full capacity after it has been fully charged and – by use in the camera - discharged again 2 or 3 times. This discharge procedure should be repeated after approximately every 25 cycles. To ensure a maximum service life of the battery, it should not be exposed to constant extremes of temperature (e.g. in a parked car in the summer or winter).
•Even when used in optimum conditions, every battery has a limited service life. After several hundred charging cycles, this becomes noticeable as the operating times get significantly shorter.
•The battery should be replaced after a maximum of four years, as its performance deteriorates and reliable operation can no longer be guaranteed, particularly in cold conditions.
•Defective batteries should be disposed of in line with the relevant instructions (see p. 108).
•The replaceable battery provides power to a back-up battery which is permanently fitted in the camera. This back-up battery retains the set date and time for up to 2 months. If this back-up battery becomes discharged it must be recharged by inserting the replaceable main battery. Once the replaceable battery has been inserted, the full capacity of the back-up battery is recovered after about a few days. This process does not require the camera to be turned on.
EN
Preparations
75
EN
Preparations
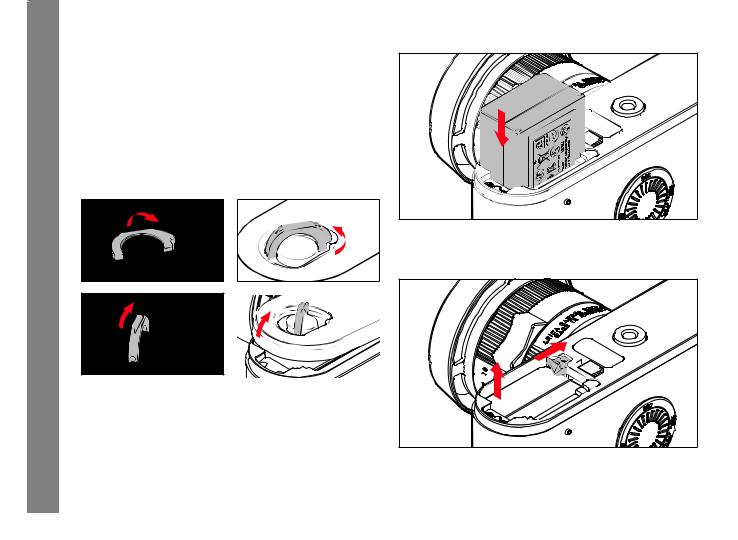
CHANGING THE BATTERY AND MEMORY CARD |
Inserting the battery |
Turn the camera o  (see p. 84).
Important:
Do not open the bottom cover nor remove the memory card or the battery whilst the red LED on the rear of the camera is fl ashing, indicating picture recording and/or data being saved to the card. Otherwise the unsaved (or not completely saved) picture data may be lost.
Removing the bottom cover
1 |
2 |
Removing the battery |
|
||
3 |
4 |
1 |
|
||
|
|
2 |
76

Charge level displays
The current battery capacity can be displayed in the viewfi nder:
1.Turn on the camera.
If required, i.e. if the camera is turned on but the viewfi nder display has been turned o again:
2.Press the shutter release to the fi rst pressure point to activate the viewfi nder display.
3.Press the function button once.
The relevant capacity is displayed as a percentage. A dot lights up above it to di erentiate it from the memory card capacity display.
Notes:
•The capacity display appears regardless of whether or not the viewfi nder display was previously on.
•Remove the battery if you will not be using the camera for a long period of time.
•A maximum of 2 months after the capacity of a battery left in the camera is exhausted (see also the last note under “Charging the battery”, p. 74), the date and time need to be re-entered.
EN
Preparations
77
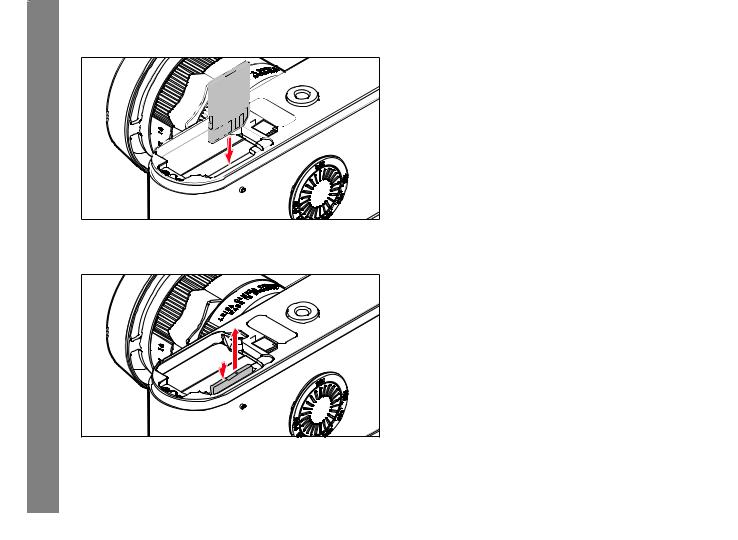
EN Inserting the memory card
Preparations |
Removing the memory card
Memory card capacity display
The number of pictures remaining can be displayed in the viewfi nder:
1.Turn on the camera.
If required, i.e. if the camera is turned on but the viewfi nder display has been turned o again:
2.Press the shutter release to the fi rst pressure point to activate the viewfi nder display.
3.Press the function button twice ° The relevant fi gure is displayed.
The display reverts to its normal status 3s after releasing the function button.
If the card's capacity limit has been reached, Full always appears, regardless of whether the viewfi nder display was previously turned on or o .
78

Compatible memory cards
The camera saves the pictures on an SD (secure digital), SDHC (high capacity), or SDXC (eXtended capacity) card.
SD/SDHC/SDXC memory cards are available from various suppliers and with di erent capacities and read/write speeds.
Particularly those with high capacities and read/write speeds allow data to be recorded and retrieved very quickly.
The cards have a write protection switch, which can be used to prevent unintentional storage and deletion of pictures. This switch takes the form of a slider on the non-beveled side of the card; in the lower position, marked LOCK, the data on the card is protected.
Notes:
•Do not touch the memory card contacts.
•The range of SD/SDHC/SDXC cards is too large for Leica Camera AG to be able to completely test all available types for compatibility and quality. Although using other card types is not likely to damage the camera or the card, some "no name" cards do not comply with the SD/SDHC/SDXC standards, and Leica Camera AG is unable to provide any guarantee that they will function correctly.
•If the memory card cannot be inserted, check that it is aligned correctly.
•As electromagnetic fields, electrostatic charges, and defects on the camera or the card can lead to damage or loss of the data on the memory card, we recommend that you also transfer the data to a computer and save it there (see p. 100).
•For the same reason, it is recommended that the card is always stored in its antistatic cover.
EN
Preparations
79

EN Close the bottom cover
Preparations |
1 |
3 |
2 |
4 |
80

LEICA M LENSES
Generally, most Leica M lenses can be used. Details on the small number of exceptions and restrictions can be found in the following notes.
They can be used regardless of the lens features, and whether the lens does or does not have 6-bit coding in the bayonet.
Even without this additional feature, i.e. when using Leica M lenses without identifi cation, the camera will deliver excellent pictures in most situations.
Important:
•Cannot be used:
–Hologon 15mm f/8
–Summicron 50mm f/2 with close up.
–Elmar 90mm f/4 with retractable tube (manufactured from 19541968)
–Some versions of the Summilux-M 35mm f/1.4 (not aspherical, manufactured from 1961-1995, Made in Canada) cannot be attached to the camera or will not focus to infi nity. The Leica Customer Care department can modify these lenses so that they can be used on the camera.
•Can be used, but risks damaging the camera or lens:
Lenses with retractable tube can only be used with the tube extended, i.e. their tube must never be retracted into the camera. This is not the case with the current Macro-Elmar-M 90mm f/4, as its tube does not protrude into the camera body even when retracted. It can therefore be used without any restrictions.
EN
Preparations
81

EN
Preparations
•Can be used with restrictions
Despite the high precision of the rangefinder on the camera, exact focusing with 135mm lenses with at full stop cannot be guaranteed due to the very low depth of field. Therefore, stopping down by at least 2 stops is recommended.
•Can be used but are excluded from exposure metering
–Super-Angulon-M 21mm f/4
–Super-Angulon-M 21mm f/3.4
–Elmarit-M 28mm f/2.8 with serial nos. before 2 314 921.
Notes:
•The Leica Customer Care department can upgrade many Leica M lenses with 6-bit coding (for address, see p. 126).
•When using the Leica Tri-Elmar-M 16-18-21mm f/4 ASPH., the set focal length is not transferred to the camera and thus is not included in the EXIF data for pictures.
•By contrast, the Leica Tri-Elmar-M 28-35-50mm f/4 ASPH. features mechanical transfer of the set focal length to the camera, necessary to display the appropriate brightline frame in the viewfinder. It is detected by the camera electronics and used for focal length specific compensation. This applies to all three versions of the lens (item numbers 11 625, 11 890, and 11 894).
82
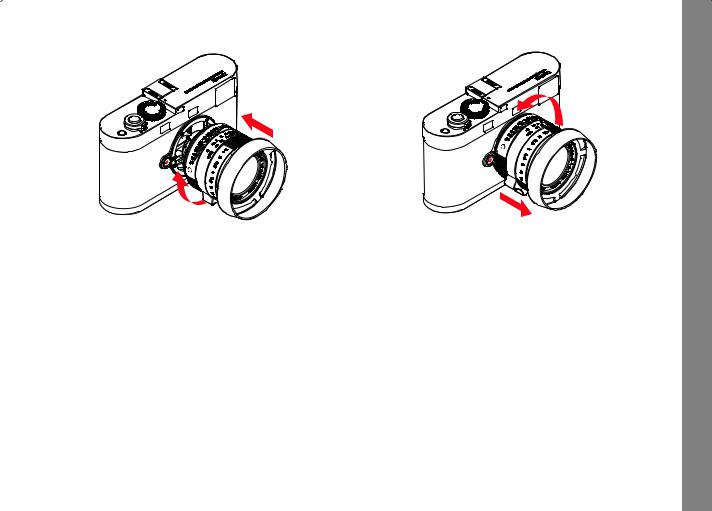
Attaching the lens Detaching the lens
1 |
1 |
|
1.Turn o the camera
2.Hold the lens by the fi xed ring.
3.Align the red index button on the lens with the release button on the camera body.
4.In this position, insert the lens.
5.Turn the lens slightly to the right, and you will hear and feel it click into place.
1.Turn o the camera
2.Hold the lens by the fi xed ring.
3.Press down the release button on the camera body.
4.Turn the lens to the left until its red index button is aligned with the release button.
5.Remove the lens.
Notes:
•Generally, to protect the Leica T against ingress of dust etc. into the interior of the camera, it is important always to have a lens or a cover fi tted to the camera body.
•For the same reason, when changing lenses work quickly and in an environment that is as dust-free as possible.
•Rear camera or lens covers should not be stored in your trouser pocket as they attract dust that can get into the camera when they are fi tted.
EN
Preparations
83
 Loading...