


LEICA M10-P
QUICK START GUIDE
Download the full scope instruction manual here: https://en.leica-camera.com/Service-Support/Support/Downloads
Please register via the following link if you would like to receive a printed
copy of the full scope instruction manual: www.order-instructions.leica-camera.com

|
6 |
|
3a |
|
3 |
2 |
11 |
1 |
10 |
|
5 |
|
|
|
|
|
|
7 |
|
|
|
8 |
|
|
|
9 |
|
18 |
19 |
20 |
16 |
17 |
|
|
15 |
|
|
|
30 |
|
|
21 |
|
|
|
26 |
27


 4 4a
4 4a


13
5
12
14


 24
24

 23
23 22
22
TOP VIEW |
6 |
6-bit encoding |
|
||
1 |
Main switch |
|
sensor for lens detection |
|
|
|
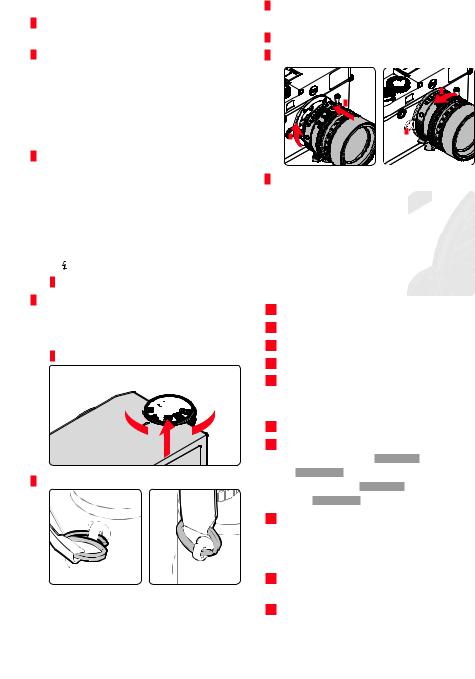
Switching the camera ON/OFF |
7 |
Bayonet |
|
|
2 |
Shutter button |
8 |
Lens release button |
|
|
|
– |
Tap: |
|
|
|
|
|
activates exposure metering and control |
|
|
2 |
|
– |
Press down fully: |
|
|
|
|
|
1 |
|
||
|
|
the picture is taken |
|
|
|
|
|
|
|
|
|
|
– |
In standby mode: |
|
|
1 |
|
|
The camera is reactivated |
|
2 |
|
|
|
|
|
||
3Shutter speed setting wheel with stop positions
–A: Automatic shutter speed control
–8s - 4000: Shutter speeds (inc. intermediate values)
–B: Long-term exposure
(8 s - 4 min via menu control, in full increments or Bulb)
–

 : Flash sync speed (1⁄180 s)
a Index
4ISO setting wheel
–A: Automatic ISO sensitivity control
–100 - 6400: Fixed ISO values
–M: Manual ISO sensitivity control
a Index
2 


 2
2
1
9Focus button
10Rangefinder viewing window
11Brightness sensor
12Viewfinder viewing window
13Self-timer LED
14Image field selector
for the selection of bright-line frame pairs 35/135 mm, 50/75 mm and 28/90 mm
15LED for recording / data storage
16MENU button
– for accessing the FAVORITES menu/
5 Strap lugs |
MAIN MENU |
|
– for exiting the FAVORITES menu, |
||
|
||
|
the MAIN MENU or any of the submenus |
17 PLAY button
– for (continuous) playback mode activation/deactivation
– for return to full-screen display
18 LV button
– for Live View mode activation/deactivation
19 Brightness sensor for LCD panel
20 |
Viewfinder eyepiece |
|
27 |
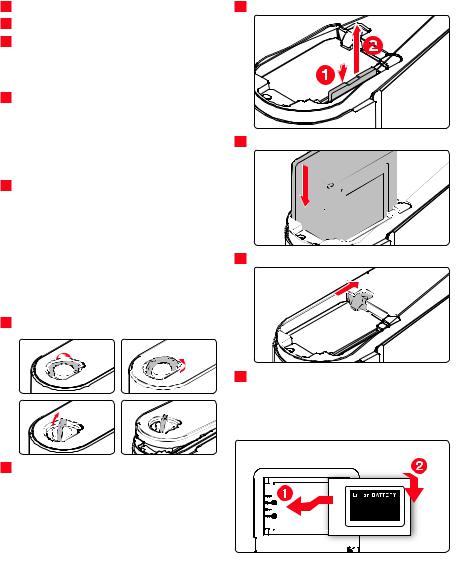
Memory card slot |
|
21 |
LCD panel |
|
|
|
|
22 |
Directional pad |
|
|
|
|
|
– |
for menu navigation |
|
|
|
|
– |
for menu item/function selection |
|
|
|
|
– |
for scrolling through the picture memory |
|
|
|
23 |
Center button |
|
|
|
|
|
– |
to access the status display |
|
|
|
|
– |
to apply menu settings |
|
|
|
|
– |
to display settings/data during exposure |
28 |
Battery compartment |
|
|
– |
for display of picture data during picture |
|
|
|
|
|
review |
|
|
|
24 |
Thumbwheel |
|
|
|
|
|
– |
for menu navigation |
|
|
|
|
– |
for menu item/function selection |
|
|
|
|
– |
for exposure compensation value |
|
|
|
|
|
selection |
|
|
|
|
– |
for enlarging/reducing viewed pictures |
|
29 |
Battery locking latch |
|
– |
for scrolling through the picture memory |
|
|
|
BOTTOM VIEW |
|
|
|
||
25 |
Locking toggle for bottom cover |
|
|
|
|
|
|
1 |
2 |
|
|
30 Bottom cover locking point
3 |
4 |
26 Tripod thread A ¼, DIN 4503 (¼”)
A flashing green status LED indicates a correctly functioning charging process. A fully charged battery is indicated by a steady green light.
 Loading...